> ## Documentation Index
> Fetch the complete documentation index at: https://domoinc-openapi-sync-dataflows.mintlify.site/llms.txt
> Use this file to discover all available pages before exploring further.

# Kintone Enterprise OAuthコネクター

export const InlineImage = ({src, alt = '', height = '1.6em'}) => {
  return <img noZoom src={src} alt={alt} style={{
    display: 'inline',
    verticalAlign: 'start',
    height: height,
    margin: '0'
  }} />;
};

## はじめに

Kintoneは、チーム向けのノーコードエンタープライズアプリケーションプラットフォームです。DomoのKintone Enterprise OAuth Configurationコネクターを使用すると、Kintone AppおよびKintone Appレコードに関するレポートを作成できます。

Kintoneはビジネスアプリケーションのサービスを提供しています。ビジネスアプリケーションは、チームが会社運営のためのタスクを実行するのに使用する、高速で使いやすいツールです。ビジネスアプリケーションは、経費報告書からタイムシート、在庫管理まで、手順とプロセスをシンプルなステップに変えます。

Kintone Enterprise OAuthアカウントには、Data Centerから接続します。このトピックでは、Kintone Enterprise OAuthコネクターのユーザーインターフェースに固有のフィールドとメニューについて説明します。DataSetの追加、更新スケジュールの設定およびDataSet情報の編集については、「 [コネクターを使用してDataSetを追加する](/ja/s/article/360042926274 "コネクターを使用してDataSetを追加する") 」を参照してください。

## 必要条件

Kintone Enterprise OAuthアカウントに接続してDataSetを作成するには、以下が必要です。

* OAuthの設定
* インスタンス/ドメイン名

### DomoインスタンスでOAuthの設定を作成する方法

OAuthの設定を作成するには：

1. 顧客のDomoインスタンスにログインします。
2. https\://{顧客ドメイン}. [domo.com/datacenter/accounts](http://domo.com/datacenter/accounts) に移動します。
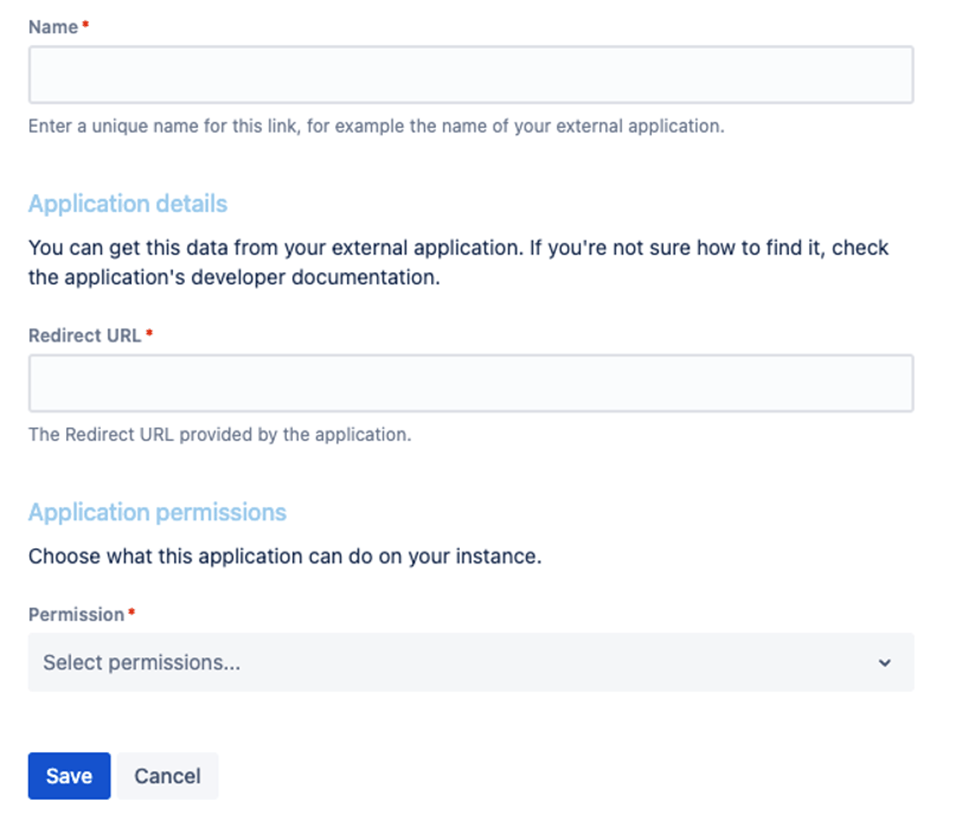
3. 新しいOAuthの設定を追加します。
4. ドロップダウンリストから
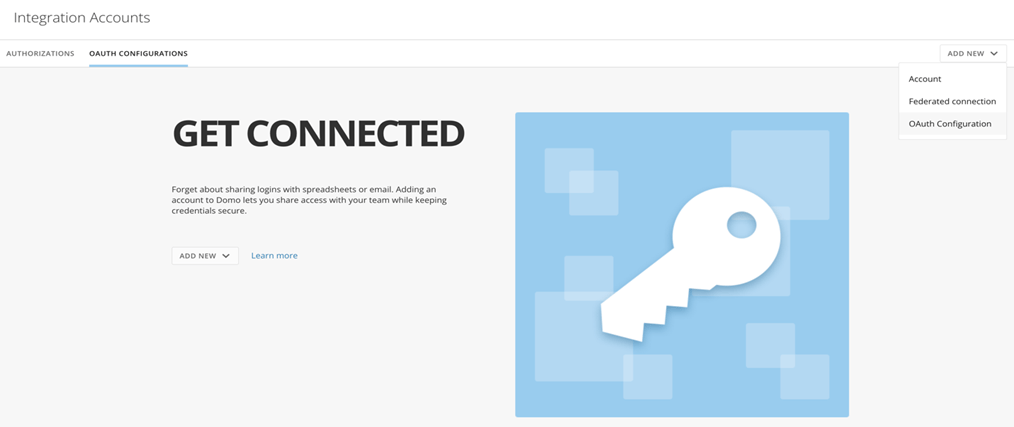
   **［Kintone OAuth Config］** 設定タイプを選択します。
5. 以下のように受信リンクを介して生成されたクライアントIDとシークレットを入力します。

<Frame>
  <img src="https://mintcdn.com/domoinc-openapi-sync-dataflows/EtHMjR0Dwu423b1z/images/kb/ka0Vq0000004gBx-00N5w00000Ri7BU-0EMVq000002lhYD.jpg?fit=max&auto=format&n=EtHMjR0Dwu423b1z&q=85&s=38f0bd4b47f523ce5ccd40aa443fbbc5" style={{width: 969, height: 408}} width="1014" height="427" data-path="images/kb/ka0Vq0000004gBx-00N5w00000Ri7BU-0EMVq000002lhYD.jpg" />
</Frame>

<Frame>
  <img src="https://mintcdn.com/domoinc-openapi-sync-dataflows/EtHMjR0Dwu423b1z/images/kb/ka0Vq0000004gBx-00N5w00000Ri7BU-0EMVq000003o5pB.jpg?fit=max&auto=format&n=EtHMjR0Dwu423b1z&q=85&s=f2673c42fb020f59d58257646690e4d5" style={{width: 404, height: 472}} width="645" height="754" data-path="images/kb/ka0Vq0000004gBx-00N5w00000Ri7BU-0EMVq000003o5pB.jpg" />
</Frame>

**受信リンクを設定する**

受信リンクを作成するには：

1. **［Administration］**
   **>** **［Applications］** **>** **［Application links］** に移動します。
2. **［Create link］**
   を選択します。
3. **［External application］**
   を選択し、方向として **［Incoming］** を選択します。
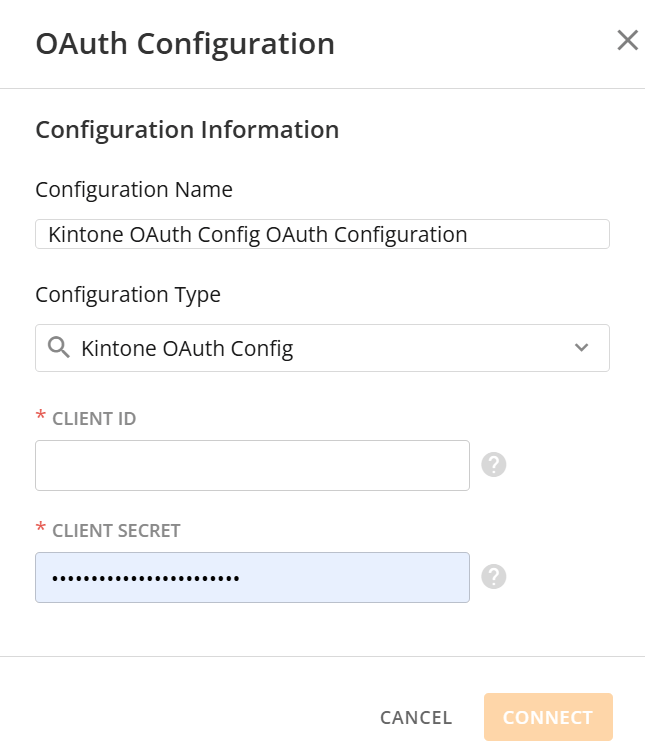
4. 以下のセクションの説明に従って、詳細を入力します。

   **注記：** **［Redirect URL］** フィールドにリンク「 [https://oauth.domo.com/api/data/v1/oauth/providers/kintone-oauth/exchange](https://oauth.domo.com/api/data/v1/oauth/providers/kintone-oauth/exchange "https://oauth.domo.com/api/data/v1/oauth/providers/kintone-oauth/exchange") 」を入力し、 **［Permission］** フィールドにドロップダウンリストから［ADMIN］を選択します。

<InlineImage src="/images/kb/ka0Vq0000004gBx-00N5w00000Ri7BU-0EMVq000003o5Z4.jpg" />

<Frame>
  <img src="https://mintcdn.com/domoinc-openapi-sync-dataflows/EtHMjR0Dwu423b1z/images/kb/ka0Vq0000004gBx-00N5w00000Ri7BU-0EMVq000003o6Rt.jpg?fit=max&auto=format&n=EtHMjR0Dwu423b1z&q=85&s=dadebdfb94a9080d322a79b5182ec37e" style={{width: 587, height: 495}} width="975" height="821" data-path="images/kb/ka0Vq0000004gBx-00N5w00000Ri7BU-0EMVq000003o6Rt.jpg" />
</Frame>

**既存のリンクのOAuth認証情報を表示する**

OAuth認証情報が失われた場合は、作成したアプリケーションリンクを使用して、いつでもアクセスできます。

OAuth認証情報を表示するには：

1. **［Administration］>［Application links］**
   に移動します。
2. 目的のアプリケーションリンクを見つけて、
   **［More actions］>［View credentials］** を選択します。

## Kintone Enterprise OAuthアカウントに接続する

このセクションでは、Kintone Enterprise OAuthコネクターページの **［認証情報］** と **［詳細］** ペインのオプションについて説明します。このページのほかのペインの項目である **［スケジュール設定］** や **［DataSetに名前を付け、説明を入力］** に関しては、ほとんどのタイプのコネクターで共通しています。詳細については、「 [コネクターを使用してDataSetを追加する](/ja/s/article/360042926274 "コネクターを使用してDataSetを追加する") 」を参照してください。

## ［認証情報］ペイン

このペインには、Kintone Enterprise OAuthアカウントに接続する認証情報の入力フィールドが含まれています。以下の表で、各フィールドに必要な内容を説明しています。

<table border="1" cellpadding="1" cellspacing="1" data-aura-rendered-by="33:195;a"><thead><tr><th colspan="1" rowspan="1"><p><span class="s1"> フィールド </span></p></th><th colspan="1" rowspan="1"><p><span class="s1"> 説明 </span></p></th></tr></thead><tbody><tr><td colspan="1" rowspan="1"> OAuth Configuration </td><td colspan="1" rowspan="1"> ［OAuth Configuration］には、自動的にログインするためのサービス認証情報が管理者によって保存されているため、必要なのはユーザー個人のOAuthログインのみです。管理者は、Data Centerの［アカウント］タブで設定を作成および編集できます。 </td></tr><tr><td colspan="1" rowspan="1"> Instance/Domain Name </td><td colspan="1" rowspan="1"> Kintoneドメイン名を入力します。 </td></tr></tbody></table>

有効なKintone Enterprise OAuth認証情報を一度入力しておくと、随時同じアカウントを使用して新しいKintone Enterprise OAuth DataSetを作成することができます。コネクターのアカウントはData Centerの **［アカウント］** タブで管理できます。このタブの詳細については、「 [コネクターアカウントを管理する](/ja/s/article/360042926054 "コネクターアカウントを管理する") 」を参照してください。

## ［詳細］ペイン

<table border="1" cellpadding="1" cellspacing="1" data-aura-rendered-by="33:195;a"><thead><tr><th colspan="1" rowspan="1"><p> メニュー </p></th><th colspan="1" rowspan="1"><p> 説明 </p></th></tr></thead><tbody><tr><td colspan="1" rowspan="1"><p> Report </p></td><td colspan="1" rowspan="1"><p> 実行するKintone Enterprise OAuthレポートを選択します。以下のレポートが利用できます。 </p><p /><table border="1"><tbody><tr><td colspan="1" rowspan="1"><b> レポート名 </b></td><td colspan="1" rowspan="1"><b> 説明 </b></td></tr><tr><td colspan="1" rowspan="1"><p> All Apps </p></td><td colspan="1" rowspan="1"> 名前、説明、関連スペース、作成者、アップデータ情報など、複数のAppの一般情報を取得します。 </td></tr><tr><td colspan="1" rowspan="1"><p> All Records of 1 App </p></td><td colspan="1" rowspan="1"> Appのすべてのレコードの詳細を取得します。 </td></tr></tbody></table></td></tr><tr><td colspan="1" rowspan="1"> Guest Space Id </td><td colspan="1" rowspan="1"> お使いのアプリケーションがゲストスペース内にある場合、ゲストスペースIDが必要です。 </td></tr><tr><td colspan="1" rowspan="1"> App Id </td><td colspan="1" rowspan="1"> レポートを作成するKintone AppのApp IDを入力します。App IDは、Kintone Appにアクセスし、URLを表示することで確認できます。/kの後に続く数字がApp IDです。 </td></tr><tr><td colspan="1" rowspan="1"> Record Number </td><td colspan="1" rowspan="1"> Appの1つのレコードにもとづいてレポートを作成する場合は、レコード番号を入力します。 </td></tr><tr><td colspan="1" rowspan="1"> Select File </td><td colspan="1" rowspan="1"> ファイルを選択します。 </td></tr><tr><td colspan="1" rowspan="1"> FileType </td><td colspan="1" rowspan="1"> ファイルタイプを選択します。 </td></tr><tr><td colspan="1" rowspan="1"> Space ID </td><td colspan="1" rowspan="1"> スペースIDを入力します。 </td></tr><tr><td colspan="1" rowspan="1"> Select language </td><td colspan="1" rowspan="1"> 言語を選択します。 </td></tr><tr><td colspan="1" rowspan="1"> Fields </td><td colspan="1" rowspan="1"> フィールドを選択します。作成者、更新者、作成日時、更新日時、レコード番号のフィールドは、デフォルトで常にDomo DataSetにインポートされます。 </td></tr><tr><td colspan="1" rowspan="1"> Exclude the Default Fields? </td><td colspan="1" rowspan="1"> デフォルトでDomo DataSetにインポートされる作成者、更新者、作成日時、更新日時、レコード番号の各フィールドを除外するには、このチェックボックスをオンにします。 </td></tr></tbody></table>

## その他のペイン

スケジュール設定、再試行、更新オプションなど、その他のコネクターインターフェースのセクションの詳細については、「 [コネクターを使用してDataSetを追加する](/ja/s/article/360042926274 "コネクターを使用してDataSetを追加する") 」を参照してください。