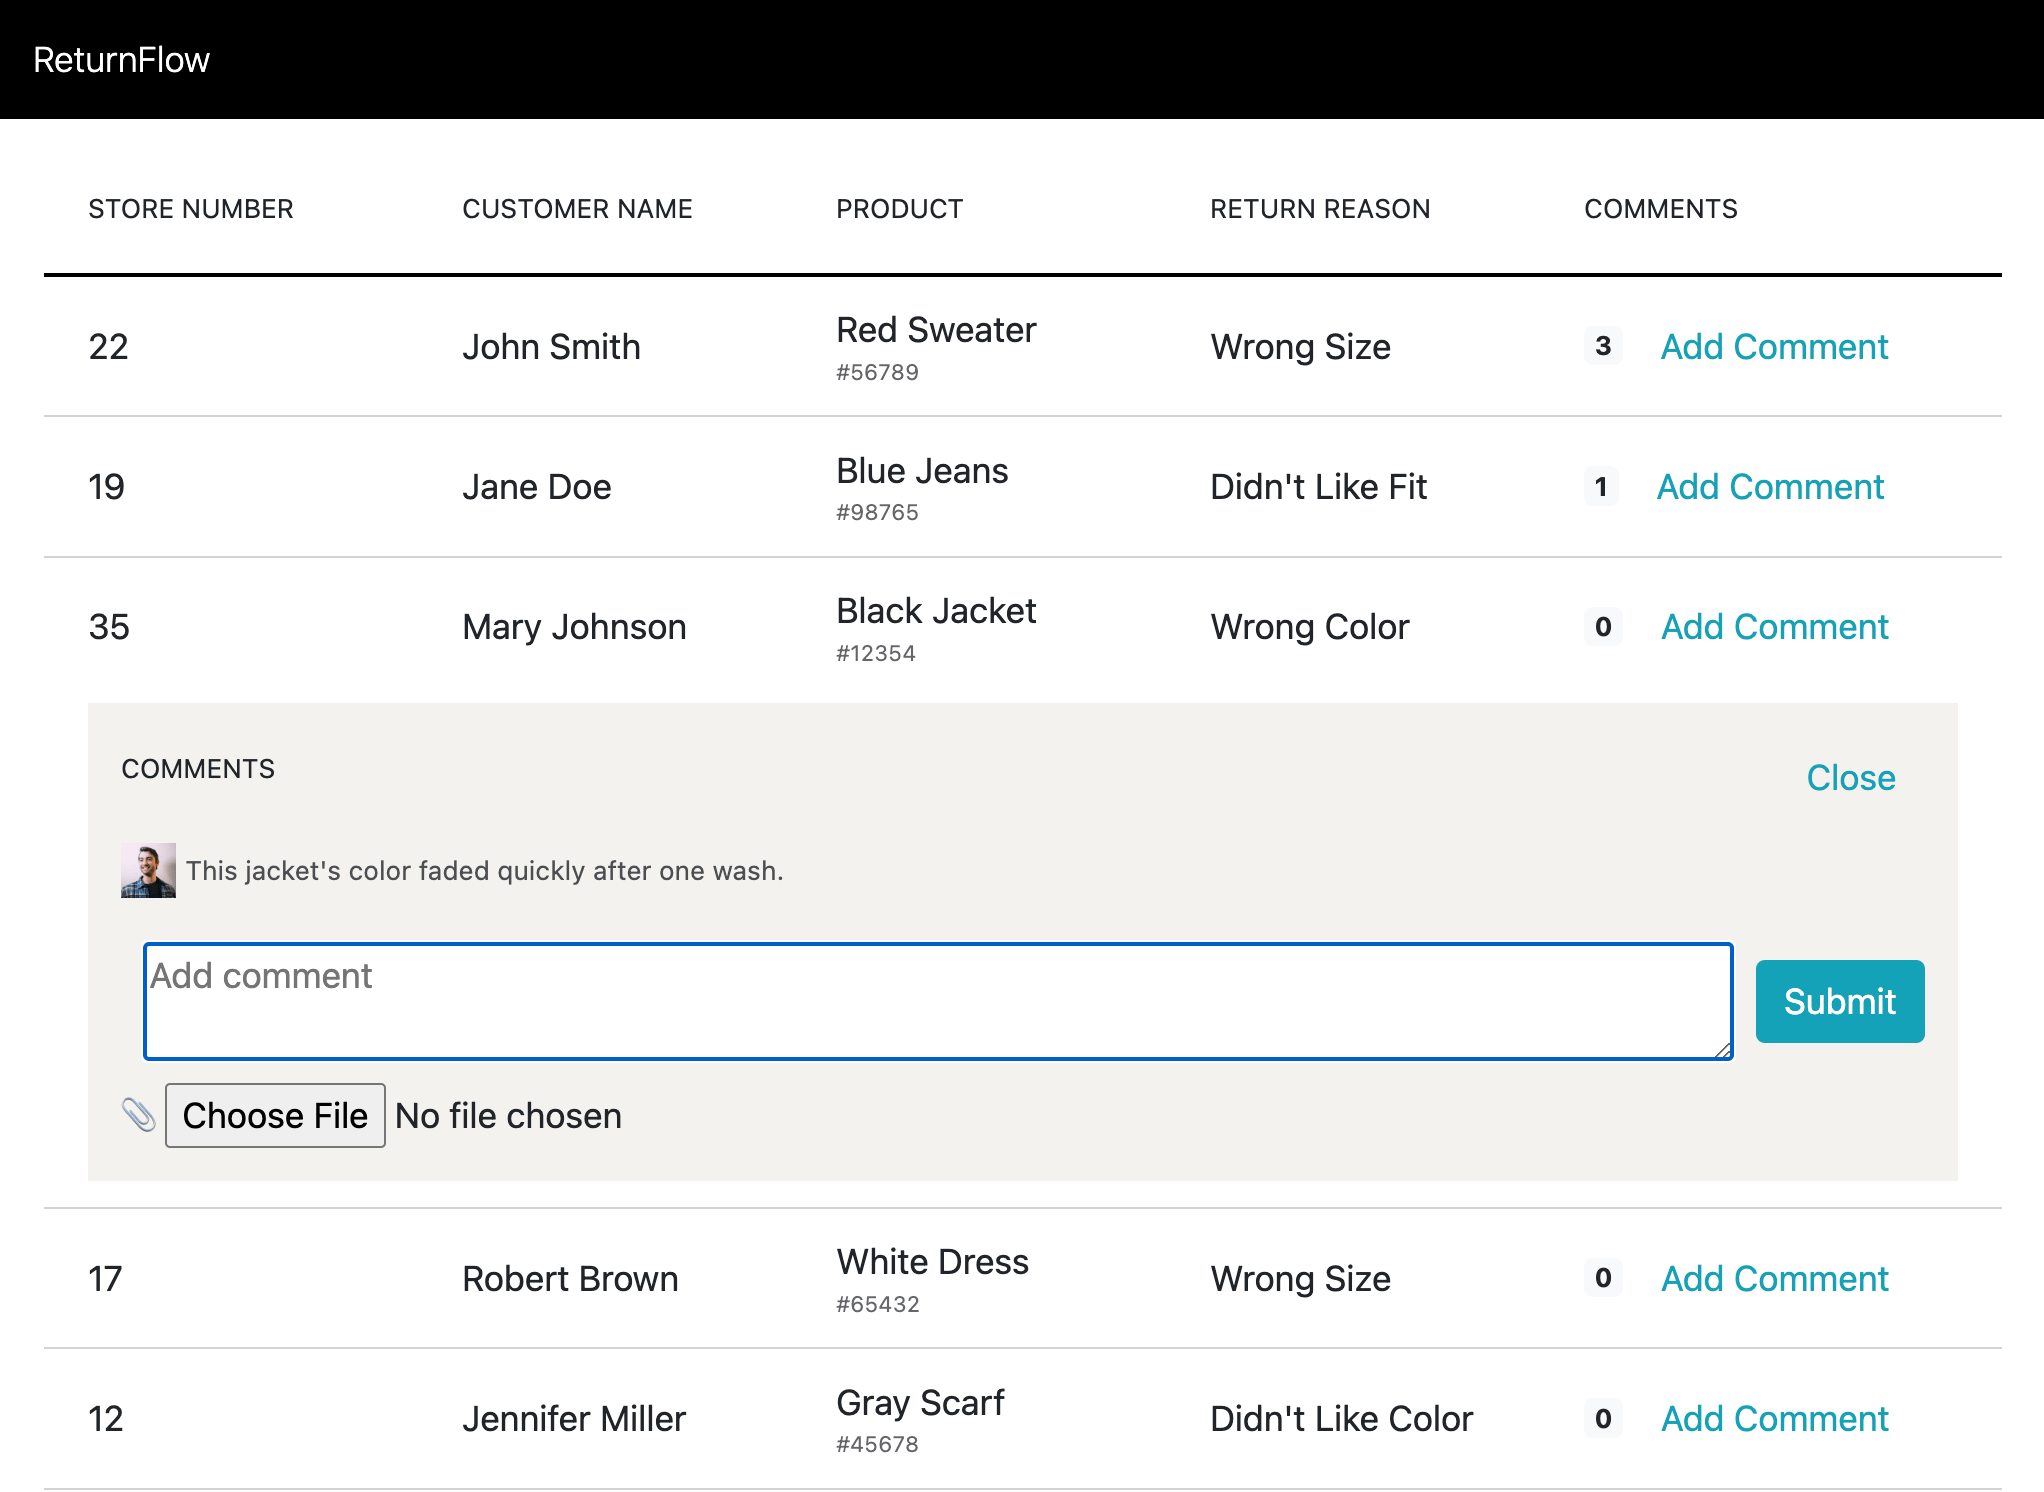
 Before beginning make sure you've completed the [QuickStart](/portal/Apps/App-Framework/Quickstart/Prerequisites), which includes setup and installation
and the prerequisites for building on the Domo App Platform.
### Step 1: Get the Data
***
Before we can build an app that lets us add commentary to data, we need to upload our data to a Domo DataSet. In theory, this app could work with any DataSet, but for simplicity we'll be using the following sample returns data.
| Store Number | Customer Name | SKU | Item Returned | Reason for Return |
| ------------ | ---------------- | ----- | ------------- | ----------------- |
| 22 | John Smith | 56789 | Red Sweater | Wrong Size |
| 19 | Jane Doe | 98765 | Blue Jeans | Didn't Like Fit |
| 35 | Mary Johnson | 12354 | Black Jacket | Wrong Color |
| 17 | Robert Brown | 65432 | White Dress | Wrong Size |
| 12 | Jennifer Miller | 45678 | Gray Scarf | Didn't Like Color |
| 31 | Brian Williams | 23456 | Purple Top | Wrong Size |
| 11 | Susan Davis | 89765 | Orange Shirt | Didn't Like Fit |
| 25 | Thomas Moore | 34987 | Yellow Shirt | Wrong Color |
| 26 | Amanda Taylor | 87654 | Green Pants | Didn't Like Fit |
| 18 | William Thompson | 87456 | Brown Skirt | Wrong Size |
To get this data into Domo you can copy and paste the above directly into Domo using a webform.
Before beginning make sure you've completed the [QuickStart](/portal/Apps/App-Framework/Quickstart/Prerequisites), which includes setup and installation
and the prerequisites for building on the Domo App Platform.
### Step 1: Get the Data
***
Before we can build an app that lets us add commentary to data, we need to upload our data to a Domo DataSet. In theory, this app could work with any DataSet, but for simplicity we'll be using the following sample returns data.
| Store Number | Customer Name | SKU | Item Returned | Reason for Return |
| ------------ | ---------------- | ----- | ------------- | ----------------- |
| 22 | John Smith | 56789 | Red Sweater | Wrong Size |
| 19 | Jane Doe | 98765 | Blue Jeans | Didn't Like Fit |
| 35 | Mary Johnson | 12354 | Black Jacket | Wrong Color |
| 17 | Robert Brown | 65432 | White Dress | Wrong Size |
| 12 | Jennifer Miller | 45678 | Gray Scarf | Didn't Like Color |
| 31 | Brian Williams | 23456 | Purple Top | Wrong Size |
| 11 | Susan Davis | 89765 | Orange Shirt | Didn't Like Fit |
| 25 | Thomas Moore | 34987 | Yellow Shirt | Wrong Color |
| 26 | Amanda Taylor | 87654 | Green Pants | Didn't Like Fit |
| 18 | William Thompson | 87456 | Brown Skirt | Wrong Size |
To get this data into Domo you can copy and paste the above directly into Domo using a webform.
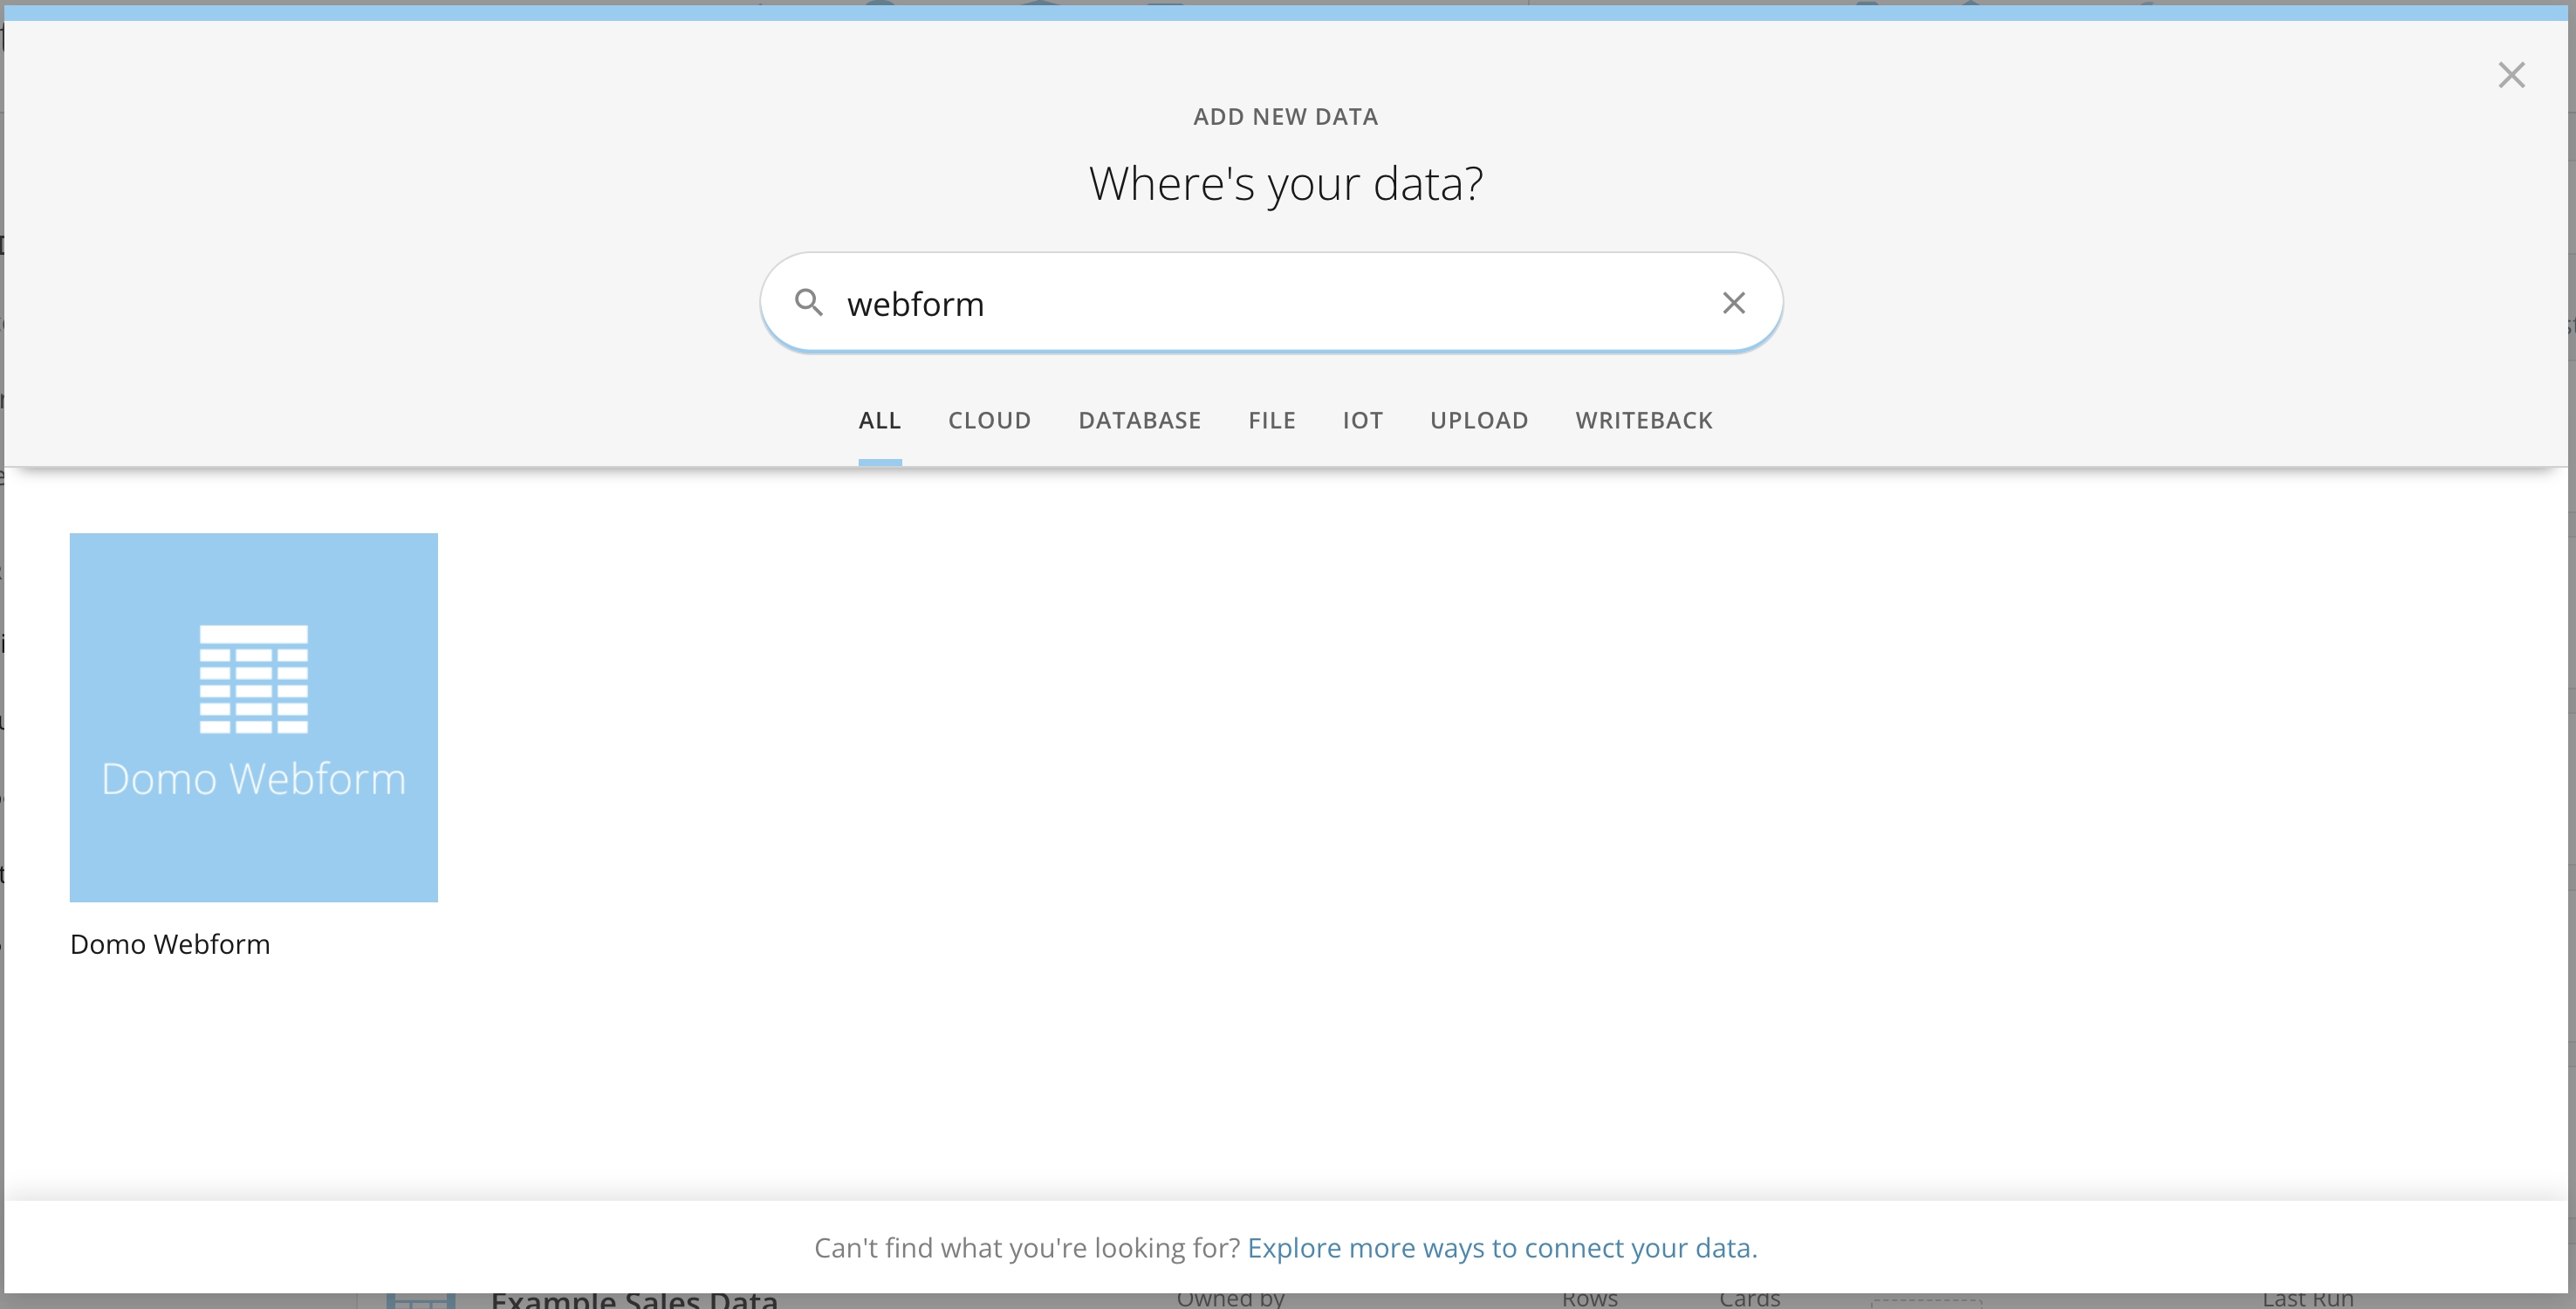 I've named my DataSet `Return Flow Sample`, but you can name yours whatever you'd like.
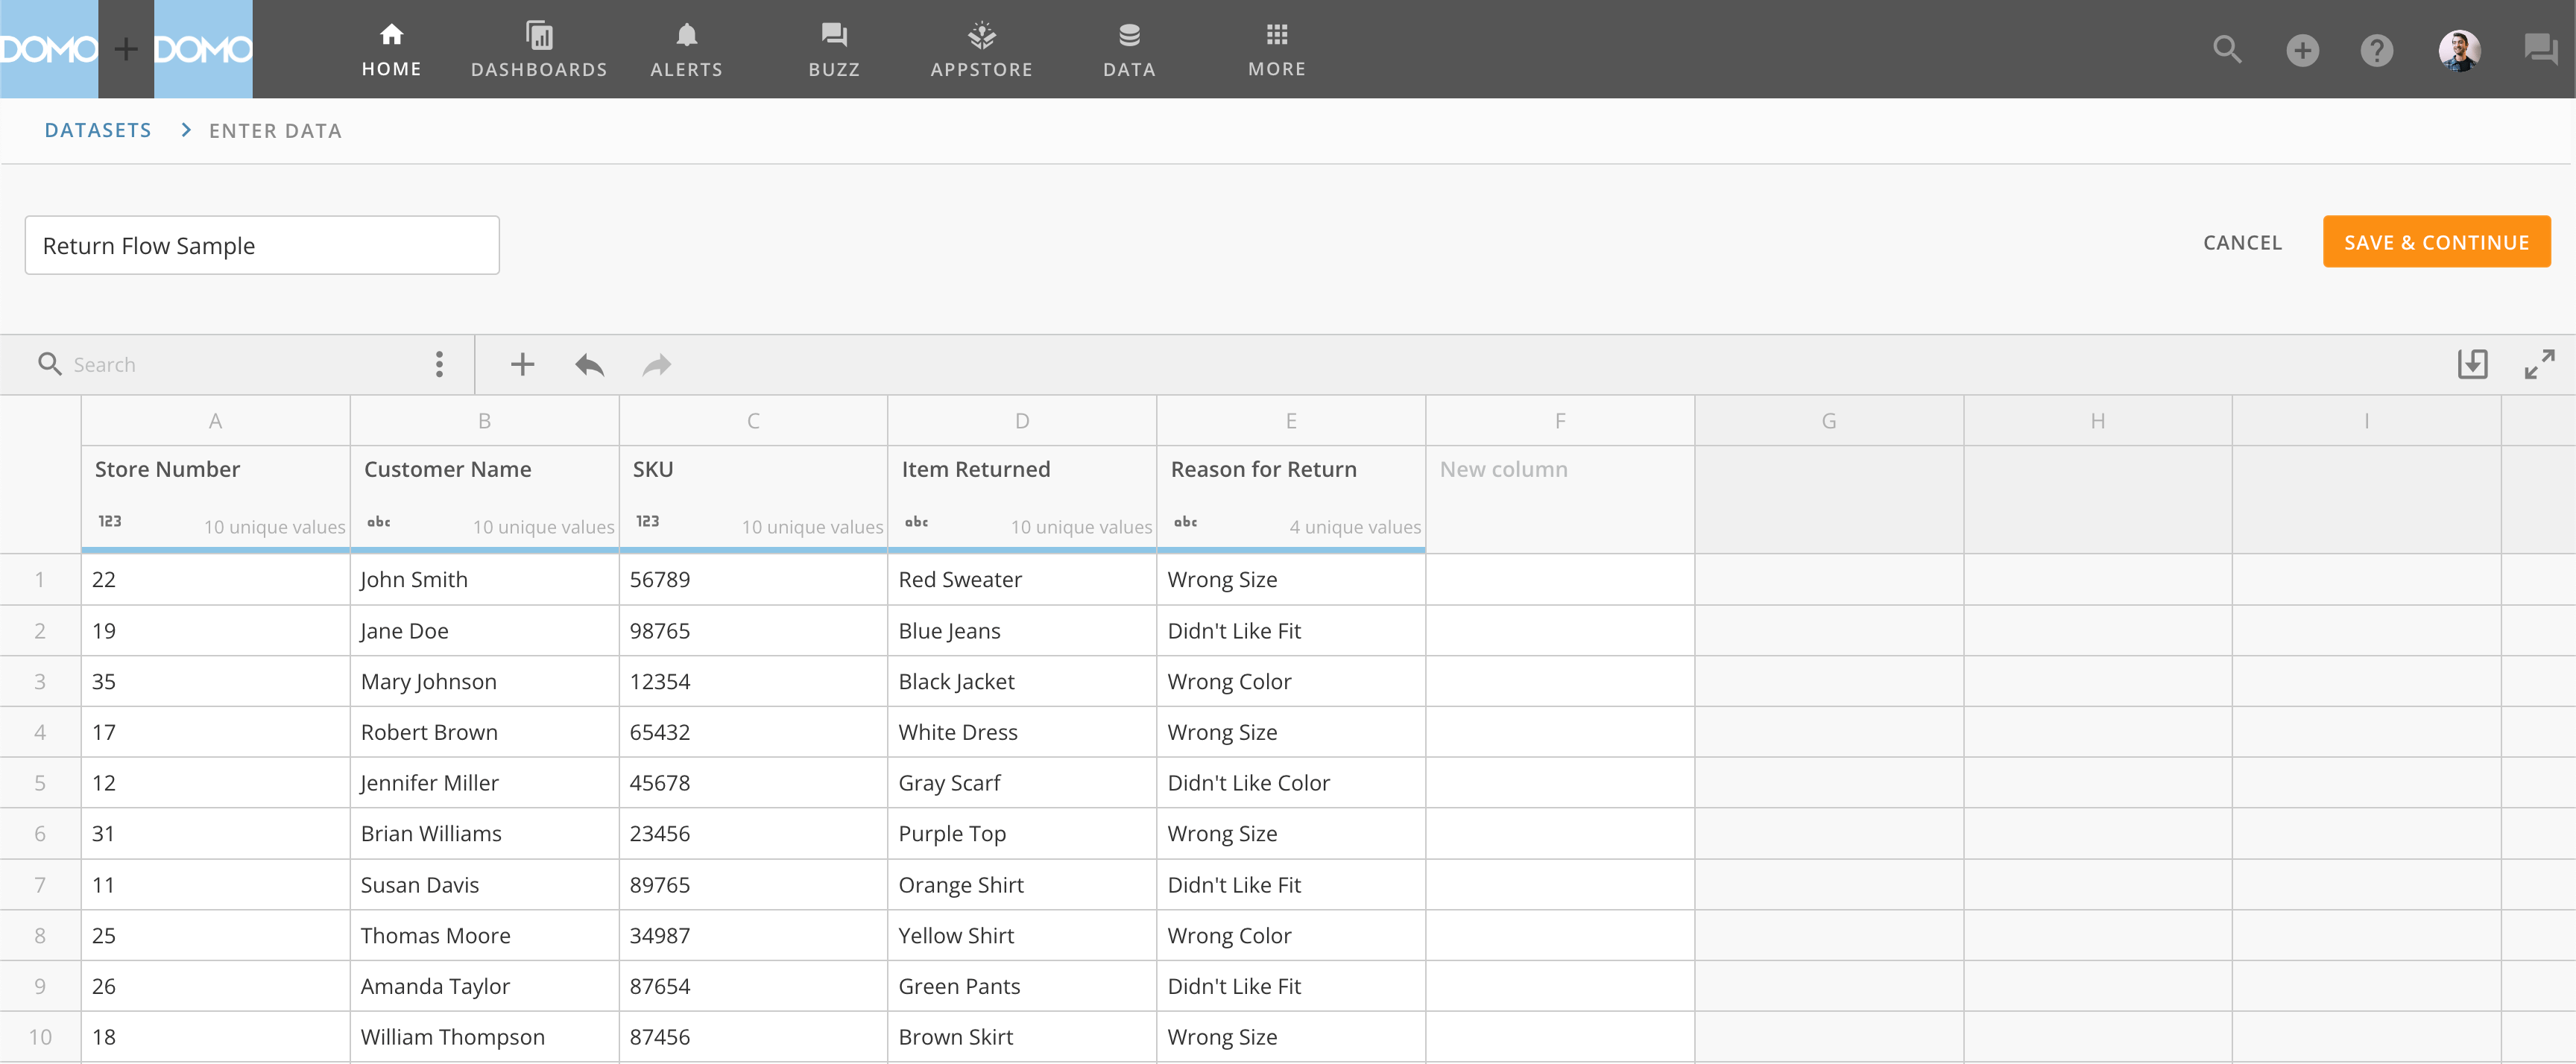 Click 'Save and Continue.'
### Step 2: Initialize Our App
***
To generate an initial app template, use the `domo init` command from your command line in the directory where you want your app files to live.
You'll be prompted to:
1. Give your app a name
2. Select a starter template
3. Connect a DataSet
Please use the same configuration as the image below, replacing the `dataset id` with the `id` of your DataSet.
Click 'Save and Continue.'
### Step 2: Initialize Our App
***
To generate an initial app template, use the `domo init` command from your command line in the directory where you want your app files to live.
You'll be prompted to:
1. Give your app a name
2. Select a starter template
3. Connect a DataSet
Please use the same configuration as the image below, replacing the `dataset id` with the `id` of your DataSet.
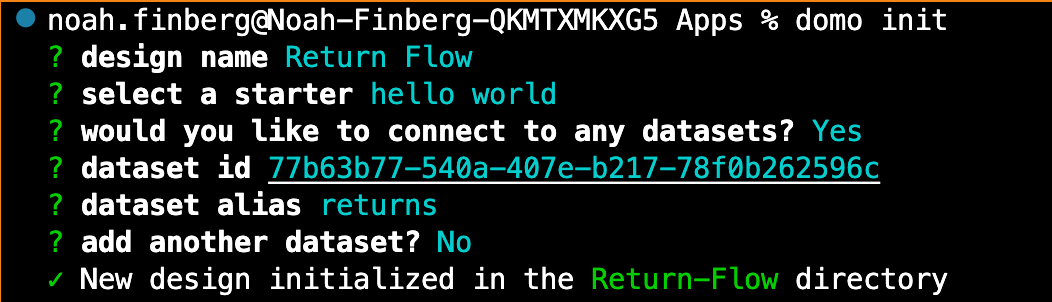 Once the files have been initialized in a new directory, you can navigate to that directory with the `cd` command and explore the basic file structure of your App. It should look like the following:
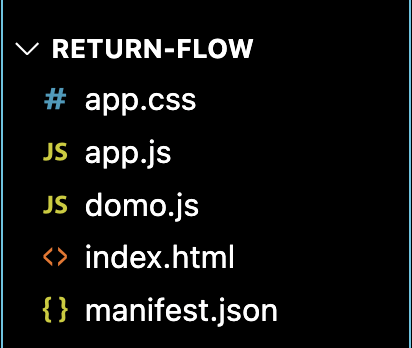 If you open up the `manifest.json` file you can see that we have some default configuration set for our app.
```json theme={"dark"}
{
"name": "Return Flow",
"version": "1.0.0",
"size": {
"width": 1,
"height": 1
},
"mapping": [
{
"dataSetId": "77b63b77-540a-407e-b217-78f0b262596c",
"alias": "returns",
"fields": []
}
]
}
```
In order to create an App Design in our Domo instance, the last thing we need is a `thumbnail.png` file to use for the App's icon image in Domo. You can use the [image found here](https://github.com/DomoApps/returns-walkthrough/blob/final/thumbnail.png).
Once, you've added the `thumbnail.png` file, go ahead and run the `domo publish` command. This should automatically add the `id` of the App Design in Domo to your `manifest.json` file as well as a `fileName` property.
Make sure your `manifest.json` file now looks something like this:
```json theme={"dark"}
{
"name": "Return Flow",
"version": "1.0.0",
"size": {
"width": 1,
"height": 1
},
"mapping": [
{
"dataSetId": "77b63b77-540a-407e-b217-78f0b262596c",
"alias": "returns",
"fields": []
}
],
"fileName": "manifest.json",
"id": "26cc6762-76cf-47f5-8def-dd76d0a6966a"
}
```
You can find a link to your new App Design in the terminal output.
If you open up the `manifest.json` file you can see that we have some default configuration set for our app.
```json theme={"dark"}
{
"name": "Return Flow",
"version": "1.0.0",
"size": {
"width": 1,
"height": 1
},
"mapping": [
{
"dataSetId": "77b63b77-540a-407e-b217-78f0b262596c",
"alias": "returns",
"fields": []
}
]
}
```
In order to create an App Design in our Domo instance, the last thing we need is a `thumbnail.png` file to use for the App's icon image in Domo. You can use the [image found here](https://github.com/DomoApps/returns-walkthrough/blob/final/thumbnail.png).
Once, you've added the `thumbnail.png` file, go ahead and run the `domo publish` command. This should automatically add the `id` of the App Design in Domo to your `manifest.json` file as well as a `fileName` property.
Make sure your `manifest.json` file now looks something like this:
```json theme={"dark"}
{
"name": "Return Flow",
"version": "1.0.0",
"size": {
"width": 1,
"height": 1
},
"mapping": [
{
"dataSetId": "77b63b77-540a-407e-b217-78f0b262596c",
"alias": "returns",
"fields": []
}
],
"fileName": "manifest.json",
"id": "26cc6762-76cf-47f5-8def-dd76d0a6966a"
}
```
You can find a link to your new App Design in the terminal output.
 Go ahead and click on that link and then create a new Card.
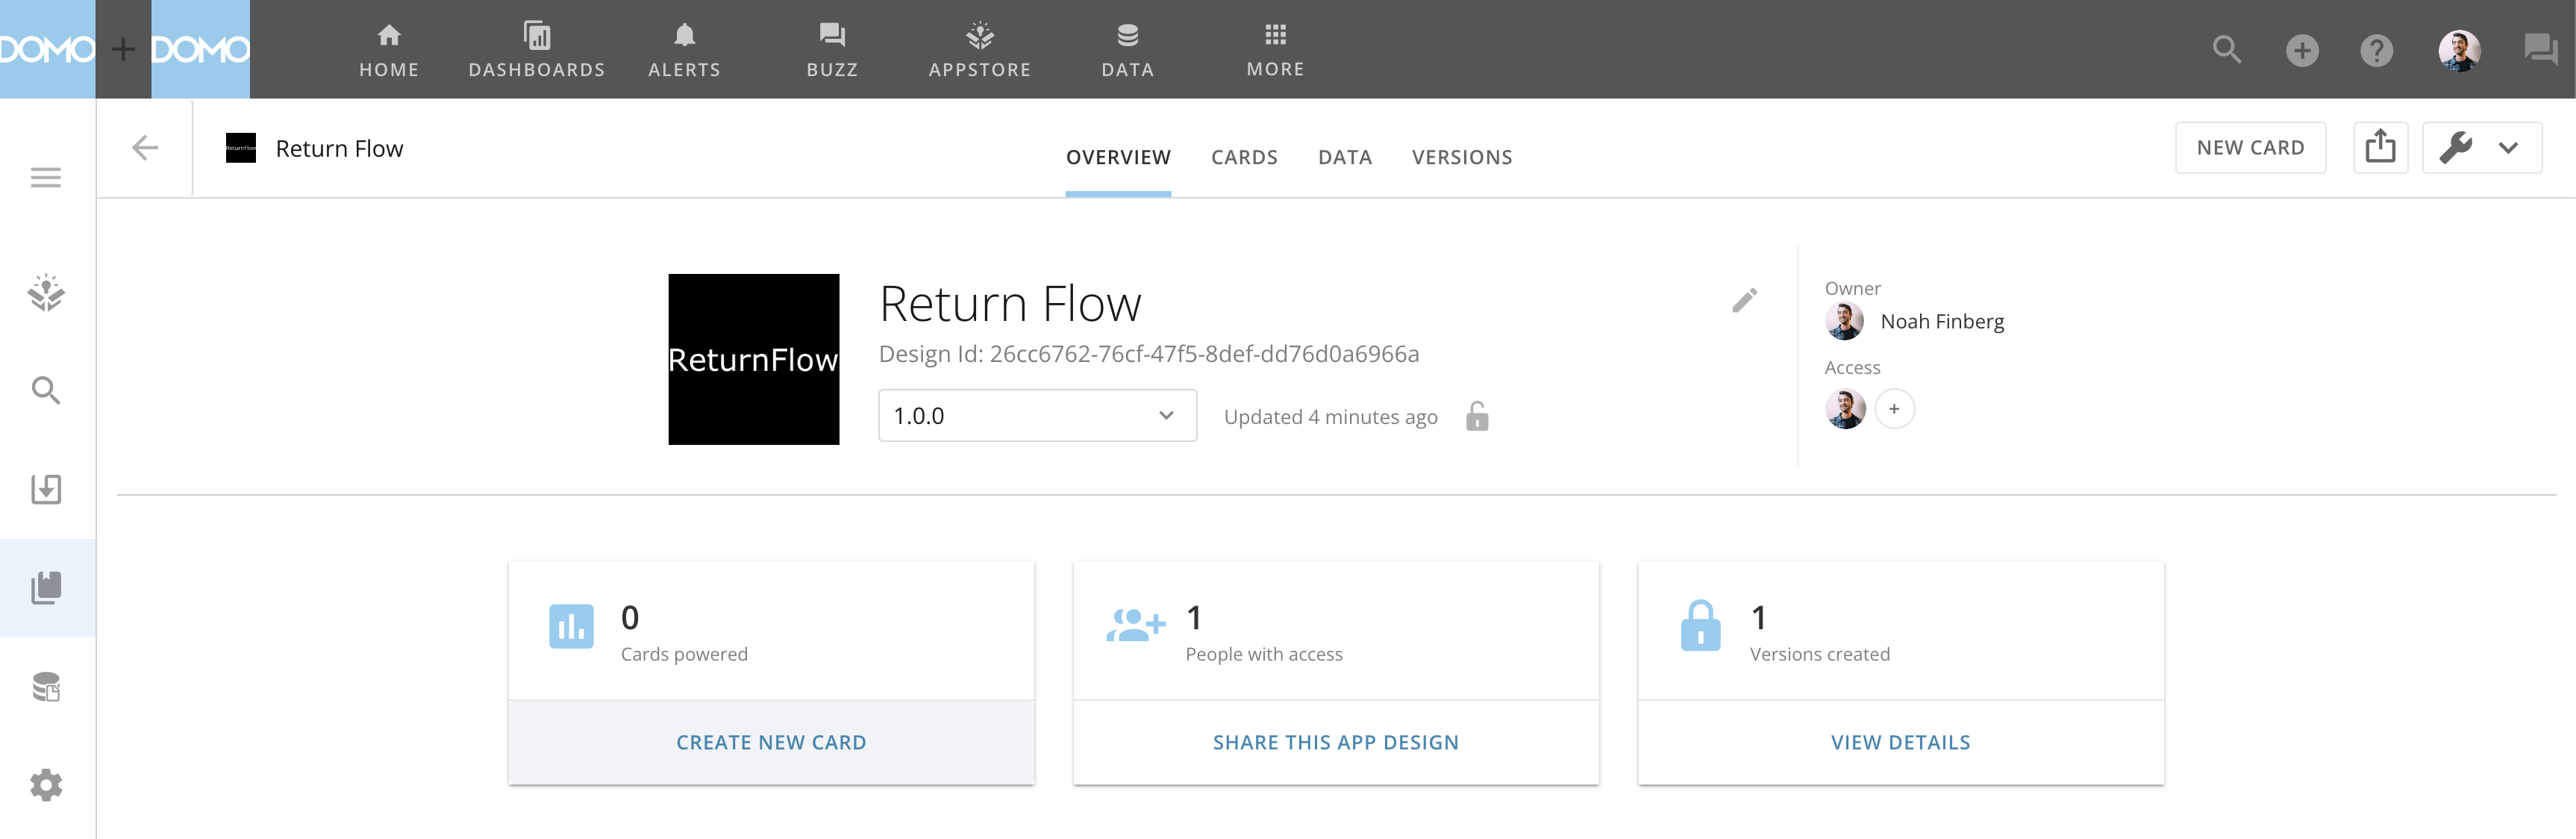 When you create a new Card (also known as an "App Instance"), you should see the App Wiring Screen that looks like the below. Our app has a simple `h1` element and is successfully wired up to a DataSet with the alias `returns`, which we've set by default to the Return Flow Sample DataSet we setup in Step 1.
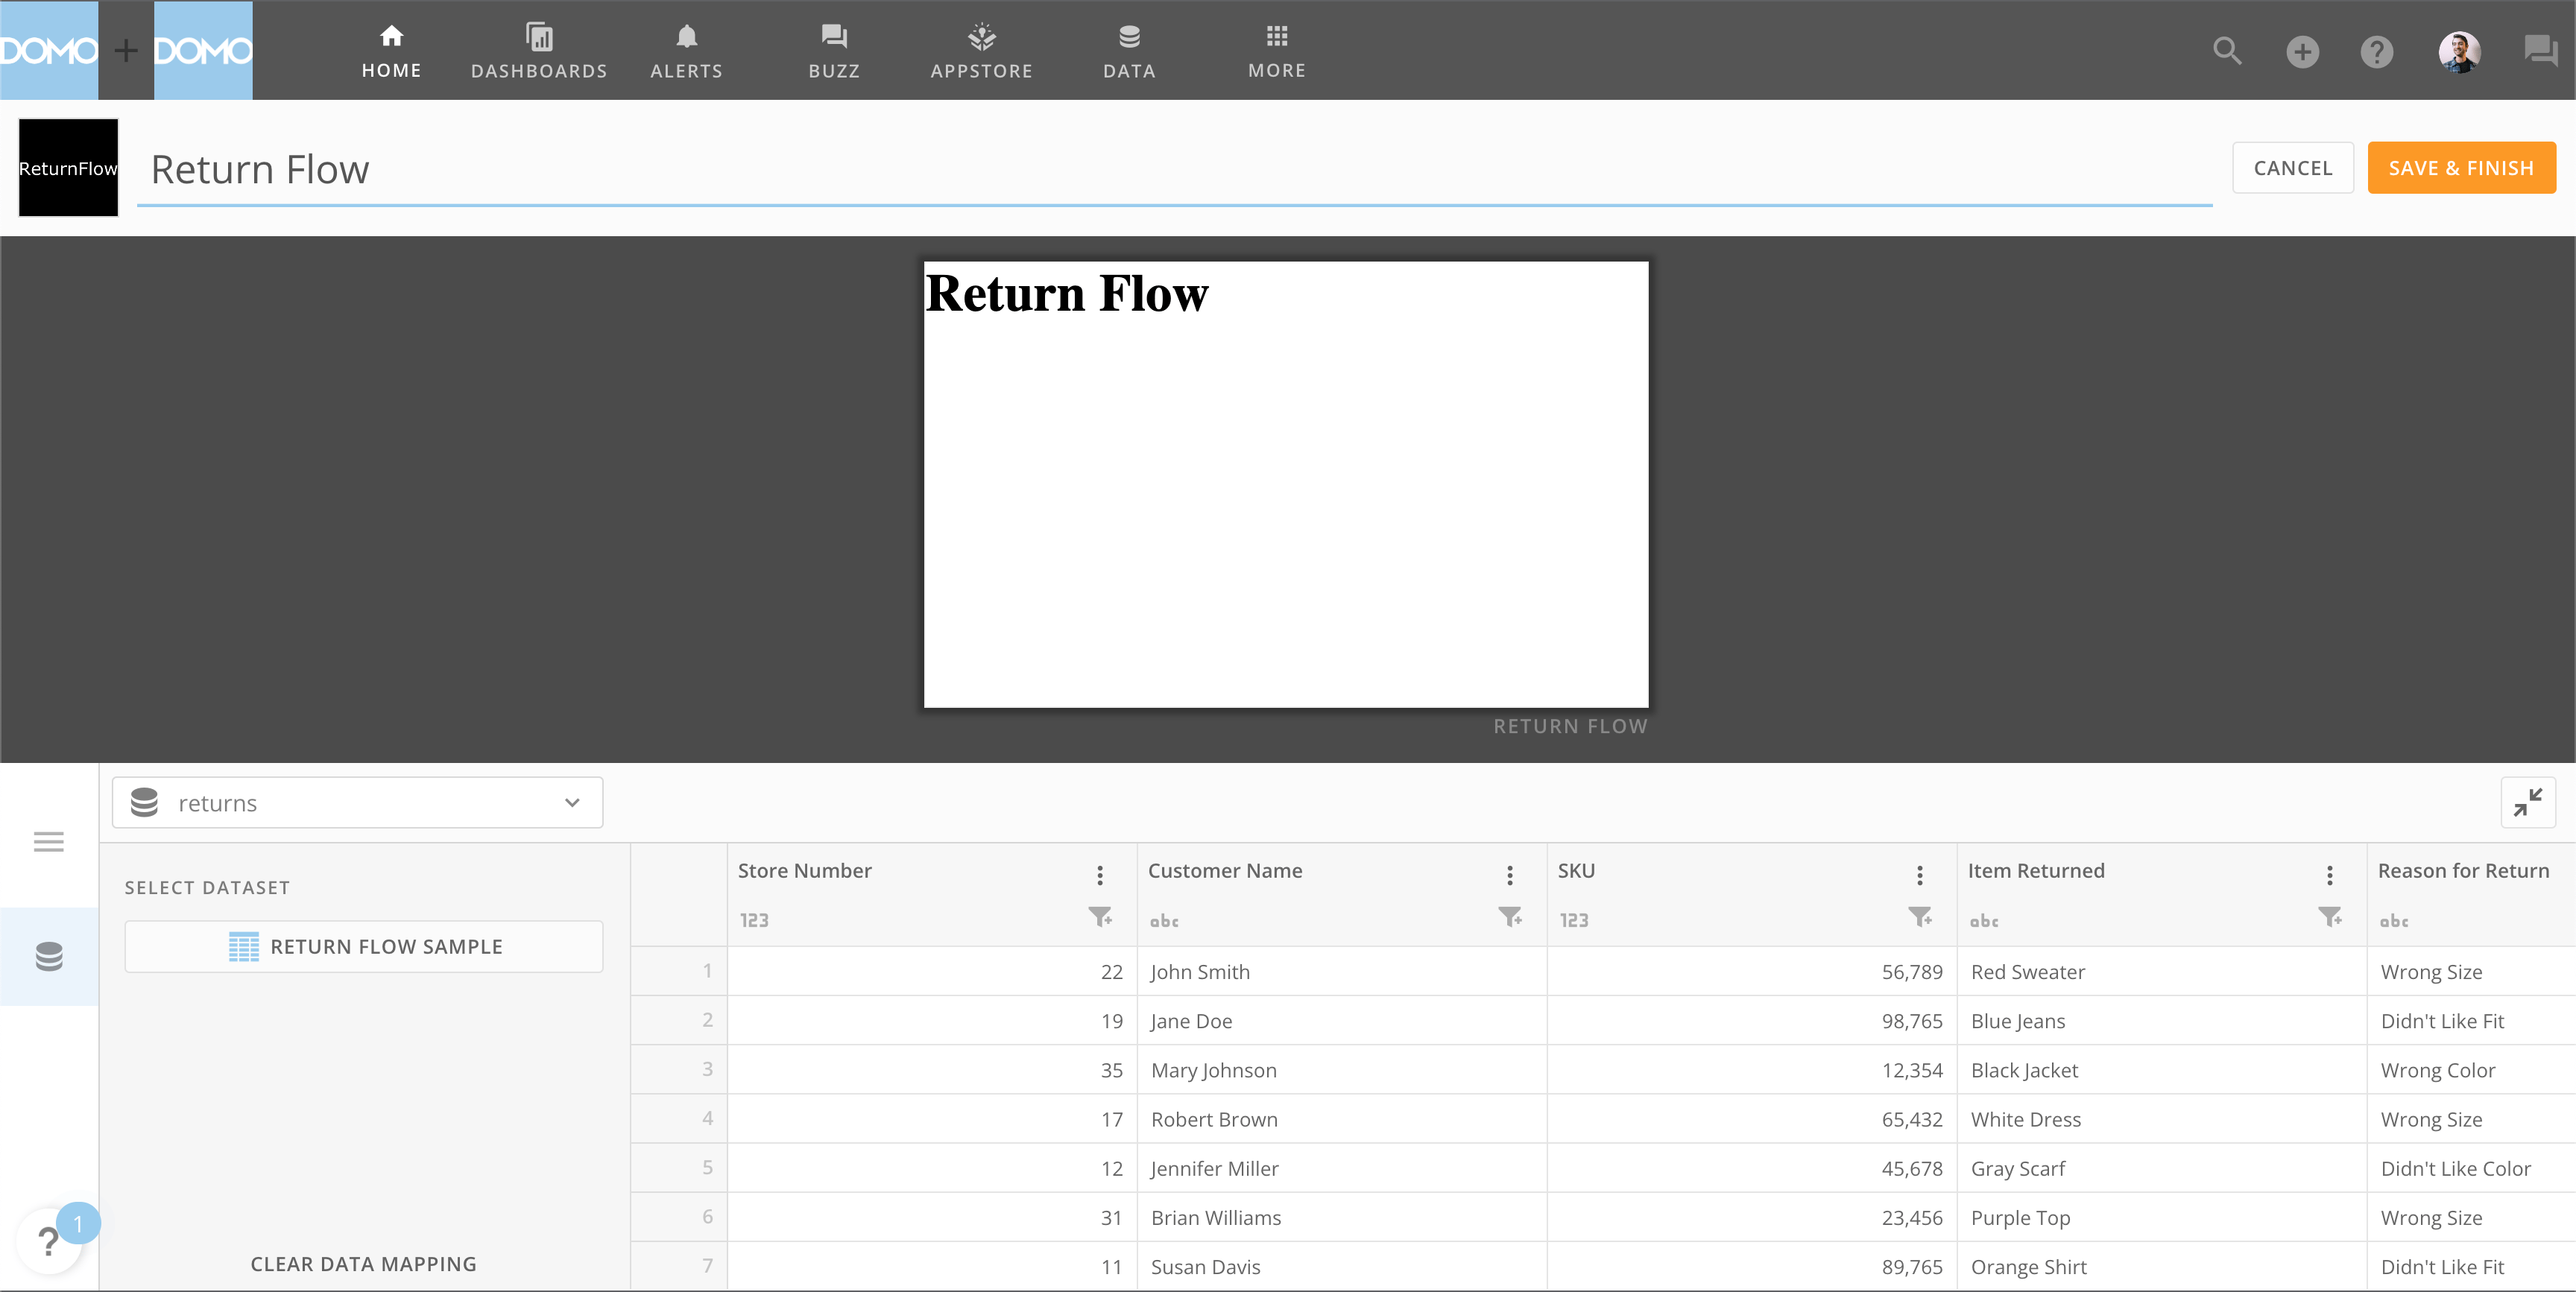 Click 'Save and Finish' and we're ready to start writing the code to build our App.
### Step 3: Explore Default Files
***
Let's have a look at some of the default files generated by our starter template.
The `index.html` file contains the basic structure of our page and loads our JavaScript and CSS assets.
```html theme={"dark"}
Click 'Save and Finish' and we're ready to start writing the code to build our App.
### Step 3: Explore Default Files
***
Let's have a look at some of the default files generated by our starter template.
The `index.html` file contains the basic structure of our page and loads our JavaScript and CSS assets.
```html theme={"dark"}
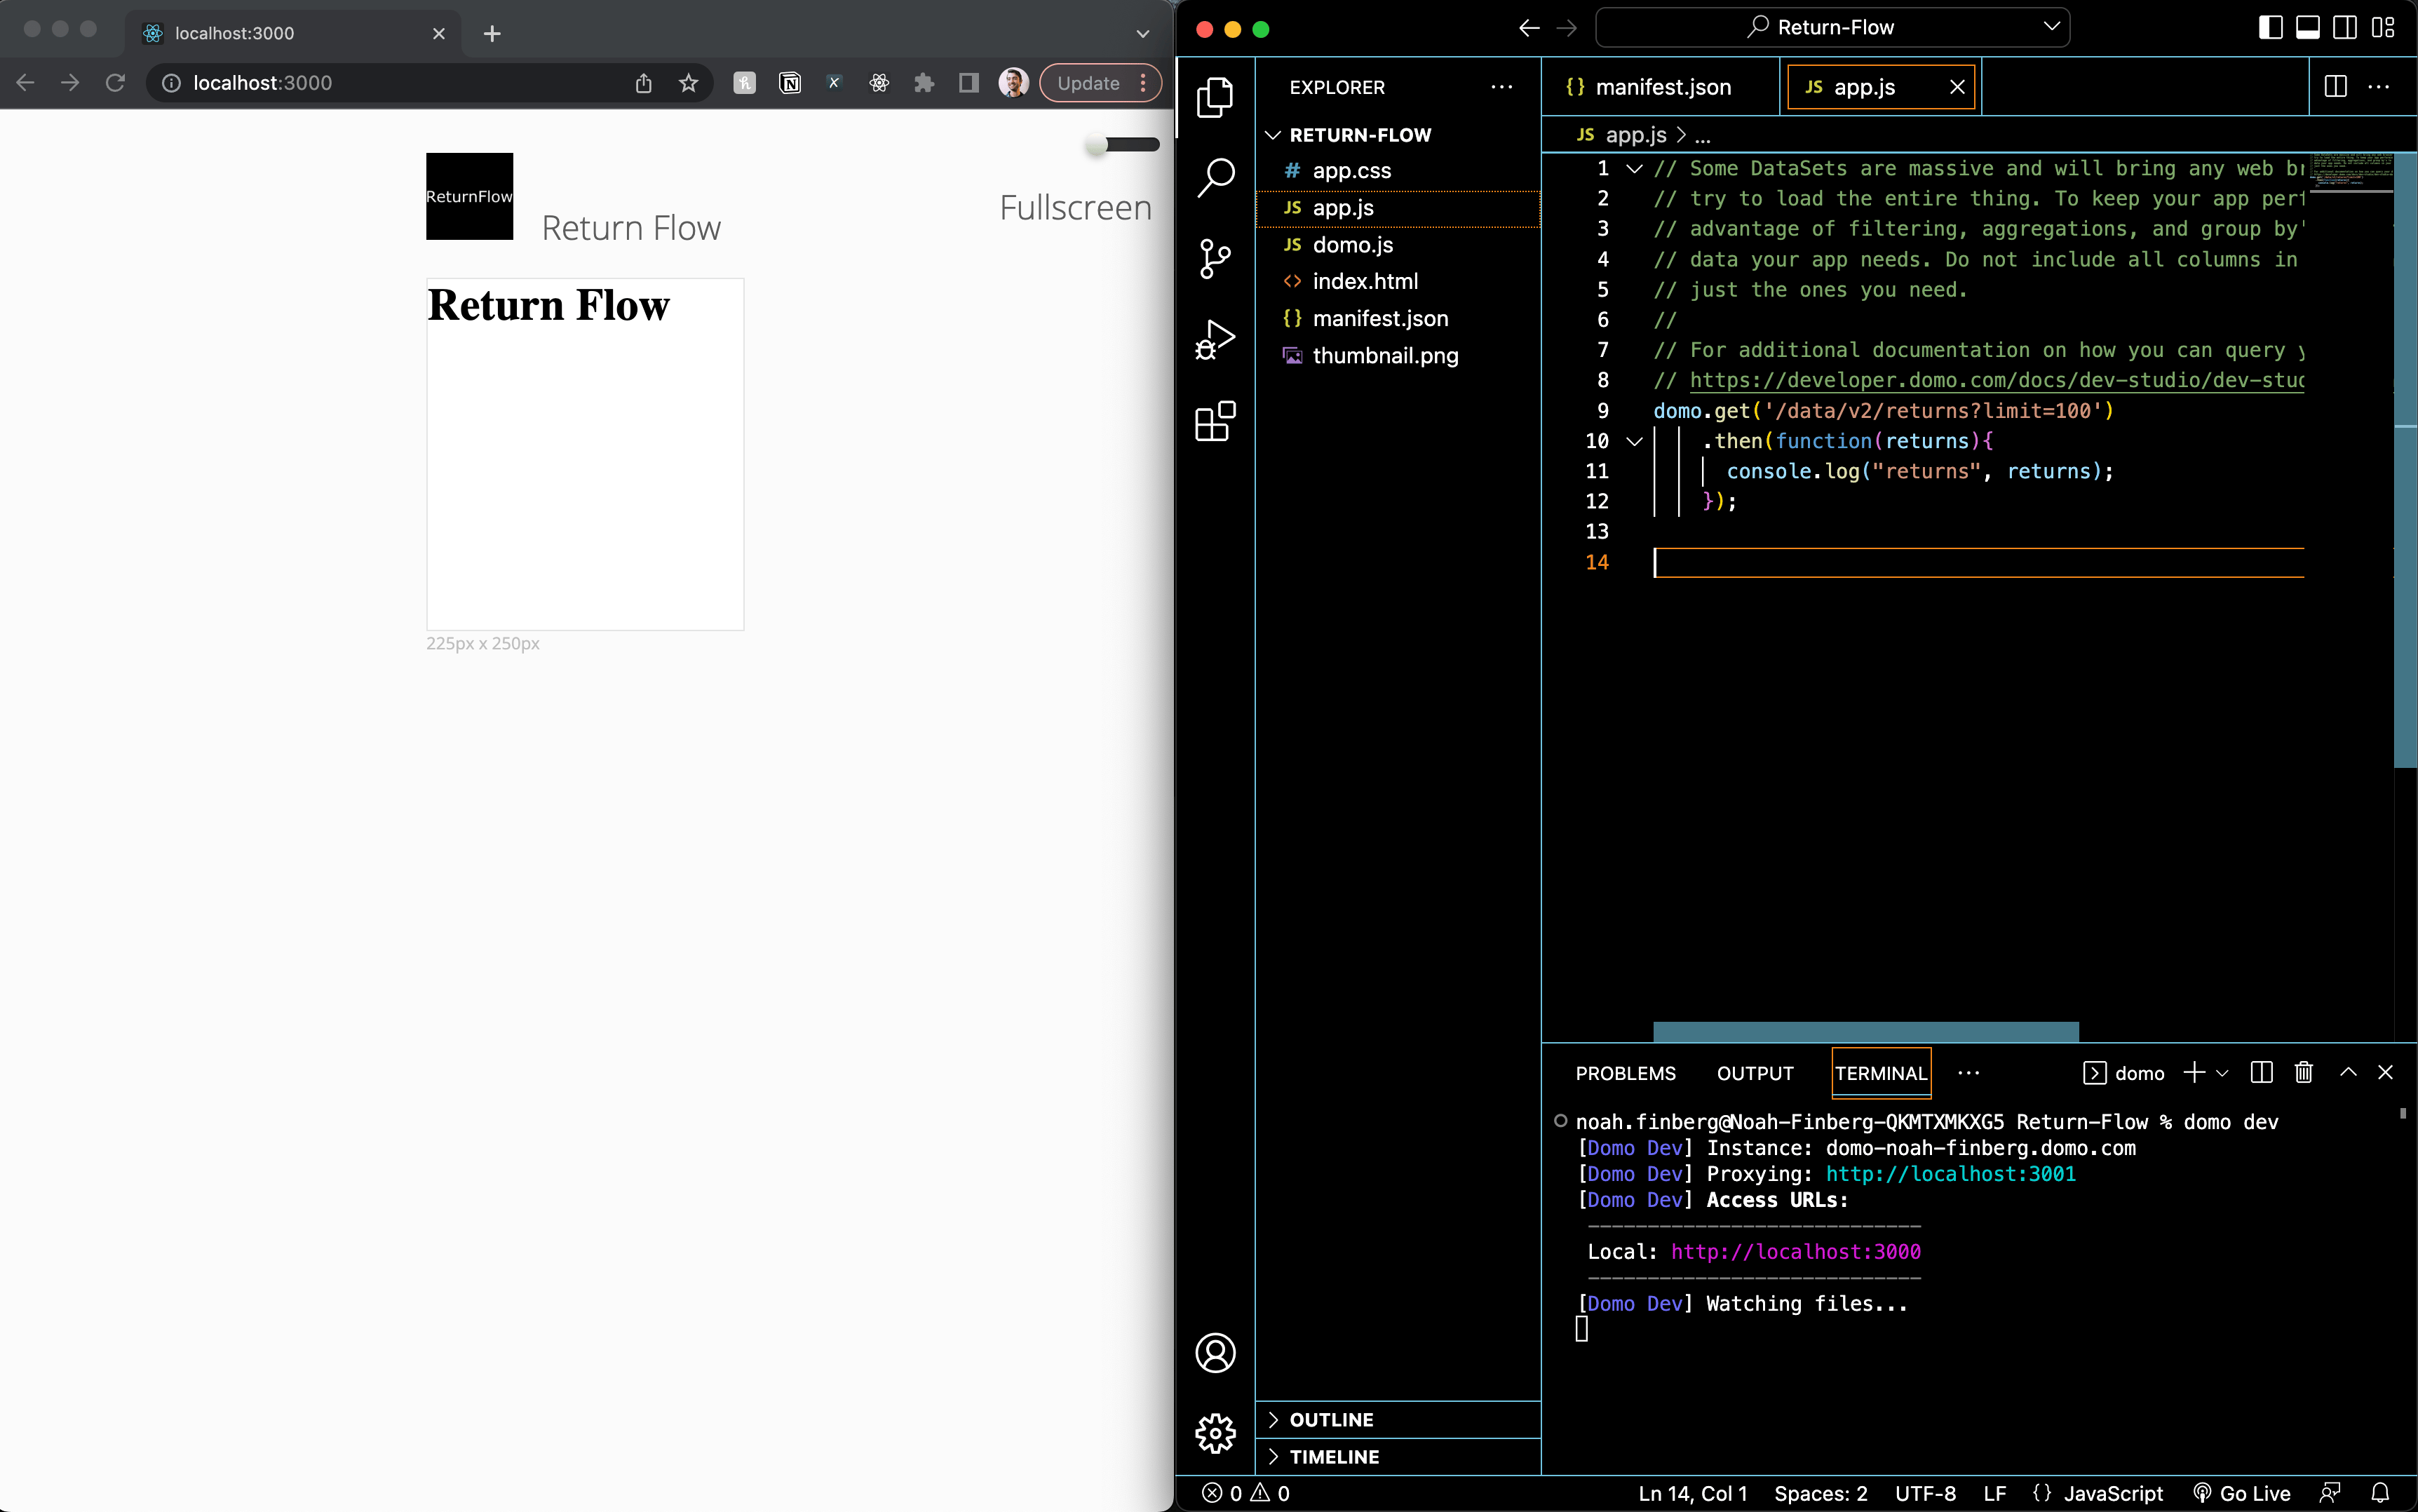 Next, right-click in your browser and click "Inspect", the navigate to the console to see if the `domo.get` request is logging data from your DataSet.
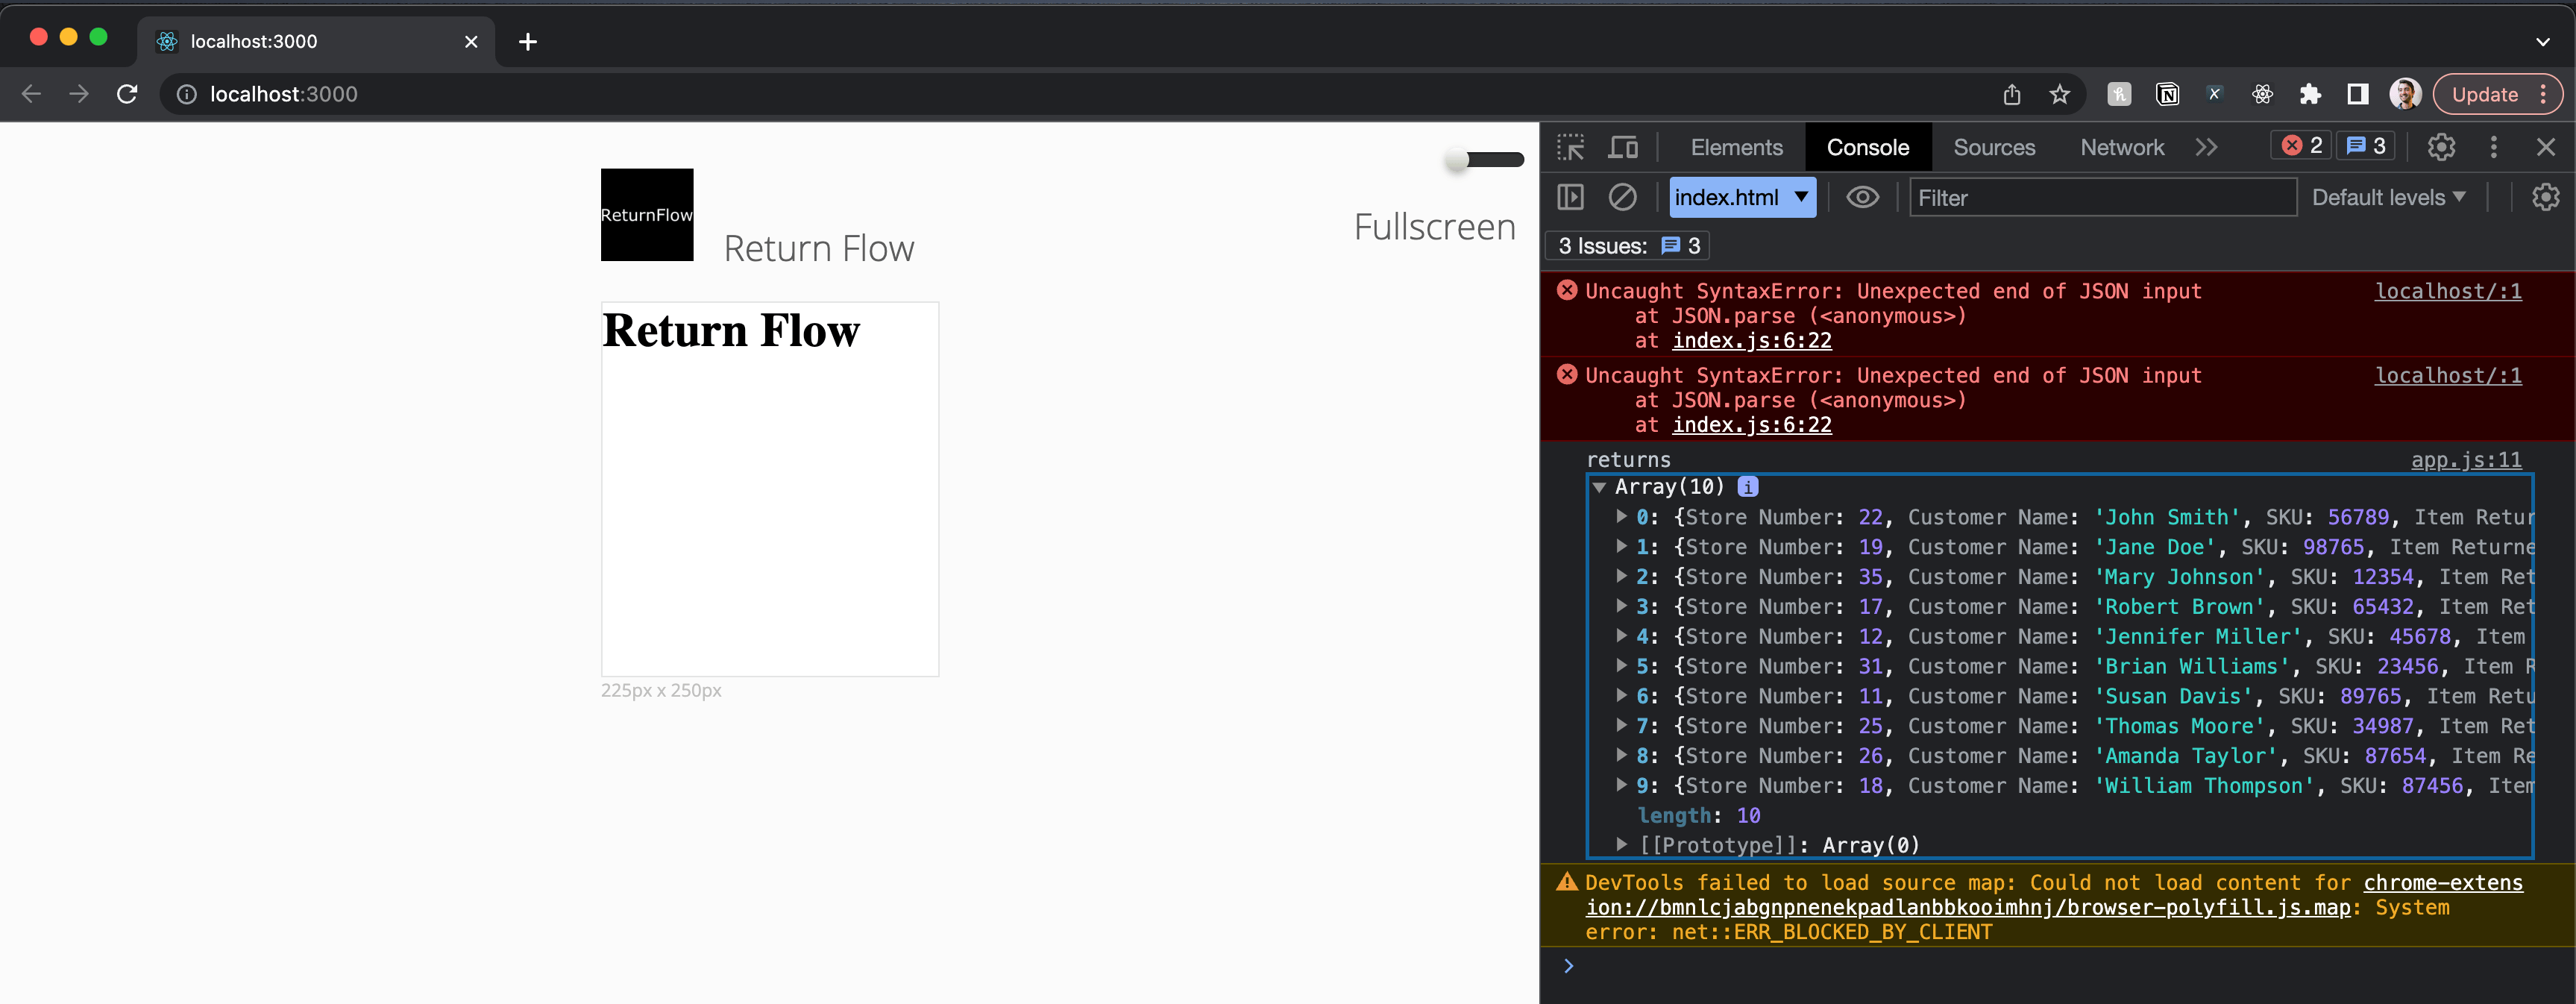 Great! We have a nice development environment ready to go and it's connected directy to data in Domo.
### Step 4: Add Item CSS
***
We'll be using the Bootstrap CSS library to provide some styles that will make the grid data we eventually display look cleaner.
The Bootstrap CDN can be found here: [https://www.bootstrapcdn.com/](https://www.bootstrapcdn.com/)
The Bootstrap component documentation here: [https://getbootstrap.com/](https://getbootstrap.com/)
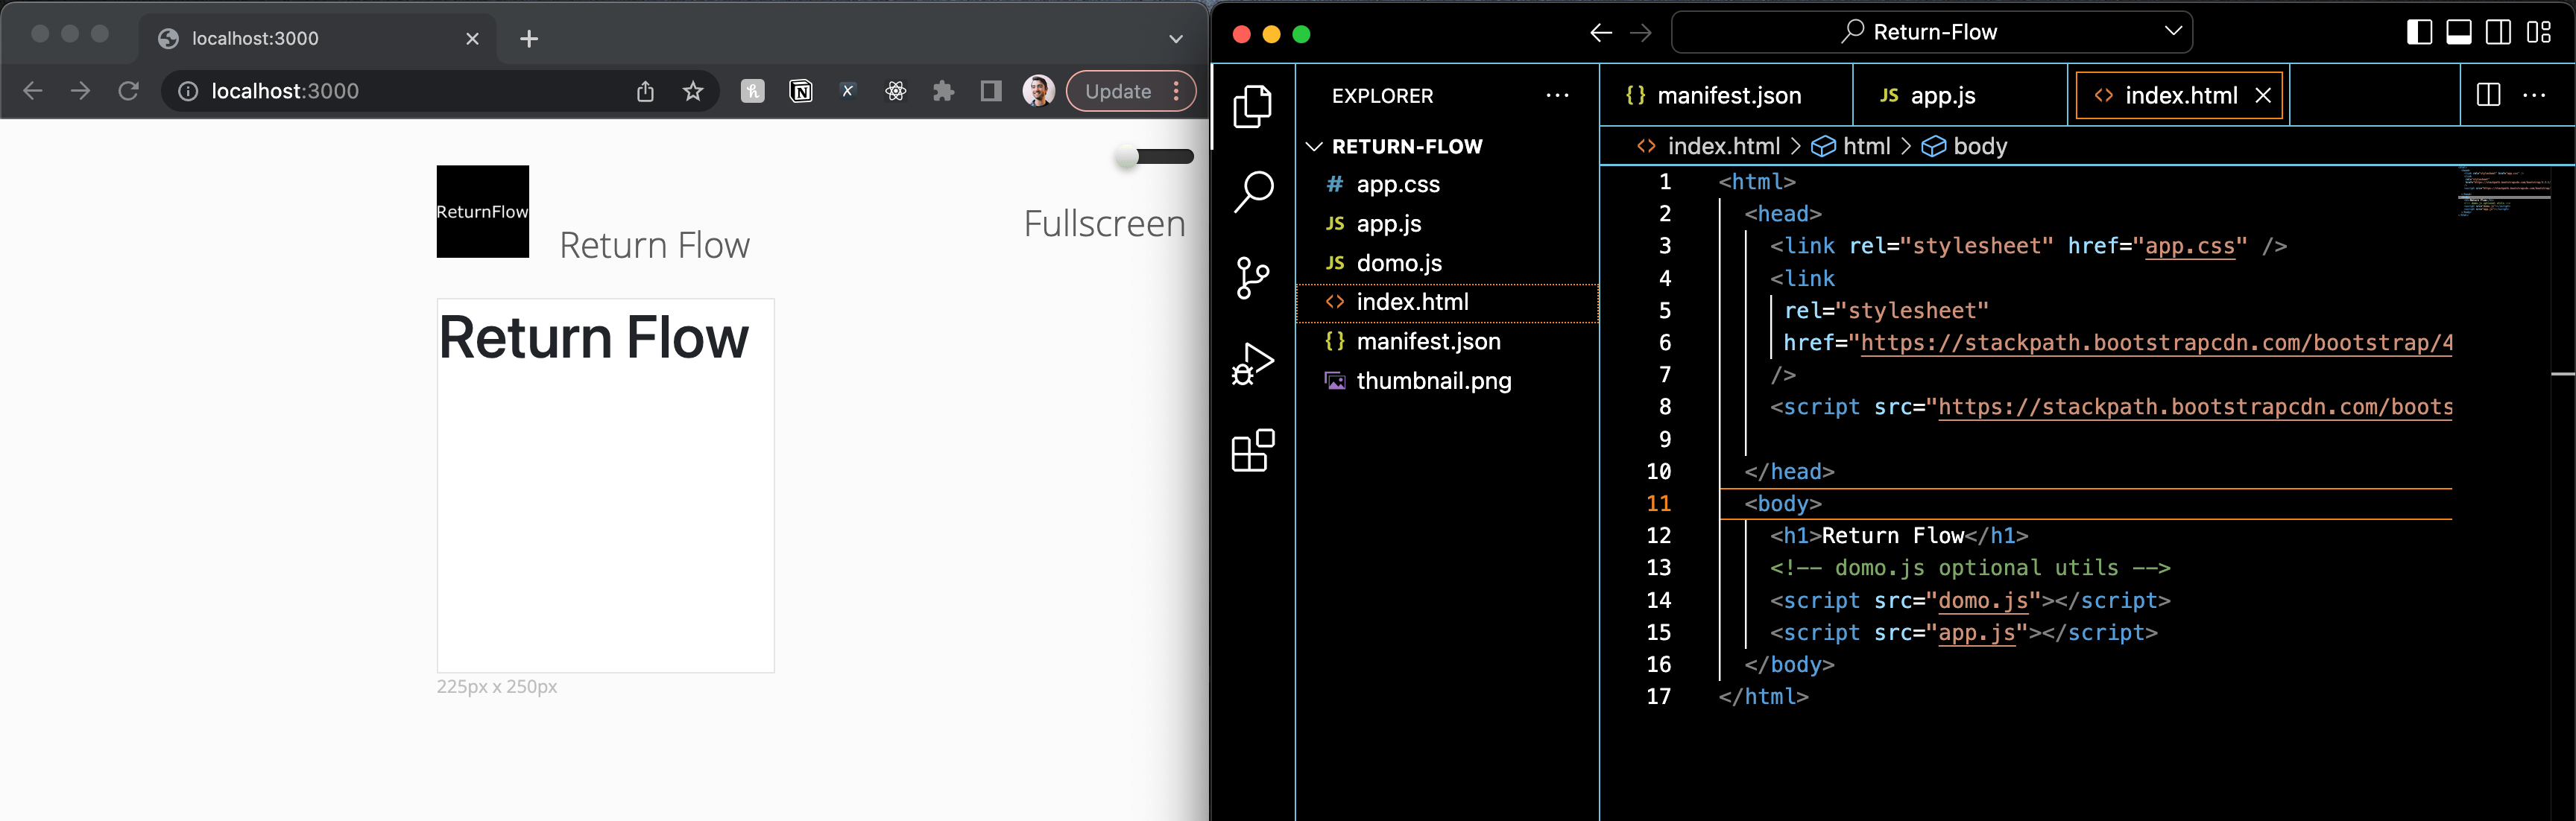
To pull in the Bootstrap library via CDN, add the following code to the `` tag in your `index.html` file.
```html theme={"dark"}
```
You should notice the font used in the App to change slightly.
Great! We have a nice development environment ready to go and it's connected directy to data in Domo.
### Step 4: Add Item CSS
***
We'll be using the Bootstrap CSS library to provide some styles that will make the grid data we eventually display look cleaner.
The Bootstrap CDN can be found here: [https://www.bootstrapcdn.com/](https://www.bootstrapcdn.com/)
The Bootstrap component documentation here: [https://getbootstrap.com/](https://getbootstrap.com/)
To pull in the Bootstrap library via CDN, add the following code to the `` tag in your `index.html` file.
```html theme={"dark"}
```
You should notice the font used in the App to change slightly.
 We can override the default Bootstrap styles with some custom CSS of our own. To do that, add the following to the `app.css` file.
```css theme={"dark"}
.header {
background-color: black;
color: white;
font-weight: 300;
padding: 15px;
}
.bodyContainer {
padding: 20px;
}
.itemContainer {
display: grid;
grid-template-columns: repeat(5, 20%);
align-items: center;
}
label {
font-weight: 400;
font-size: 12px;
text-transform: uppercase;
}
.sku {
font-size: 10px;
opacity: 0.7;
}
/** BOOTSTRAP OVERRIDES */
.list-group-item {
border: none;
border-bottom: 2px solid lightgray;
}
.list-group-item:last-child {
border-radius: 0px;
border: none;
}
.btn-link {
color: #17a2b8;
}
a {
color: #17a2b8;
font-size: 12px;
}
```
### Step 5: Update Manifest
***
#### Update the App Size
First, we can make our card bigger by editing the `manifest.json` file's size property.
```json theme={"dark"}
"size": {
"width": 4,
"height": 3
},
```
#### Update the DataSet Mapping
Next, the default information for the dataset mapping needs to be updated to include some additional information about the columns that we will be using in the app. Replace the `fields` array of the dataset in the `mapping` object:
```json theme={"dark"}
"fields": [
{
"alias": "storeNumber",
"columnName": "Store Number"
},
{
"alias": "customerName",
"columnName": "Customer Name"
},
{
"alias": "SKU",
"columnName": "SKU"
},
{
"alias": "itemReturned",
"columnName": "Item Returned"
},
{
"alias": "reasonForReturn",
"columnName": "Reason for Return"
}
]
```
#### Configure an AppDB Collection
We also want to define an AppDB collection where we can store data from user input. Define that collection using the below code snippet that can be added after the mapping array:
```json theme={"dark"}
"collections": [
{
"name": "comments",
"schema": {
"columns": [
{
"name": "id",
"type": "STRING"
},
{
"name": "user",
"type": "STRING"
},
{
"name": "postBody",
"type": "STRING"
}
]
},
"syncEnabled": true
}
],
```
This code will define a new collection named `comments` with three properties: `id`, `user`, and `postBody`. With the `syncEnabled` property set to true, this will also automatically sync our AppDB collection to a DataSet in Domo. For more on AppDB see the [AppDB API Reference](/portal/API-Reference/app-framework-apis/AppDB-API).
There's just one more update we need to make to the `manifest.json` file to ensure we can develop locally against our new AppDB collection: adding a `proxyId`.
You can find the `proxyId` of your App Instance in the Cards tab of the App Design. Go ahead and copy that id and add it to your `manifest.json` file.
We can override the default Bootstrap styles with some custom CSS of our own. To do that, add the following to the `app.css` file.
```css theme={"dark"}
.header {
background-color: black;
color: white;
font-weight: 300;
padding: 15px;
}
.bodyContainer {
padding: 20px;
}
.itemContainer {
display: grid;
grid-template-columns: repeat(5, 20%);
align-items: center;
}
label {
font-weight: 400;
font-size: 12px;
text-transform: uppercase;
}
.sku {
font-size: 10px;
opacity: 0.7;
}
/** BOOTSTRAP OVERRIDES */
.list-group-item {
border: none;
border-bottom: 2px solid lightgray;
}
.list-group-item:last-child {
border-radius: 0px;
border: none;
}
.btn-link {
color: #17a2b8;
}
a {
color: #17a2b8;
font-size: 12px;
}
```
### Step 5: Update Manifest
***
#### Update the App Size
First, we can make our card bigger by editing the `manifest.json` file's size property.
```json theme={"dark"}
"size": {
"width": 4,
"height": 3
},
```
#### Update the DataSet Mapping
Next, the default information for the dataset mapping needs to be updated to include some additional information about the columns that we will be using in the app. Replace the `fields` array of the dataset in the `mapping` object:
```json theme={"dark"}
"fields": [
{
"alias": "storeNumber",
"columnName": "Store Number"
},
{
"alias": "customerName",
"columnName": "Customer Name"
},
{
"alias": "SKU",
"columnName": "SKU"
},
{
"alias": "itemReturned",
"columnName": "Item Returned"
},
{
"alias": "reasonForReturn",
"columnName": "Reason for Return"
}
]
```
#### Configure an AppDB Collection
We also want to define an AppDB collection where we can store data from user input. Define that collection using the below code snippet that can be added after the mapping array:
```json theme={"dark"}
"collections": [
{
"name": "comments",
"schema": {
"columns": [
{
"name": "id",
"type": "STRING"
},
{
"name": "user",
"type": "STRING"
},
{
"name": "postBody",
"type": "STRING"
}
]
},
"syncEnabled": true
}
],
```
This code will define a new collection named `comments` with three properties: `id`, `user`, and `postBody`. With the `syncEnabled` property set to true, this will also automatically sync our AppDB collection to a DataSet in Domo. For more on AppDB see the [AppDB API Reference](/portal/API-Reference/app-framework-apis/AppDB-API).
There's just one more update we need to make to the `manifest.json` file to ensure we can develop locally against our new AppDB collection: adding a `proxyId`.
You can find the `proxyId` of your App Instance in the Cards tab of the App Design. Go ahead and copy that id and add it to your `manifest.json` file.
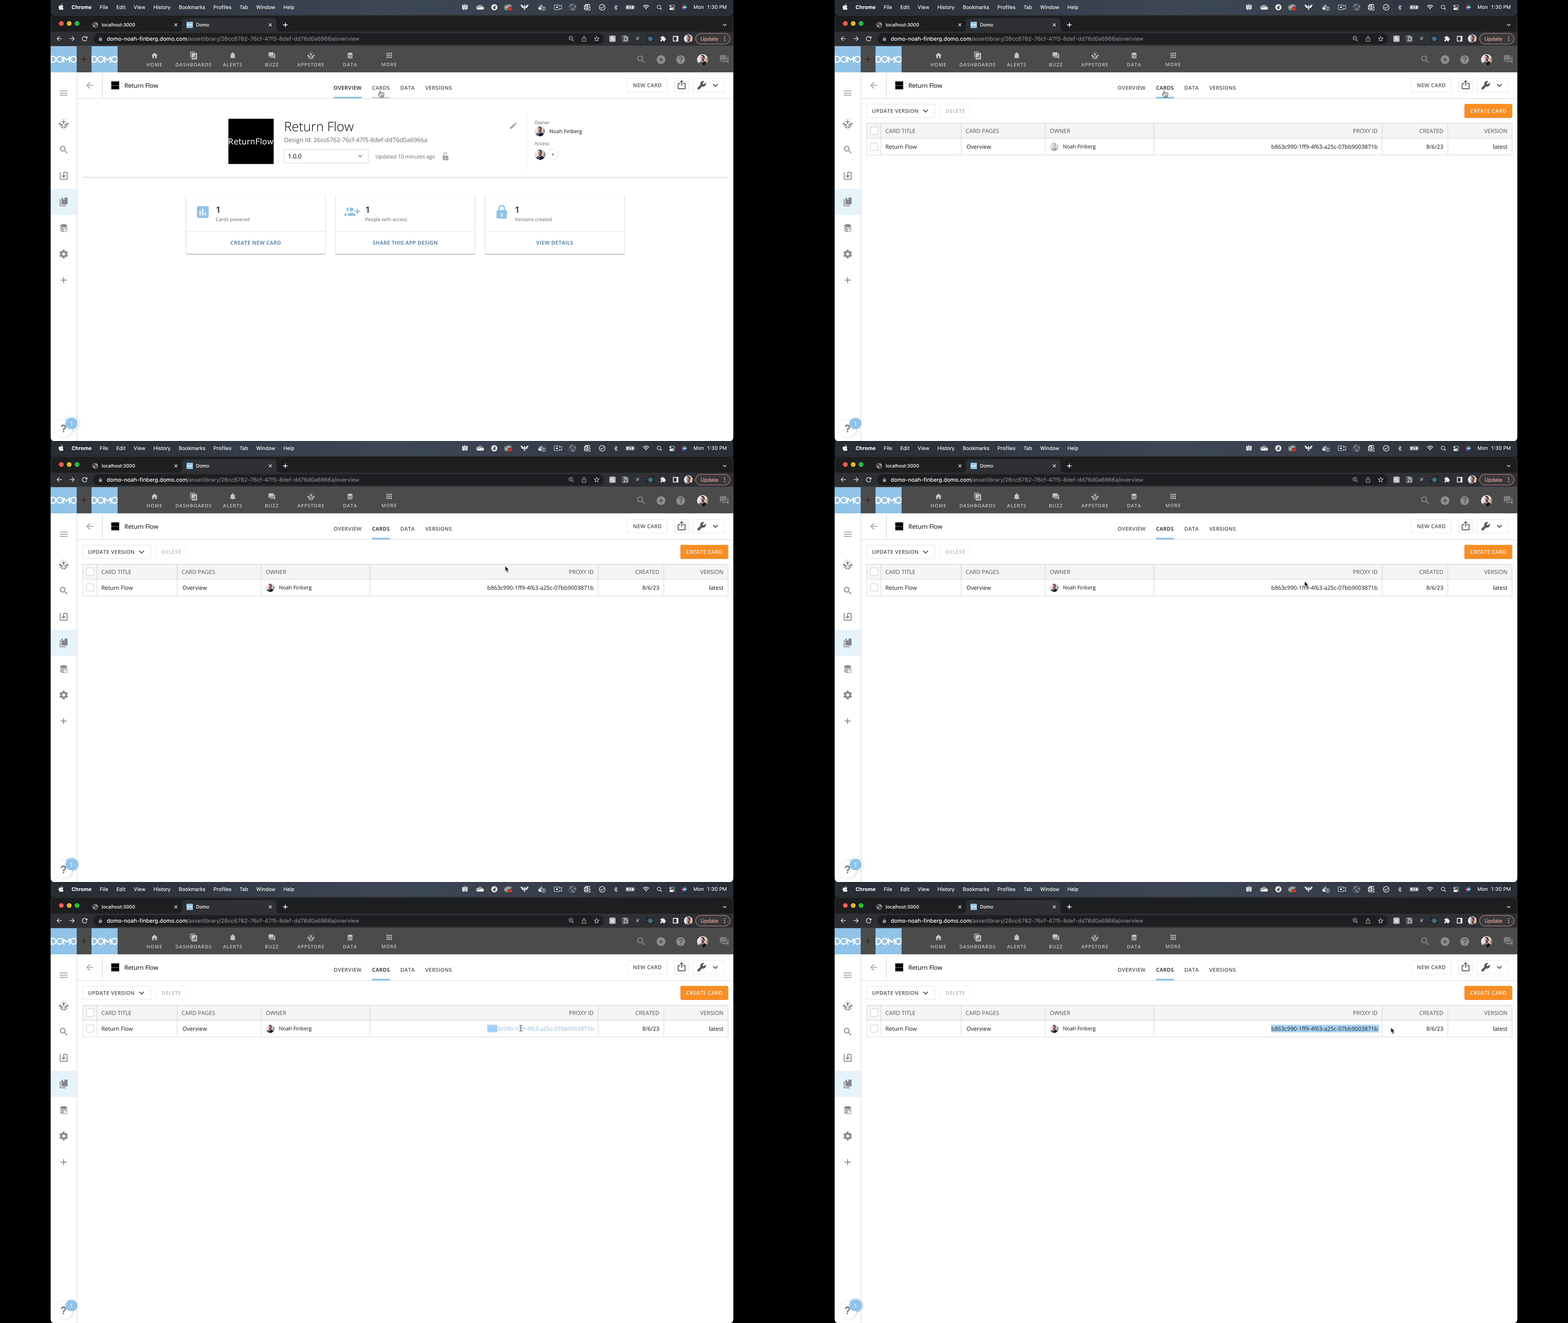 Your final `manifest.json` file should now look something like this:
```json theme={"dark"}
{
"name": "Return Flow",
"version": "1.0.0",
"size": {
"width": 4,
"height": 3
},
"mapping": [
{
"dataSetId": "77b63b77-540a-407e-b217-78f0b262596c",
"alias": "returns",
"fields": [
{
"alias": "storeNumber",
"columnName": "Store Number"
},
{
"alias": "customerName",
"columnName": "Customer Name"
},
{
"alias": "SKU",
"columnName": "SKU"
},
{
"alias": "itemReturned",
"columnName": "Item Returned"
},
{
"alias": "reasonForReturn",
"columnName": "Reason for Return"
}
]
}
],
"collections": [
{
"name": "comments",
"schema": {
"columns": [
{
"name": "id",
"type": "STRING"
},
{
"name": "user",
"type": "STRING"
},
{
"name": "postBody",
"type": "STRING"
}
]
},
"syncEnabled": true
}
],
"fileName": "manifest.json",
"id": "26cc6762-76cf-47f5-8def-dd76d0a6966a",
"proxyId": "b863c990-1ff9-4f63-a25c-07bb9003871b"
}
```
#### Publish the App
Let's publish our changes to our App Design in Domo so we can see the new Data Mapping and AppDB Collection reflected there.
Stop the local server with `Command-C` (Mac) or `Control-C` (Windows). Then run `domo publish`.
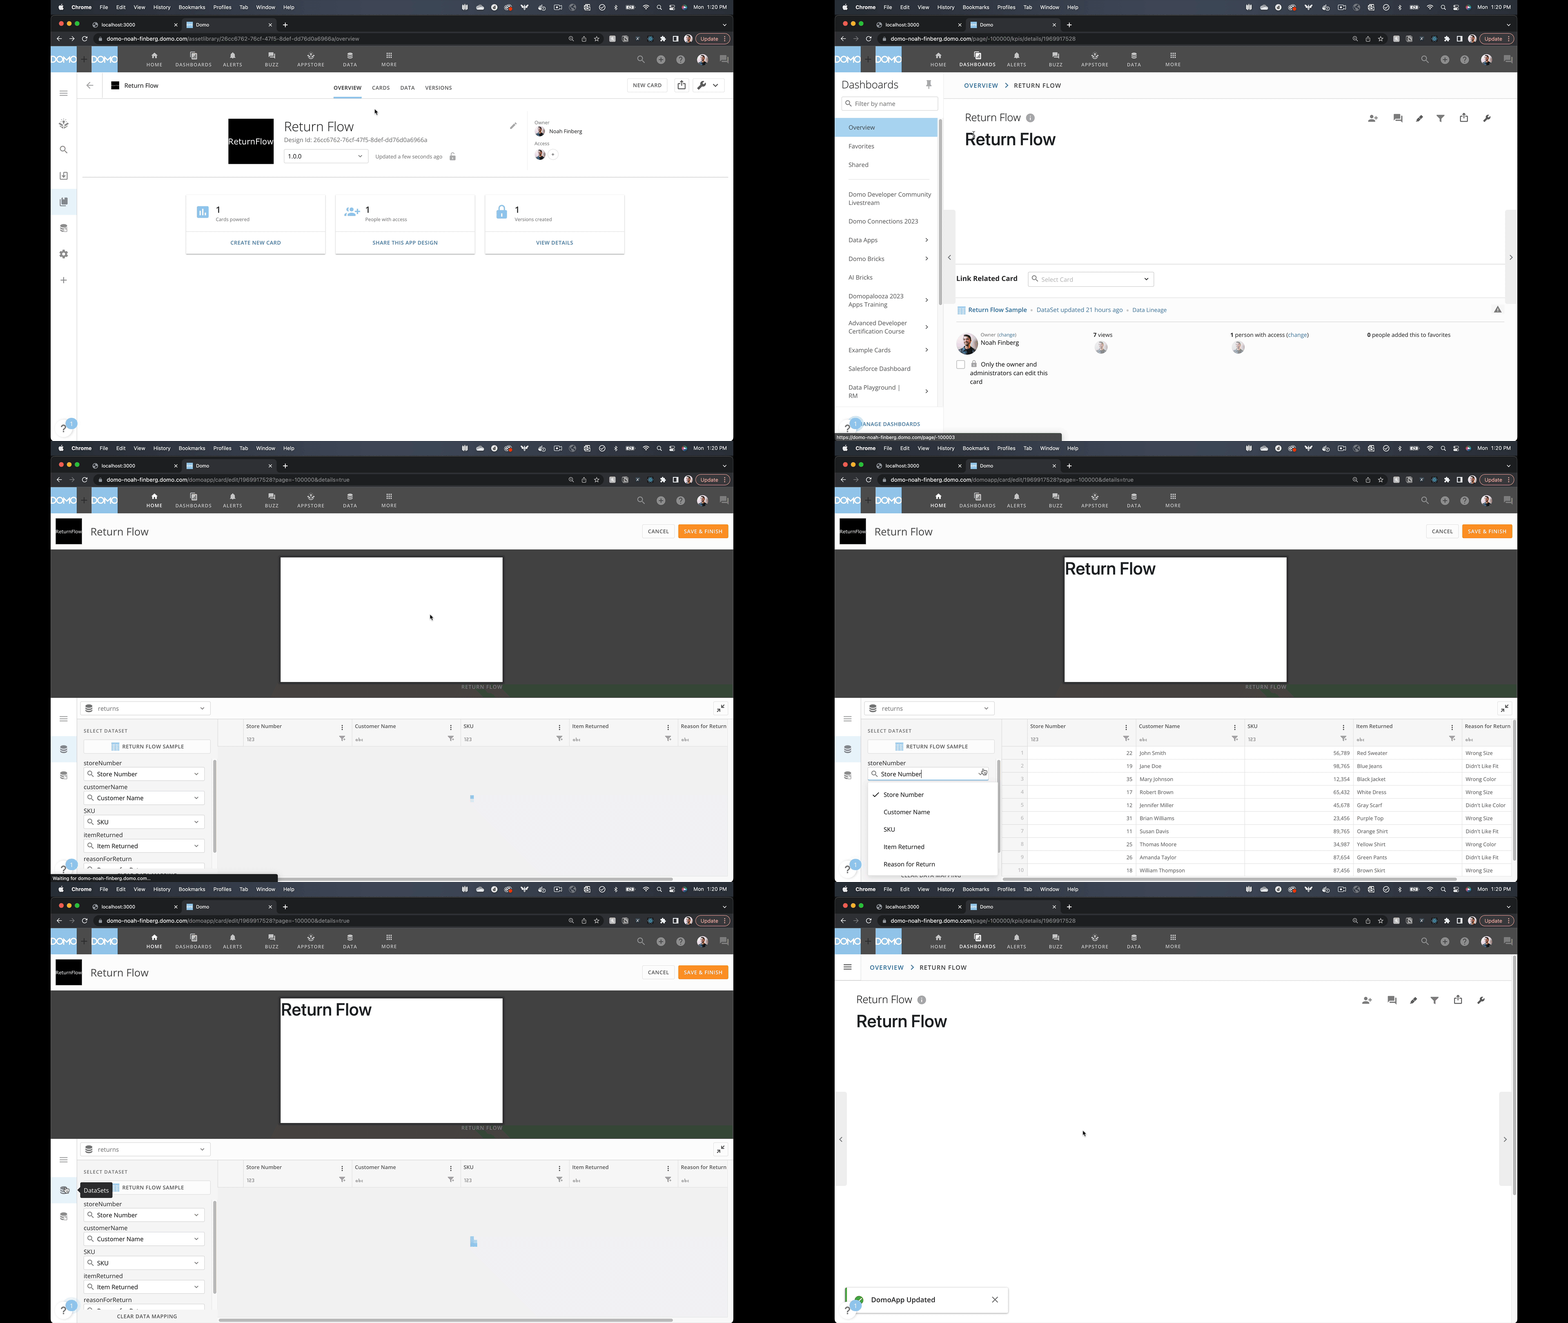
If you look at your App Design, go to the Card where you App Instance lives, and then click "Edit Card" you can see that the Mapping on the Wiring Screen has changed. You can now select which columns in your connected DataSet map to which column aliases. You should also see a new AppDB collection called `comments`, which has and empty array of data to start `[]`.
Your final `manifest.json` file should now look something like this:
```json theme={"dark"}
{
"name": "Return Flow",
"version": "1.0.0",
"size": {
"width": 4,
"height": 3
},
"mapping": [
{
"dataSetId": "77b63b77-540a-407e-b217-78f0b262596c",
"alias": "returns",
"fields": [
{
"alias": "storeNumber",
"columnName": "Store Number"
},
{
"alias": "customerName",
"columnName": "Customer Name"
},
{
"alias": "SKU",
"columnName": "SKU"
},
{
"alias": "itemReturned",
"columnName": "Item Returned"
},
{
"alias": "reasonForReturn",
"columnName": "Reason for Return"
}
]
}
],
"collections": [
{
"name": "comments",
"schema": {
"columns": [
{
"name": "id",
"type": "STRING"
},
{
"name": "user",
"type": "STRING"
},
{
"name": "postBody",
"type": "STRING"
}
]
},
"syncEnabled": true
}
],
"fileName": "manifest.json",
"id": "26cc6762-76cf-47f5-8def-dd76d0a6966a",
"proxyId": "b863c990-1ff9-4f63-a25c-07bb9003871b"
}
```
#### Publish the App
Let's publish our changes to our App Design in Domo so we can see the new Data Mapping and AppDB Collection reflected there.
Stop the local server with `Command-C` (Mac) or `Control-C` (Windows). Then run `domo publish`.
If you look at your App Design, go to the Card where you App Instance lives, and then click "Edit Card" you can see that the Mapping on the Wiring Screen has changed. You can now select which columns in your connected DataSet map to which column aliases. You should also see a new AppDB collection called `comments`, which has and empty array of data to start `[]`.
 ### Step 6: Add some boilerplate HTML structure
***
Start your development server again using the `domo dev` command.
Then, replace the `
### Step 6: Add some boilerplate HTML structure
***
Start your development server again using the `domo dev` command.
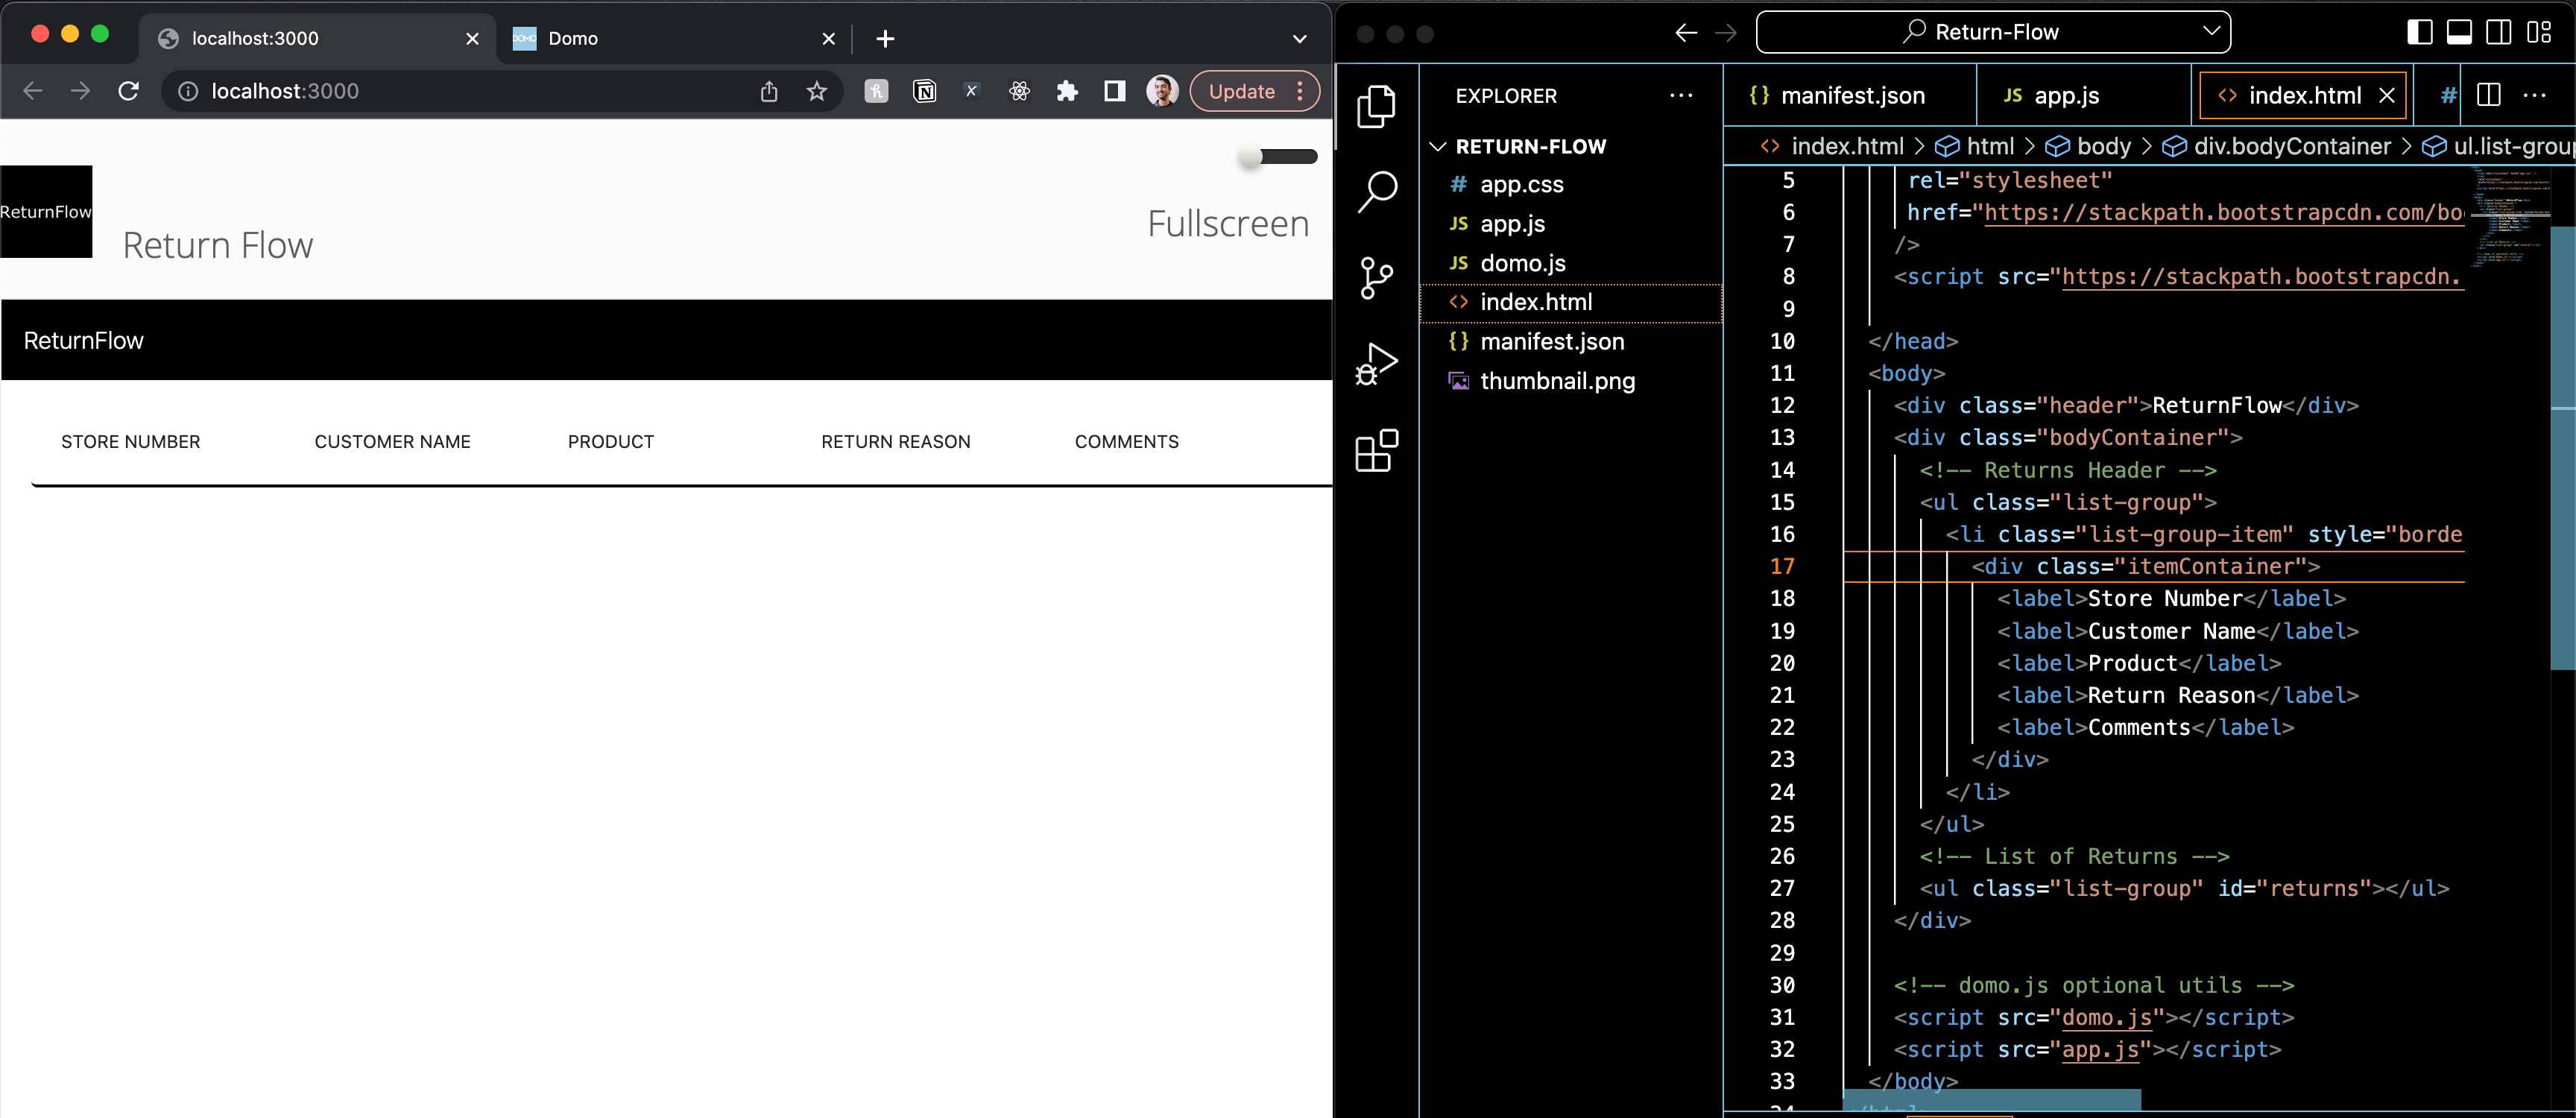
Then, replace the `ReturnFlow
{/* Returns Header */}
```
This will setup the structure of our grid table that will display the data that we will be fetching from the sample returns dataset.
 ### Step 7: Fetch Returns Data
***
Replace the existing `domo.get()` call with the following defined async function in the `app.js` file:
```javascript theme={"dark"}
async function loadData() {
const returns = await domo.get('/data/v1/returns?limit=100');
const returnsElement = document.querySelector('#returns');
returns.forEach((item, index) => {
const row = document.createElement('li');
row.setAttribute('class', 'list-group-item'); // bootstrap class name
row.innerHTML = generateRow(item, index);
returnsElement.appendChild(row);
});
}
```
The above code references a function called `generateRow()` which has not yet been defined. Define it below the `loadData()` function to give your app a way to generate html structure for each row of data returned from the dataset:
```javascript theme={"dark"}
function generateRow(item, index) {
return `
{/* Row of Return Data */}
### Step 7: Fetch Returns Data
***
Replace the existing `domo.get()` call with the following defined async function in the `app.js` file:
```javascript theme={"dark"}
async function loadData() {
const returns = await domo.get('/data/v1/returns?limit=100');
const returnsElement = document.querySelector('#returns');
returns.forEach((item, index) => {
const row = document.createElement('li');
row.setAttribute('class', 'list-group-item'); // bootstrap class name
row.innerHTML = generateRow(item, index);
returnsElement.appendChild(row);
});
}
```
The above code references a function called `generateRow()` which has not yet been defined. Define it below the `loadData()` function to give your app a way to generate html structure for each row of data returned from the dataset:
```javascript theme={"dark"}
function generateRow(item, index) {
return `
{/* Row of Return Data */}
${item.storeNumber}
${item.customerName}
${item.itemReturned}
#${item.SKU}
${item.reasonForReturn}
0
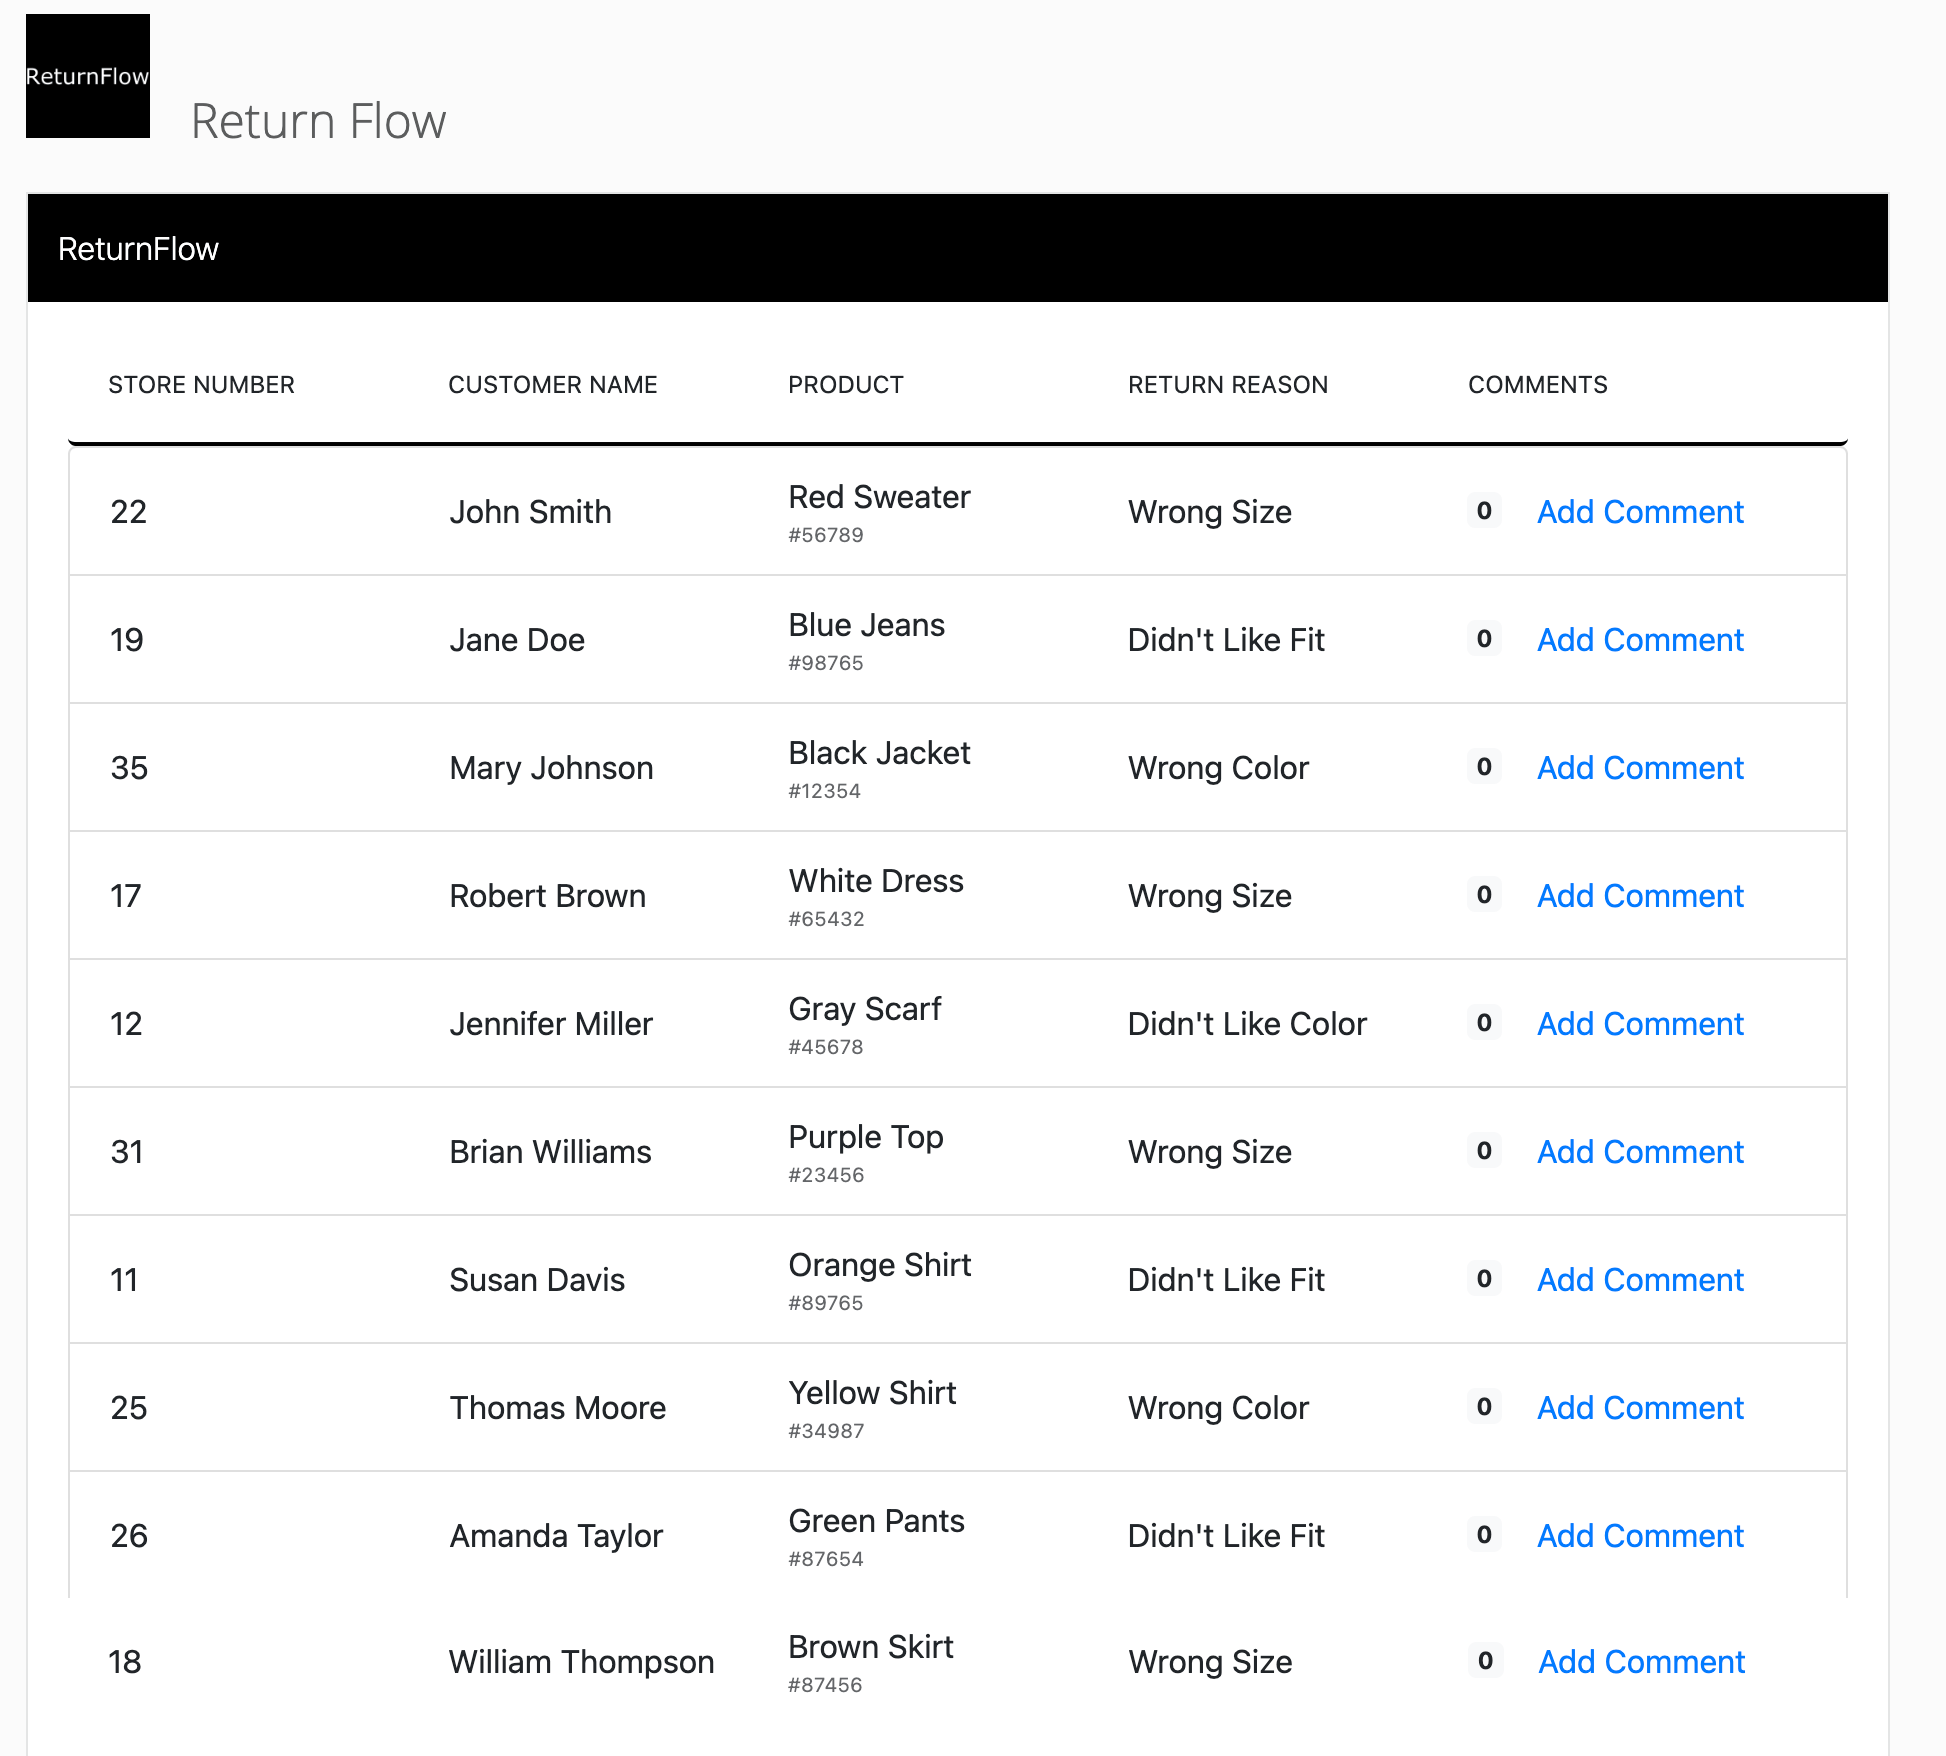 However, the "Add Comments" link doesn't do anything yet. Let's work on that next.
### Step 8 Show Comment Section
***
In the `app.js` file add an `onClick` handler to the `button` HTML in the `generateRow()` function as follows.
```html theme={"dark"}
```
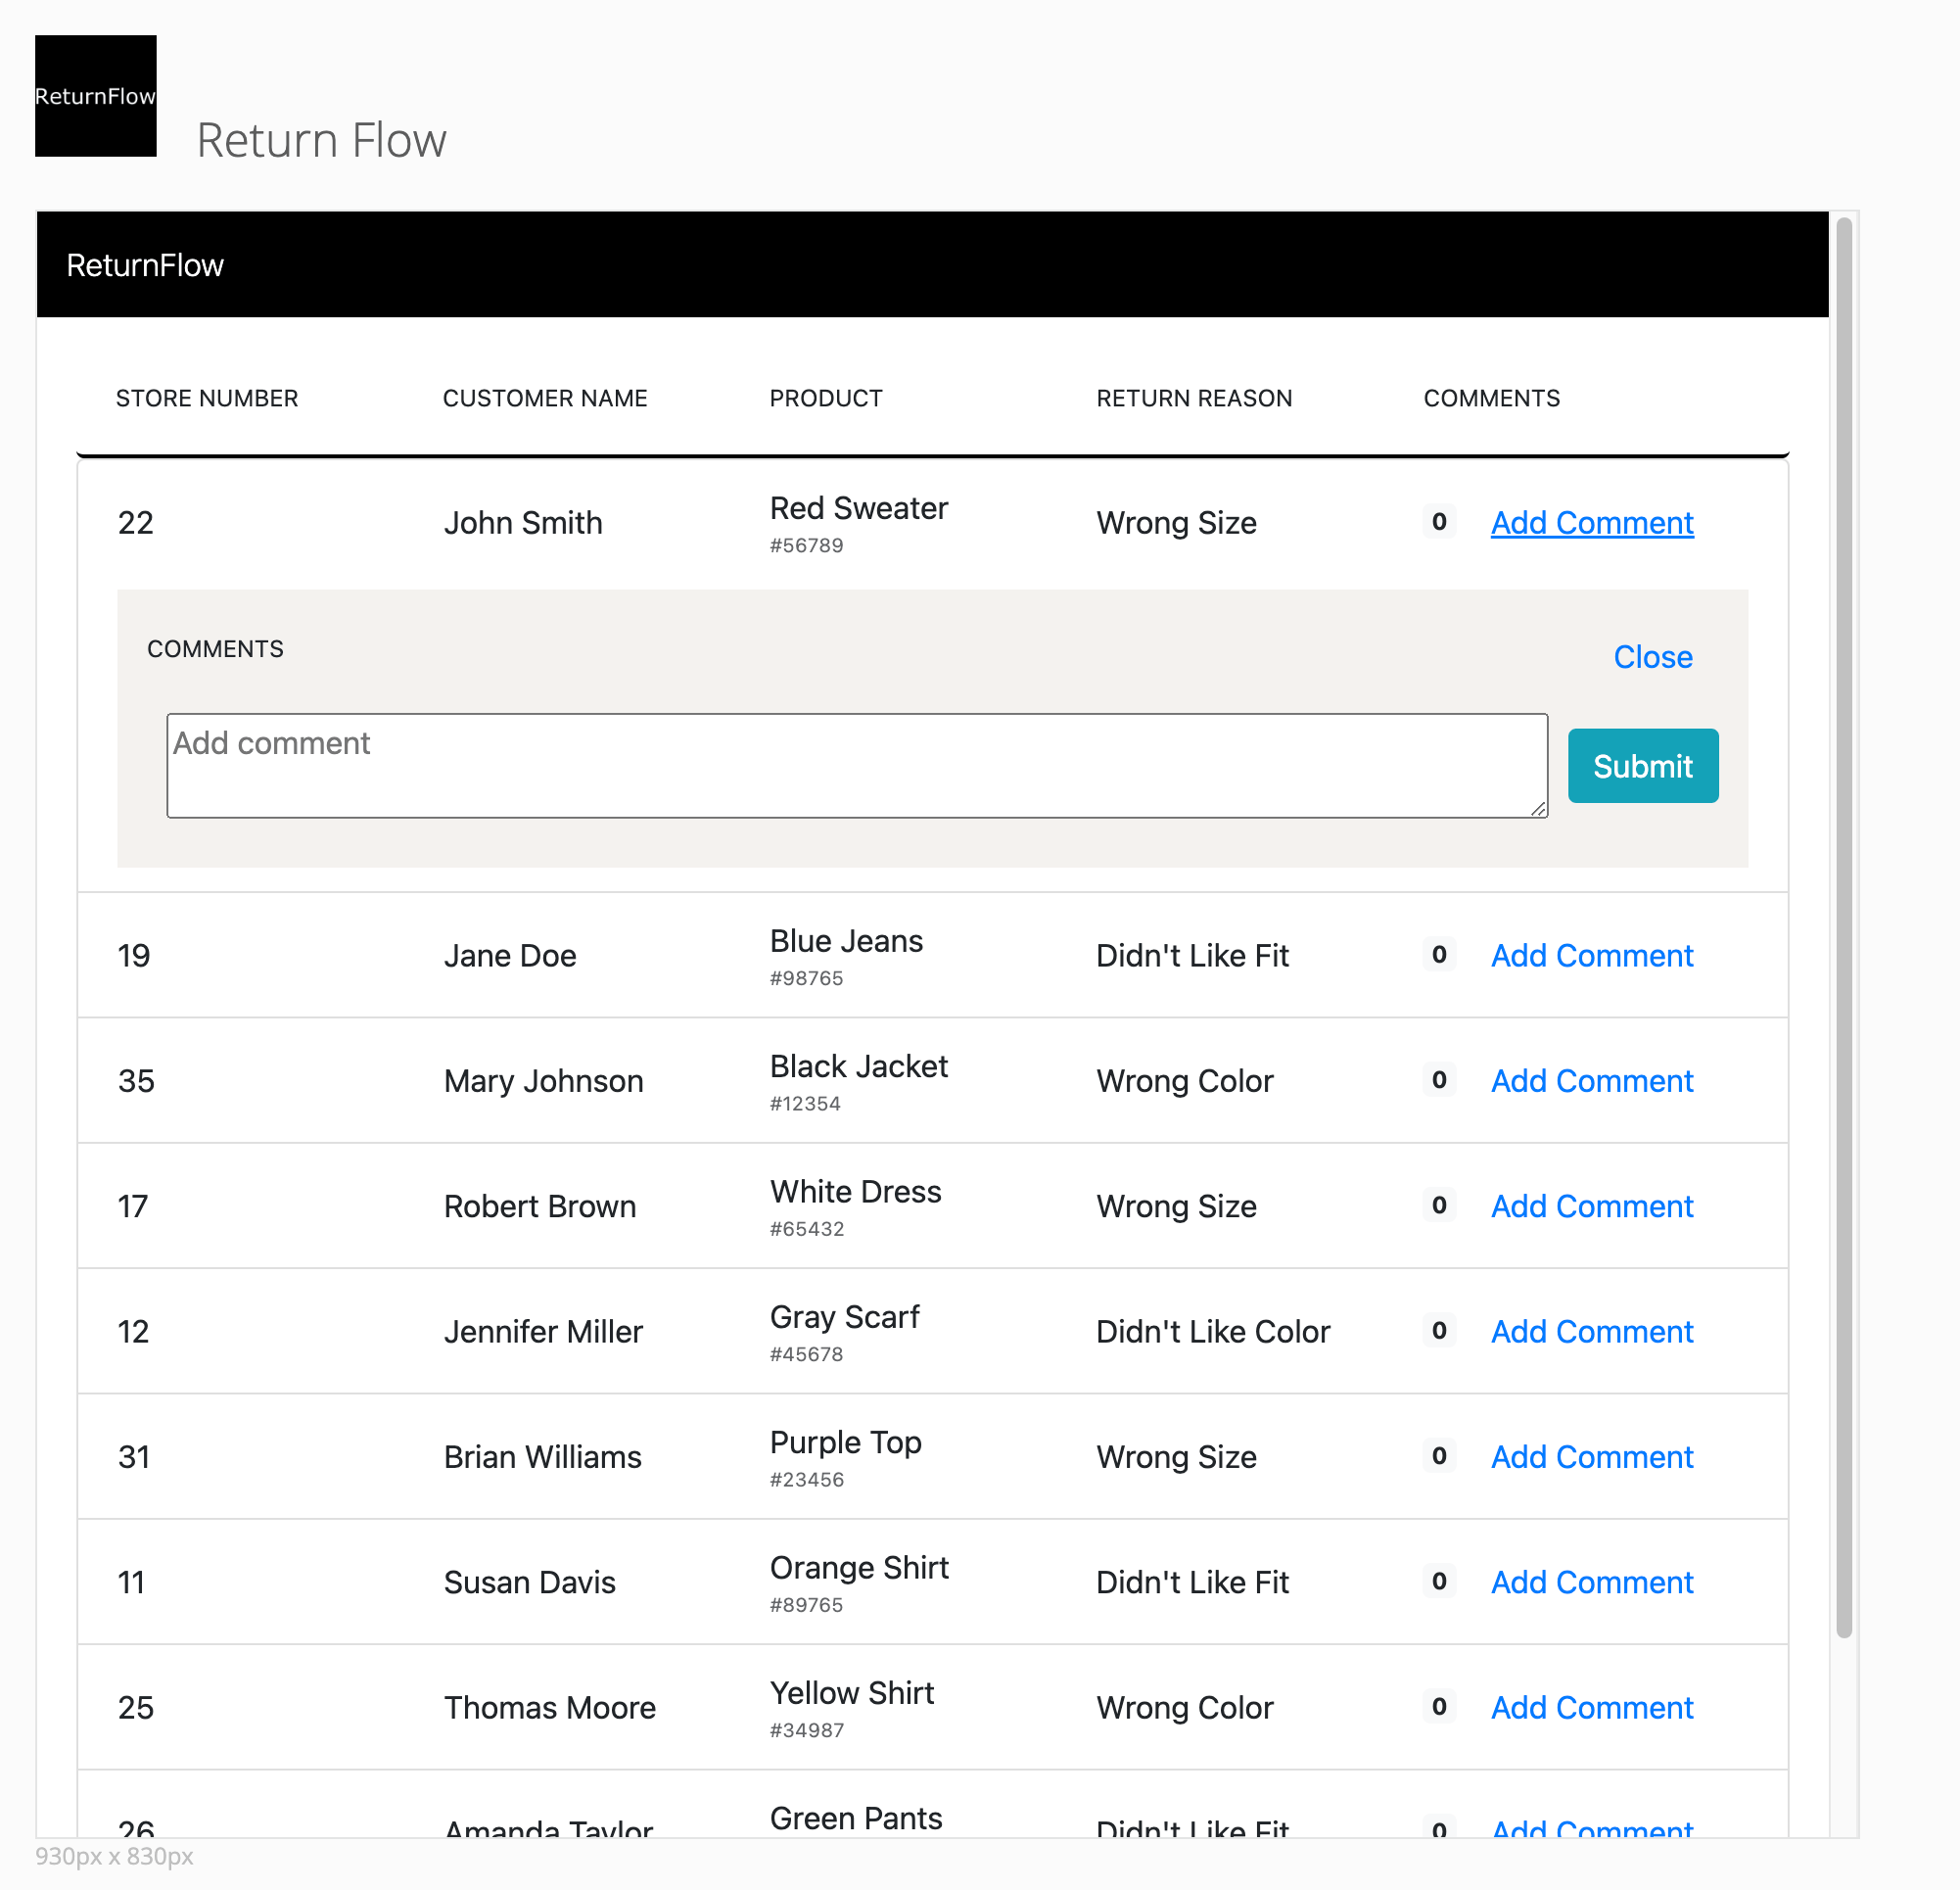
Notice that it is calling a function called `modifyCommentsContainer()` that will set a comment container’s visibility property to true. We need to define that function at the bottom of the `app.js` file using the below code.
```javascript theme={"dark"}
function modifyCommentsContainer(index, className) {
const commentContainer = document.querySelector(
`#commentsContainer-${index}`,
);
commentContainer.setAttribute('class', className);
}
```
This code references an html element called `commentsContainer` that should be created for each row in our dataset. We need to ensure that this container is defined when generating each row of data. To do this, update the `generateRow()` function to look like this:
```javascript theme={"dark"}
function generateRow(item, index) {
return `
{/* Row of Return Data */}
However, the "Add Comments" link doesn't do anything yet. Let's work on that next.
### Step 8 Show Comment Section
***
In the `app.js` file add an `onClick` handler to the `button` HTML in the `generateRow()` function as follows.
```html theme={"dark"}
```
Notice that it is calling a function called `modifyCommentsContainer()` that will set a comment container’s visibility property to true. We need to define that function at the bottom of the `app.js` file using the below code.
```javascript theme={"dark"}
function modifyCommentsContainer(index, className) {
const commentContainer = document.querySelector(
`#commentsContainer-${index}`,
);
commentContainer.setAttribute('class', className);
}
```
This code references an html element called `commentsContainer` that should be created for each row in our dataset. We need to ensure that this container is defined when generating each row of data. To do this, update the `generateRow()` function to look like this:
```javascript theme={"dark"}
function generateRow(item, index) {
return `
{/* Row of Return Data */}
${item.storeNumber}
${item.customerName}
${item.itemReturned}
#${item.SKU}
${item.reasonForReturn}
0
 ### Step 9: Create Comment Data
***
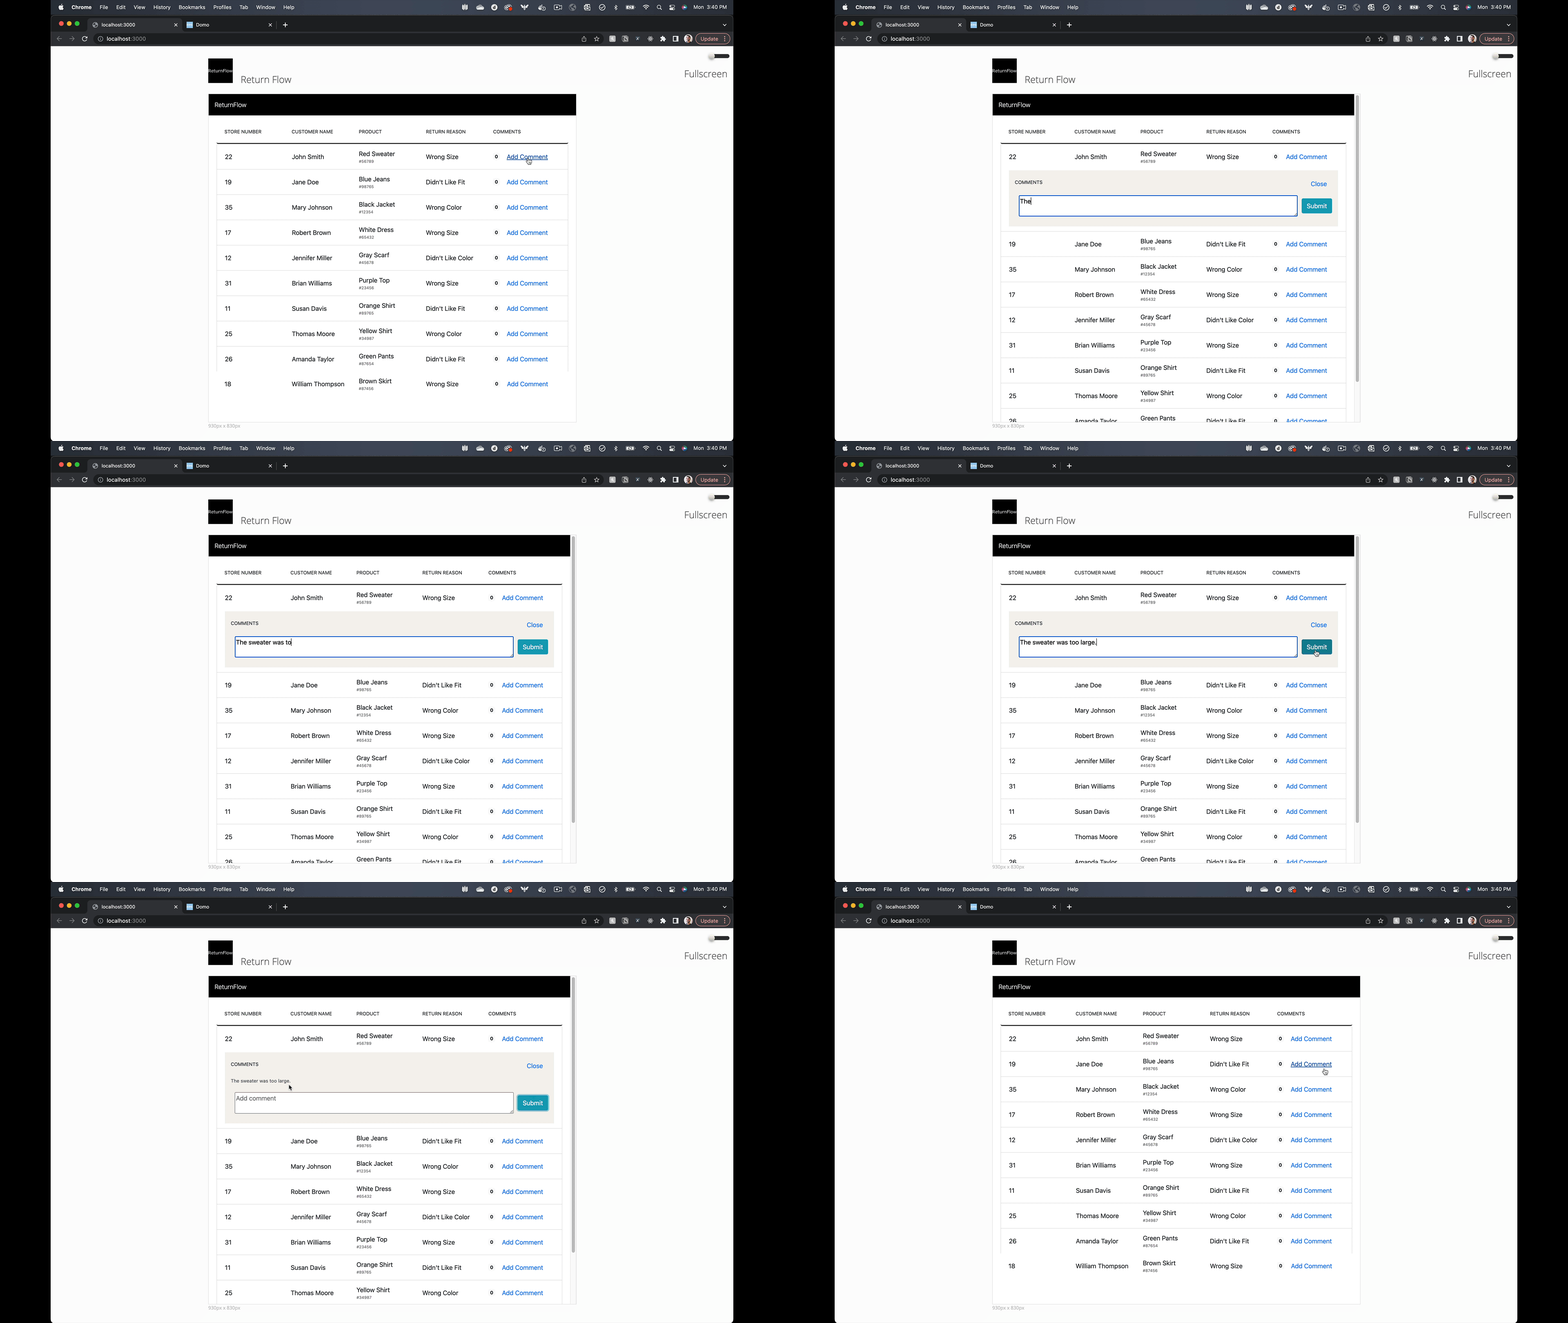
Modify the `onClick` handler for the submit button inside the `generateRow()` function in `app.js` as follows:
```html theme={"dark"}
### Step 9: Create Comment Data
***
Modify the `onClick` handler for the submit button inside the `generateRow()` function in `app.js` as follows:
```html theme={"dark"}
${item.storeNumber}
${item.customerName}
${item.itemReturned}
#${item.SKU}
${item.reasonForReturn}
0
 ### Step 10: Fetch comment data
***
To fetch our comment data, we'll make a get request to our AppDB collection like this:
```javascript theme={"dark"}
const commentDocuments = await domo.get(
'/domo/datastores/v1/collections/comments/documents',
);
```
We'll add this code to the `loadData()` function and pass our `commentDocuments` to our `generateRow()` function:
```javascript theme={"dark"}
async function loadData() {
const returns = await domo.get('/data/v1/returns?limit=100');
const commentDocuments = await domo.get(
'/domo/datastores/v1/collections/comments/documents',
);
const returnsElement = document.querySelector('#returns');
returns.forEach((item, index) => {
const row = document.createElement('li');
row.setAttribute('class', 'list-group-item'); // bootstrap class name
row.innerHTML = generateRow(item, index, commentDocuments);
returnsElement.appendChild(row);
});
}
```
Now that the `generateRow()` function has access to the `commentDocuments` that were passed in, it will need to filter those documents down to just the documents that apply to that row. Add the following filter expression at the top of the `generateRow()` function:
```javascript theme={"dark"}
function generateRow(item, index, commentDocuments) {
const filteredComments = commentDocuments.filter(
(commentDocument) => commentDocument.content.id == index,
);
return `
{/* Row of Return Data */}
### Step 10: Fetch comment data
***
To fetch our comment data, we'll make a get request to our AppDB collection like this:
```javascript theme={"dark"}
const commentDocuments = await domo.get(
'/domo/datastores/v1/collections/comments/documents',
);
```
We'll add this code to the `loadData()` function and pass our `commentDocuments` to our `generateRow()` function:
```javascript theme={"dark"}
async function loadData() {
const returns = await domo.get('/data/v1/returns?limit=100');
const commentDocuments = await domo.get(
'/domo/datastores/v1/collections/comments/documents',
);
const returnsElement = document.querySelector('#returns');
returns.forEach((item, index) => {
const row = document.createElement('li');
row.setAttribute('class', 'list-group-item'); // bootstrap class name
row.innerHTML = generateRow(item, index, commentDocuments);
returnsElement.appendChild(row);
});
}
```
Now that the `generateRow()` function has access to the `commentDocuments` that were passed in, it will need to filter those documents down to just the documents that apply to that row. Add the following filter expression at the top of the `generateRow()` function:
```javascript theme={"dark"}
function generateRow(item, index, commentDocuments) {
const filteredComments = commentDocuments.filter(
(commentDocument) => commentDocument.content.id == index,
);
return `
{/* Row of Return Data */}
${item.storeNumber}
${item.customerName}
${item.itemReturned}
#${item.SKU}
${item.reasonForReturn}
0
${filteredComments.map((commentDocument) =>
`${generateCommentElement(commentDocument)} `).join("") }
```
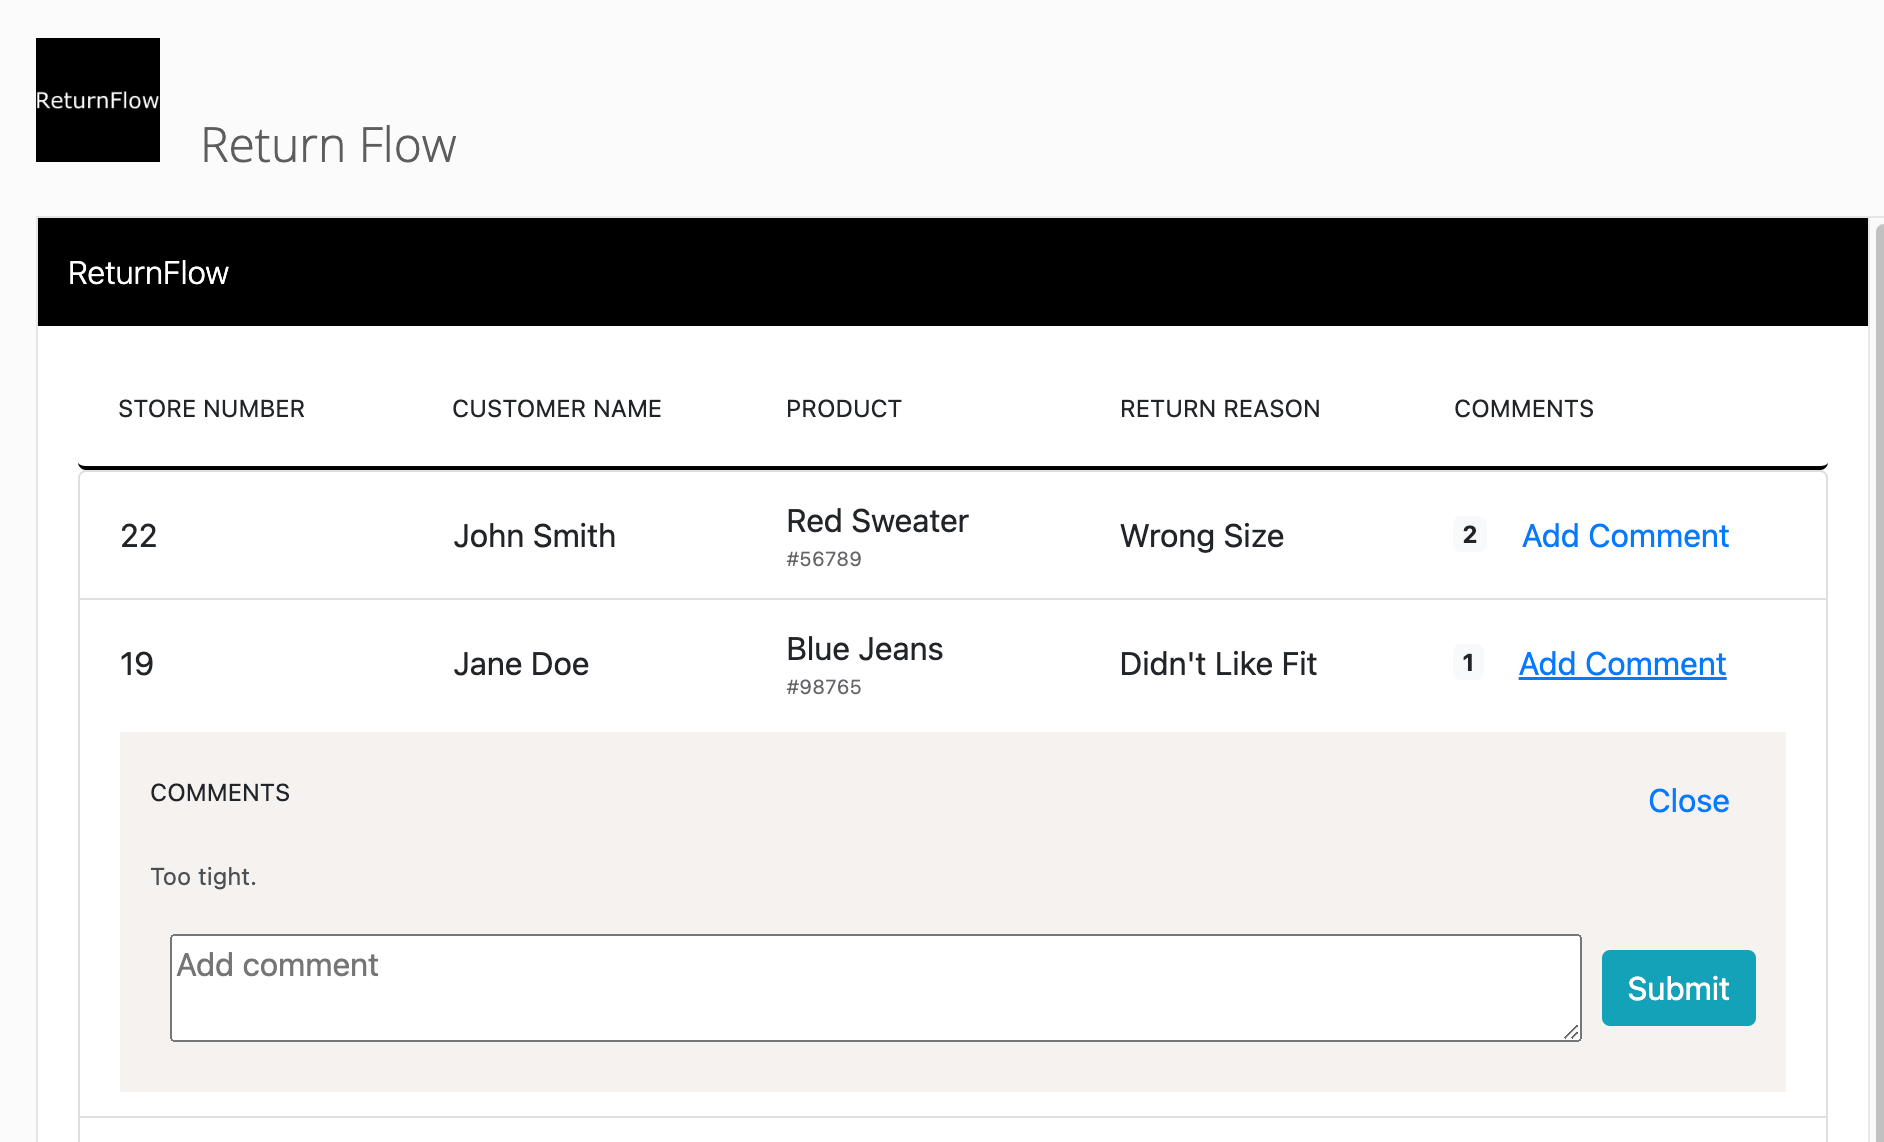
Your entire `generateRow()` function should now look like this:
```javascript theme={"dark"}
function generateRow(item, index, commentDocuments) {
const filteredComments = commentDocuments.filter(
(commentDocument) => commentDocument.content.id == index,
);
return `
{/* Row of Return Data */}
${item.storeNumber}
${item.customerName}
${item.itemReturned}
#${item.SKU}
${item.reasonForReturn}
${filteredComments.length}
 ### Step 11 - Add Avatars
***
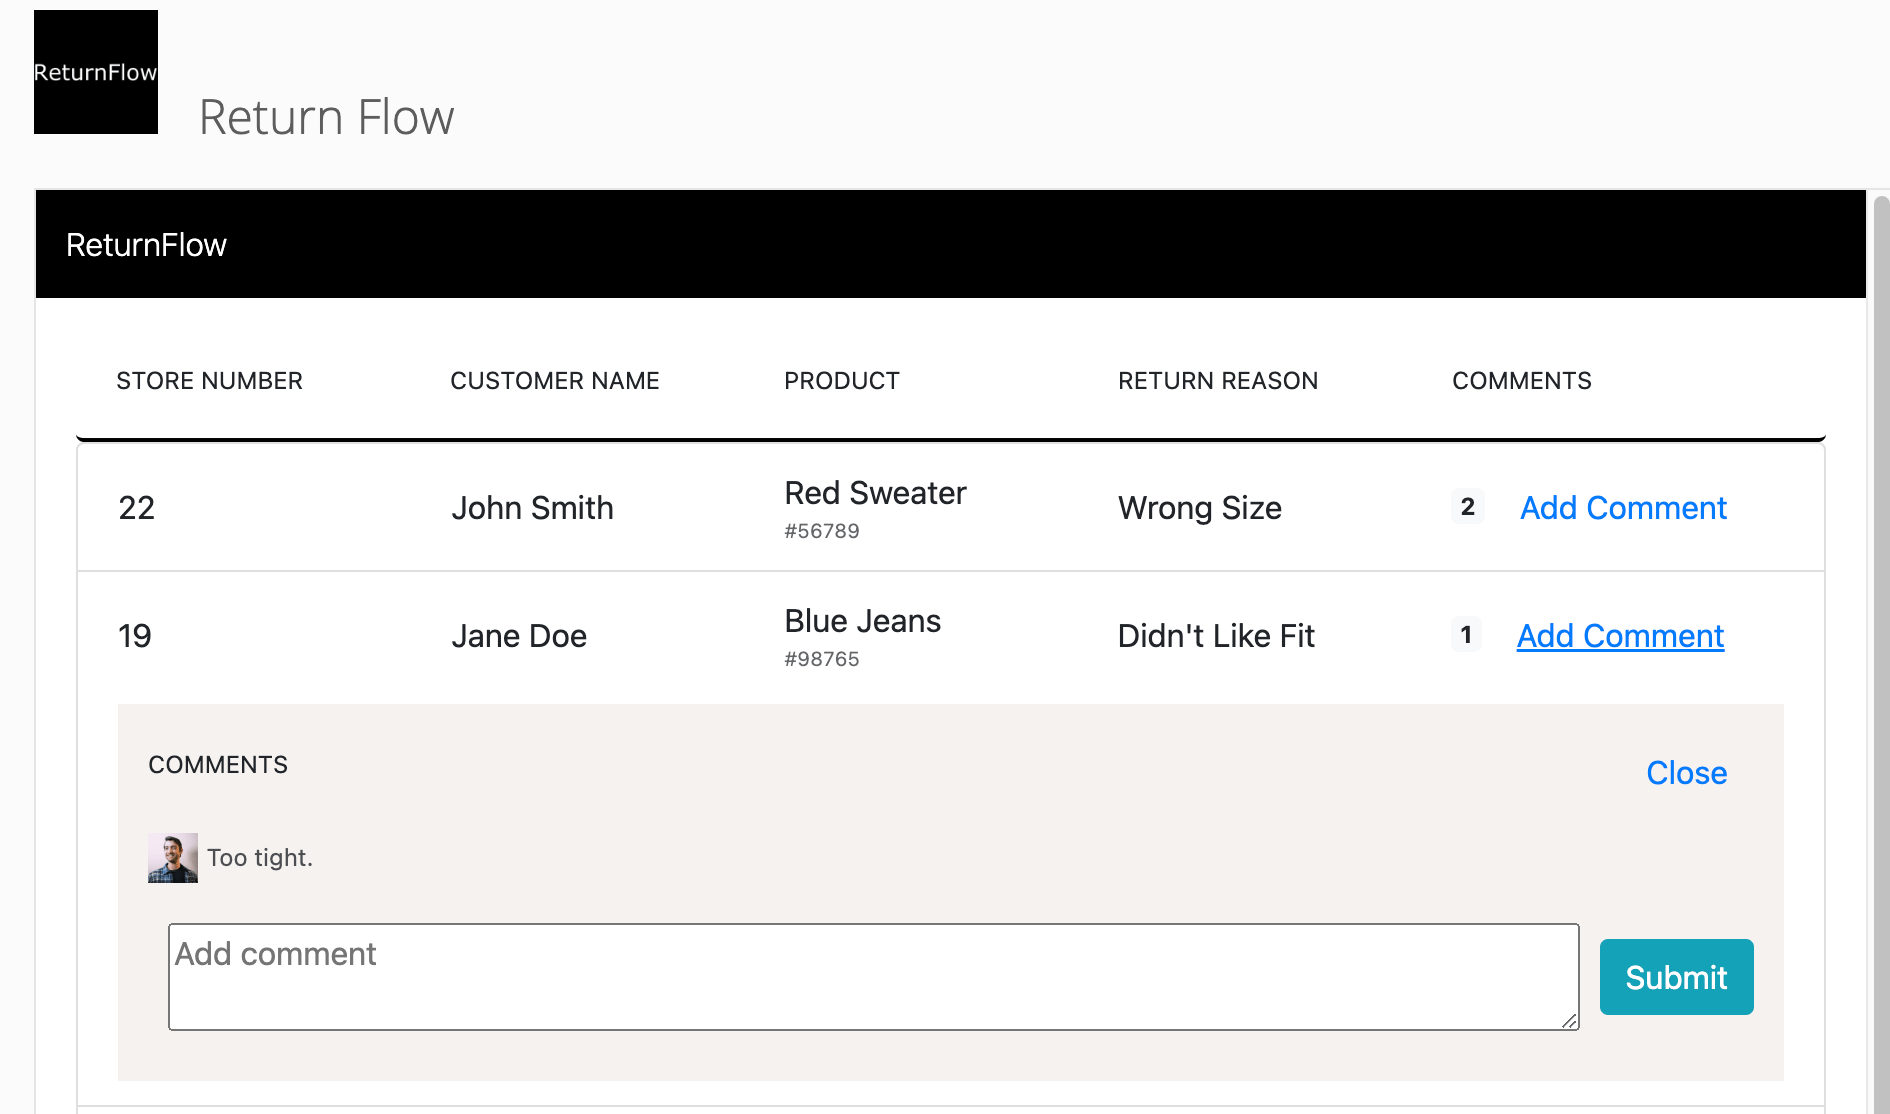
Next we can add avatars to each comment by using the Users API so that we know who made each comment. Update the `generateComment()` function as follows.
```javascript theme={"dark"}
function generateCommentElement(commentDocument) {
return `
### Step 11 - Add Avatars
***
Next we can add avatars to each comment by using the Users API so that we know who made each comment. Update the `generateComment()` function as follows.
```javascript theme={"dark"}
function generateCommentElement(commentDocument) {
return `

 ### Step 12: Add Attachments
***
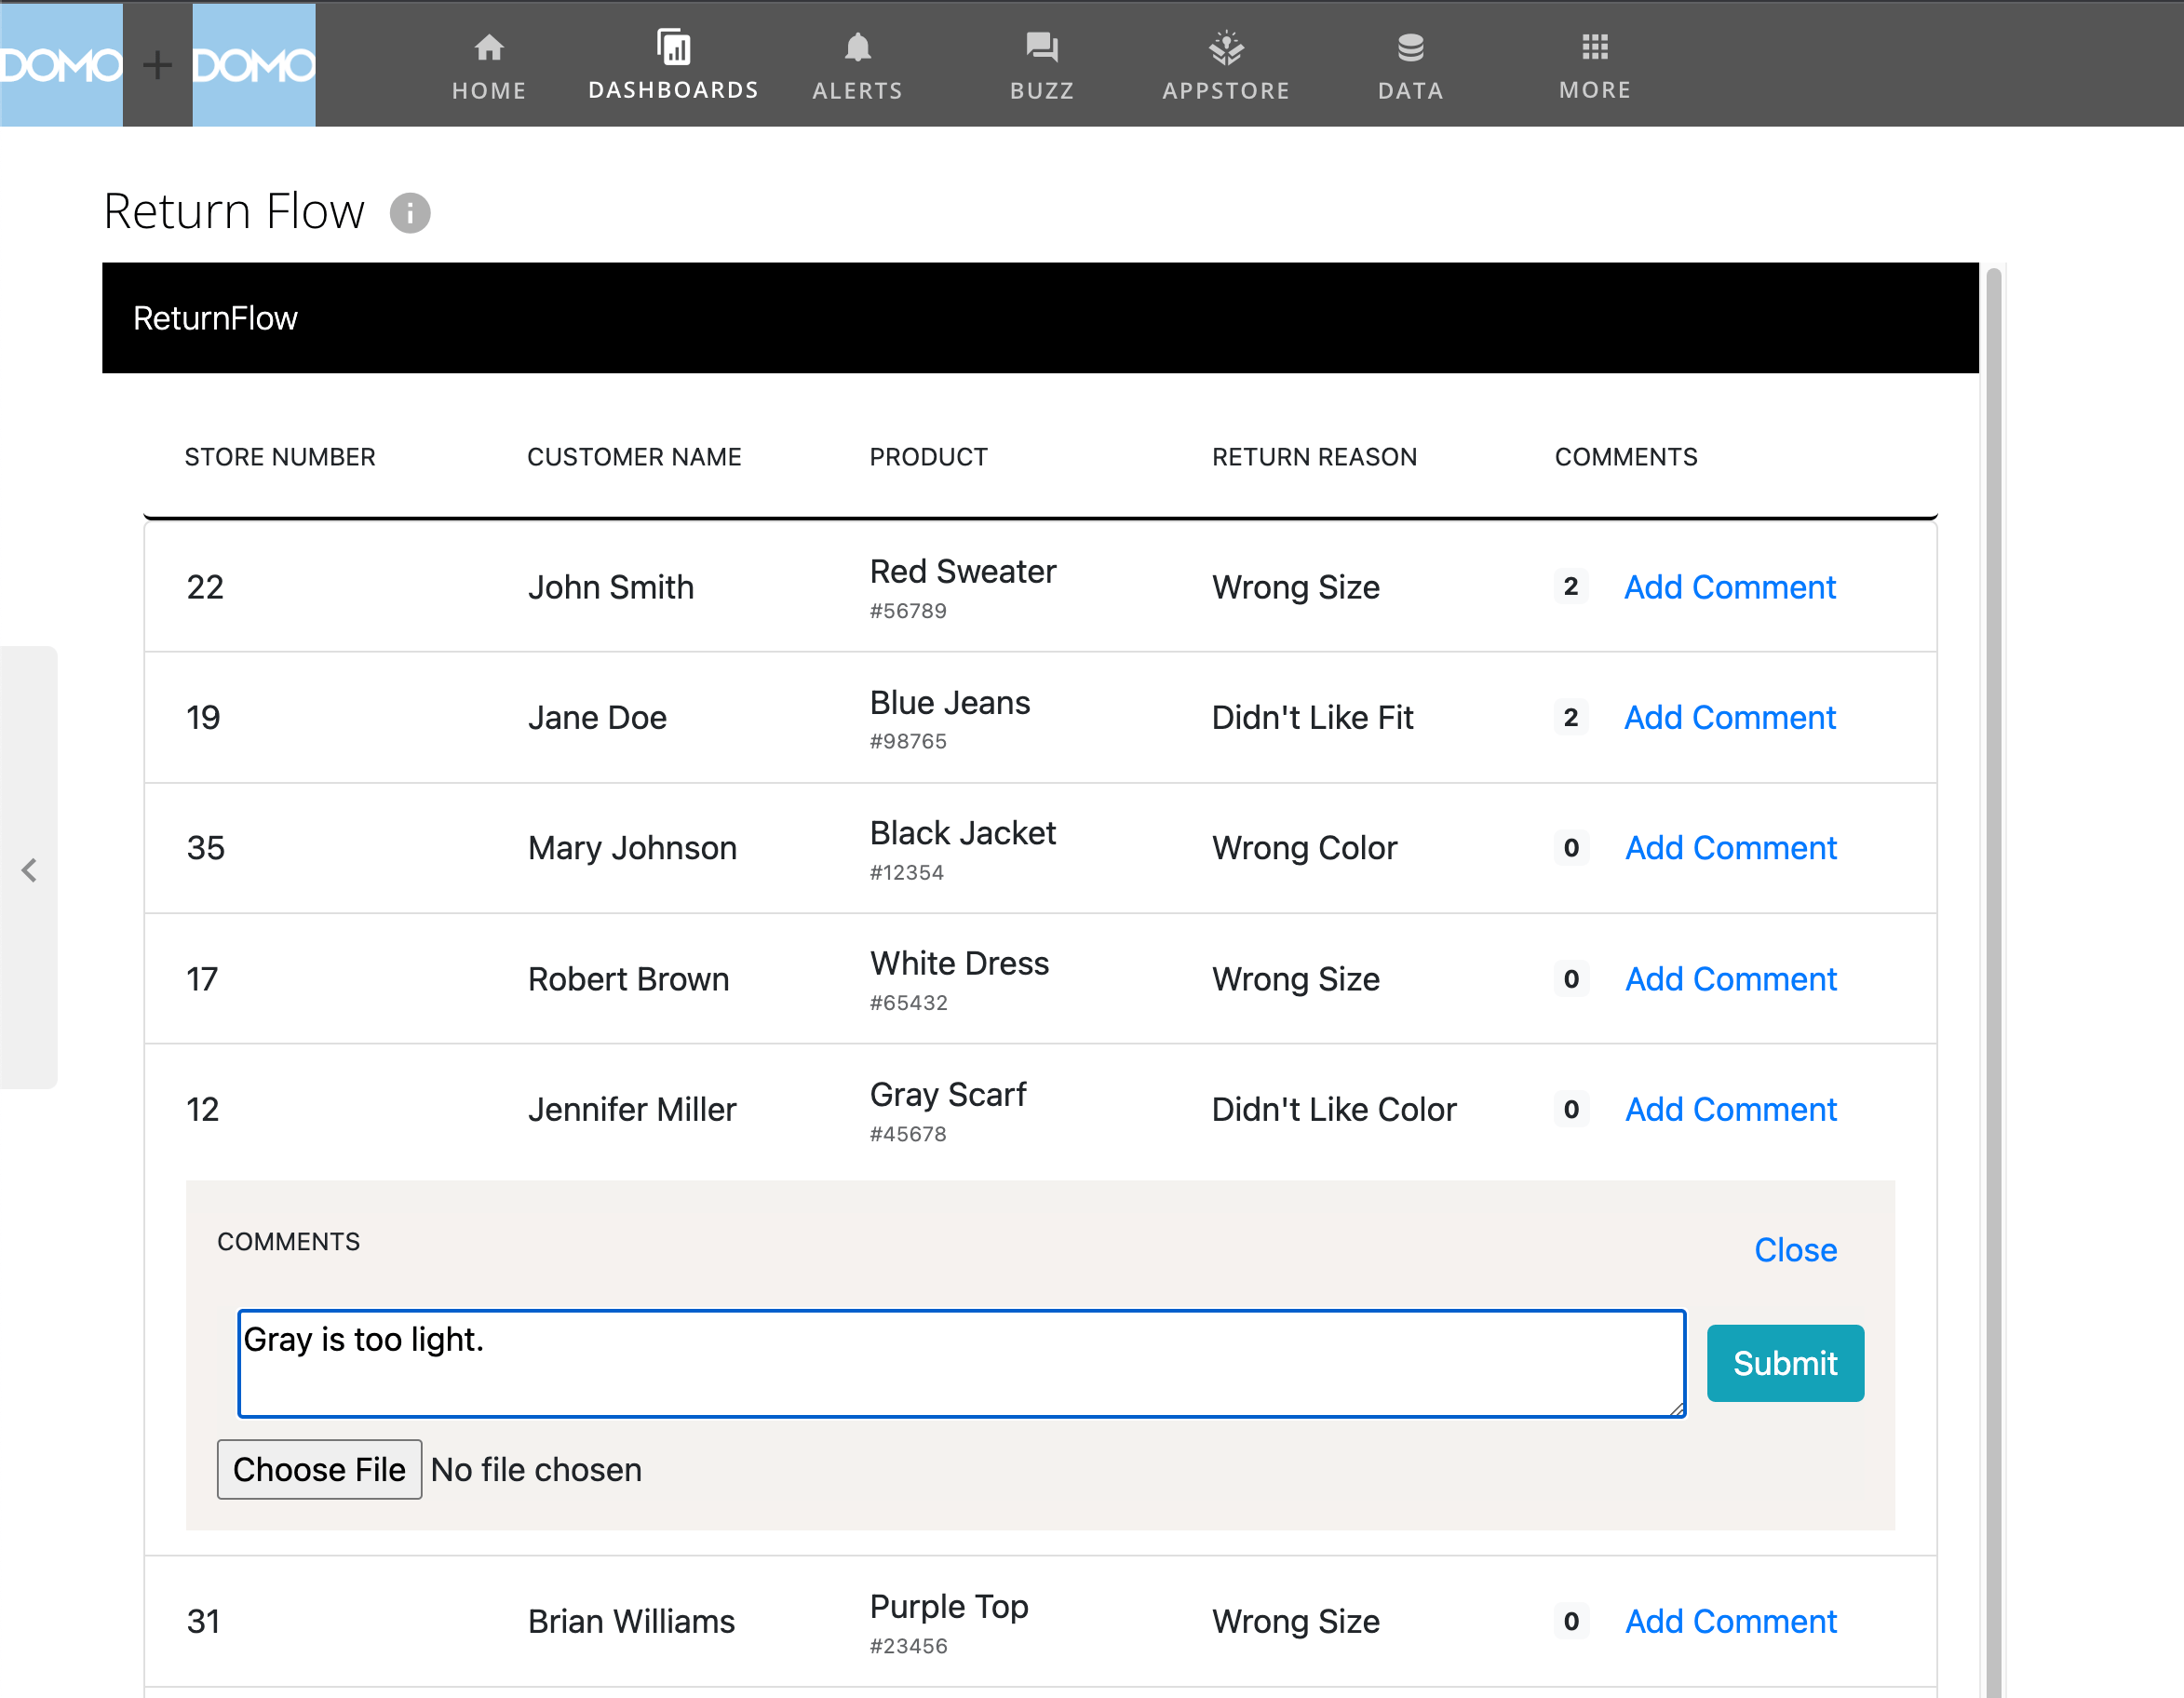
You can add attachments to your comments using the Files API. Add the following code to the bottom of the `generateRow()` function right below the `commentsContainer` div to give the user the option to add an attachment with their comment.
```html theme={"dark"}
### Step 12: Add Attachments
***
You can add attachments to your comments using the Files API. Add the following code to the bottom of the `generateRow()` function right below the `commentsContainer` div to give the user the option to add an attachment with their comment.
```html theme={"dark"}

${
commentDocument.content.attachmentName !== undefined
? `📎 ${commentDocument.content.attachmentName}`
: ''
}
`;
}
```
You should now be able to submit a comment with an attachment, see that attachment on the comment, and download the attachment.
Finally, let's `domo publish` one more time to update the App in our Domo instance.
 ### Next Steps
***
Congrats! You've successfully built an App on Domo to be able to add comments to data in a table. You've leveraged many of the App Framework APIs (Data API, AppDB API, Users API, and Files API) and should be in good shape to extend the functionality of this App.
A few potential improvements you might try to make as a challenge:
1. Add loading states
2. Create a search bar that filters the list of returns
3. Add branding and logos
4. Add ability to edit and delete comments
5. Dynamically update the comment count after a comment has been submitted
### Next Steps
***
Congrats! You've successfully built an App on Domo to be able to add comments to data in a table. You've leveraged many of the App Framework APIs (Data API, AppDB API, Users API, and Files API) and should be in good shape to extend the functionality of this App.
A few potential improvements you might try to make as a challenge:
1. Add loading states
2. Create a search bar that filters the list of returns
3. Add branding and logos
4. Add ability to edit and delete comments
5. Dynamically update the comment count after a comment has been submitted