> ## Documentation Index
> Fetch the complete documentation index at: https://domoinc-openapi-sync-dataflows.mintlify.site/llms.txt
> Use this file to discover all available pages before exploring further.

# DataSet Watchdog

export const InlineImage = ({src, alt = '', height = '1.6em'}) => {
  return <img noZoom src={src} alt={alt} style={{
    display: 'inline',
    verticalAlign: 'start',
    height: height,
    margin: '0'
  }} />;
};

## Intro

DataSet Watchdog allows you to monitor your most important DataSets and DataFlows to help minimize impact should any problems arise.

Sometimes a change upstream can have unintended consequences. Use Data Watchdog to monitor and receive Alerts for your most important DataSets and DataFlows.

DataSet Watchdog is part of the Governance Toolkit. To enable it, please reach out to your Account Executive (AE).

***

## Access the Toolkit

To access the Governance Toolkit, do the following:

1. In the navigation header, go to **More** > **Admin.**
2. In the **Governance** menu, select **Toolkit.**

   <Note>
     **Note:** If the **Toolkit** option does not display in the **Governance** menu, make sure your user role has the required grants. You may need to enable the Toolkit by reaching out to your Account Executive (AE).
   </Note>

## Required Grants

To access the Governance Toolkit, a user will need one of two grants enabled for their role: Create Custom Pipeline Processes or Administer Custom Pipeline Processes. Grants can be added to a custom user role. By default, the Administer Custom Pipeline Process grant is enabled for Admin users.

* **Create Custom Pipeline Processes —**
  Allows the user to create, update, share, and delete jobs. Only allows the user to view jobs that they created or jobs that have been shared with them.
* **Administer Custom Pipeline Processes —**
  Allows the user to create, update, share, and delete jobs. Allows the user to see all jobs within the pipeline.
* **Edit DataFlow**
* **Edit DataSet**

To learn more about custom roles and grants, see [Managing Custom Roles.](/s/article/360043438973)

## Available Watchdog Watcher Types

<table border="1" cellpadding="1" cellspacing="1" data-aura-rendered-by="33:209;a"><thead><tr><th colspan="1" rowspan="1"><p> Watcher Type </p></th><th colspan="1" rowspan="1"><p> Description </p></th></tr></thead><tbody><tr><td colspan="1" rowspan="1"><p> DataSet Errors </p></td><td colspan="1" rowspan="1"> Checks if the selected DataSets have errored on the last run. </td></tr><tr><td colspan="1" rowspan="1"><p> DataFlow Errors </p></td><td colspan="1" rowspan="1"> Checks if the selected DataFlows have errored on the last run. </td></tr><tr><td colspan="1" rowspan="1"> DataSet Index Time </td><td colspan="1" rowspan="1"> Checks if the select DataSets' indexing duration has exceeded the user-provided time limit. </td></tr><tr><td colspan="1" rowspan="1"> DataSet Last Updated </td><td colspan="1" rowspan="1"> Checks if the selected DataSets have executed within the user-provided period. </td></tr><tr><td colspan="1" rowspan="1"> Outlier DataSet execution times </td><td colspan="1" rowspan="1"> Checks if the DataSets selected have run a certain percentage longer, or shorter, than the previous execution. </td></tr><tr><td colspan="1" rowspan="1"> Outlier DataFlow execution times </td><td colspan="1" rowspan="1"> Checks if the DataFlows selected have run a certain percentage longer, or shorter, than the previous execution </td></tr><tr><td colspan="1" rowspan="1"> Row count change </td><td colspan="1" rowspan="1"> Checks if the row count has changed by a certain percentage, positive or negative, compared to the last execution. </td></tr><tr><td colspan="1" rowspan="1"> Custom Query </td><td colspan="1" rowspan="1"> Checks if there are any rows that meet the condition specified in the query against the selected DataSets. </td></tr></tbody></table>

## Notification Settings

There are four ways to notify users if any of the above watchers find something unexpected:

1. [Webhooks](#webhooks)
2. Select users
3. Select groups
4. Manually enter email addresses

Alternatively, you can do a combination of any/all of the above.

If the job finds something unexpected, the system sends an email with an impact report and a link to the DataSet(s)/DataFlow(s) with the issues.

### Webhooks

Follow these steps to configure a webhook:

1. Enter the webhook URL of the desired messaging system. Each service is different, so you need to reference third-party documentation. For example, if you are retrieving a webhook from Slack, look up how to retrieve a webhook in Slack's online documentation.

2. Copy the payload from the third-party.

3. On the new job configuration screen for DataSet Watchdog, under
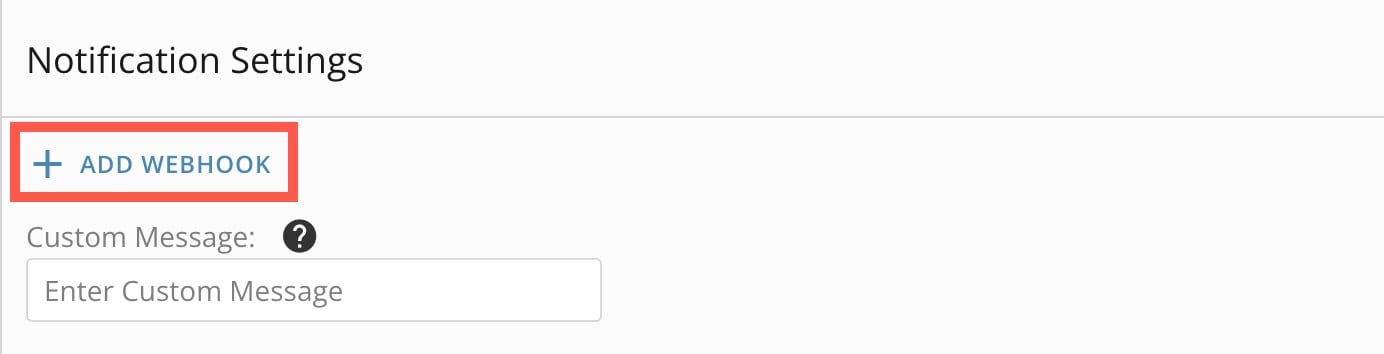
   **Notification Settings**, select **+ Add Webhook** to display two fields.

   <Frame>
     <img alt="+ add webhook.jpg" src="https://mintcdn.com/domoinc-openapi-sync-dataflows/y73kYVYT02nhoBL7/images/kb/ka05w00000129aT-00N5w00000Ri7BU-0EM5w000006uoOe.jpg?fit=max&auto=format&n=y73kYVYT02nhoBL7&q=85&s=813bccb90c0de82957b048d38c400131" style={{width: 442, height: 113}} width="1384" height="354" data-path="images/kb/ka05w00000129aT-00N5w00000Ri7BU-0EM5w000006uoOe.jpg" />
   </Frame>

   Paste the third-party payload into the **Webhook Payload** field.

   <Frame>
     <img alt="webhook payload field.jpg" src="https://mintcdn.com/domoinc-openapi-sync-dataflows/y73kYVYT02nhoBL7/images/kb/ka05w00000129aT-00N5w00000Ri7BU-0EM5w000006uoMd.jpg?fit=max&auto=format&n=y73kYVYT02nhoBL7&q=85&s=9fd5c7d4d6a51e3f303f033bb560d721" style={{width: 653, height: 100}} width="2618" height="402" data-path="images/kb/ka05w00000129aT-00N5w00000Ri7BU-0EM5w000006uoMd.jpg" />
   </Frame>

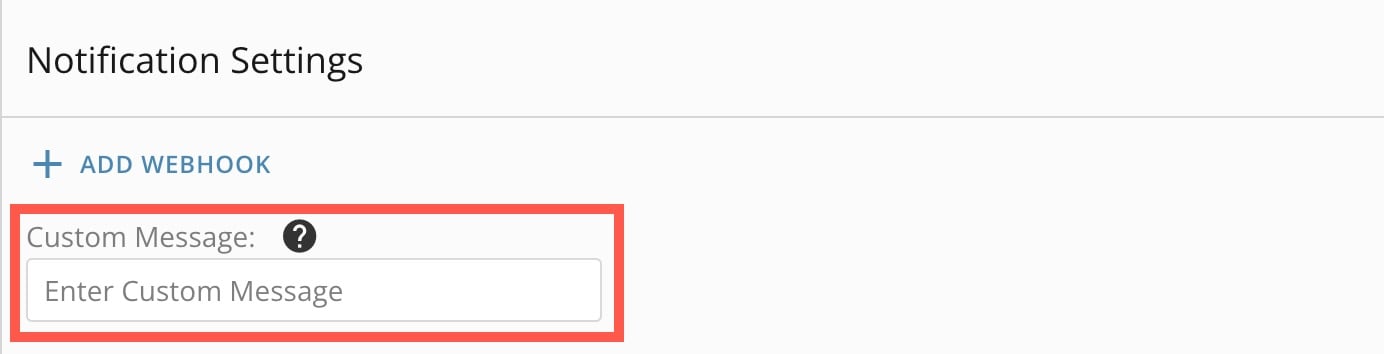
4. (Optional) Enter a custom message text that is included in the DataSet Watchdog-generated Alert text. This message is optional, but we recommend it to provide the user with helpful information. The custom message only displays in the DataSet Watchdog-generated text, which displays wherever ###MESSAGE### is placed in the webhook payload.
   1. Enter your text in the
      **Custom Message** field.
      <Frame>
        <img alt="enter custom message.jpg" src="https://mintcdn.com/domoinc-openapi-sync-dataflows/y73kYVYT02nhoBL7/images/kb/ka05w00000129aT-00N5w00000Ri7BU-0EM5w000006uoOo.jpg?fit=max&auto=format&n=y73kYVYT02nhoBL7&q=85&s=861f9a28e956055395e81e3f8b45cdcd" style={{width: 619, height: 158}} width="1384" height="354" data-path="images/kb/ka05w00000129aT-00N5w00000Ri7BU-0EM5w000006uoOo.jpg" />
      </Frame>

   2. Paste ###MESSAGE### in the appropriate part of the webhook playload to display your custom message.

#### Delete Webhook

To delete a webhook, select <InlineImage src="/images/kb/ka05w00000129aT-00N5w00000Ri7BU-0EM5w000006uoNM.jpg" /> **Delete** for that webhook.

<Frame>
  <img alt="delete webhook.jpg" src="https://mintcdn.com/domoinc-openapi-sync-dataflows/y73kYVYT02nhoBL7/images/kb/ka05w00000129aT-00N5w00000Ri7BU-0EM5w000006uoNl.jpg?fit=max&auto=format&n=y73kYVYT02nhoBL7&q=85&s=89c5093e72083f8a8faab73092f25bac" style={{width: 680, height: 105}} width="2618" height="402" data-path="images/kb/ka05w00000129aT-00N5w00000Ri7BU-0EM5w000006uoNl.jpg" />
</Frame>

## Reporting

Select either a currently existing Watchdog metrics DataSet, or enter a name to create a new one. This new DataSet contains a row for each entity—DataSet or DataFlow—and what the results of the check were.

## Configuration DataSet (optional)

The required columns and column order in the optional configuration DataSet are as follows:

<table border="1" cellpadding="1" cellspacing="1" data-aura-rendered-by="33:209;a"><thead><tr><th colspan="1" rowspan="1"><p> Column name </p></th><th colspan="1" rowspan="1"><p> Column description </p></th></tr></thead><tbody><tr><td colspan="1" rowspan="1"><p> entity\_id </p></td><td colspan="1" rowspan="1"><p> The ID of the entity to be monitored. This can typically be found in the browser URL when viewing the detail page of the entity, such as a DataSet overview page. </p></td></tr><tr><td colspan="1" rowspan="1"><p> entity\_type </p></td><td colspan="1" rowspan="1"><p> Supported values are: DATAFLOW and DATA\_SOURCE </p></td></tr><tr><td colspan="1" rowspan="1"><p> watcher\_type </p></td><td colspan="1" rowspan="1"><p> The following types are supported: </p><ul><li> error\_detection </li><li> row\_count\_variance </li><li> execution\_variance </li><li> custom\_query </li><li> max\_indexing\_time </li><li> last\_data\_updated (See watcher type paragraphs for descriptions.) </li></ul></td></tr><tr><td colspan="1" rowspan="1"><p> value </p></td><td colspan="1" rowspan="1"><p> The value to be used for the specific watcher type. </p><p> Example: </p><pre class="ckeditor_codeblock">custom\_query </pre><p><br /> watcher type would take a query as the value. </p> <Warning><div class="info-box-wrapper"><div class="info-box-icon-container"><span class="info-box-icon" /></div><div class="info-box-content-container"><div class="info-box-content"><b> Important: </b><pre class="ckeditor_codeblock">error\_detection</pre><br /> types do NOT require a value. </div></div></div> </Warning></td></tr></tbody></table>

The following image shows an example configuration DataSet:

<Frame>
  <img alt="config dataset.png" src="https://mintcdn.com/domoinc-openapi-sync-dataflows/y73kYVYT02nhoBL7/images/kb/ka05w00000129aT-00N5w00000Ri7BU-0EM5w000006uF9R.jpg?fit=max&auto=format&n=y73kYVYT02nhoBL7&q=85&s=48428dde5e642be5ec866b35f39af5b4" style={{width: 749, height: 134}} width="936" height="168" data-path="images/kb/ka05w00000129aT-00N5w00000Ri7BU-0EM5w000006uF9R.jpg" />
</Frame>

<Note>
  **Note:** Only 100 rows are supported per configuration DataSet. This is to ensure that DataSet Watchdog is as efficient as possible to monitor your most important data.
</Note>

## Remote Instance Configuration

With DataSet Watchdog, you can monitor from one Domo instance important DataSets stored in other instances to which you have access. This allows you to ensure the quality of the data your users are consuming.

Remote instance monitoring requires a configuration DataSet to run (see [Configuration DataSet](#configuration_dataset) ). It also requires you to have a Domo Access Token account configured with either a Domo Access Token or with a username and password for the instance you want to monitor. Instructions for [configuring a Domo Access Token account](#configure_domo_access_token_account) appear below.

### Configure DataSet Watchdog for Remote Instance

You can configure DataSet Watchdog for an external instance you have access to by following these steps:

1. While creating or editing a job for DataSet Watchdog, in the
   **Settings** section of the job configuration page, select **Remote Instance**.

2. Under
   **Configuration**, select a configuration DataSet populated with valid values for the remote instance according to the [Configuration DataSet](#config_dataset) section above.

3. Under
   **Instance Settings**, in the **Instance:** field, enter the domain for the remote instance you want to configure DataSet Watchdog for.

4. From the
   **Select the account for your instance:** list, select a valid Domo Access Token account. To learn how to [configure a Domo Access Token account](#configure_domo_access_token_account), see below.

5. (Optional) Configure any notifications in the
   **Notifications** section.

6. Fill in the details for the
   **Reporting** section.

   <Note>
     **Note:** The notification emails and metric logs are written to the instance the policy is running from, not to the remote instance.
   </Note>

7. Select
   **Submit** to save your changes to the job.

### Configure Domo Access Token Account

Follow these steps to configure a Domo Access Token account:

1. In the Domo navigation header, select
   **Data**.

   The **Data Center** opens.

2. In the sidebar, select <InlineImage src="/images/kb/ka05w00000129aT-00N5w00000Ri7BU-0EM5w000006uFA5.jpg" /> **Accounts**.

3. Select **Add New** > **Account**.

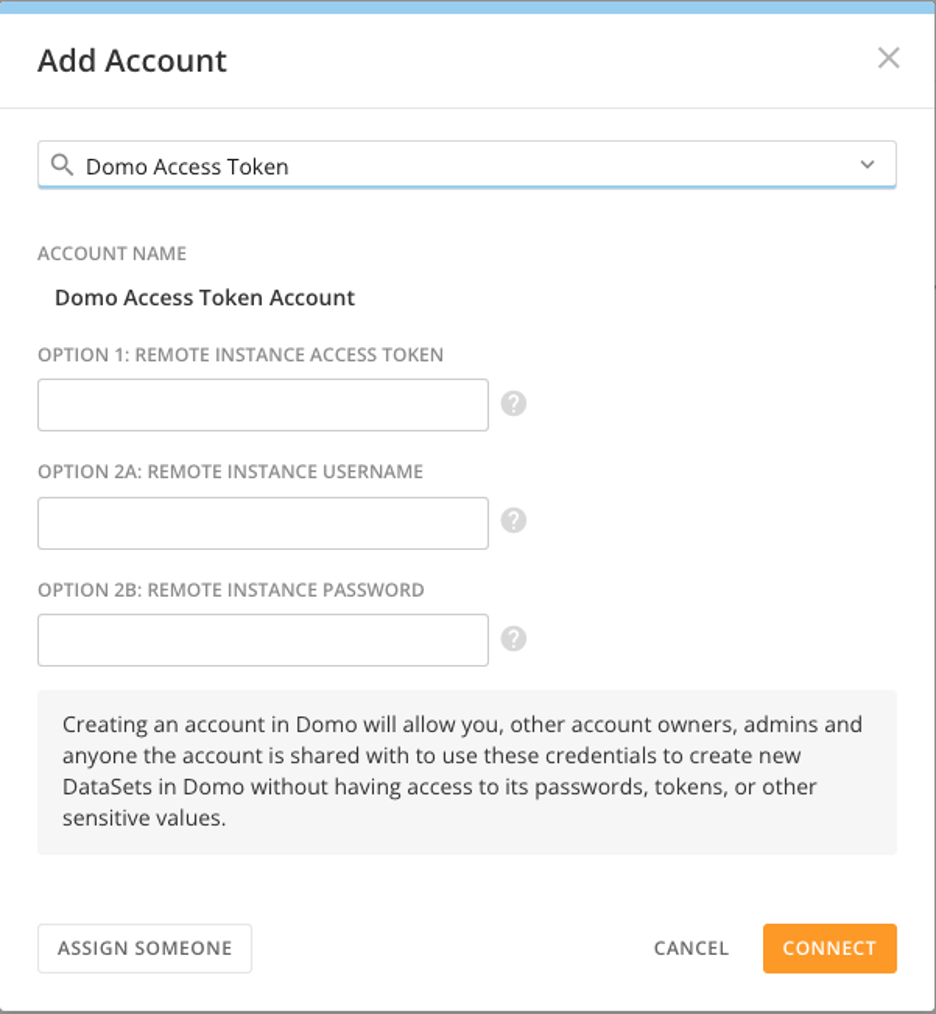
   The **Add Account** modal displays.

   <Frame>
     <img alt="domo access token.png" src="https://mintcdn.com/domoinc-openapi-sync-dataflows/y73kYVYT02nhoBL7/images/kb/ka05w00000129aT-00N5w00000Ri7BU-0EM5w000006uF9v.jpg?fit=max&auto=format&n=y73kYVYT02nhoBL7&q=85&s=83af8d79dff5c4f1336d08620f5a3aab" style={{width: 591, height: 641}} width="936" height="1014" data-path="images/kb/ka05w00000129aT-00N5w00000Ri7BU-0EM5w000006uF9v.jpg" />
   </Frame>

4. In the modal, complete one of the following options:
   * **Access Token —**
     Enter an access token in the **Remote Instance Access Token** field. To learn how to generate a token, see [Generate Access Token](#generate_access_token).
   * **Username and password —**
     Enter your credentials in the **Remote Instance Username** and **Remote Instance Password** fields.

5. Select
   **Connect**.

### Generate Access Token

Follow these steps to generate an access token:

1. In the Domo navigation header, select **More** > **Admin**.

   The Admin Settings display.
2. In the
   **Authentication** menu of the Admin Settings, select **Access tokens**.
3. On the
   **Access tokens** page, select **+ Generate access token**.

   <Frame>
     <img src="https://mintcdn.com/domoinc-openapi-sync-dataflows/enfTkpqxhZnichpt/images/kb/ka05w00000128xR-00N5w00000Ri7BU-0EM5w000006uFA0.jpg?fit=max&auto=format&n=enfTkpqxhZnichpt&q=85&s=d66be05545cc2be432d7a34000bdfc0c" width="1456" height="144" data-path="images/kb/ka05w00000128xR-00N5w00000Ri7BU-0EM5w000006uFA0.jpg" />
   </Frame>
4. Enter a description in the
   **Access token description** field.
5. Search for and select a user for whom you are generating the access token.
6. Select an expiration interval in the
   **Expire after** list.
7. Select
   **Generate**.
8. Copy the code to use.

## Notes

* You can only select one watcher type per job, but you can select multiple DataSets and/or DataFlows per job, depending on the watcher type selected.
* If using the
  **Custom Query** option, ensure that all the DataSets selected contain the columns used in the query, otherwise it fails to run for that DataSet.
* When the job is Enabled, it automatically runs one time per hour. If the job is Disabled, it does not run unless it is run manually.