> ## Documentation Index
> Fetch the complete documentation index at: https://domoinc-openapi-sync-dataflows.mintlify.site/llms.txt
> Use this file to discover all available pages before exploring further.
# Domo Add-ins for Microsoft Office 365 Apps | User Guide
export const InlineImage = ({src, alt = '', height = '1.6em'}) => {
return ;
};
### Intro
This user guide provides instructions for performing common tasks within the Domo add-ins for the Excel, Outlook, PowerPoint, and Word Microsoft 365 apps. When the guide refers to "apps" in general, it is referring to these four apps. The described tasks apply to all apps unless otherwise noted.
It's possible to use the add-ins in many scenarios. See our [video](#video) about how to use the add-in to create a meeting template in PowerPoint, below.
In addition to the tasks described in this guide, the Domo add-ins provide access to Buzz from within the Microsoft 365 apps. Learn how to [Use Buzz with Add-ins](#use_buzz) below.
All tasks in this guide require you to have previously installed the Domo add-in for the app you are working in. If you cannot access Microsoft Appsource, see the [Domo Add-ins for Microsoft 365 | Manual Installation Guide](/s/article/000005146) and the [Domo Add-ins for Microsoft 365 | Manual Installation Guide for Enterprise](/s/article/000005145).
#### Install Domo Add-ins
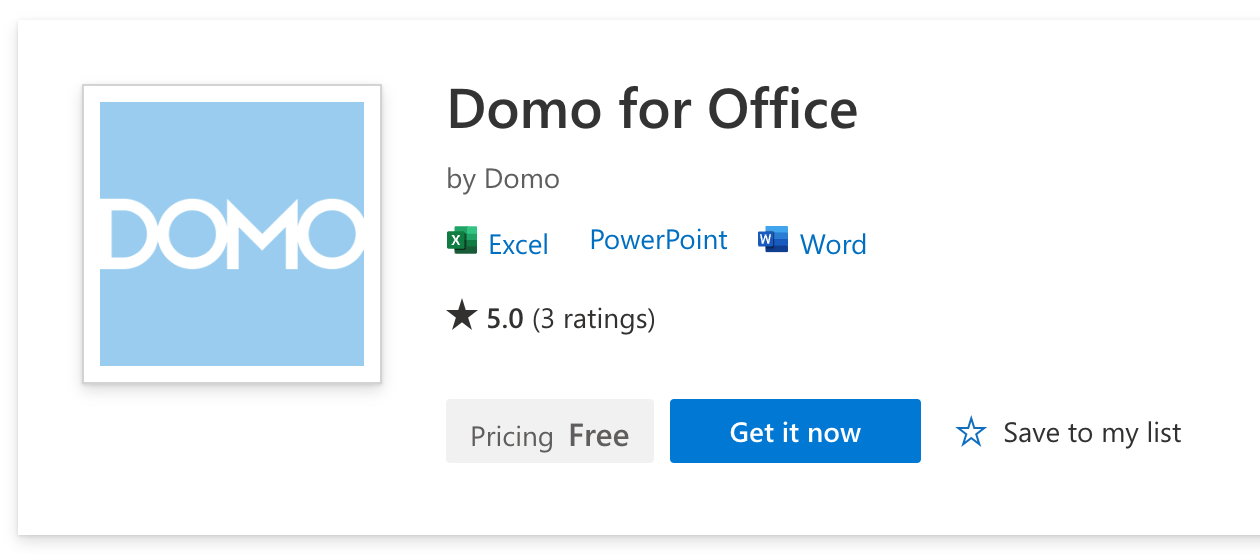
We highly recommend downloading the add-ins from Microsoft AppSource at the links below:
* [Domo for Office](https://appsource.microsoft.com/en-US/product/office/WA200005264?exp=ubp8) (Excel, PowerPoint, and Word)
* [Domo for Outlook](https://appsource.microsoft.com/en-US/product/office/WA200005307?exp=ubp8\&tab=Overview)
The Outlook add-in is supported by both Android and iOS mobile devices.
Updates to the Domo add-ins should automatically apply to your installation. If you don't see these updates, you may need to clear your Microsoft 365 add-in's cache. For instructions on how to do this, see [Microsoft’s documentation](https://learn.microsoft.com/en-us/office/dev/add-ins/testing/clear-cache) .
### PDP
When you create content in Domo against DataSets with PDP configured, your Personalized Data Permissions, or PDP, are automatically applied.
When you export Domo content or take screenshots to include in documents outside of Domo, recipients receive the data as seen by you with your PDP and access levels. The Domo add-ins for Microsoft 365 apps work similarly until the recipient triggers an automatic or manual refresh, at which point the content from Domo is refreshed with the recipient’s individual PDP and access levels.
Given this information, you should not use add-ins with the expectation that they are a way to create and share content using PDP.
**Note:** If the recipient of your content does not have the Domo add-in, they cannot refresh the content, so the data remains static and as seen by you.
### Known Limitations
**Outlook**
* Auto-refresh functionality is not available because an email is a static document.
**PowerPoint**
* Due to a limitation of the current release of PowerPoint, the auto-refresh options are not currently available. You must manually refresh each imported card or DataSet from the **Document** tab of the Domo toolbar.
***
**Important:** Unless otherwise noted, all tasks in this guide require the same steps in each of the four Microsoft 365 apps for which there are Domo add-ins (Excel, Outlook, PowerPoint, and Word).
##### Access & Connect
* [Access the Domo sidebar in Excel, PowerPoint, and Word](#access_domo_sidebar)
* [Access the Domo sidebar in Outlook](#access_domo_sidebar_outlook)
* [Connect to a Domo instance](#connect_to_domo_instance)
* [Delete a Domo instance](#delete_domo_instance)
* [Disconnect from/Reconnect to a Domo instance](#disconnect_and_reconnect)
* [Switch instances](#switch_instances)
##### Add & Refresh Content
* [Search Domo content](#search_domo_content)
* [Import Domo content to your document (Excel, PowerPoint, and Word)](#import_domo_content)
* [Configure import settings](#configure_import_settings)
* [Refresh all Domo content in your document](#refresh_all_domo_content)
* [Refresh all Domo content individually](#refresh_all_domo_content_individually)
* [Display variable controls](#enable_variables)
* [Apply filters](#apply_filters)
* [View filter details](#filter_details)
* [Update filters](#update_filters)
* [Use Content Swap](#content_swap)
* [Search for dashboards and content](#SearchforDashboardsandContent)
* [Search for and import DataSets](#SearchforandImportDataSets)
* [Alter document settings](#alter_document_settings)
* [Alter Domo content settings individually](#alter_domo_content_settings)
* [Lock Domo content in your document](#lock_domo_content)
* [Add data to Domo](#add_data_to_domo)
##### App-specific Tasks
* [Update DataSets in Excel](#update_datasets_in_excel)
* [Add data to Domo from an email attachment in Outlook](#add_data_to_domo_from_email_attachment)
* [Content tracking in PowerPoint](#content_tracking_in_powerpoint)
* [Create a reusable template with the Microsoft PowerPoint add-in (video)](#create_a_reusable_template)
***
### Access the Domo Sidebar in Excel, PowerPoint, and Word
1. Open the Microsoft 365 app you want to work in.
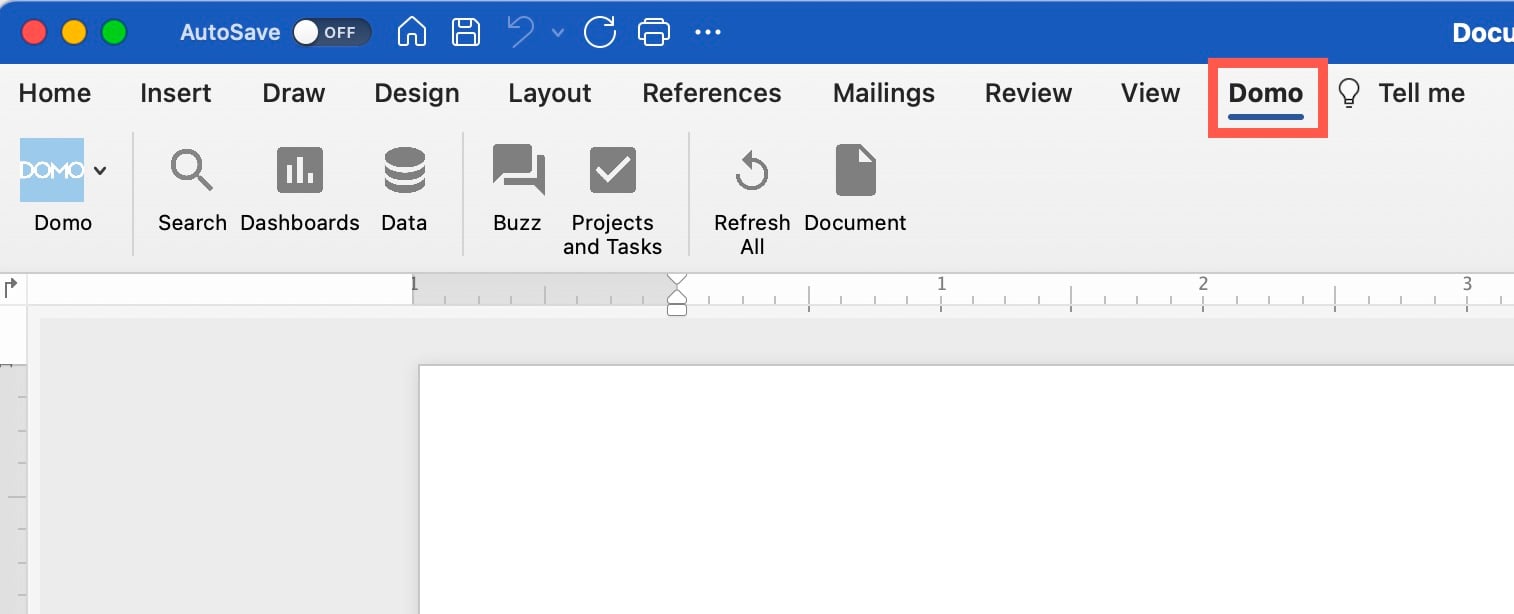
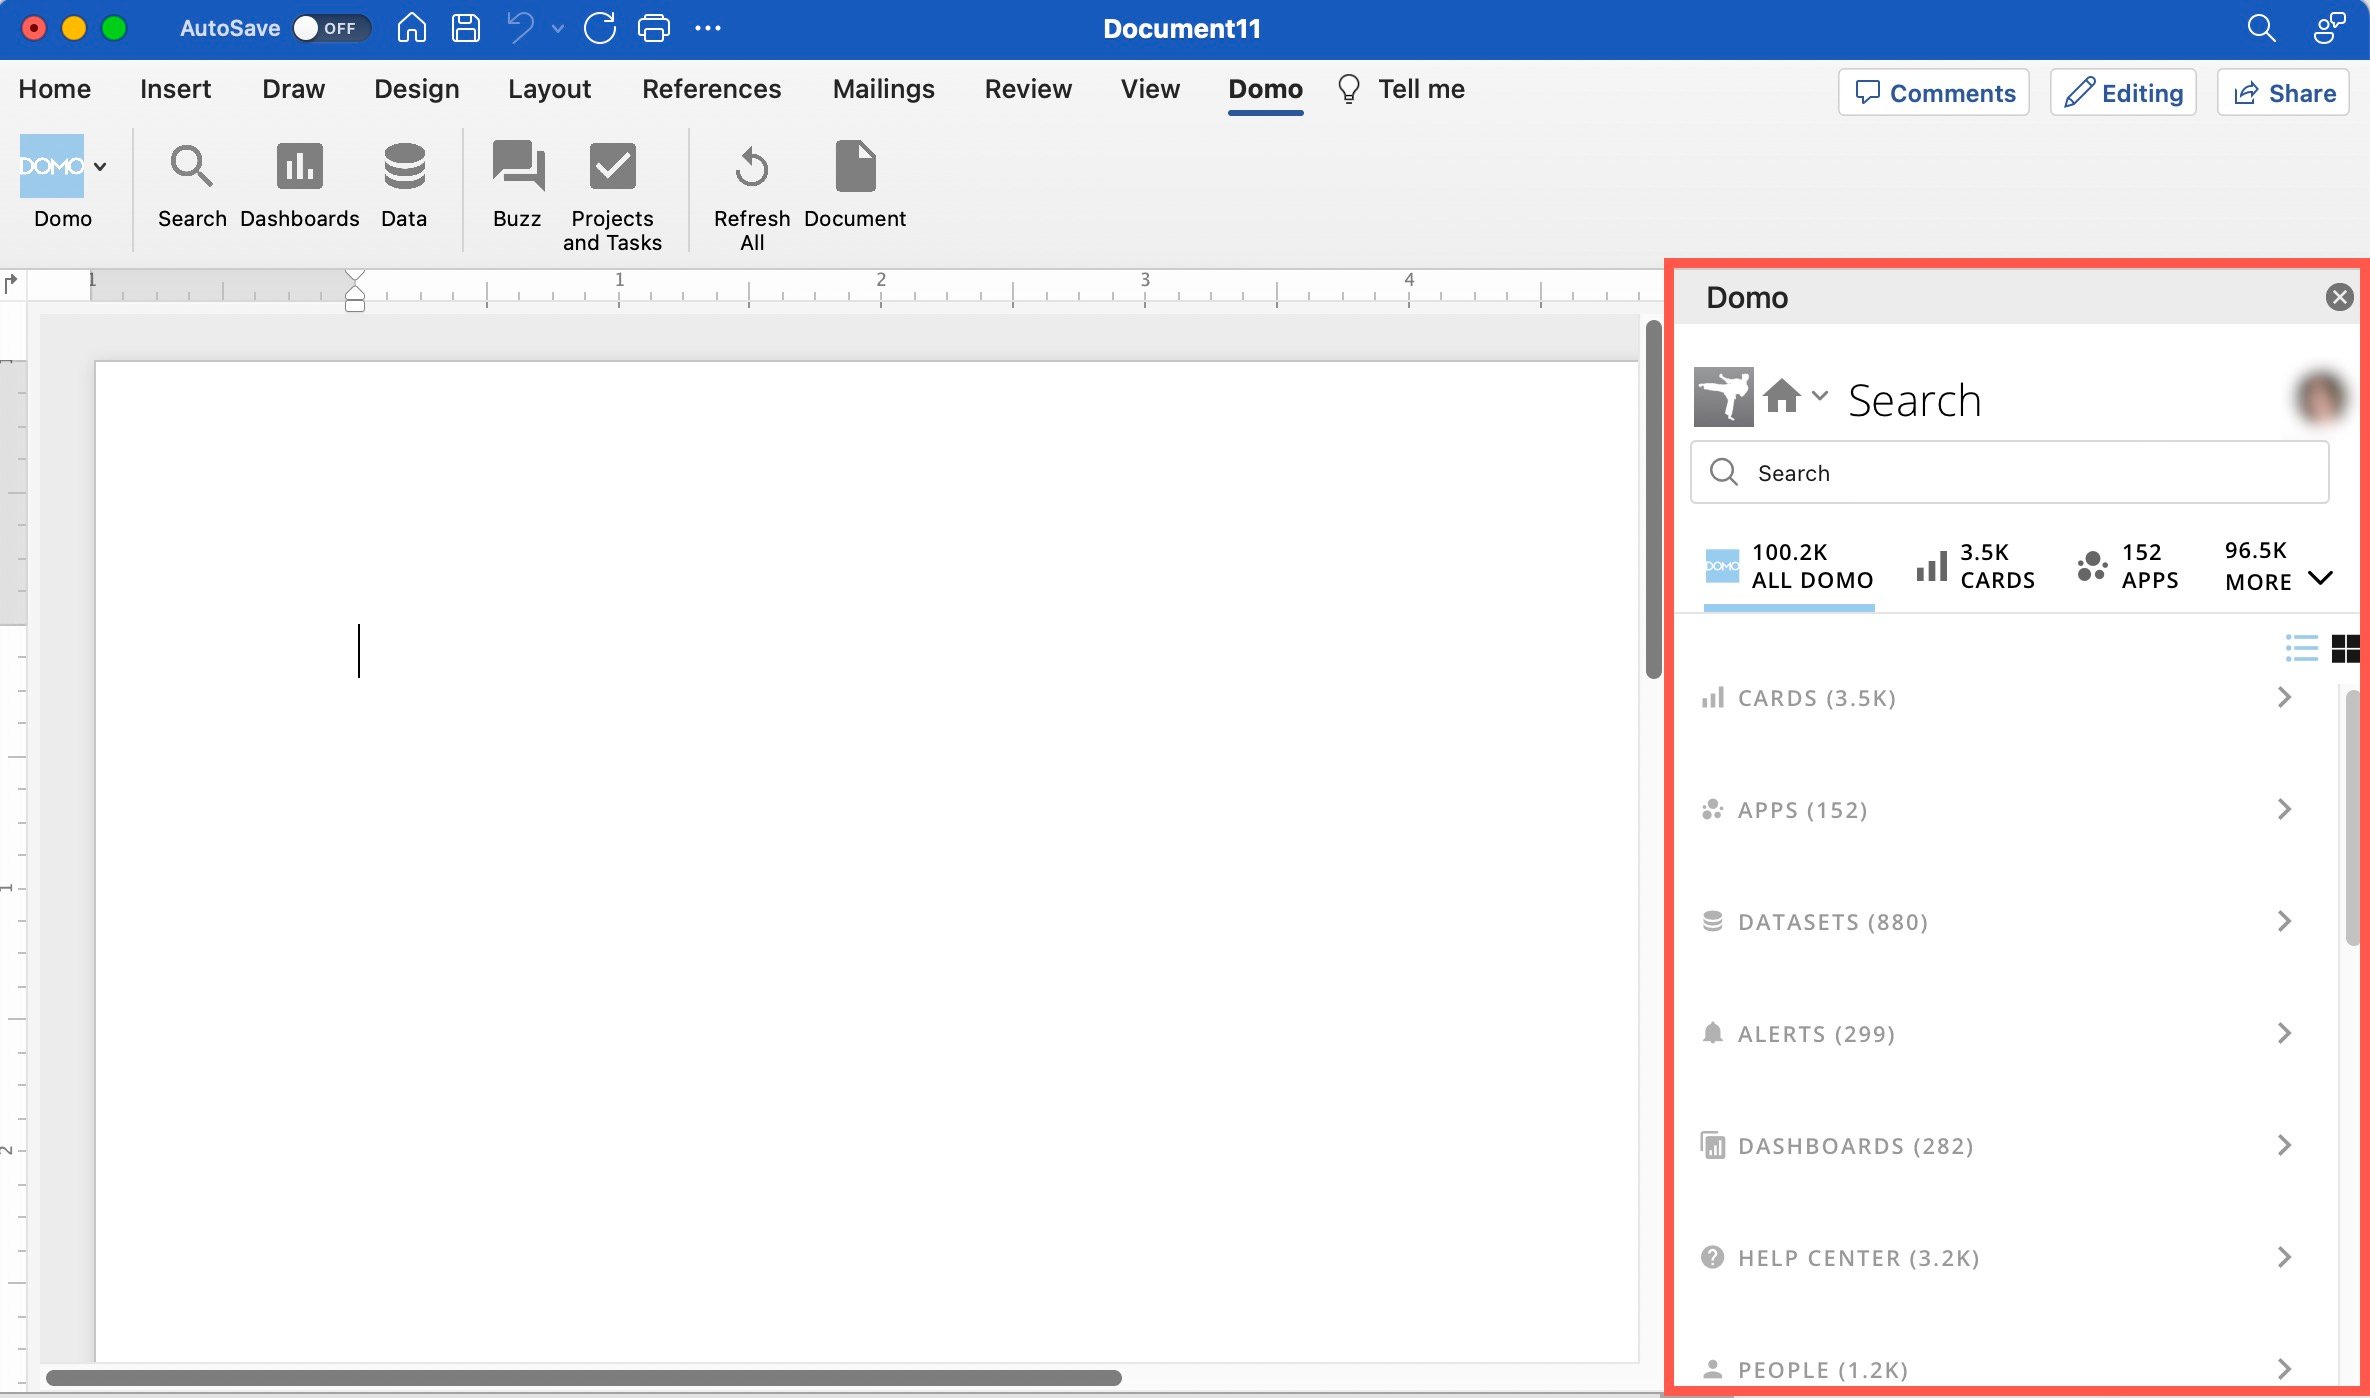
2. In the app ribbon, go to the **Domo** tab.
The Domo toolbar displays.
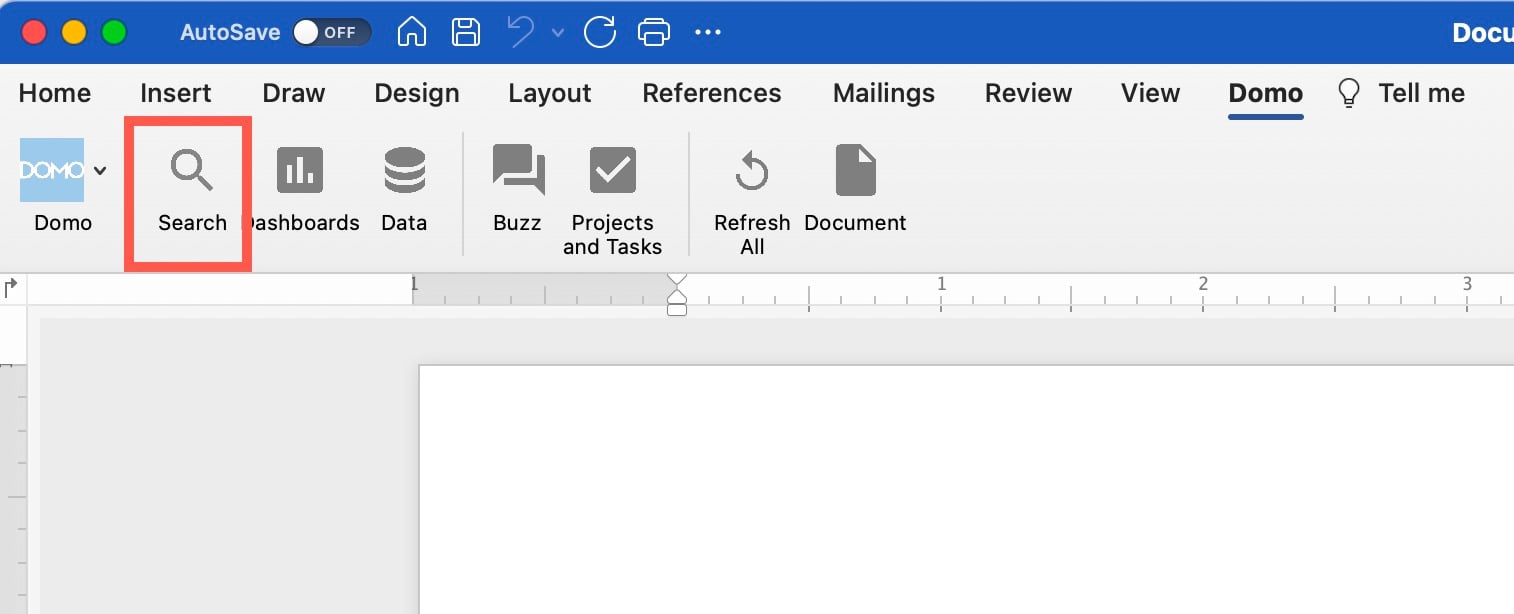
3. In the Domo toolbar, select **Search**.
The Domo add-in displays in a sidebar to the right of your document. After you connect to a Domo instance in the sidebar, that instance opens when you access the sidebar.
### Access the Domo Sidebar in Outlook
1. Open Outlook.
2. In the toolbar, select **Domo** (or **More** > **Domo**) to display the menu.
3. Select **Search**.
The Domo add-in displays in a sidebar to the right of your document. After connecting to a Domo instance in the sidebar, that instance opens when you access the sidebar.
### Connect to a Domo Instance
1. Select the **Domo** logo from the toolbar at the top of your Microsoft 365 app.
2. Select **+ Add Instance**.
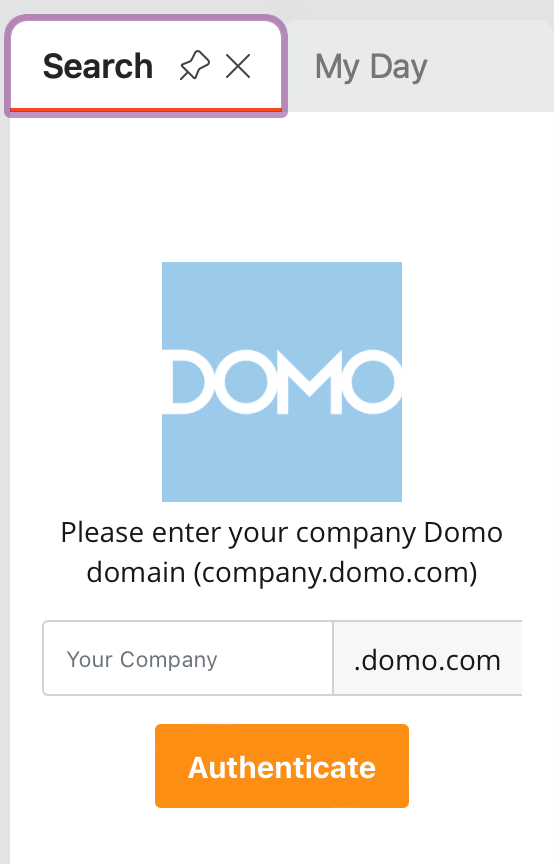
The Domo add-in displays in a sidebar at the right of the app.
3. In the sidebar, enter your organization's domain in the **Your Company** field.
4. Select **Authenticate** or **+** to sign into your instance.
A web page opens where you can sign in with your Domo credentials.
5. Enter your email and password and select **Sign In**.
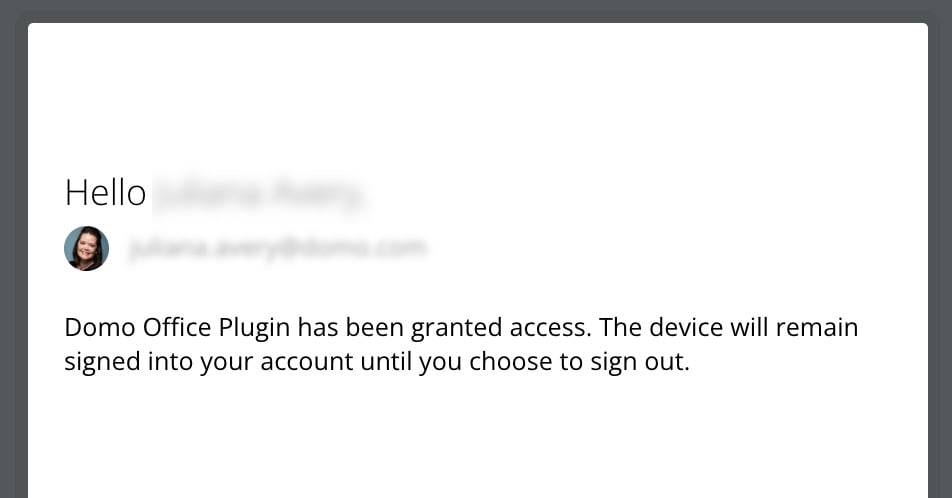
If your Domo credentials are validated, you are redirected to a web page confirming that you have been granted access. Close the page and return to your Microsoft 365 app to use the Domo add-in.
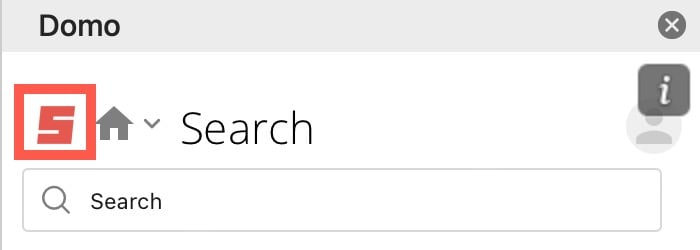
The logo of the instance you are currently connected to displays on all screens of the Domo sidebar to help you verify which instance you are interacting with.
### Delete a Domo Instance
1. Select the **Domo** logo from the toolbar at the top of your Microsoft 365 app.
2. Select **+ Add Instance**.
The Domo add-in displays in a sidebar at the right of the app.
3. In the sidebar, under **Instances History**, locate the instance you want to delete and select **Delete** to the right of the instance name.
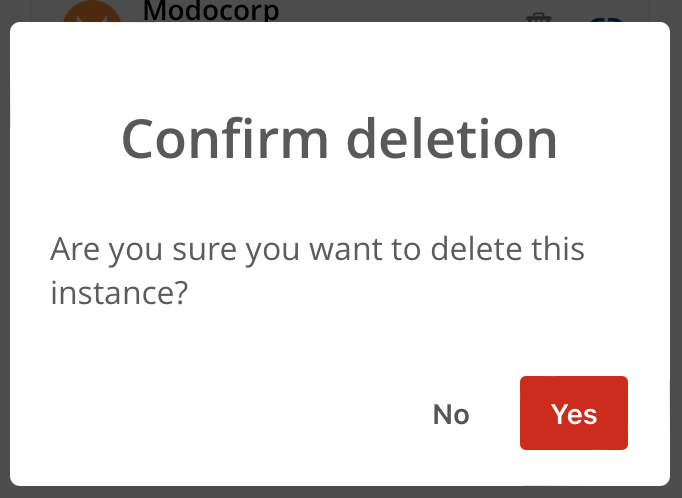
A dialog displays to confirm the deletion of the instance.
* If you select **Yes**, the instance is removed from the add-in.
* If you select **No**, you return to the previous screen.
### Disconnect from/Reconnect to a Domo Instance
1. Select the **Domo** logo from the toolbar at the top of your Microsoft 365 app.
2. Select **+ Add Instance**.
The Domo add-in displays in a sidebar at the right of the app.
3. In the sidebar, under **Instances History**, find the instance you want to disconnect from and select the link icon.
A dialog displays to confirm that you want to unlink that instance.
* If you select **Yes**, you return to the previous screen, and the link icon is replaced by the open link icon for that instance.
* If you select **No**, you return to the previous screen.
4. From the **Instances** screen of the add-in, you can add another instance by entering the domain name in the **Your Company** field and selecting **+**. Additionally, you can reconnect any disconnected instances by selecting the open link icon for that instance.
### Switch Instances
To switch to an instance, you must be connected to that instance. To switch to an instance that you are not connected to, follow the instructions earlier in this guide to [Connect to a Domo Instance](#connect_to_domo_instance).
1. Select the **Domo** logo from the toolbar at the top of your Microsoft 365 app.
2. Select **+ Add Instance**.
The Domo add-in displays in a sidebar at the right of the app.
3. Under **Instances History**, you can view the list of connected instances.
4. Select the logo for the connected instance that you want to switch to.
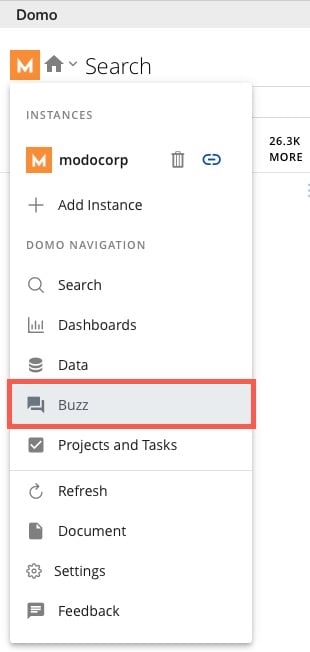
**Use Buzz with Add-ins:** You can access Buzz conversations and begin new ones without leaving the Microsoft app.
In the Domo sidebar, select **Home** > **Buzz**.
### Add & Refresh Content
# Search Domo Content
1. Complete this step depending on the app you are working in.
* For Excel, PowerPoint, and Word:
1. Select **Search** in the Domo toolbar at the top of your document.
The **Search** screen of the add-in displays in a sidebar to the right of your document.
* For Outlook:
1. Select the **Domo** logo in the toolbar at the top of the app.
The menu displays.
2\. In the menu, select **Search**.
The **Search** screen of the add-in displays in a sidebar at the right of the app.
2. Enter keywords in the **Search** field at the top of the sidebar.
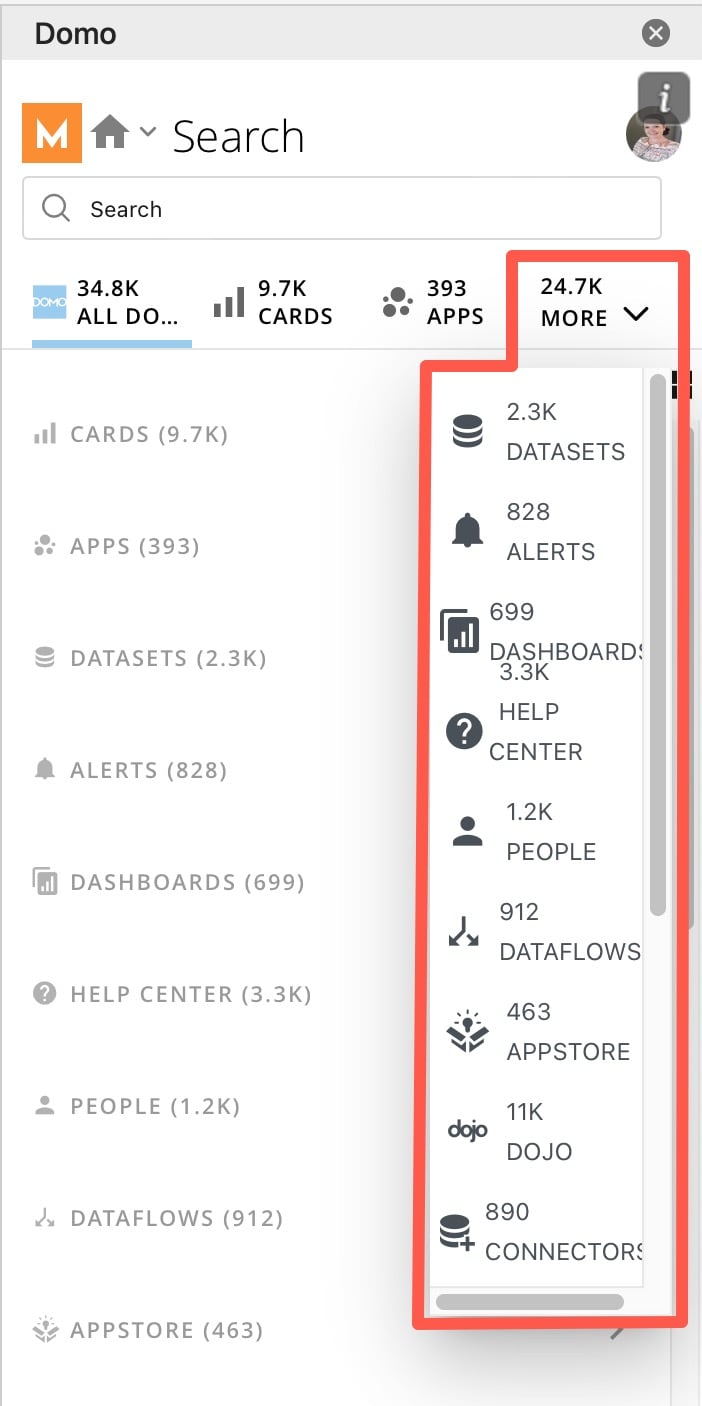
3. You can filter the search results between **All Domo**, **Card**, **Apps**, and **More**. Selecting **More** opens a menu with more filtering options.
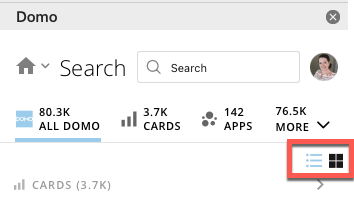
You can change the format you view results in by toggling between **List** and **Tile** at the top of the search results.
### Import Domo Content to Your Document (Excel, PowerPoint, Word)
1. Follow the instructions above to [search](#search_domo_content) for the content you want to import into your document.
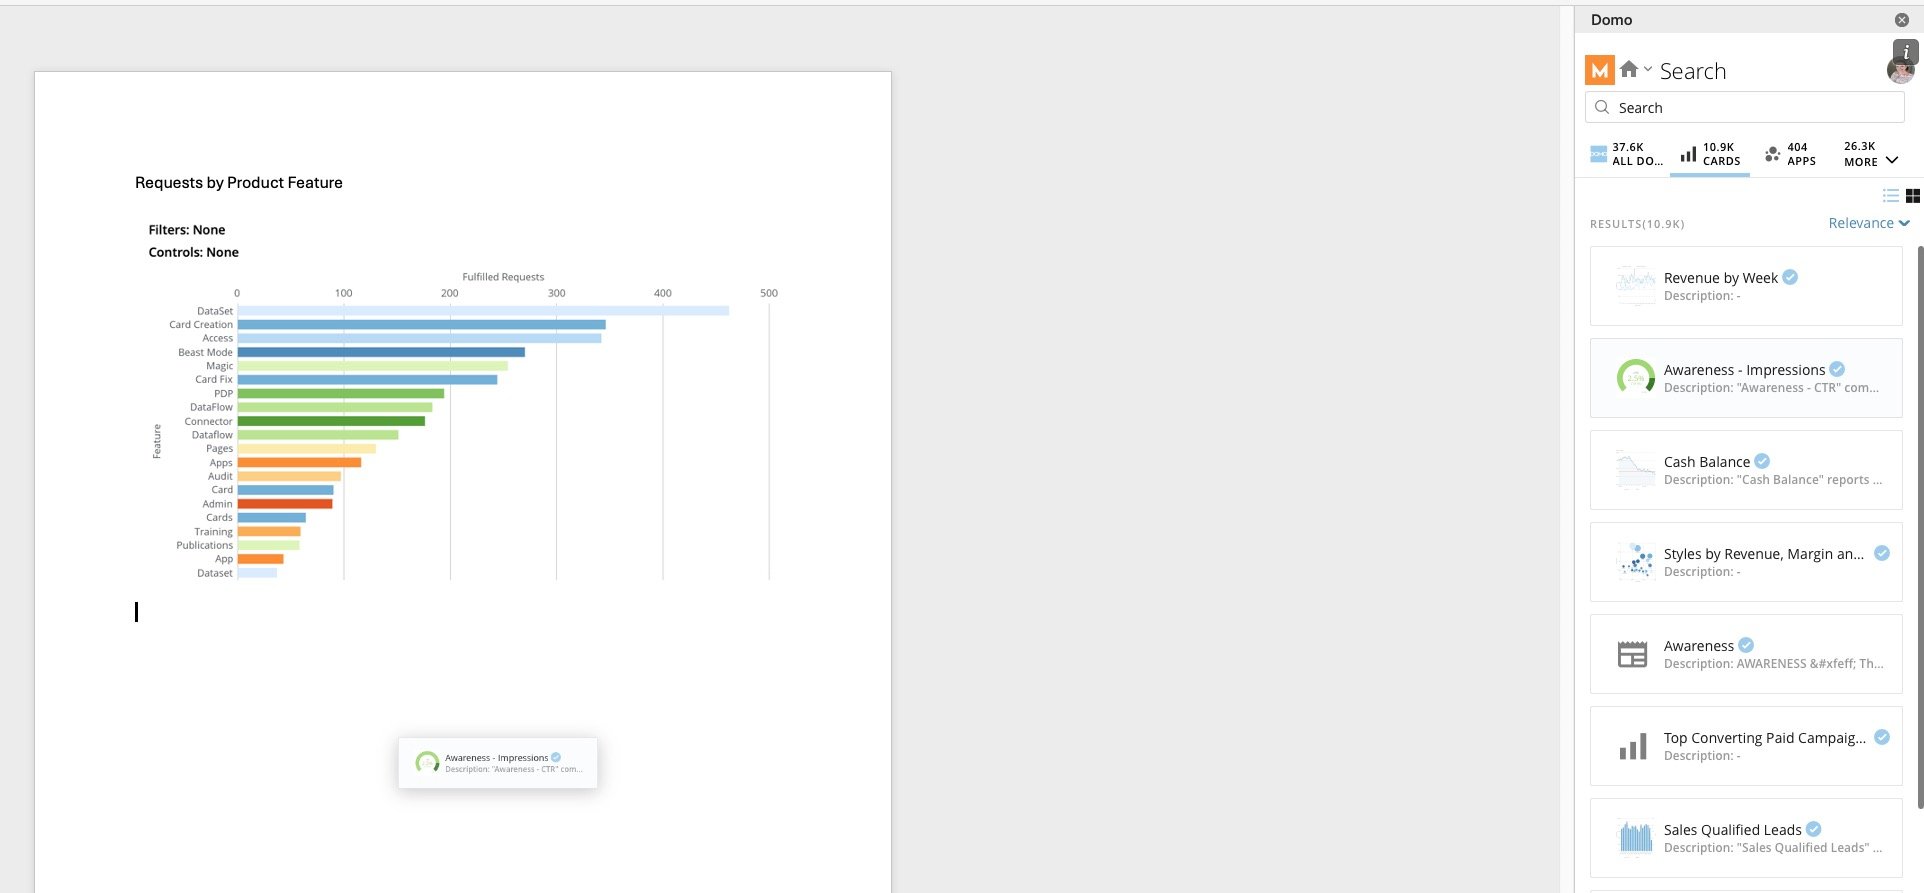
2. In the search results, select the content.
3. Drag the content into your document.
The content import modal displays.
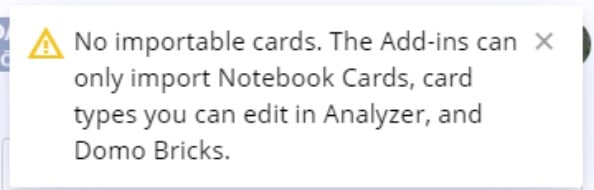
**Supported card types:** Importing is currently supported for Notebook Cards, all card types you can edit in Analyzer, and Domo Bricks. Other card types open in a web browser when selected and cannot be imported.
If a card of an unsupported type is selected for import, a message displays that the card is not importable. Similarly, if the **Import All** option is used with a dashboard that contains cards of unsupported type, the message displays.
# Configure Import Settings
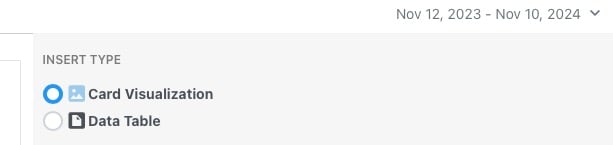
1. Choose whether to import the content as a **Card Visualization** or a **Data Table**.
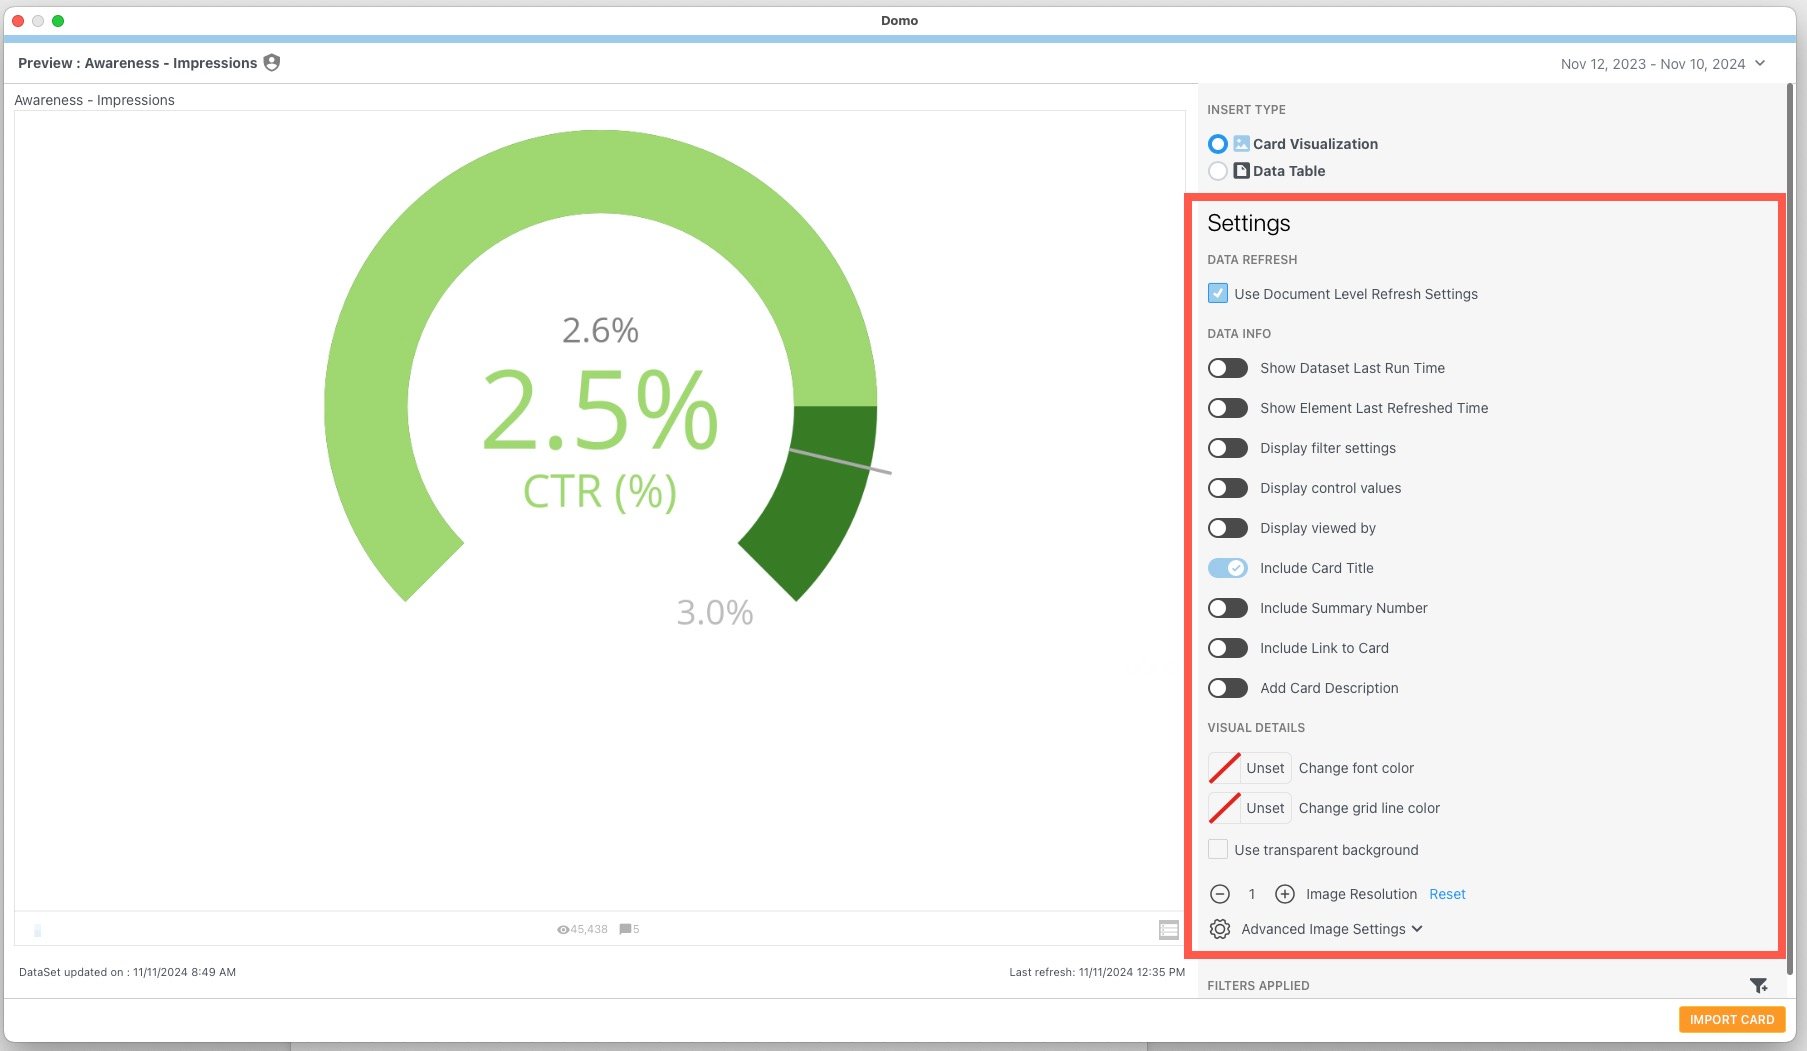
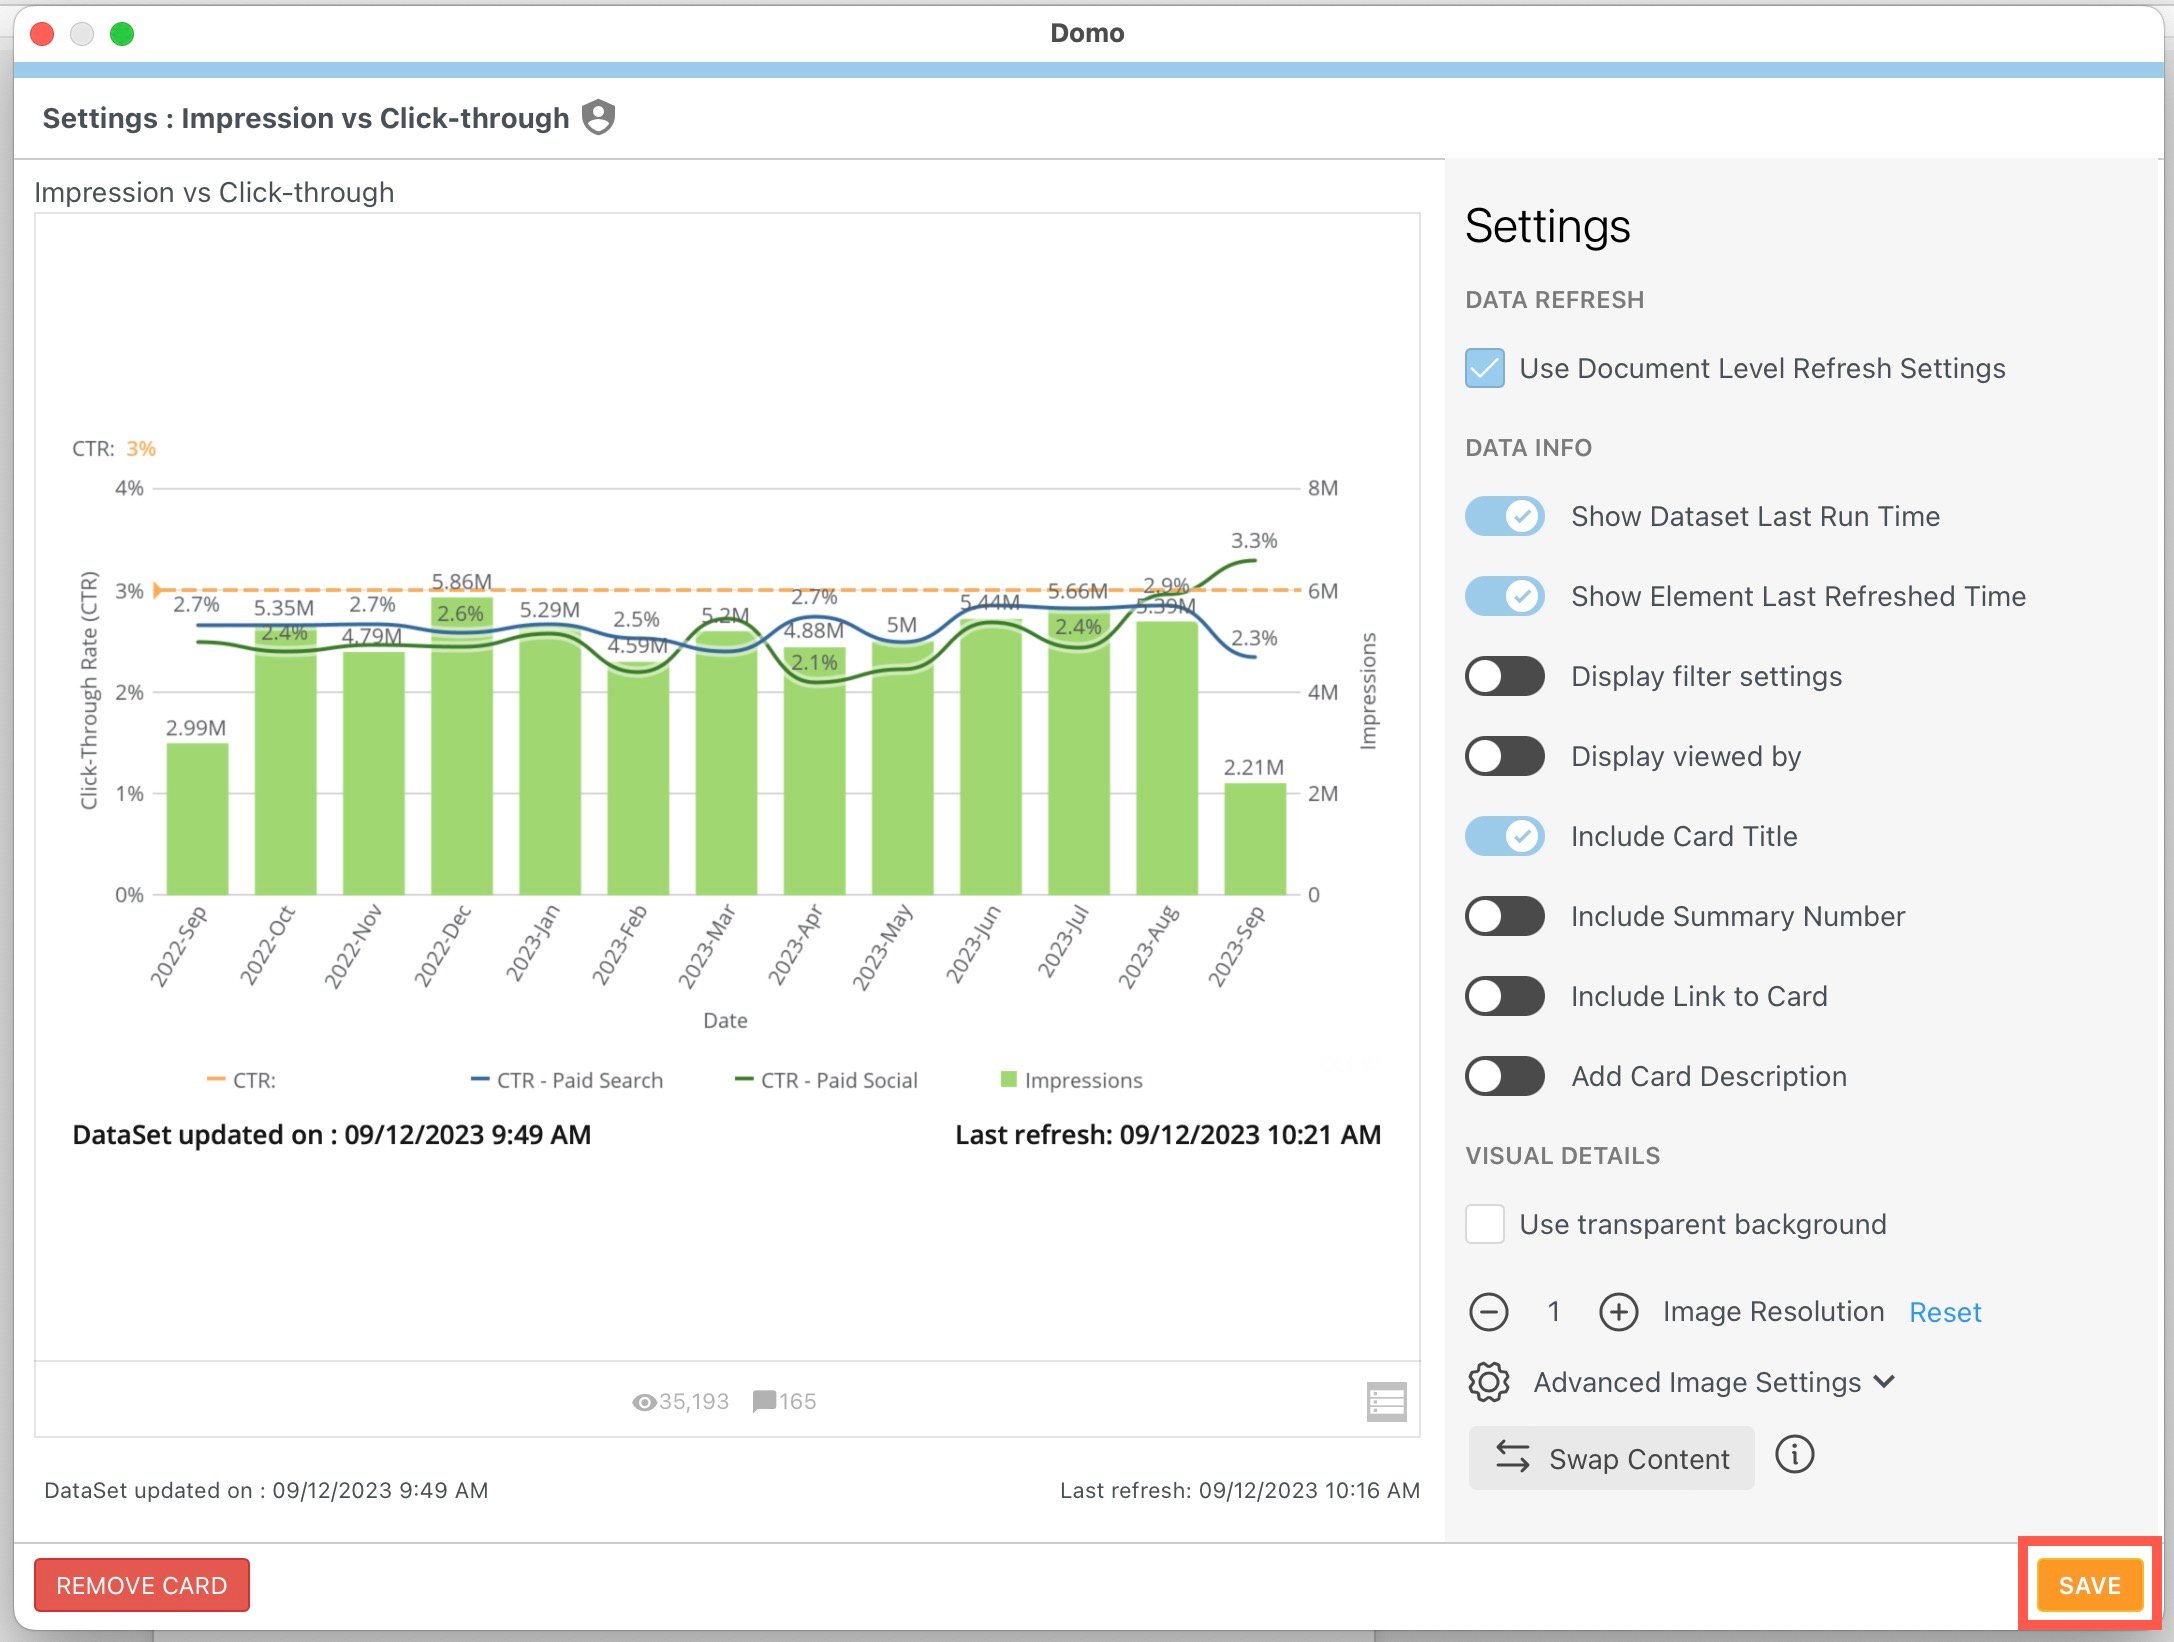
2. Make any changes to the **Settings**, which are described below.
* **Data Refresh —** This section includes the option to **Use Document Level Refresh Settings**. Learn how to [refresh all content](#refresh_all_domo_content) in your document and how to [refresh content individually](#refresh_all_domo_content_individually).
* **Data Info —** This section includes switches to enable the following:
* Show DataSet Last Run Time
* Show Element Last Refreshed Time
* Display filter settings.
* Display control values
* Display viewed by
* (Cards only) Include Card Title
* (Cards only) Include Summary Number
When you choose to include the Summary Number, you have the option under **Visual Details** to **Hide Card Image**. This allows only the Summary Number itself to display in the document.
* (Cards only) Include Link to Card
* (Cards only) Add Card Description
* **Visual Details —** This section includes the options to change the colors for font color and grid line color and the option to **Use transparent background** to improve design functionality in your document.
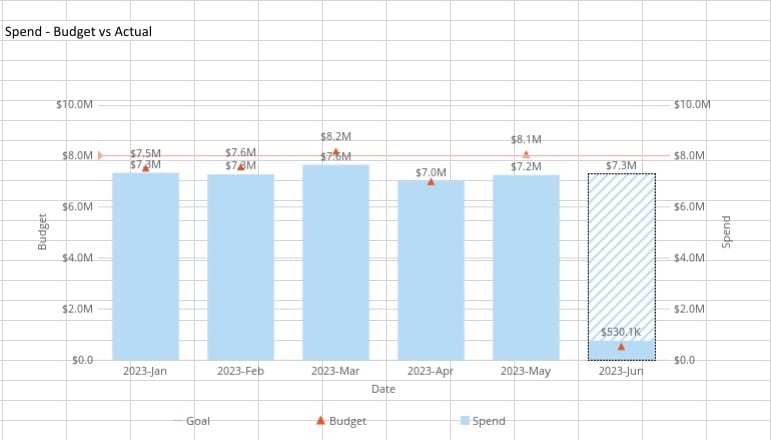
* **Advanced Image Settings —** Selecting **Advanced Image Settings** allows you to adjust the width, height, and scale of the image. Select **Reset** to return to the default settings.
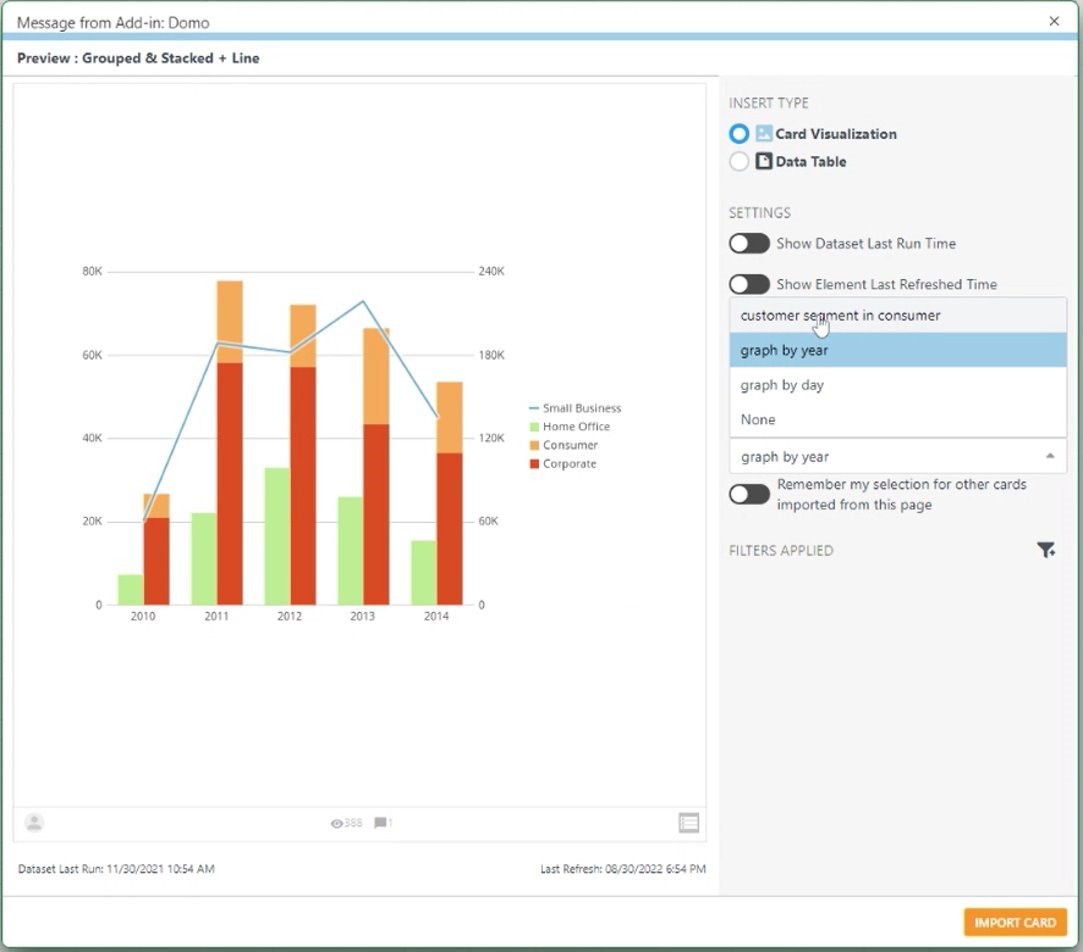
**Note:** You can also search for and import cards from the **Dashboards** tile in the Domo toolbar of your document. If you import a card this way, a modal displays with a list of all the Page Filters available for the content under **Settings**. You can select a Page Filter to apply to the card you are importing. If you enable the switch for **Remember my selection for other cards imported from this page**, you can continue to import cards from that dashboard without needing to re-configure the Page Filters each time.
3. (Optional) Choose filters to apply to your card content inside the import modal. Learn how to apply filters.
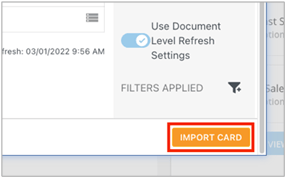
4. Select **Import Card**.
5. Verify that the configured card imported correctly to your document.
**Note:** See [Altering Document Settings](#AlterDocumentSettingsExcelPowerPointWord) for more information about modifying imported content.
#### Refresh All Domo Content in Your Document (Excel, PowerPoint, Word)
When you refresh your content, the same settings you applied during the [initial import](#configure_import_settings) are applied to the refresh query.
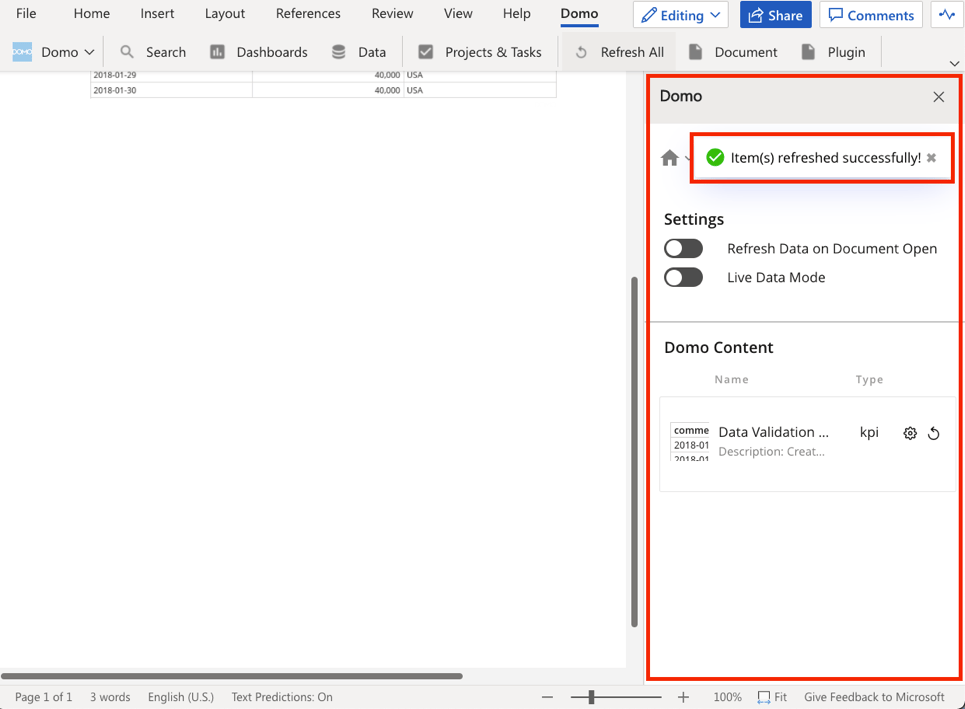
1. Select **Refresh All** in the Domo toolbar at the top of your document.
All the Domo content in your document refreshes, and the **Document** screen of the Domo add-in displays in a sidebar to the right of your document.
2. Adjust the **Settings** in the add-in as needed.
**Note:** You can make sure the format of your documentation doesn’t change when you refresh your content by selecting **Lock Content**.
#### Refresh All Domo Content Individually (Excel, PowerPoint, Word)
When you refresh your content, the same settings you applied during the [initial import](#configure_import_settings) are applied to the refresh query.
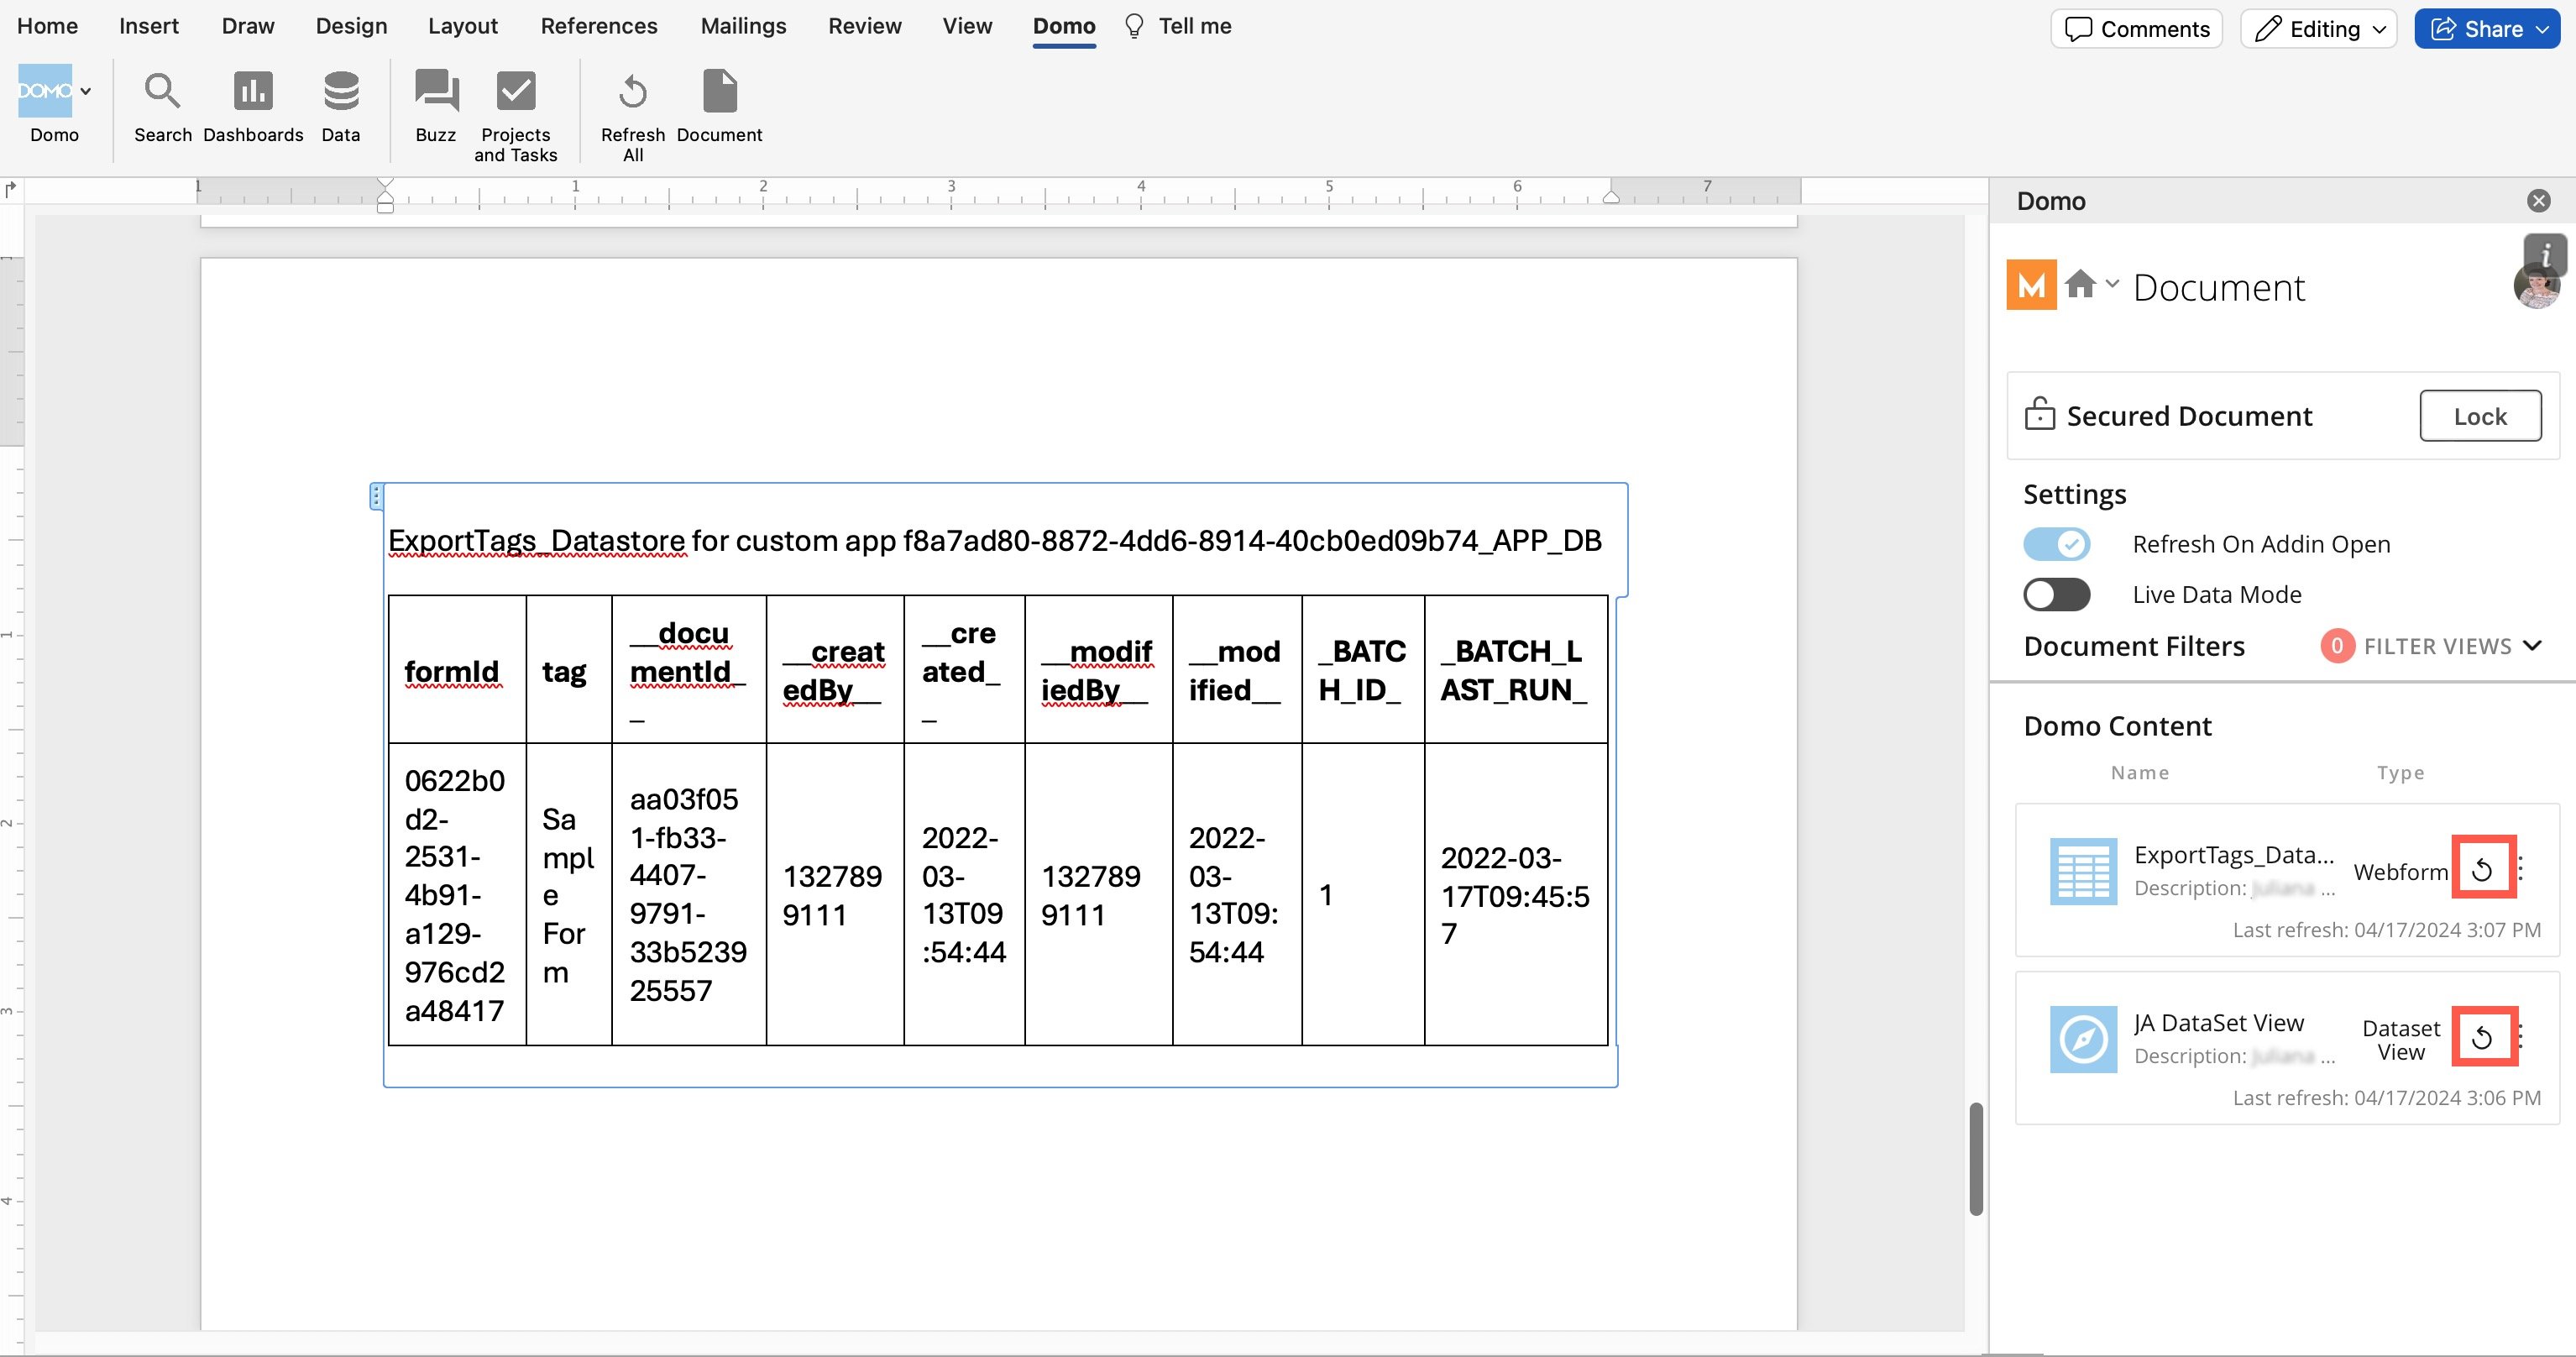
1. Open the **Document** screen of the Domo add-in. For detailed instructions on how to do this, see [Alter Document Settings](#AlterDocumentSettingsExcelPowerPointWord).
2. In the **Domo Content** section of the Document screen of the add-in, find the content that you want to refresh.
3. Select **Refresh** for each item.
#### Display Variable Controls
When you import Domo content to a document, you can choose to display the value of variables being used in your card. You can enable this this setting even if there are no variables currently being used on your card, because you can add variables after import.
Follow these steps to configure and display these controls.
1. Begin [importing Domo content](#import_domo_content) to PowerPoint.
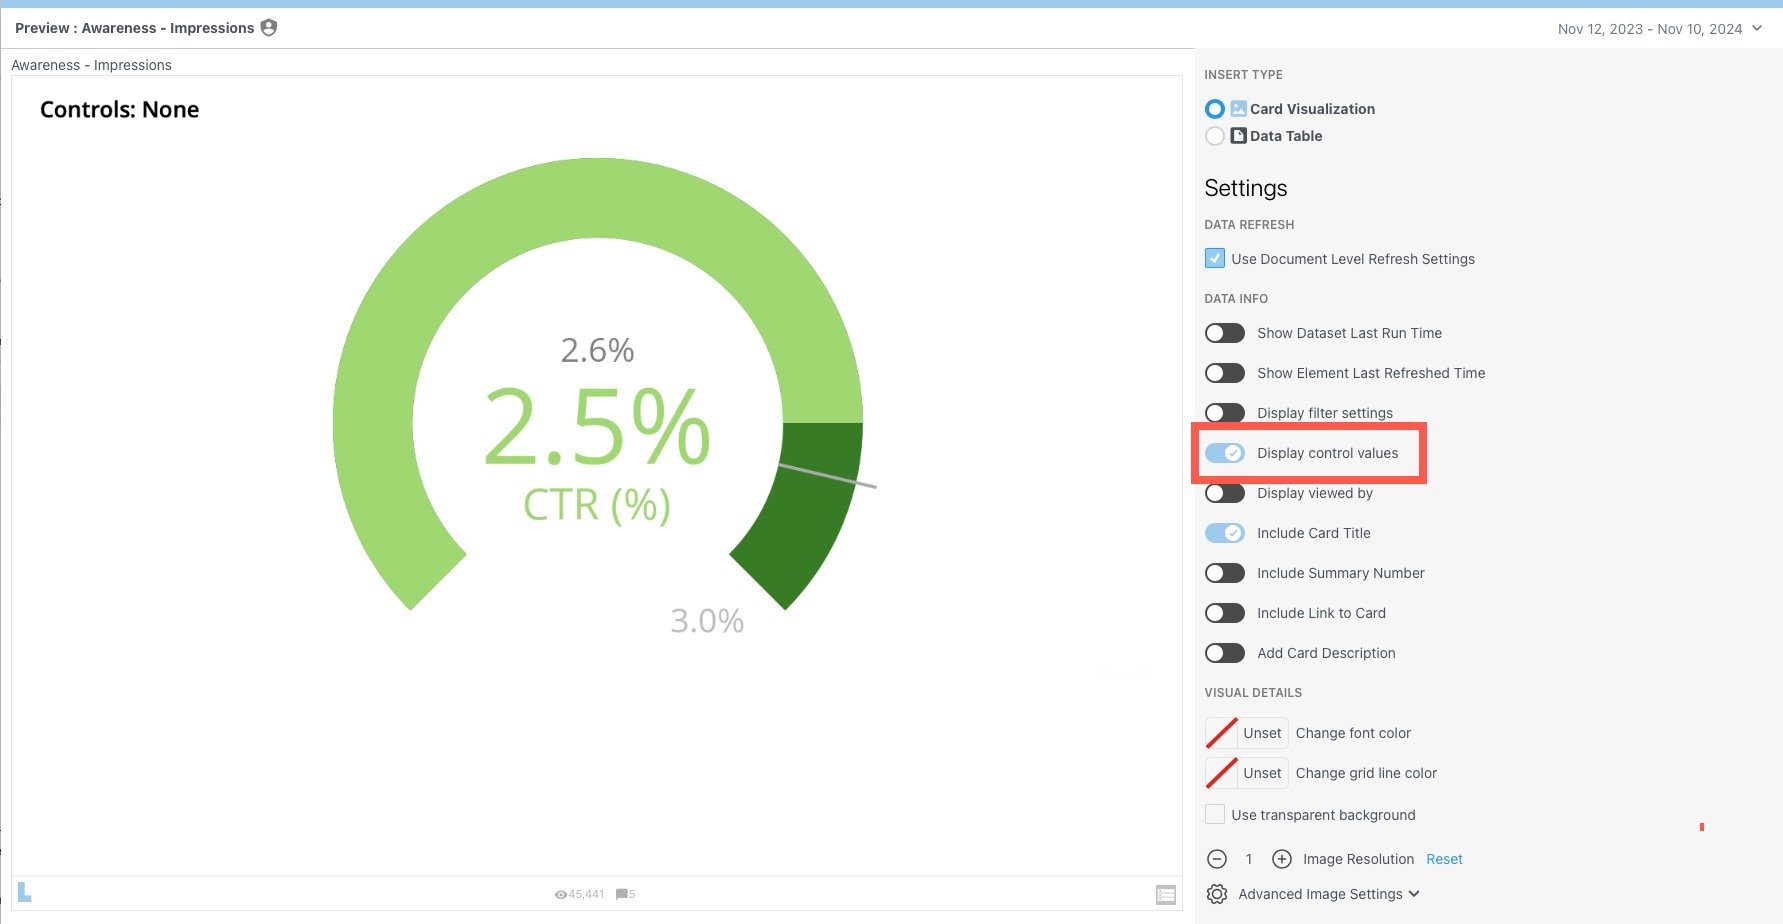
2. While [configuring the import settings](#configure_import_settings), switch the toggle labeled **Display control values**.
3. Make any other changes to the import settings and import the card.
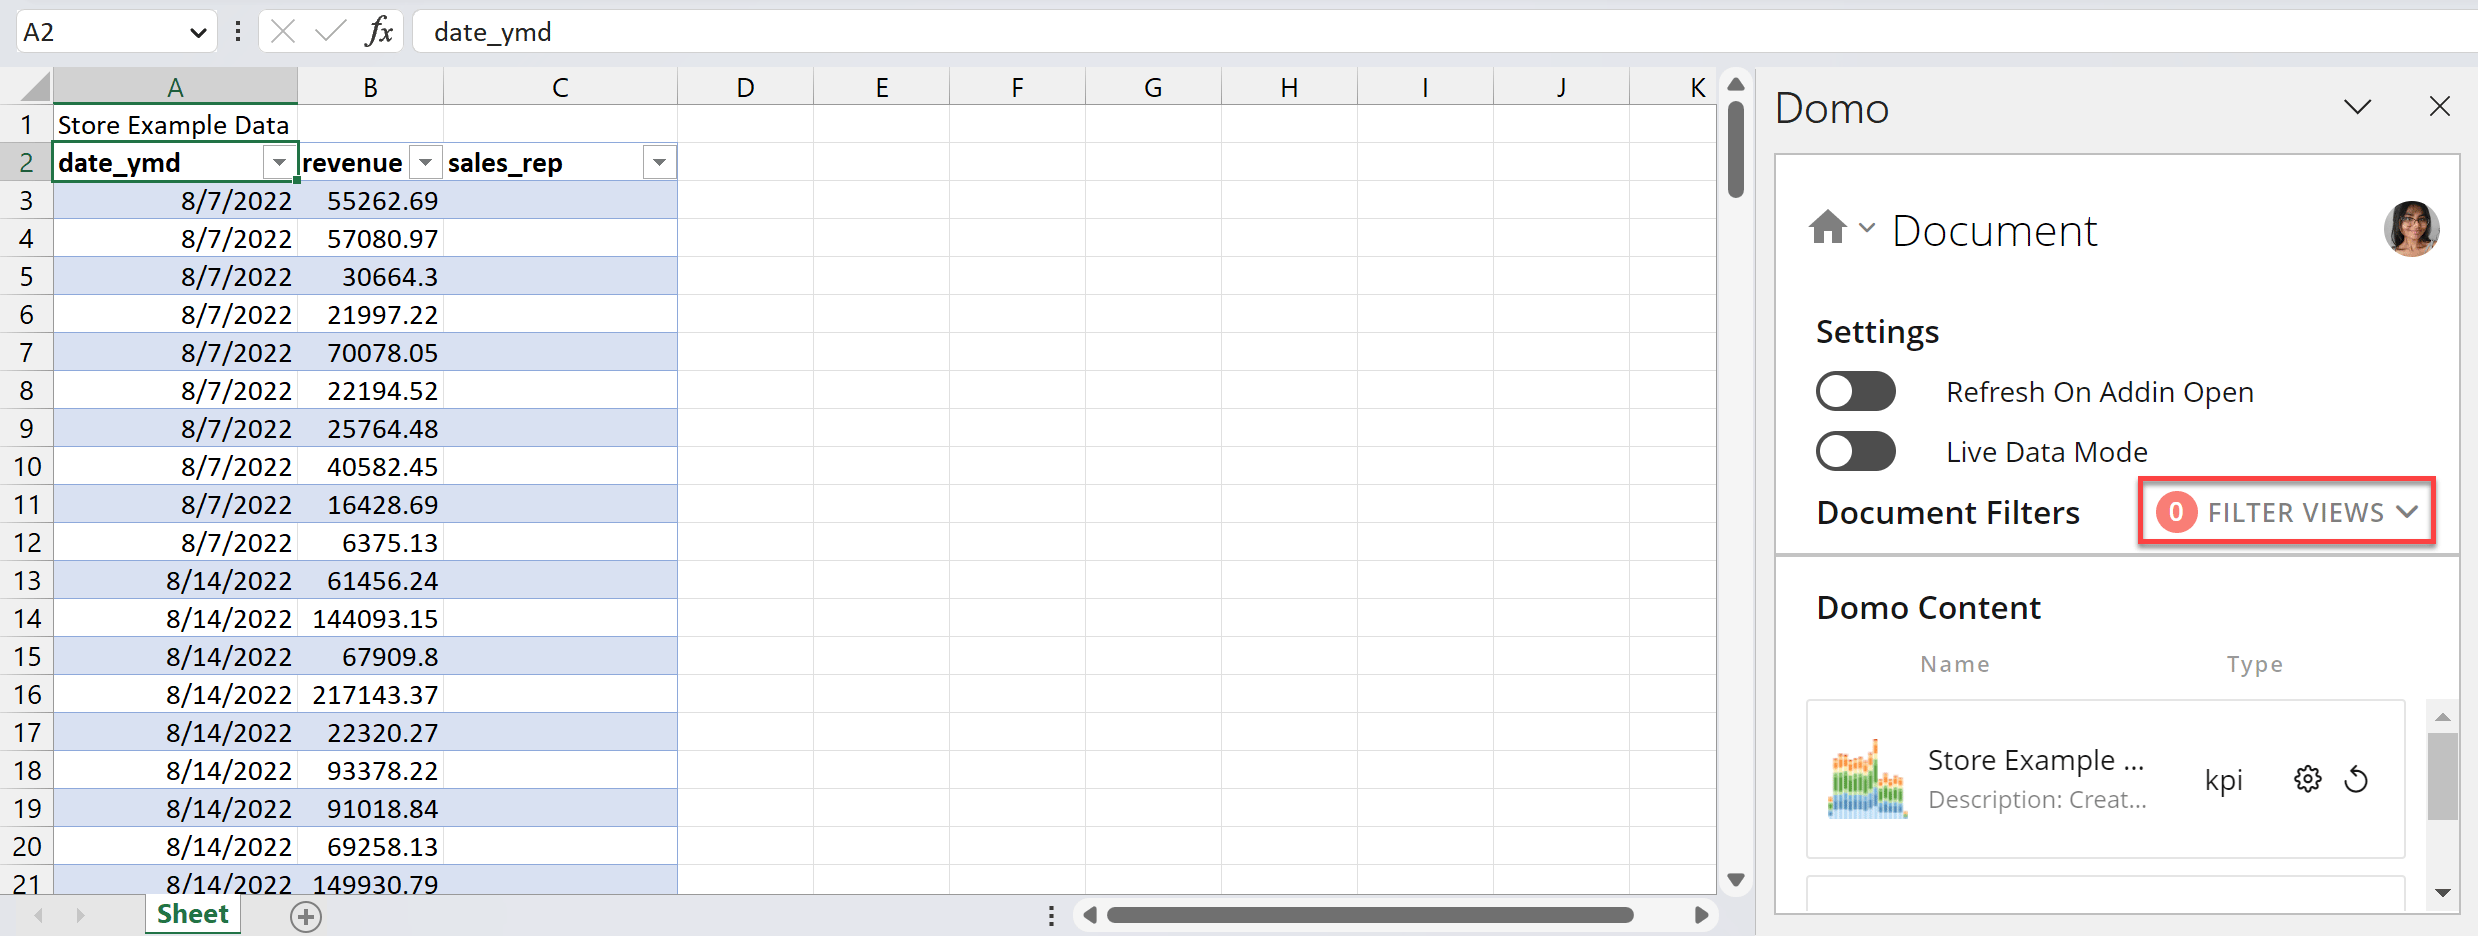
4. Go to the **Document** tab of the Domo sidebar and select **Filter Views**.
5. Select **Controls**.
6. Set the appropriate control values for the variables you want to display on the card. **Note:** This is particularly important if no variables have been configured previously.
7. When finished, select **Save Filters**.
8. [Refresh](#refresh_all_domo_content_individually) the content to display the variable values you selected.
Now the card displays controls that are currently in use.
**Note:** If you have multiple cards in your document that use the same calculated field containing a variable, all the cards will be updated accordingly after you set the control values.
#### Apply Filters
In the card import modal shown in the instructions for [Importing Domo Content to Your Document](#ImportDomoContenttoYourDocumentExcelPowerPointWord), there are additional Filters you can configure when importing content. Follow these instructions to apply them.
1. In the right navigation menu of the card import modal, select **Filters**.
You are redirected to the **Setup Filters** screen of the modal.
2. In **Setup Filters**, drag the columns you want to filter on from the **Available Columns** section to the **Filters** section.
3. For each column in the **Filters** section, select the column and choose any applicable values for the Filter, such as Filter type and condition. Select **Apply** to apply each Filter.
4. When you have created all your Filters, select **Finish** to return to the main screen of the card import modal.
The applied Filters display in the right navigation menu of the modal.
5. Select **Save** to save your Filters and close the modal.
**Note:** Document Filters allow you to apply Filters to all columns with the same name in your document. To use them, highlight the column you want to filter, select the **Document** tab in the Domo toolbar, and then select **Filter Views**.
#### View Filter Details
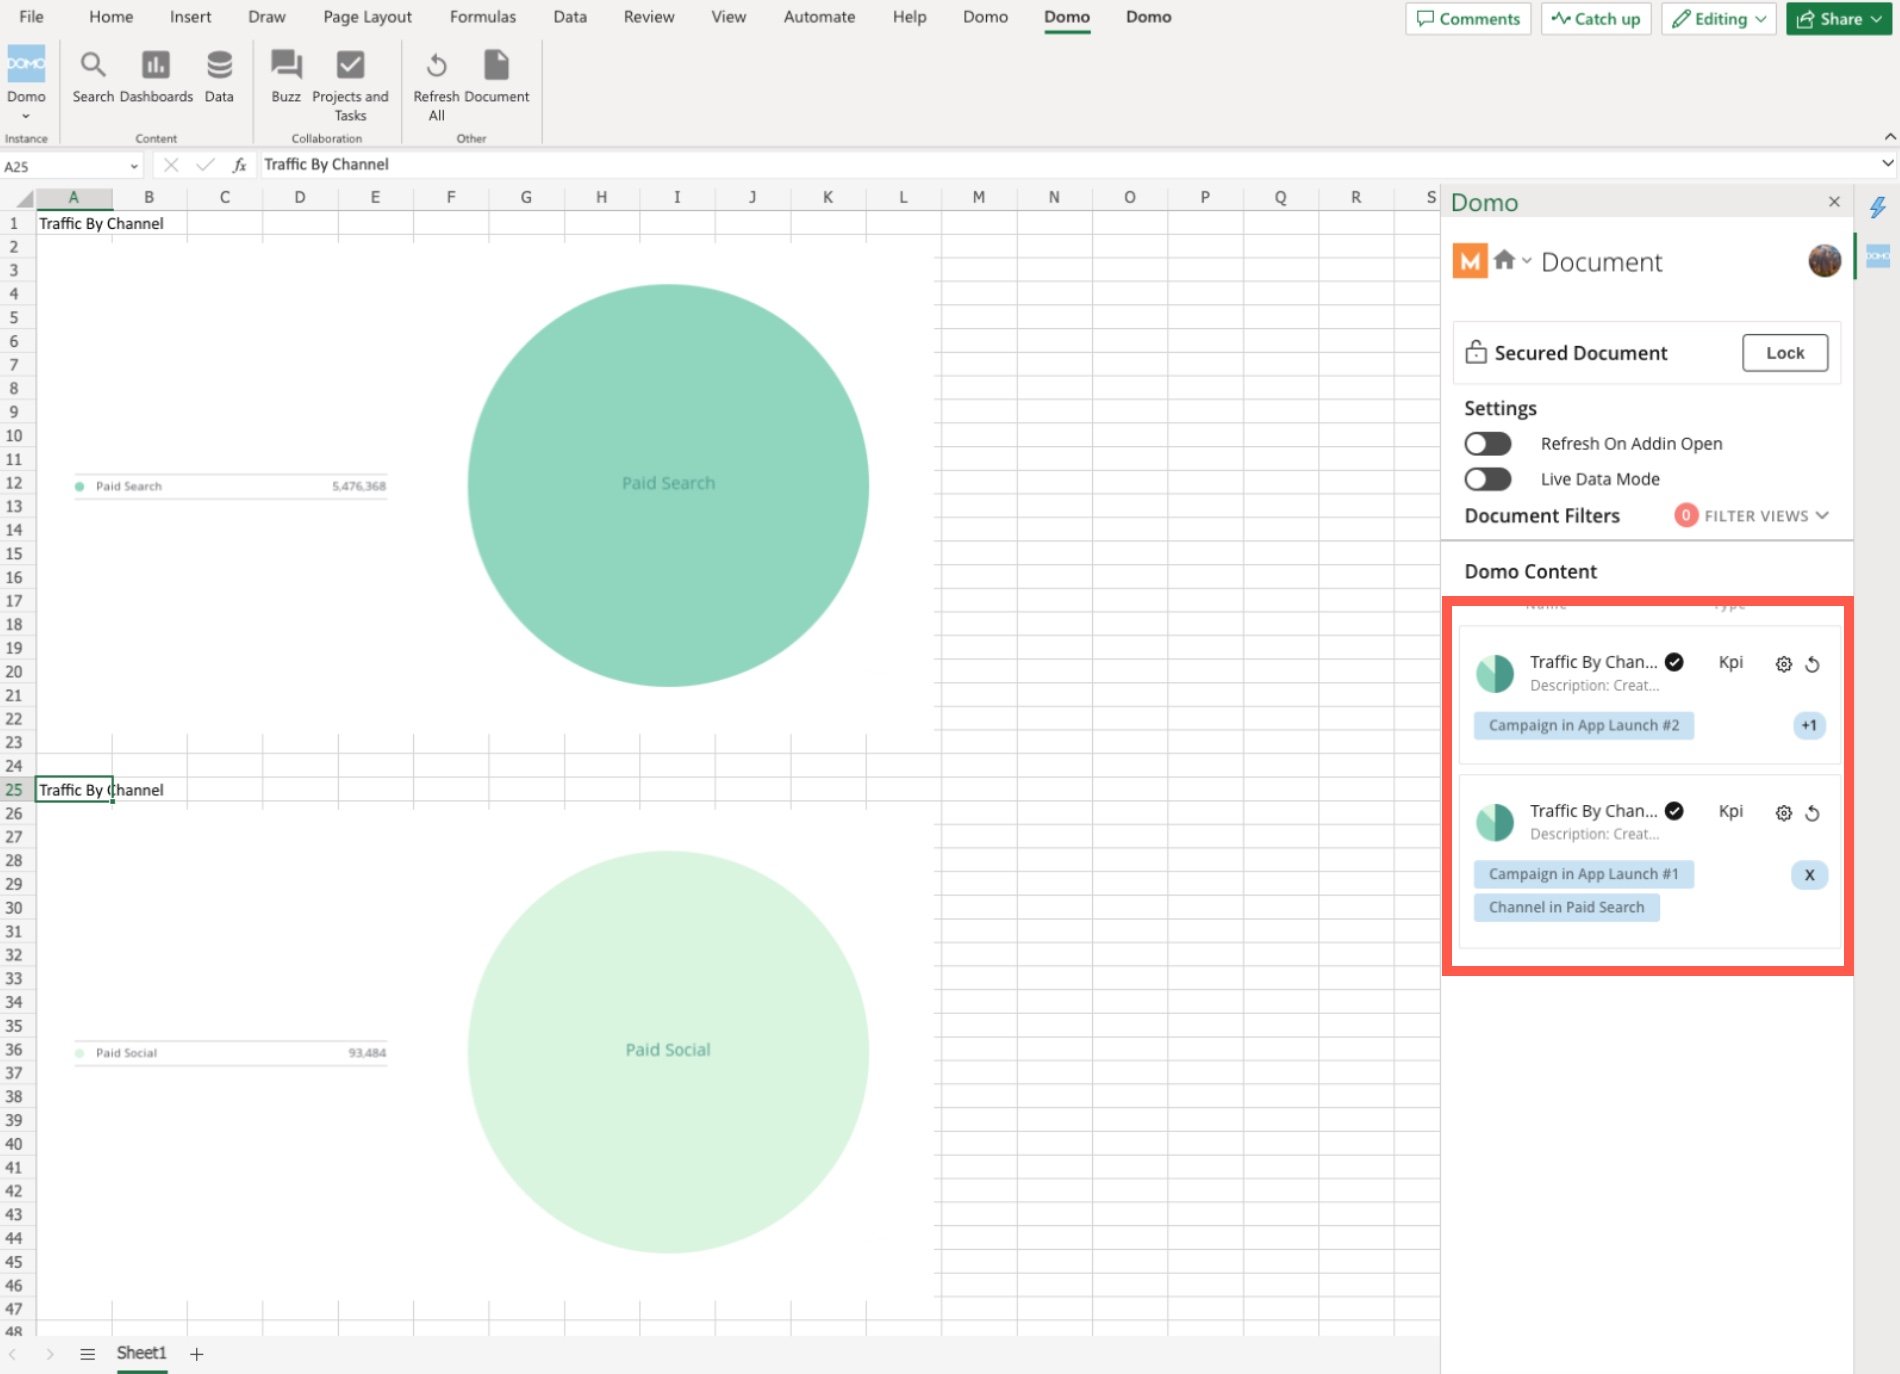
In the **Document** tab of the Domo sidebar, you can view the details for each set of Filters for each imported item in your document. This helps you distinguish between different versions of the content.
#### Update Filters
After you import content and apply Filters, you can update your Filters by following these steps:
1. Select **Document** from the Domo toolbar at the top of your Microsoft 365 app.
The **Document** screen of the Domo add-in displays in a sidebar to the right of your document.
2. In the list of Domo Content, find the content for which you want to update the Filters.
3. Select **Settings** for that content.
The card import modal displays.
4. Select **Filters**.
You are redirected to the **Setup Filters** screen of the modal.
5. Edit, add, or remove any Filters for the content. See Applying Filters for more information.
6. When you have made all the updates to your Filters, select **Finish** to return to the main screen of the card import modal.
7. Select **Save** to save your Filters and close the modal.
### Use Content Swap
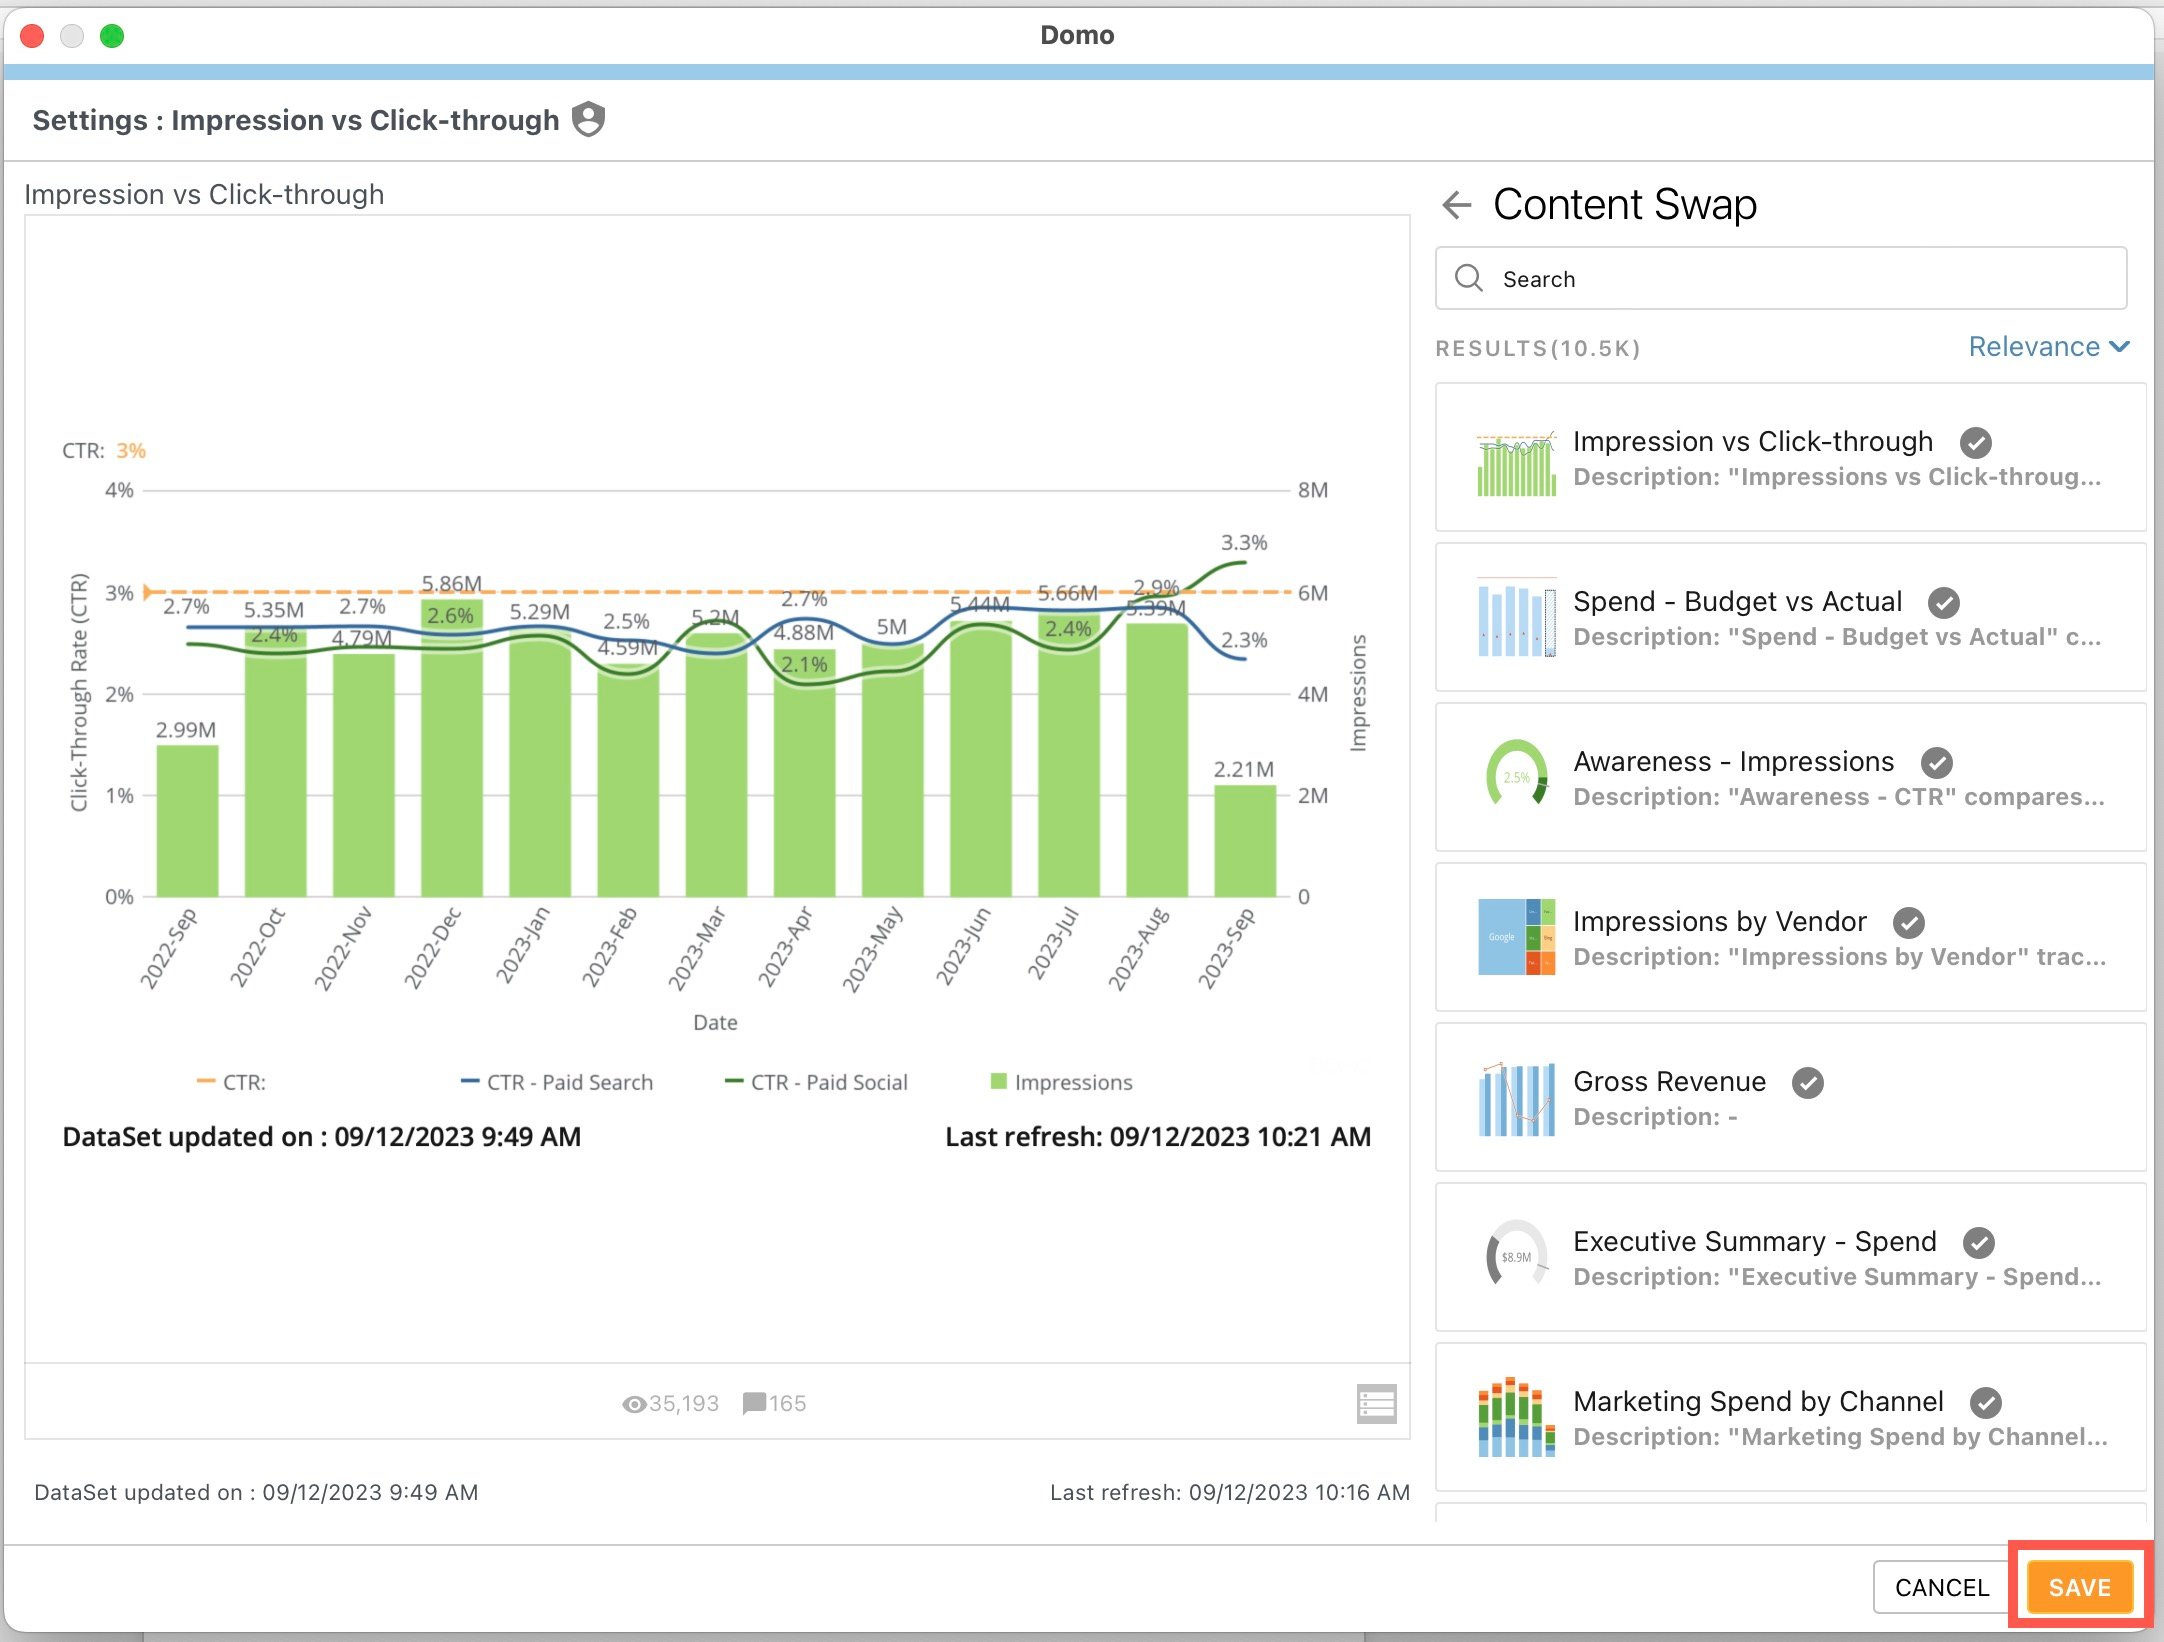
Content Swap allows you to replace content in your document while preserving existing content settings. Content Filters are not preserved. Follow the steps below to use Content Swap.
1. In the Domo toolbar of your document, select **Document** to display document information in the Domo sidebar.
2. In the sidebar, locate the content you want to swap and select **More** > **Swap Content**.
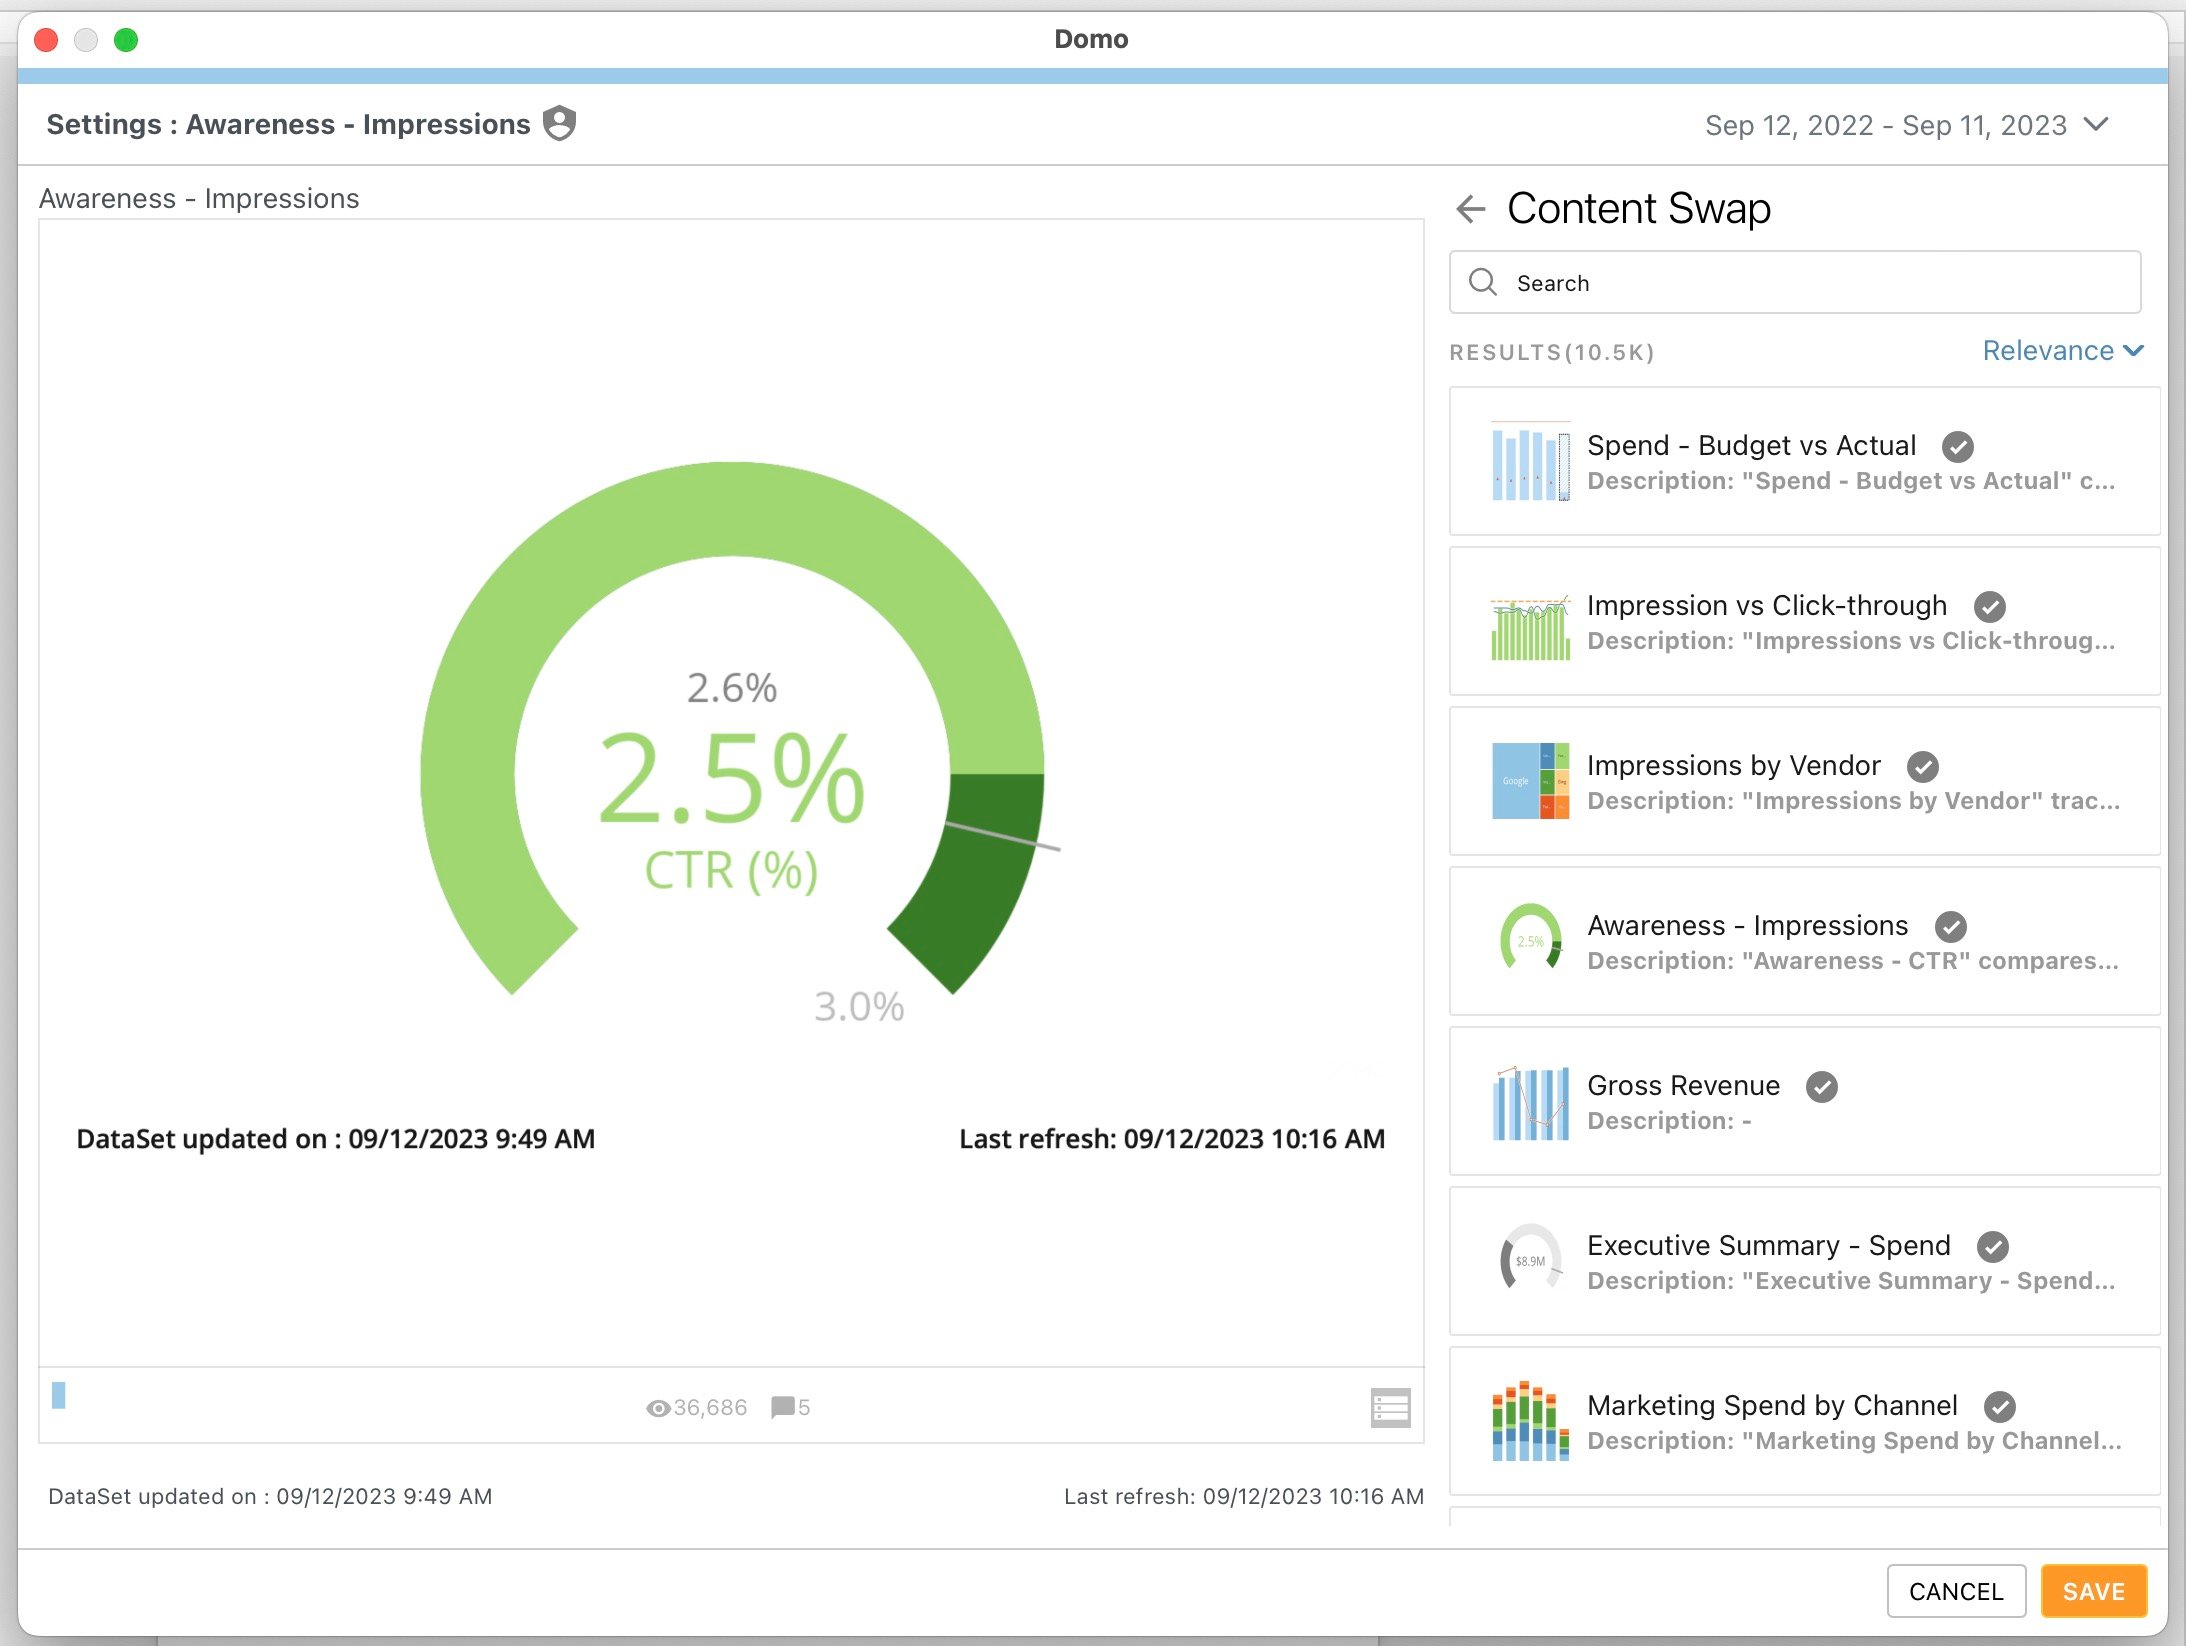
The **Content Swap** modal displays.
3. Locate and select the content you want to swap in and select **Save**.
4. Adjust any settings and configure any Filters.
5. Select **Save** to close the modal and keep your changes.
**Dynamic Image Rendering:** If you resize an image after importing it to your document, you may experience distortion. Fix any distortion by refreshing the card after resizing it and the image will re-render and display in the original quality with the correct aspect ratio. Learn how to [refresh your content](#refresh_all_domo_content).
### Search for Dashboards and Content
1. Complete this step depending on the app you are working in.
* For Excel, PowerPoint, and Word:
1. Select **Dashboards** in the Domo toolbar at the top of your document.
The **Dashboard** screen of the Domo add-in displays in a sidebar to the right of your document.
* For Outlook:
1. Select the **Domo** logo in the toolbar at the top of the app.
The menu displays.
2\. In the menu, select **Dashboards**.
The **Dashboards** screen of the add-in displays in a sidebar at the right of the app.
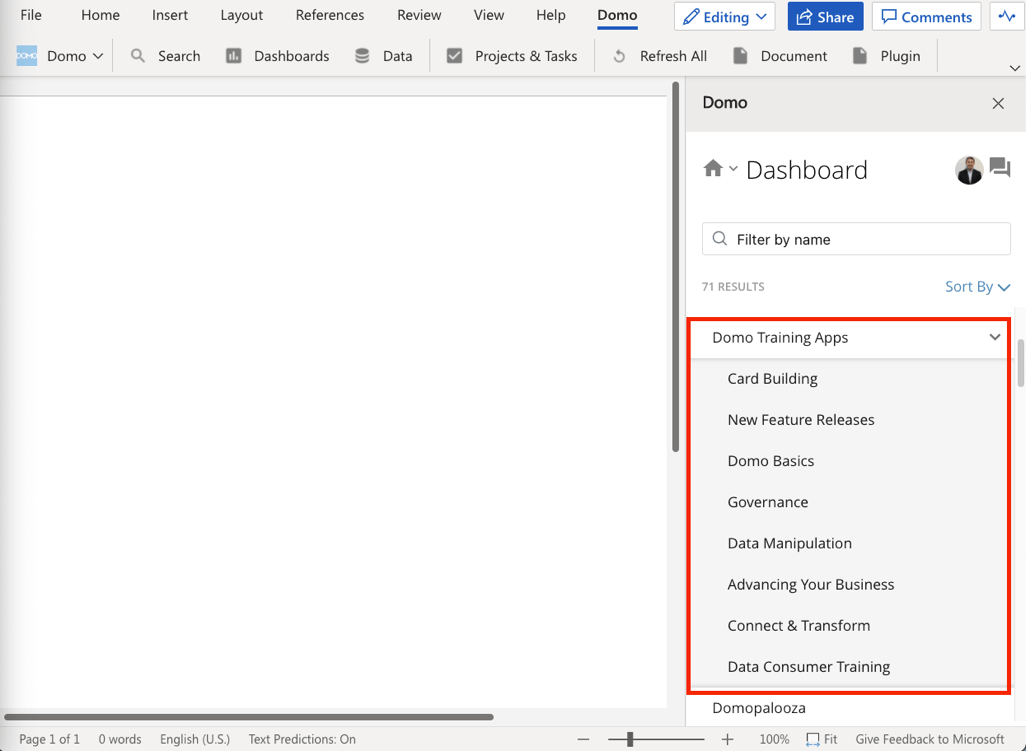
2. Enter keywords into the **Filter by name** field at the top of the **Dashboard** screen or scroll through the list items to find the dashboard you are looking for.
**Note:** Some dashboards are nested under other search results. To view these nested dashboards, select the down arrow.
3. When you find the dashboard you are looking for, select it to view its contents.
### Search for and Import DataSets
1. Complete this step depending on the app you are working in.
* For Excel, PowerPoint, and Word:
1. Select **Data** in the Domo toolbar at the top of your document.
The **Data** screen of the Domo add-in displays in a sidebar to the right of your document.
* For Outlook:
1. Select the **Domo** logo in the toolbar at the top of the app.
The menu displays.
2\. In the menu, select **Data**.
The **Data** screen of the add-in displays in a sidebar at the right of the app.
2. Find the data you're looking for. You can do any of the following:
* Enter keywords into the **Search** bar at the top of the **Data** screen of the add-in or scroll through the list.
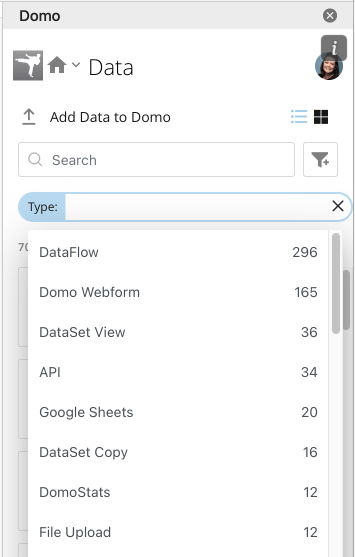
* Select **Filters** to use one or more filters to narrow your results.
**Note:** Filters allow you to filter by various criteria, such as who owns the DataSet, what type of data it is, any tags it may have, and when it was last run.
* After you select a Filter, you are prompted to select criteria for that Filter. In this example, the **Type** filter allows you to filter to items like DataFlows or file uploads.
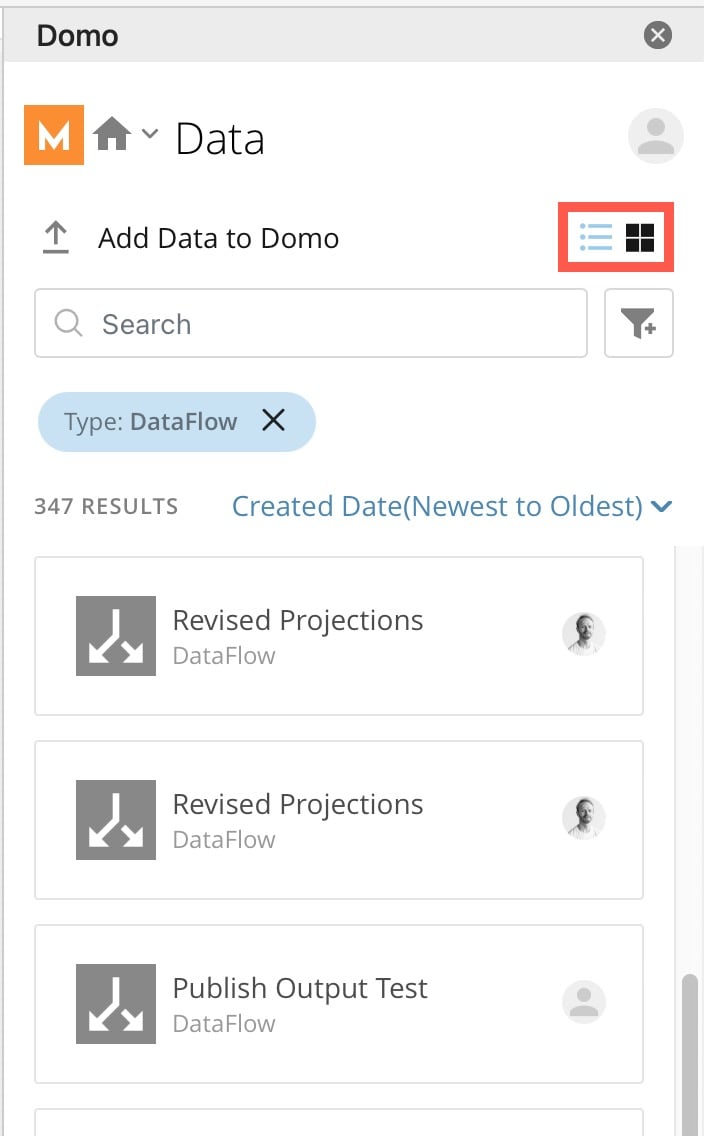
* With all search criteria applied, you can view the results in list and tile formats by toggling between **List** and **Tile** at the top of the search results.
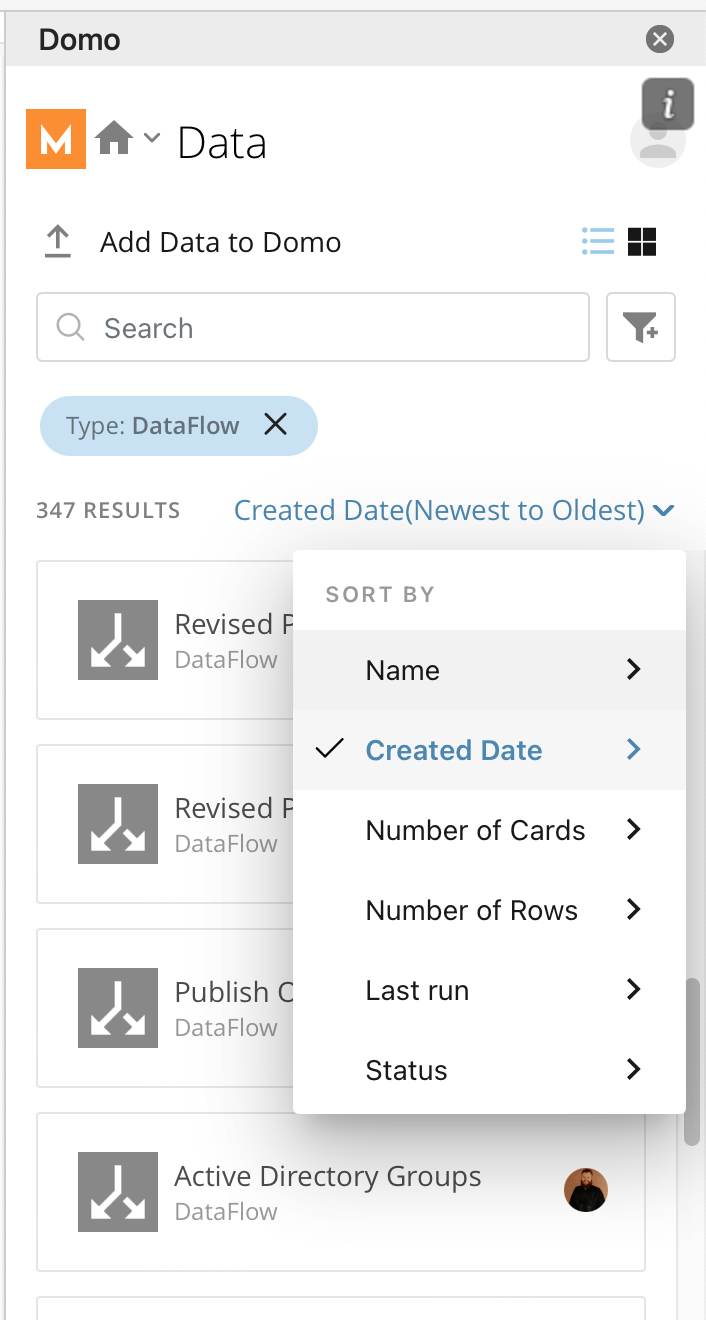
* You can sort results by **Name**, **Created Date**, **Number of Cards**, **Number of Rows**, **Last run**, and **Status**.
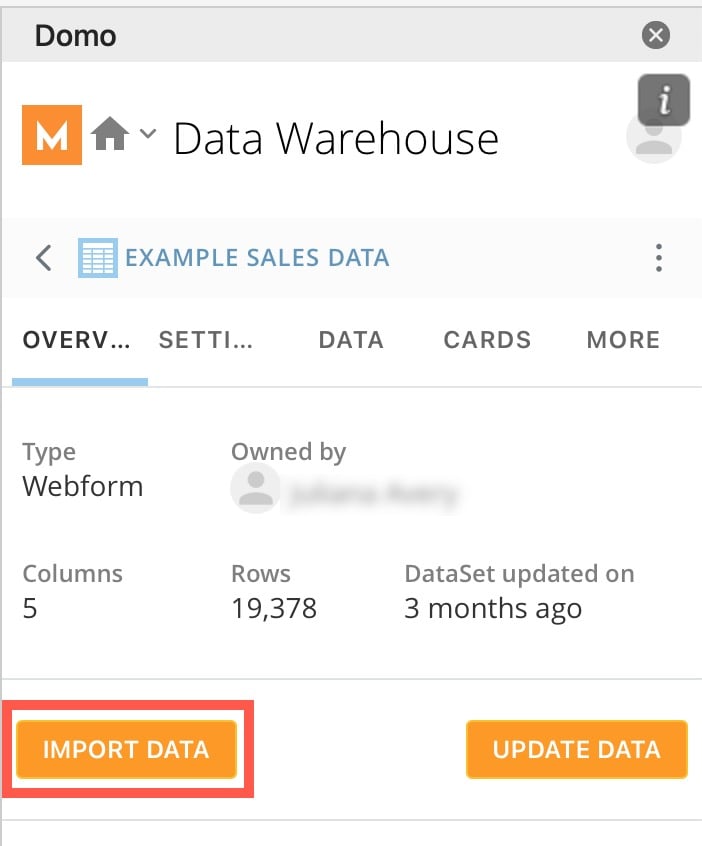
3. Select the DataSet that you want to import into your document.
4. Select **Import Data**.
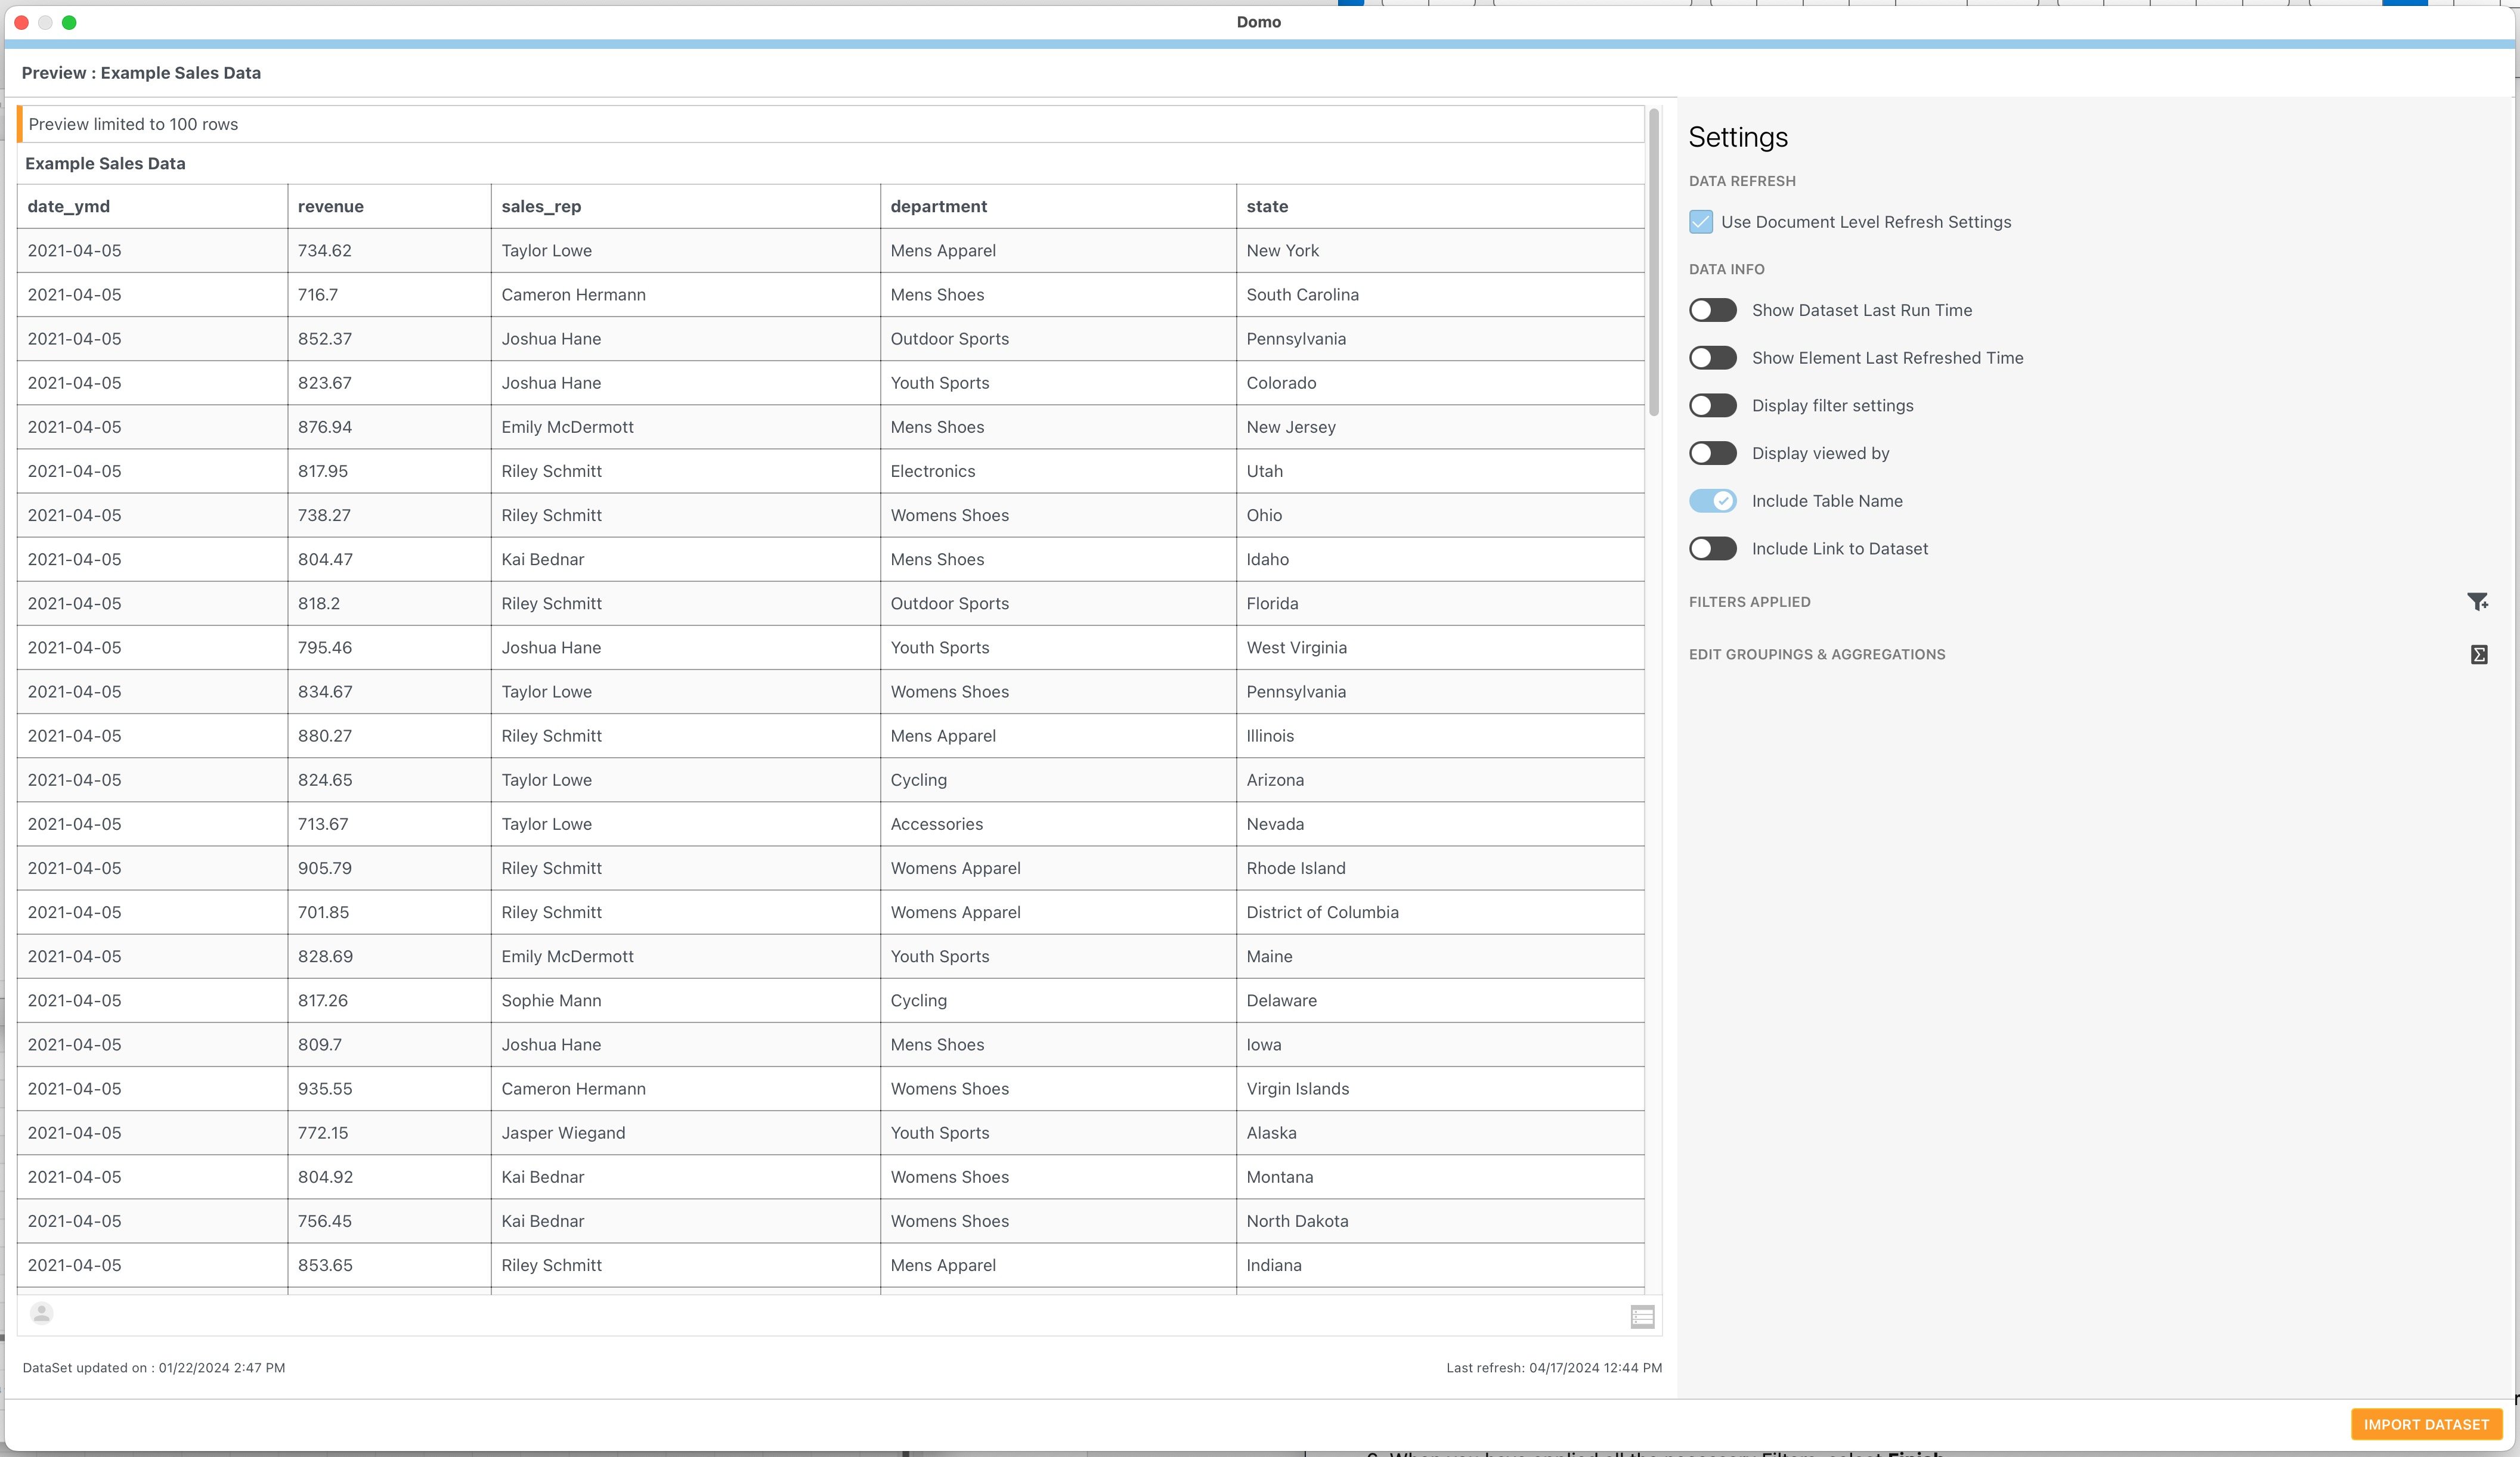
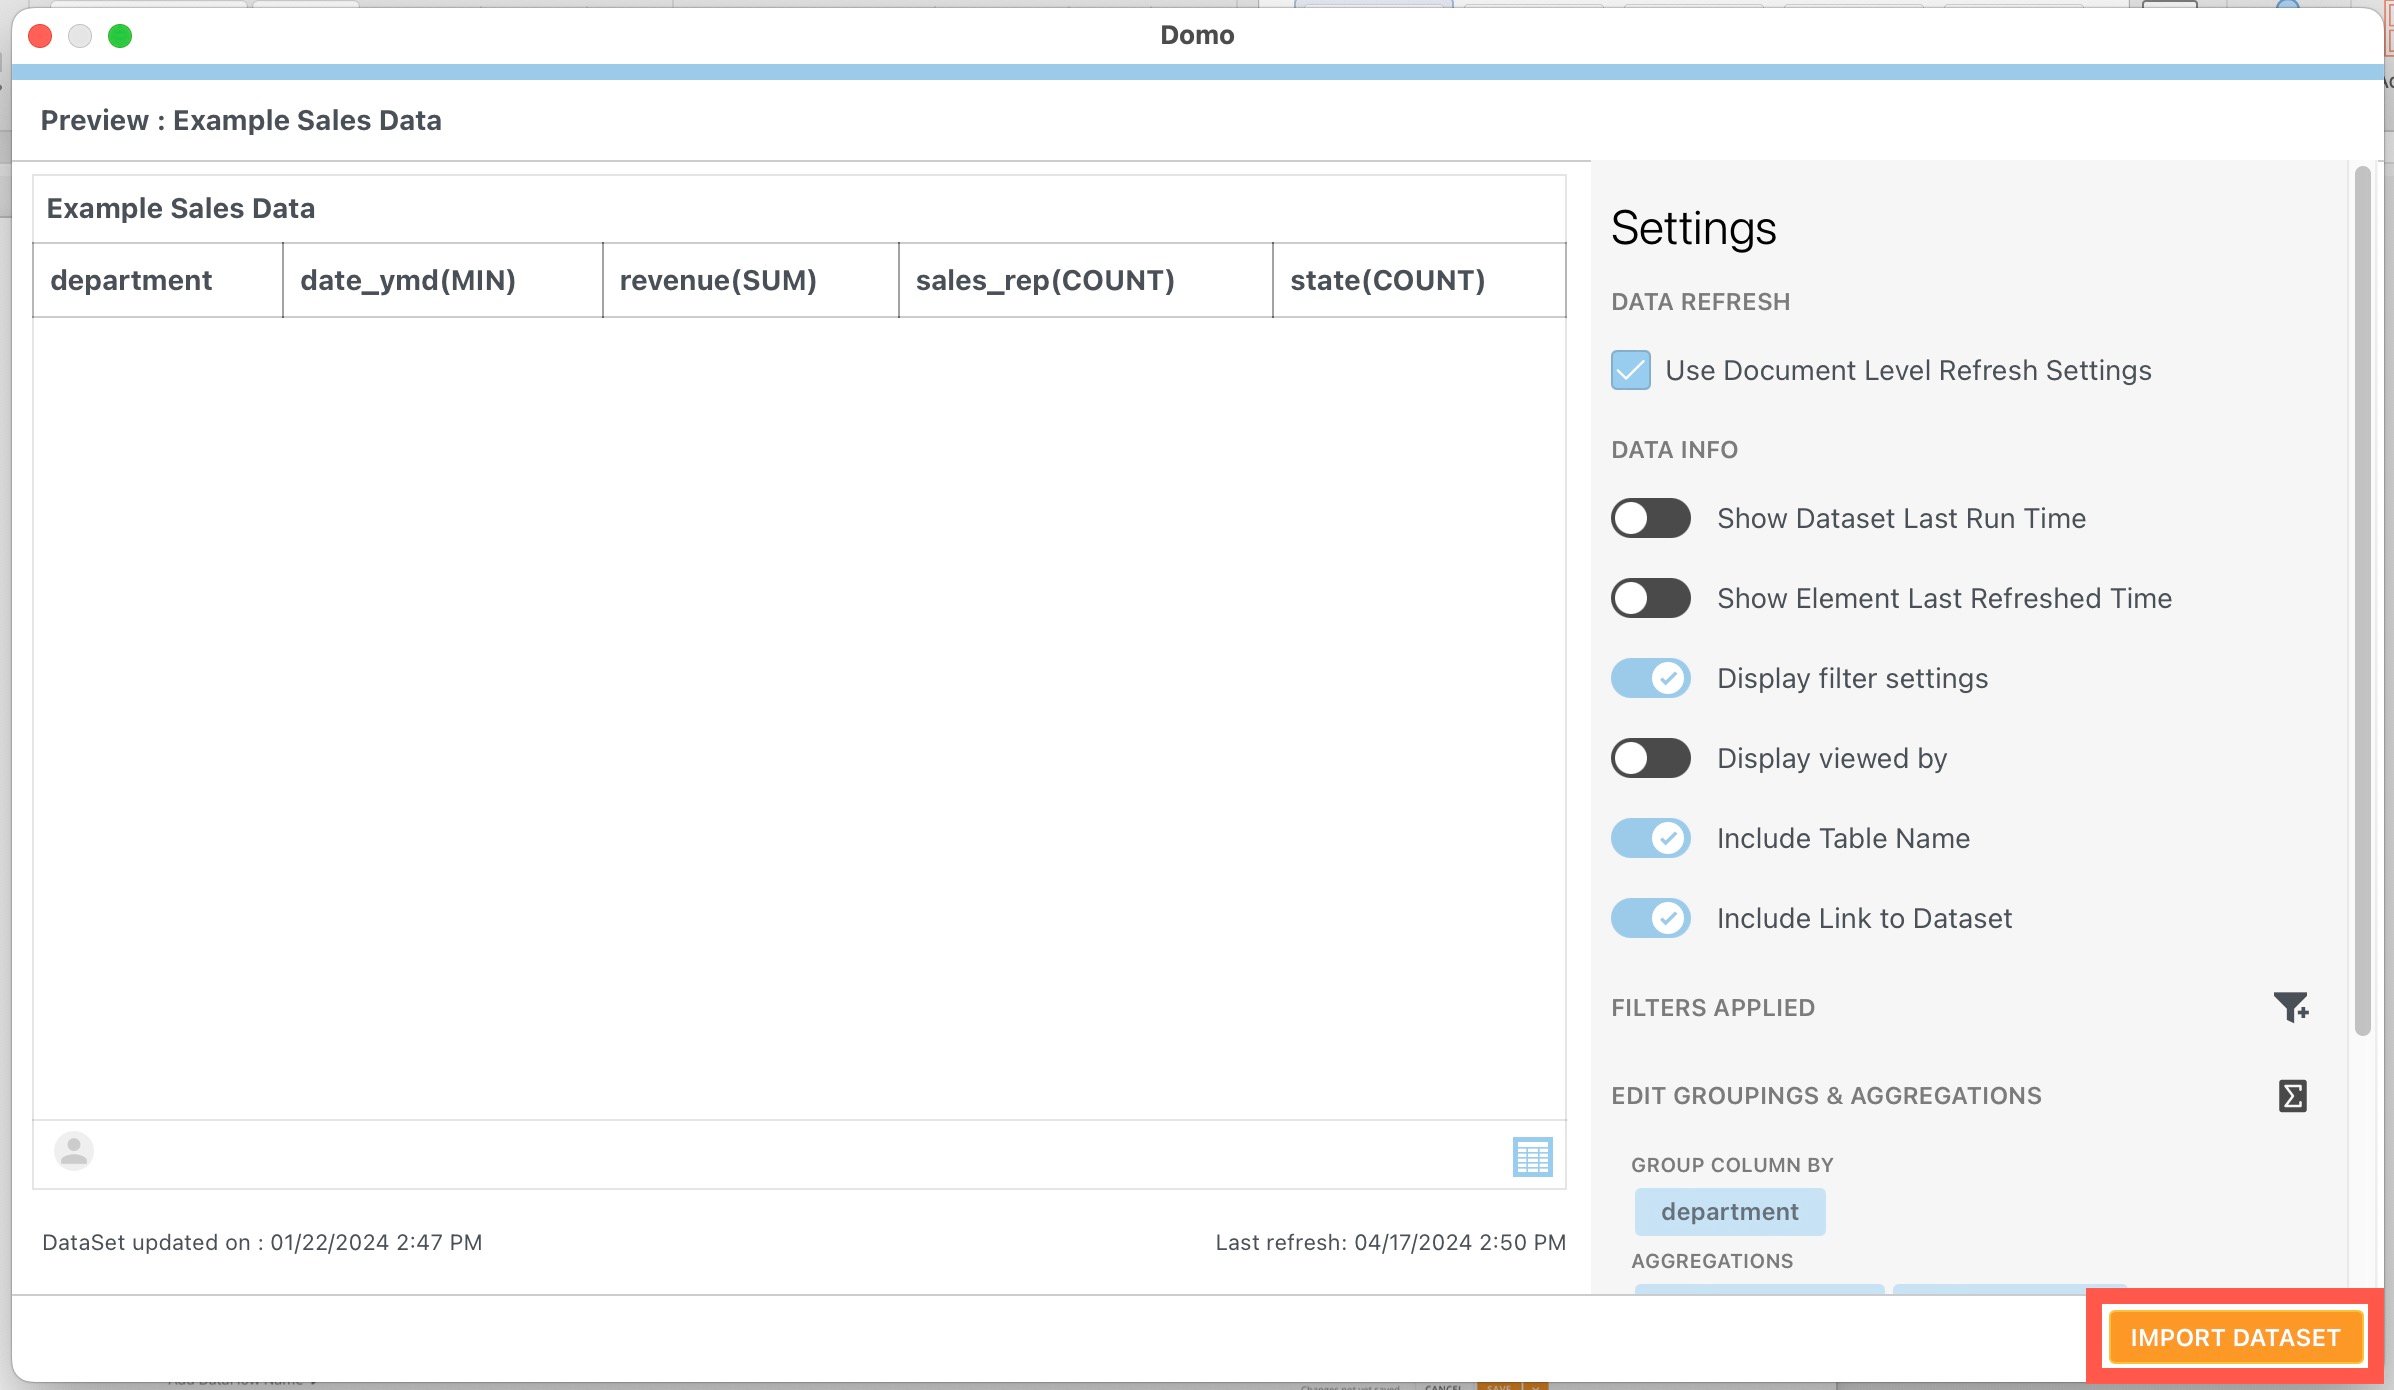
A preview modal displays where you can choose refresh settings, choose to view/hide data info, apply filters, and edit groupings and aggregations. The preview is limited to 100 rows.
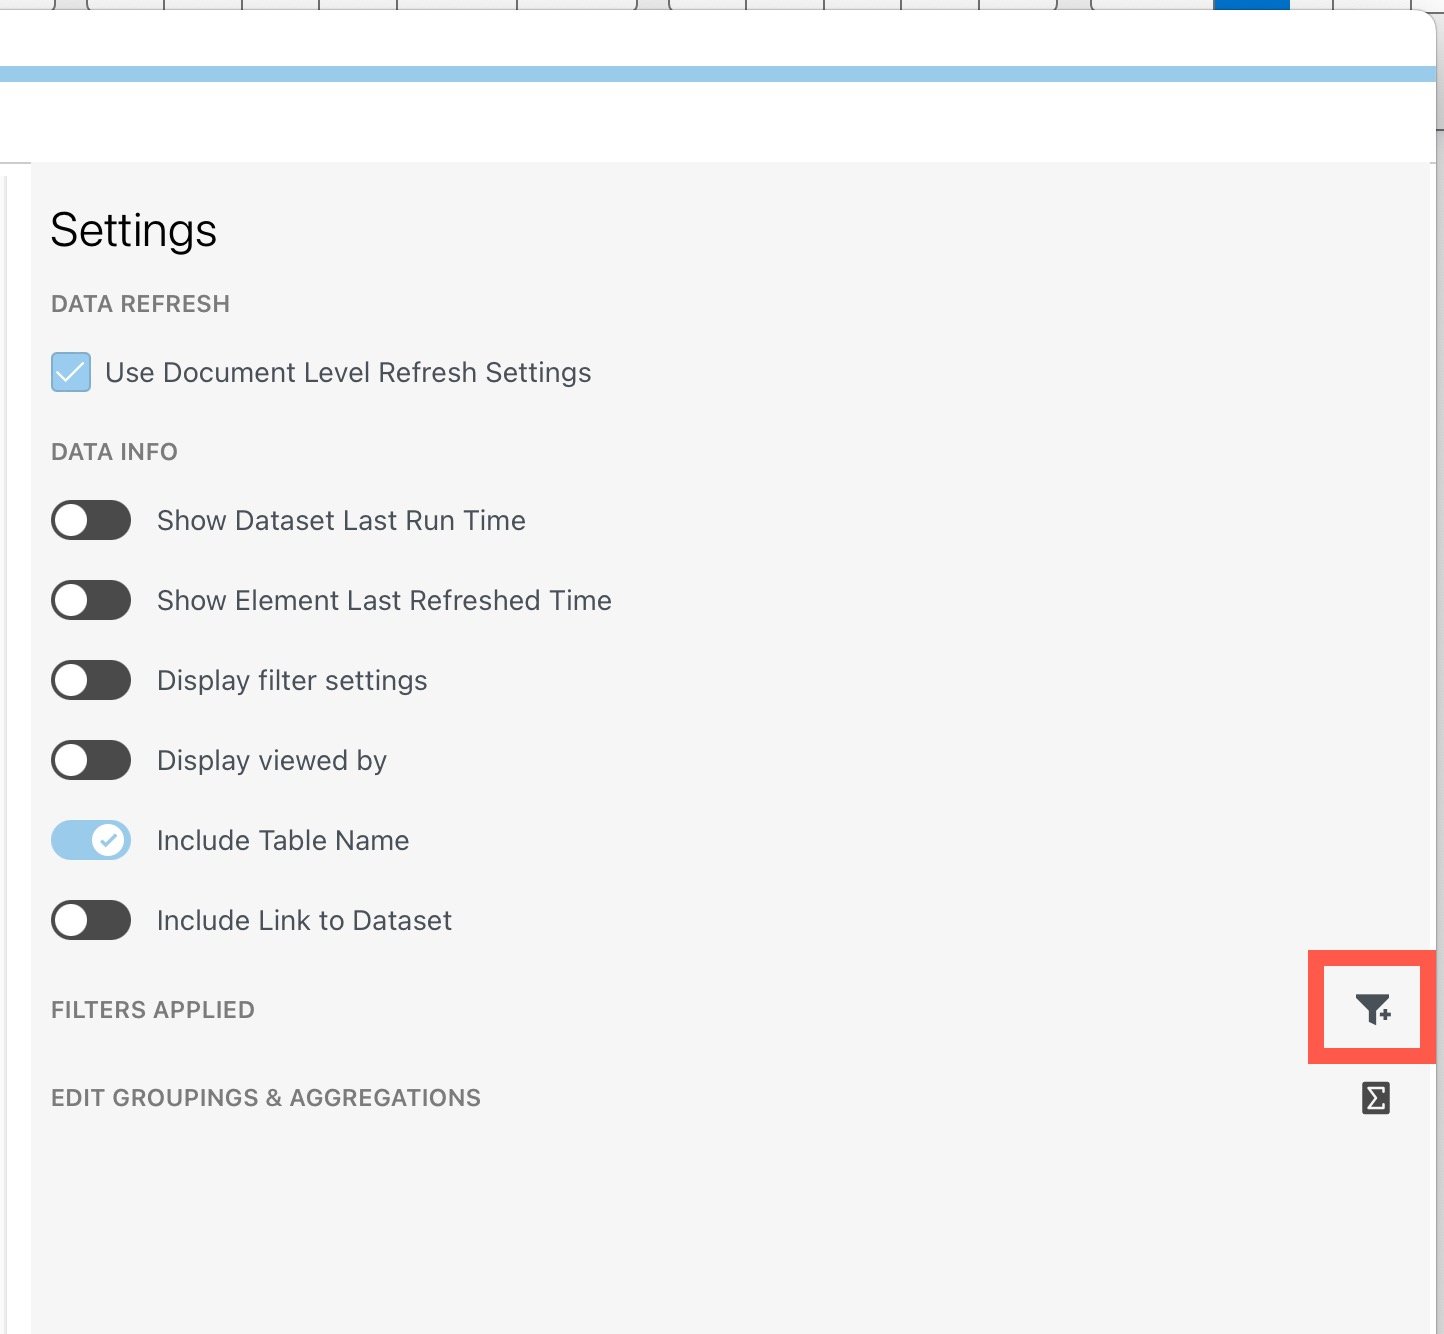
5. (Optional) Select **Filters** to set up filters and select columns.
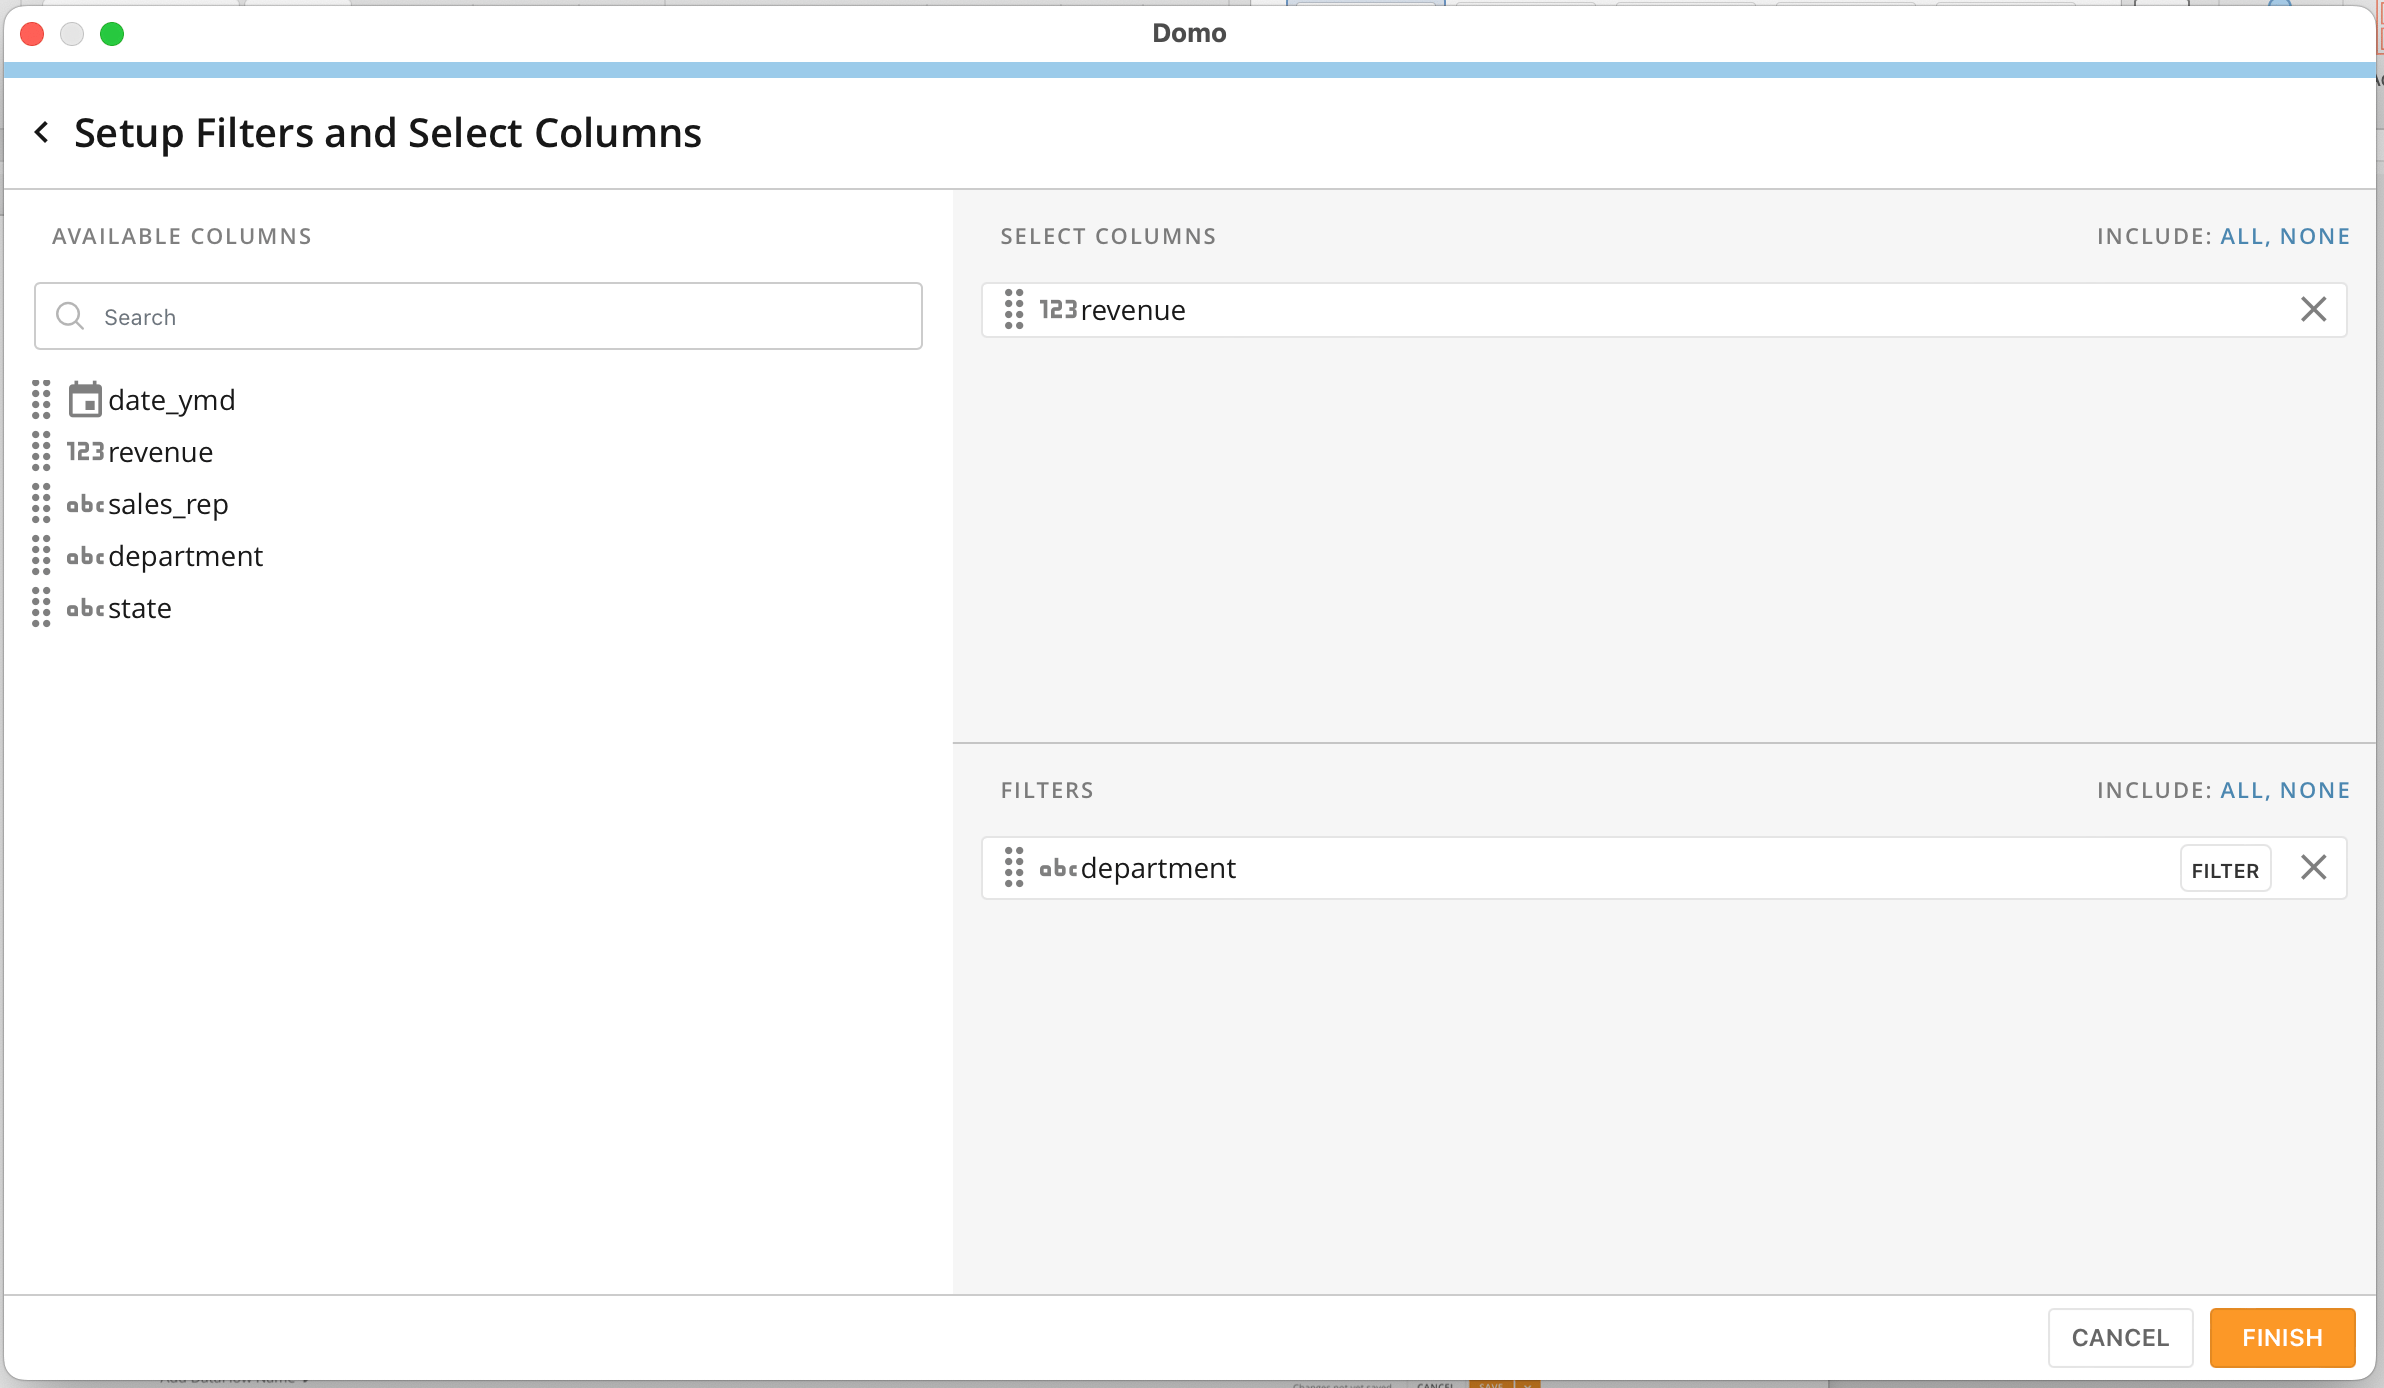
There are three sections of the filters setup screen: **Available Columns**, **Select Columns**, **and Filters**. You can drag items between the sections.
After configuring filters, select **Finish**.
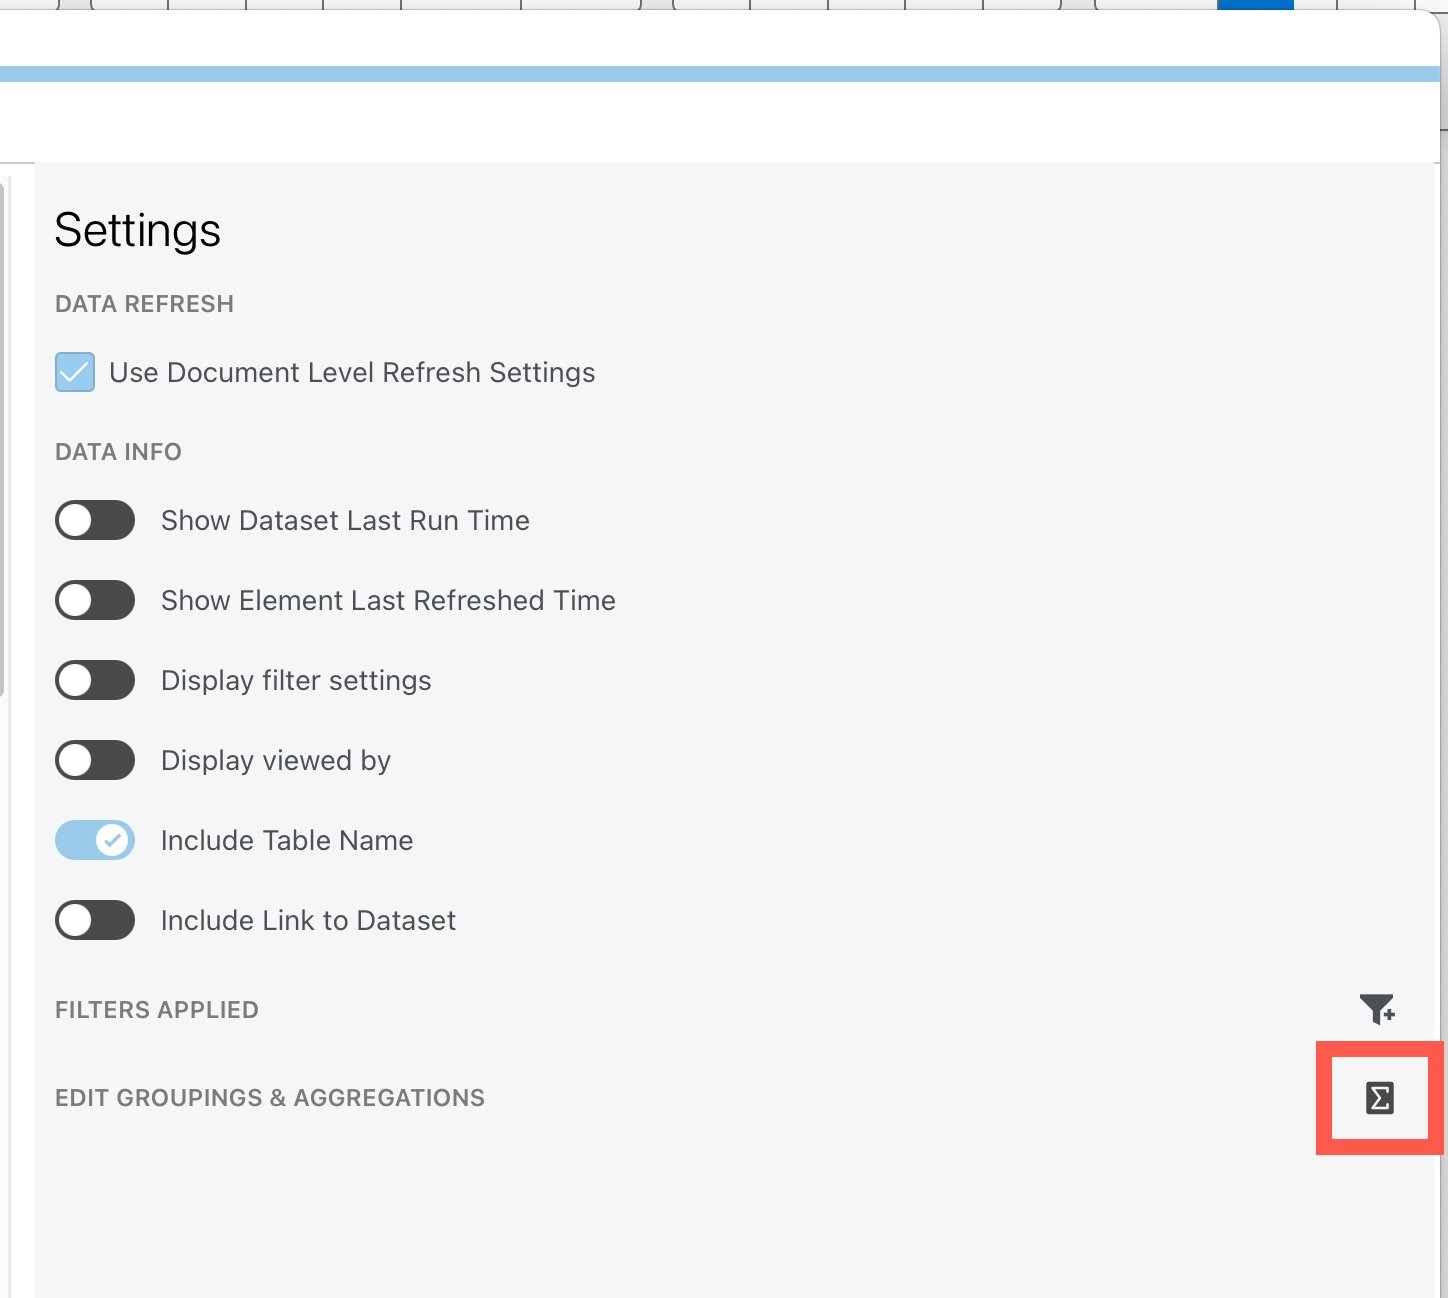
6. (Optional) Select **Edit Groupings & Aggregations** to change how your data is imported.
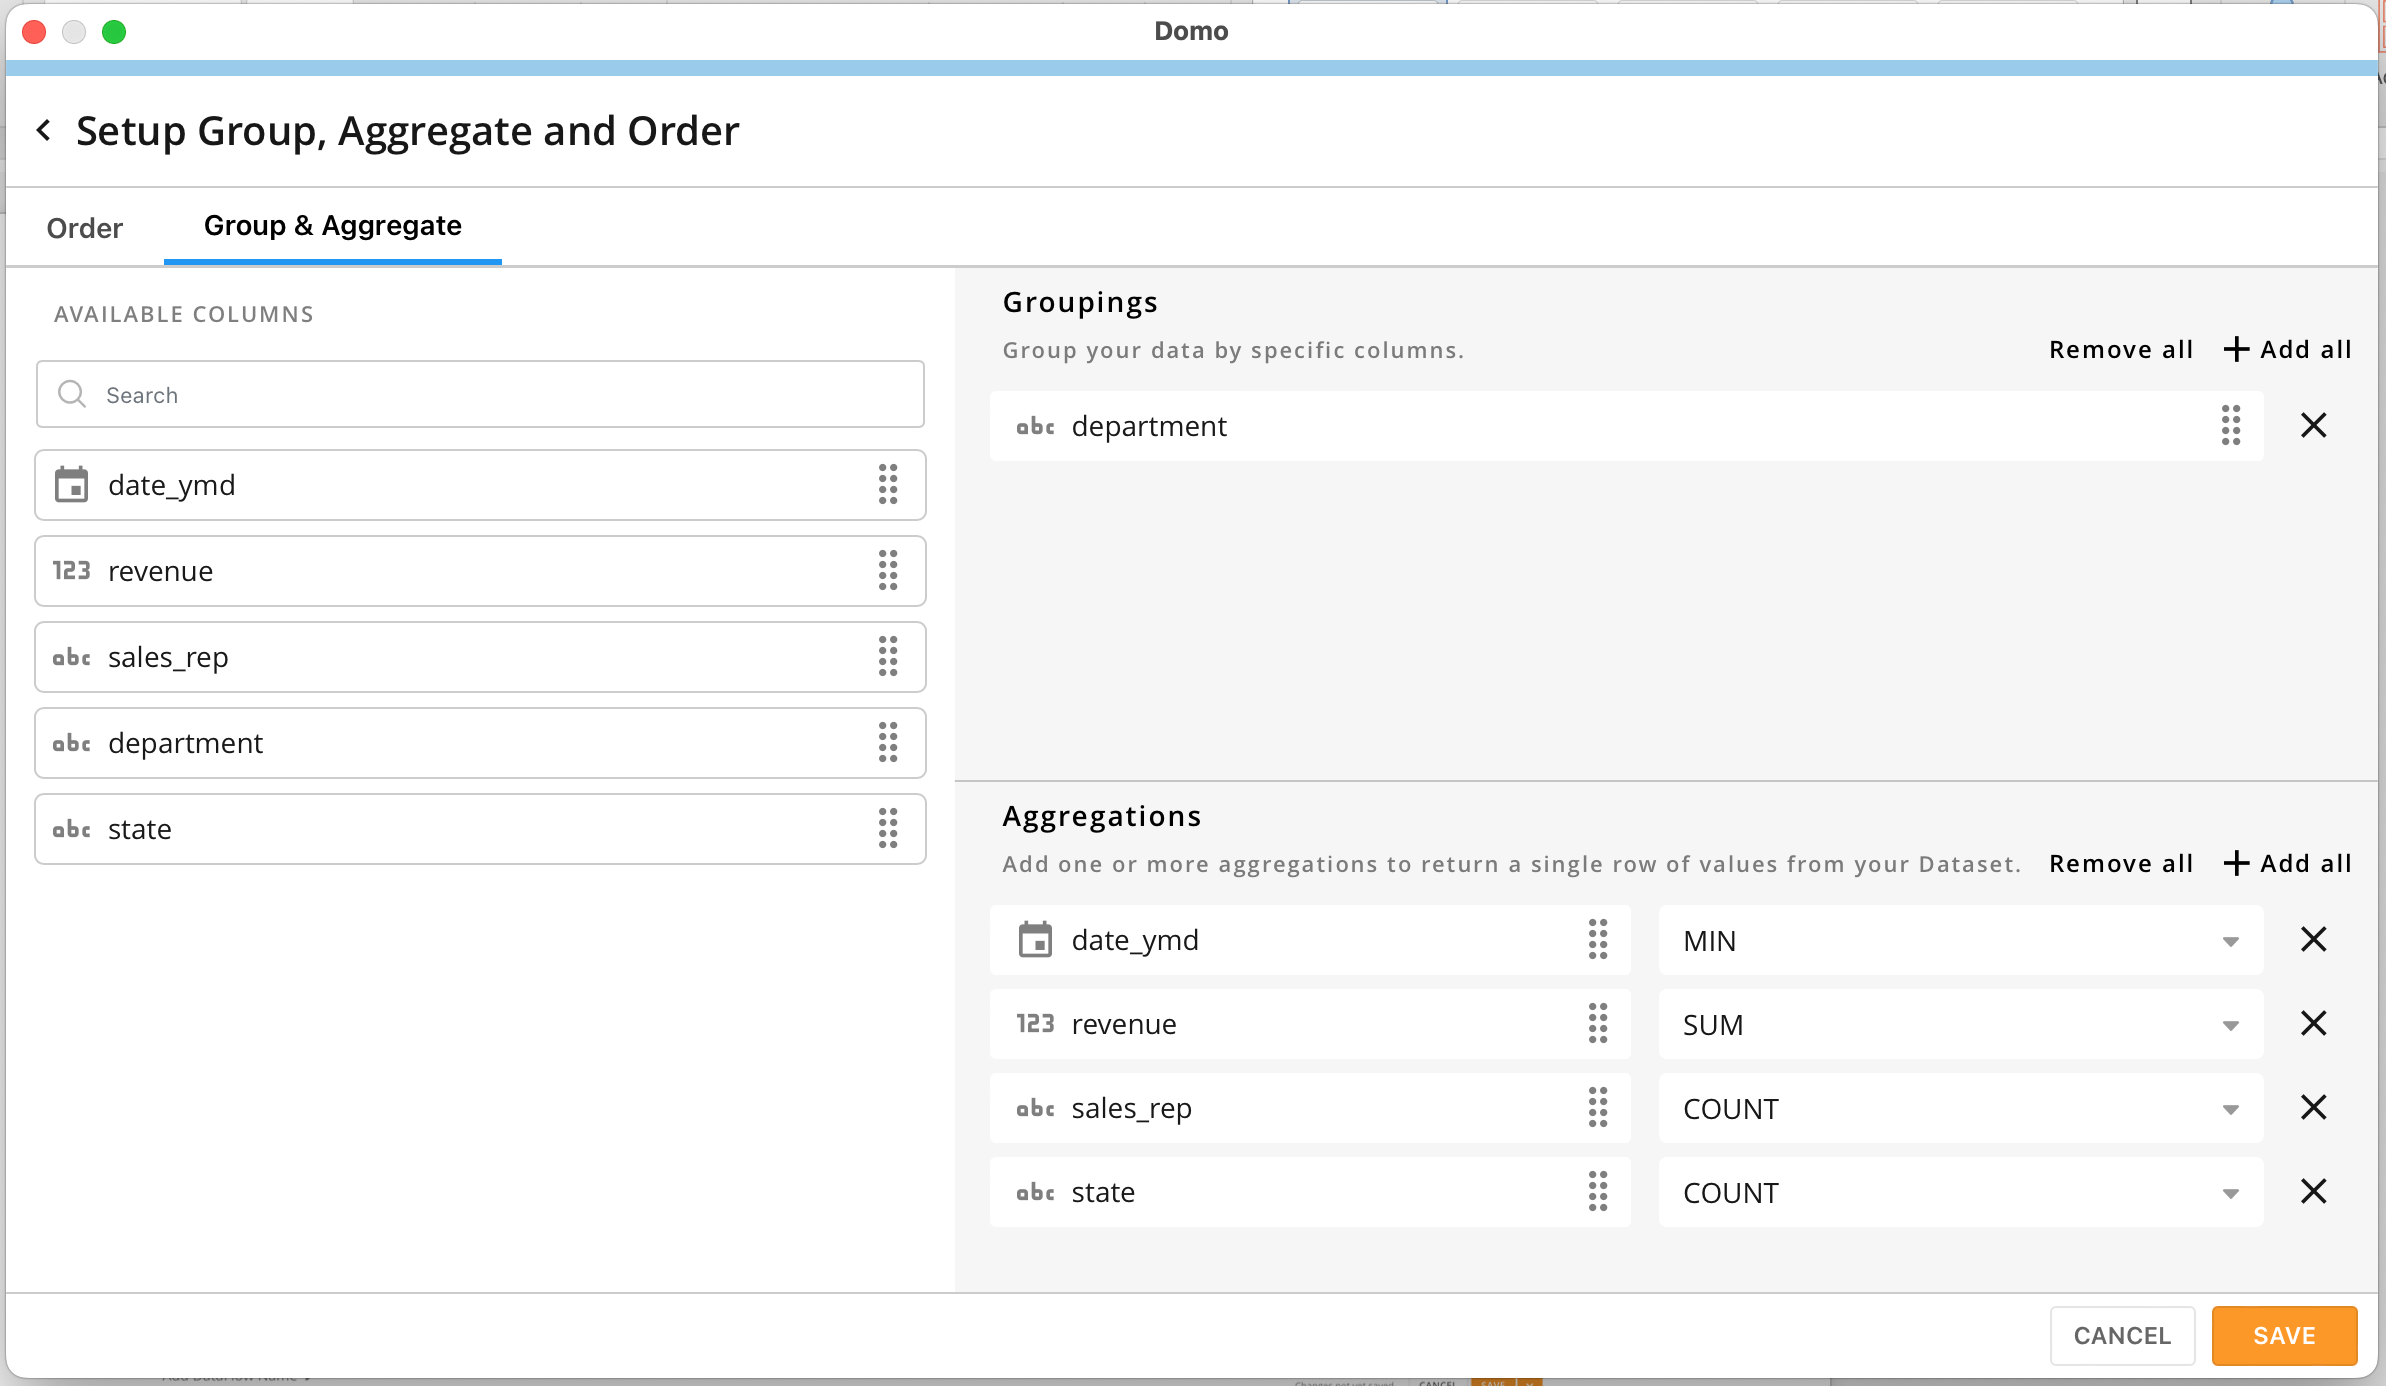
* There are two tabs in this interface: **Order** and **Group & Aggregate**. After making changes, select **Finish**.
* In the **Group & Aggregate** tab, you can drag available columns to the **Groupings** section to group your data by specific columns or to the **Aggregations** section to add one or more aggregations to return a single row of values from your DataSet. You can choose to **Add all** or **Remove all** columns from either section.
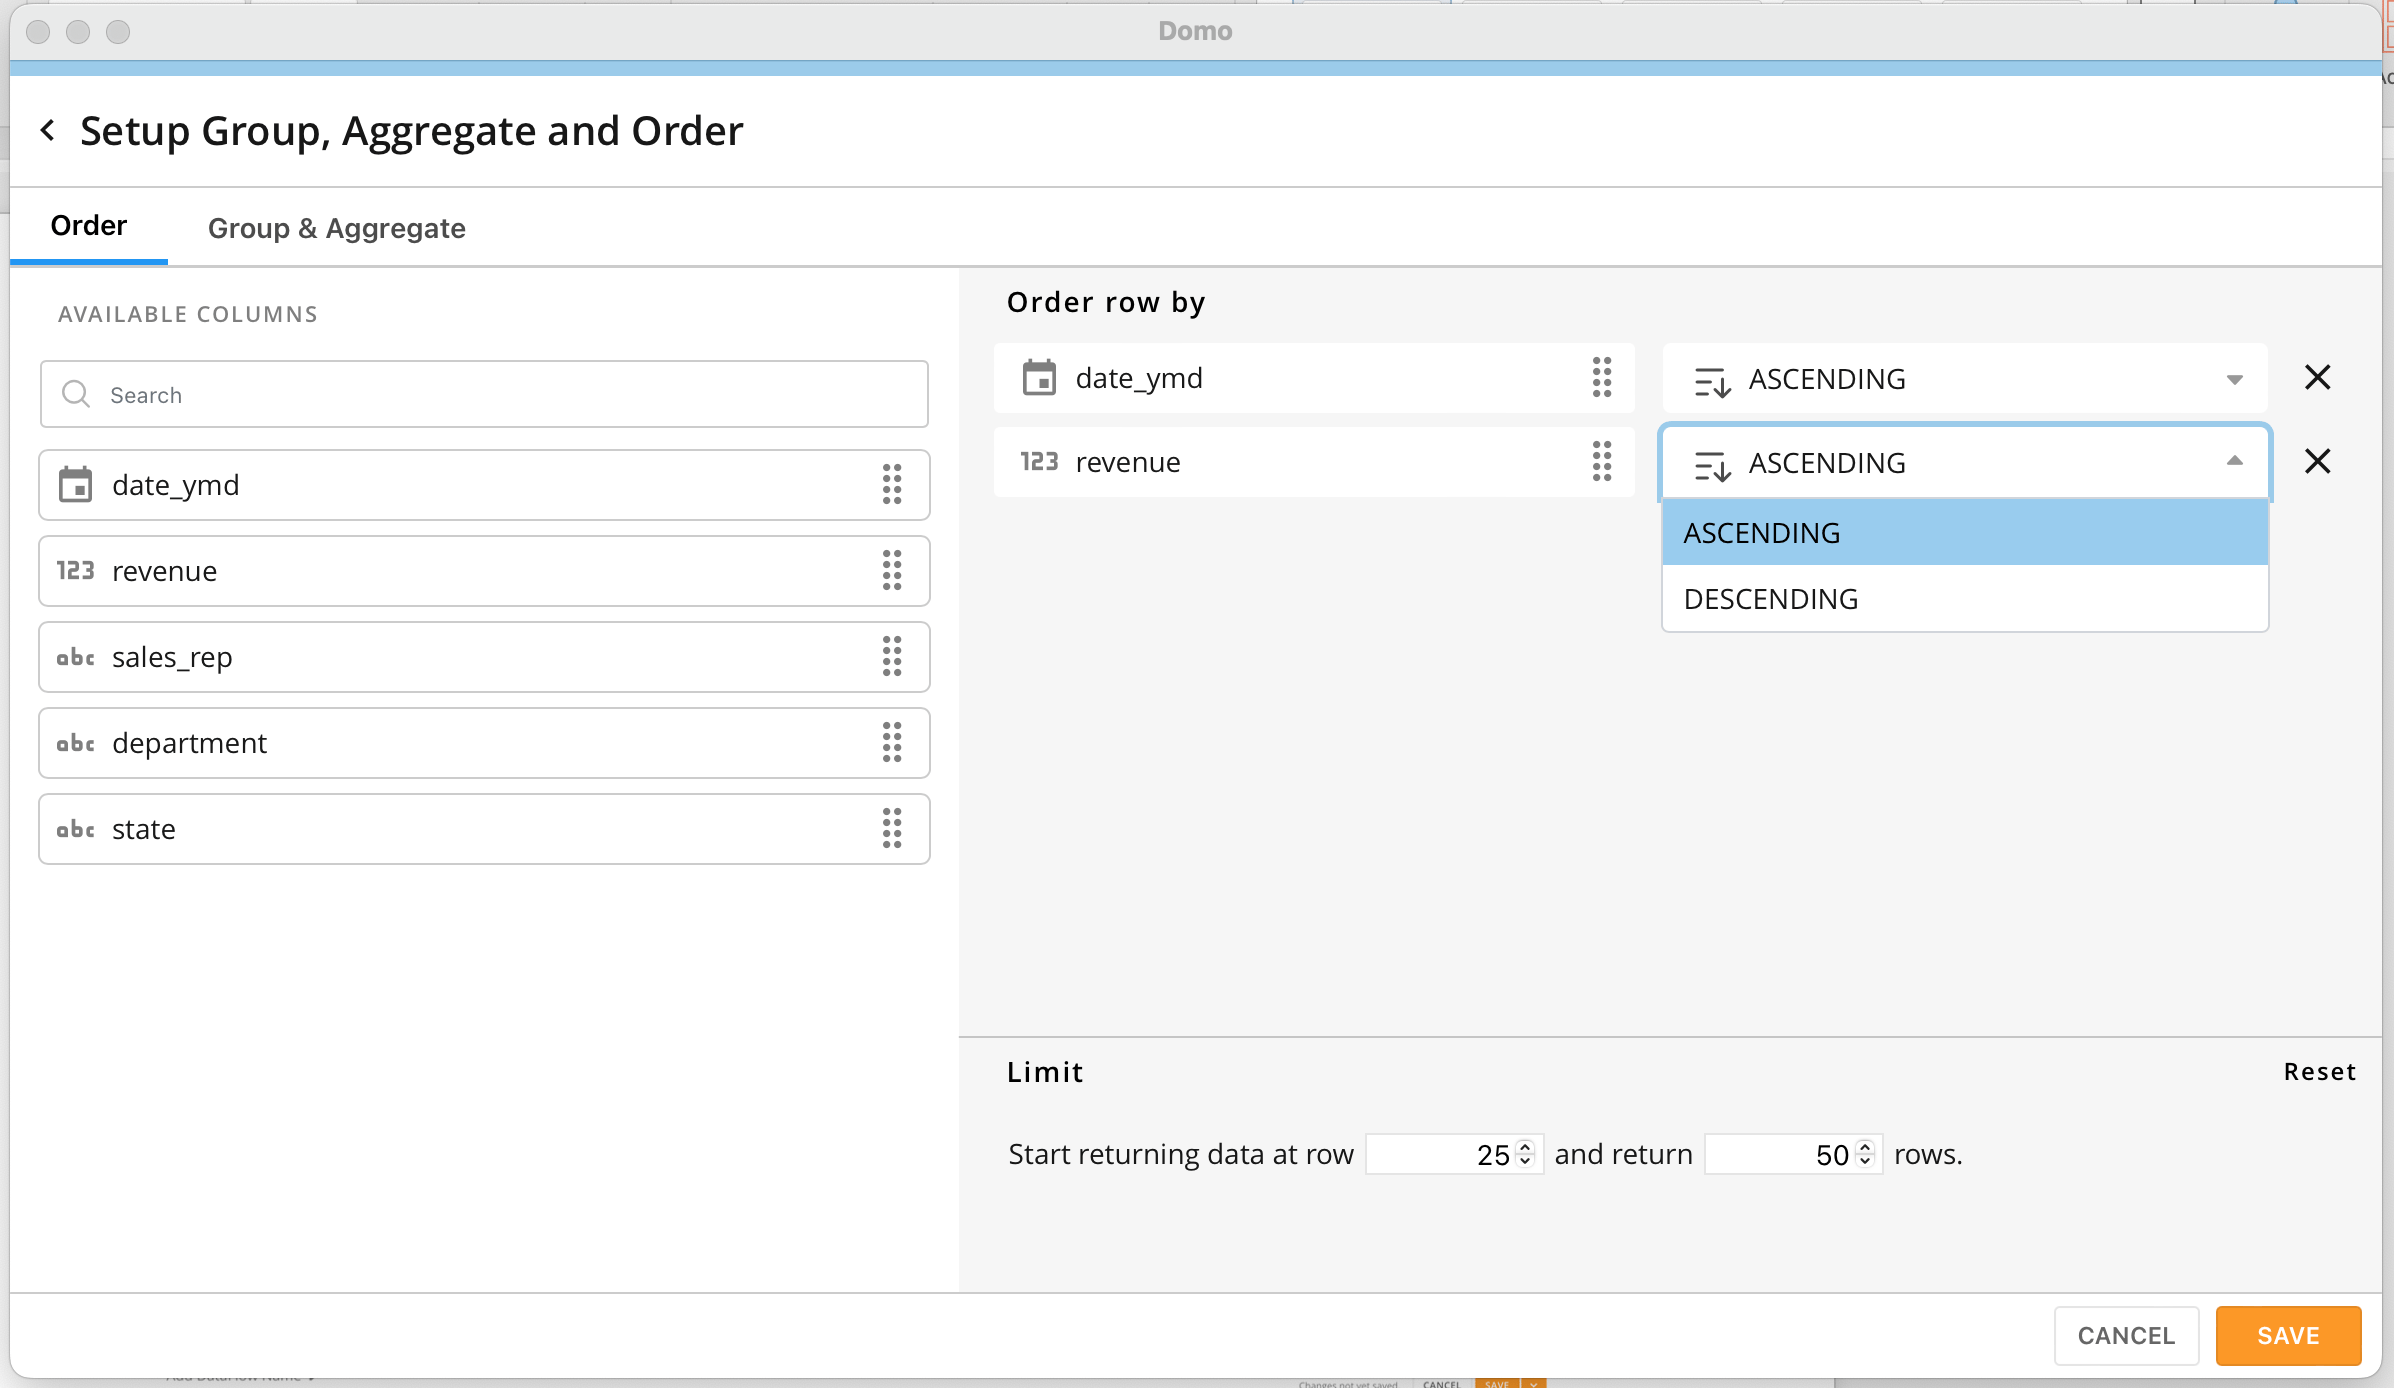
* In the **Order** tab, you can order your rows by one or more columns, in ascending or descending order, and add a limit.
**Note:** A limit defines a row at which to start returning data and the number of rows to return. You can choose to return all rows.
7. When you have finished configuring all settings in the preview modal, select **Import DataSet**.
8. Verify the import and that the data displays correctly in your document.
### Alter Document Settings (Excel, PowerPoint, Word)
**Note:** Any changes to imported content from within the Microsoft app are not reflected in the original asset in Domo. You can change the settings or Filters for the original asset in the **Document** tab of the add-in. Any changes made to the source of the content using the add-in display in the Microsoft app after refreshing.
1. Select **Document** in the Domo toolbar at the top of your document.
The **Document** screen of the add-in displays in a sidebar to the right of the document.
2. Under **Settings** in the add-in, adjust the settings as needed.
### Alter Domo Content Settings Individually (Excel, PowerPoint, Word)
1. Open the **Document** screen of the Domo add-in. For detailed instructions on how to do this, see [Altering Document Settings](#AlterDocumentSettingsExcelPowerPointWord).
2. In the **Domo Content** section of the Document sidebar, find the content that you want to alter the settings for and select **Settings**.
A modal displays with a content preview and sections for settings, Filters, and other information about content.
3. Select **Save** or **Remove Card**.
* If you select **Save**, any changes you made are saved, and you return to the Document screen of the sidebar.
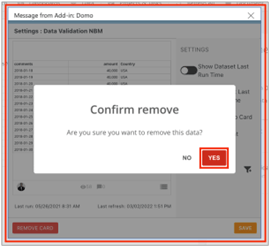
* If you select **Remove Card**, a dialog displays asking you to confirm that you want to remove the content from your document. If you select **Yes**, that content is removed from your document.
### Lock Domo Content in Your Document (Excel, PowerPoint, Word)
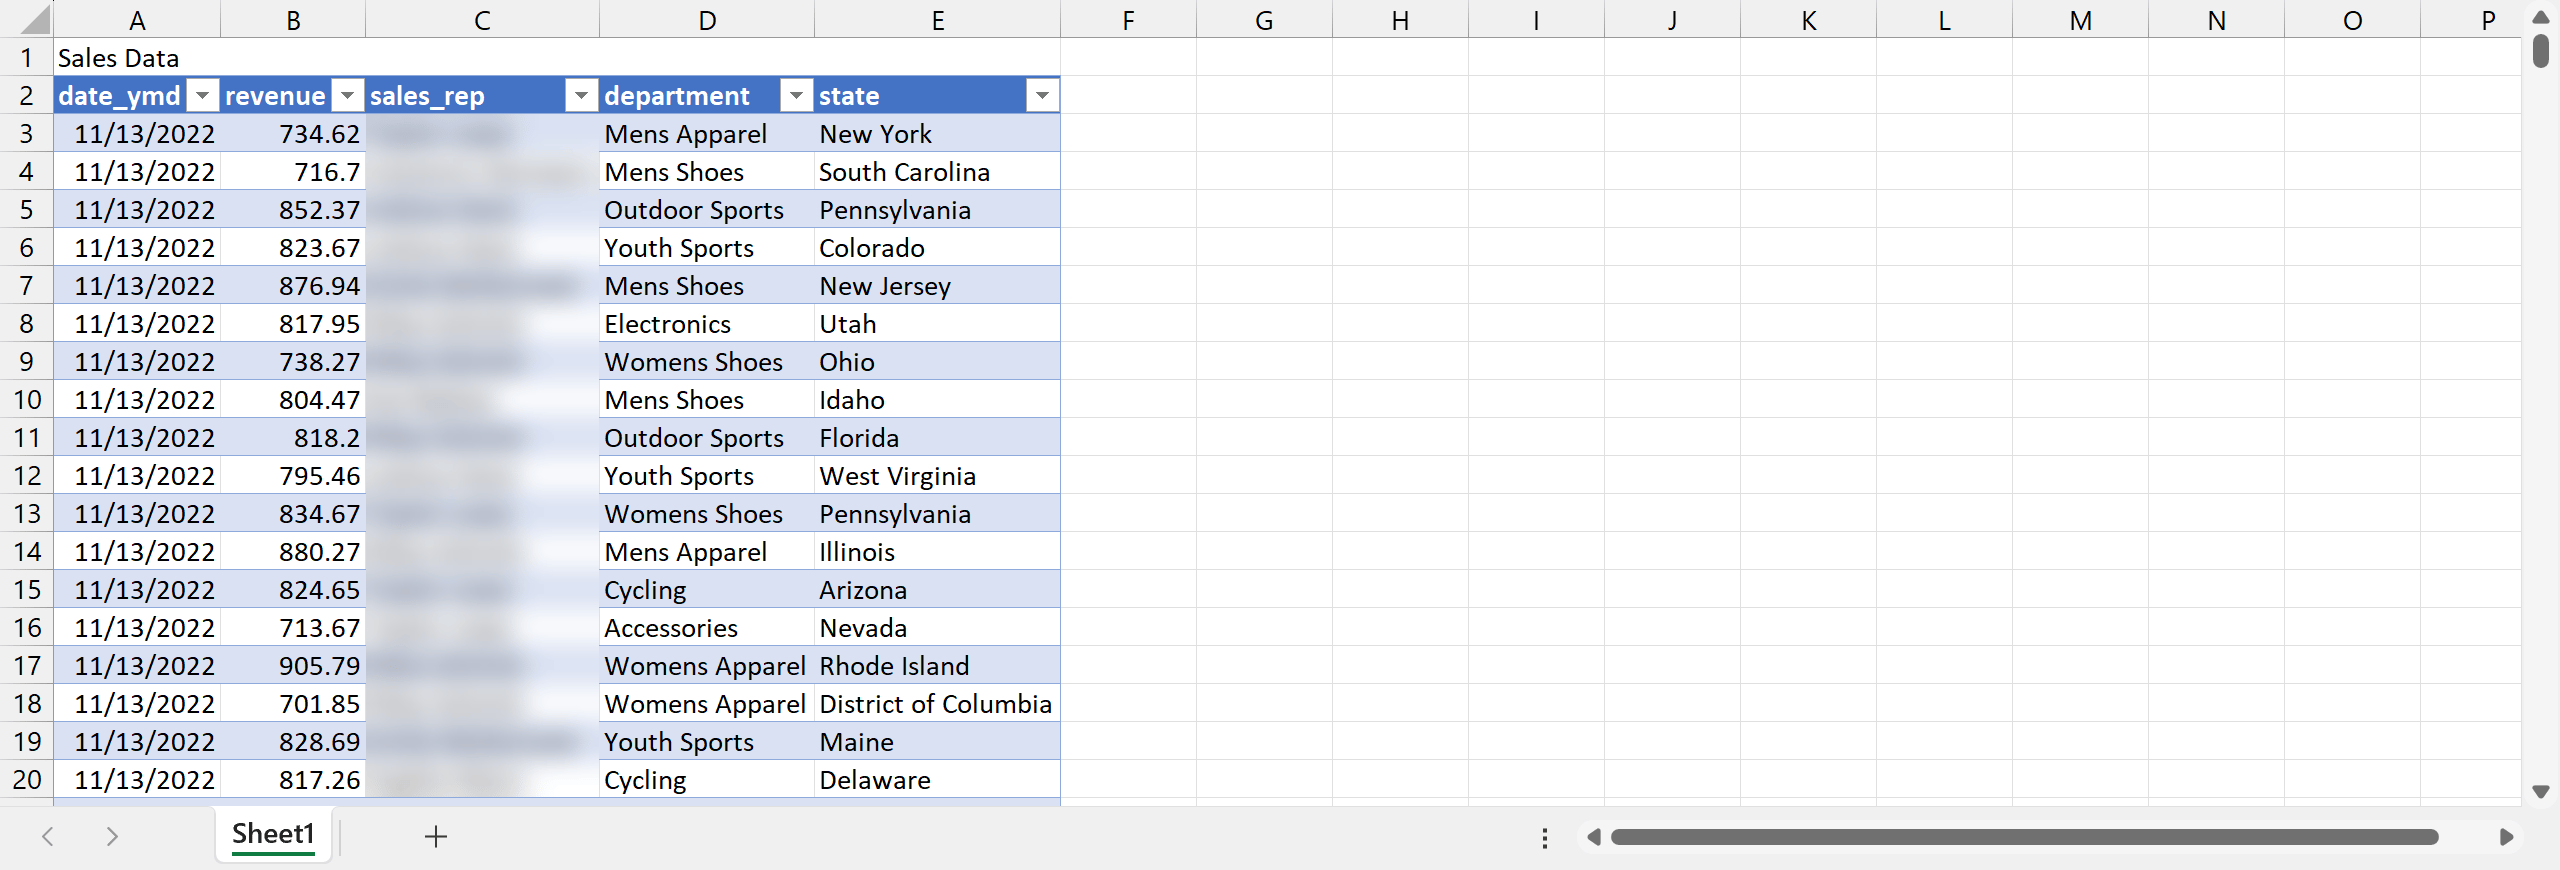
To avoid sharing data with users who do not have access to the Domo content in your document, you can lock the document before sharing it with other users. Users with access to the content only see the data they have access to via PDP and security settings.
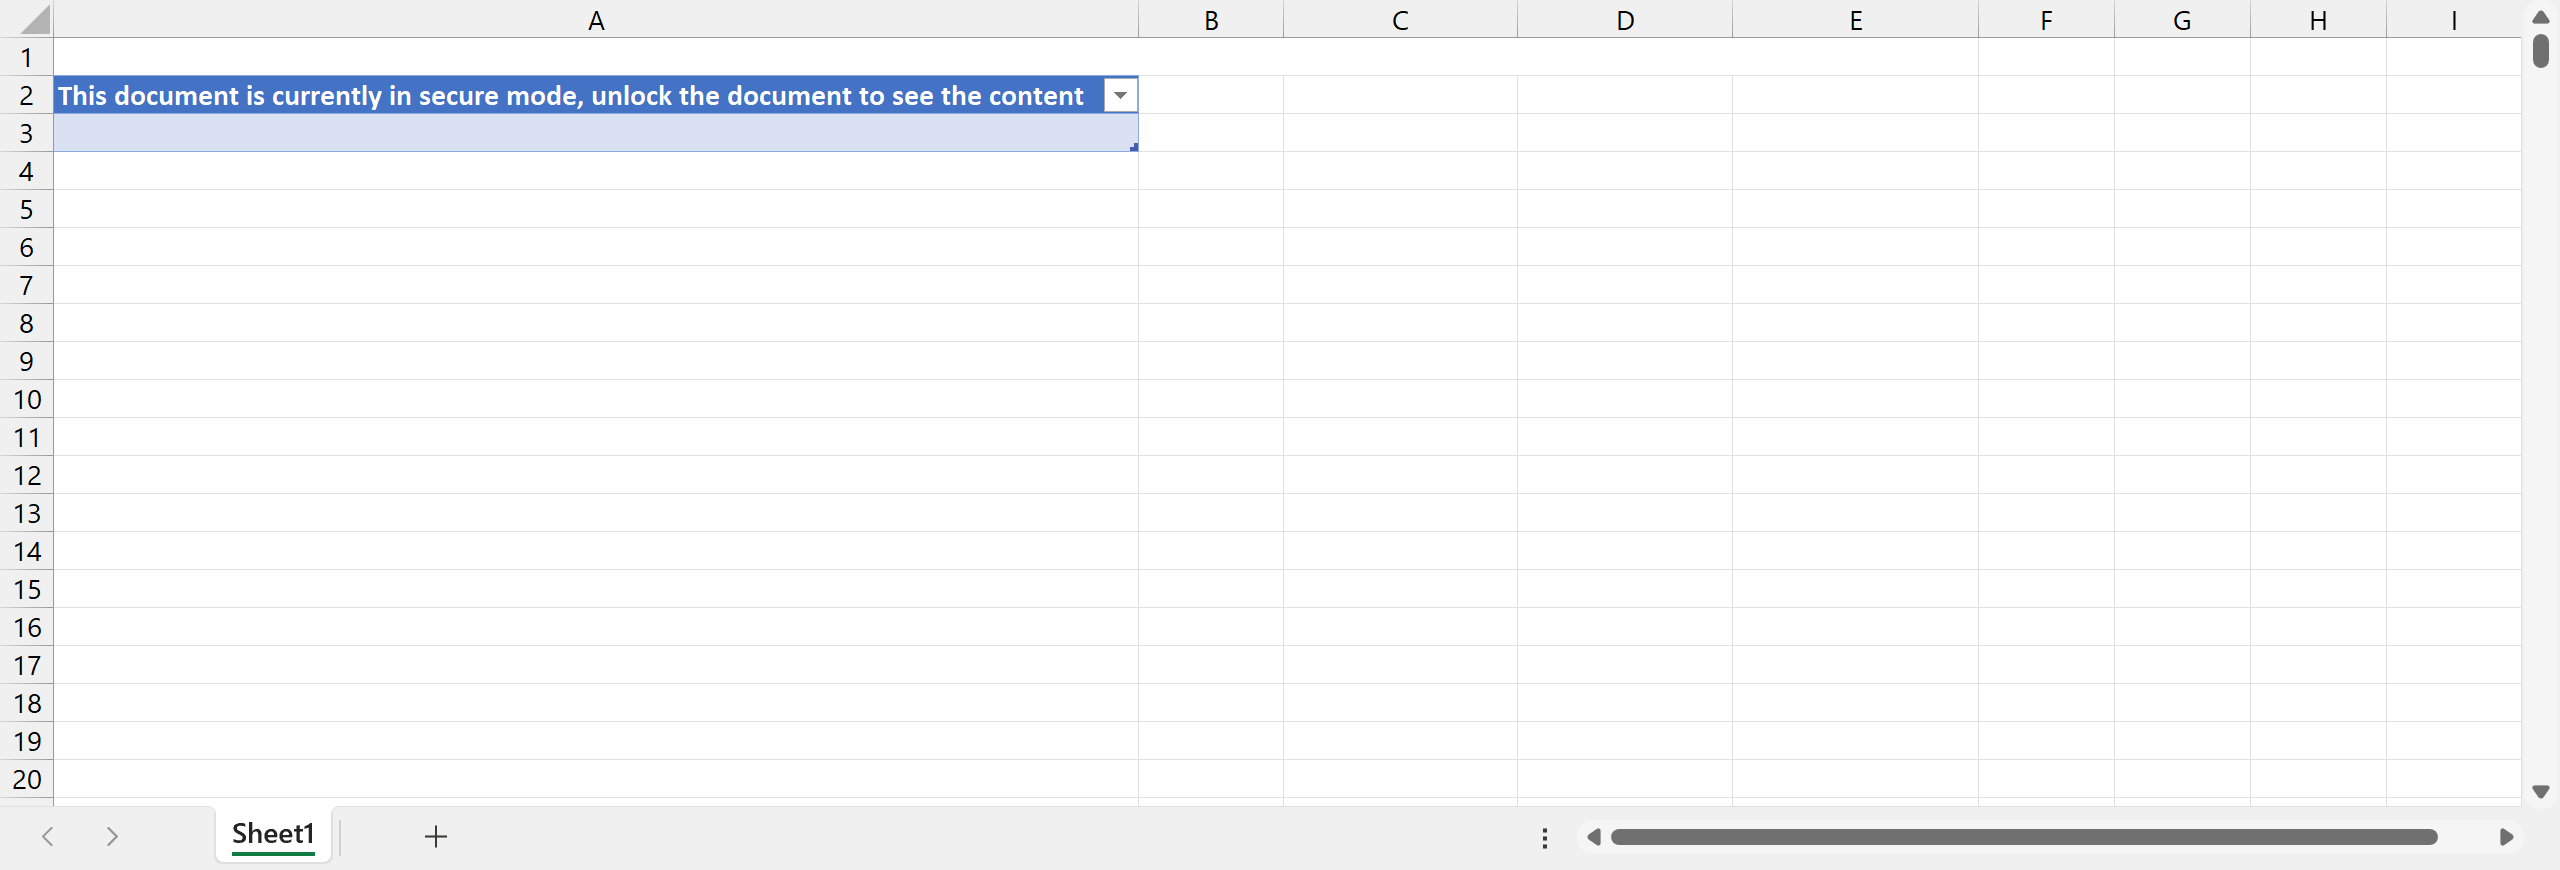
The first image below shows how unlocked content displays, while the second image shows how locked content displays.
Follow these steps to lock Domo content in your document:
1. Open the **Document** screen of the Domo add-in. For detailed instructions on how to do this, see [Alter Document Settings](#AlterDocumentSettingsExcelPowerPointWord).
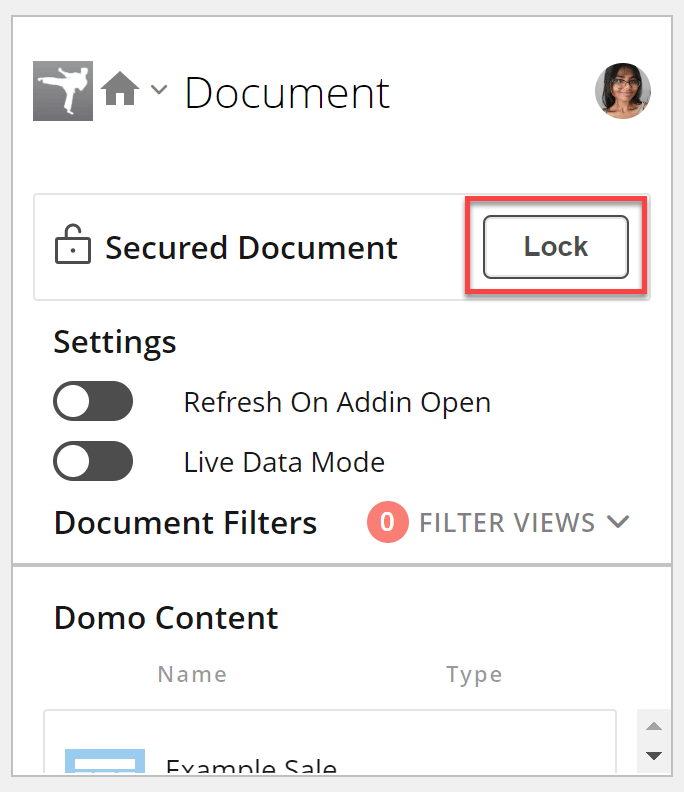
2. Next to **Secured Document**, select **Lock**.
**Lock** changes to **Unlock**, and the following text displays: "This document is currently in secure mode, unlock the document to see the content."
Select **Unlock** to unlock your document and allow all users to view its contents.
### Add Data to Domo (Excel, Outlook, and Word)
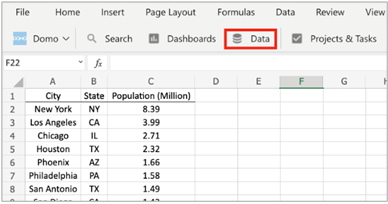
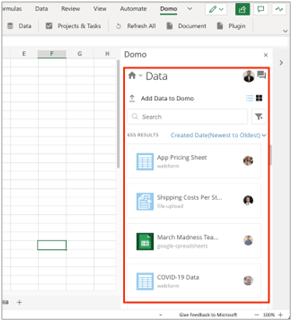
1. Select **Data** in the Domo toolbar at the top of the app.
The **Data** screen of the Domo sidebar opens at the right of the document.
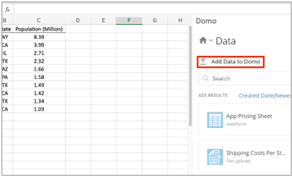
2. In the sidebar, select **Add Data to Domo**.
The **Add Data to Domo** modal displays.
3. Check the boxes to select each of the tables that you want to upload to Domo.
4. (Optional) Next to your selected content, hover over **Preview** to preview it.
5. Select **Next** to configure the DataSets.
6. Select the radio button to **Create New Dataset** or **Update Existing Dataset**.
A preview of the selected data displays in the **Preview** area so you can view and validate the data before importing it to Domo.
You can configure your **Column Data type** in the **Preview** by selecting the column and choosing the data type from the list.
* If you choose **Create New Dataset**, you are prompted to add a **Name** and any **Tags**.
1. Select **Next** to add these items for each sheet.
2. Complete any remaining fields.
3. (Optional) Select **Open in Domo** to open each selected sheet in Domo.
* If you choose **Update Existing Dataset**, you are prompted to select any DataSets in Domo that you want to update from the menu.
1. Select the radio button for how you want to update the DataSet: **Replace** or **Append**.
2. Add any **Tags**.
3. Complete any remaining fields.
4. Select **Next** to configure each of the selected sheets.
7. Select **Finish**.
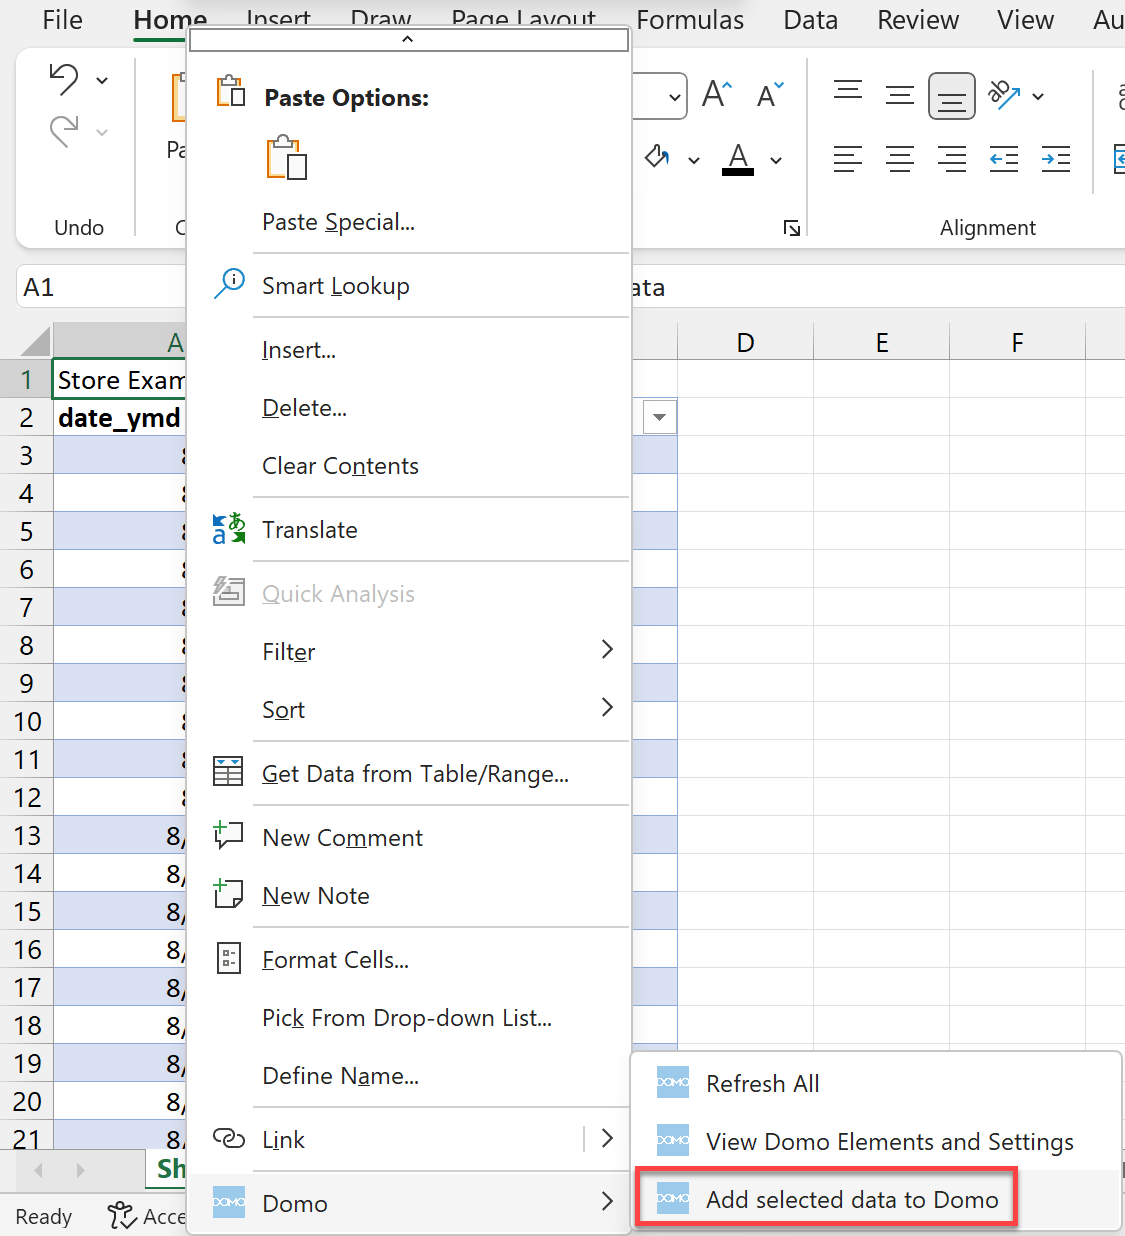
**Note:** To upload only part of an existing DataSet to Domo, highlight your desired data, right-click it, and select **Domo** > **Add selected data to Domo**.
### App-Specific Tasks
The following tasks are specific to a certain MS app.
# Update DataSets in Excel
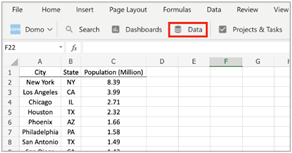
1. Select **Data** in the Domo toolbar at the top of the spreadsheet.
The **Data** screen of the Domo add-in displays in a sidebar to the right of the spreadsheet.
2. Enter keywords in the **Search** bar to locate the DataSet you want to update.
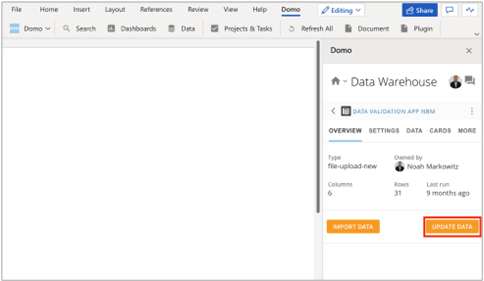
3. Select the DataSet.
4. Select **Update Data**.
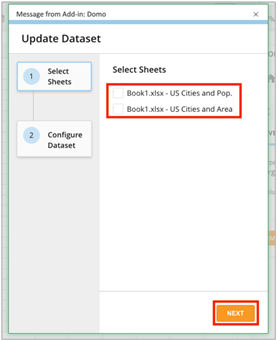
The **Update DataSet** modal displays, prompting you to select the sheets that you want to upload.
5. Select the checkboxes for the sheets you want to upload.
6. Select **Next** to configure the selected sheets.
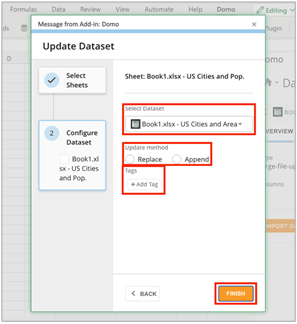
7. Select the DataSet you want to update in Domo.
8. Select the radio button for how you want to update the DataSet: **Replace** or **Append**.
9. Apply any necessary **Tags**.
10. After you have configured all selected sheets, select **Finish**
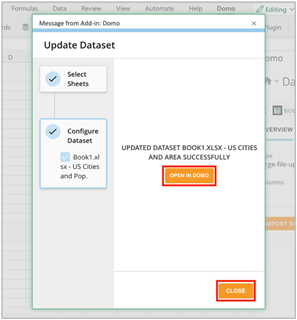
11. (Optional) Select **Open in Domo** to open the updated DataSet in Domo in a new window.
12. Select **Close** to close the modal.
# Add Data to Domo from an Email Attachment in Outlook
1. Open the email that you want to import DataSets from.
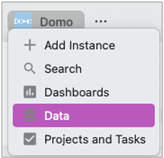
2. Select the **Domo** logo from the toolbar at the top of the app.
The Domo menu displays.
3. In the Domo menu, select **Data**.
The **Data** screen of the Domo add-in displays at the right of the app.
4. In the **Data** sidebar, select **Add Data to Domo**.
The **Add Data to Domo** modal displays.
5. Select the radio button
for where your data is coming from: **From an Attachment** or **From Email Body**.
6. Select **Next**.
7. Select the checkboxes for the data you want to add.
8. Select **Next**.
9. Select the radio button
to **Create New Dataset** or **Update Existing Dataset**.
* If you choose **Create New Dataset**, you are prompted to add a **Name** and any **Tags**.
1. Select **Next** to add these items for each of the selected sheets.
2. Complete any remaining fields.
3. (Optional) Select **Open in Domo** to open each selected sheet in Domo.
* If you choose **Update Existing Dataset**, you are prompted to select any DataSets in Domo that you want to update from the menu.
1. Select the radio button for how you want to update the DataSet: **Replace** or **Append**.
2. Add any **Tags**.
3. Complete any remaining fields.
4. Select **Next** to configure each of the selected sheets.
10. Select **Finish**.
11. (Optional) Select **Open in Domo** to open the DataSet in Domo in a new window.
12. Select **Close** to close the modal.
# Content Tracking in PowerPoint
In PowerPoint, when you copy and paste Domo content to duplicate it within the slide deck, the copied and pasted content is untracked. Untracked content cannot be refreshed and updated. The Scan Slide tool allows you to scan your slides for any untracked content and displays it on the **Document** screen of the Domo add-in sidebar with a "Found Untracked Content" label. After content is found, future document refreshes affect all content.
To scan for untracked content in your slides, follow these steps:
1. Open the **Document** screen of the Domo sidebar in your PowerPoint file. (From the **Domo** tab in your PowerPoint file, select **Document.**)
2. In your slide deck, navigate to and select the slide you want to scan for untracked content.
3. In the Domo sidebar, select **Scan Slide**.
Content identified as untracked displays with a label in the sidebar and is now refreshed with all other content during document refreshes.
**Important:** Due to the current version of Microsoft PowerPoint, it is not possible to scan the whole slide deck at the same time. Slides must be scanned individually to identify all untracked content.
### Create a Reusable Template with the Microsoft PowerPoint Add-in — Video
 Updates to the Domo add-ins should automatically apply to your installation. If you don't see these updates, you may need to clear your Microsoft 365 add-in's cache. For instructions on how to do this, see [Microsoft’s documentation](https://learn.microsoft.com/en-us/office/dev/add-ins/testing/clear-cache)
  The Domo toolbar displays.
 3. In the Domo toolbar, select
  The Domo add-in displays in a sidebar to the right of your document. After you connect to a Domo instance in the sidebar, that instance opens when you access the sidebar.
 ### Access the Domo Sidebar in Outlook
1. Open Outlook.
2. In the toolbar, select **Domo** (or
### Access the Domo Sidebar in Outlook
1. Open Outlook.
2. In the toolbar, select **Domo** (or 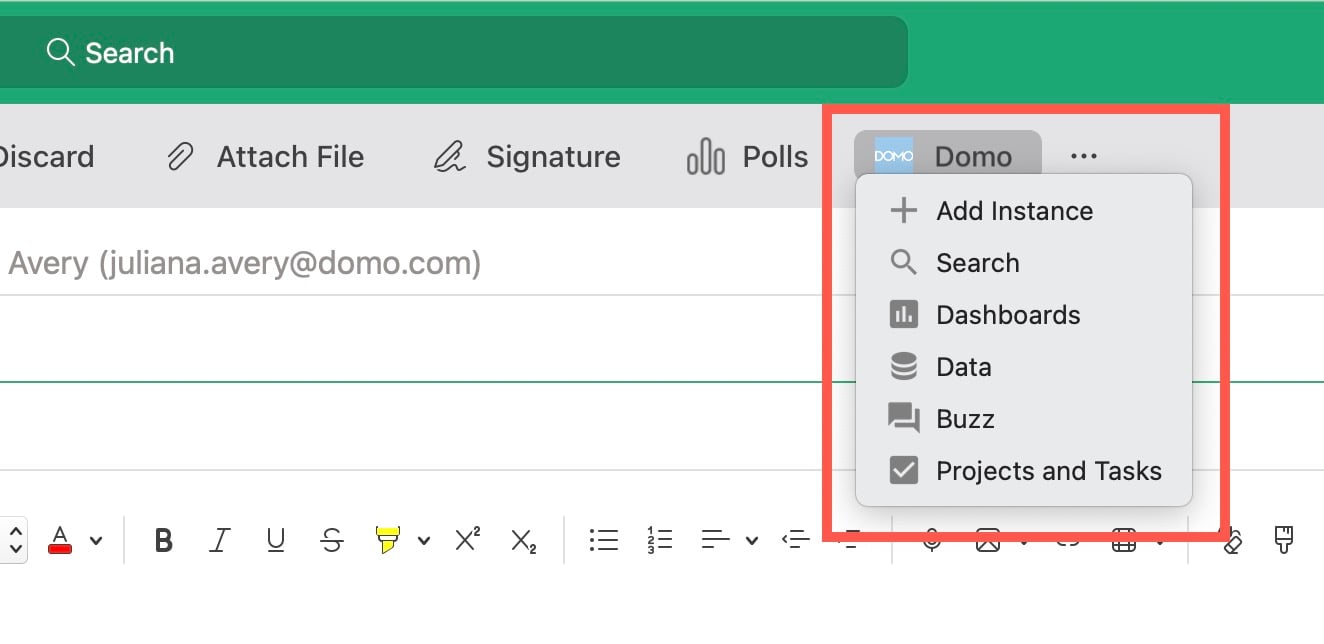 3. Select
  ### Connect to a Domo Instance
1. Select the **Domo** logo from the toolbar at the top of your Microsoft 365 app.
2. Select **+ Add Instance**.
The Domo add-in displays in a sidebar at the right of the app.
3. In the sidebar, enter your organization's domain in the **Your Company** field.
4. Select **Authenticate** or **+** to sign into your instance.
A web page opens where you can sign in with your Domo credentials.
5. Enter your email and password and select **Sign In**.
If your Domo credentials are validated, you are redirected to a web page confirming that you have been granted access. Close the page and return to your Microsoft 365 app to use the Domo add-in.
### Connect to a Domo Instance
1. Select the **Domo** logo from the toolbar at the top of your Microsoft 365 app.
2. Select **+ Add Instance**.
The Domo add-in displays in a sidebar at the right of the app.
3. In the sidebar, enter your organization's domain in the **Your Company** field.
4. Select **Authenticate** or **+** to sign into your instance.
A web page opens where you can sign in with your Domo credentials.
5. Enter your email and password and select **Sign In**.
If your Domo credentials are validated, you are redirected to a web page confirming that you have been granted access. Close the page and return to your Microsoft 365 app to use the Domo add-in.
 The logo of the instance you are currently connected to displays on all screens of the Domo sidebar to help you verify which instance you are interacting with.
 ### Delete a Domo Instance
1. Select the **Domo** logo from the toolbar at the top of your Microsoft 365 app.
2. Select **+ Add Instance**.
The Domo add-in displays in a sidebar at the right of the app.
3. In the sidebar, under **Instances History**, locate the instance you want to delete and select
### Delete a Domo Instance
1. Select the **Domo** logo from the toolbar at the top of your Microsoft 365 app.
2. Select **+ Add Instance**.
The Domo add-in displays in a sidebar at the right of the app.
3. In the sidebar, under **Instances History**, locate the instance you want to delete and select 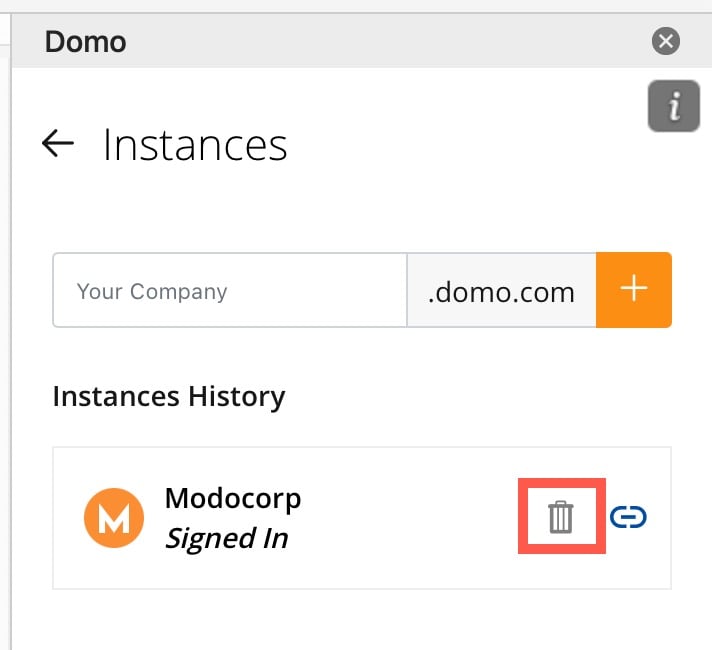 A dialog displays to confirm the deletion of the instance.
* If you select **Yes**, the instance is removed from the add-in.
* If you select **No**, you return to the previous screen.
A dialog displays to confirm the deletion of the instance.
* If you select **Yes**, the instance is removed from the add-in.
* If you select **No**, you return to the previous screen.
 ### Disconnect from/Reconnect to a Domo Instance
1. Select the **Domo** logo from the toolbar at the top of your Microsoft 365 app.
2. Select **+ Add Instance**.
The Domo add-in displays in a sidebar at the right of the app.
3. In the sidebar, under **Instances History**, find the instance you want to disconnect from and select the
### Disconnect from/Reconnect to a Domo Instance
1. Select the **Domo** logo from the toolbar at the top of your Microsoft 365 app.
2. Select **+ Add Instance**.
The Domo add-in displays in a sidebar at the right of the app.
3. In the sidebar, under **Instances History**, find the instance you want to disconnect from and select the 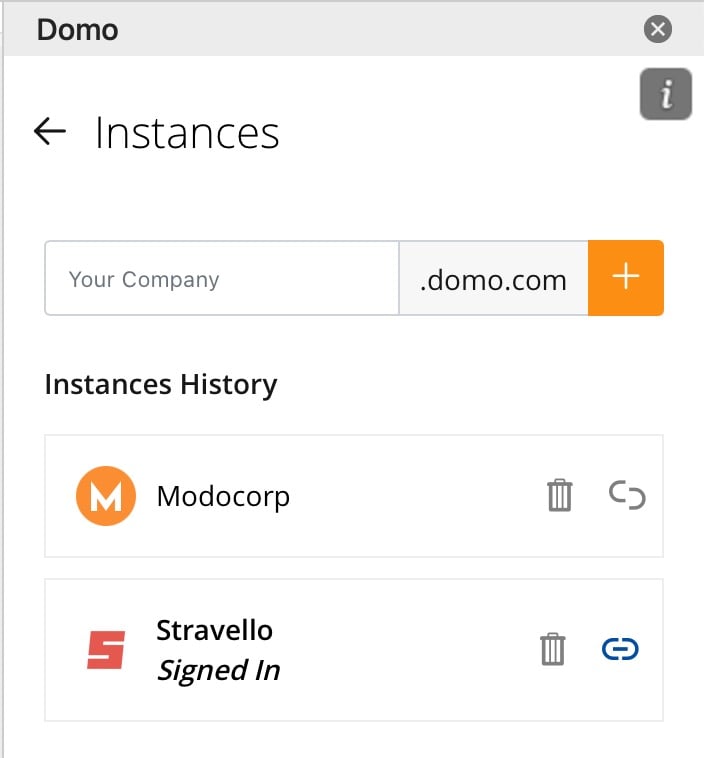 4. Select the logo for the connected instance that you want to switch to.
 You can change the format you view results in by toggling between
  ### Import Domo Content to Your Document (Excel, PowerPoint, Word)
1. Follow the instructions above to [search](#search_domo_content) for the content you want to import into your document.
2. In the search results, select the content.
3. Drag the content into your document.
The content import modal displays.
### Import Domo Content to Your Document (Excel, PowerPoint, Word)
1. Follow the instructions above to [search](#search_domo_content) for the content you want to import into your document.
2. In the search results, select the content.
3. Drag the content into your document.
The content import modal displays.
 # Configure Import Settings
1. Choose whether to import the content as a **Card Visualization** or a **Data Table**.
# Configure Import Settings
1. Choose whether to import the content as a **Card Visualization** or a **Data Table**.
 2. Make any changes to the **Settings**, which are described below.
 * **Data Refresh —** This section includes the option to **Use Document Level Refresh Settings**. Learn how to [refresh all content](#refresh_all_domo_content) in your document and how to [refresh content individually](#refresh_all_domo_content_individually).
* **Data Info —** This section includes switches to enable the following:
* Show DataSet Last Run Time
* Show Element Last Refreshed Time
* Display filter settings.
* Display control values
* Display viewed by
* (Cards only) Include Card Title
* (Cards only) Include Summary Number
When you choose to include the Summary Number, you have the option under **Visual Details** to **Hide Card Image**. This allows only the Summary Number itself to display in the document.
* (Cards only) Include Link to Card
* (Cards only) Add Card Description
* **Visual Details —** This section includes the options to change the colors for font color and grid line color and the option to **Use transparent background** to improve design functionality in your document.
* **Data Refresh —** This section includes the option to **Use Document Level Refresh Settings**. Learn how to [refresh all content](#refresh_all_domo_content) in your document and how to [refresh content individually](#refresh_all_domo_content_individually).
* **Data Info —** This section includes switches to enable the following:
* Show DataSet Last Run Time
* Show Element Last Refreshed Time
* Display filter settings.
* Display control values
* Display viewed by
* (Cards only) Include Card Title
* (Cards only) Include Summary Number
When you choose to include the Summary Number, you have the option under **Visual Details** to **Hide Card Image**. This allows only the Summary Number itself to display in the document.
* (Cards only) Include Link to Card
* (Cards only) Add Card Description
* **Visual Details —** This section includes the options to change the colors for font color and grid line color and the option to **Use transparent background** to improve design functionality in your document.
 * **Advanced Image Settings —** Selecting **Advanced Image Settings** allows you to adjust the width, height, and scale of the image. Select **Reset** to return to the default settings.

 3. (Optional) Choose filters to apply to your card content inside the import modal. Learn how to apply filters.
4. Select **Import Card**.
3. (Optional) Choose filters to apply to your card content inside the import modal. Learn how to apply filters.
4. Select **Import Card**.
 5. Verify that the configured card imported correctly to your document.

 2. Adjust the **Settings** in the add-in as needed.
 #### Display Variable Controls
When you import Domo content to a document, you can choose to display the value of variables being used in your card. You can enable this this setting even if there are no variables currently being used on your card, because you can add variables after import.
Follow these steps to configure and display these controls.
1. Begin [importing Domo content](#import_domo_content) to PowerPoint.
2. While [configuring the import settings](#configure_import_settings), switch the toggle labeled **Display control values**.
#### Display Variable Controls
When you import Domo content to a document, you can choose to display the value of variables being used in your card. You can enable this this setting even if there are no variables currently being used on your card, because you can add variables after import.
Follow these steps to configure and display these controls.
1. Begin [importing Domo content](#import_domo_content) to PowerPoint.
2. While [configuring the import settings](#configure_import_settings), switch the toggle labeled **Display control values**.
 3. Make any other changes to the import settings and import the card.
4. Go to the **Document** tab of the Domo sidebar and select **Filter Views**.
3. Make any other changes to the import settings and import the card.
4. Go to the **Document** tab of the Domo sidebar and select **Filter Views**.
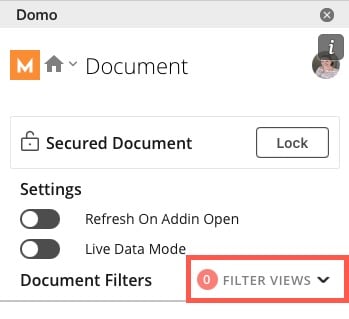 5. Select **Controls**.
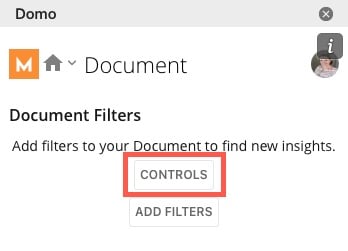 6. Set the appropriate control values for the variables you want to display on the card. **Note:** This is particularly important if no variables have been configured previously.
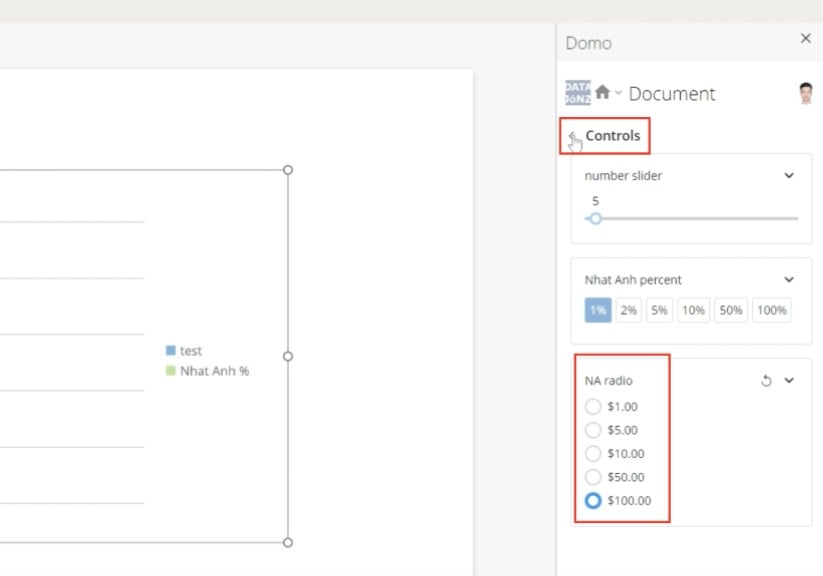 7. When finished, select **Save Filters**.
8. [Refresh](#refresh_all_domo_content_individually) the content to display the variable values you selected.
Now the card displays controls that are currently in use.
7. When finished, select **Save Filters**.
8. [Refresh](#refresh_all_domo_content_individually) the content to display the variable values you selected.
Now the card displays controls that are currently in use.
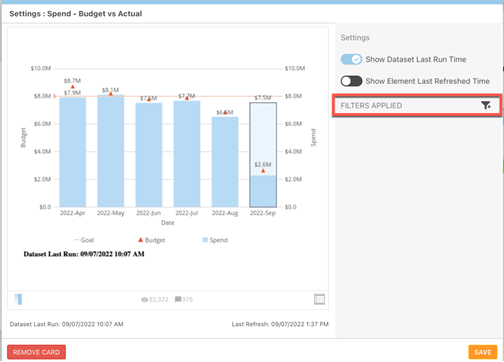 2. In **Setup Filters**, drag the columns you want to filter on from the **Available Columns** section to the **Filters** section.
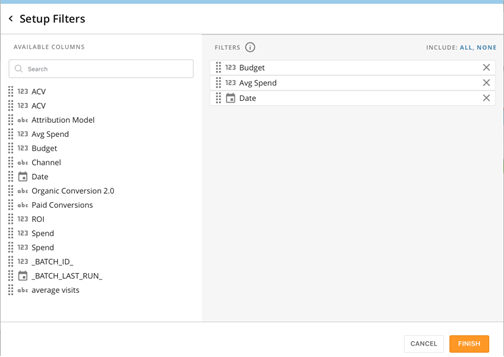 3. For each column in the **Filters** section, select the column and choose any applicable values for the Filter, such as Filter type and condition. Select **Apply** to apply each Filter.
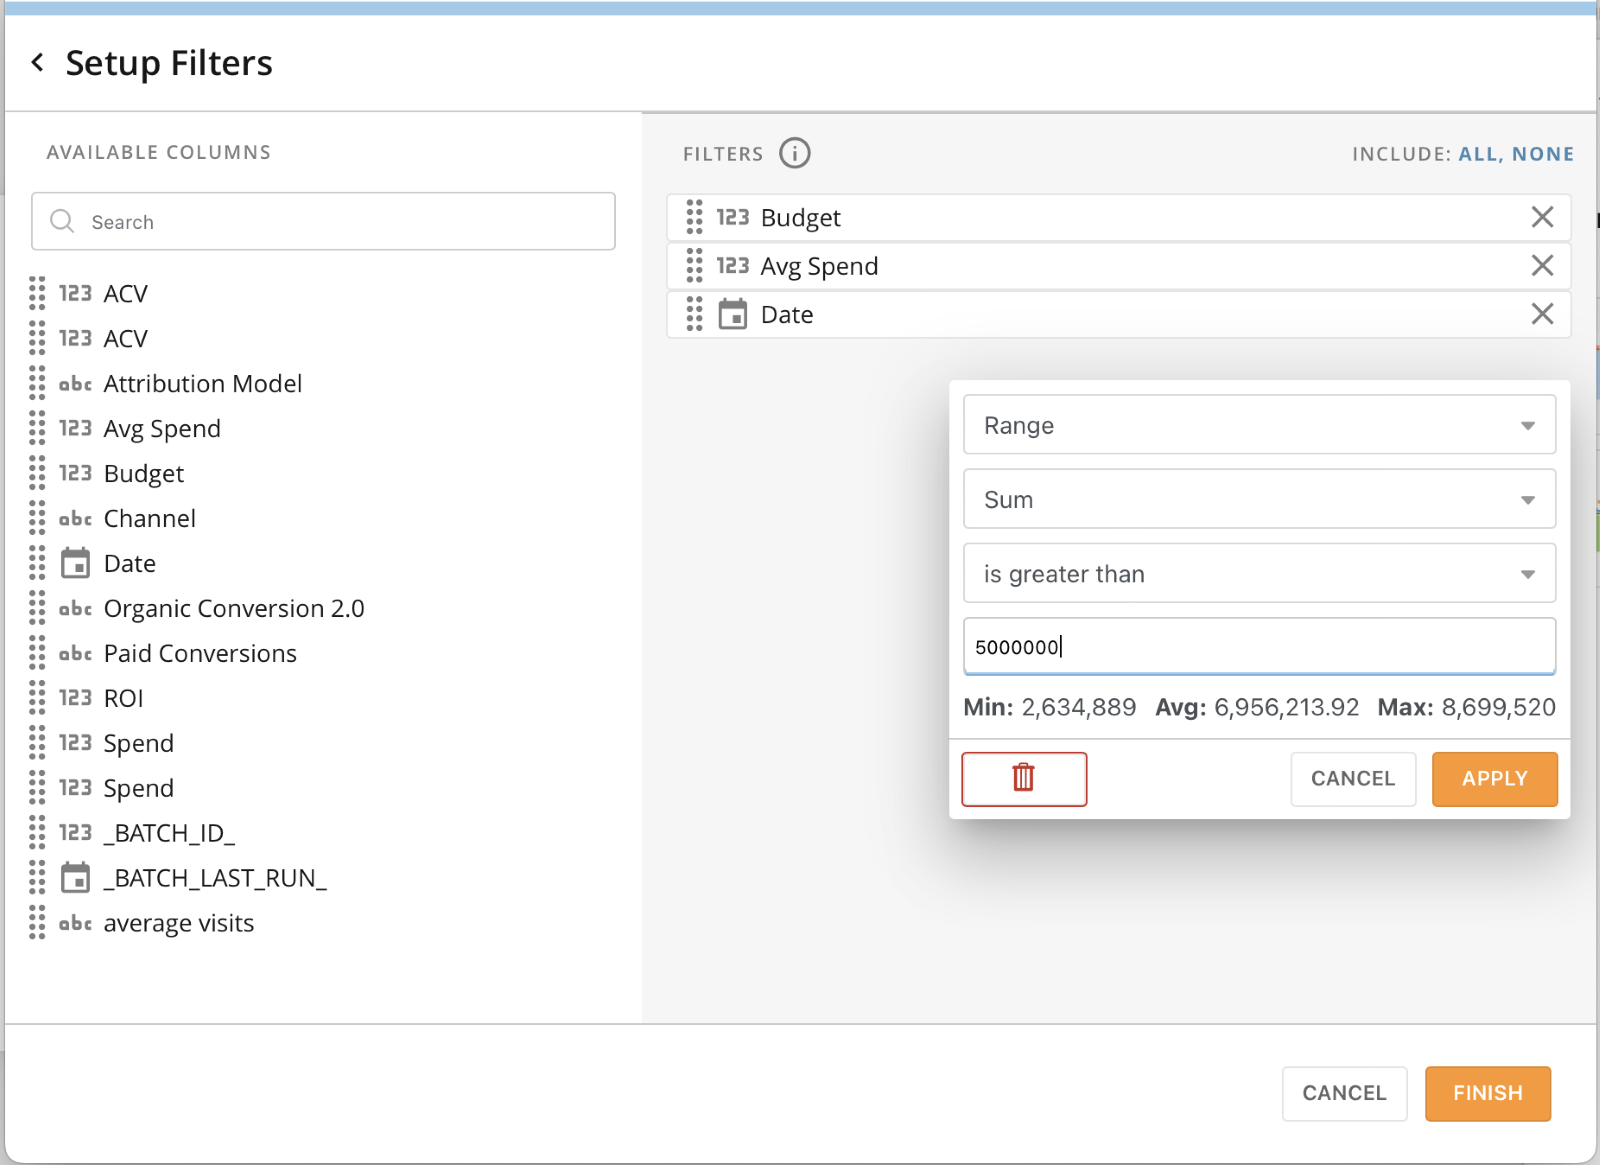 4. When you have created all your Filters, select **Finish** to return to the main screen of the card import modal.
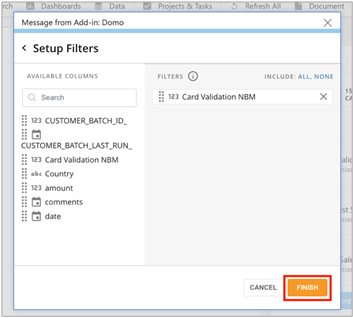 The applied Filters display in the right navigation menu of the modal.
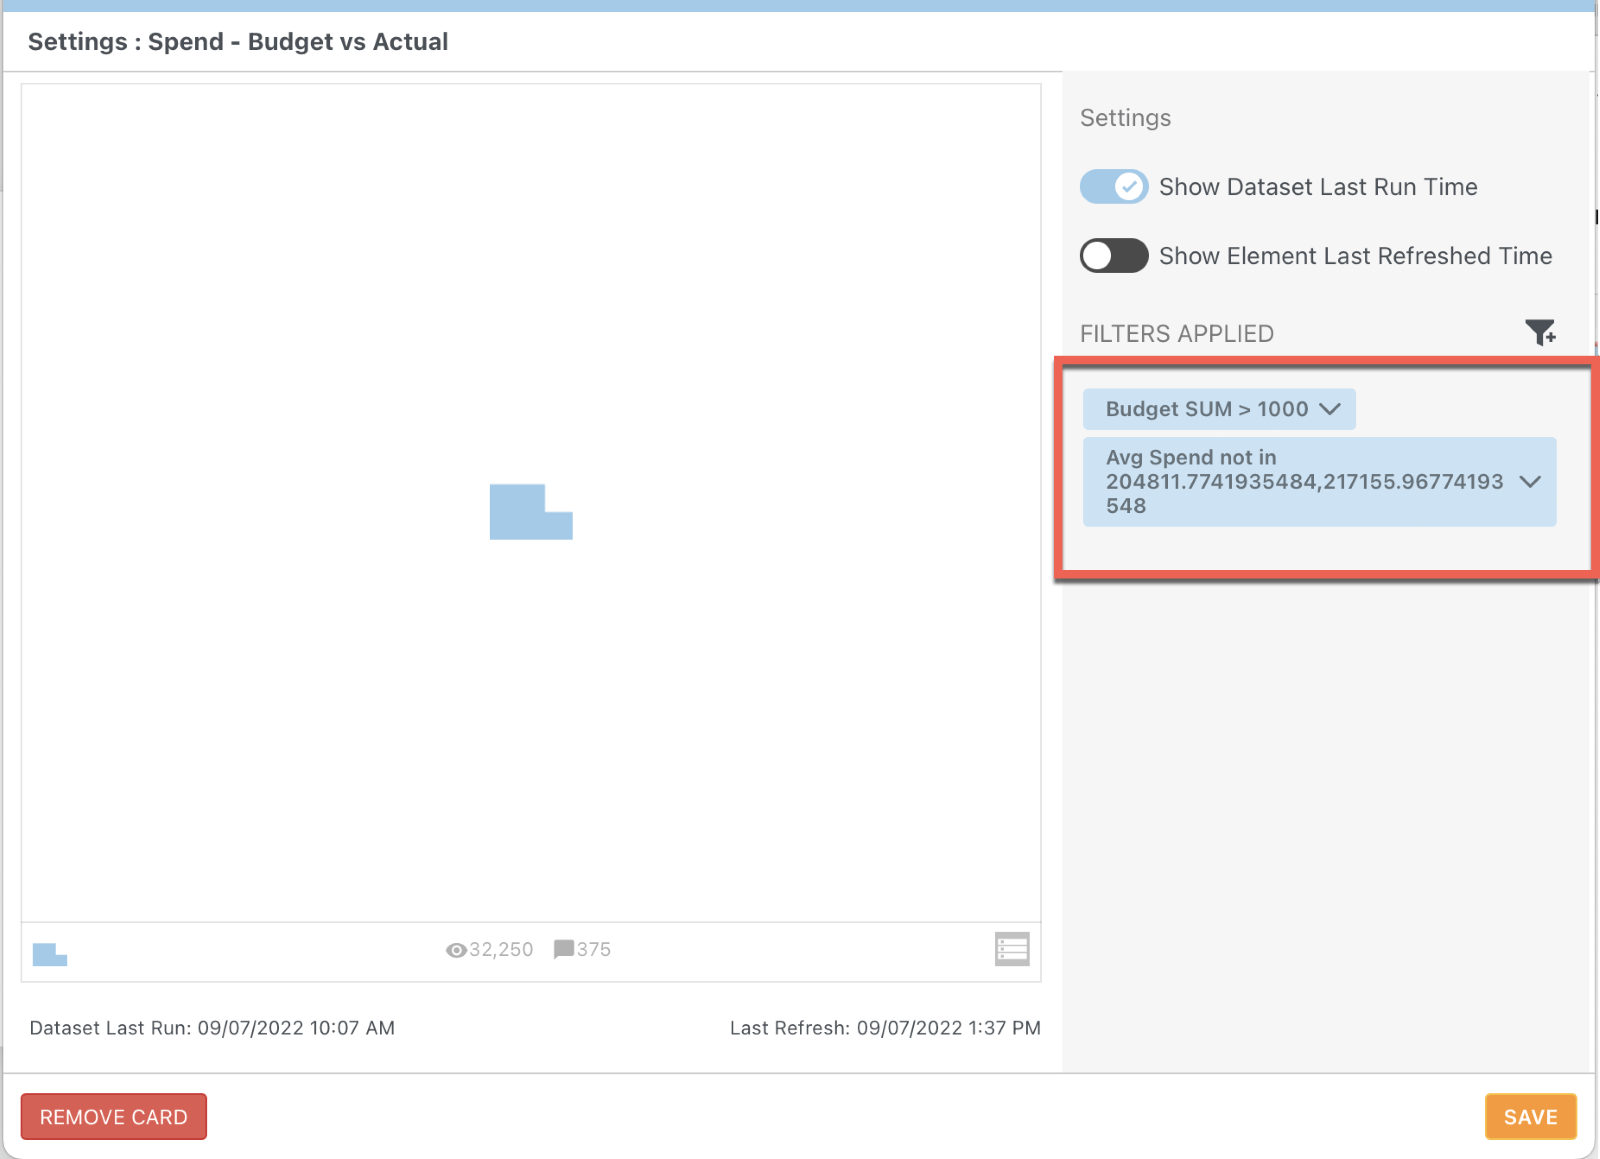 5. Select **Save** to save your Filters and close the modal.
 #### Update Filters
After you import content and apply Filters, you can update your Filters by following these steps:
1. Select **Document** from the Domo toolbar at the top of your Microsoft 365 app.
The **Document** screen of the Domo add-in displays in a sidebar to the right of your document.
2. In the list of Domo Content, find the content for which you want to update the Filters.
3. Select
#### Update Filters
After you import content and apply Filters, you can update your Filters by following these steps:
1. Select **Document** from the Domo toolbar at the top of your Microsoft 365 app.
The **Document** screen of the Domo add-in displays in a sidebar to the right of your document.
2. In the list of Domo Content, find the content for which you want to update the Filters.
3. Select 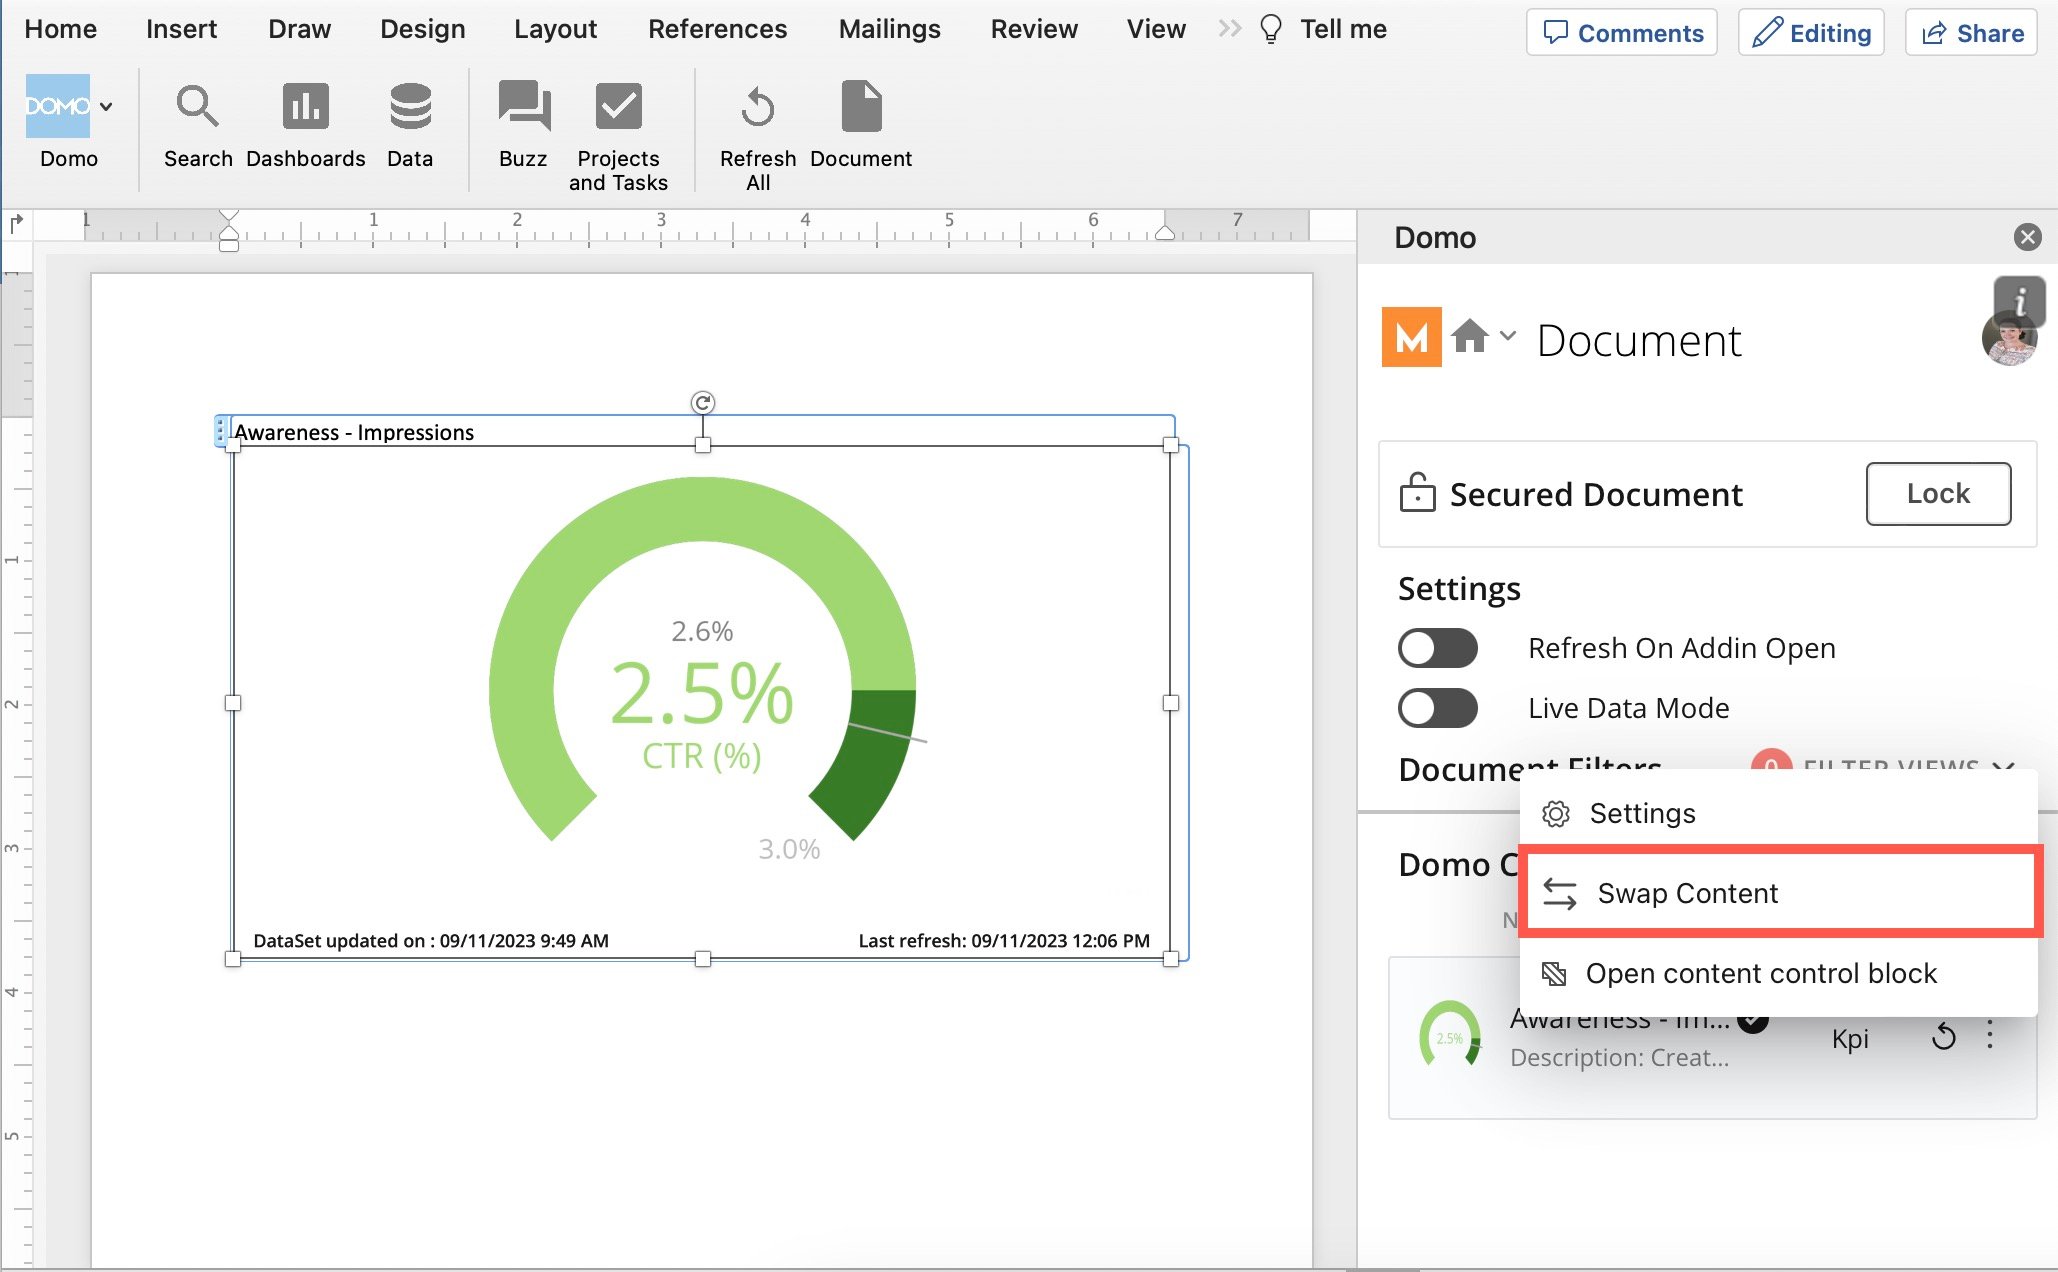 The **Content Swap** modal displays.
 3. Locate and select the content you want to swap in and select **Save**.
 4. Adjust any settings and configure any Filters.
5. Select **Save** to close the modal and keep your changes.
4. Adjust any settings and configure any Filters.
5. Select **Save** to close the modal and keep your changes.
 3. When you find the dashboard you are looking for, select it to view its contents.
### Search for and Import DataSets
1. Complete this step depending on the app you are working in.
* For Excel, PowerPoint, and Word:
1. Select **Data** in the Domo toolbar at the top of your document.
The **Data** screen of the Domo add-in displays in a sidebar to the right of your document.
* For Outlook:
1. Select the **Domo** logo in the toolbar at the top of the app.
The menu displays.
2\. In the menu, select **Data**.
The **Data** screen of the add-in displays in a sidebar at the right of the app.
2. Find the data you're looking for. You can do any of the following:
* Enter keywords into the **Search** bar at the top of the **Data** screen of the add-in or scroll through the list.
* Select
3. When you find the dashboard you are looking for, select it to view its contents.
### Search for and Import DataSets
1. Complete this step depending on the app you are working in.
* For Excel, PowerPoint, and Word:
1. Select **Data** in the Domo toolbar at the top of your document.
The **Data** screen of the Domo add-in displays in a sidebar to the right of your document.
* For Outlook:
1. Select the **Domo** logo in the toolbar at the top of the app.
The menu displays.
2\. In the menu, select **Data**.
The **Data** screen of the add-in displays in a sidebar at the right of the app.
2. Find the data you're looking for. You can do any of the following:
* Enter keywords into the **Search** bar at the top of the **Data** screen of the add-in or scroll through the list.
* Select 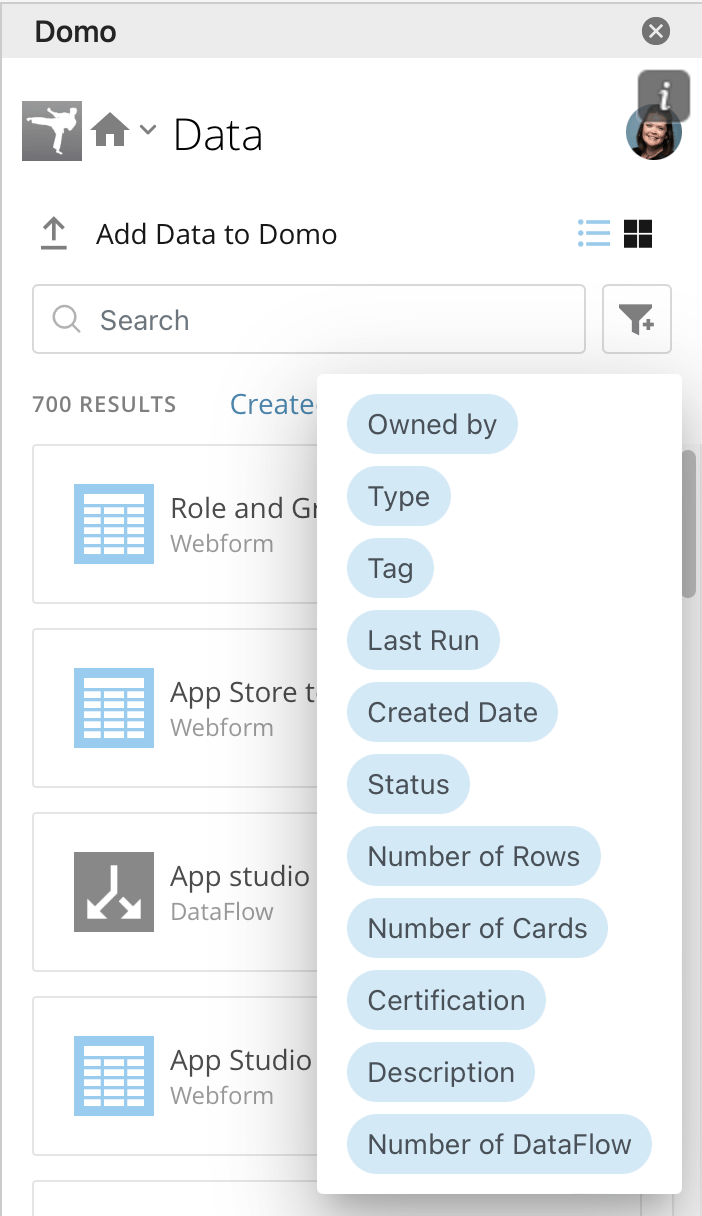 * After you select a Filter, you are prompted to select criteria for that Filter. In this example, the **Type** filter allows you to filter to items like DataFlows or file uploads.
 * With all search criteria applied, you can view the results in list and tile formats by toggling between
  * You can sort results by **Name**, **Created Date**, **Number of Cards**, **Number of Rows**, **Last run**, and **Status**.
 3. Select the DataSet that you want to import into your document.
4. Select **Import Data**.
3. Select the DataSet that you want to import into your document.
4. Select **Import Data**.
 A preview modal displays where you can choose refresh settings, choose to view/hide data info, apply filters, and edit groupings and aggregations. The preview is limited to 100 rows.
 5. (Optional) Select
  There are three sections of the filters setup screen: **Available Columns**, **Select Columns**, **and Filters**. You can drag items between the sections.
After configuring filters, select **Finish**.
There are three sections of the filters setup screen: **Available Columns**, **Select Columns**, **and Filters**. You can drag items between the sections.
After configuring filters, select **Finish**.
 6. (Optional) Select
  * There are two tabs in this interface: **Order** and **Group & Aggregate**. After making changes, select **Finish**.
* In the **Group & Aggregate** tab, you can drag available columns to the **Groupings** section to group your data by specific columns or to the **Aggregations** section to add one or more aggregations to return a single row of values from your DataSet. You can choose to **Add all** or **Remove all** columns from either section.
* There are two tabs in this interface: **Order** and **Group & Aggregate**. After making changes, select **Finish**.
* In the **Group & Aggregate** tab, you can drag available columns to the **Groupings** section to group your data by specific columns or to the **Aggregations** section to add one or more aggregations to return a single row of values from your DataSet. You can choose to **Add all** or **Remove all** columns from either section.
 * In the **Order** tab, you can order your rows by one or more columns, in ascending or descending order, and add a limit.
 7. When you have finished configuring all settings in the preview modal, select **Import DataSet**.
 8. Verify the import and that the data displays correctly in your document.
### Alter Document Settings (Excel, PowerPoint, Word)
8. Verify the import and that the data displays correctly in your document.
### Alter Document Settings (Excel, PowerPoint, Word)
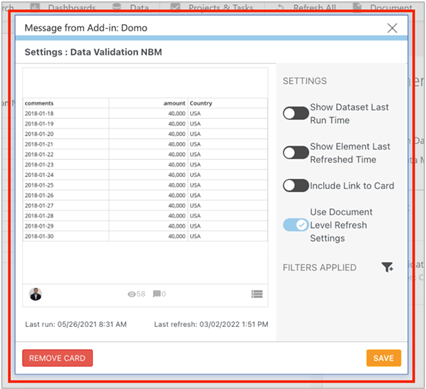 3. Select **Save** or **Remove Card**.
* If you select **Save**, any changes you made are saved, and you return to the Document screen of the sidebar.
* If you select **Remove Card**, a dialog displays asking you to confirm that you want to remove the content from your document. If you select **Yes**, that content is removed from your document.
3. Select **Save** or **Remove Card**.
* If you select **Save**, any changes you made are saved, and you return to the Document screen of the sidebar.
* If you select **Remove Card**, a dialog displays asking you to confirm that you want to remove the content from your document. If you select **Yes**, that content is removed from your document.
 ### Lock Domo Content in Your Document (Excel, PowerPoint, Word)
To avoid sharing data with users who do not have access to the Domo content in your document, you can lock the document before sharing it with other users. Users with access to the content only see the data they have access to via PDP and security settings.
The first image below shows how unlocked content displays, while the second image shows how locked content displays.
### Lock Domo Content in Your Document (Excel, PowerPoint, Word)
To avoid sharing data with users who do not have access to the Domo content in your document, you can lock the document before sharing it with other users. Users with access to the content only see the data they have access to via PDP and security settings.
The first image below shows how unlocked content displays, while the second image shows how locked content displays.
 Follow these steps to lock Domo content in your document:
1. Open the **Document** screen of the Domo add-in. For detailed instructions on how to do this, see [Alter Document Settings](#AlterDocumentSettingsExcelPowerPointWord).
2. Next to **Secured Document**, select **Lock**.
Follow these steps to lock Domo content in your document:
1. Open the **Document** screen of the Domo add-in. For detailed instructions on how to do this, see [Alter Document Settings](#AlterDocumentSettingsExcelPowerPointWord).
2. Next to **Secured Document**, select **Lock**.
 **Lock** changes to **Unlock**, and the following text displays: "This document is currently in secure mode, unlock the document to see the content."
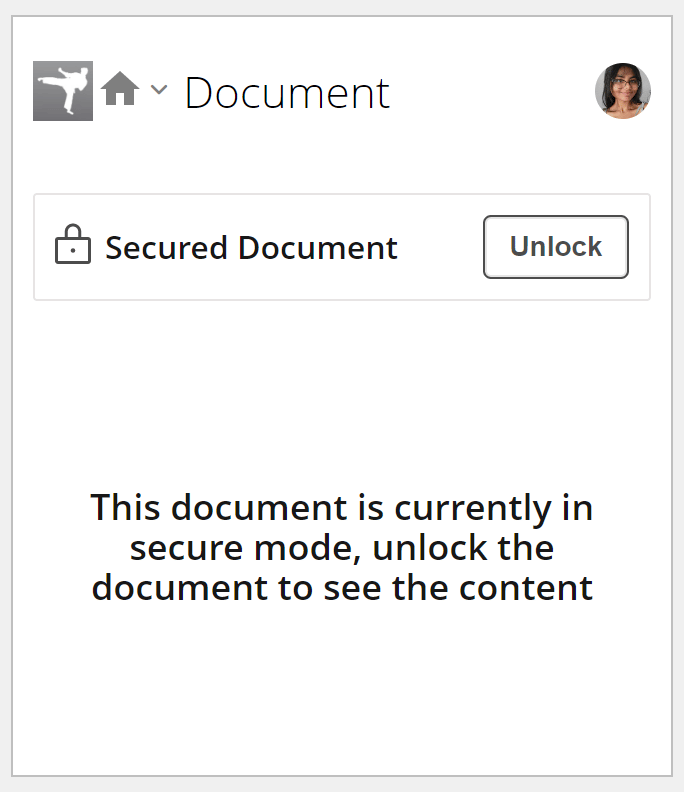 Select **Unlock** to unlock your document and allow all users to view its contents.
### Add Data to Domo (Excel, Outlook, and Word)
1. Select **Data** in the Domo toolbar at the top of the app.
The **Data** screen of the Domo sidebar opens at the right of the document.
Select **Unlock** to unlock your document and allow all users to view its contents.
### Add Data to Domo (Excel, Outlook, and Word)
1. Select **Data** in the Domo toolbar at the top of the app.
The **Data** screen of the Domo sidebar opens at the right of the document.
 2. In the sidebar, select **Add Data to Domo**.
The **Add Data to Domo** modal displays.
2. In the sidebar, select **Add Data to Domo**.
The **Add Data to Domo** modal displays.
 3. Check the boxes to select each of the tables that you want to upload to Domo.
4. (Optional) Next to your selected content, hover over
3. Check the boxes to select each of the tables that you want to upload to Domo.
4. (Optional) Next to your selected content, hover over 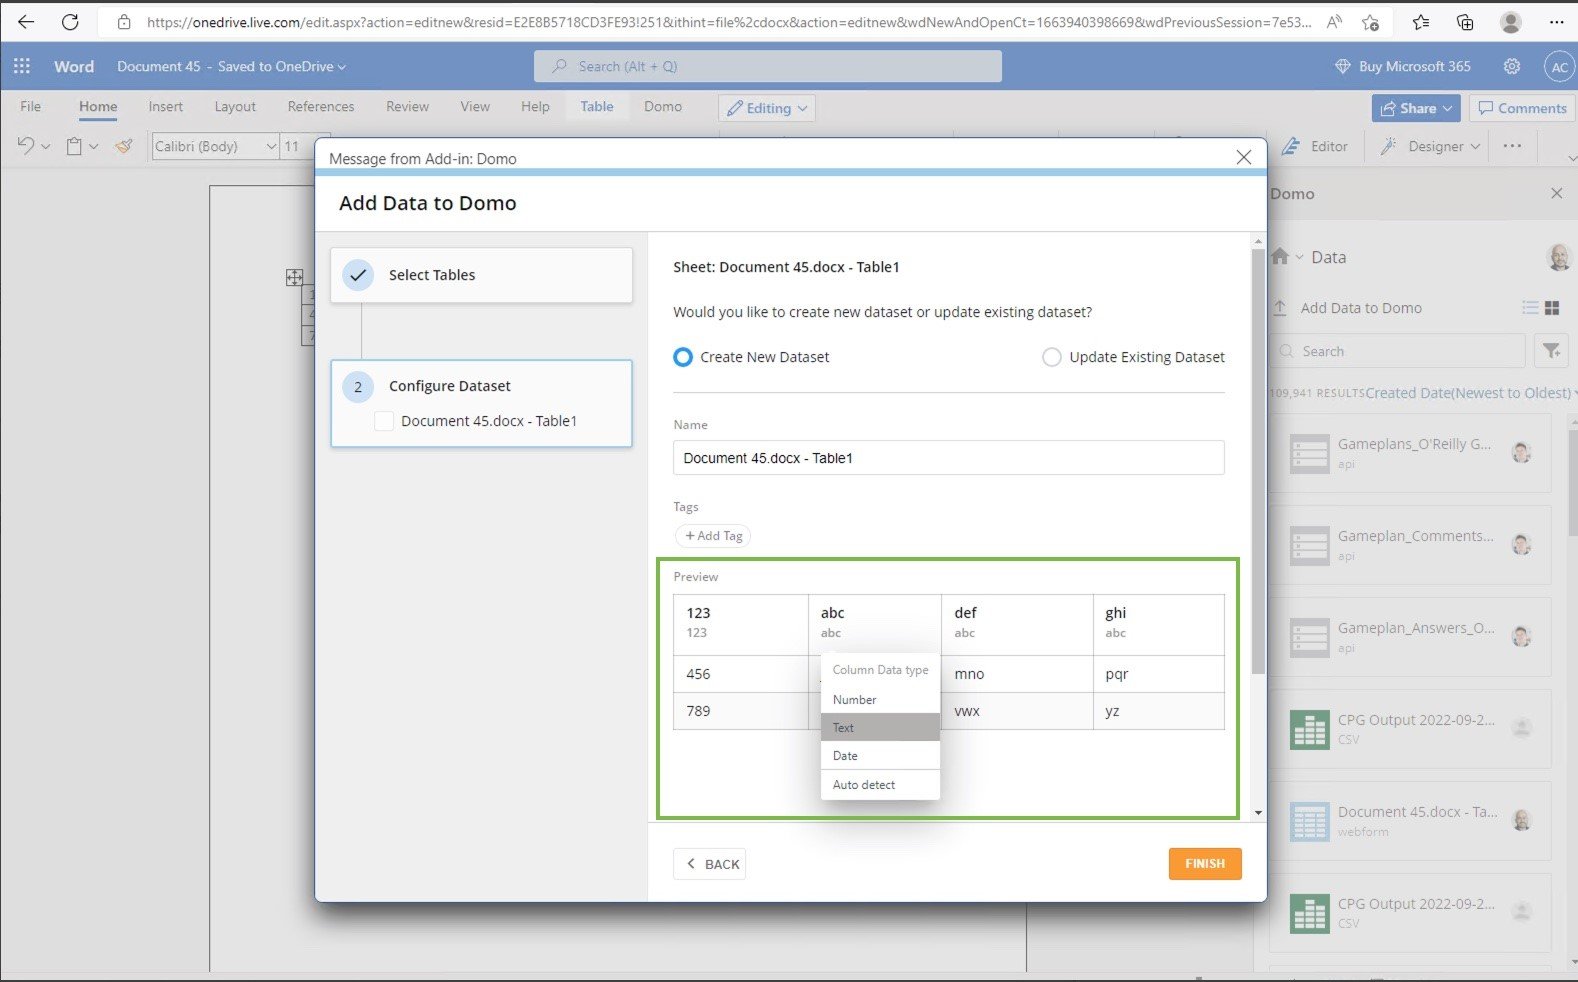 * If you choose **Create New Dataset**, you are prompted to add a **Name** and any **Tags**.
1. Select **Next** to add these items for each sheet.
2. Complete any remaining fields.
3. (Optional) Select **Open in Domo** to open each selected sheet in Domo.
* If you choose **Update Existing Dataset**, you are prompted to select any DataSets in Domo that you want to update from the menu.
1. Select the radio button for how you want to update the DataSet: **Replace** or **Append**.
2. Add any **Tags**.
3. Complete any remaining fields.
4. Select **Next** to configure each of the selected sheets.
7. Select **Finish**.
* If you choose **Create New Dataset**, you are prompted to add a **Name** and any **Tags**.
1. Select **Next** to add these items for each sheet.
2. Complete any remaining fields.
3. (Optional) Select **Open in Domo** to open each selected sheet in Domo.
* If you choose **Update Existing Dataset**, you are prompted to select any DataSets in Domo that you want to update from the menu.
1. Select the radio button for how you want to update the DataSet: **Replace** or **Append**.
2. Add any **Tags**.
3. Complete any remaining fields.
4. Select **Next** to configure each of the selected sheets.
7. Select **Finish**.
 5. Select the checkboxes for the sheets you want to upload.
6. Select **Next** to configure the selected sheets.
5. Select the checkboxes for the sheets you want to upload.
6. Select **Next** to configure the selected sheets.
 7. Select the DataSet you want to update in Domo.
8. Select the radio button for how you want to update the DataSet: **Replace** or **Append**.
9. Apply any necessary **Tags**.
10. After you have configured all selected sheets, select **Finish**
7. Select the DataSet you want to update in Domo.
8. Select the radio button for how you want to update the DataSet: **Replace** or **Append**.
9. Apply any necessary **Tags**.
10. After you have configured all selected sheets, select **Finish**
 11. (Optional) Select **Open in Domo** to open the updated DataSet in Domo in a new window.
 12. Select **Close** to close the modal.
# Add Data to Domo from an Email Attachment in Outlook
1. Open the email that you want to import DataSets from.
2. Select the **Domo** logo from the toolbar at the top of the app.
The Domo menu displays.
12. Select **Close** to close the modal.
# Add Data to Domo from an Email Attachment in Outlook
1. Open the email that you want to import DataSets from.
2. Select the **Domo** logo from the toolbar at the top of the app.
The Domo menu displays.
 3. In the Domo menu, select **Data**.
The **Data** screen of the Domo add-in displays at the right of the app.
3. In the Domo menu, select **Data**.
The **Data** screen of the Domo add-in displays at the right of the app.
 4. In the **Data** sidebar, select **Add Data to Domo**.
The **Add Data to Domo** modal displays.
5. Select the radio button
for where your data is coming from: **From an Attachment** or **From Email Body**.
4. In the **Data** sidebar, select **Add Data to Domo**.
The **Add Data to Domo** modal displays.
5. Select the radio button
for where your data is coming from: **From an Attachment** or **From Email Body**.
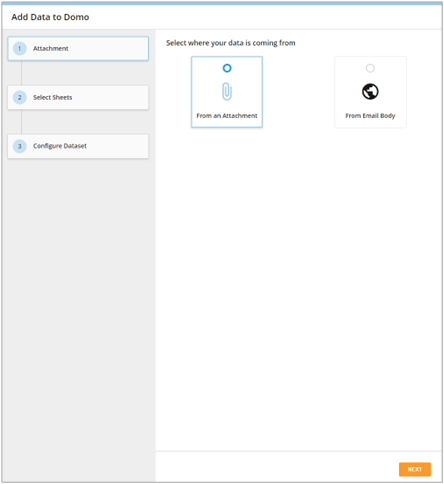 6. Select **Next**.
7. Select the checkboxes for the data you want to add.
6. Select **Next**.
7. Select the checkboxes for the data you want to add.
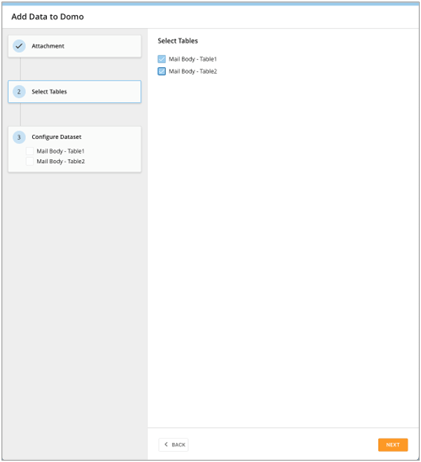 8. Select **Next**.
9. Select the radio button
to **Create New Dataset** or **Update Existing Dataset**.
* If you choose **Create New Dataset**, you are prompted to add a **Name** and any **Tags**.
1. Select **Next** to add these items for each of the selected sheets.
2. Complete any remaining fields.
3. (Optional) Select **Open in Domo** to open each selected sheet in Domo.
* If you choose **Update Existing Dataset**, you are prompted to select any DataSets in Domo that you want to update from the menu.
1. Select the radio button for how you want to update the DataSet: **Replace** or **Append**.
2. Add any **Tags**.
3. Complete any remaining fields.
4. Select **Next** to configure each of the selected sheets.
10. Select **Finish**.
8. Select **Next**.
9. Select the radio button
to **Create New Dataset** or **Update Existing Dataset**.
* If you choose **Create New Dataset**, you are prompted to add a **Name** and any **Tags**.
1. Select **Next** to add these items for each of the selected sheets.
2. Complete any remaining fields.
3. (Optional) Select **Open in Domo** to open each selected sheet in Domo.
* If you choose **Update Existing Dataset**, you are prompted to select any DataSets in Domo that you want to update from the menu.
1. Select the radio button for how you want to update the DataSet: **Replace** or **Append**.
2. Add any **Tags**.
3. Complete any remaining fields.
4. Select **Next** to configure each of the selected sheets.
10. Select **Finish**.
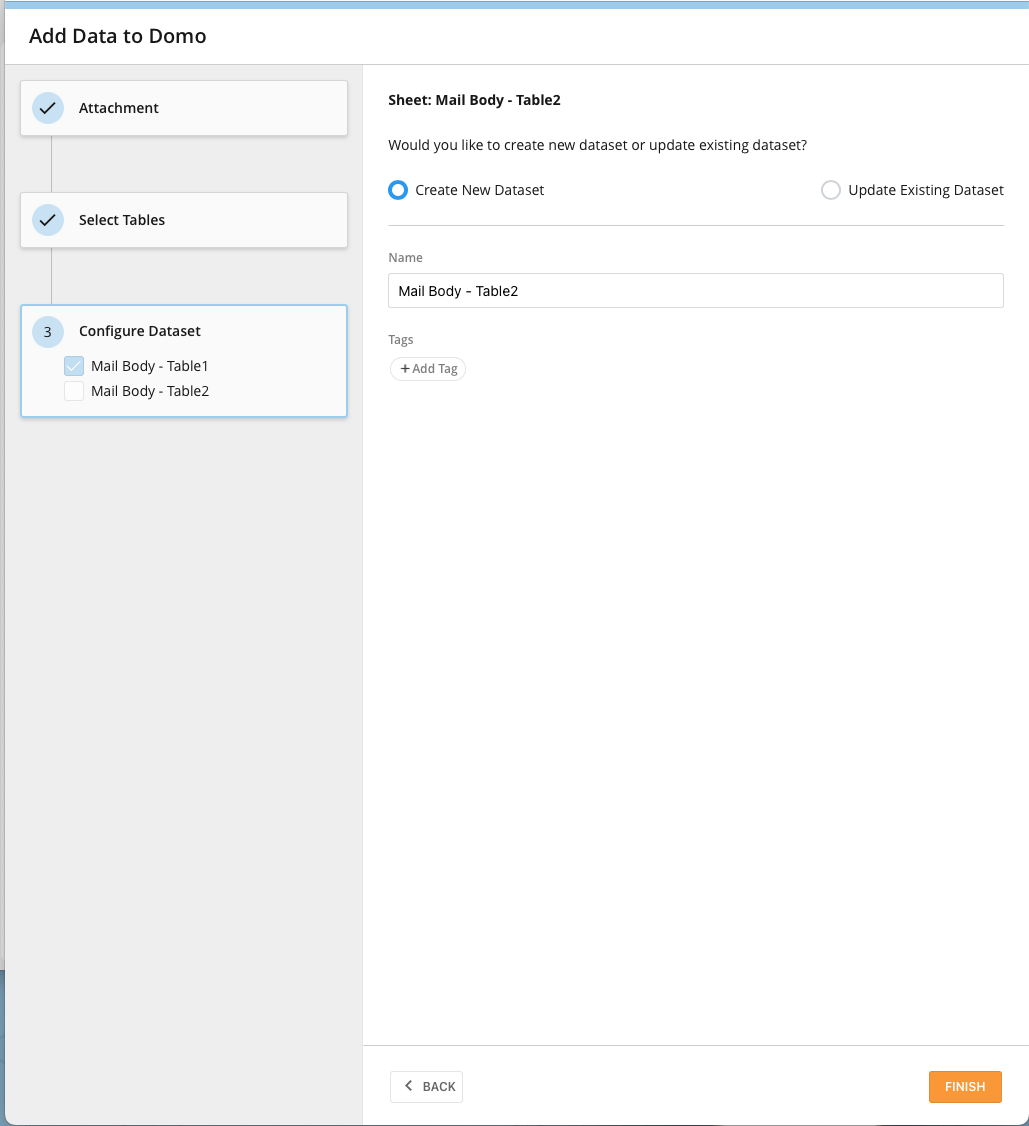 11. (Optional) Select **Open in Domo** to open the DataSet in Domo in a new window.
12. Select **Close** to close the modal.
# Content Tracking in PowerPoint
In PowerPoint, when you copy and paste Domo content to duplicate it within the slide deck, the copied and pasted content is untracked. Untracked content cannot be refreshed and updated. The Scan Slide tool allows you to scan your slides for any untracked content and displays it on the **Document** screen of the Domo add-in sidebar with a "Found Untracked Content" label. After content is found, future document refreshes affect all content.
To scan for untracked content in your slides, follow these steps:
1. Open the **Document** screen of the Domo sidebar in your PowerPoint file. (From the **Domo** tab in your PowerPoint file, select **Document.**)
2. In your slide deck, navigate to and select the slide you want to scan for untracked content.
3. In the Domo sidebar, select **Scan Slide**.
11. (Optional) Select **Open in Domo** to open the DataSet in Domo in a new window.
12. Select **Close** to close the modal.
# Content Tracking in PowerPoint
In PowerPoint, when you copy and paste Domo content to duplicate it within the slide deck, the copied and pasted content is untracked. Untracked content cannot be refreshed and updated. The Scan Slide tool allows you to scan your slides for any untracked content and displays it on the **Document** screen of the Domo add-in sidebar with a "Found Untracked Content" label. After content is found, future document refreshes affect all content.
To scan for untracked content in your slides, follow these steps:
1. Open the **Document** screen of the Domo sidebar in your PowerPoint file. (From the **Domo** tab in your PowerPoint file, select **Document.**)
2. In your slide deck, navigate to and select the slide you want to scan for untracked content.
3. In the Domo sidebar, select **Scan Slide**.
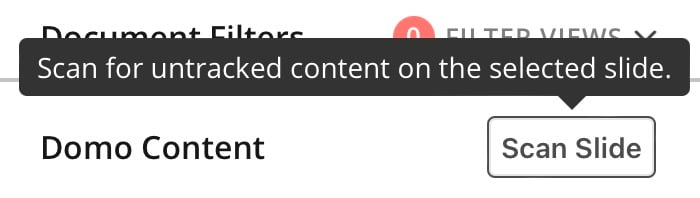 Content identified as untracked displays with a label in the sidebar and is now refreshed with all other content during document refreshes.