> ## Documentation Index
> Fetch the complete documentation index at: https://domoinc-openapi-sync-dataflows.mintlify.site/llms.txt
> Use this file to discover all available pages before exploring further.

# Google Sheets Writeback Workload Identity Federation Connector

## Intro

Google Sheets allows you to create and edit spreadsheets online while collaborating with other users in real-time. With Domo's Google Sheets Writeback Workload identity federation connector, you can transfer your data from a Domo dataset to your Google Sheet. To learn more about the Google API, visit their page ([https://developer.google.com](https://developer.google.com "https://developer.google.com") ).

You export data to Google Sheets in the Data Center. This topic discusses the fields and menus that are specific to the Google Sheets Writeback Workload Identity Federation connector user interface. General information for adding DataSets, setting update schedules, and editing DataSet information is discussed in [Adding a DataSet Using a Data Connector](/s/article/360042926274 "Adding a DataSet Using a Data Connector").

<Note>
  **Note:** The owner of a writeback dataset must also be an owner or co-owner of the input dataset.
</Note>

## Prerequisites

To configure this connector, you will need the following:

* A project created in the Google Developers Console with the Google Sheets API enabled.
* A Google Service Token JSON file.

The following steps explain in detail how to create your project and obtain the needed credentials.

### Step 1: Creating a Project in the Google Developers Console

To create a project in the Google Developers Console, do the following:

1. Go to
   [https://console.developers.google.com](https://console.developers.google.com "https://console.developers.google.com").

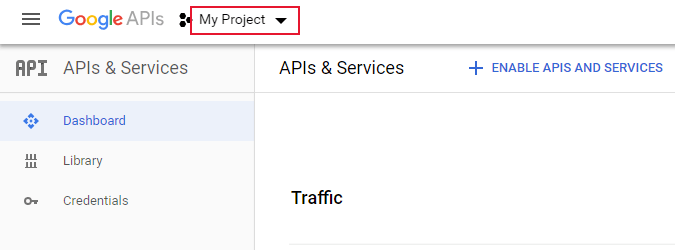
2. Click the dropdown arrow next to
   **My Project**.

   <Frame>
     <img alt="googlesheets_writeback_1.png" src="https://mintcdn.com/domoinc-openapi-sync-dataflows/blcgkVgnZv6gj_XY/images/kb/ka05w00000123L9-00N5w00000Ri7BU-0EM5w000005vO5e.png?fit=max&auto=format&n=blcgkVgnZv6gj_XY&q=85&s=f03feb392ea59ce30f3bb25369729015" width="675" height="250" data-path="images/kb/ka05w00000123L9-00N5w00000Ri7BU-0EM5w000005vO5e.png" />
   </Frame>

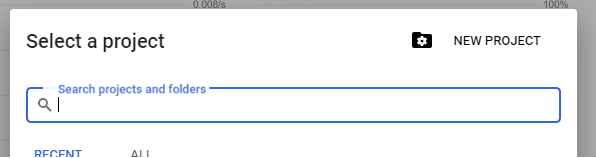
3. Click
   **New Project**.

   <Frame>
     <img alt="googlesheets_writeback_2.png" src="https://mintcdn.com/domoinc-openapi-sync-dataflows/blcgkVgnZv6gj_XY/images/kb/ka05w00000123L9-00N5w00000Ri7BU-0EM5w000005vO5Z.png?fit=max&auto=format&n=blcgkVgnZv6gj_XY&q=85&s=b44efa97c8a173faf5f4babcd3a21d71" width="596" height="158" data-path="images/kb/ka05w00000123L9-00N5w00000Ri7BU-0EM5w000005vO5Z.png" />
   </Frame>

4. Name your project and select the parent folder.

5. Click
   **Create**.
   <Note>
     **Note:** You can also use an existing project if you want.
   </Note>

### Step 2: Enabling the Google Sheets API

To enable the Google Sheets for your project, do the following:

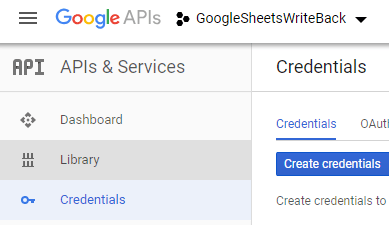
1. In the Google Developers Console, select your project and click
   **Library**.

   <Frame>
     <img alt="googlesheets_writeback_3.png" src="https://mintcdn.com/domoinc-openapi-sync-dataflows/blcgkVgnZv6gj_XY/images/kb/ka05w00000123QW-00N5w00000Ri7BU-0EM5w000005vOA9.png?fit=max&auto=format&n=blcgkVgnZv6gj_XY&q=85&s=e621c7a2594bb1df7e39086bafc16d69" width="389" height="225" data-path="images/kb/ka05w00000123QW-00N5w00000Ri7BU-0EM5w000005vOA9.png" />
   </Frame>

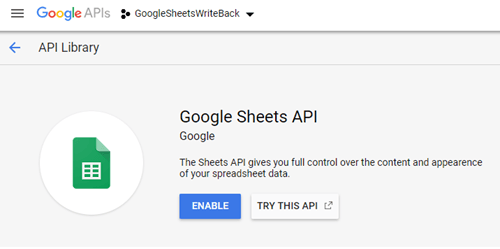
2. Search for the Google Sheets API.

3. Click
   **Enable**.
   <Frame>
     <img alt="googlesheets_writeback_4.png" src="https://mintcdn.com/domoinc-openapi-sync-dataflows/GXvfa618wDUsB9JU/images/kb/ka05w000001275E-00N5w00000Ri7BU-0EM5w000005vO9t.png?fit=max&auto=format&n=GXvfa618wDUsB9JU&q=85&s=4631e3823eb322135a5706ebeed9028f" width="500" height="249" data-path="images/kb/ka05w000001275E-00N5w00000Ri7BU-0EM5w000005vO9t.png" />
   </Frame>

### Step 3: Creating a Service Account

To create a Service Account, do the following:

1. In the Google Developers Console, open the
   **Credentials** tab.

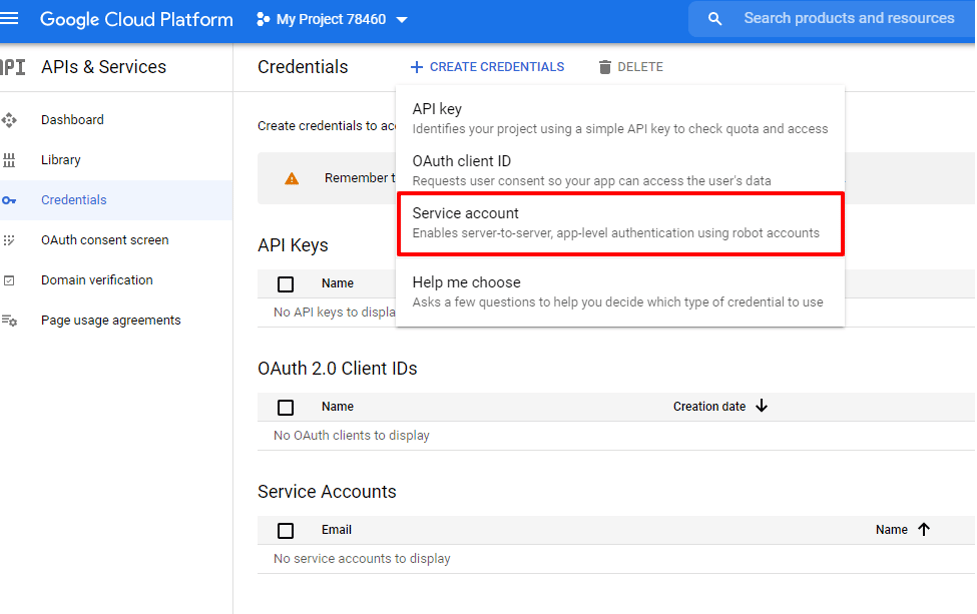
2. Click
   **+ Create Credentials** then select **Service account**.
   <Frame>
     <img alt="Service_Account.png" src="https://mintcdn.com/domoinc-openapi-sync-dataflows/GXvfa618wDUsB9JU/images/kb/ka05w000001275E-00N5w00000Ri7BU-0EM5w000005vO9n.png?fit=max&auto=format&n=GXvfa618wDUsB9JU&q=85&s=cf791a6ad53afb4b2c1b41607c72493d" width="977" height="614" data-path="images/kb/ka05w000001275E-00N5w00000Ri7BU-0EM5w000005vO9n.png" />
   </Frame>

3. Name the new Service account.

4. Click
   **Create and Continue**.

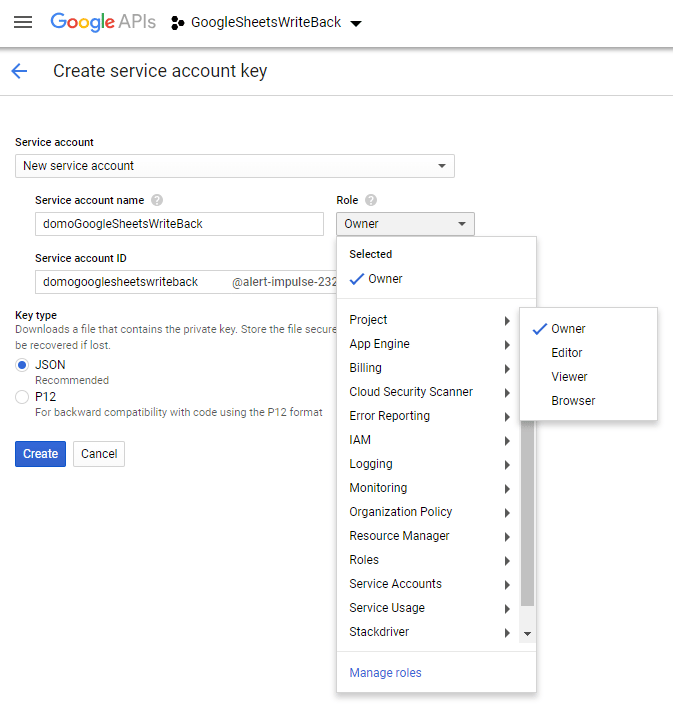
5. In the
   **Role** dropdown, select **Basic > Owner**.

6. Click
   **Done**.

7. Click on the Email field under
   **Service Accounts**.
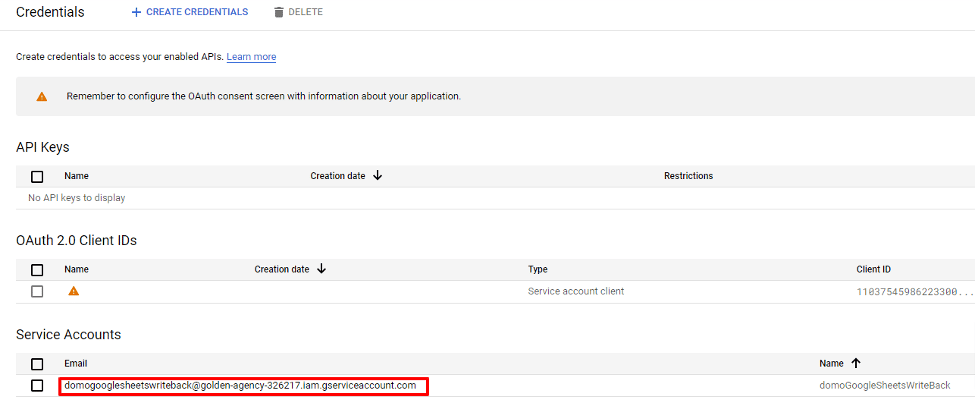
   <Frame>
     <img alt="Email_Account.png" src="https://mintcdn.com/domoinc-openapi-sync-dataflows/GXvfa618wDUsB9JU/images/kb/ka05w000001275E-00N5w00000Ri7BU-0EM5w000005vO9o.png?fit=max&auto=format&n=GXvfa618wDUsB9JU&q=85&s=ac560401a968a4e468218227f5b2ec00" width="977" height="404" data-path="images/kb/ka05w000001275E-00N5w00000Ri7BU-0EM5w000005vO9o.png" />
   </Frame>

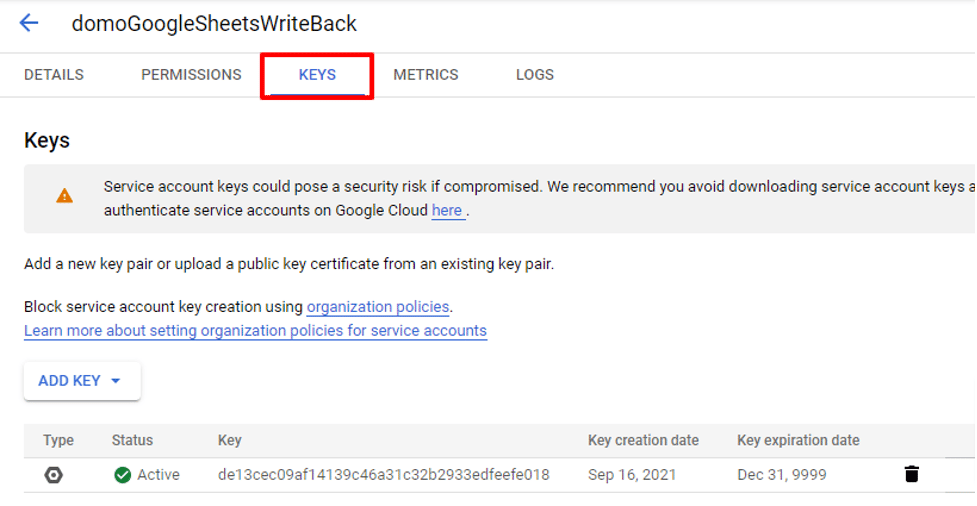
8. Click on the
   **Keys** option.

   <Frame>
     <img alt="Keys.png" src="https://mintcdn.com/domoinc-openapi-sync-dataflows/GXvfa618wDUsB9JU/images/kb/ka05w000001275E-00N5w00000Ri7BU-0EM5w000005vO9j.png?fit=max&auto=format&n=GXvfa618wDUsB9JU&q=85&s=ed957d73546e5e0460fa33e377aa85d9" width="977" height="506" data-path="images/kb/ka05w000001275E-00N5w00000Ri7BU-0EM5w000005vO9j.png" />
   </Frame>

9. Click
   **Add Key** and then select **Create New Key**.

10. Choose
    **JSON**, click **Create**.

    Select a safe location for the file as you will need it soon.
    <Frame>
      <img alt="googlesheets_writeback_6.png" src="https://mintcdn.com/domoinc-openapi-sync-dataflows/GXvfa618wDUsB9JU/images/kb/ka05w000001275E-00N5w00000Ri7BU-0EM5w000005vO9u.png?fit=max&auto=format&n=GXvfa618wDUsB9JU&q=85&s=a1001f258e4ccd400439a92d64dbd98e" width="673" height="719" data-path="images/kb/ka05w000001275E-00N5w00000Ri7BU-0EM5w000005vO9u.png" />
    </Frame>

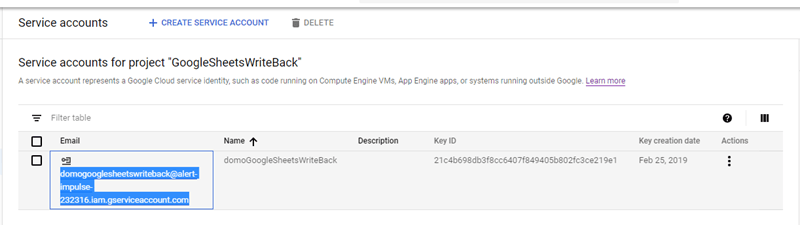
11. Copy the email address for the project you created.
    <Frame>
      <img alt="googlesheets_writeback_8.png" src="https://mintcdn.com/domoinc-openapi-sync-dataflows/GXvfa618wDUsB9JU/images/kb/ka05w000001275E-00N5w00000Ri7BU-0EM5w000005vO9s.png?fit=max&auto=format&n=GXvfa618wDUsB9JU&q=85&s=e56fbc25fa78ebd5fa0f136c40954c6f" width="800" height="226" data-path="images/kb/ka05w000001275E-00N5w00000Ri7BU-0EM5w000005vO9s.png" />
    </Frame>

12. Open
    [https://sheets.google.com](https://sheets.google.com "https://sheets.google.com") and create a new sheet.

13. Share the sheet with the email address you copied in step

14. (The email address owner must have at least Editor-level privileges.)

15. Copy the URL to the spreadsheet, as you will need it later.

    The spreadsheet URL should look similar to the following: `docs.google.com/spreadsheets/d/<googlesheetID>/edit#gid=0`
### Step 4: Creating a Workload Identity Pool and Provider

Follow the steps given below to create a Workload Identity Pool and Provider:

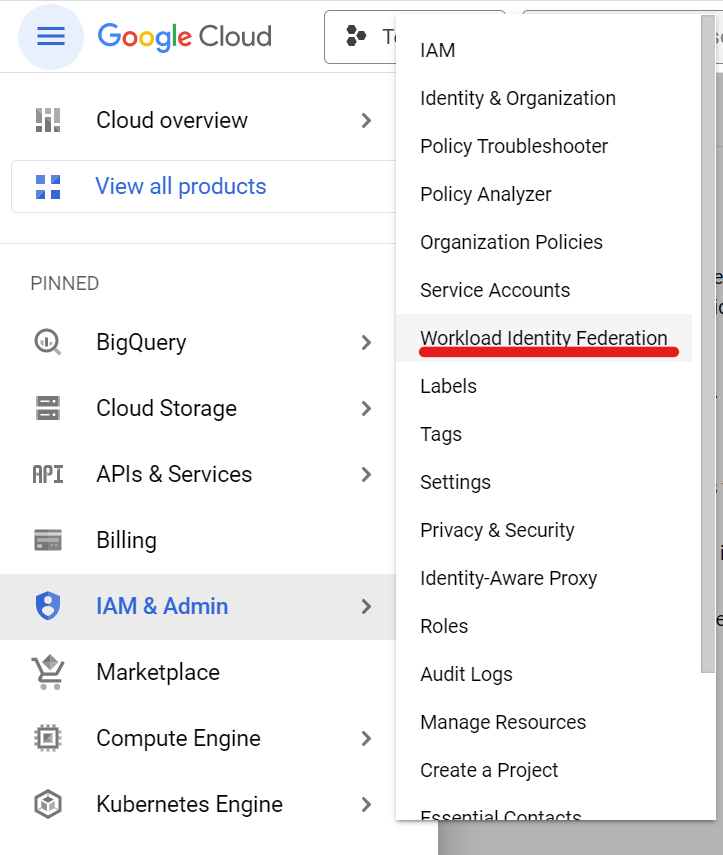
1. In the
   **Google Developers Console**, open the. **Workload Identity Federation** tab.

   <Frame>
     <img alt="WIF.png" src="https://mintcdn.com/domoinc-openapi-sync-dataflows/GXvfa618wDUsB9JU/images/kb/ka05w00000127HF-00N5w00000Ri7BU-0EM5w000006uN55.jpg?fit=max&auto=format&n=GXvfa618wDUsB9JU&q=85&s=4f5f23f9a4b996eac531bec45552b90a" style={{width: 519, height: 614}} width="723" height="855" data-path="images/kb/ka05w00000127HF-00N5w00000Ri7BU-0EM5w000006uN55.jpg" />
   </Frame>

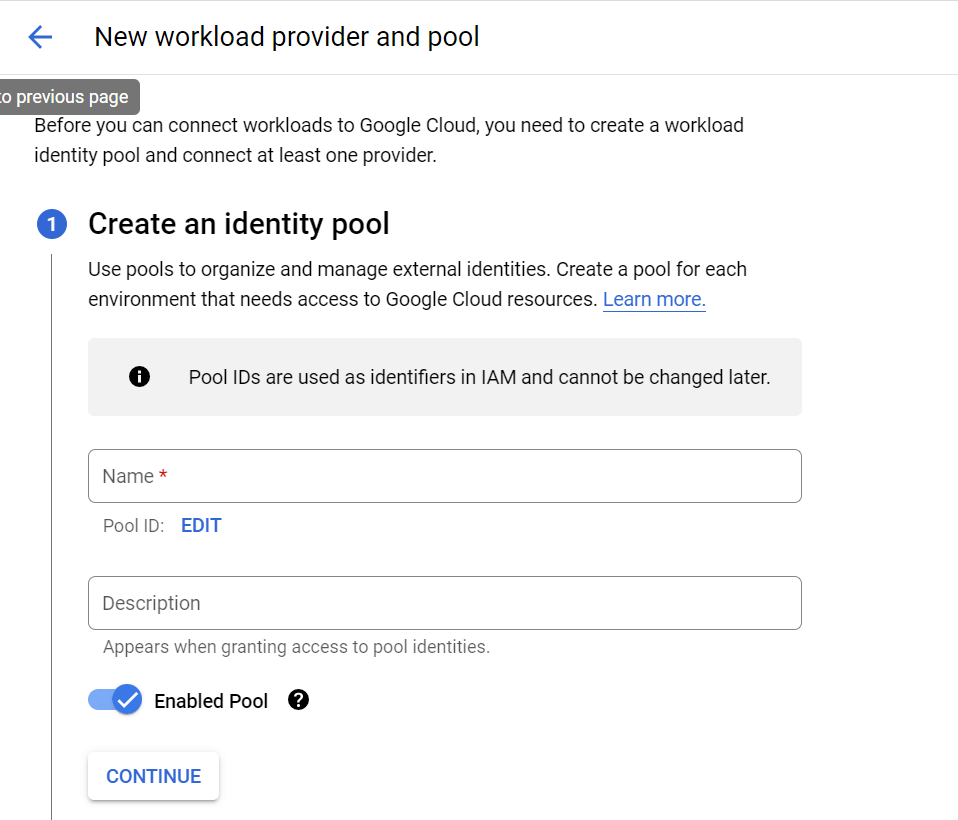
2. Create a new workload identity pool and provide the required details.
   <Frame>
     <img alt="New Workload.png" src="https://mintcdn.com/domoinc-openapi-sync-dataflows/GXvfa618wDUsB9JU/images/kb/ka05w00000127HF-00N5w00000Ri7BU-0EM5w000006uN5j.jpg?fit=max&auto=format&n=GXvfa618wDUsB9JU&q=85&s=02445f14be2be8688359489a27e553f7" style={{width: 424, height: 363}} width="958" height="820" data-path="images/kb/ka05w00000127HF-00N5w00000Ri7BU-0EM5w000006uN5j.jpg" />
   </Frame>

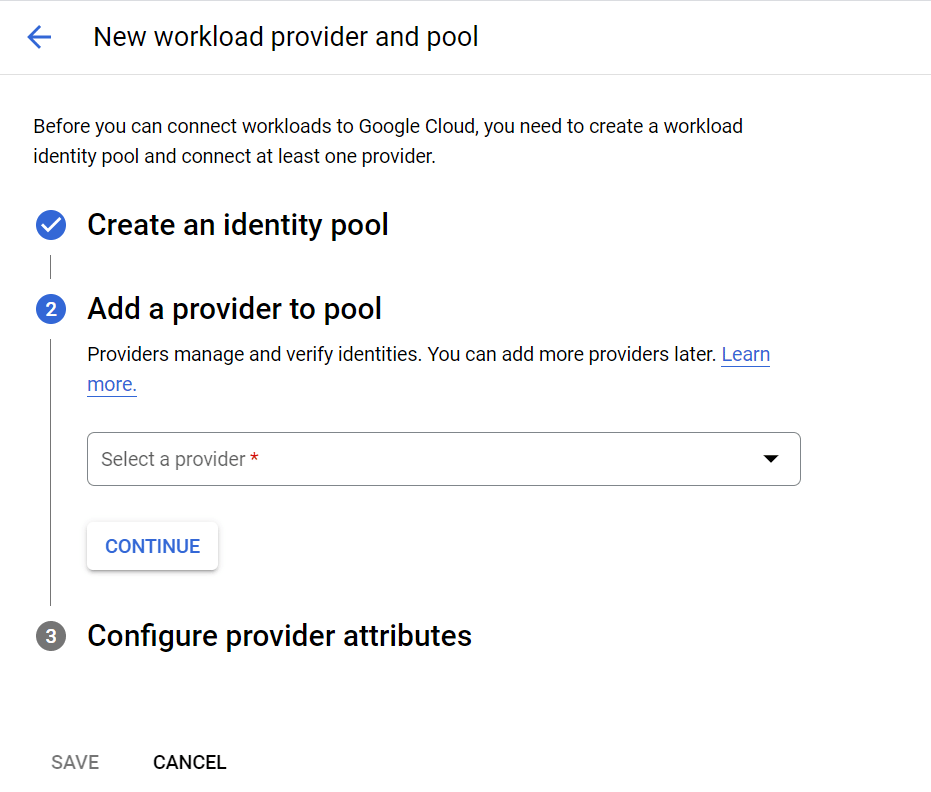
3. Add a new identity provider to the pool and provide required details.
   <Frame>
     <img alt="Provider and Pool.png" src="https://mintcdn.com/domoinc-openapi-sync-dataflows/GXvfa618wDUsB9JU/images/kb/ka05w00000127HF-00N5w00000Ri7BU-0EM5w000006uN6D.jpg?fit=max&auto=format&n=GXvfa618wDUsB9JU&q=85&s=d2226a2f33b676d238d83b4140810bc1" style={{width: 415, height: 353}} width="931" height="792" data-path="images/kb/ka05w00000127HF-00N5w00000Ri7BU-0EM5w000006uN6D.jpg" />
   </Frame>

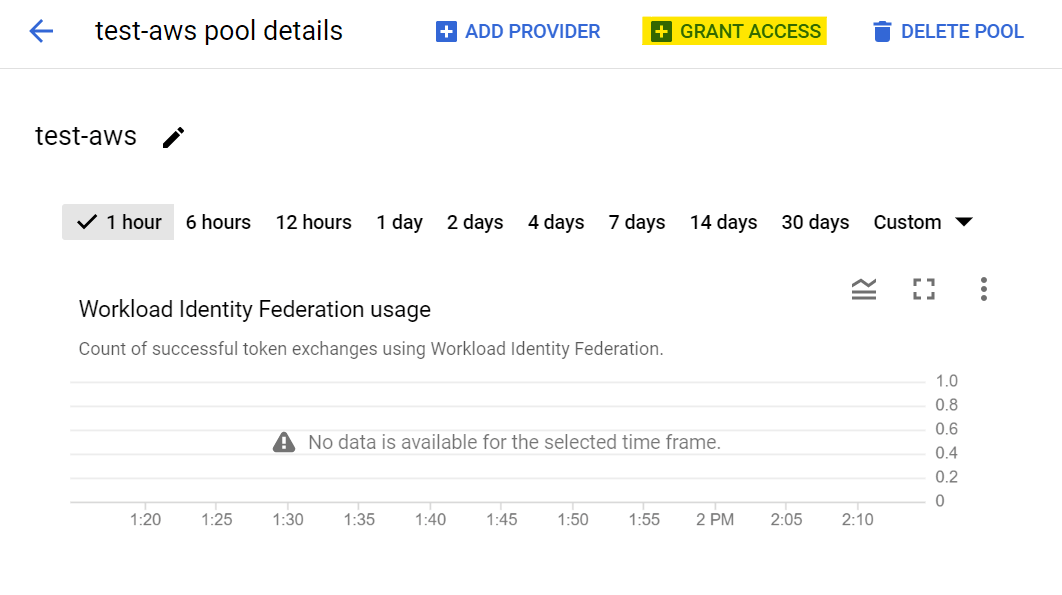
4. Click
   **Continue**.

   <Frame>
     <img alt="Grant Access.png" src="https://mintcdn.com/domoinc-openapi-sync-dataflows/GXvfa618wDUsB9JU/images/kb/ka05w00000127HF-00N5w00000Ri7BU-0EM5w000006uN6S.jpg?fit=max&auto=format&n=GXvfa618wDUsB9JU&q=85&s=7cebcc16e749827507e7f96f5fe4a3e2" style={{width: 498, height: 279}} width="1062" height="595" data-path="images/kb/ka05w00000127HF-00N5w00000Ri7BU-0EM5w000006uN6S.jpg" />
   </Frame>

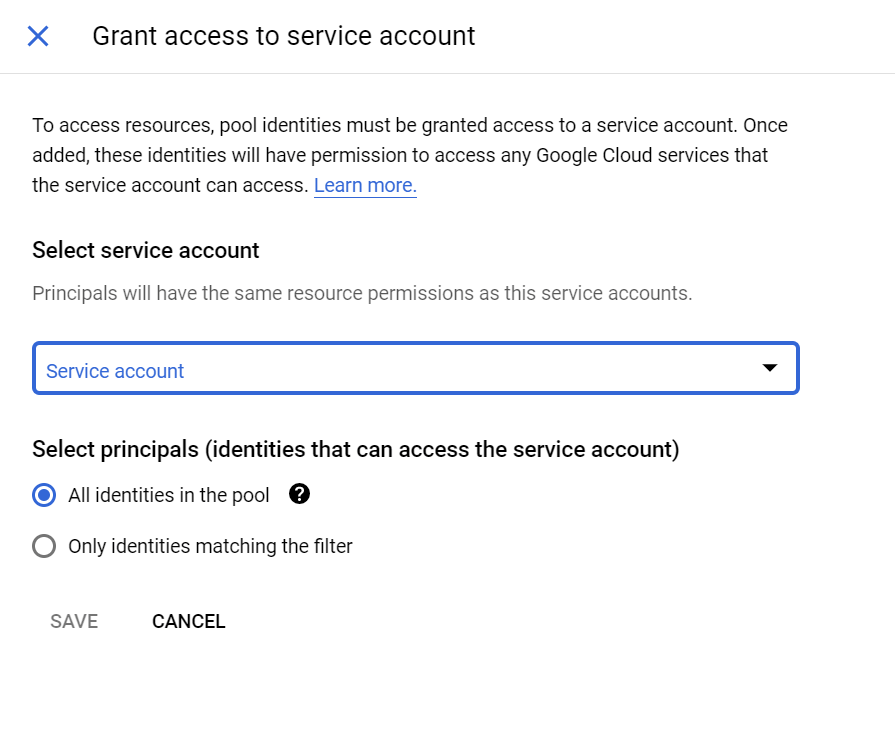
5. Grant access to the required service account.
   <Frame>
     <img alt="Grant Acess_SA.png" src="https://mintcdn.com/domoinc-openapi-sync-dataflows/GXvfa618wDUsB9JU/images/kb/ka05w00000127HF-00N5w00000Ri7BU-0EM5w000006uN6X.jpg?fit=max&auto=format&n=GXvfa618wDUsB9JU&q=85&s=3f2596a8354de168a4d13302f0561e81" style={{width: 444, height: 368}} width="895" height="742" data-path="images/kb/ka05w00000127HF-00N5w00000Ri7BU-0EM5w000006uN6X.jpg" />
   </Frame>

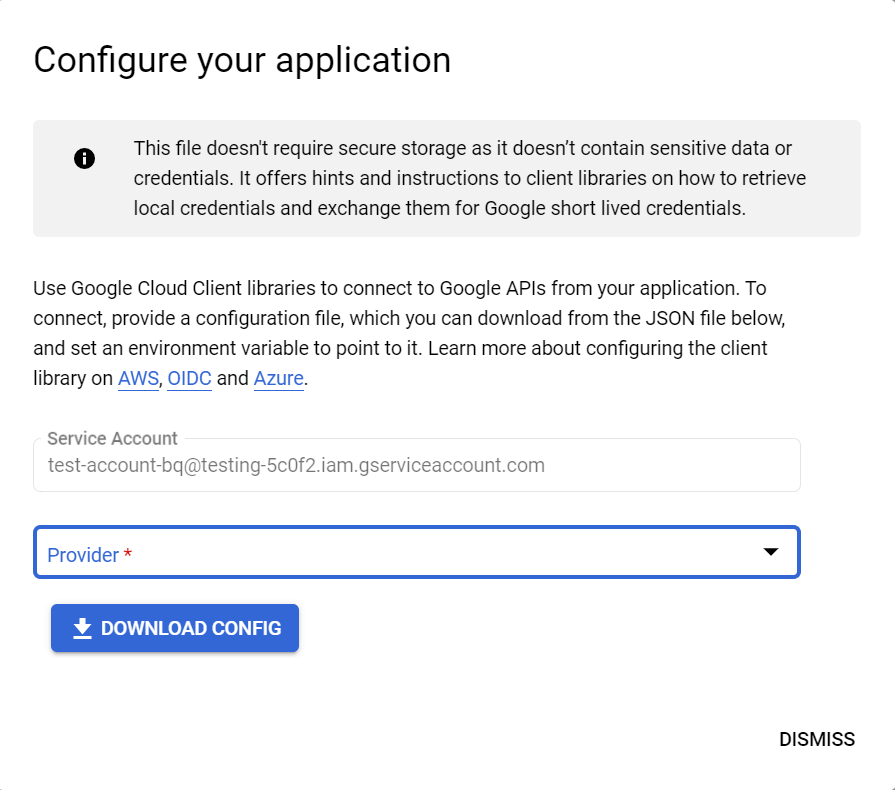
6. Select the required service account and identity provider and get the configuration JSON file.
   <Frame>
     <img alt="Config.png" src="https://mintcdn.com/domoinc-openapi-sync-dataflows/GXvfa618wDUsB9JU/images/kb/ka05w00000127HF-00N5w00000Ri7BU-0EM5w000006uN84.jpg?fit=max&auto=format&n=GXvfa618wDUsB9JU&q=85&s=e932f33cb04c87395690ac87d97c2290" style={{width: 470, height: 415}} width="895" height="790" data-path="images/kb/ka05w00000127HF-00N5w00000Ri7BU-0EM5w000006uN84.jpg" />
   </Frame>

## Configuring the Connection

This section enumerates the options in the **Credentials** and **Details** panes in the Google Sheets Writeback Workload Identity Federation Connector page. The components of the other panes in this page, **Scheduling** and **Name & Describe Your DataSet**, are universal across most connector types and are discussed in greater length in [Adding a DataSet Using a Data Connector](/s/article/360042926274 "Adding a DataSet Using a Data Connector").

### Credentials Pane

This pane contains fields for entering credentials to connect to your Domo developer account as well as your Google Sheet. The following table describes what is needed for each field:

<table border="1" cellpadding="1" cellspacing="1" data-aura-rendered-by="33:195;a"><thead><tr><th colspan="1" rowspan="1"><p><span class="s1"> Field </span></p></th><th colspan="1" rowspan="1"><p><span class="s1"> Description </span></p></th></tr></thead><tbody><tr><td colspan="1" rowspan="1"><p> External Account Config JSON Key </p></td><td colspan="1" rowspan="1"><p> Enter the external account config JSON key. </p></td></tr></tbody></table>

Once you have entered valid credentials, you can use the same account any time you go to set up a new Domo-Google Sheets connection. You can manage connector accounts in the **Accounts** tab in the Data Center. For more information about this tab, see [Managing User Accounts for Connectors](/s/article/360042926054 "Managing User Accounts for Connectors").

### Details Pane

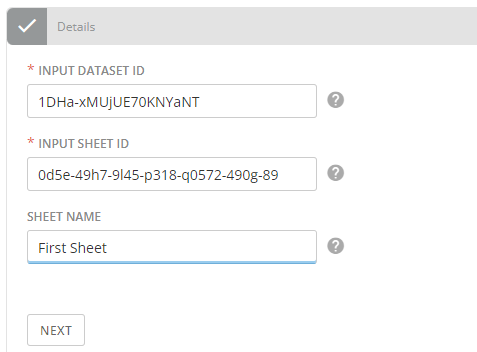
This pane contains a number of fields for specifying your data and indicating where it's going.

<table border="1" cellpadding="1" cellspacing="1" data-aura-rendered-by="33:195;a"><thead><tr><th colspan="1" rowspan="1"><p> Menu </p></th><th colspan="1" rowspan="1"><p> Description </p></th></tr></thead><tbody><tr><td colspan="1" rowspan="1"><p> Input DataSet ID </p></td><td colspan="1" rowspan="1"><p> Enter your Domo dataset ID(GUID) located in the dataset url. Example: <a href="https://customer.domo.com/datasources/<strong>aaaaaaaa-bbbb-cccc-dddd-eeeeeeeeeeee</strong>/details/settings" rel="noopener" target="_blank"> [https://customer.domo.com/datasources/\&lt;strong\&gt;aaaaaaaa-bbbb-cccc-dddd-eeeeeeeeeeee\&lt;/strong\&gt;/details/settings](https://customer.domo.com/datasources/\&lt;strong\&gt;aaaaaaaa-bbbb-cccc-dddd-eeeeeeeeeeee\&lt;/strong\&gt;/details/settings) </a></p></td></tr><tr><td colspan="1" rowspan="1"> Input Sheet ID </td><td colspan="1" rowspan="1"> Enter the GoogleSheet ID that has been shared with the Service Account you created. Example: <a href="https://docs.google.com/spreadsheets/d/<strong>18zN0RQ8HIaEj2USwtAkCMX7AKBl-x-_vq24kPd4_Tsk</strong>/edit#gid=0<br>Note" rel="noopener" target="_blank"> [https://docs.google.com/spreadsheets/d/\&lt;strong\&gt;18zN0RQ8HIaEj2USwtAkCMX7AKBl-x-\_vq24kPd4\_Tsk\&lt;/strong\&gt;/edit#gid=0\&lt;br\&gt;Note](https://docs.google.com/spreadsheets/d/\&lt;strong\&gt;18zN0RQ8HIaEj2USwtAkCMX7AKBl-x-_vq24kPd4_Tsk\&lt;/strong\&gt;/edit#gid=0\&lt;br\&gt;Note) </a> - all data in this sheet will be replaced </td></tr><tr><td colspan="1" rowspan="1"><span> Sheet Name </span></td><td colspan="1" rowspan="1"><p><span> Enter the sheet name. </span></p> <Note><div class="info-box-wrapper"><div class="info-box-icon-container" /><div class="info-box-content-container"><div class="info-box-content"><b> Note: </b> By default, the sheet name will be <b> Sheet1 </b>. </div></div></div> </Note></td></tr></tbody></table>

<Frame>
  <img alt="Sheet_name.png" src="https://mintcdn.com/domoinc-openapi-sync-dataflows/GXvfa618wDUsB9JU/images/kb/ka05w000001275E-00N5w00000Ri7BU-0EM5w000005vO9q.png?fit=max&auto=format&n=GXvfa618wDUsB9JU&q=85&s=0e51ef414db9c3432b5e58afd481cee1" width="477" height="352" data-path="images/kb/ka05w000001275E-00N5w00000Ri7BU-0EM5w000005vO9q.png" />
</Frame>

## Adding Caller Permission while Debugging

The following steps allow you to add caller permissions:

1. Create a service account using the Google Developer Console.

   [https://console.developers.google.com/iam-admin/serviceaccounts/](https://console.developers.google.com/iam-admin/serviceaccounts/)
2. Under **Options**, create a key.

   This key is your usual **client\_secret.json**.
3. Make the role owner for the service account (**Member name = service account ID = service account email**).

   Example: [thomasapp@appname-201813.iam.gserviceaccount.com](mailto:thomasapp@appname-201813.iam.gserviceaccount.com)
4. Copy the email address of your service account = service account ID.
5. Navigate to your browser to the Google sheet you want to interact with.
6. Click
   **SHARE** on the top right of your screen.
7. Navigate to the advanced settings and share it with an email address of your service account.

   Example: [thomasapp@appname-201813.iam.gserviceaccount.com](mailto:thomasapp@appname-201813.iam.gserviceaccount.com)

### Other Panes

For information about the remaining sections of the connector interface, including how to configure scheduling, retry, and update options, see [Adding a DataSet Using a Data Connector](/s/article/360042926274 "Adding a DataSet Using a Data Connector").

## FAQs

<AccordionGroup>
  <Accordion title="What kind of credentials do I need to power up this connector?">
    You need the service account key JSON of your Google Sheets Service Account.
  </Accordion>

  <Accordion title="Where can I find my service account key JSON?">
    To find your service account key JSON:

    * Open the IAM & Admin page in the GCP Console.
    * In the left navigation, click Service accounts.
    * Select your project and click Open.
    * Click Create Service Account.
    * Enter a service account name and service account description. Click Create.
    * Select a role you wish to grant to the service account (Project Owner). Click Continue.
    * Click Create key. Select JSON key type. Click Create. Private key will be saved to your computer.
    * Close the pop up. Click Done.
  </Accordion>

  <Accordion title="How frequently will my data update?">
    As often as needed.
  </Accordion>

  <Accordion title="Are there any API limits that I need to be aware of?">
    No
  </Accordion>

  <Accordion title="How do I find the Input Dataset ID?">
    Your Domo input dataset id is in the URL of the dataset you are exporting data from. For example:

    `https://customer.domo.com/datasources/aaaaaaaa-bbbb-cccc-dddd-eeeeeeeeeeee/details/settings`
  </Accordion>

  <Accordion title="How do I find the Input Sheet ID?">
    The Input Sheet ID is the Google Sheet ID that has been shared with the Service Account you created.
  </Accordion>

  <Accordion title="What is the Sheet Name?">
    You need to provide the name for the sheet here. If you do not specify a sheet name, the connector will use the sheet name as 'Sheet1.'
  </Accordion>
</AccordionGroup>