> ## Documentation Index
> Fetch the complete documentation index at: https://domoinc-openapi-sync-dataflows.mintlify.site/llms.txt
> Use this file to discover all available pages before exploring further.

# Manage Workflows

export const InlineImage = ({src, alt = '', height = '1.6em'}) => {
  return <img noZoom src={src} alt={alt} style={{
    display: 'inline',
    verticalAlign: 'start',
    height: height,
    margin: '0'
  }} />;
};

### Intro

This article covers Workflows management and governance topics like [grants](#required_grants) and workflow-specific [permissions](#manage_permissions). Also, learn about workflow [versioning](#manage_workflow_versions) and [recovery](#recover_an_execution). Admins and those with the Manage Workflows grant can manage alternative triggers to start workflows. Learn more about [triggers](#manage_triggers) below.

<Note>
  **Glossary:** *Italicized* terms in this article have particular definitions within Workflows. The [glossary](https://domo-support.domo.com/s/article/000005108?language=en_US#glossary) lists the definitions.
</Note>

Contact your Domo account team or [Domo support <InlineImage src="/images/kb/ka0Vq00000001FR-00N5w00000Ri7BU-0EMVq0000000XDh.jpg" />](https://domo-support.domo.com/s/) for help enabling, configuring, or operating Workflows.

***

### Required Grants

The following grants give you rights to the Workflows feature:

* **Create Workflows —** This grant allows you to [create a new workflow](https://domo-support.domo.com/s/article/000005331?language=en_US#create_a_workflow_blank_canvas), including from the [template library](https://domo-support.domo.com/s/article/000005331?language=en_US#create_workflow_from_template). Anyone in the instance who needs to create new workflows should have this grant.
* **Manage Workflows —** This grant allows you to perform any action on any workflow in your Domo instance. Superusers, admins, and anyone who helps manage Workflows for the instance should have this grant. People with this grant who need to access *executed* workflow instances must specifically grant themselves the View Execution List and Edit Execution Details permissions to that workflow in the permissions modal. Learn about [permissions](#manage_permissions) in the next section.

The [Manage Permissions](#manage_permissions) section explains how to give non-admin users in your instance access to a specific workflow. There are a number of available permissions.

### Manage Permissions

Within Workflows, *permissions* are the way to provide people and groups granular access to a workflow.

For example, a person must have Delete permission for a workflow before they can delete any *version* of it.

<Warning>
  **Important:** To manage permissions, you must have either Share or Admin permission to the workflow. Workflow owners have these permissions by default. If you don't own the workflow, you must be granted this permission by an owner or current admin. If you have only Share permission, you can only grant the same level or a lower level of permission to others.
</Warning>

<Note>
  **Permissions —** The available permissions are described below:

  * **Admin —**
    Grants access to perform any action on the workflow. This permission is separate from the Manage Workflows [grant](#required_grants), which gives someone access to all the workflows in their Domo instance.

  By default, the workflow owner has Admin permission to the workflow, but this access can be changed or revoked.

  * **Delete —**
    Grants access to delete the workflow (if it is *pre-deployed* or deactivated) AND any version of the workflow. See the [glossary](https://domo-support.domo.com/s/article/000005108?language=en_US#glossary) to learn about deployment and deactivation.
  * **Read —**
    Grants view-only access to all versions of the workflow.
  * **Write —**
    Grants access to edit any *pre-deployed* version of the workflow. To make changes to a deployed version, you must create a new version of the workflow.
  * **Share —**
    Grants ability to share access to the workflow with others. Those with Share permission to the workflow can only share access at a level that is equal to or less than their own.
  * **Deploy —**
    Grants access to *deploy* versions of the workflow.
  * **Execute —**
    Grants access to run a deployed version of the workflow.
  * **View Execution List —**
    Grants view-only access to the workflow's [executions](#view_executions), including the [execution details](#review_execution_details) and [playback controls](#playback_controls).

  If the permission holder doesn't have the Manage Workflows [grant](#required_grants), the Executions List only displays executions that they have personally started. People with View Execution List permission to the workflow *and* the Manage Workflows grant can view every execution of the workflow.

  * **Edit Execution Details —**
    Grants access to edit and recover failed or in-progress workflow [executions](#view_executions).

  If the permission holder doesn't have the Manage Workflows [grant](#required_grants), they can only edit/recover executions that they have personally started. People with Edit Execution Details permission to the workflow and the Manage Workflows grant can edit/recover any executed workflow with an In-Progress or Failed status.
</Note>

Follow the steps below to manage permissions for a workflow:

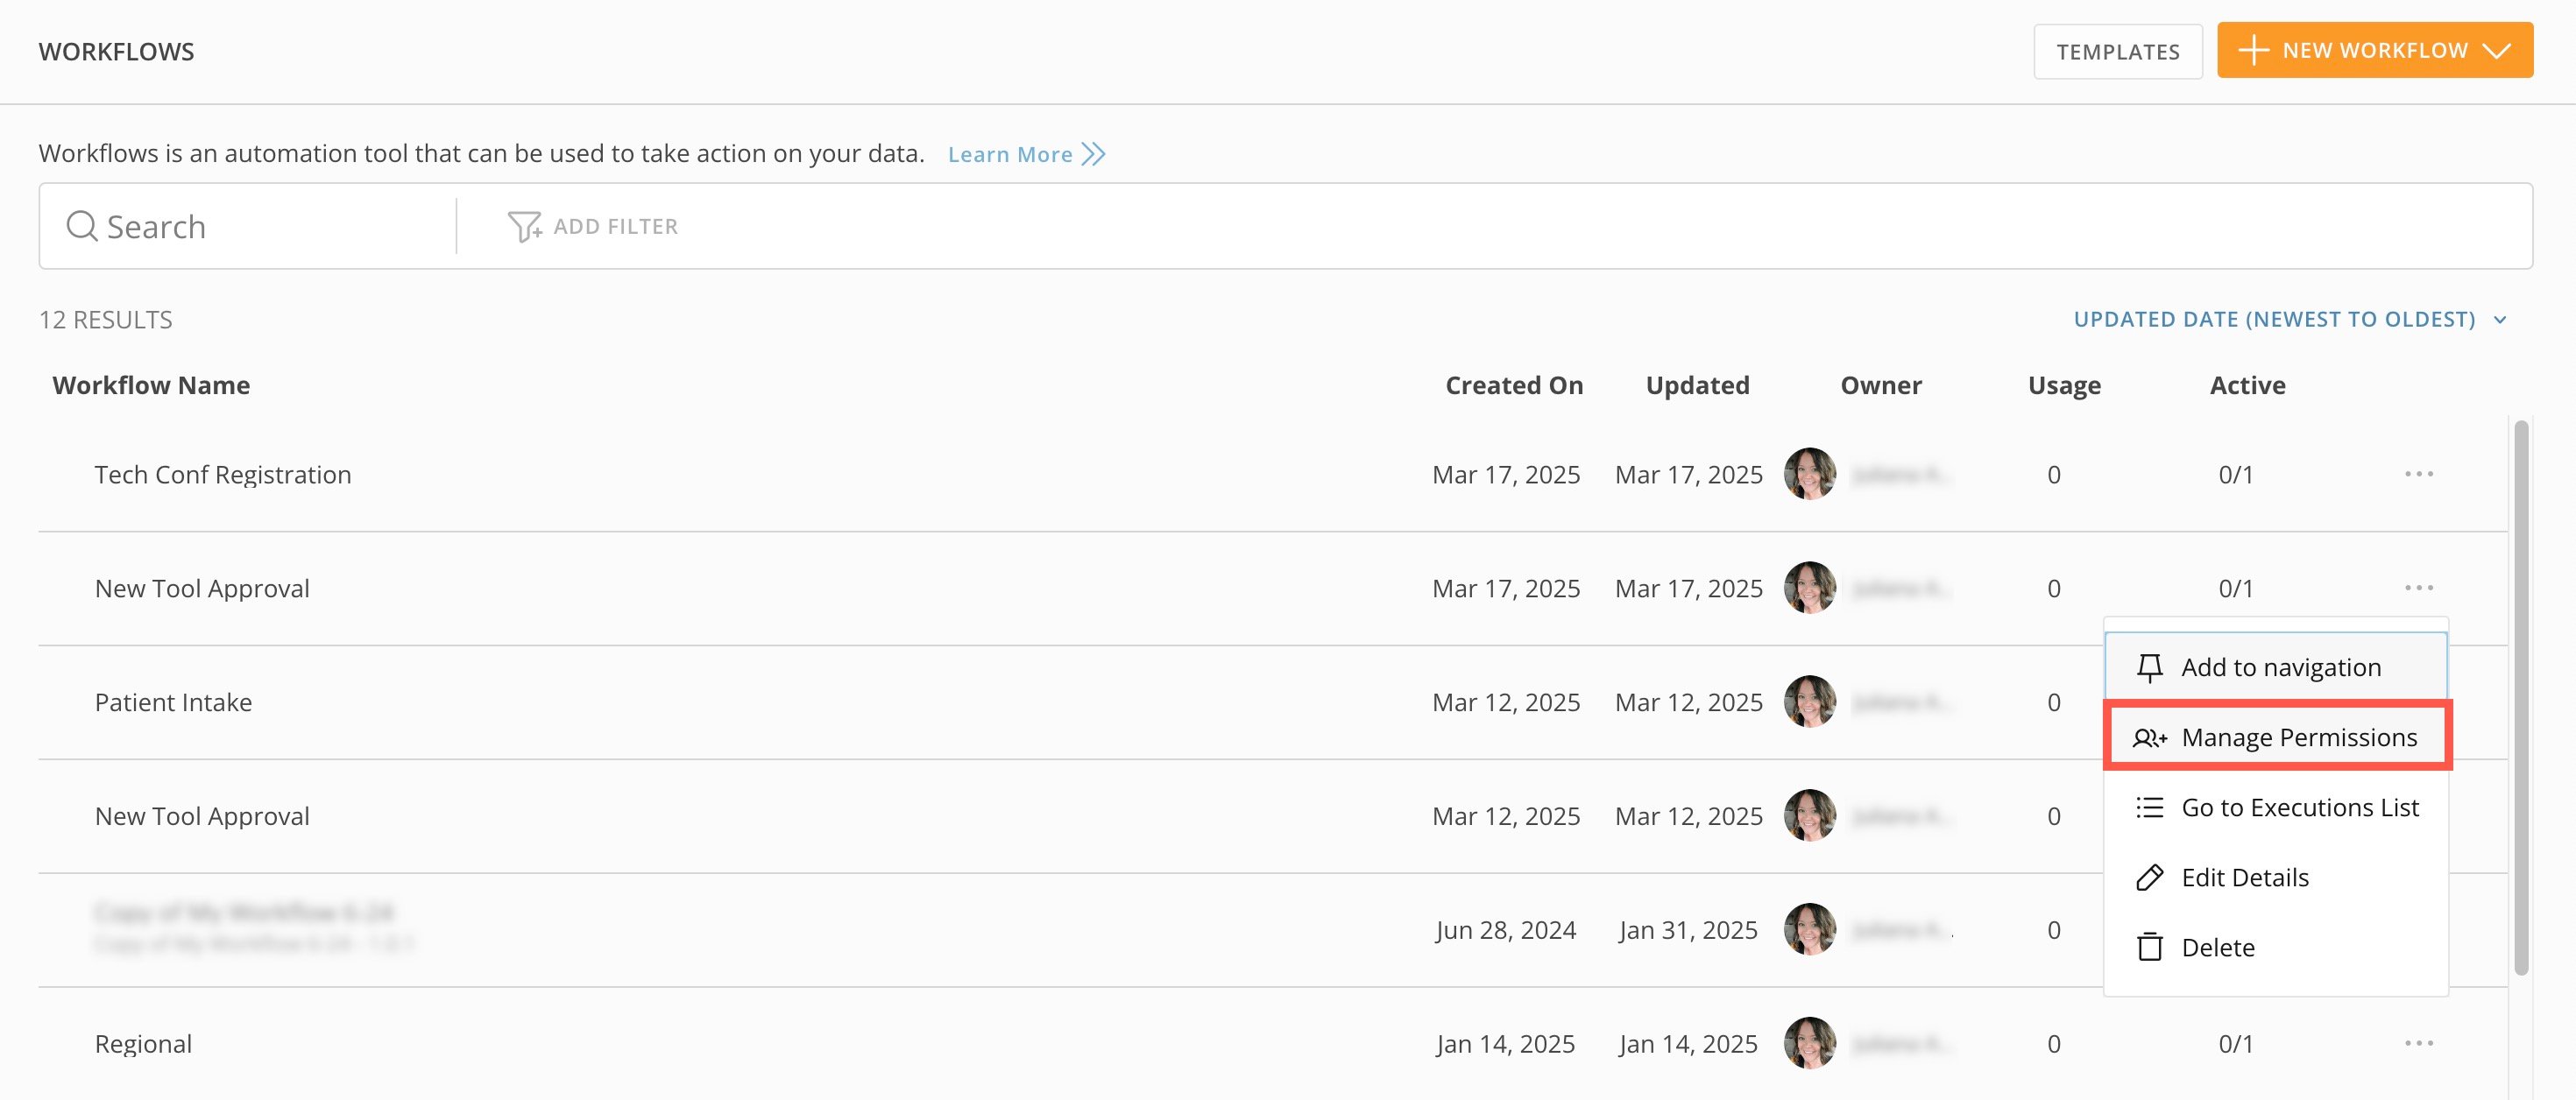
1. From the Workflows default view, locate the workflow where you want to manage permissions and select
   <InlineImage src="/images/kb/ka0Vq0000009THK-00N5w00000Ri7BU-0EMVq000005xtVR.jpg" /> **More** (horizontal three-dot icon) > **Manage Permissions**.

   <Frame>
     <img alt="" src="https://mintcdn.com/domoinc-openapi-sync-dataflows/t-REVUfgwLiw_Ine/images/kb/ka0Vq0000009THK-00N5w00000Ri7BU-0EMVq000005xtQb.jpg?fit=max&auto=format&n=t-REVUfgwLiw_Ine&q=85&s=f65fc82ac476b6c75f9b8fd8607e7322" style={{width: 899, height: 384}} width="2940" height="1256" data-path="images/kb/ka0Vq0000009THK-00N5w00000Ri7BU-0EMVq000005xtQb.jpg" />
   </Frame>

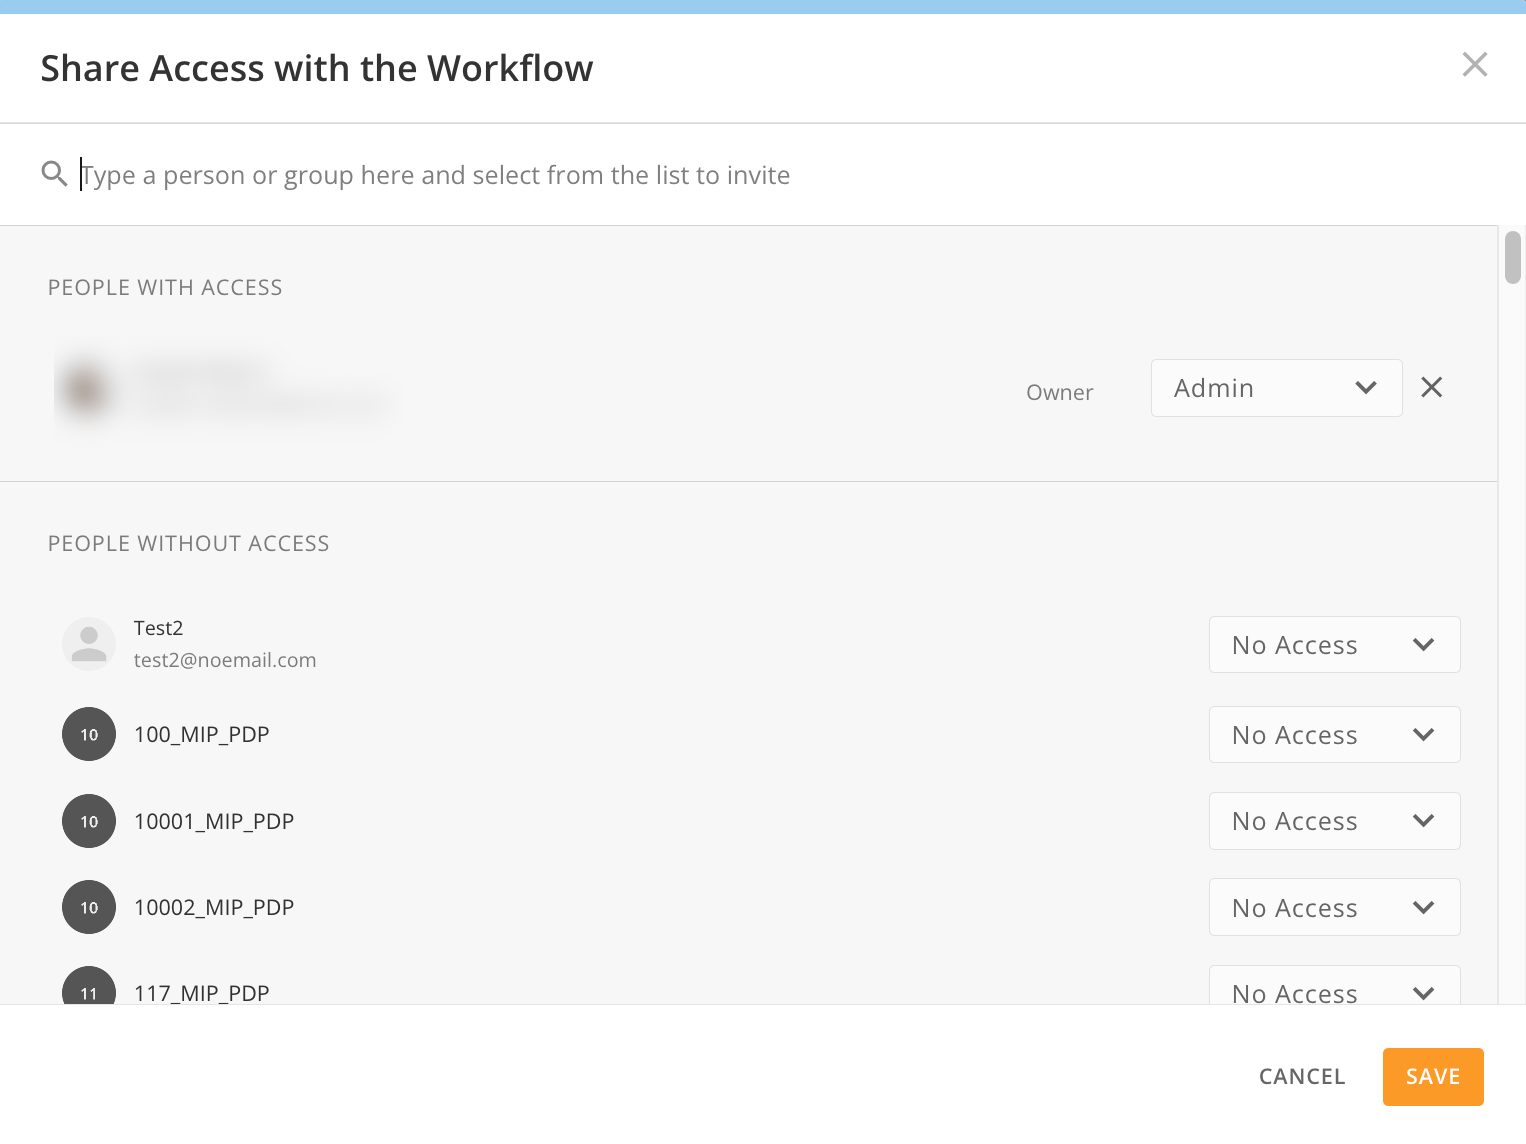
   The permissions modal displays.

   <Frame>
     <img alt="workflows permissions modal.png" src="https://mintcdn.com/domoinc-openapi-sync-dataflows/t-REVUfgwLiw_Ine/images/kb/ka0Vq0000009THK-00N5w00000Ri7BU-0EM5w000006uKA7.jpg?fit=max&auto=format&n=t-REVUfgwLiw_Ine&q=85&s=c0a21769a1f0d04321186b9e4094ccc4" style={{width: 599, height: 450}} width="1526" height="1144" data-path="images/kb/ka0Vq0000009THK-00N5w00000Ri7BU-0EM5w000006uKA7.jpg" />
   </Frame>

2. Depending on your permissions, you can use the dropdowns to update permissions for any person or group in your instance.
<Note>
  **Note:** You can only grant someone else your same level of access or a lower level. For example, a user with Share access cannot grant another user Admin access.
</Note>

3. Save your changes before closing the modal.

### Edit the Workflow Name & Description

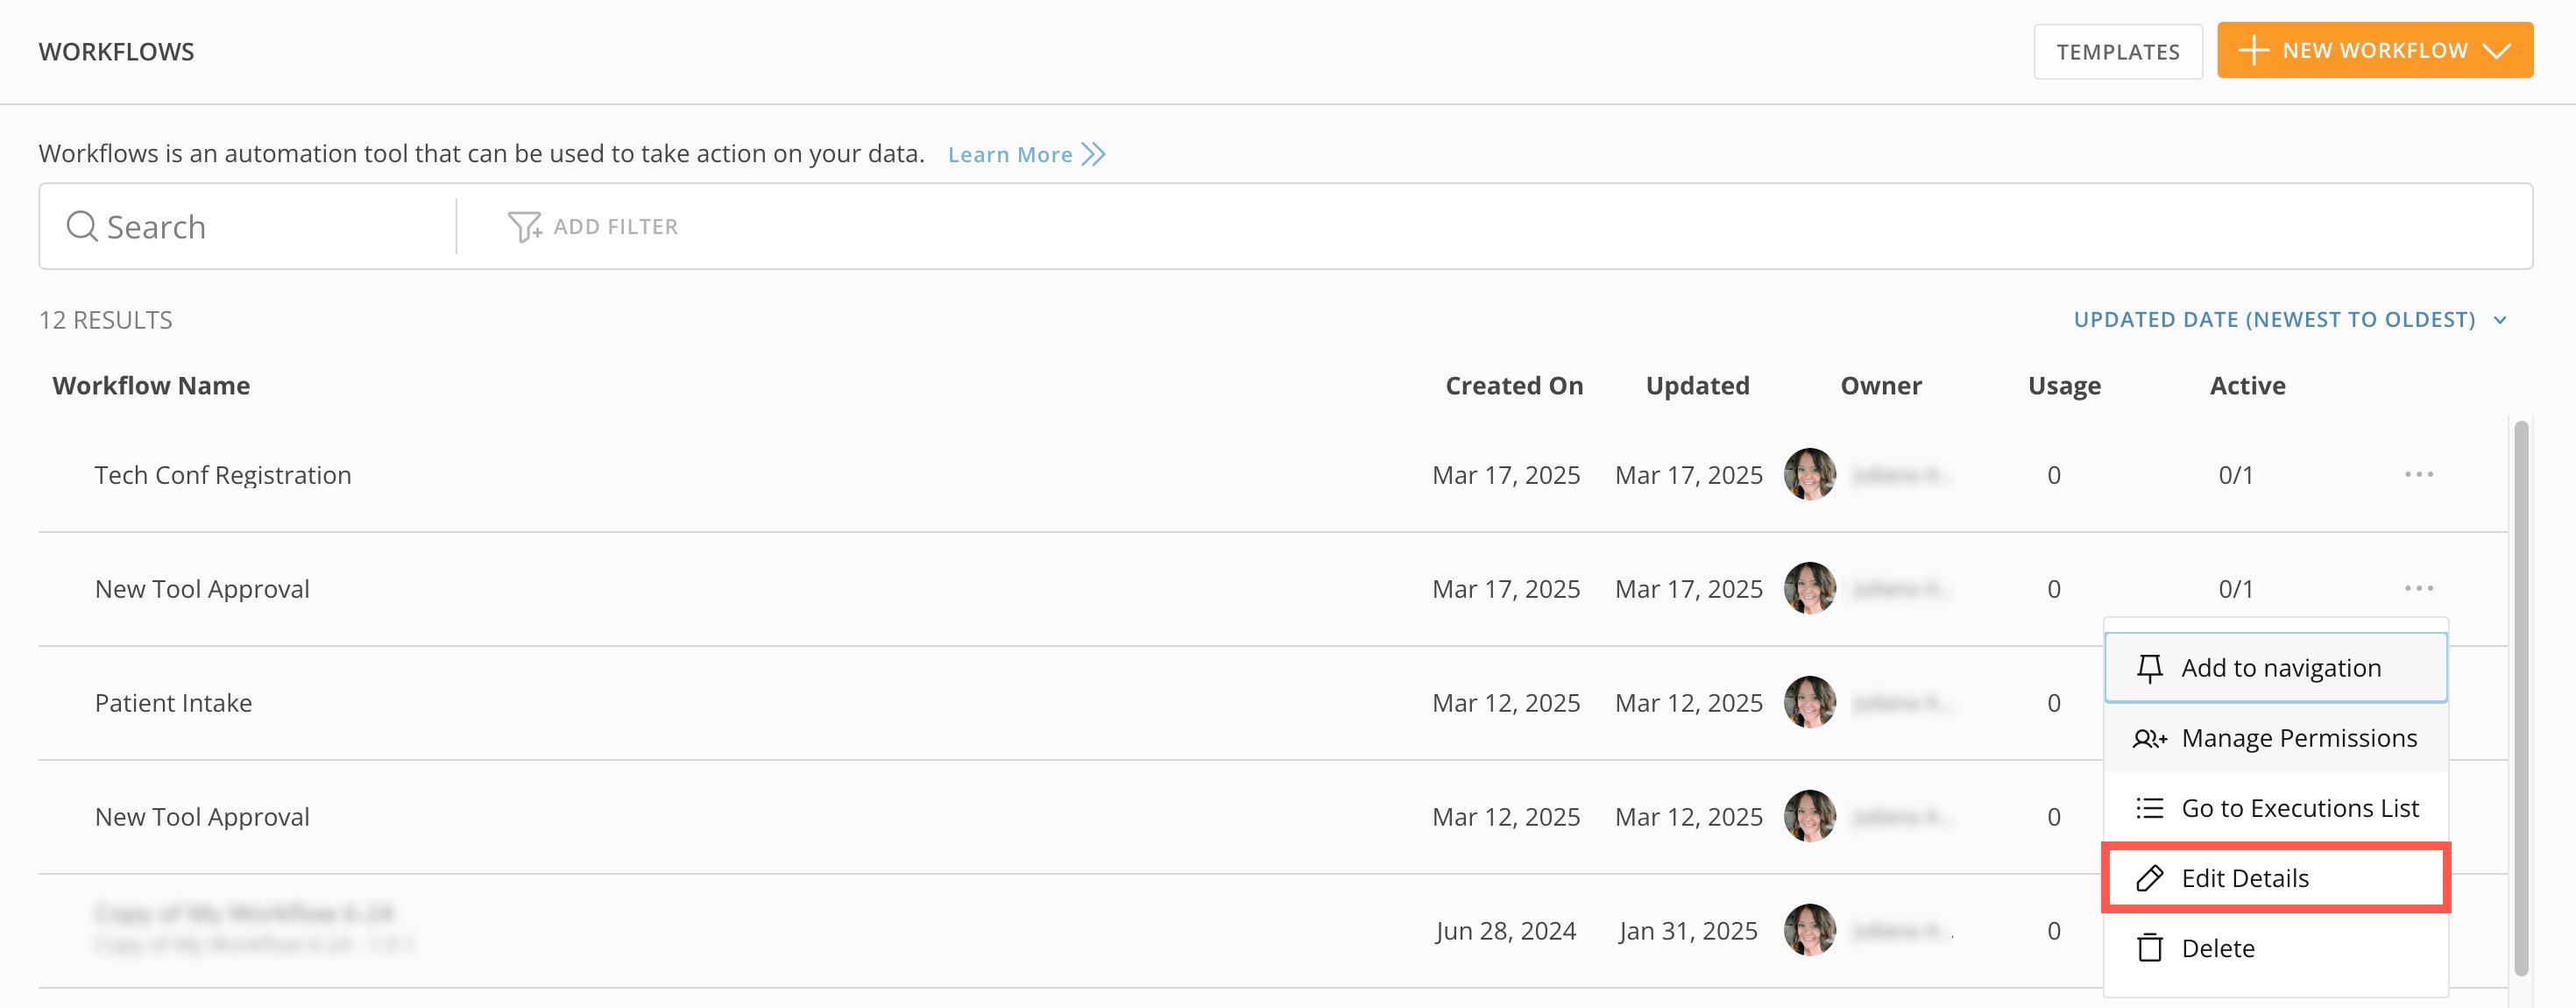
If you have Edit or Admin [permission](#manage_permissions) for a workflow, you can change its name and description from the Workflows default view by selecting <InlineImage src="/images/kb/ka0Vq0000009THK-00N5w00000Ri7BU-0EMVq000005xtVR-1.jpg" /> **More** (horizontal three-dot icon) > **Edit Details**.

<Frame>
  <img alt="" src="https://mintcdn.com/domoinc-openapi-sync-dataflows/t-REVUfgwLiw_Ine/images/kb/ka0Vq0000009THK-00N5w00000Ri7BU-0EMVq000005xtX3.jpg?fit=max&auto=format&n=t-REVUfgwLiw_Ine&q=85&s=9df42c80718f31ea86781bc648637ad0" style={{width: 900, height: 352}} width="2940" height="1150" data-path="images/kb/ka0Vq0000009THK-00N5w00000Ri7BU-0EMVq000005xtX3.jpg" />
</Frame>

### Edit a Workflow

<Note>
  **Note:** You cannot edit a workflow after it's been *deployed*. Instead, you must create a new *version* of the workflow. Learn how to [manage versions](#manage_workflow_versions).
</Note>

If a workflow version hasn't been deployed, you can continue to edit it by following these steps:

1. From your default Workflows view, select the workflow to open the versions list. Learn about the
   [versions list](#manage_workflow_versions).
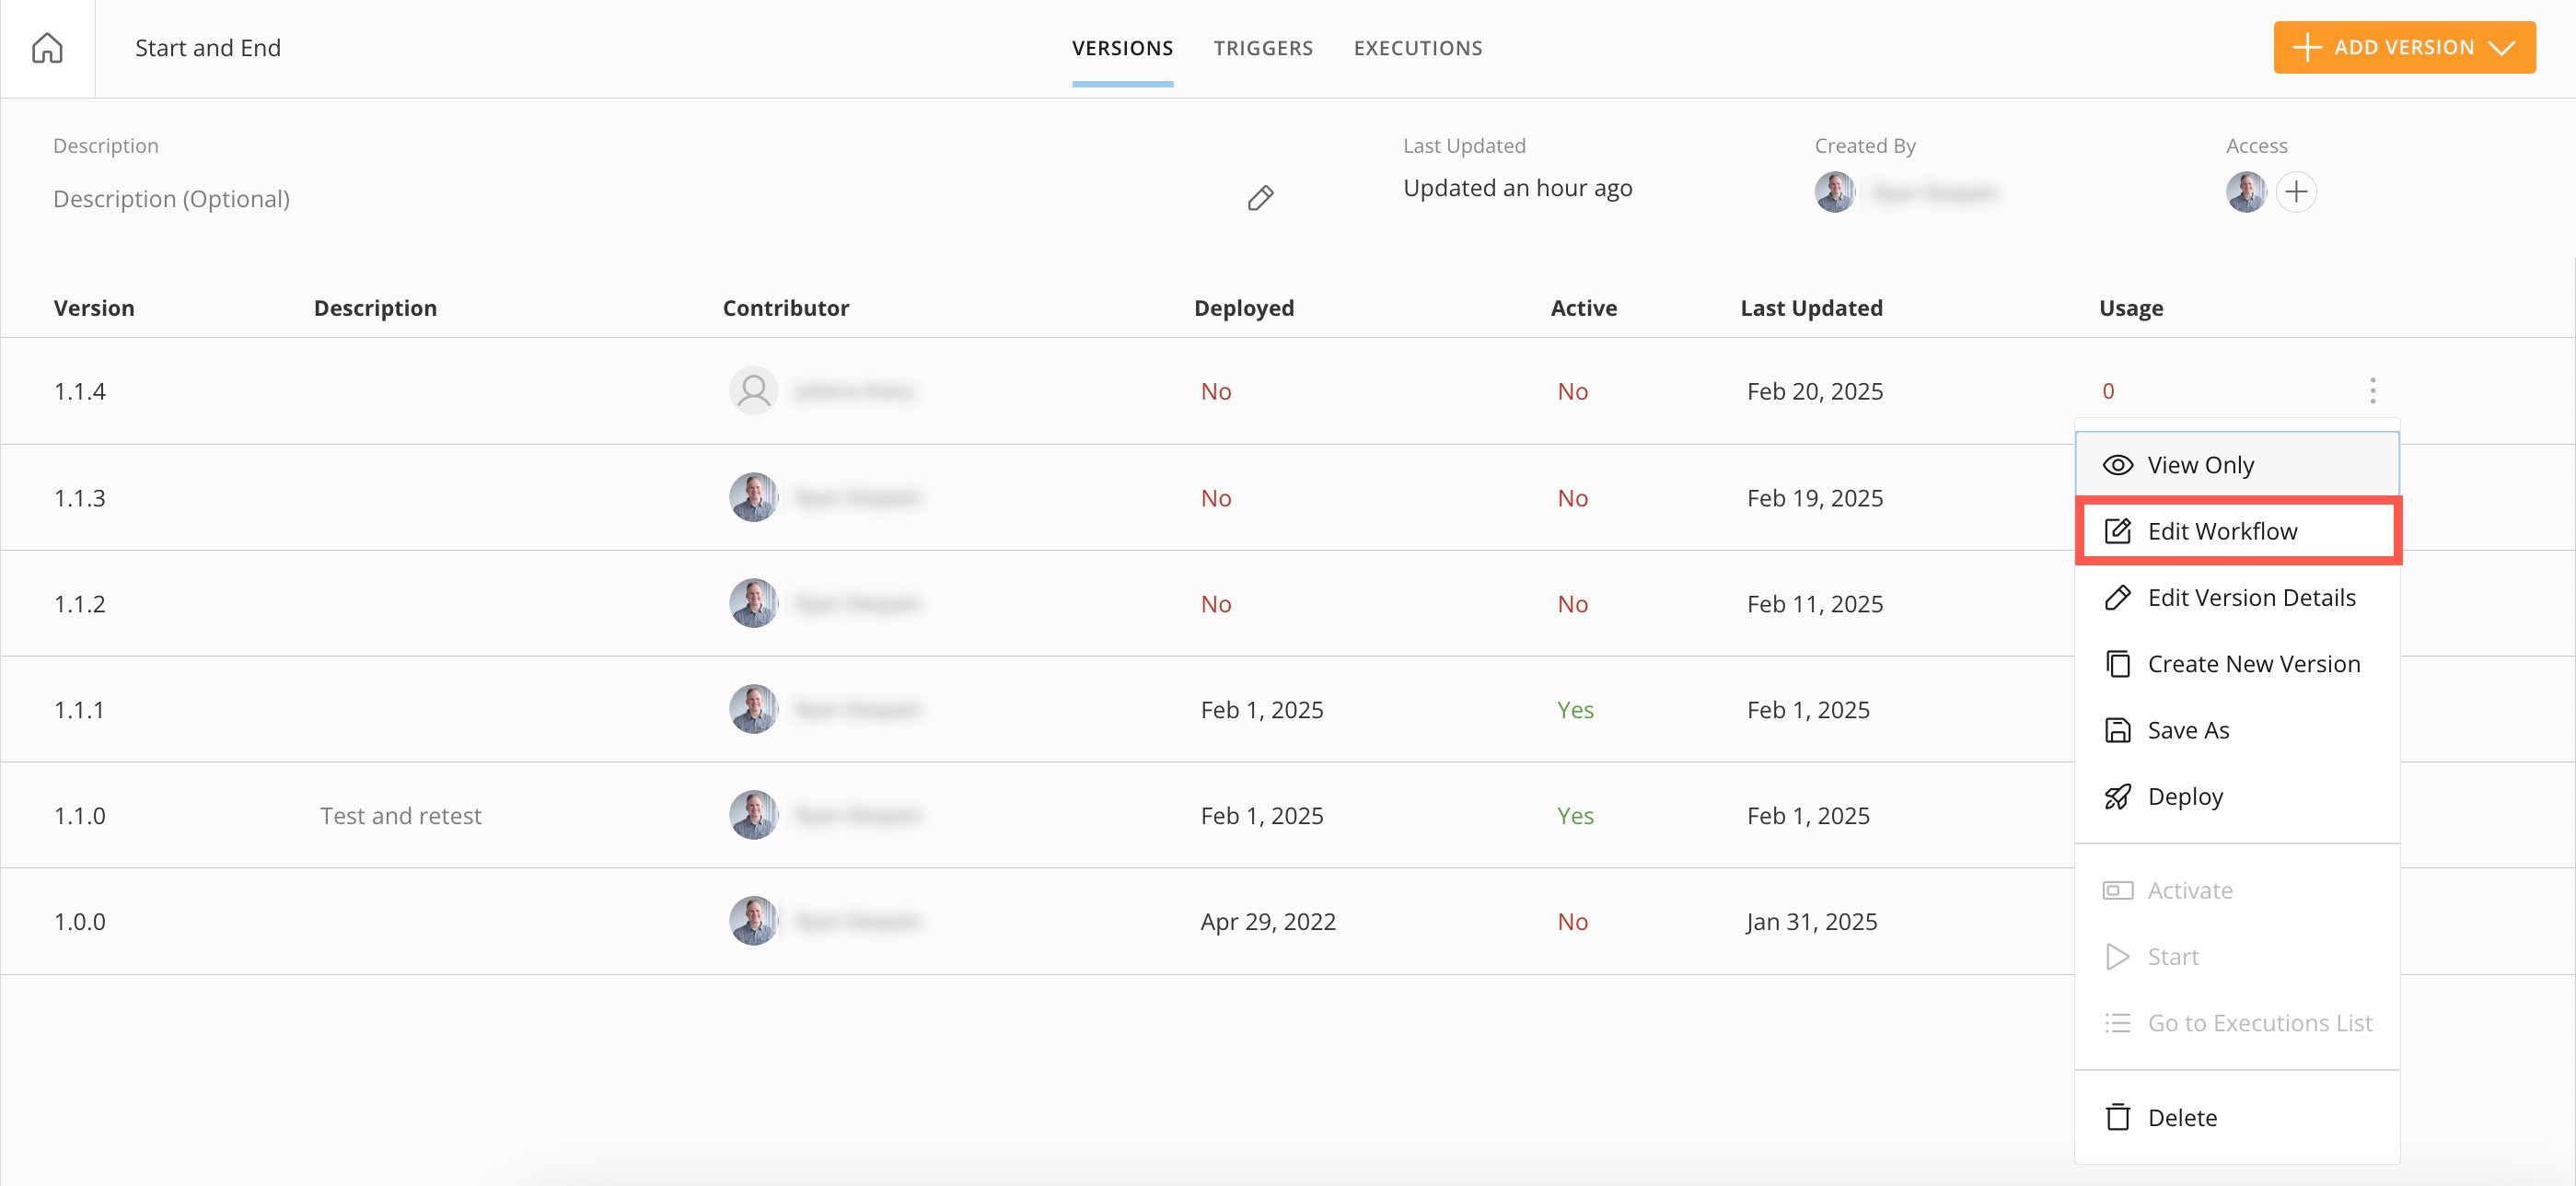
2. In the version list, select
   <InlineImage src="/images/kb/ka0Vq0000009THK-00N5w00000Ri7BU-0EMVq000005xtdV.jpg" /> **More** (vertical three-dot icon) > **Edit Workflow** for the workflow version you want to edit.

   The version opens in the canvas in edit mode.

   <Frame>
     <img alt="" src="https://mintcdn.com/domoinc-openapi-sync-dataflows/t-REVUfgwLiw_Ine/images/kb/ka0Vq0000009THK-00N5w00000Ri7BU-0EMVq000005UsuX.jpg?fit=max&auto=format&n=t-REVUfgwLiw_Ine&q=85&s=b95f1e620da88d002baf72ac3fee1db3" style={{width: 899, height: 414}} width="2798" height="1288" data-path="images/kb/ka0Vq0000009THK-00N5w00000Ri7BU-0EMVq000005UsuX.jpg" />
   </Frame>

   <Warning>
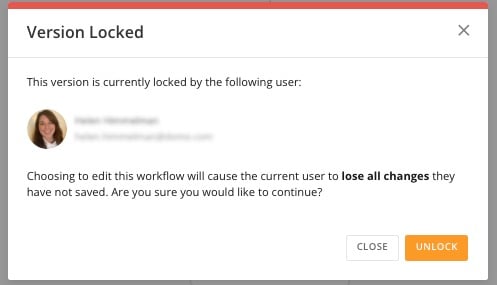
     **Access a Locked Version:** Only one person can edit a *pre-deployed* version at a time. While someone is editing a pre-deployed version, other people who try to edit it receive a **Version Locked** modal to prevent updates from being written over. The modal provides the name of the person who is editing the version and offers the option to see the version in view-only mode.

     If you have Admin [permission](#manage_permissions) for the workflow, you can unlock a locked version. In this case, the modal warns that unlocking the version may result in unsaved changes by either person. For example, if someone unlocks a version while you are working on it, all of your unsaved edits are lost, and others can open and edit that version.

     <Frame>
       <img alt="locked version.jpg" src="https://mintcdn.com/domoinc-openapi-sync-dataflows/t-REVUfgwLiw_Ine/images/kb/ka0Vq0000009THK-00N5w00000Ri7BU-0EMVq000001qbUL.jpg?fit=max&auto=format&n=t-REVUfgwLiw_Ine&q=85&s=df6acb205f00f57214b32960f21a895d" style={{width: 400, height: 229}} width="497" height="285" data-path="images/kb/ka0Vq0000009THK-00N5w00000Ri7BU-0EMVq000001qbUL.jpg" />
     </Frame>
   </Warning>

### Delete a Workflow

Deleting a workflow deletes all of its versions. You can't delete a workflow with any active versions, so you must *deactivate* all versions before deleting the workflow.

To delete the workflow, you must have Delete or Admin permission for it. Learn about [permissions](#manage_permissions).

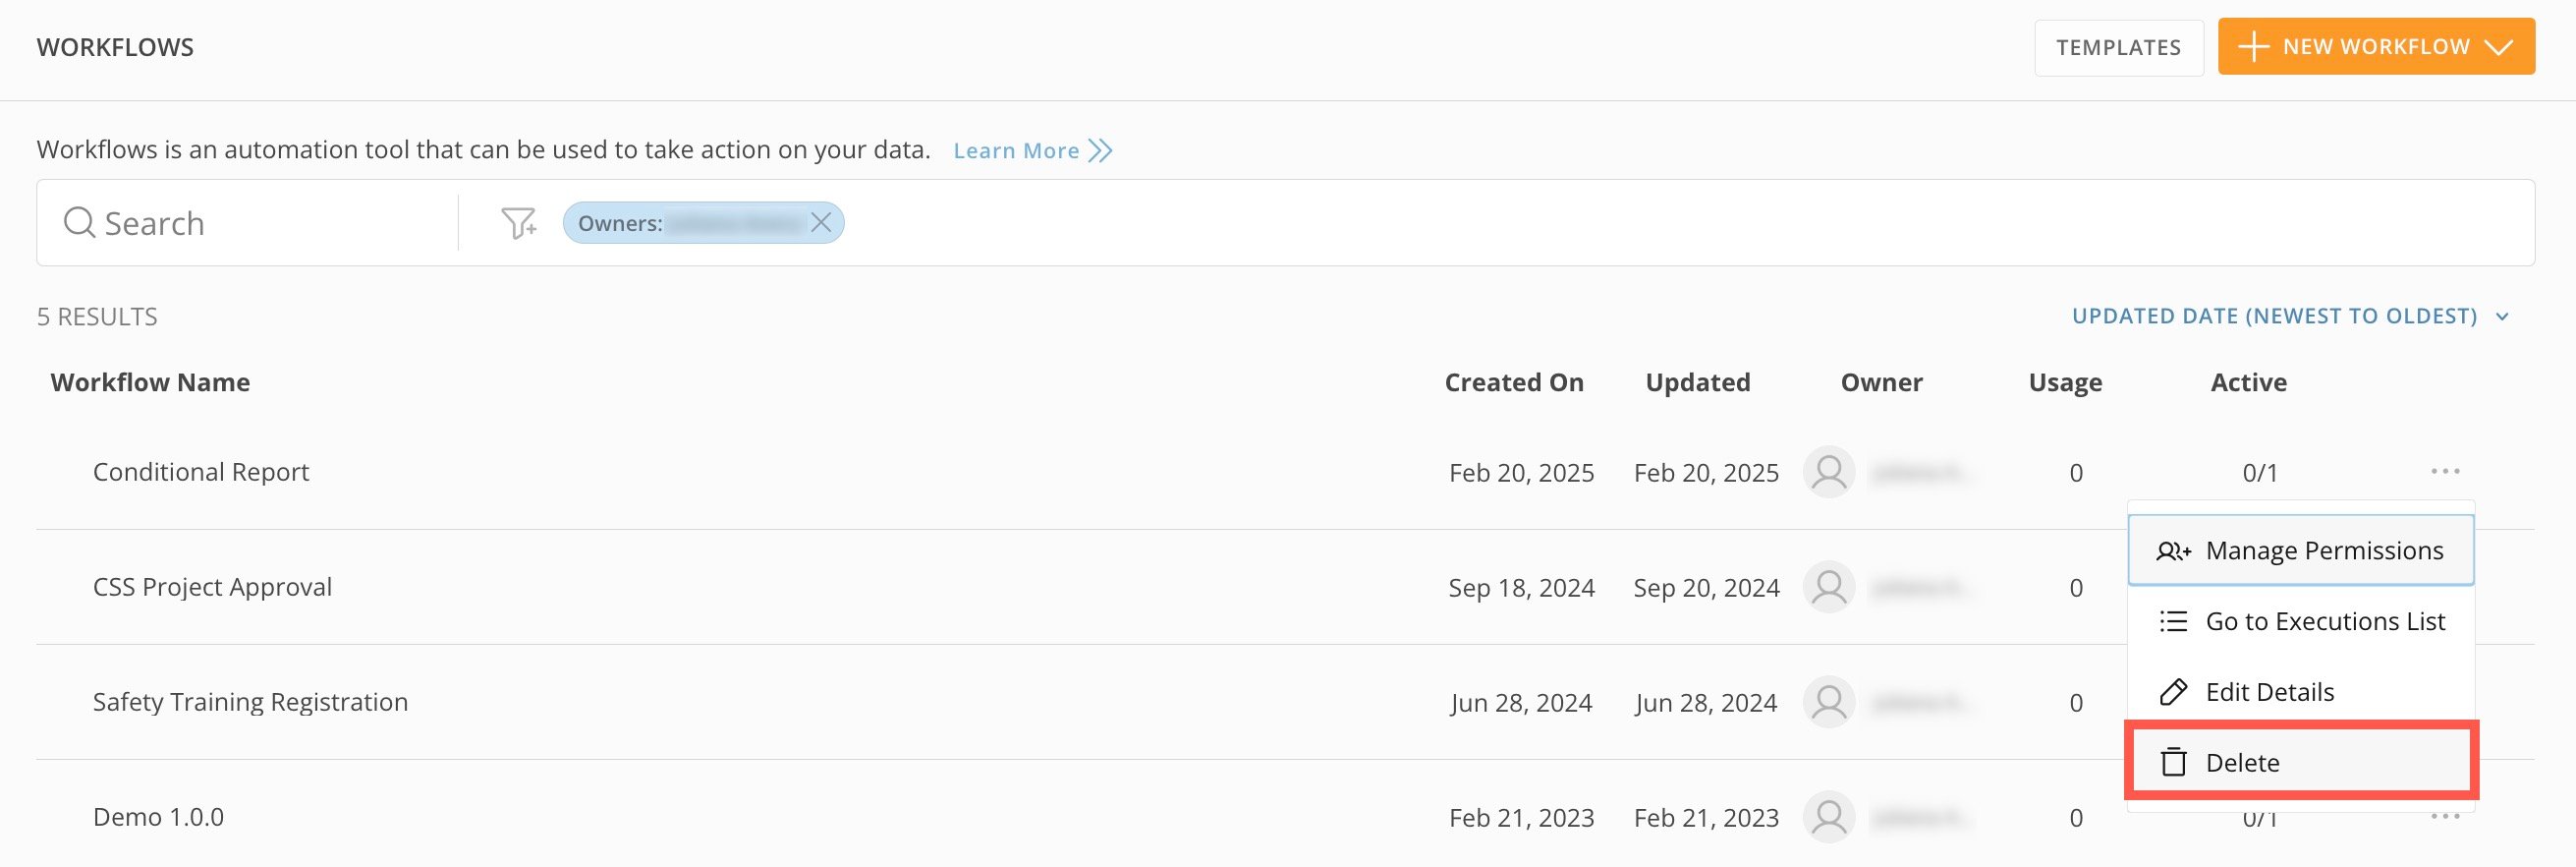
Delete the workflow from the Workflows default view by selecting <InlineImage src="/images/kb/ka0Vq0000009THK-00N5w00000Ri7BU-0EMVq000005xtVR-2.jpg" /> **More** (horizontal three-dot icon) > **Delete**.

<Frame>
  <img alt="" src="https://mintcdn.com/domoinc-openapi-sync-dataflows/t-REVUfgwLiw_Ine/images/kb/ka0Vq0000009THK-00N5w00000Ri7BU-0EMVq000005UtfK.jpg?fit=max&auto=format&n=t-REVUfgwLiw_Ine&q=85&s=8f3f1d5683142eafd5944d7f965ab874" style={{width: 898, height: 302}} width="2622" height="882" data-path="images/kb/ka0Vq0000009THK-00N5w00000Ri7BU-0EMVq000005UtfK.jpg" />
</Frame>

### Manage Workflow Versions

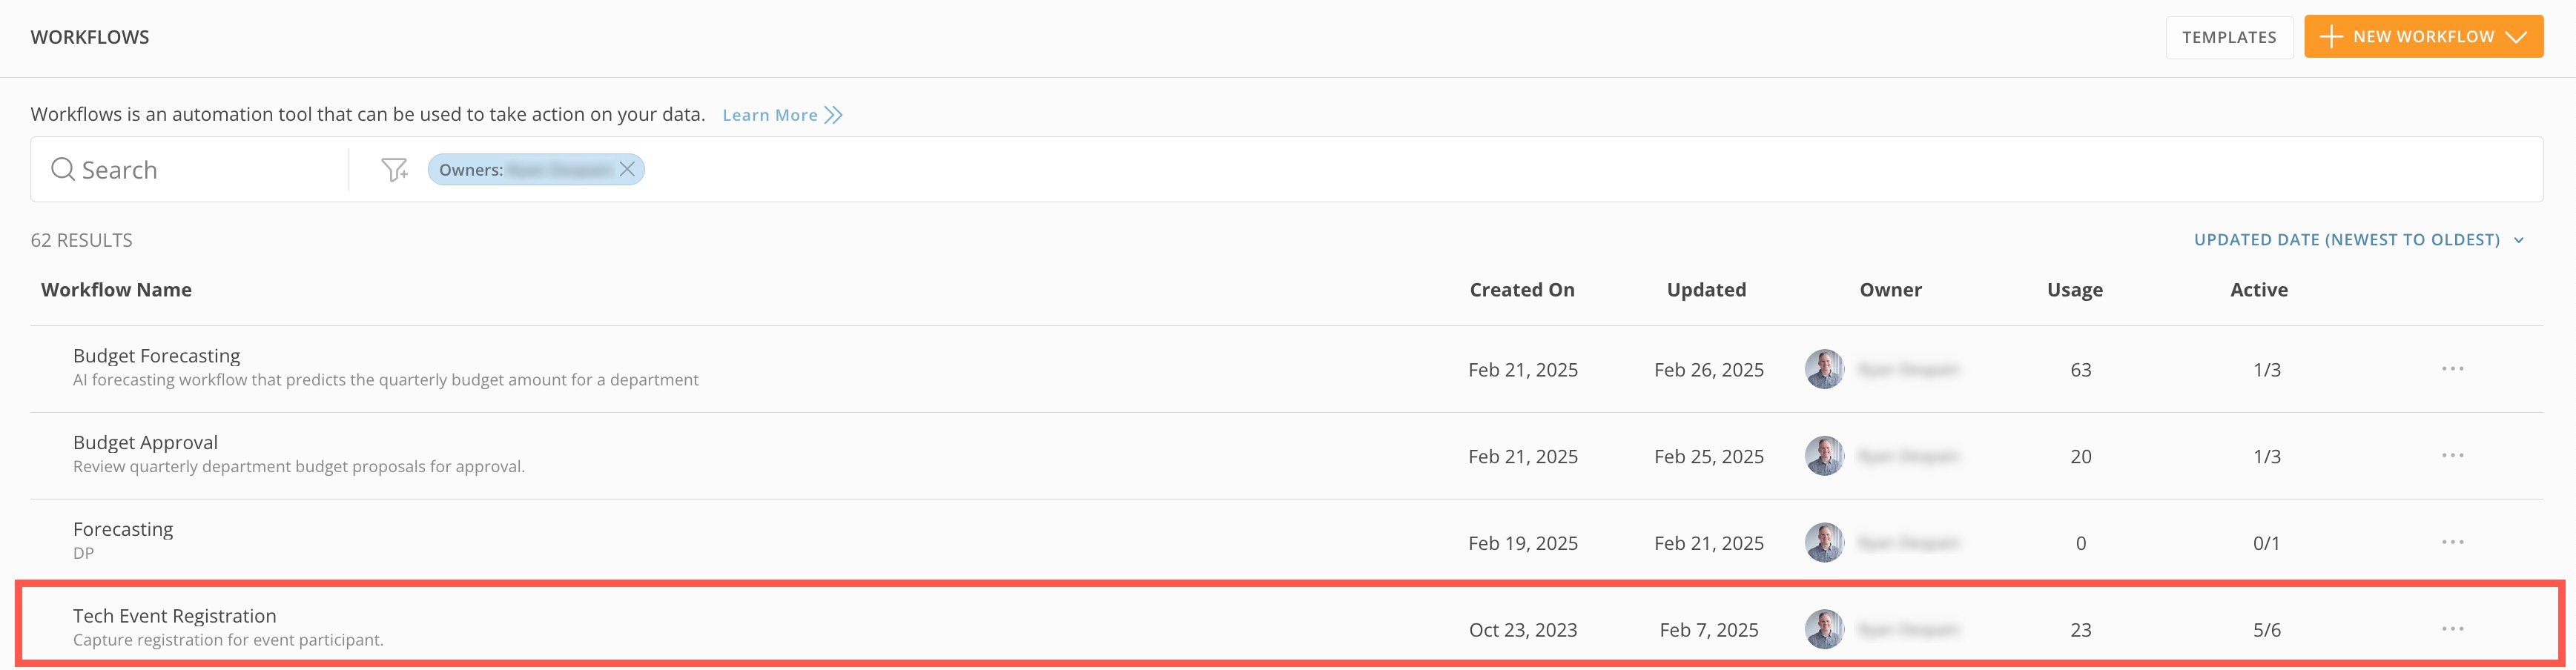
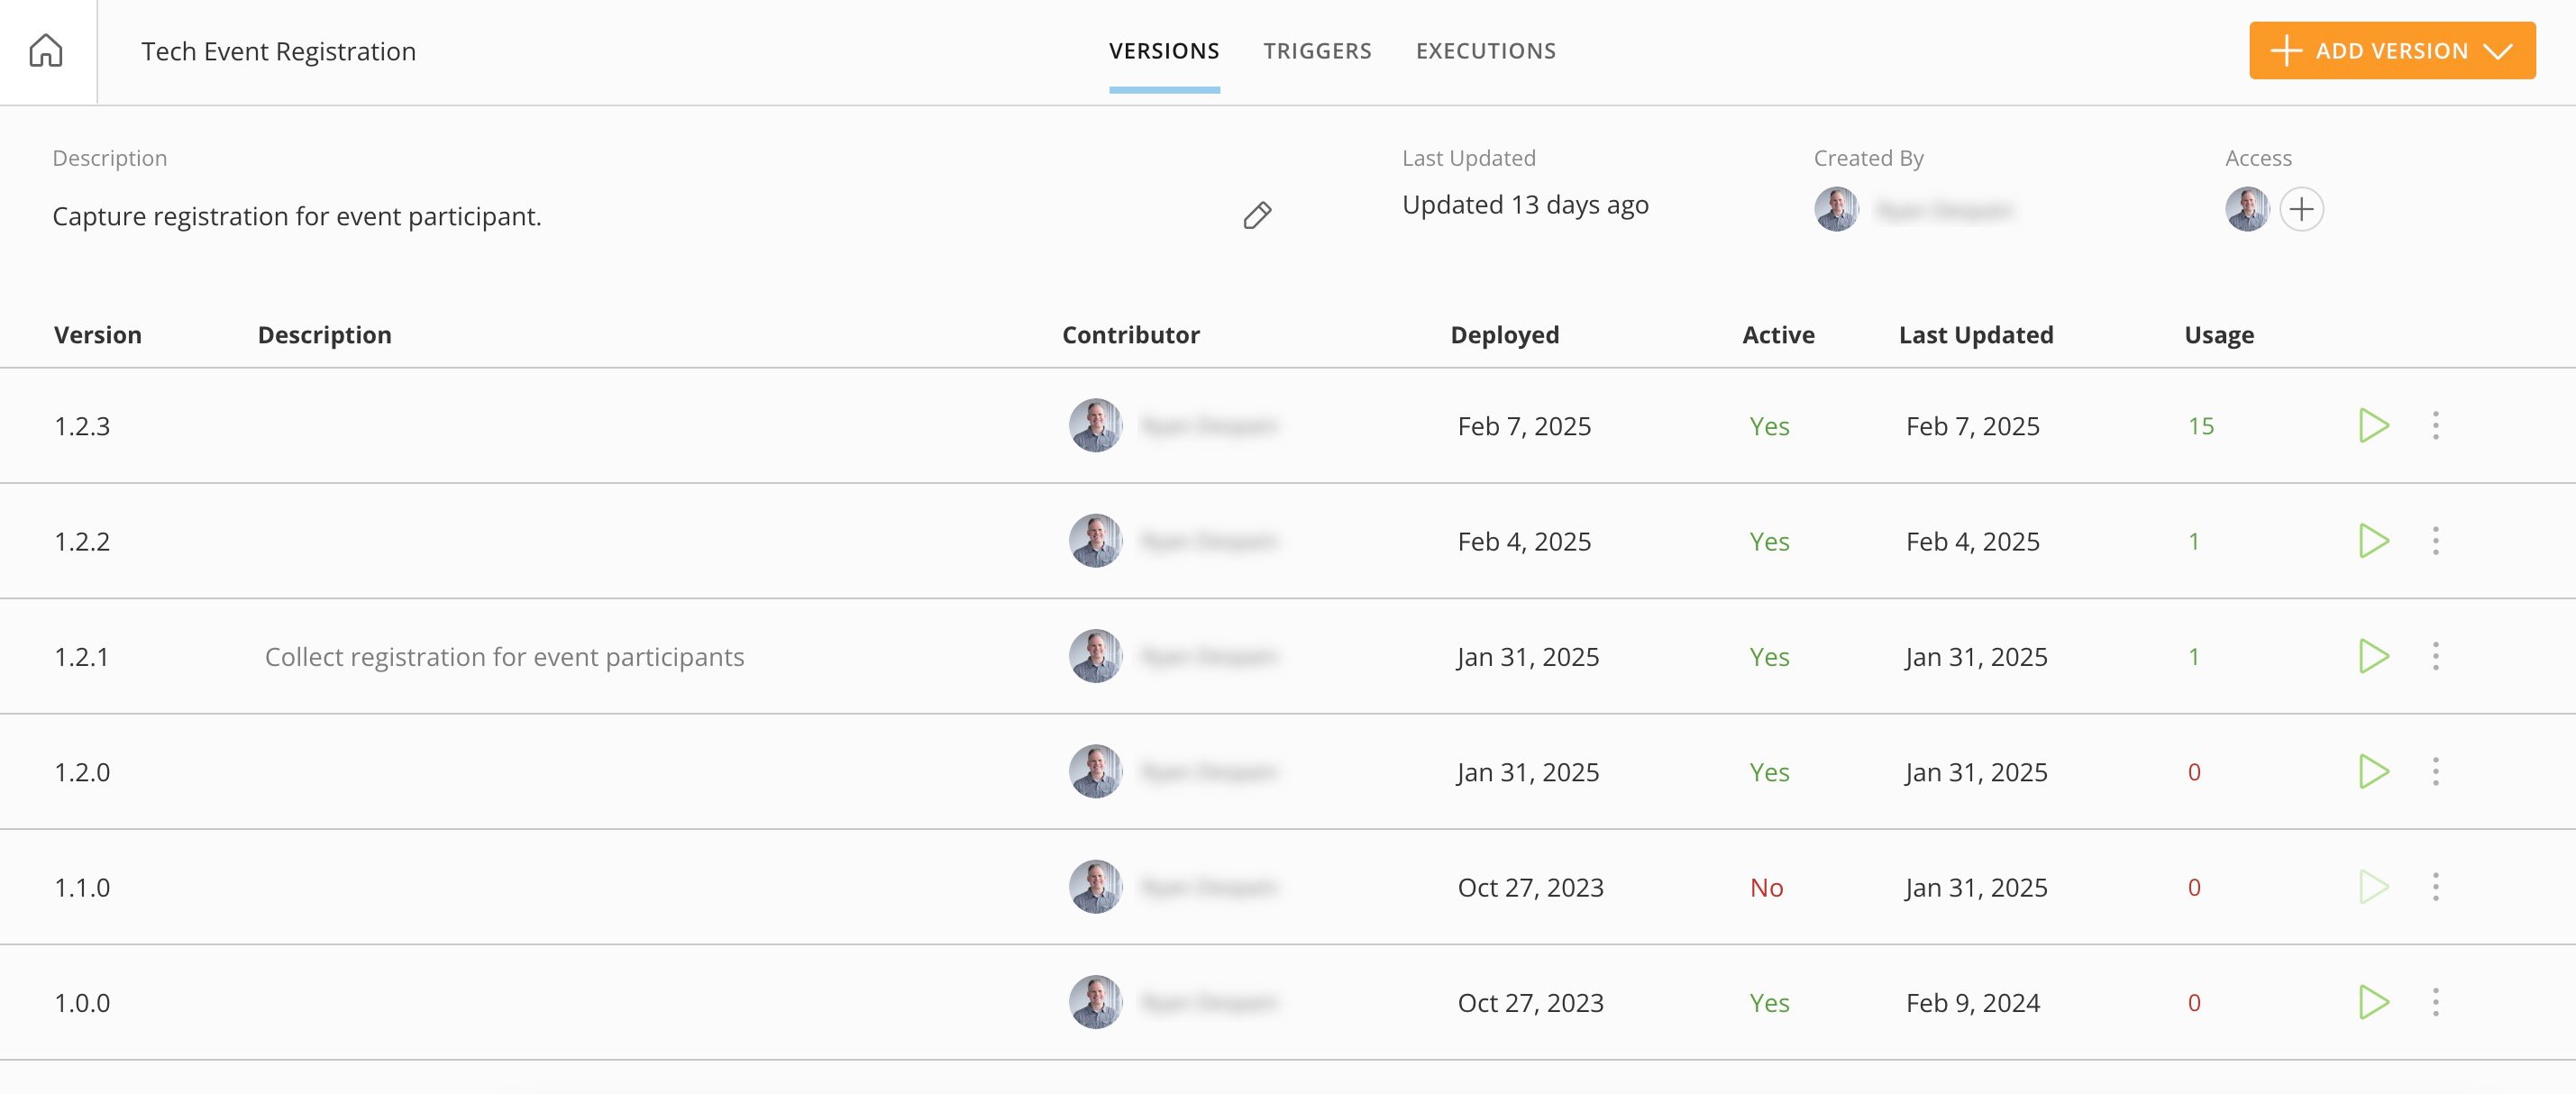
You cannot edit a workflow after it's been *deployed*. Instead, you must create a new version of the workflow—like a **Save As** —and edit the new *version*. A single workflow can have multiple versions, each with its own version number in *\<\<major.minor.patch>>* format (Example: 1.1.2). To view a workflow's versions list, select the workflow from the Workflows home.
<Frame>
  <img alt="" src="https://mintcdn.com/domoinc-openapi-sync-dataflows/t-REVUfgwLiw_Ine/images/kb/ka0Vq0000009THK-00N5w00000Ri7BU-0EMVq000005zToc.jpg?fit=max&auto=format&n=t-REVUfgwLiw_Ine&q=85&s=2140eda42dc8c3d8f4402f0dd829e85b" style={{width: 899, height: 234}} width="3474" height="904" data-path="images/kb/ka0Vq0000009THK-00N5w00000Ri7BU-0EMVq000005zToc.jpg" />
</Frame>

In the **Versions** tab, the listed **contributor** is the version creator, which can differ from the workflow creator.
<Frame>
  <img alt="" src="https://mintcdn.com/domoinc-openapi-sync-dataflows/t-REVUfgwLiw_Ine/images/kb/ka0Vq0000009THK-00N5w00000Ri7BU-0EMVq000005UuRh.jpg?fit=max&auto=format&n=t-REVUfgwLiw_Ine&q=85&s=3f6470ef8723675b76644fcdb66cf889" style={{width: 897, height: 381}} width="2858" height="1214" data-path="images/kb/ka0Vq0000009THK-00N5w00000Ri7BU-0EMVq000005UuRh.jpg" />
</Frame>

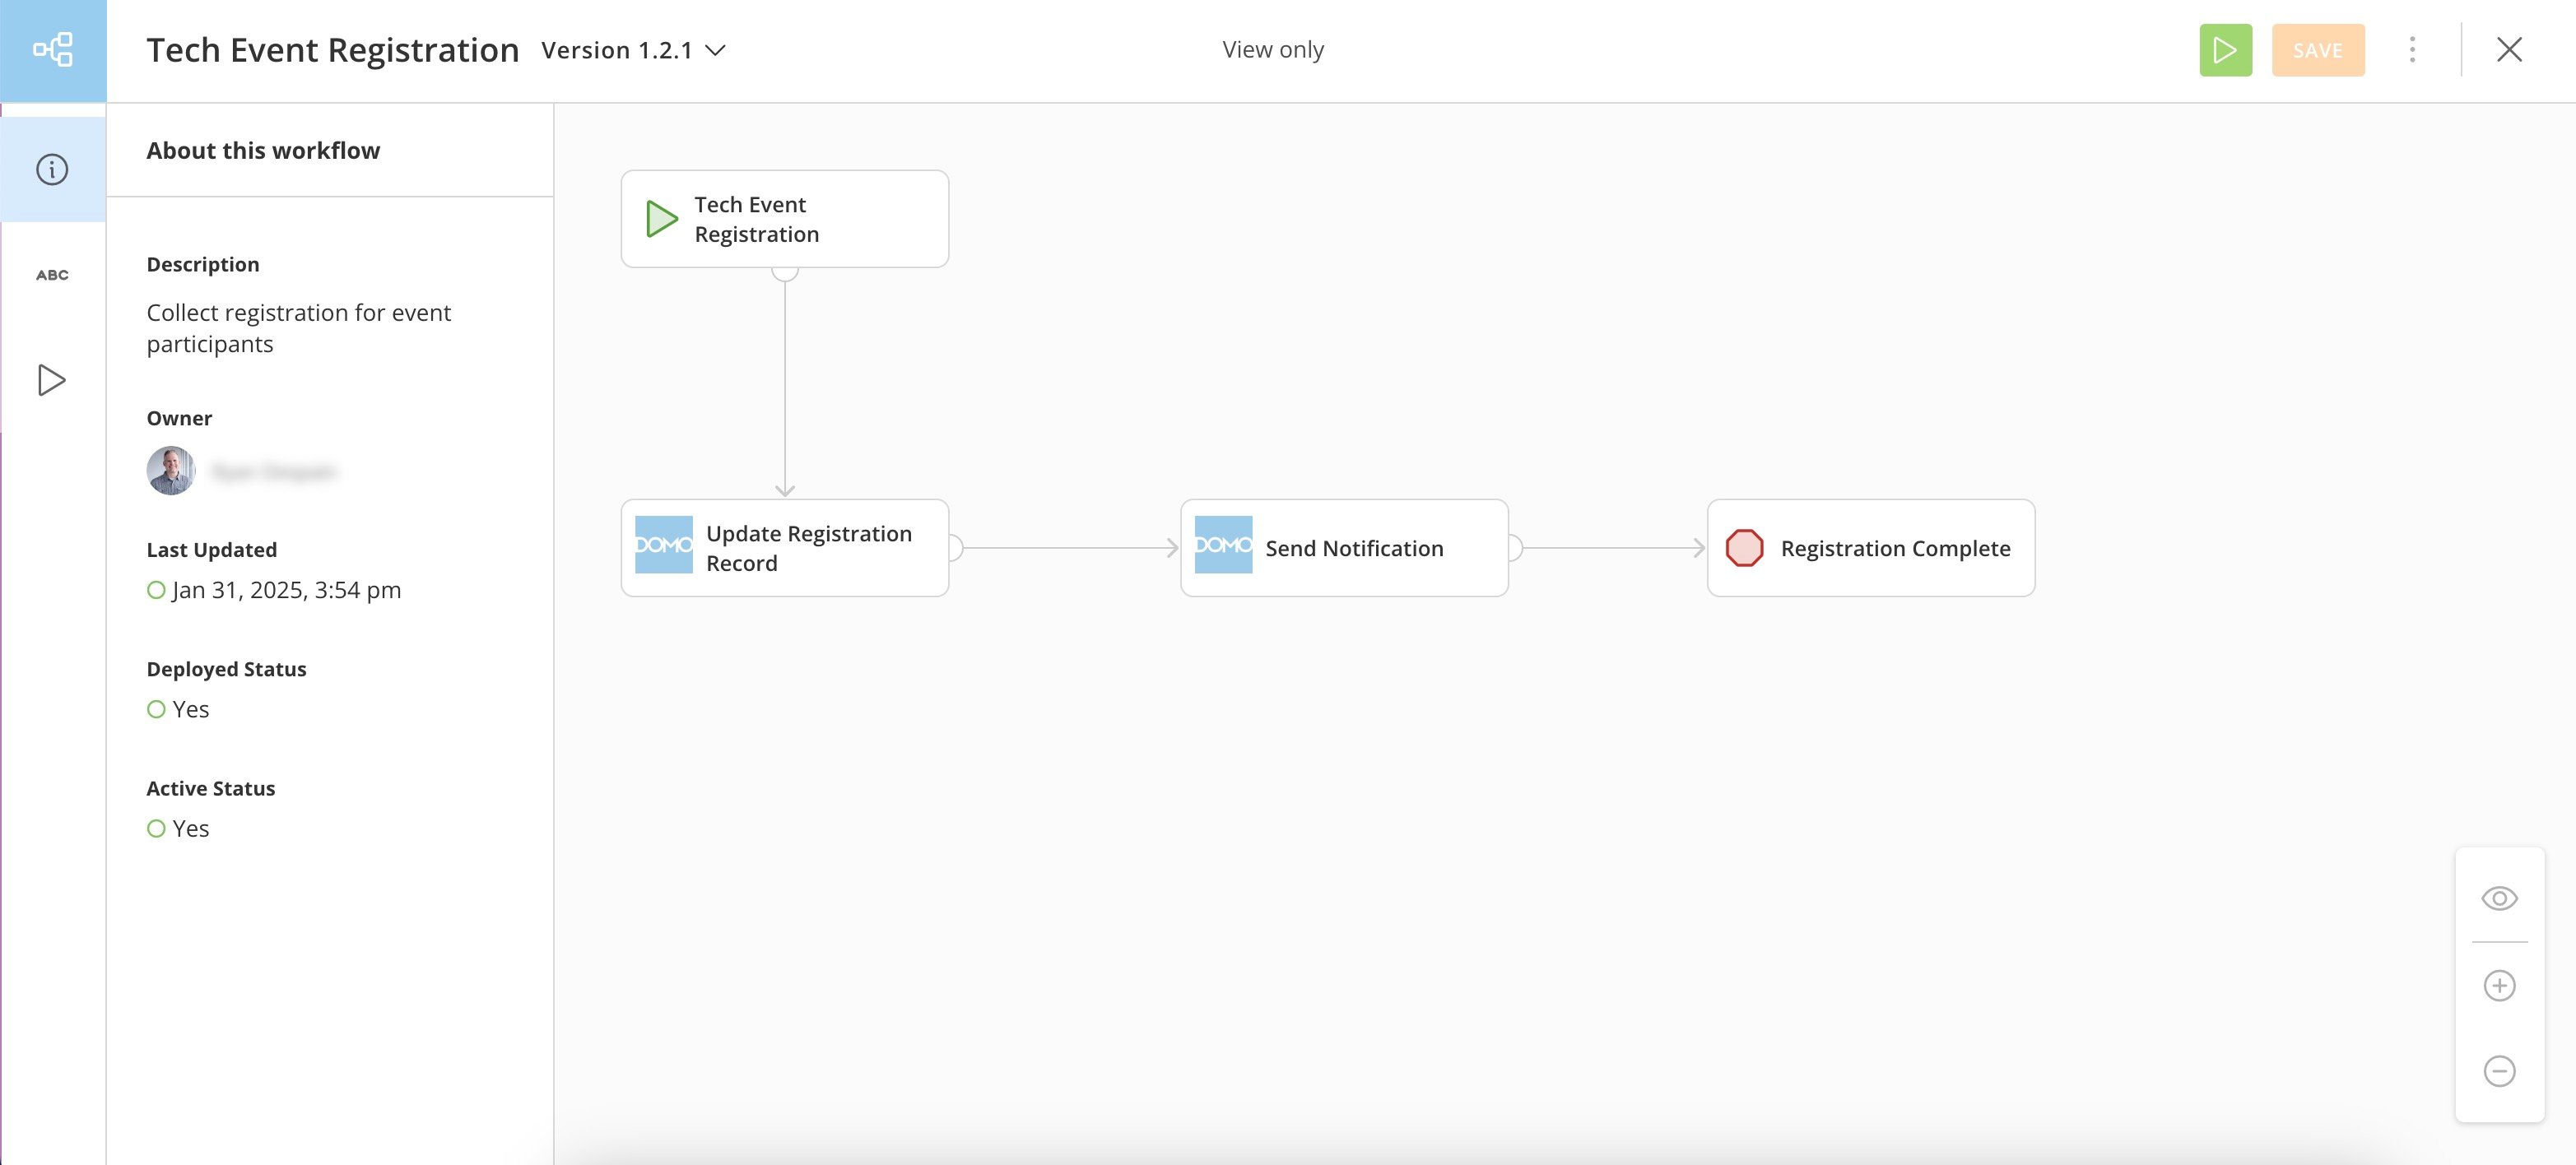
Selecting a version from the list opens the canvas and displays the version's graphical model in the least restrictive mode based on your permissions and the model's status:

* If the version is *deployed*, the model opens in view only mode. You cannot edit a deployed version. To edit, you must create a new version.
* If the version is *pre-deployed* and you have only Read [permission](#manage_permissions) for the workflow, the model opens in view only mode.
* If the version is *pre-deployed* and you have Write or Admin [permission](#manage_permissions) for the workflow, the version opens in edit mode. Learn how to [design a workflow](https://domo-support.domo.com/s/article/000005331?language=en_US#design_your_workflow).
<Frame>
  <img alt="" src="https://mintcdn.com/domoinc-openapi-sync-dataflows/t-REVUfgwLiw_Ine/images/kb/ka0Vq0000009THK-00N5w00000Ri7BU-0EMVq000005Uul3.jpg?fit=max&auto=format&n=t-REVUfgwLiw_Ine&q=85&s=36d176a075bbde7c6c32d1825c6b470a" style={{width: 899, height: 407}} width="3130" height="1416" data-path="images/kb/ka0Vq0000009THK-00N5w00000Ri7BU-0EMVq000005Uul3.jpg" />
</Frame>

# Version Actions

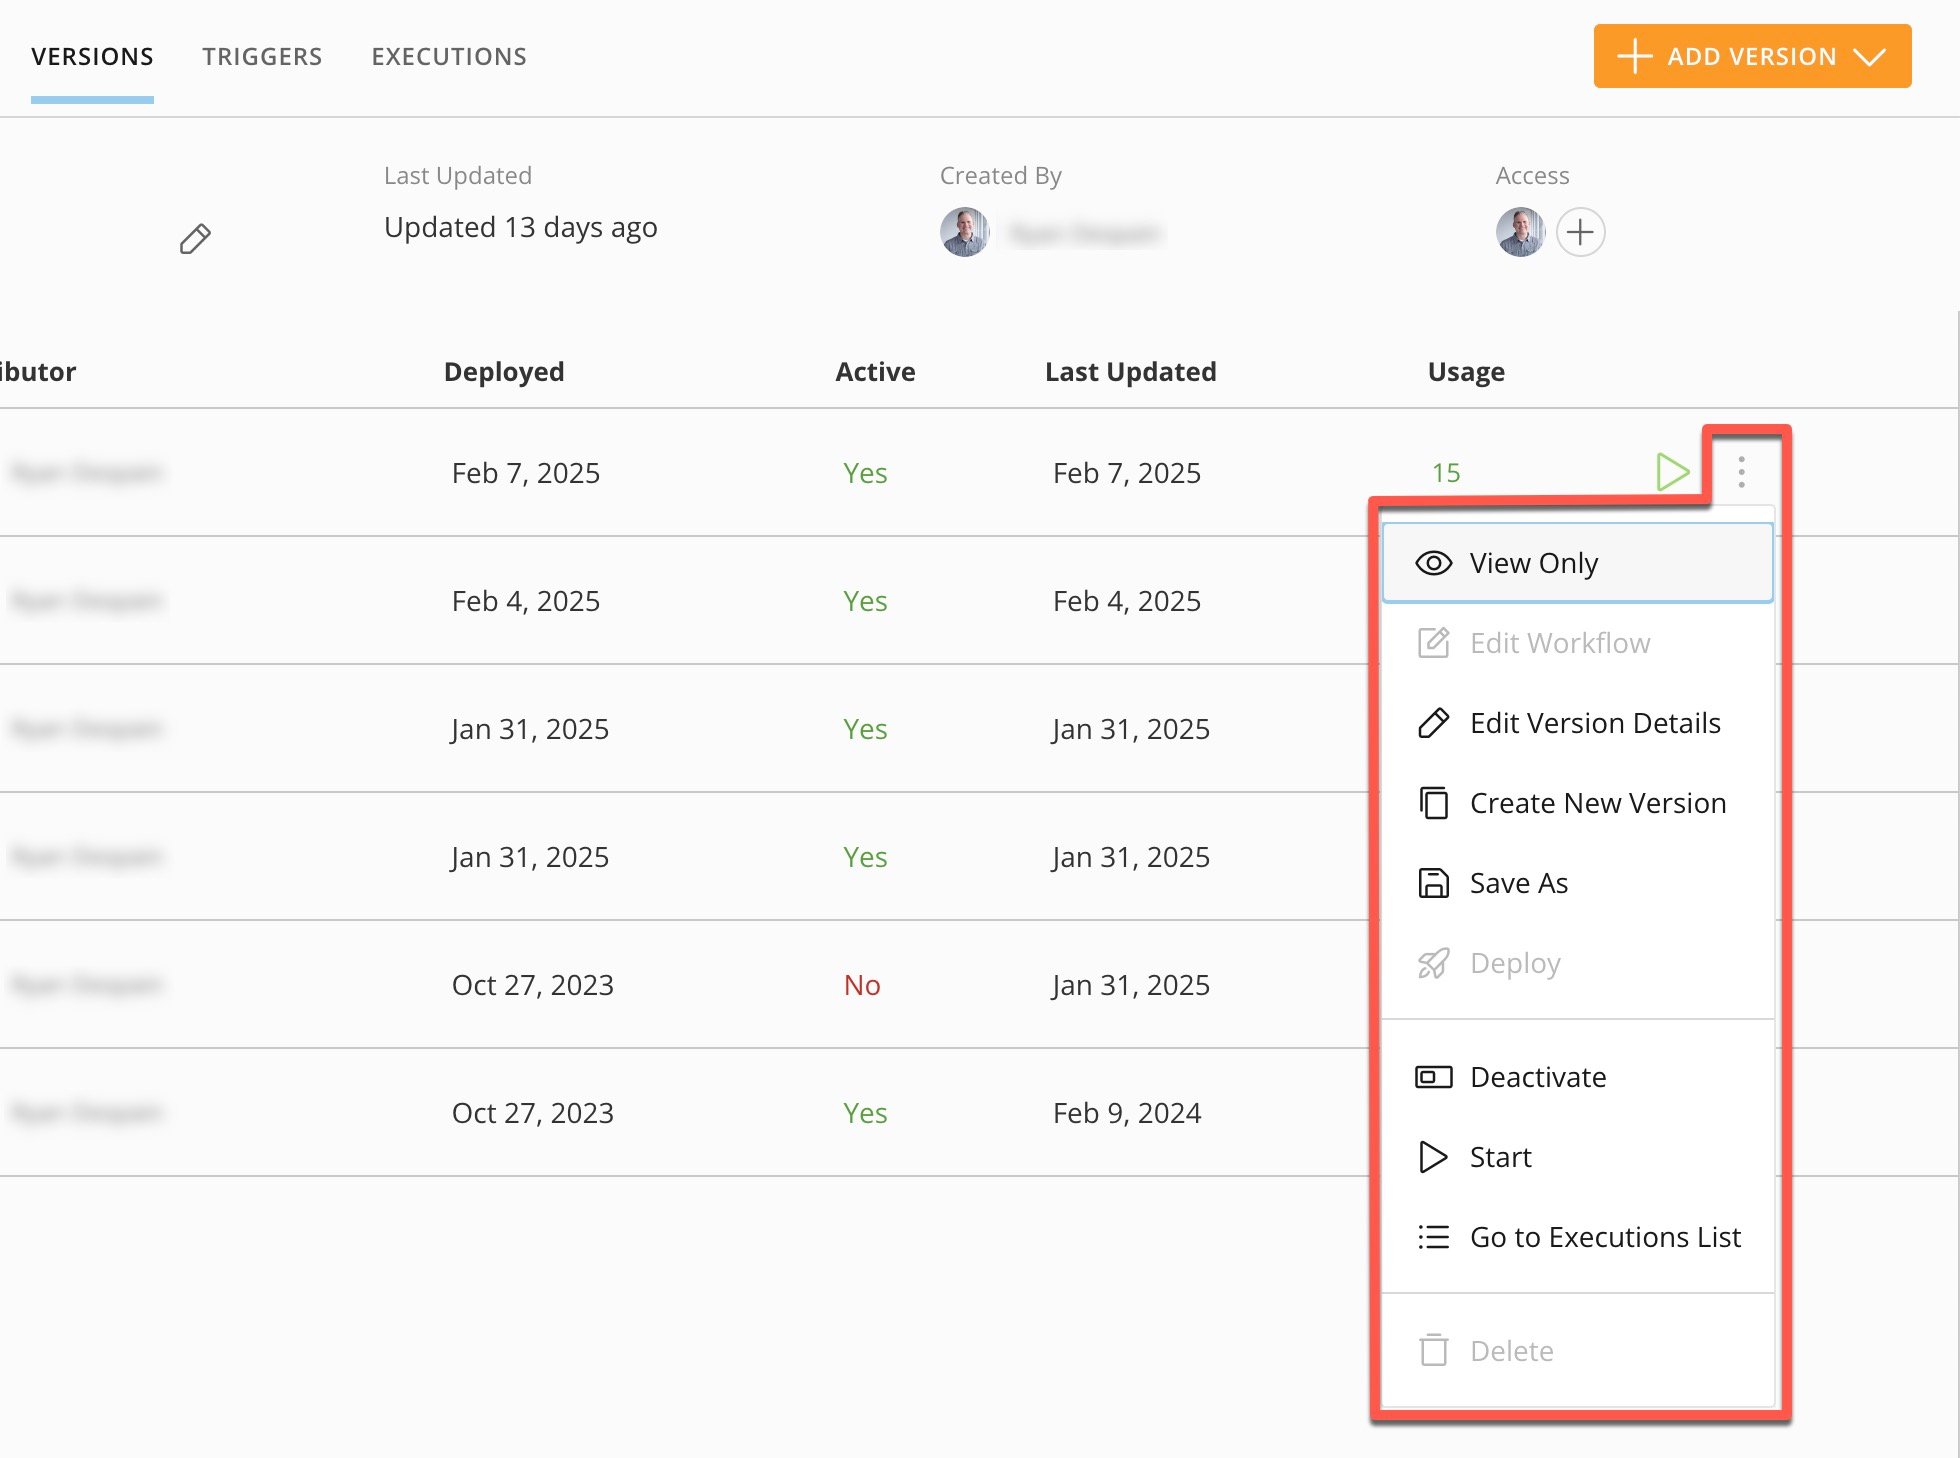
In the **Versions** tab, the <InlineImage src="/images/kb/ka0Vq0000009THK-00N5w00000Ri7BU-0EMVq000005xtdV-1.jpg" /> **More** menu (vertical three-dot icon) for each version includes the following options, described in the table below.
<Frame>
  <img alt="" src="https://mintcdn.com/domoinc-openapi-sync-dataflows/t-REVUfgwLiw_Ine/images/kb/ka0Vq0000009THK-00N5w00000Ri7BU-0EMVq000005UvSb.jpg?fit=max&auto=format&n=t-REVUfgwLiw_Ine&q=85&s=b60cc38437ed645e8e6038d6489d9d1f" style={{width: 547, height: 407}} width="1960" height="1458" data-path="images/kb/ka0Vq0000009THK-00N5w00000Ri7BU-0EMVq000005UvSb.jpg" />
</Frame>

<Note>
  **Note:** If you can't access an action in the menu, either you don't have [permission](#manage_permissions) to perform the action, or the action is not available due to the version *status*. To review the version status, see the [execution details](#review_execution_details).
</Note>

<table border="1" cellpadding="1" cellspacing="1" data-aura-rendered-by="33:208;a"><thead><tr><th colspan="1" rowspan="1"><p> Action </p></th><th colspan="1" rowspan="1"><p> Required Permission </p></th><th colspan="1" rowspan="1"><p> Description </p></th></tr></thead><tbody><tr><td colspan="1" rowspan="1"><p><b> View Only </b></p></td><td colspan="1" rowspan="1"><p> View, Edit, or Admin </p></td><td colspan="1" rowspan="1"><p> Opens the version in view-only mode. </p></td></tr><tr><td colspan="1" rowspan="1"><p><b> Edit Workflow </b></p></td><td colspan="1" rowspan="1"><p> Edit or Admin </p></td><td colspan="1" rowspan="1"><p> \*\*This is only available if the version has not been deployed. </p><p> Opens the version in edit mode. </p></td></tr><tr><td colspan="1" rowspan="1"><p><b> Edit Version Details </b></p></td><td colspan="1" rowspan="1"><p> Edit or Admin </p></td><td colspan="1" rowspan="1"><p> Opens a modal where you can edit the version description. </p></td></tr><tr><td colspan="1" rowspan="1"><p><b> Create New Version </b></p></td><td colspan="1" rowspan="1"><p> Edit or Admin </p></td><td colspan="1" rowspan="1"><p> Opens the <b> Create New Version </b> modal. </p><p> Learn how to create a new version. </p></td></tr><tr><td colspan="1" rowspan="1"><p><b> Deploy </b></p></td><td colspan="1" rowspan="1"><p> Deploy or Admin </p></td><td colspan="1" rowspan="1"><p> Attempts to deploy the version. A version can't run until it's been deployed. Deploying a version activates it by default. </p><p> If there are <a href="https://domo-support.domo.com/s/article/000005331?language=en_US#validate_a_workflow" target="_self"> validation </a> issues, you are required to resolve errors before deployment. </p></td></tr><tr><td colspan="1" rowspan="1"><p><b> Activate </b> / <b> Deactivate </b></p></td><td colspan="1" rowspan="1"><p> Edit or Admin </p></td><td colspan="1" rowspan="1"><p> Deactivates/activates a deployed version. </p><p> A version can't run until it's active. Deploying a version activates it by default. You can deactivate the version to keep it from running, but you can't "undeploy" it after it's been deployed. </p><p> A deactivated version can't be started. </p></td></tr><tr><td colspan="1" rowspan="1"><p><b> Start </b></p></td><td colspan="1" rowspan="1"><p> Execute or Admin </p></td><td colspan="1" rowspan="1"><p> Initiates a workflow execution, including launching a form start. </p></td></tr><tr><td colspan="1" rowspan="1"><p><b> Go to Executions List </b></p></td><td colspan="1" rowspan="1"><p> View Execution List, Edit Execution Details, or Admin </p></td><td colspan="1" rowspan="1"><p> Opens the <a href="#access_executions_list" target="_self"> Executions </a> tab. </p></td></tr><tr><td colspan="1" rowspan="1"><p><b> Delete </b></p></td><td colspan="1" rowspan="1"><p> Delete or Admin </p></td><td colspan="1" rowspan="1"><p> Deletes the version. </p><p> You can't delete a deployed version with an active status. <a id="create_a_new_version" target="_blank" /></p></td></tr></tbody></table>

# Create a New Version

<Warning>
  **Important:** To create a new version, you must have both the Create Workflows [grant](#required_grants) and Write or Admin [permission](#manage_permissions) for the workflow.
</Warning>

In the **Versions** tab, select **+ Add Version**
to view the following options:

<Frame>
  <img alt="" src="https://mintcdn.com/domoinc-openapi-sync-dataflows/t-REVUfgwLiw_Ine/images/kb/ka0Vq0000009THK-00N5w00000Ri7BU-0EMVq000005UuRh.jpg?fit=max&auto=format&n=t-REVUfgwLiw_Ine&q=85&s=3f6470ef8723675b76644fcdb66cf889" style={{width: 900, height: 382}} width="2858" height="1214" data-path="images/kb/ka0Vq0000009THK-00N5w00000Ri7BU-0EMVq000005UuRh.jpg" />
</Frame>

* **Blank Canvas —** Selecting this option creates a new version of the workflow without using a previous version as a starting point.
* **Existing Version —** Selecting this option displays a list of all previous versions of the workflow. You can make changes to any version's configuration and save it as a new version. Select any of the available versions to number your new version, add an optional description, and open it in the canvas. If you change the default version number, it must be in the *\<\<major.minor.patch>>* format. If a version number has already been used for the workflow, you can't use it again.

  <Frame>
    <img alt="Screenshot 2023-03-30 at 1.50.50 PM.png" src="https://mintcdn.com/domoinc-openapi-sync-dataflows/t-REVUfgwLiw_Ine/images/kb/ka0Vq0000009THK-00N5w00000Ri7BU-0EM5w000006uKNQ.jpg?fit=max&auto=format&n=t-REVUfgwLiw_Ine&q=85&s=2a82d23b726be2a126e70ee937af1e59" style={{width: 200, height: 284}} width="346" height="492" data-path="images/kb/ka0Vq0000009THK-00N5w00000Ri7BU-0EM5w000006uKNQ.jpg" />
  </Frame>

  <Note>
    **Version info:** *Deployed* means that the workflow has been validated and can run.

    *Active* means that the workflow is currently configured to run on a schedule or in response to a trigger.

    You can *deactivate* a workflow to prevent it from running without deleting it. To see status details and other version info, go to the [Executions](#view_executions) tab.
  </Note>

### Manage Workflow Triggers

Triggers allow you to start a workflow from other places in Domo—such as inside an App Studio app—or with a timer. You can configure a manual trigger from the [start shape](https://domo-support.domo.com/s/article/000005331?language=en_US#configure_workflow_start) inside that workflow version. There is no other process to set up a manual trigger. All the triggers configured for a workflow version display in the workflow's **Triggers** tab.

To create a workflow trigger, you must have the Manage Workflows [grant](#required_grants) *and* Admin or Execute [permission](#manage_permissions) to the workflow.

<Note>
  **Note:** Other than a manual trigger, all other triggers (including timers) can only be configured after a workflow has been *deployed*. Some triggers must be configured in the feature from which the trigger should execute, such as App Studio.

  Follow these steps to add a trigger:
</Note>

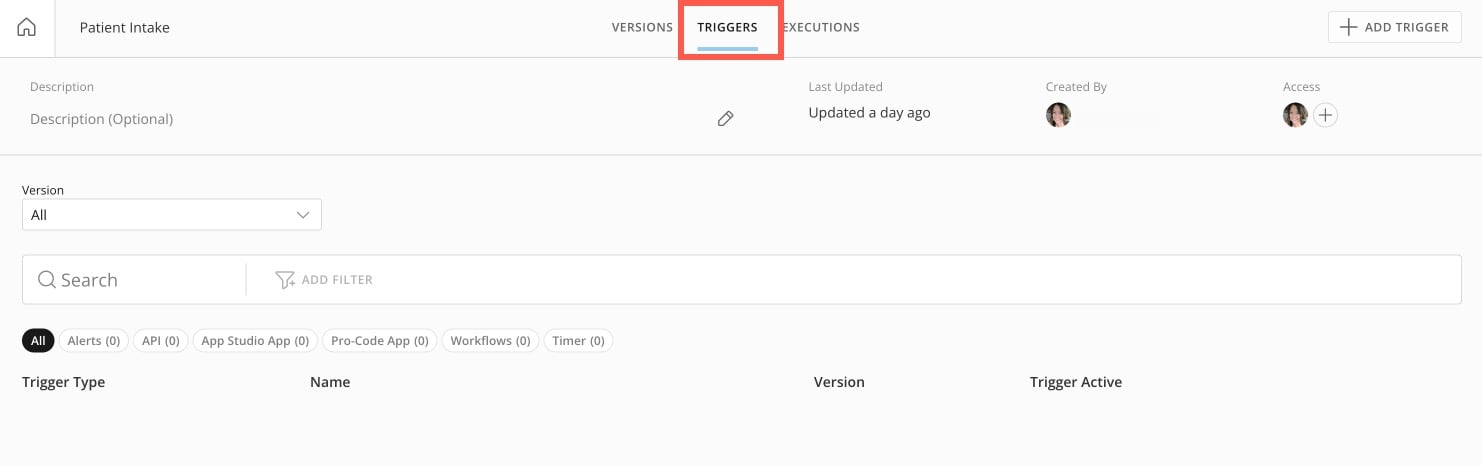
1. Choose the workflow from the Workflows home and go to the **Triggers** tab.

   <Frame>
     <img alt="" src="https://mintcdn.com/domoinc-openapi-sync-dataflows/t-REVUfgwLiw_Ine/images/kb/ka0Vq0000009THK-00N5w00000Ri7BU-0EMVq000005uR7V.jpg?fit=max&auto=format&n=t-REVUfgwLiw_Ine&q=85&s=401fa461b1f9398fe7400ac11951b8ce" style={{width: 900, height: 283}} width="1482" height="466" data-path="images/kb/ka0Vq0000009THK-00N5w00000Ri7BU-0EMVq000005uR7V.jpg" />
   </Frame>

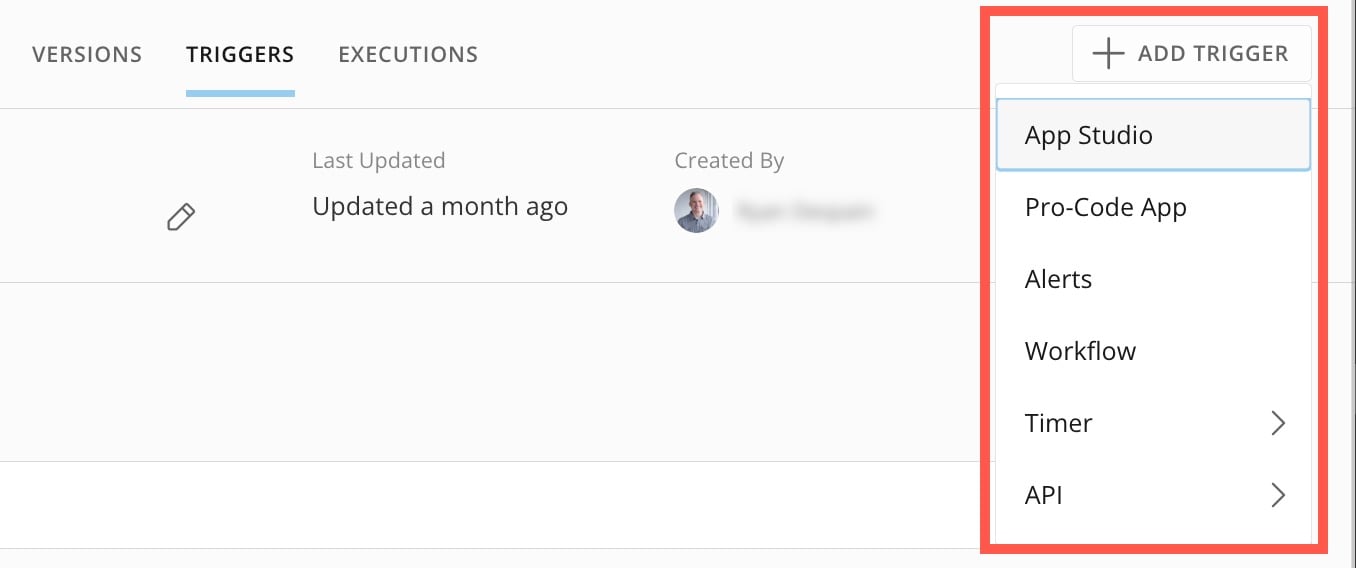
2. Select **Add Trigger** > **\< *trigger type>***.
   <Frame>
     <img alt="" src="https://mintcdn.com/domoinc-openapi-sync-dataflows/t-REVUfgwLiw_Ine/images/kb/ka0Vq0000009THK-00N5w00000Ri7BU-0EMVq000005xtnB.jpg?fit=max&auto=format&n=t-REVUfgwLiw_Ine&q=85&s=9d04f2bc5608f1426651b44559f00b9c" style={{width: 599, height: 251}} width="1356" height="568" data-path="images/kb/ka0Vq0000009THK-00N5w00000Ri7BU-0EMVq000005xtnB.jpg" />
   </Frame>

   Each trigger type has its own setup requirements. After configuration, the trigger will be listed here in the **Triggers** tab.

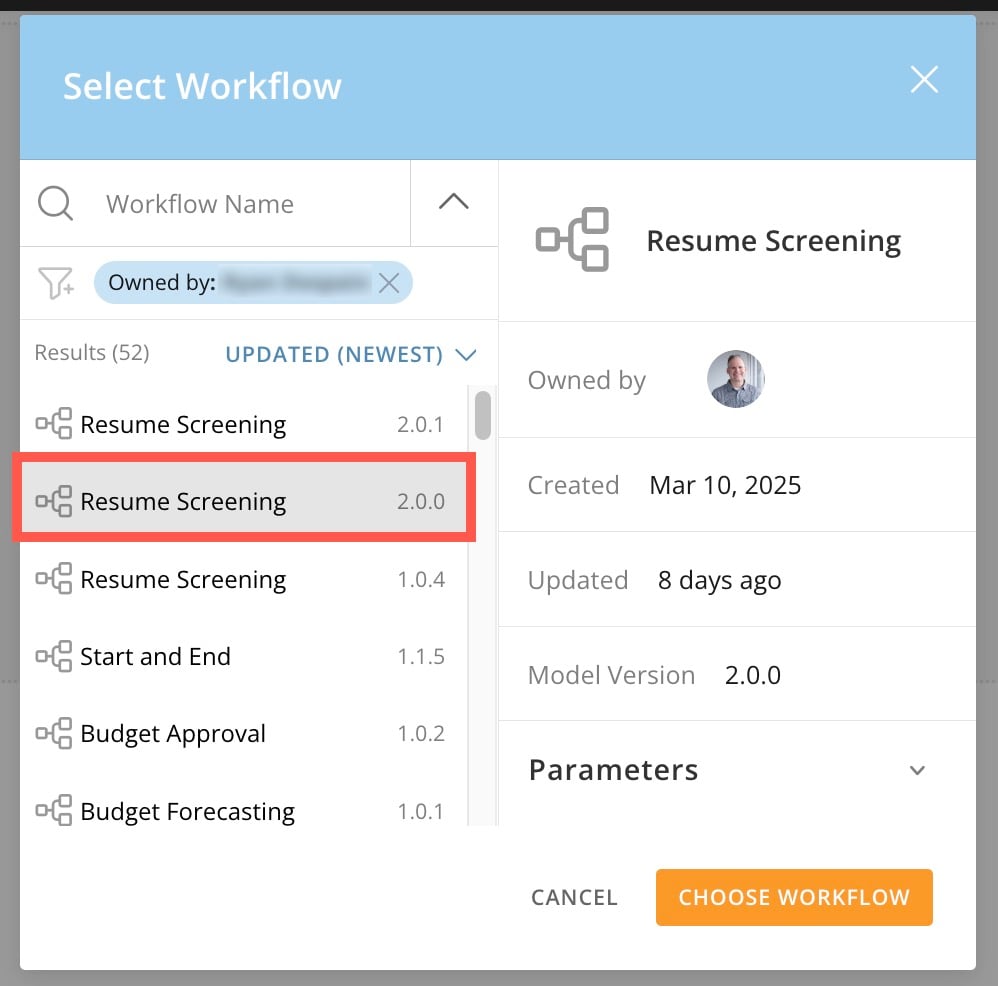
   * **App Studio —** Go to the App Studio app where you want the trigger to originate and add the Workflow widget. Locate and choose the correct version of the workflow.

     In the image below, there are three available versions of the Resume Screening workflow. You want to trigger version 2.0.0 from inside your app, so you choose that version.
     <Frame>
       <img alt="" src="https://mintcdn.com/domoinc-openapi-sync-dataflows/t-REVUfgwLiw_Ine/images/kb/ka0Vq0000009THK-00N5w00000Ri7BU-0EMVq000005yuhC.jpg?fit=max&auto=format&n=t-REVUfgwLiw_Ine&q=85&s=74ba80d22d81e2267ebad43bc3e141b4" style={{width: 378, height: 373}} width="998" height="986" data-path="images/kb/ka0Vq0000009THK-00N5w00000Ri7BU-0EMVq000005yuhC.jpg" />
     </Frame>

   * **Pro-Code app —** Choose an existing app from the Asset Library configured with a workflow and map it to a card, or use the Pro-code Editor to build a new app. Program the app design to use a workflow, which can be selected and mapped via the card configuration panel.

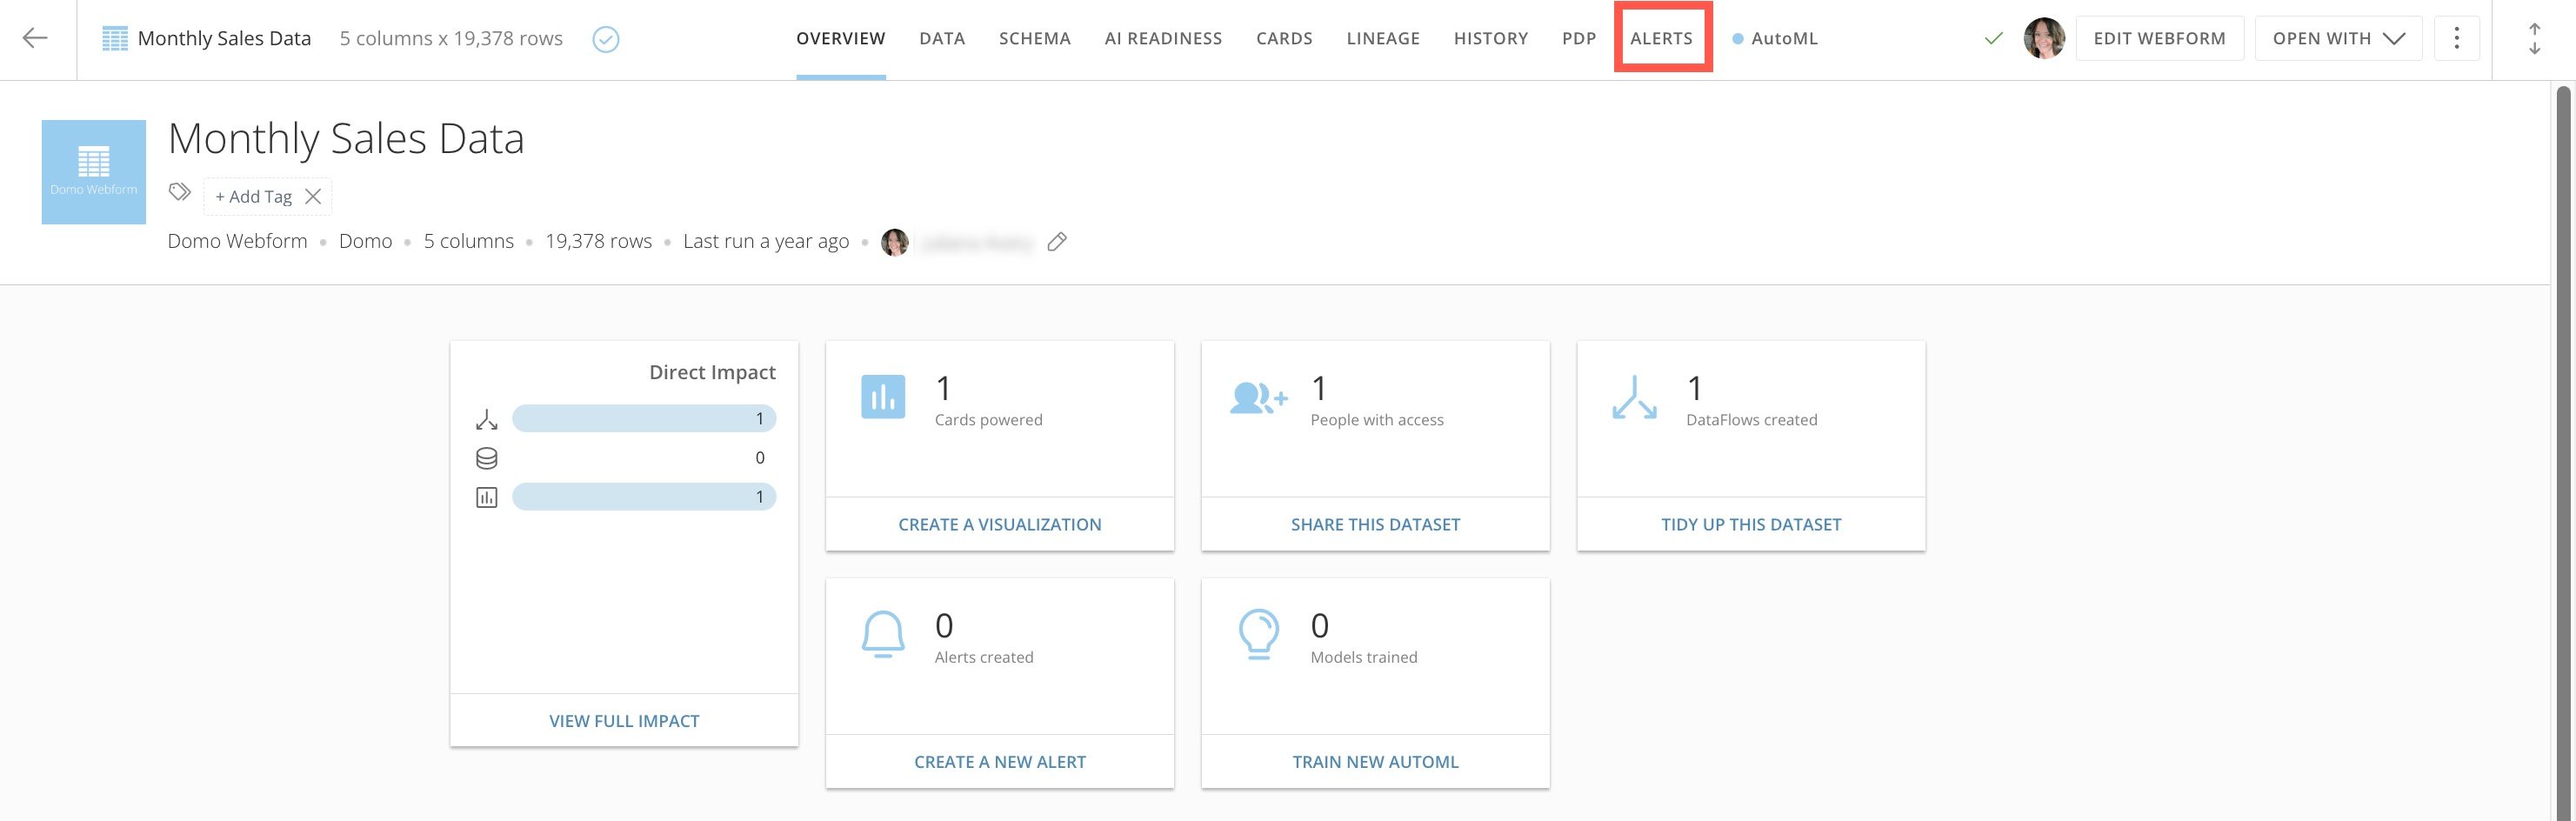
   * **Alerts —** Go to the DataSet's Details page and navigate to the **Alerts** tab. While creating a new Alert or editing an existing one, set the Action as the workflow version you want to execute when the Alert is triggered. Learn how to [create an Alert](/s/article/360042925994).
     <Frame>
       <img alt="" src="https://mintcdn.com/domoinc-openapi-sync-dataflows/t-REVUfgwLiw_Ine/images/kb/ka0Vq0000009THK-00N5w00000Ri7BU-0EMVq000005xu4v.jpg?fit=max&auto=format&n=t-REVUfgwLiw_Ine&q=85&s=5efa84ce76e5abc57229a49186dcddc4" style={{width: 898, height: 286}} width="2962" height="944" data-path="images/kb/ka0Vq0000009THK-00N5w00000Ri7BU-0EMVq000005xu4v.jpg" />
     </Frame>

   * **Workflow —** Learn how to [create a workflow trigger](#workflow_trigger) to trigger one workflow with another.

   * **Timer —** Choose the workflow version and configure a timer with an update interval and start time. The available update intervals are as follows:

     * **Every Minute —** Displays a **Minute Duration** dropdown with options for Every Minute, Every 5 Minutes, and Every 15 Minutes.

       After selecting an option, you can optionally check the box labeled **Start Between** and choose the start and end times between which the workflow runs on the interval if you only want the workflow to run during certain hours of the day.
     * **Every Hour** **—** Deploys the workflow every hour.

       Optionally, you can check the box labeled **Start Between** and choose the start and end times between which the workflow runs every hour. If the **Start Between** box is unchecked, the workflow runs once per hour, 24 times per day.
     * **Every Day** **—** Deploys the workflow once every day. In the Start field, select the hour you want the workflow to start. The **End** field automatically populates based on the chosen start field.
     * **Every Weekday** **—** Deploys the workflow one time every weekday (Monday – Friday). The workflow doesn't start on weekend days (Saturday & Sunday). You must select the hour for the workflow to start in the **Start** field. The **End** field automatically populates based on the chosen start field.
     * **Every Week** **—** Deploys the workflow once per week. In the **On this day** field, select the day you want the workflow to start and the hour of the day that it should start.
     * **Every Month** **—** Deploys the workflow once per month on a specified day. Choose an option from the **On this day** dropdown. The options are the 1st of the month, the 15th of the month, and the Last day of the month. After choosing an option, choose the hour of the day that the workflow should start.
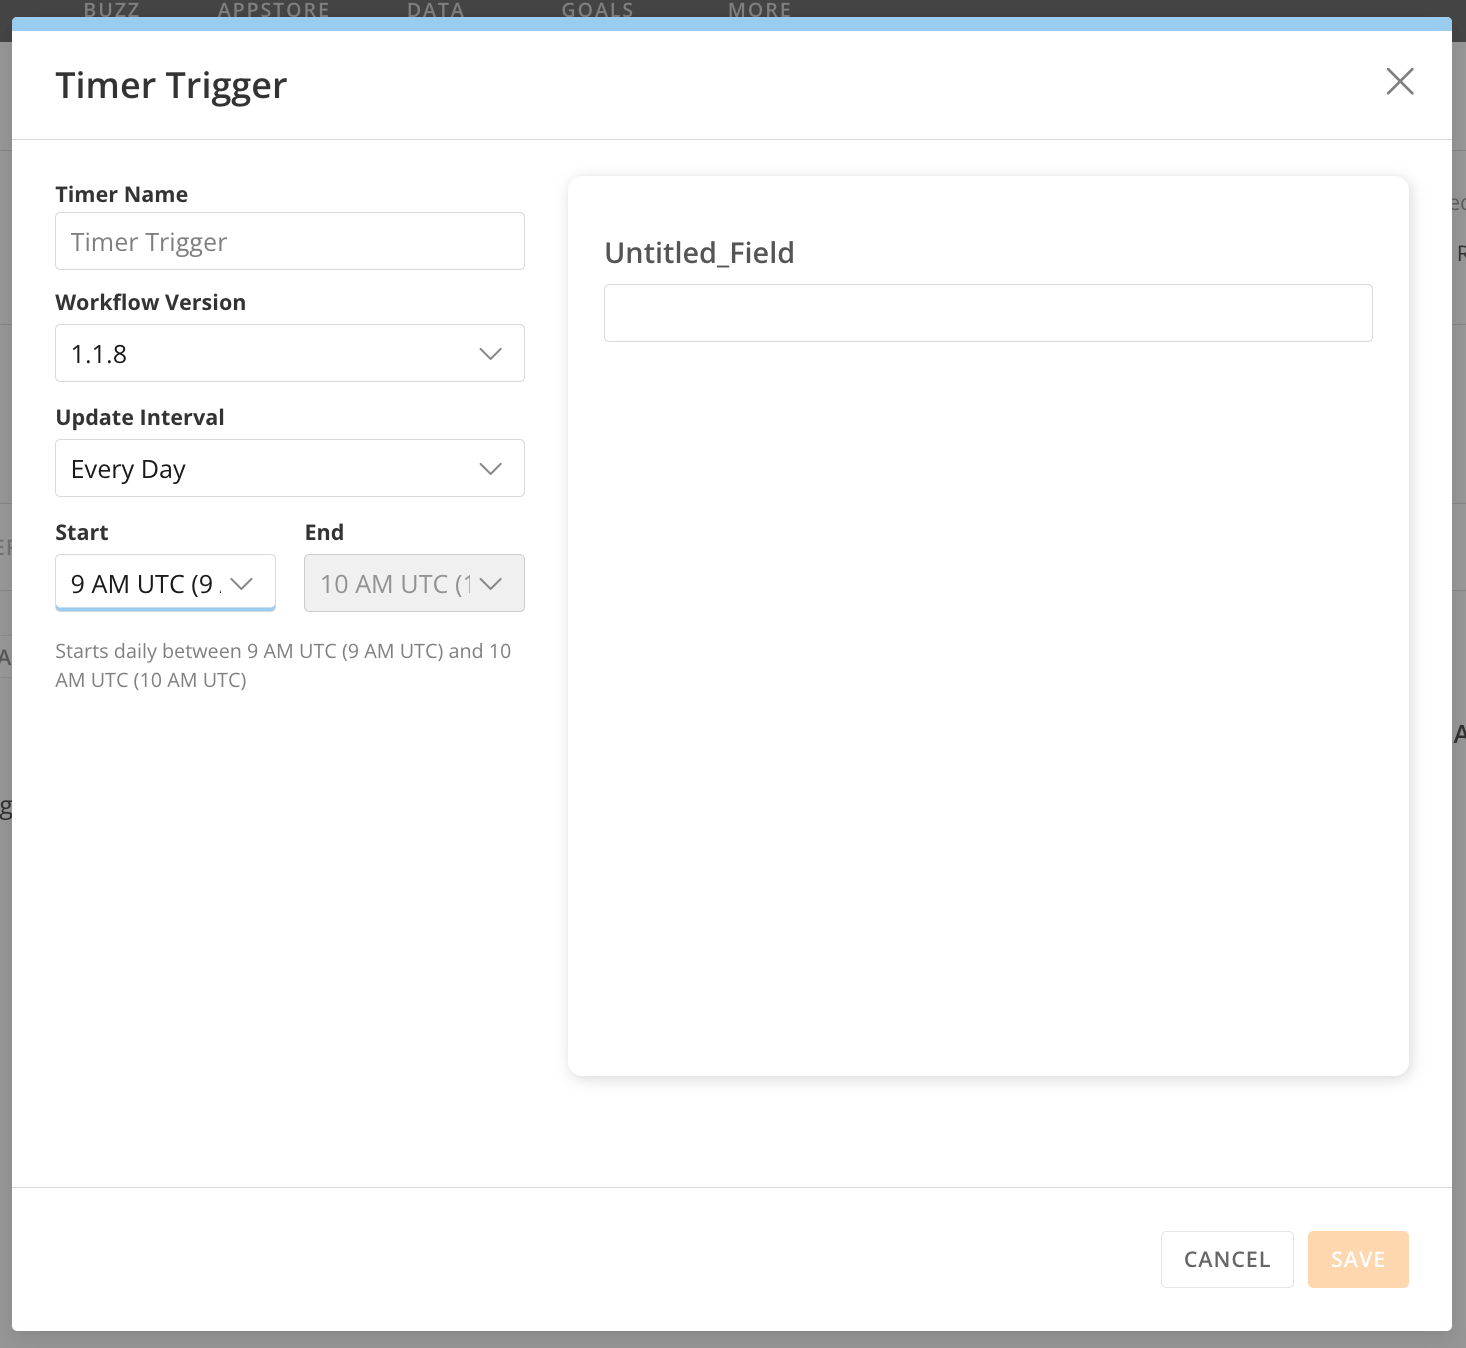
<Frame>
  <img alt="" src="https://mintcdn.com/domoinc-openapi-sync-dataflows/t-REVUfgwLiw_Ine/images/kb/ka0Vq0000009THK-00N5w00000Ri7BU-0EMVq000005yxn7.jpg?fit=max&auto=format&n=t-REVUfgwLiw_Ine&q=85&s=f43c1f79807ba41598ce8cf83135ad20" style={{width: 500, height: 460}} width="1466" height="1348" data-path="images/kb/ka0Vq0000009THK-00N5w00000Ri7BU-0EMVq000005yxn7.jpg" />
</Frame>

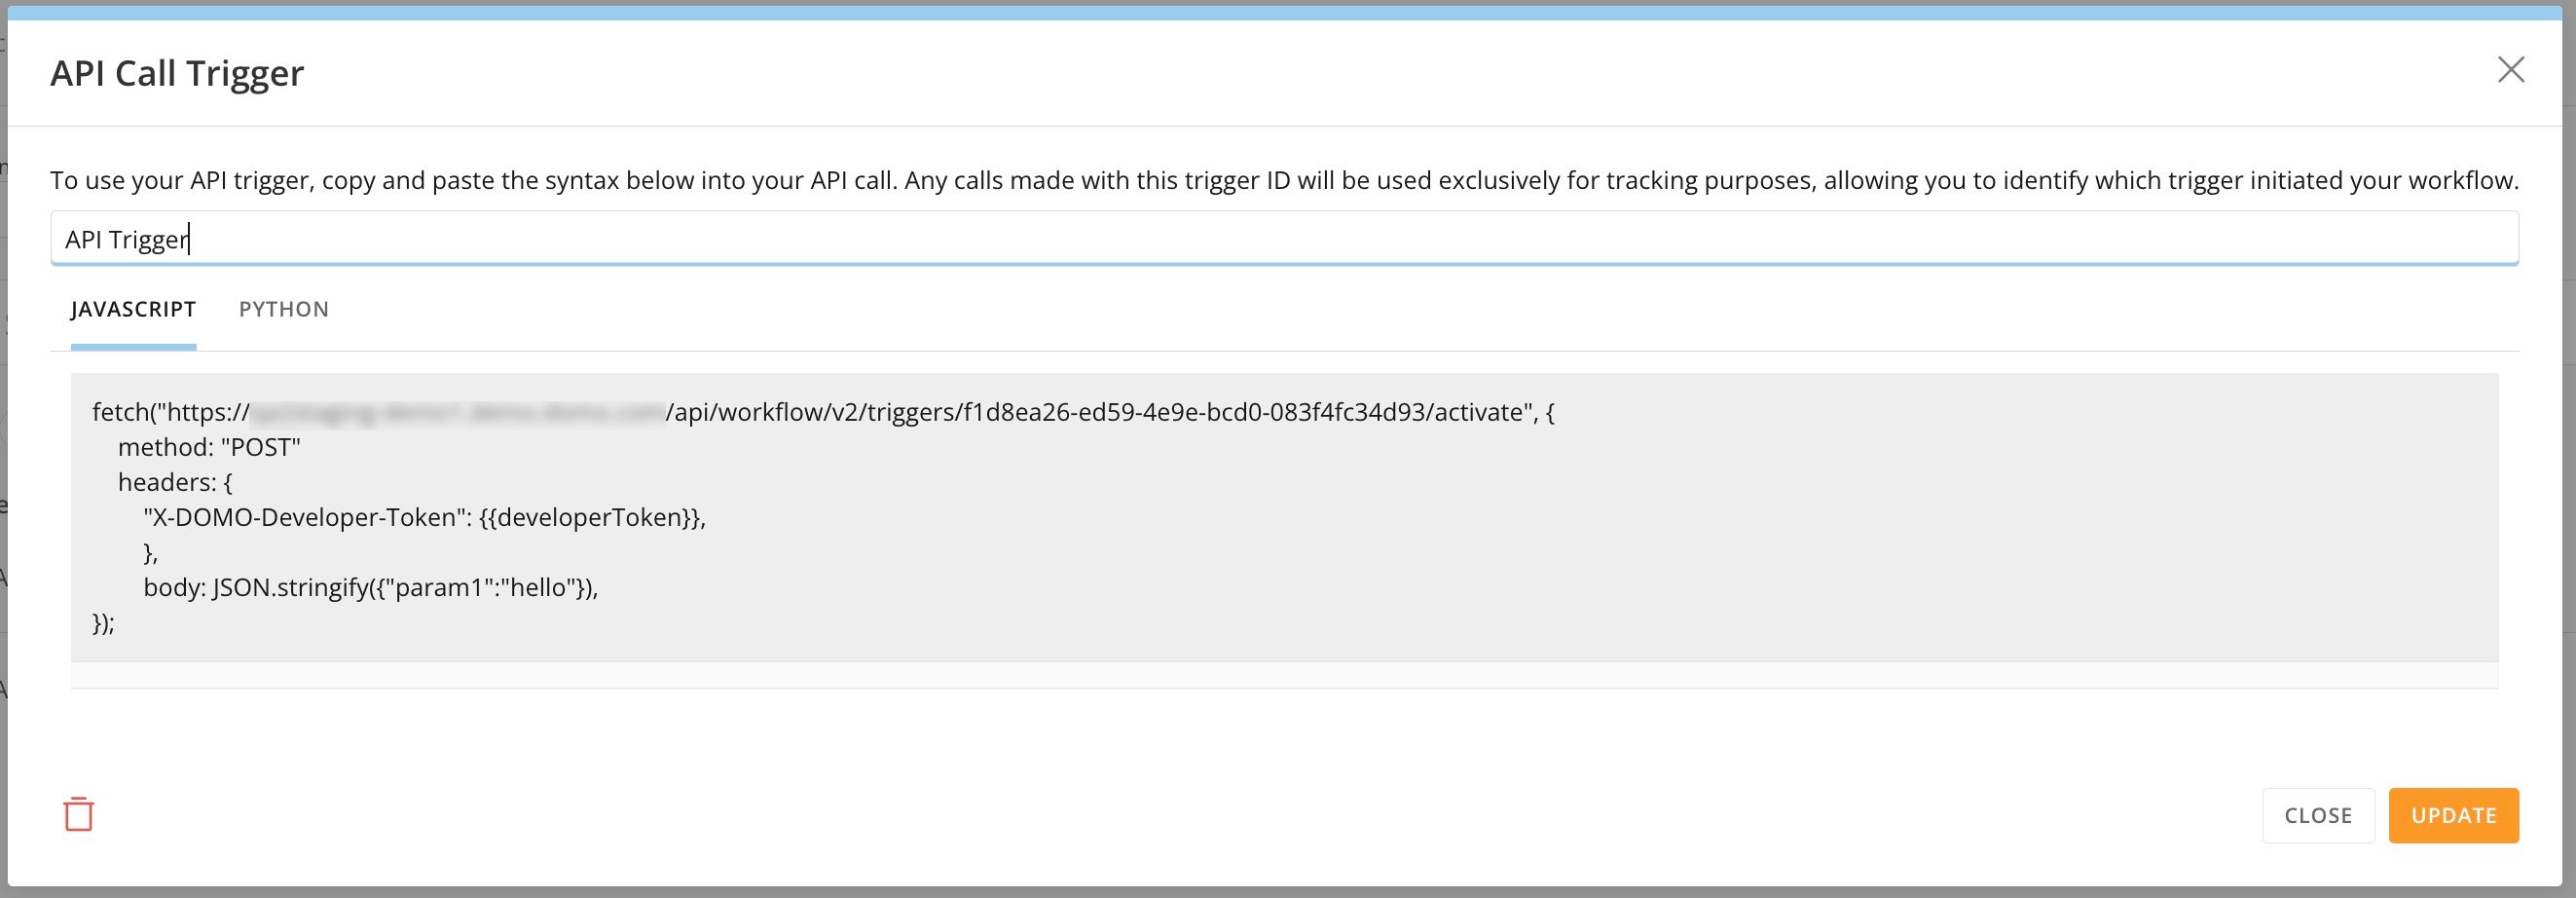
* **API trigger —** Choose the workflow version. Syntax is generated in JavaScript and Python. It contains a trigger ID. You can copy and paste the syntax into the API call. Any calls made with this trigger ID will be exclusively used for tracking purposes so you can identify which trigger initiated your workflow.
  <Frame>
    <img alt="" src="https://mintcdn.com/domoinc-openapi-sync-dataflows/t-REVUfgwLiw_Ine/images/kb/ka0Vq0000009THK-00N5w00000Ri7BU-0EMVq000005yyWH.jpg?fit=max&auto=format&n=t-REVUfgwLiw_Ine&q=85&s=8a992ef6338ca6ebf3f534dc0293bbf7" style={{width: 898, height: 313}} width="2646" height="922" data-path="images/kb/ka0Vq0000009THK-00N5w00000Ri7BU-0EMVq000005yyWH.jpg" />
  </Frame>

1. View your configured trigger in the **Triggers** tab. You can also view and configure triggers for deployed versions from the **Triggers** [tab](https://domo-support.domo.com/s/article/000005331?language=en_US#left_panel) in the canvas.
   <Note>
     **Note:** Triggers cannot currently be copied from one workflow version to another.
   </Note>

# Create a Workflow Trigger

1. Open the triggering workflow in edit mode. It must be *pre-deployed*. Otherwise, create a new version.
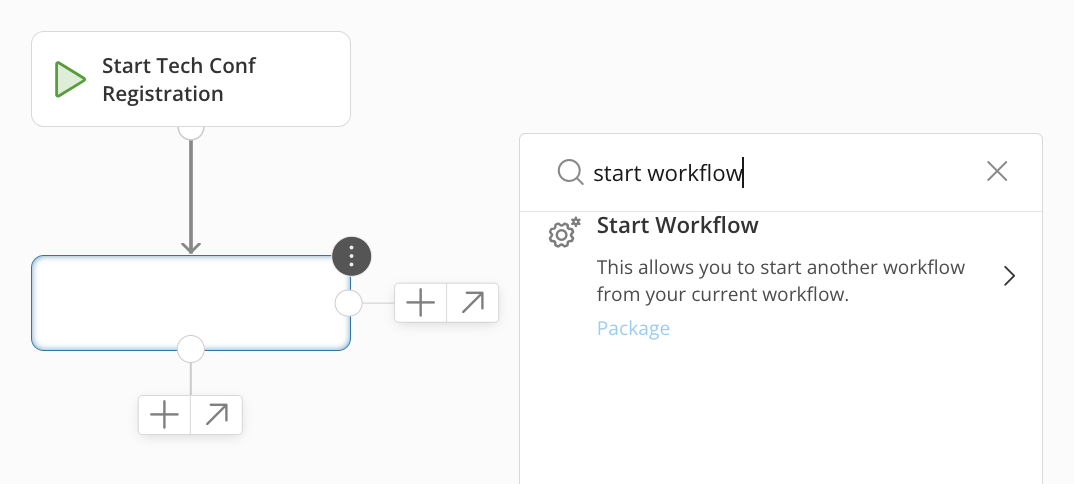
2. Add a step to start the target workflow.
   1. Search for "Start Workflow" in the search bar of the action menu.

      <Frame>
        <img alt="" src="https://mintcdn.com/domoinc-openapi-sync-dataflows/t-REVUfgwLiw_Ine/images/kb/ka0Vq0000009THK-00N5w00000Ri7BU-0EMVq000005ywr4.jpg?fit=max&auto=format&n=t-REVUfgwLiw_Ine&q=85&s=c6c3fc5cdf50582e93d3f6ae9a5427ee" style={{width: 499, height: 225}} width="1074" height="484" data-path="images/kb/ka0Vq0000009THK-00N5w00000Ri7BU-0EMVq000005ywr4.jpg" />
      </Frame>

   2. Select the **Start Workflow** package.

   3. Locate the target workflow in the function list and map the necessary parameters.

   4. Save your changes.
3. Deploy the triggering workflow.

   The workflow trigger displays in the **Triggers** tab for that workflow.

# Delete a Trigger

You can delete triggers from Alerts, App Studio, Pro-code apps, and Workflows from the feature where it was configured.

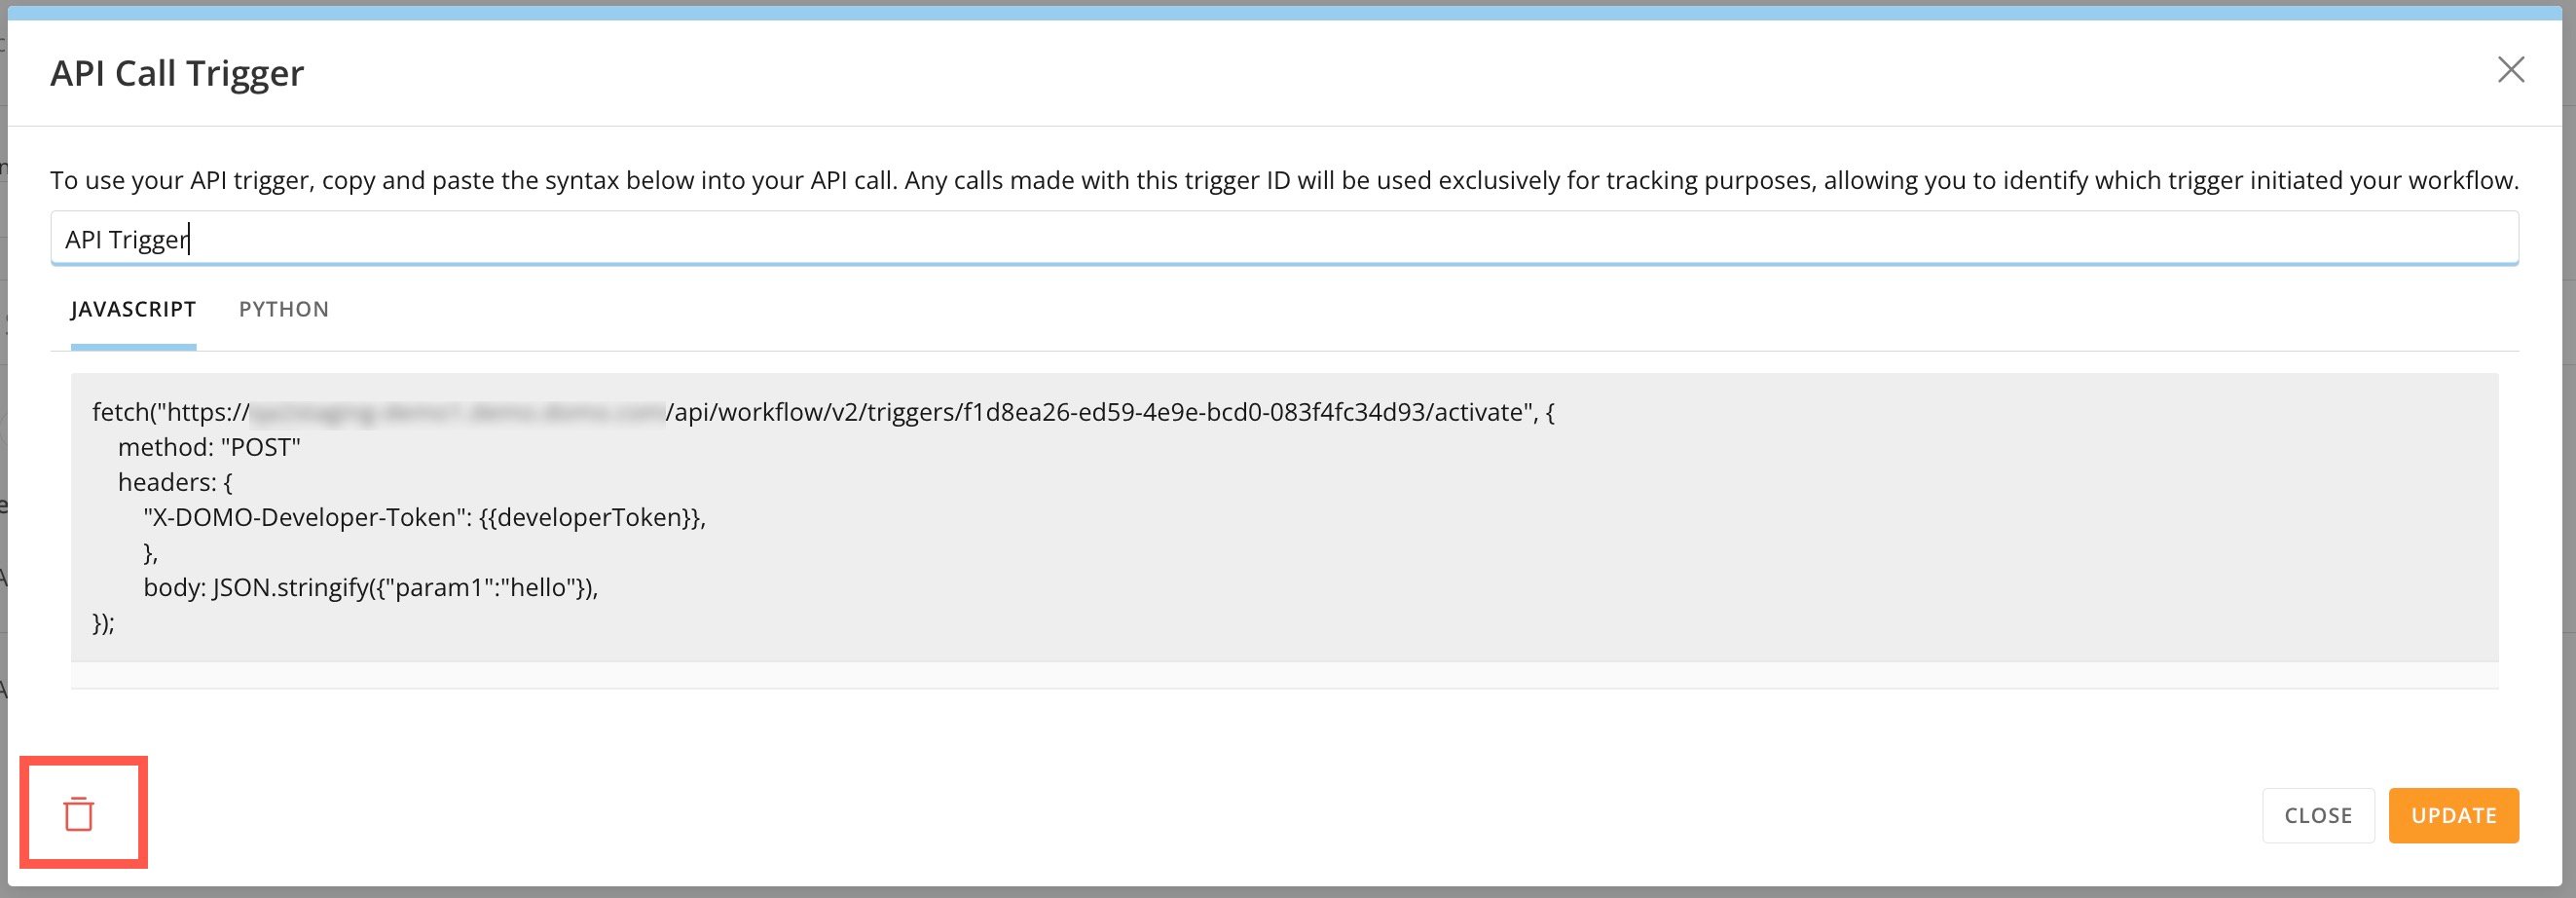
Delete a trigger from a timer or API call by using the <InlineImage src="/images/kb/ka0Vq0000009THK-00N5w00000Ri7BU-0EMVq000005yzKH.jpg" /> **Delete** (trash can icon) option in their configuration modals.
<Frame>
  <img alt="" src="https://mintcdn.com/domoinc-openapi-sync-dataflows/t-REVUfgwLiw_Ine/images/kb/ka0Vq0000009THK-00N5w00000Ri7BU-0EMVq000005yzSL.jpg?fit=max&auto=format&n=t-REVUfgwLiw_Ine&q=85&s=f6b620b23c4df565725e145b000ba113" style={{width: 700, height: 244}} width="2646" height="922" data-path="images/kb/ka0Vq0000009THK-00N5w00000Ri7BU-0EMVq000005yzSL.jpg" />
</Frame>

### View Workflow Executions

Owners and those with Admin [permission](#manage_permissions) can view a workflow's executions. Others can see or edit the workflow's executions if they have View Execution List and/or Edit Execution Details permission to the workflow.

From the Workflows home, select **More** (horizontal three-dot icon) > <InlineImage src="/images/kb/ka0Vq0000009THK-00N5w00000Ri7BU-0EMVq000001n7m9.jpg" /> **Go to Executions List**.
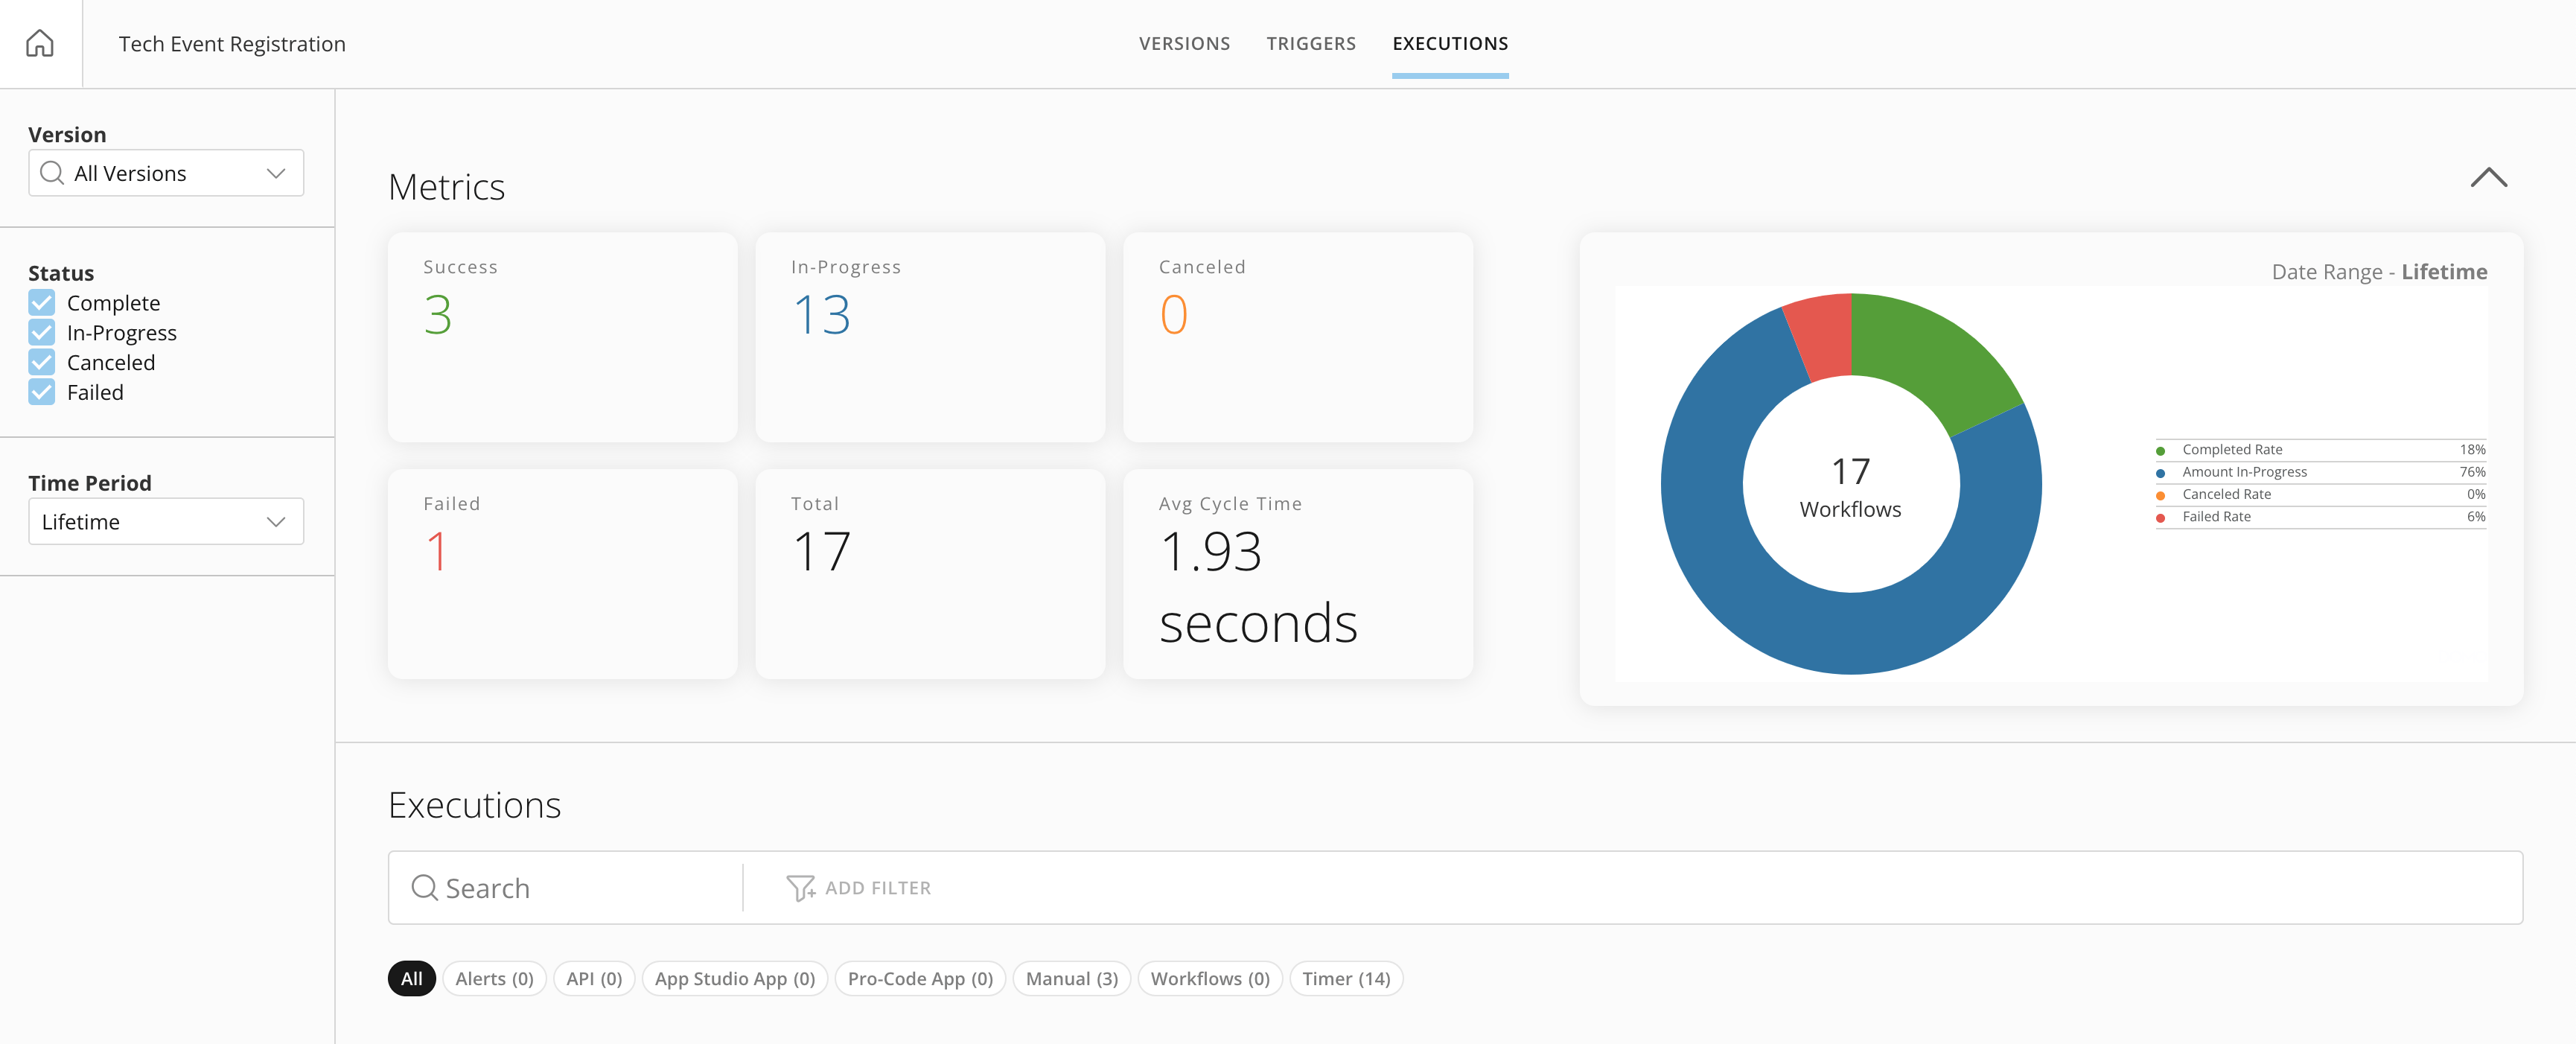
The **Executions** tab displays.

The **Executions** tab includes a filter panel to sort executions by version, status, and time period; metrics tiles; and a pie chart that visually represents the metrics as percentages.

<Frame>
  <img alt="" src="https://mintcdn.com/domoinc-openapi-sync-dataflows/t-REVUfgwLiw_Ine/images/kb/ka0Vq0000009THK-00N5w00000Ri7BU-0EMVq000005UwtJ.jpg?fit=max&auto=format&n=t-REVUfgwLiw_Ine&q=85&s=4fa107ae07d4a31c36d7a82537effd31" style={{width: 899, height: 364}} width="3460" height="1402" data-path="images/kb/ka0Vq0000009THK-00N5w00000Ri7BU-0EMVq000005UwtJ.jpg" />
</Frame>

<Warning>
  **Important:**

  * The default value for the
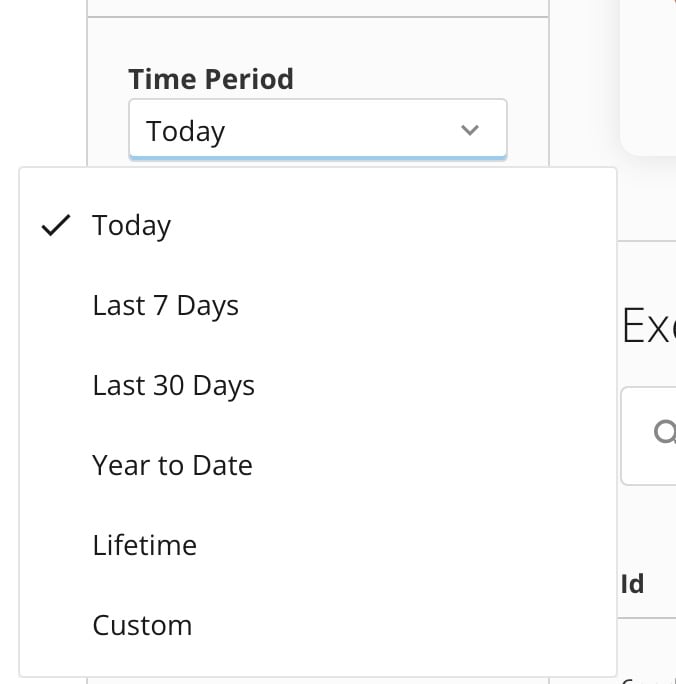
    **Time Period** filter is `Today.` If you are not seeing the expected results in your **Executions** tab and visuals, check the time period value.

  <Frame>
    <img alt="time period filter.jpg" src="https://mintcdn.com/domoinc-openapi-sync-dataflows/t-REVUfgwLiw_Ine/images/kb/ka0Vq0000009THK-00N5w00000Ri7BU-0EMVq000001n96P.jpg?fit=max&auto=format&n=t-REVUfgwLiw_Ine&q=85&s=0b9b7d697102bad14bab8d9e3ea4c1db" style={{width: 301, height: 305}} width="676" height="684" data-path="images/kb/ka0Vq0000009THK-00N5w00000Ri7BU-0EMVq000001n96P.jpg" />
  </Frame>

  * Choosing to filter by a longer time period may require more time to return results.
</Warning>

# Cancel Workflows in Bulk

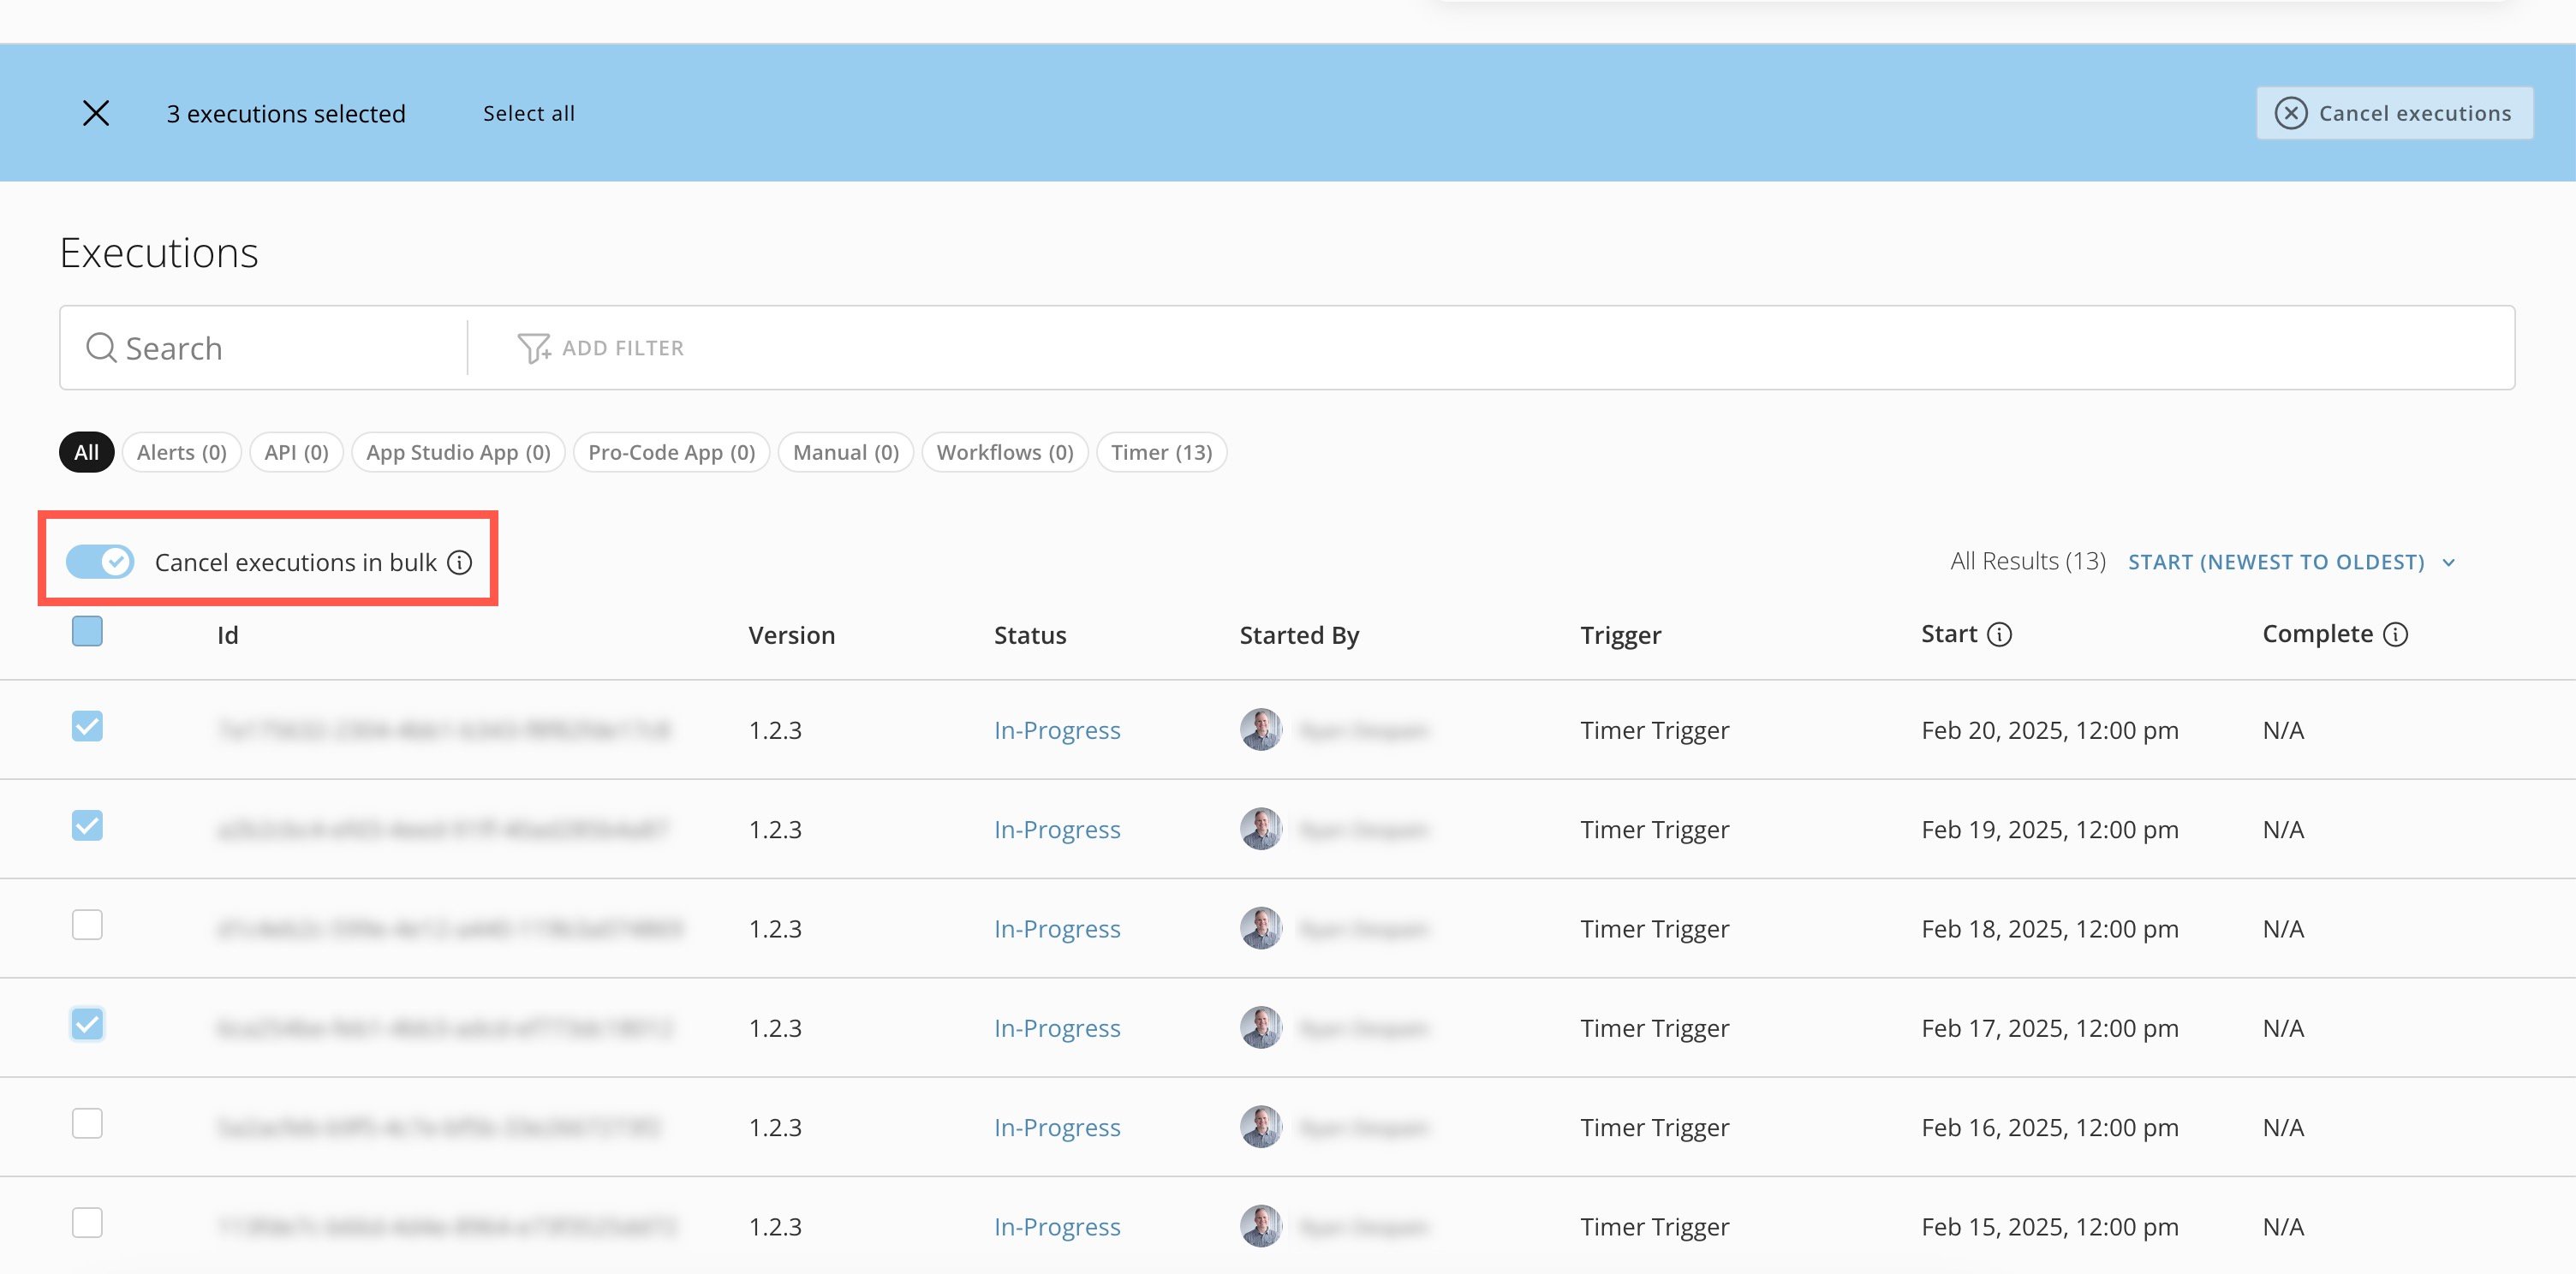
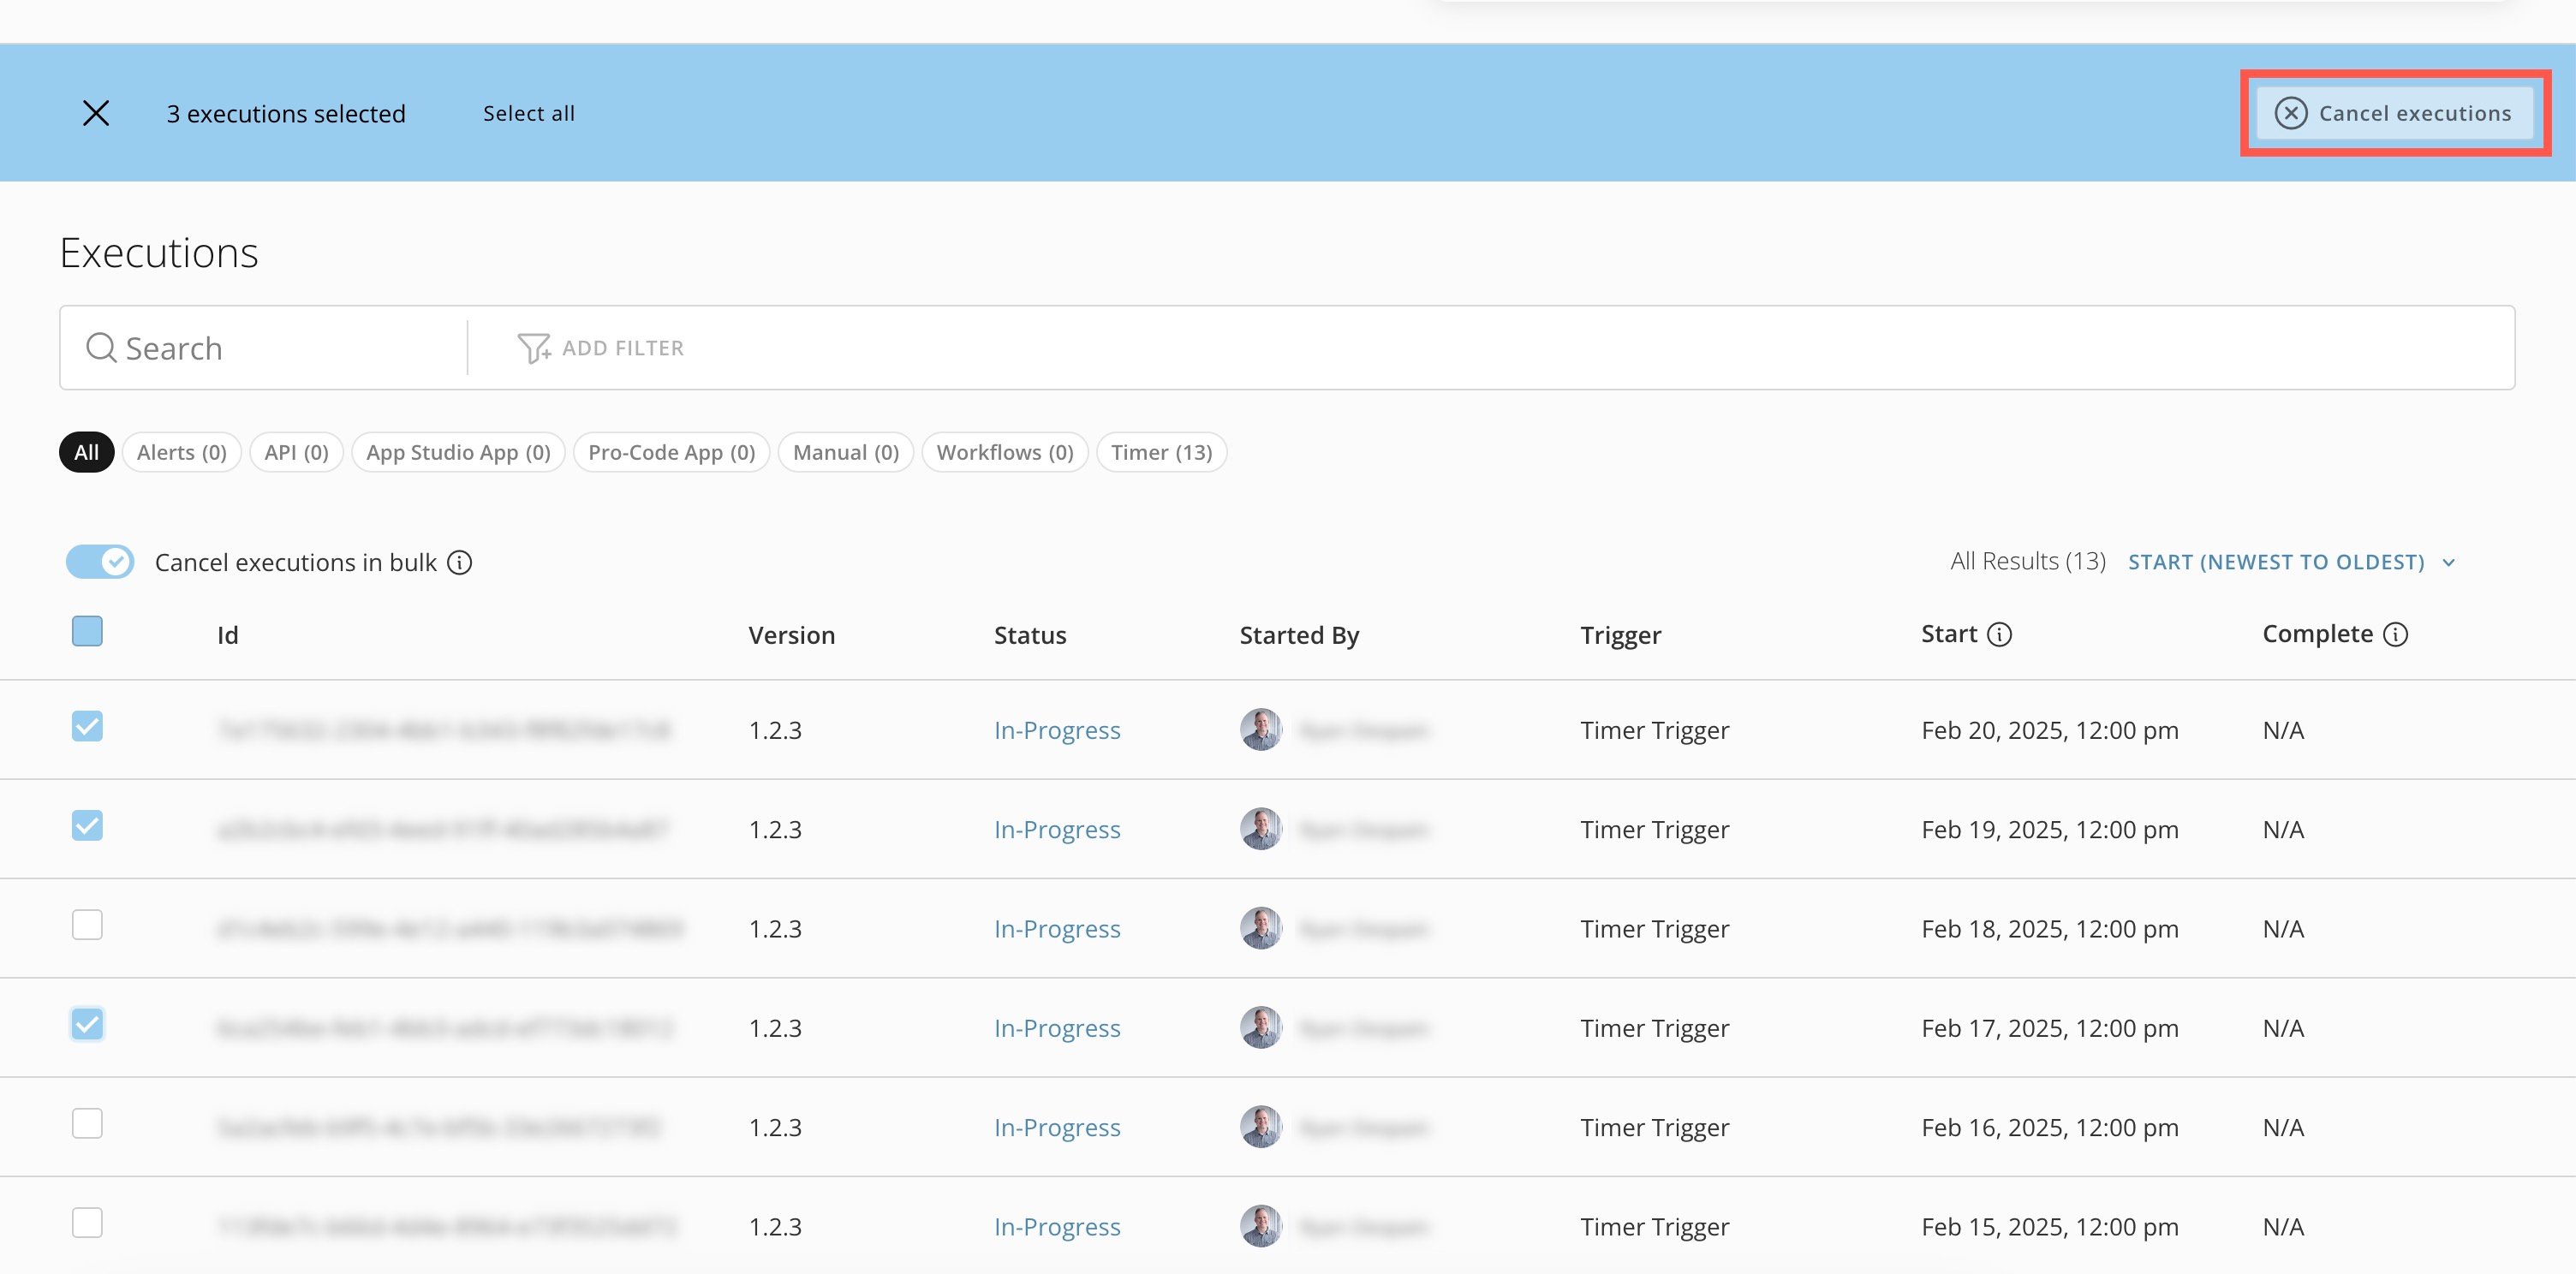
To cancel multiple in-progress or failed workflow executions at a time in the **Executions** tab, toggle the switch labeled **Cancel executions in bulk**. You can't change the status of a canceled workflow.

<Frame>
  <img alt="" src="https://mintcdn.com/domoinc-openapi-sync-dataflows/t-REVUfgwLiw_Ine/images/kb/ka0Vq0000009THK-00N5w00000Ri7BU-0EMVq000005UvR0.jpg?fit=max&auto=format&n=t-REVUfgwLiw_Ine&q=85&s=3d4ba6e43a81af86c027d7e0ed6aabe6" style={{width: 900, height: 445}} width="3008" height="1488" data-path="images/kb/ka0Vq0000009THK-00N5w00000Ri7BU-0EMVq000005UvR0.jpg" />
</Frame>

Check the box for each workflow you want to cancel, or check the top box to "select all." Then select **Cancel executions**.

**Note:** The more workflows you cancel, the longer the request takes to process.
<Frame>
  <img alt="" src="https://mintcdn.com/domoinc-openapi-sync-dataflows/t-REVUfgwLiw_Ine/images/kb/ka0Vq0000009THK-00N5w00000Ri7BU-0EMVq000005UxxR.jpg?fit=max&auto=format&n=t-REVUfgwLiw_Ine&q=85&s=643b320554724ed10342150cbec05cb3" style={{width: 900, height: 445}} width="3008" height="1488" data-path="images/kb/ka0Vq0000009THK-00N5w00000Ri7BU-0EMVq000005UxxR.jpg" />
</Frame>

# Review Execution Details

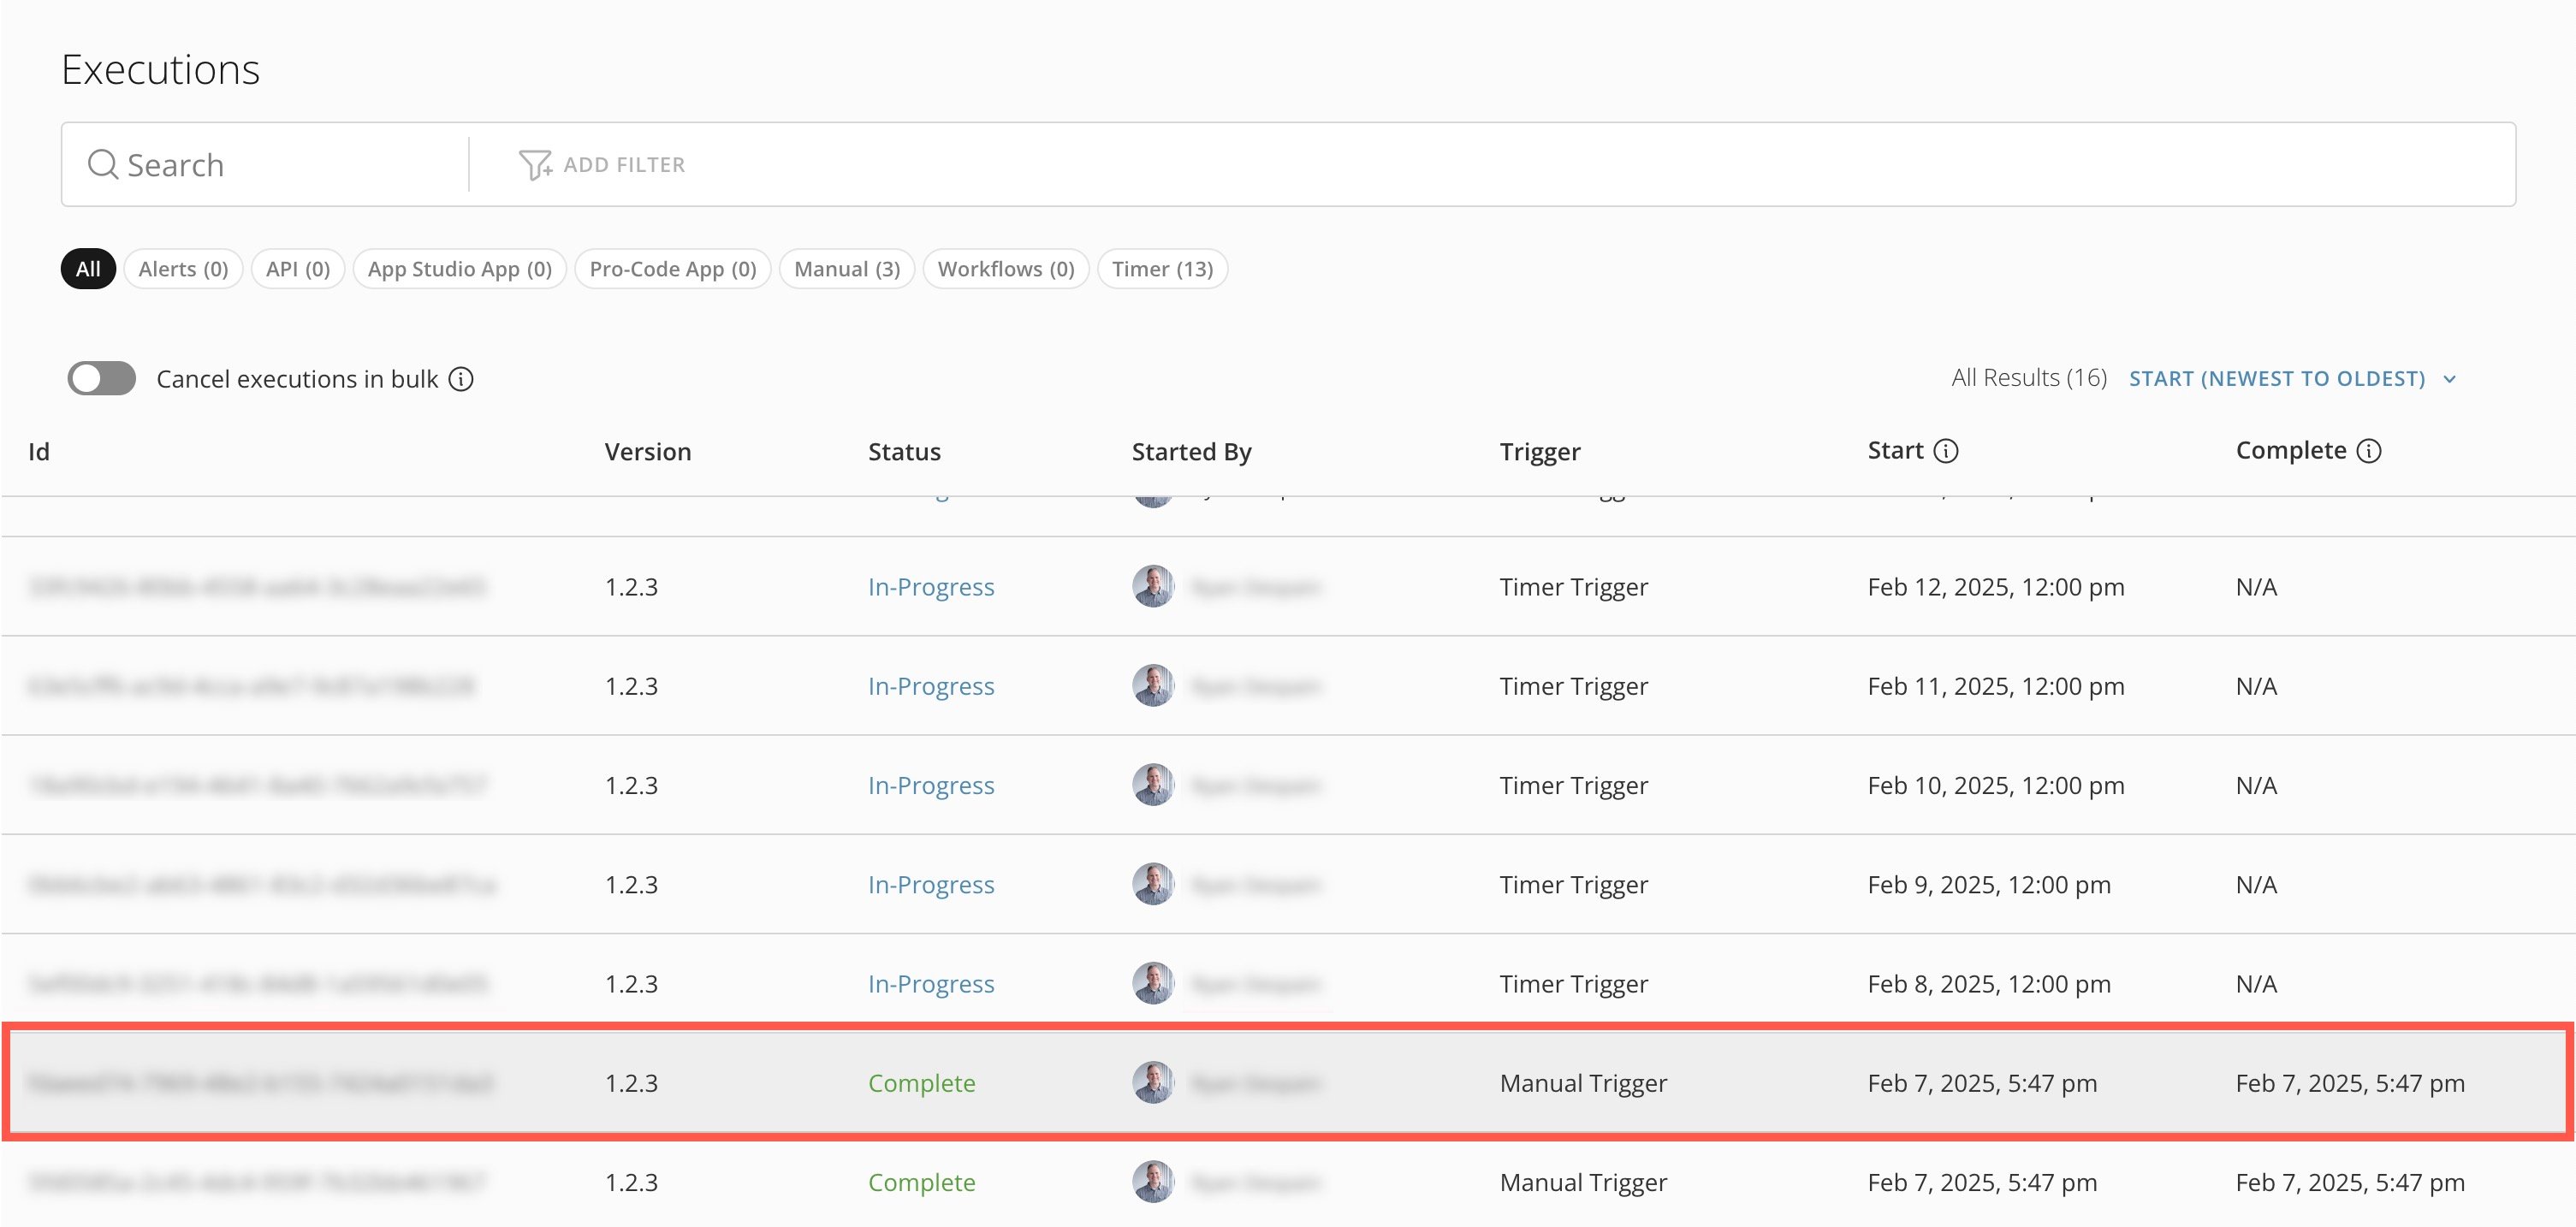
If you have View Execution List [permission](#manage_permissions) to the workflow, you can select an execution from the **Executions** tab to view details about it, like how long a certain shape took to execute or the shape where the execution failed.
<Frame>
  <img alt="" src="https://mintcdn.com/domoinc-openapi-sync-dataflows/t-REVUfgwLiw_Ine/images/kb/ka0Vq0000009THK-00N5w00000Ri7BU-0EMVq000005UylR.jpg?fit=max&auto=format&n=t-REVUfgwLiw_Ine&q=85&s=2df736f97cf6f688e89fb26f172d17ea" style={{width: 897, height: 427}} width="3010" height="1434" data-path="images/kb/ka0Vq0000009THK-00N5w00000Ri7BU-0EMVq000005UylR.jpg" />
</Frame>

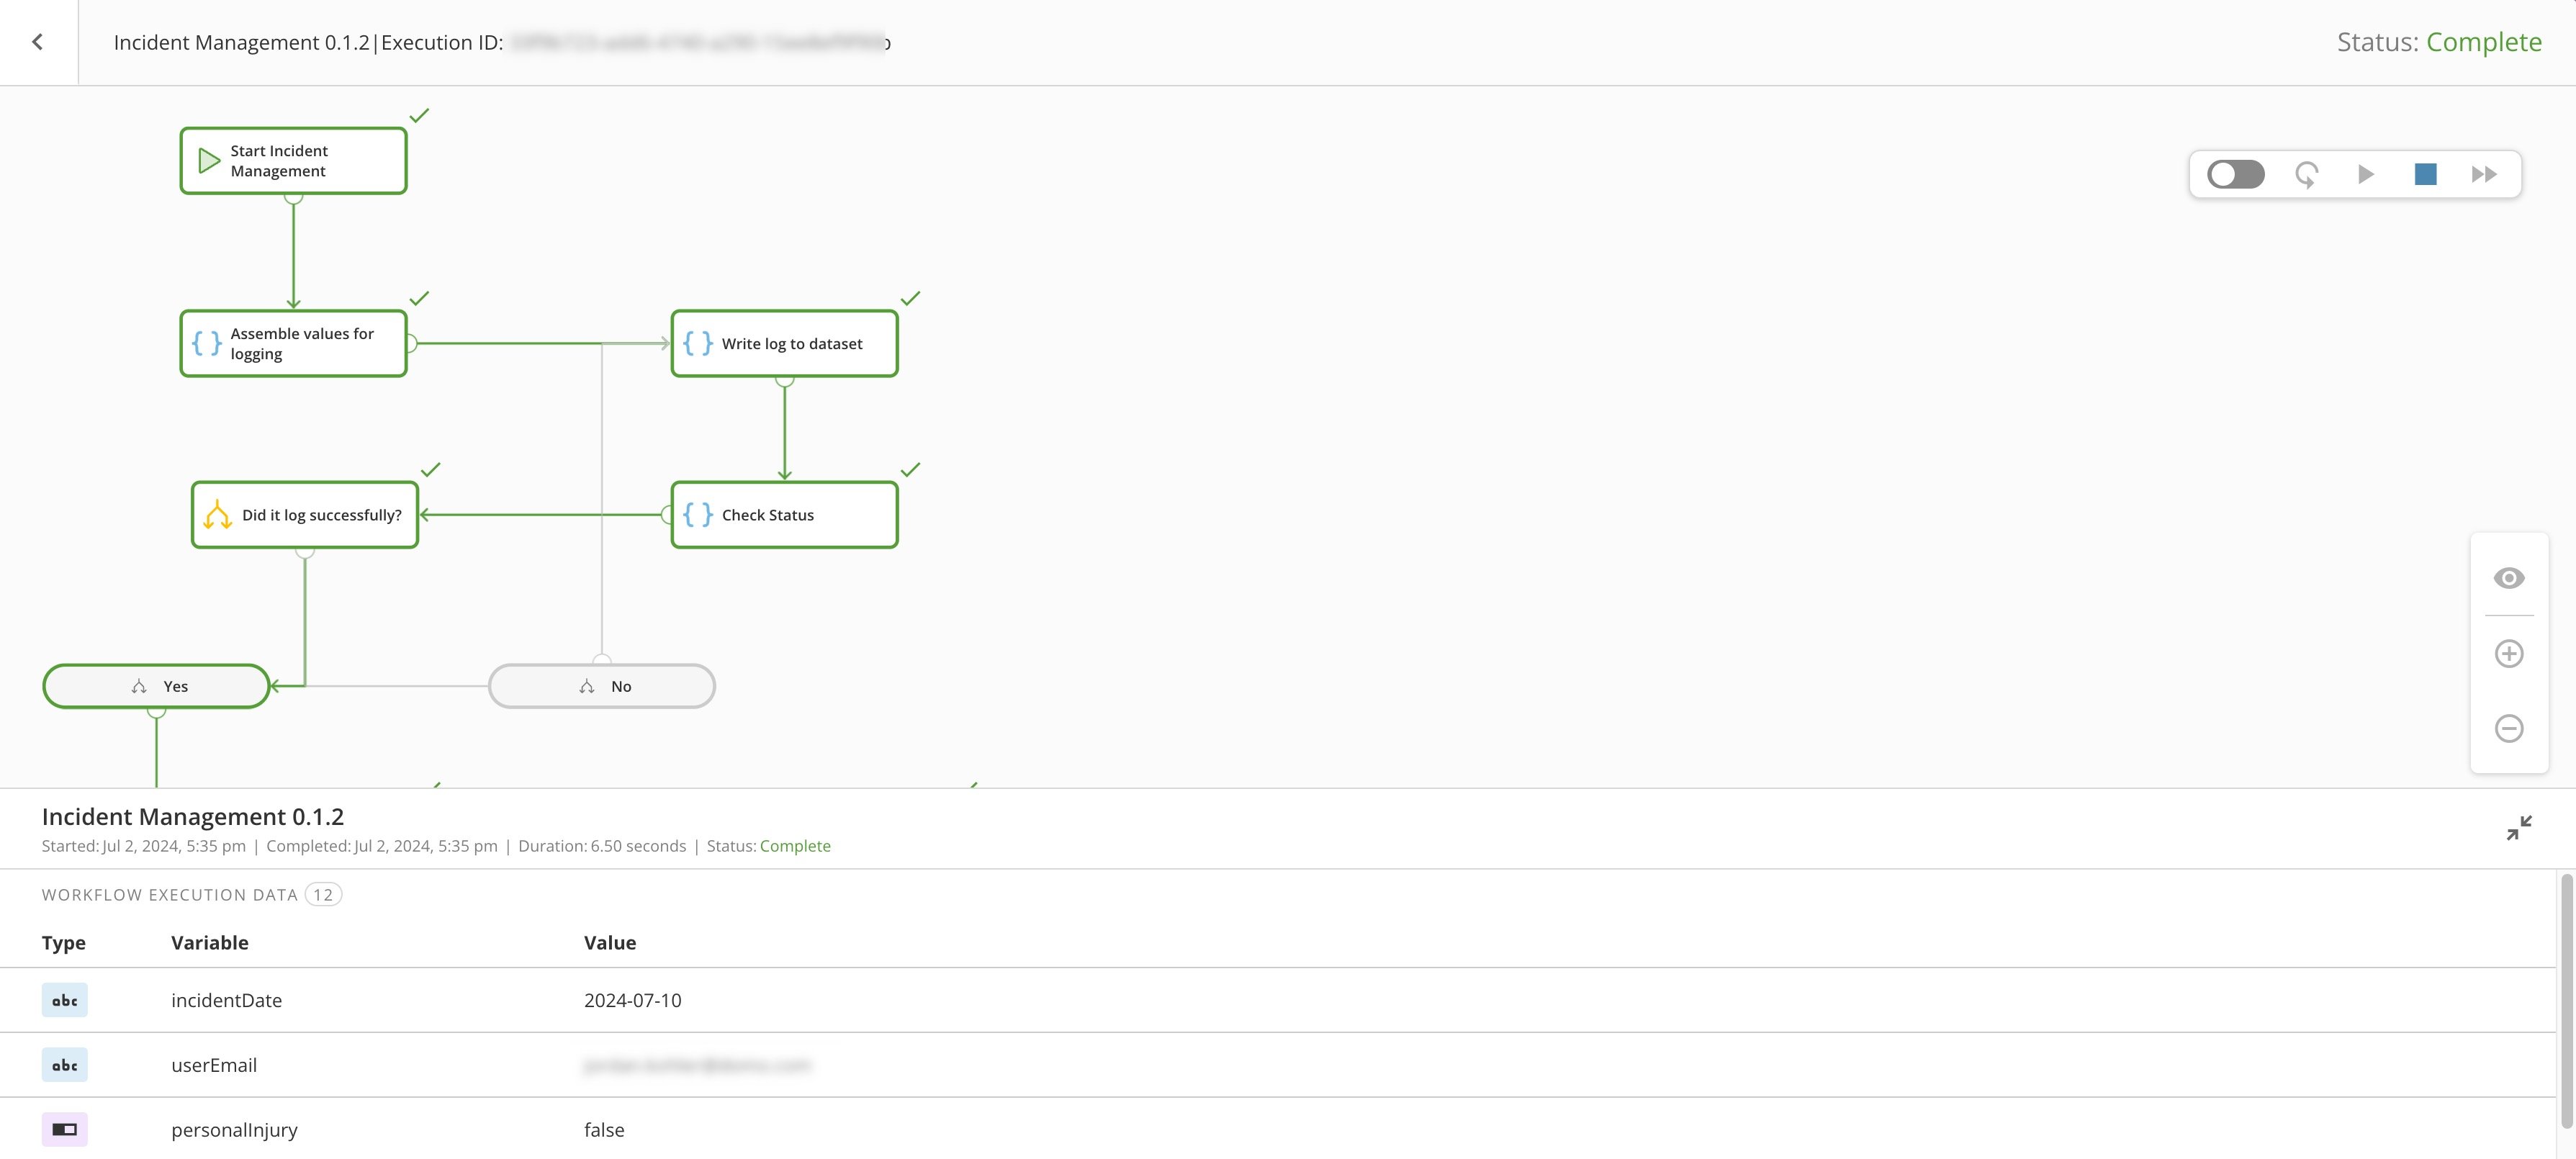
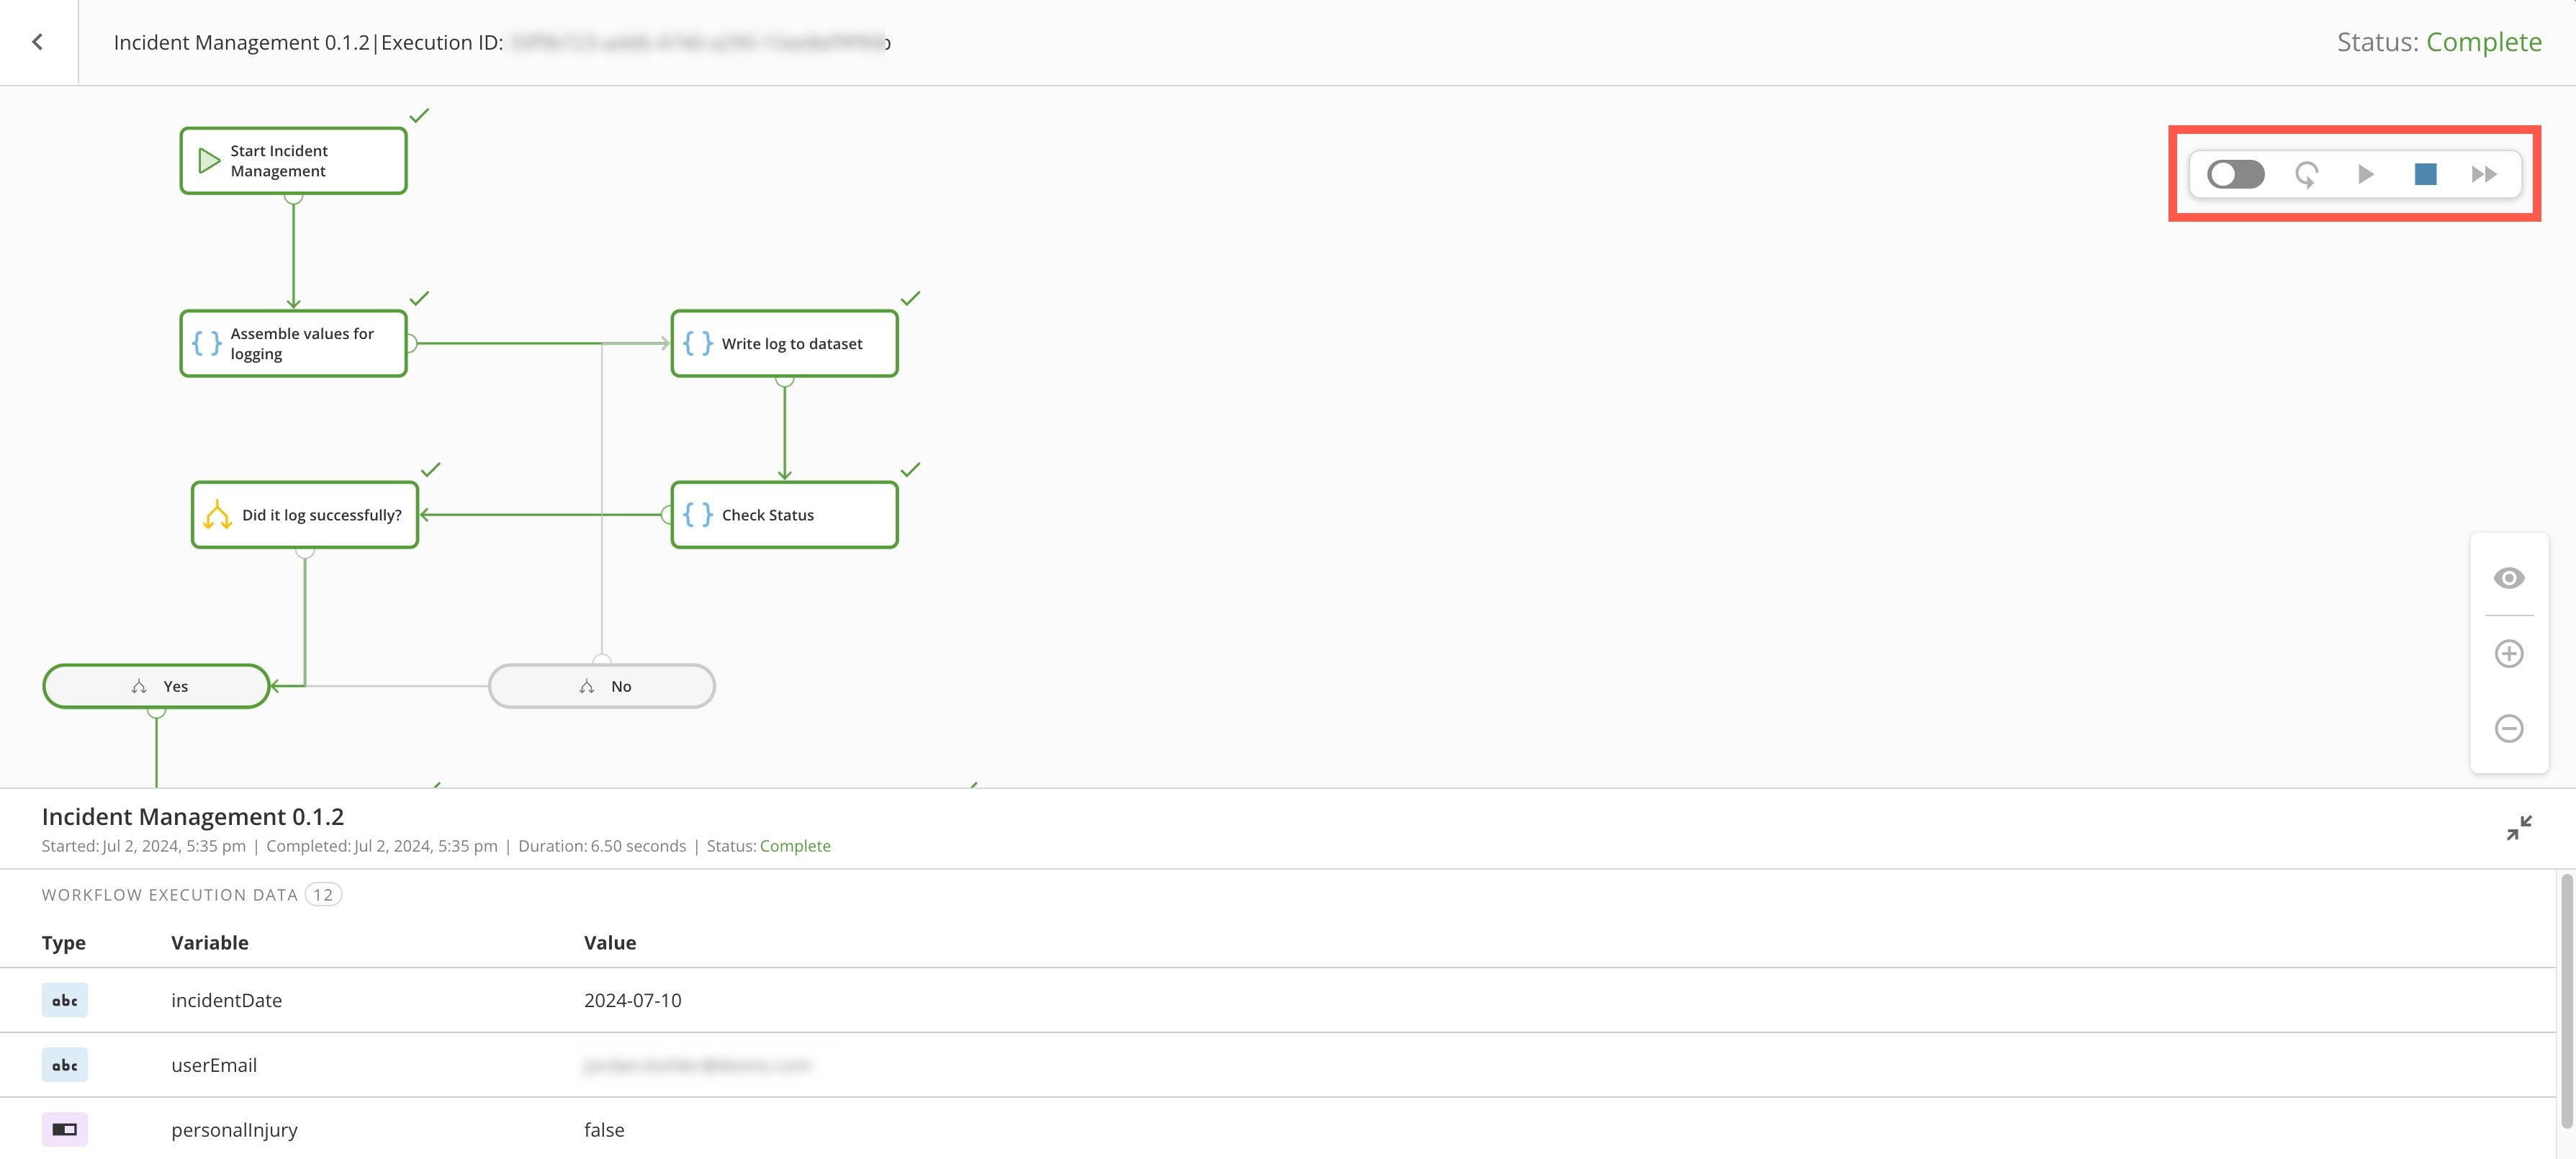
The execution details display in the Workflows canvas, which includes the execution's current status, [playback controls](#playback_controls), and a resizable data panel at the bottom of the screen.

Executed workflows can have one of the following four statuses:

* Complete
* In Progress
* Canceled
* Failed

On the canvas, completed shapes display outlined in green, and any shape currently in progress is outlined in blue. If the execution was stopped before one or more shapes completed, the execution status is Canceled; if any shapes failed before completing, they are outlined in red and the execution status is Failed.
<Note>
  **Iterations:** If a shape completed more than once, a badge on the shape displays the number of times it completed during the execution. If the shape completes only once, no number displays.

  <Frame>
    <img alt="execution details.jpg" src="https://mintcdn.com/domoinc-openapi-sync-dataflows/t-REVUfgwLiw_Ine/images/kb/ka0Vq0000009THK-00N5w00000Ri7BU-0EMVq000001gWkU.jpg?fit=max&auto=format&n=t-REVUfgwLiw_Ine&q=85&s=bf6486b6e5a6ed597add52c903a42d43" style={{width: 900, height: 405}} width="3578" height="1610" data-path="images/kb/ka0Vq0000009THK-00N5w00000Ri7BU-0EMVq000001gWkU.jpg" />
  </Frame>
</Note>

#### Use Playback Controls

You can use the playback controls to start and replay execution events.

<Frame>
  <img alt="playback controls.jpg" src="https://mintcdn.com/domoinc-openapi-sync-dataflows/t-REVUfgwLiw_Ine/images/kb/ka0Vq0000009THK-00N5w00000Ri7BU-0EMVq000001gXzt.jpg?fit=max&auto=format&n=t-REVUfgwLiw_Ine&q=85&s=ac0c06992a94977250a0a915090ad7f9" style={{width: 900, height: 405}} width="3578" height="1610" data-path="images/kb/ka0Vq0000009THK-00N5w00000Ri7BU-0EMVq000001gXzt.jpg" />
</Frame>

The following table describes the playback controls:

<table border="1" cellpadding="1" cellspacing="1" data-aura-rendered-by="33:208;a"><thead><tr><th colspan="1" rowspan="1"><p> Icon </p></th><th colspan="1" rowspan="1"><p> Control </p></th><th colspan="1" rowspan="1"><p> Description </p></th></tr></thead><tbody><tr><td colspan="1" rowspan="1"><p><img alt="toggle.jpg" src="https://mintcdn.com/domoinc-openapi-sync-dataflows/t-REVUfgwLiw_Ine/images/kb/ka0Vq0000009THK-00N5w00000Ri7BU-0EM5w000006uPIp.jpg?fit=max&auto=format&n=t-REVUfgwLiw_Ine&q=85&s=89b8e649904b9e03b59afe489e187abf" style={{width: 62, height: 32}} width="82" height="42" data-path="images/kb/ka0Vq0000009THK-00N5w00000Ri7BU-0EM5w000006uPIp.jpg" /></p></td><td colspan="1" rowspan="1"><p> Toggle </p></td><td colspan="1" rowspan="1"><p> Controls whether the screen begins to auto-play the execution or displays the furthest point reached in the flow. </p></td></tr><tr><td colspan="1" rowspan="1"><p><img alt="replay.jpg" src="https://mintcdn.com/domoinc-openapi-sync-dataflows/t-REVUfgwLiw_Ine/images/kb/ka0Vq0000009THK-00N5w00000Ri7BU-0EM5w000006uPIu.jpg?fit=max&auto=format&n=t-REVUfgwLiw_Ine&q=85&s=315e453b44182d5ad2c2232797a9d4bd" style={{width: 56, height: 41}} width="70" height="50" data-path="images/kb/ka0Vq0000009THK-00N5w00000Ri7BU-0EM5w000006uPIu.jpg" /></p></td><td colspan="1" rowspan="1"><p> Replay </p></td><td colspan="1" rowspan="1"><p> Replays the execution from the first start shape. </p></td></tr><tr><td colspan="1" rowspan="1"><p><img alt="play.jpg" src="https://mintcdn.com/domoinc-openapi-sync-dataflows/t-REVUfgwLiw_Ine/images/kb/ka0Vq0000009THK-00N5w00000Ri7BU-0EM5w000006uPJ4.jpg?fit=max&auto=format&n=t-REVUfgwLiw_Ine&q=85&s=ad743391a0682eca4b520e2c97c1d633" style={{width: 48, height: 48}} width="56" height="56" data-path="images/kb/ka0Vq0000009THK-00N5w00000Ri7BU-0EM5w000006uPJ4.jpg" /></p></td><td colspan="1" rowspan="1"><p> Play </p></td><td colspan="1" rowspan="1"><p> Plays or resumes the execution from the last stopped point. </p></td></tr><tr><td colspan="1" rowspan="1"><p><img alt="stop.jpg" src="https://mintcdn.com/domoinc-openapi-sync-dataflows/t-REVUfgwLiw_Ine/images/kb/ka0Vq0000009THK-00N5w00000Ri7BU-0EM5w000006uPJO.jpg?fit=max&auto=format&n=t-REVUfgwLiw_Ine&q=85&s=07f42d889c337bd103640c73ab5787c8" style={{width: 48, height: 48}} width="54" height="58" data-path="images/kb/ka0Vq0000009THK-00N5w00000Ri7BU-0EM5w000006uPJO.jpg" /></p></td><td colspan="1" rowspan="1"><p> Stop </p></td><td colspan="1" rowspan="1"><p /><p> Stops/pauses the execution playback. </p><p /></td></tr><tr><td colspan="1" rowspan="1"><p><img alt="fast forward.jpg" src="https://mintcdn.com/domoinc-openapi-sync-dataflows/t-REVUfgwLiw_Ine/images/kb/ka0Vq0000009THK-00N5w00000Ri7BU-0EM5w000006uPJT.jpg?fit=max&auto=format&n=t-REVUfgwLiw_Ine&q=85&s=e45989add05a6ea2e9b4188b64f236f0" style={{width: 56, height: 41}} width="58" height="52" data-path="images/kb/ka0Vq0000009THK-00N5w00000Ri7BU-0EM5w000006uPJT.jpg" /></p></td><td colspan="1" rowspan="1"><p> Fast Forward </p></td><td colspan="1" rowspan="1"><p> Increases the speed of playback. There are four speeds, and repeatedly selecting the button cycles through them. </p></td></tr></tbody></table>

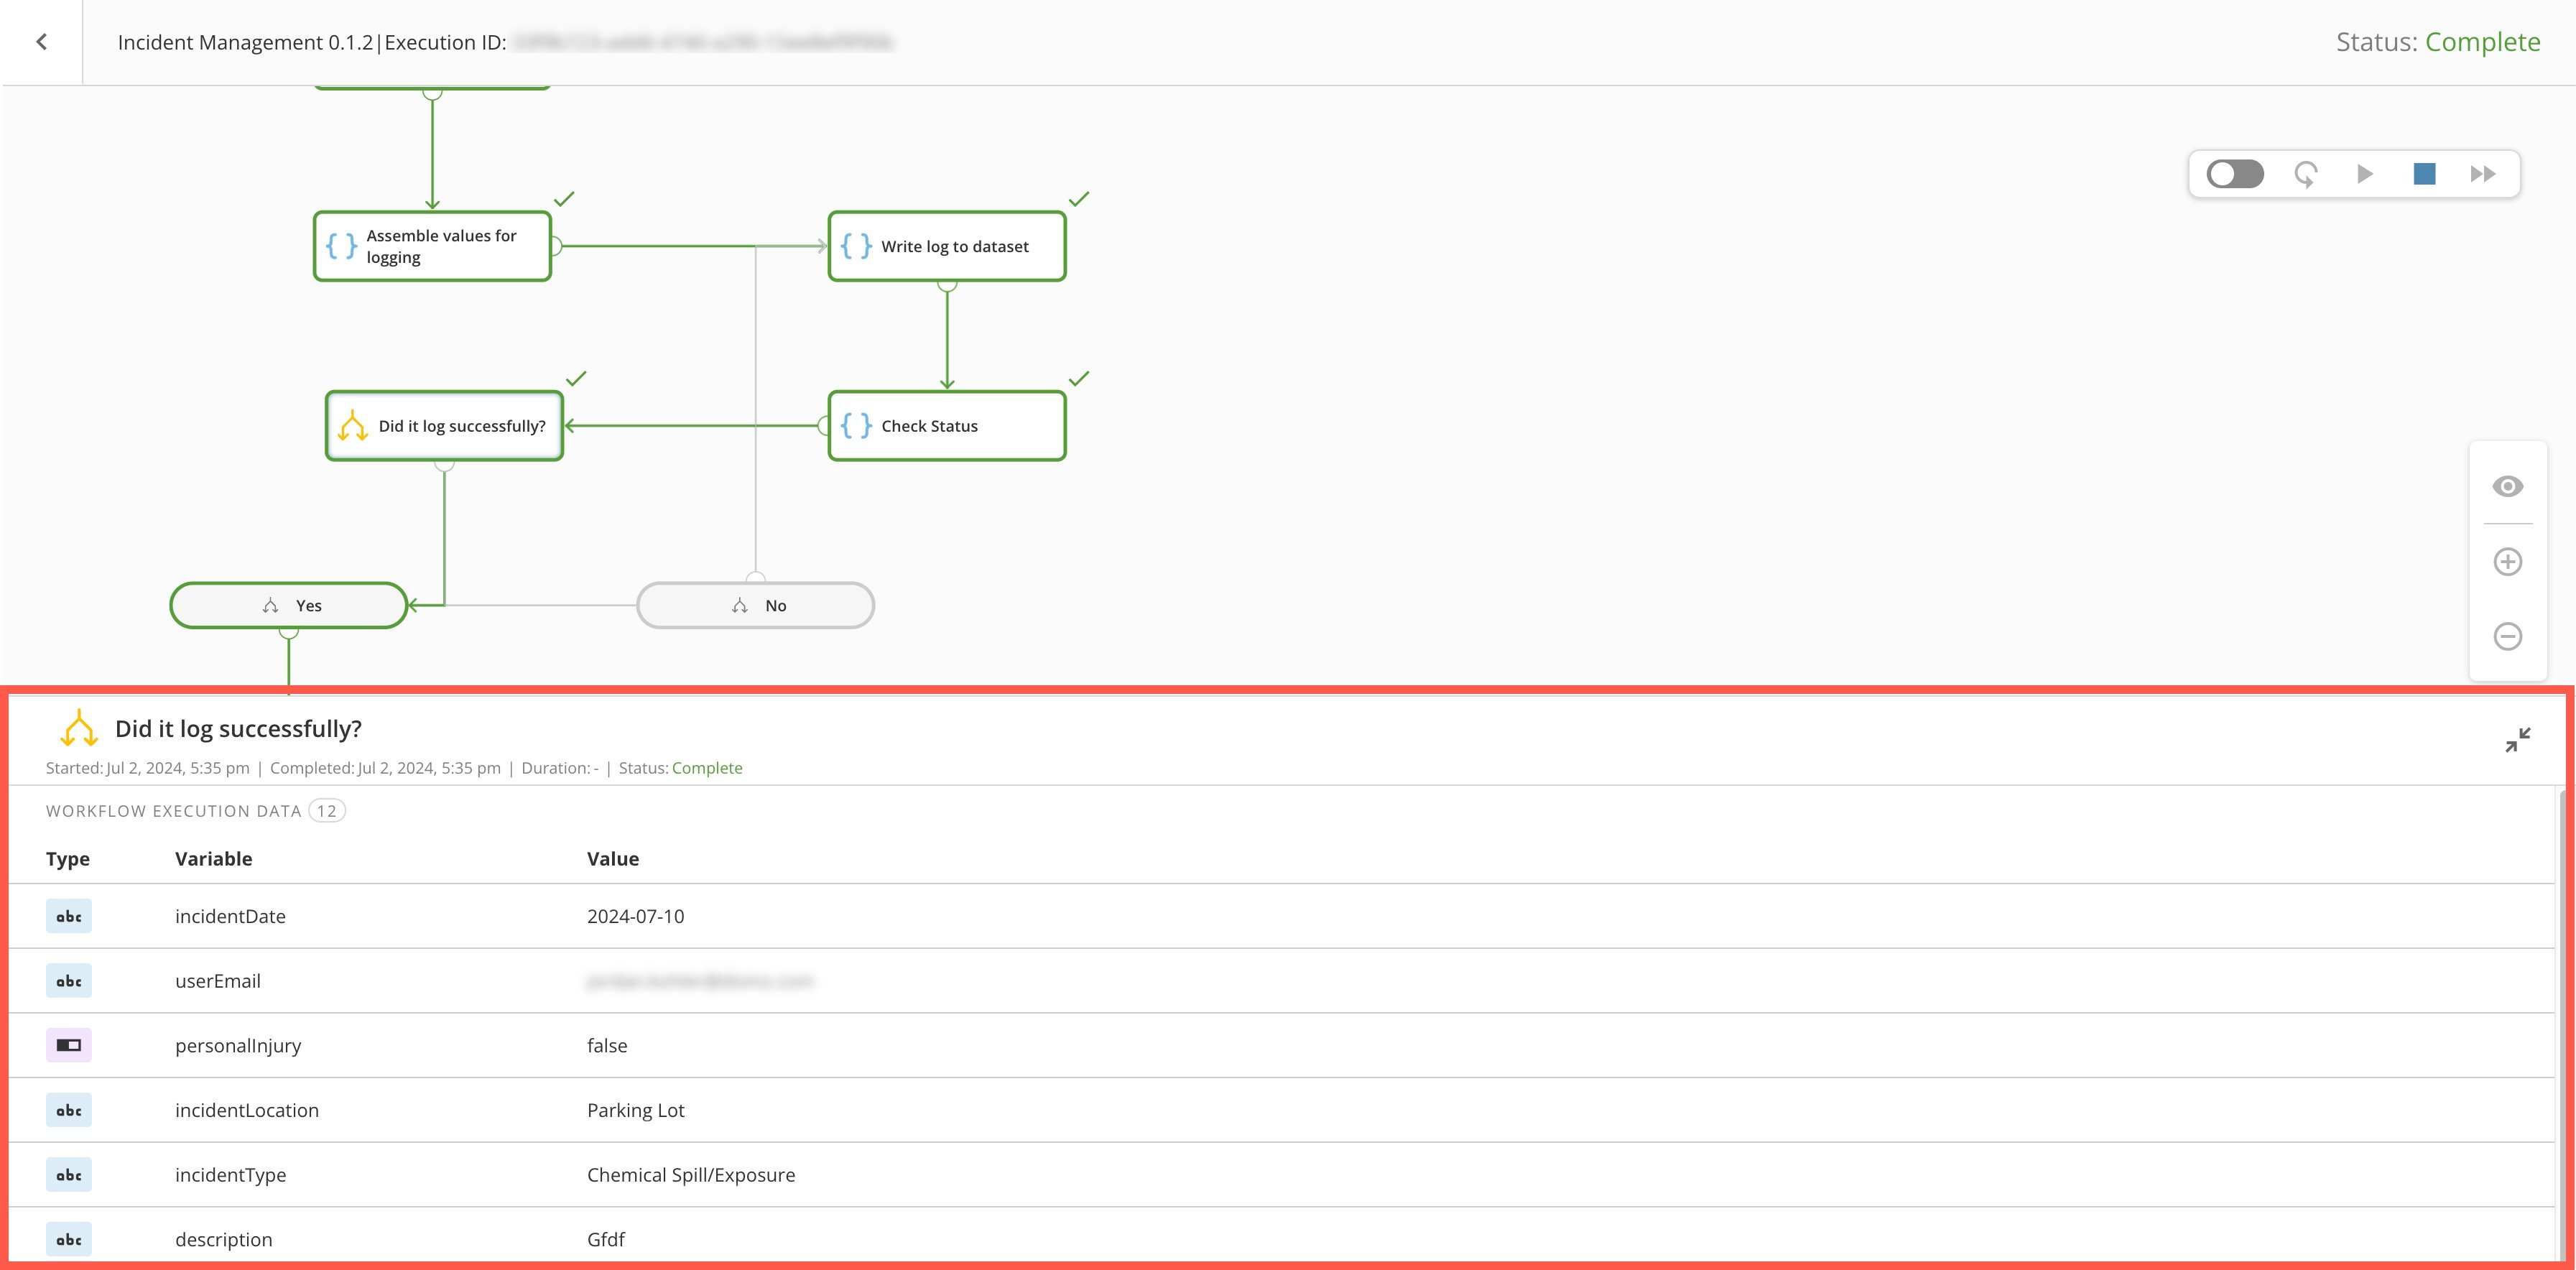
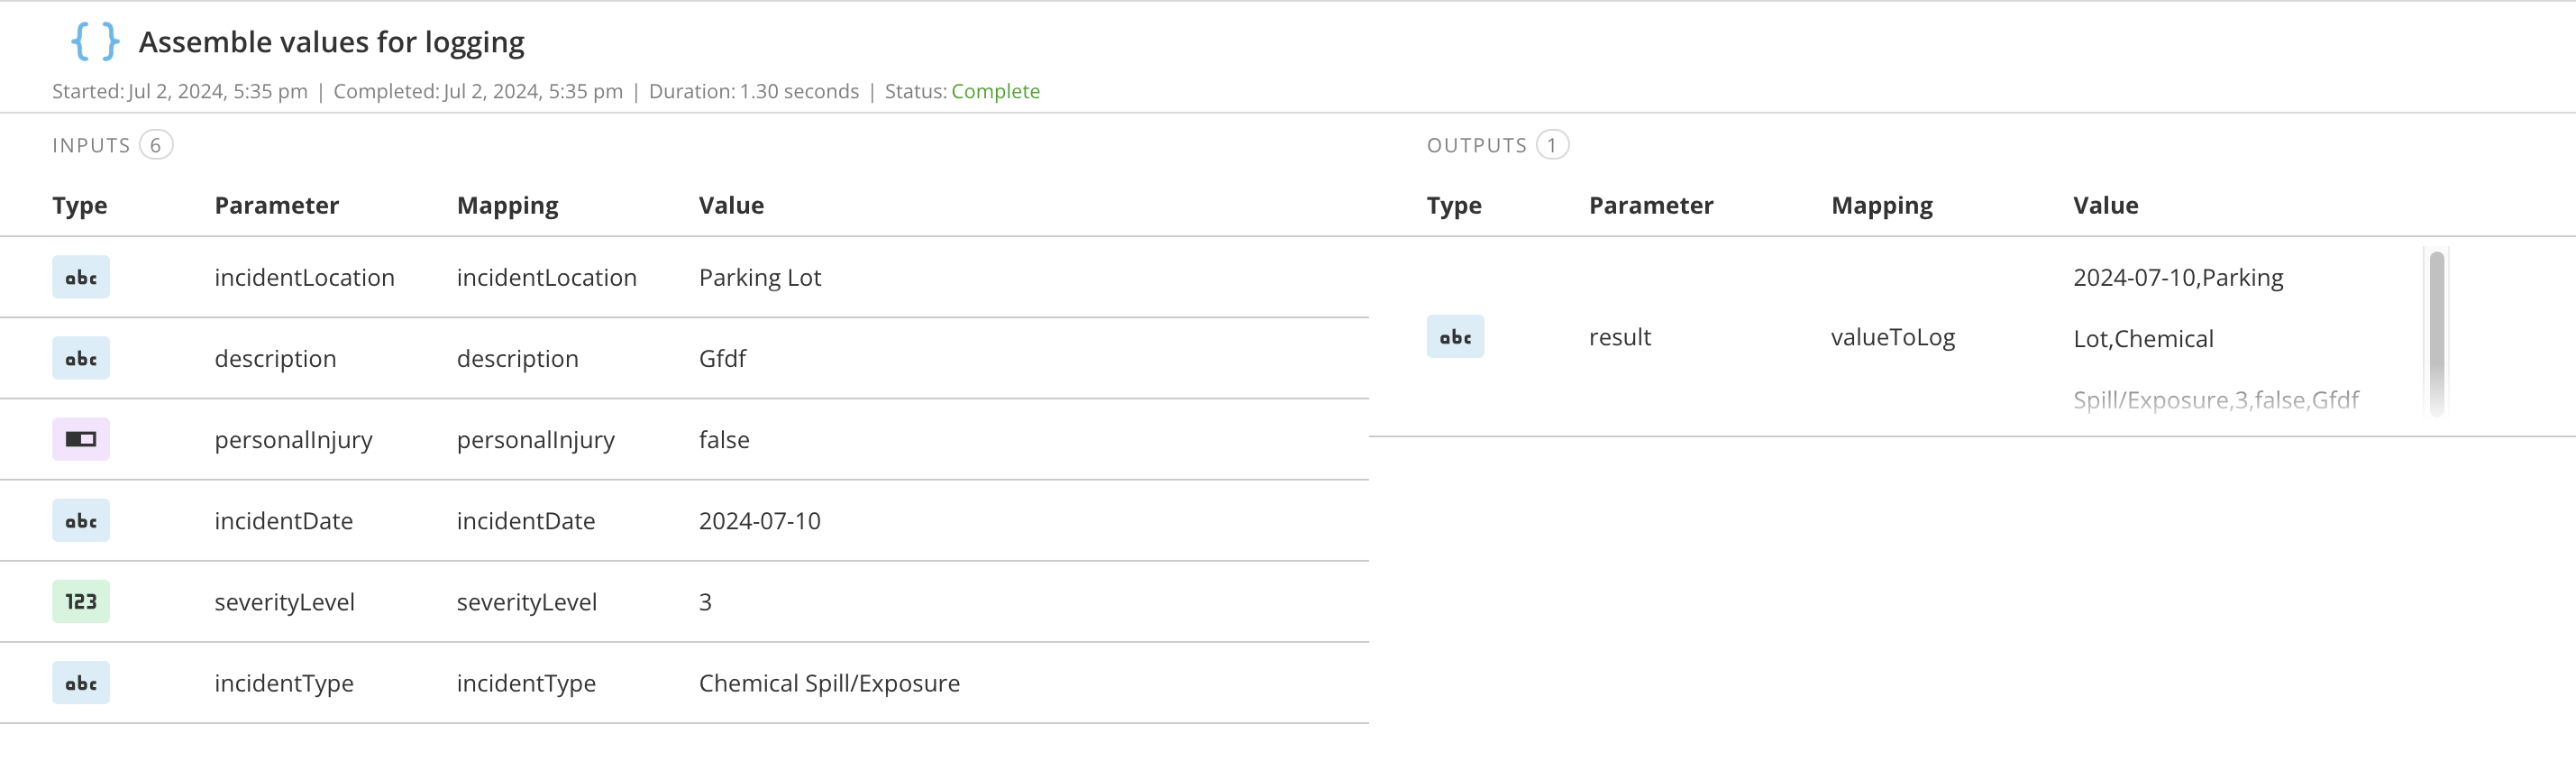
During and after playback, you can select a shape to review its execution data. Selecting a shape highlights it and opens the data panel, which displays the values used in the shape, the variable names with their types, and the actual values used.

<Frame>
  <img alt="data panel.jpg" src="https://mintcdn.com/domoinc-openapi-sync-dataflows/t-REVUfgwLiw_Ine/images/kb/ka0Vq0000009THK-00N5w00000Ri7BU-0EMVq000001gZYf.jpg?fit=max&auto=format&n=t-REVUfgwLiw_Ine&q=85&s=2f42f0a32dae5ad25292358dc84fdf48" style={{width: 900, height: 444}} width="3586" height="1768" data-path="images/kb/ka0Vq0000009THK-00N5w00000Ri7BU-0EMVq000001gZYf.jpg" />
</Frame>

User Tasks and Code Functions display inputs and outputs, while other shapes display the actual values of the variables when the shape was activated.
<Frame>
  <img alt="Screenshot 2024-07-09 at 11.48.22 AM.png" src="https://mintcdn.com/domoinc-openapi-sync-dataflows/t-REVUfgwLiw_Ine/images/kb/ka0Vq0000009THK-00N5w00000Ri7BU-0EMVq000001ga89.jpg?fit=max&auto=format&n=t-REVUfgwLiw_Ine&q=85&s=26c2ff277fc6d60c6430692efcbf9d48" style={{width: 900, height: 269}} width="2858" height="854" data-path="images/kb/ka0Vq0000009THK-00N5w00000Ri7BU-0EMVq000001ga89.jpg" />
</Frame>

For shapes that were activated multiple times, you can page through the iterations in the data panel to see the data for each iteration.

### Recover/Retry an Execution

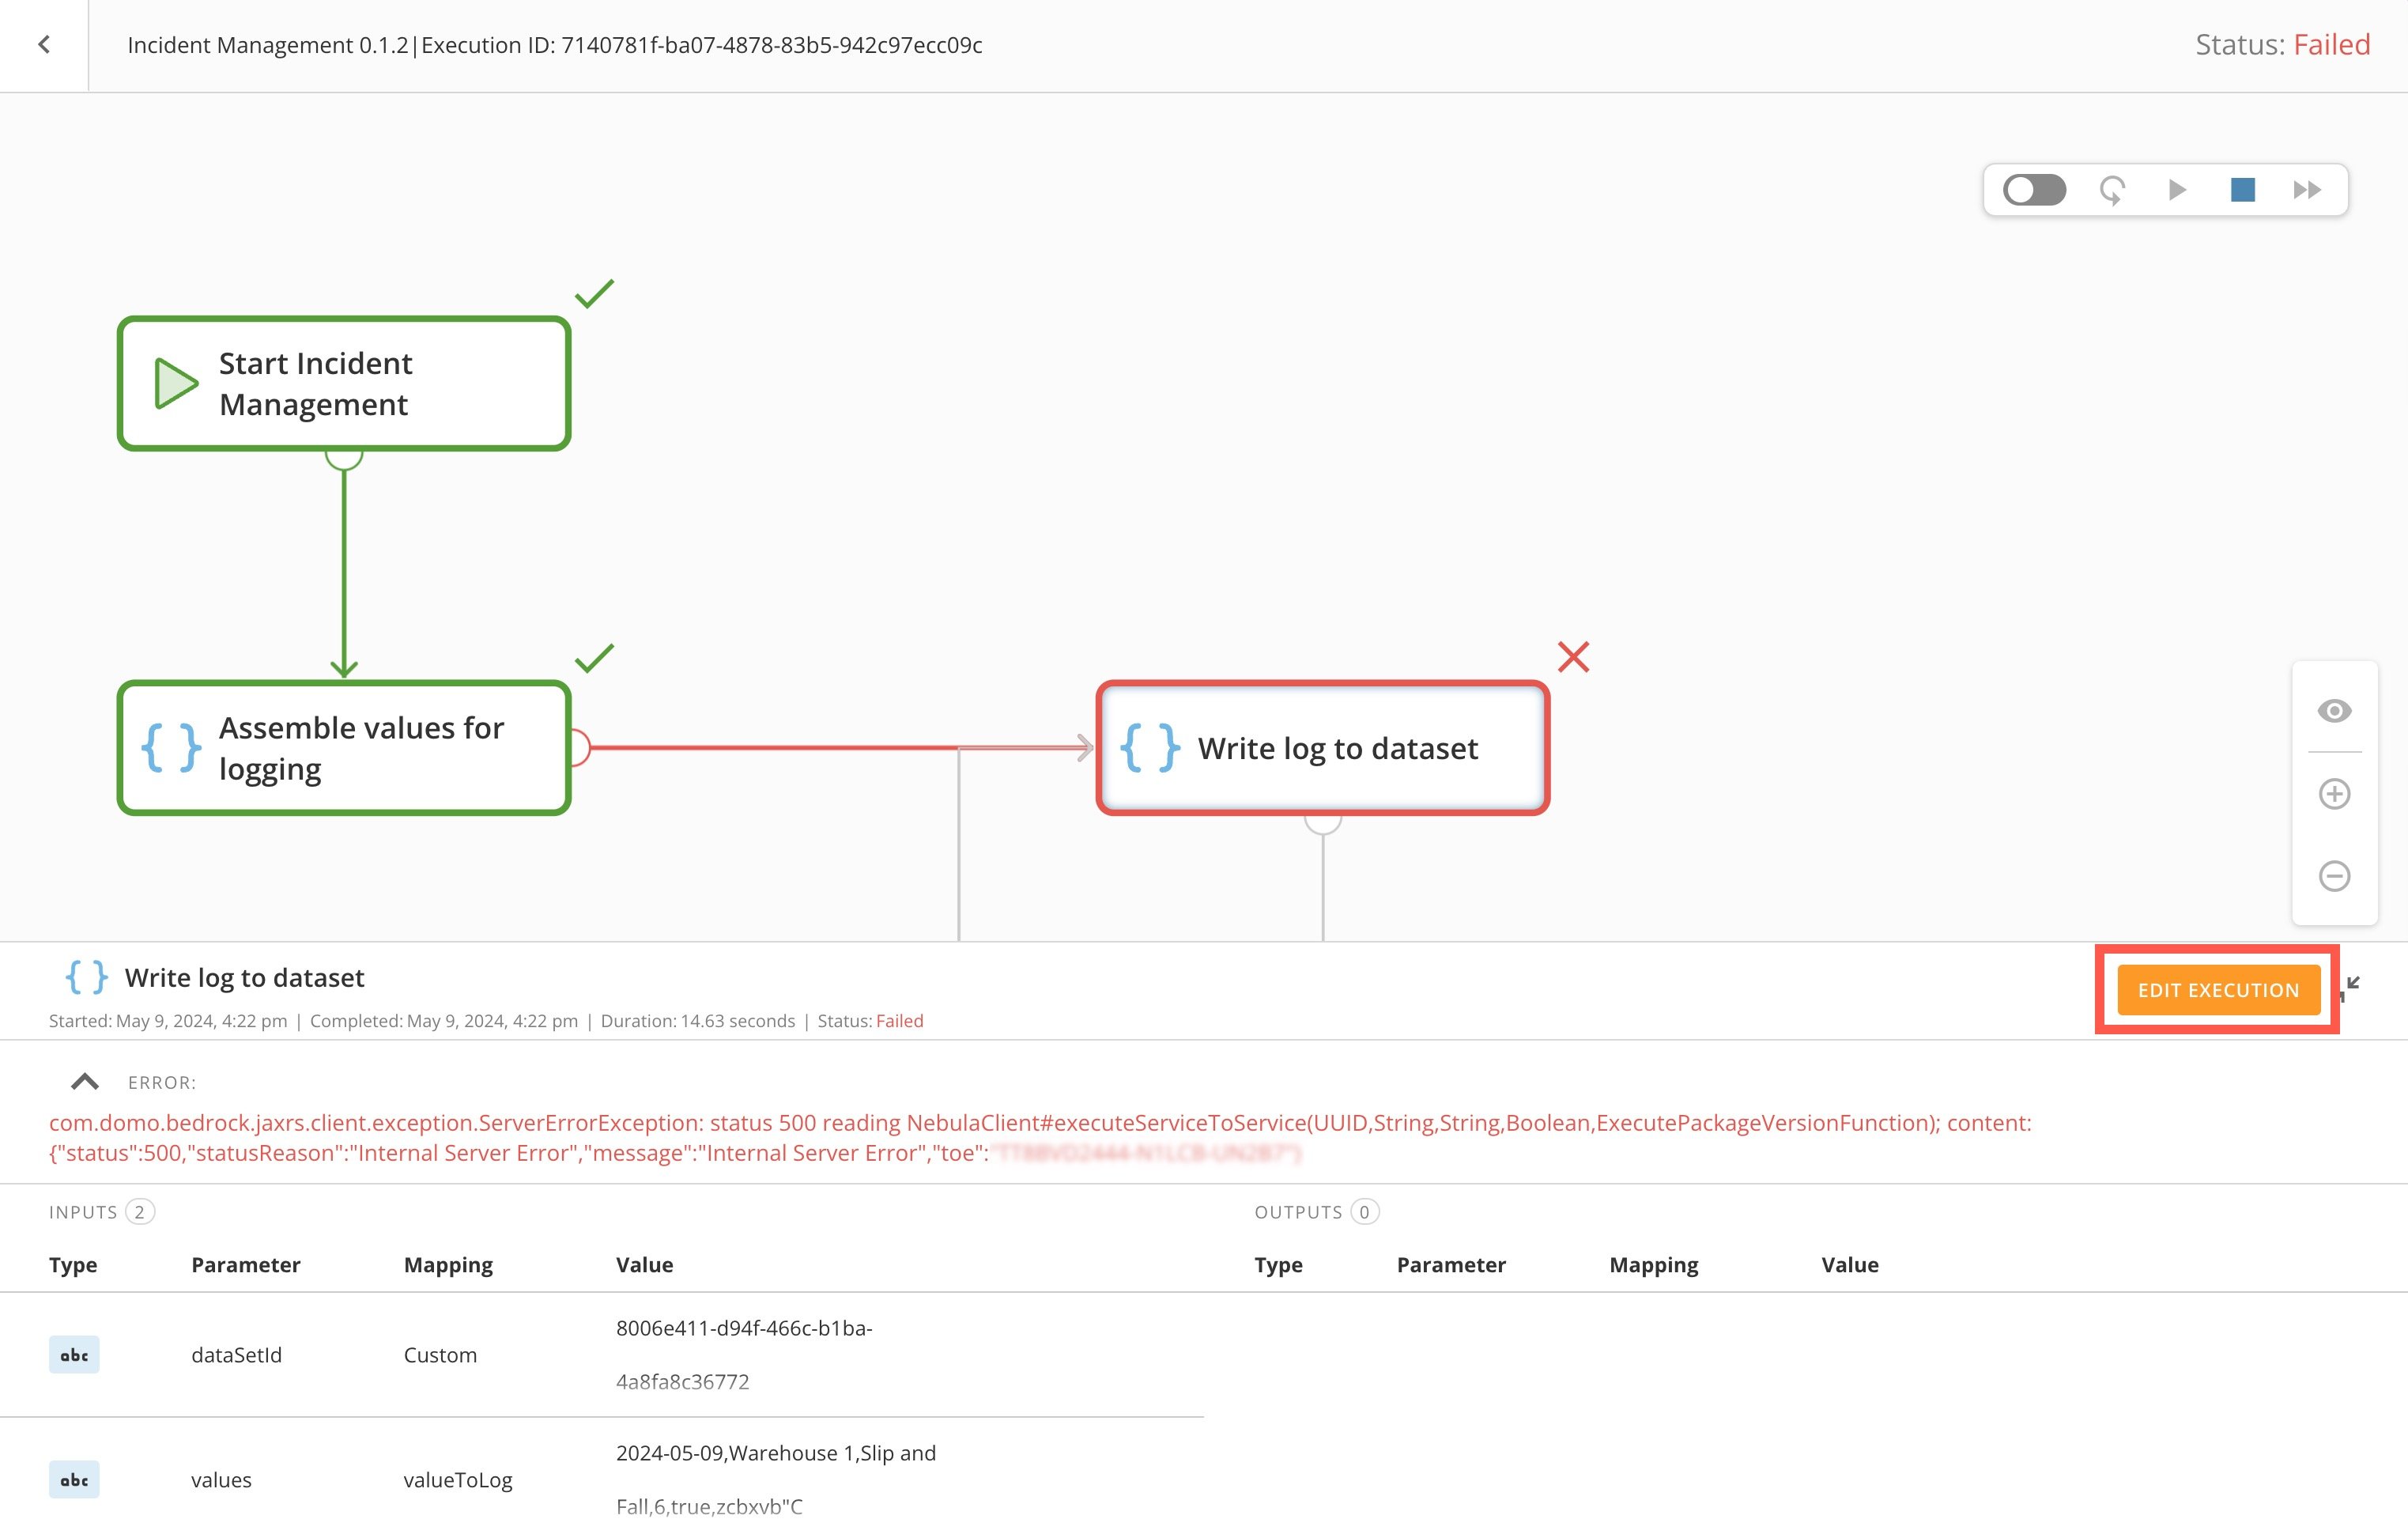
If you have Edit Execution Details [permission](#manage_permissions) to a workflow, you can recover failed executions of the workflow. Recovery means that you can **a)** try to update the data at the errored shape and then **b)** retry the execution.
<Note>
  **Note:** You can only enter Recovery mode when an error occurs or when the execution is waiting for an in-progress User Task or Wait shape to complete. Other shapes finish too quickly to apply recovery options while they are in progress.
</Note>

To access Recovery mode for an execution, select the shape. In the shape's data panel, select **Edit Execution** in the top right corner.

<Frame>
  <img alt="edit execution.jpg" src="https://mintcdn.com/domoinc-openapi-sync-dataflows/t-REVUfgwLiw_Ine/images/kb/ka0Vq0000009THK-00N5w00000Ri7BU-0EMVq000001garJ.jpg?fit=max&auto=format&n=t-REVUfgwLiw_Ine&q=85&s=42110b4bc0ac3eb640953c8bdec01f38" style={{width: 899, height: 573}} width="3046" height="1940" data-path="images/kb/ka0Vq0000009THK-00N5w00000Ri7BU-0EMVq000001garJ.jpg" />
</Frame>

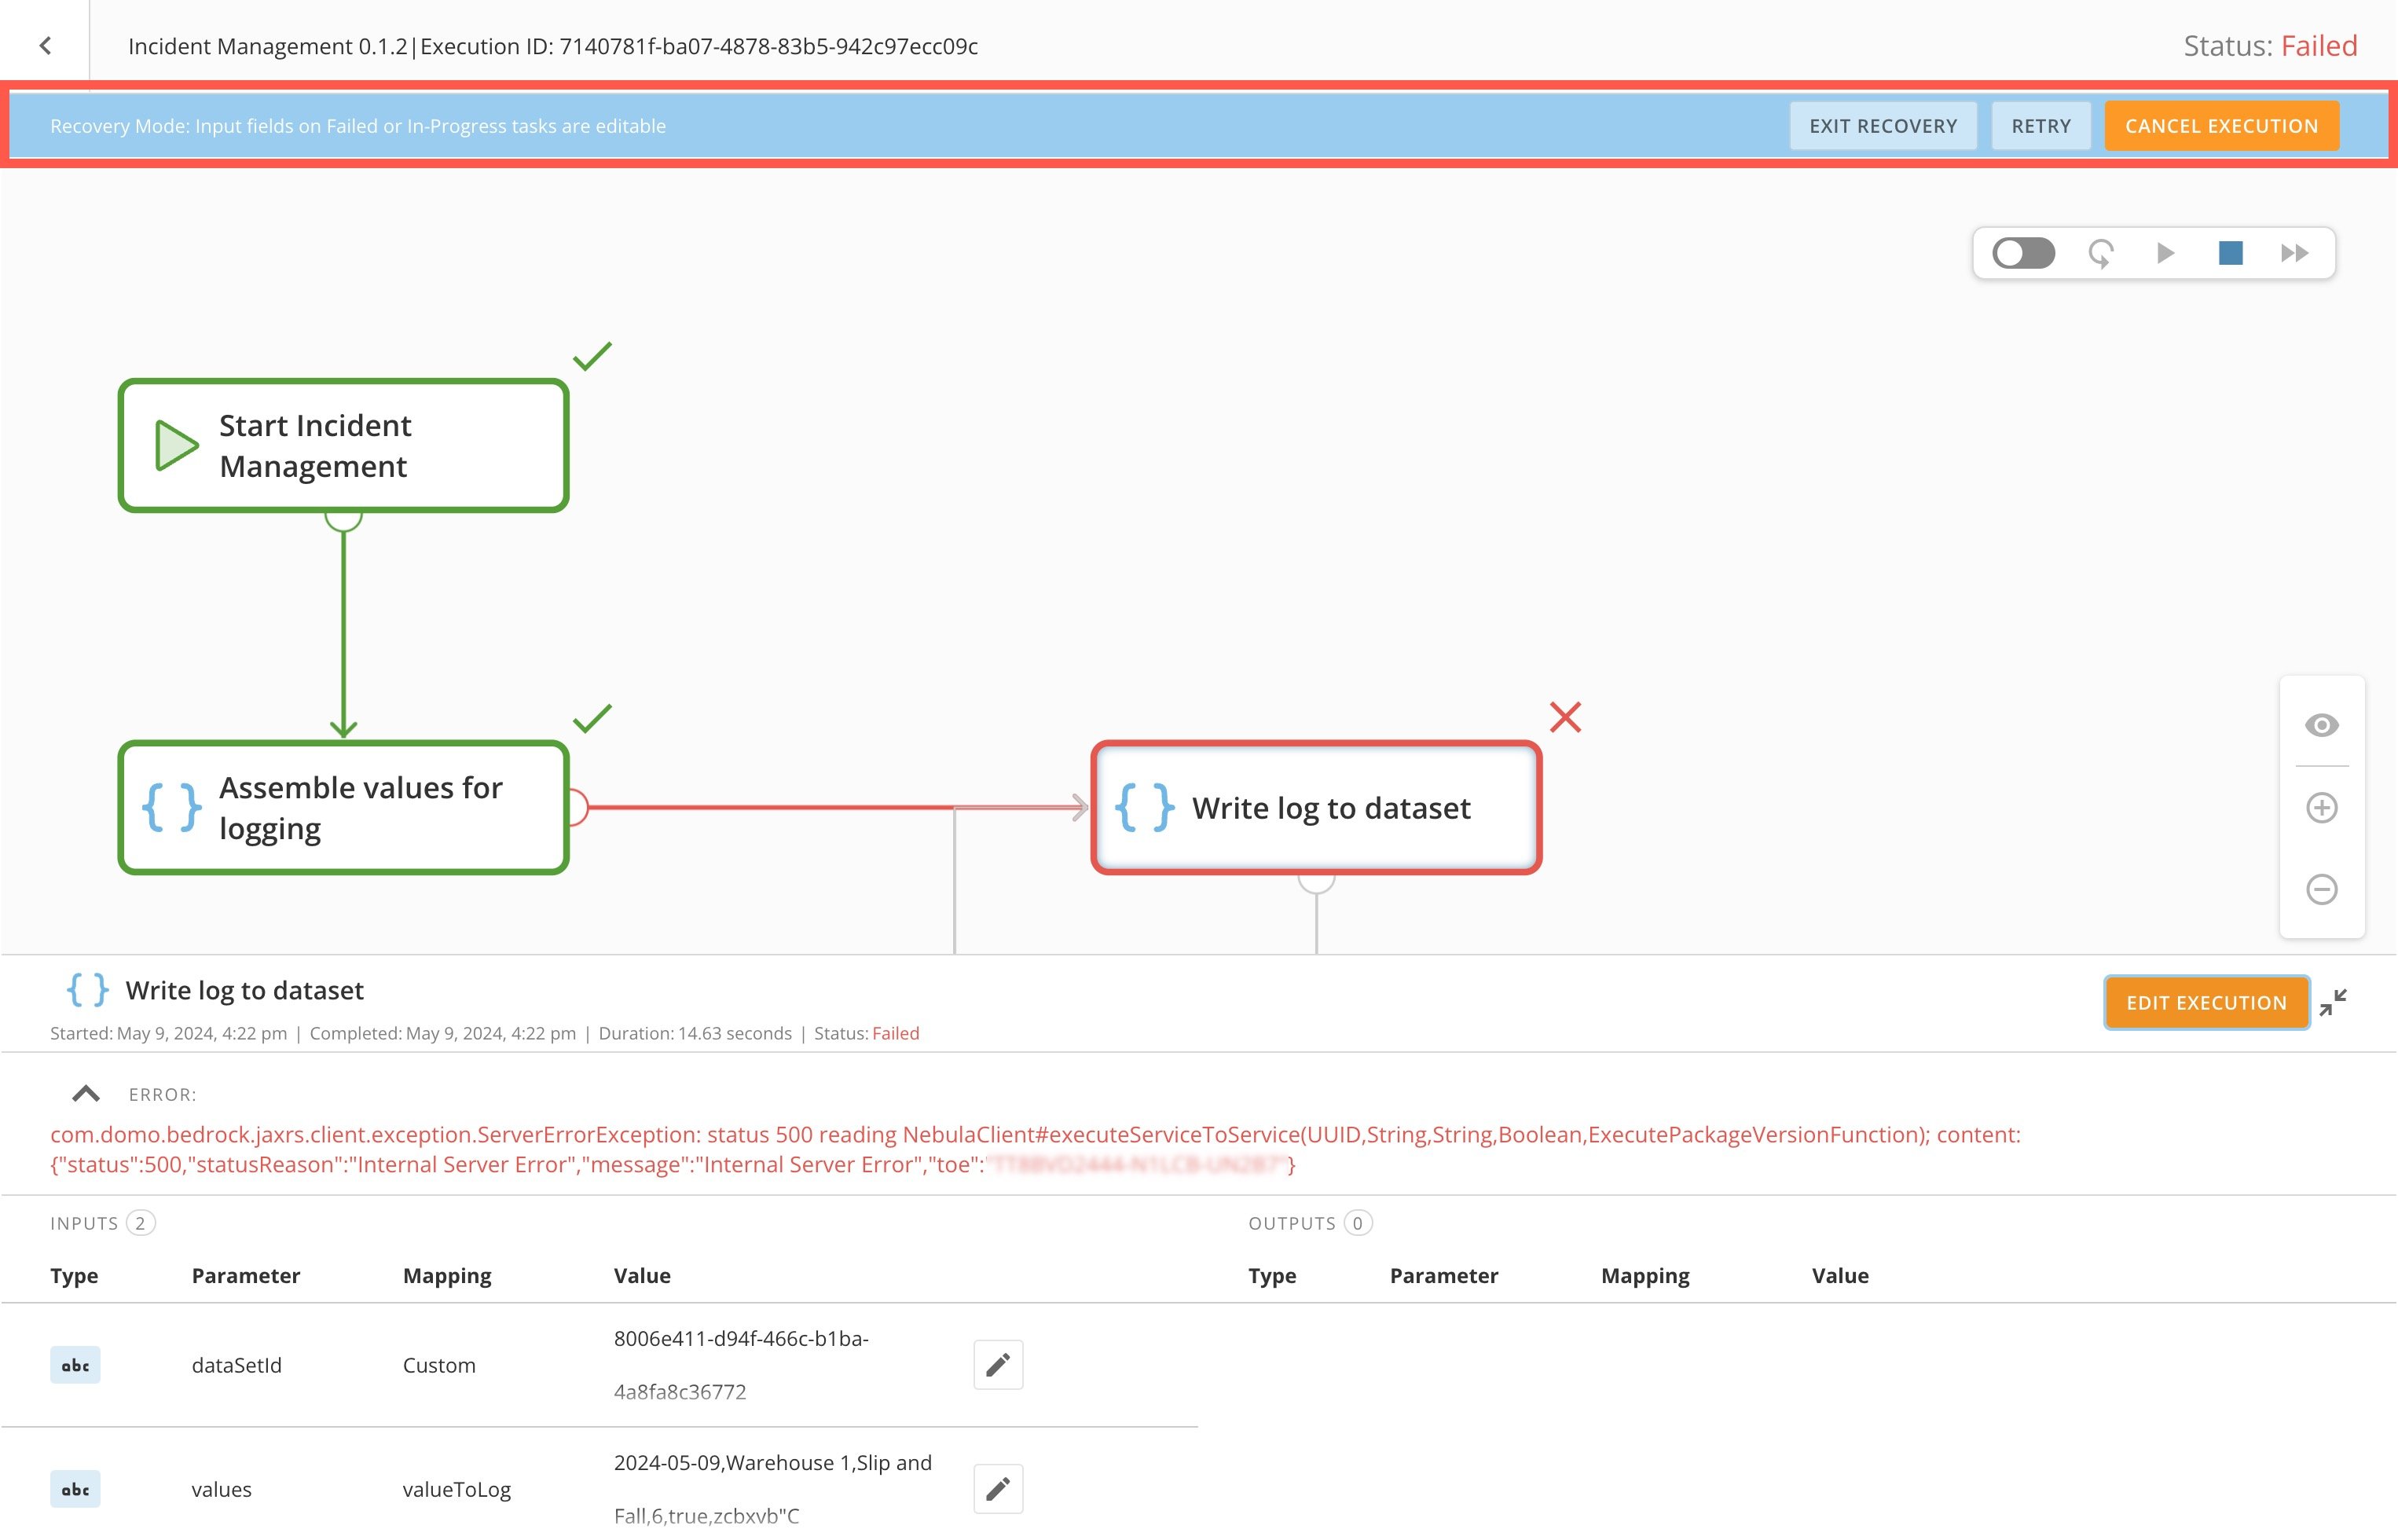
In Recovery mode, a banner at the top of the screen displays the recovery options, which are described below.
<Frame>
  <img alt="recovery banner.jpg" src="https://mintcdn.com/domoinc-openapi-sync-dataflows/t-REVUfgwLiw_Ine/images/kb/ka0Vq0000009THK-00N5w00000Ri7BU-0EMVq000001gb93.jpg?fit=max&auto=format&n=t-REVUfgwLiw_Ine&q=85&s=a3b8302e98abe18994f3895fdbc15c1c" style={{width: 900, height: 578}} width="3052" height="1960" data-path="images/kb/ka0Vq0000009THK-00N5w00000Ri7BU-0EMVq000001gb93.jpg" />
</Frame>

# Recovery Options

The available recovery options include:

* **Exit Recovery —** Takes you back to view only mode.
* **Retry —** Attempts to run an execution again from where the workflow failed or is currently in progress.
* **Cancel Instance —** Stops a workflow execution and updates the status to Canceled.

# Edit Execution Data

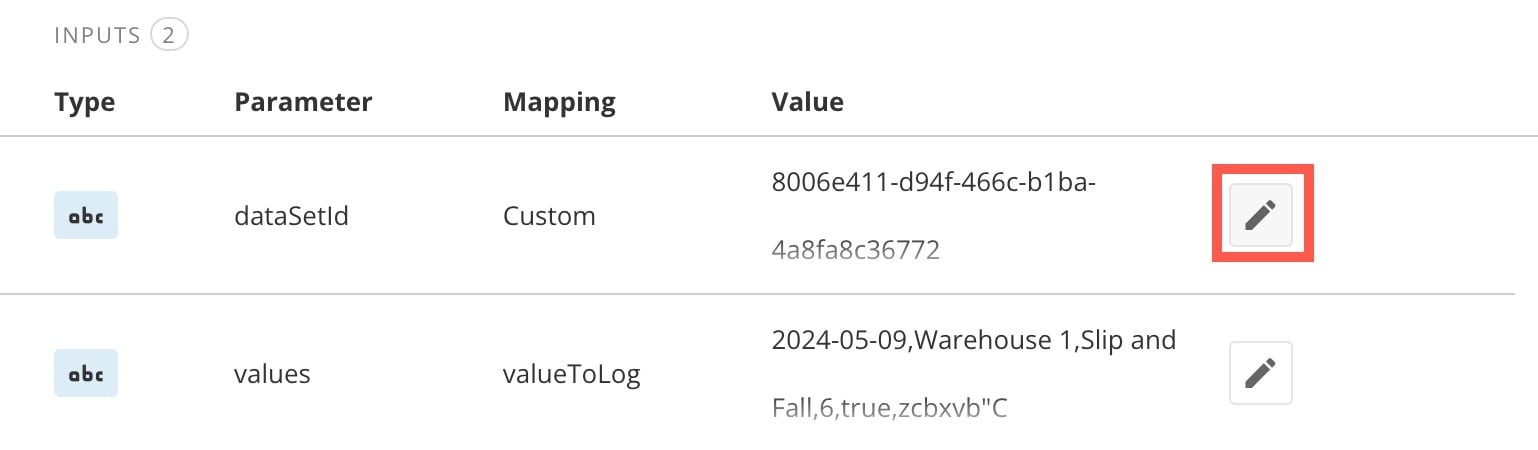
While in Recovery mode, you can change input data at the current or last active point in the execution before attempting to retry it. To do this, locate the input you want to change in the data panel and select <InlineImage src="/images/kb/ka0Vq0000000Qyb-00N5w00000Ri7BU-0EMVq000000K309.jpg" /> **Edit** for that input.
<Frame>
  <img alt="edit input.jpg" src="https://mintcdn.com/domoinc-openapi-sync-dataflows/t-REVUfgwLiw_Ine/images/kb/ka0Vq0000009THK-00N5w00000Ri7BU-0EMVq000001gbfJ.jpg?fit=max&auto=format&n=t-REVUfgwLiw_Ine&q=85&s=8f49b2073f58f6b1036c650940206d73" style={{width: 649, height: 190}} width="1538" height="450" data-path="images/kb/ka0Vq0000009THK-00N5w00000Ri7BU-0EMVq000001gbfJ.jpg" />
</Frame>

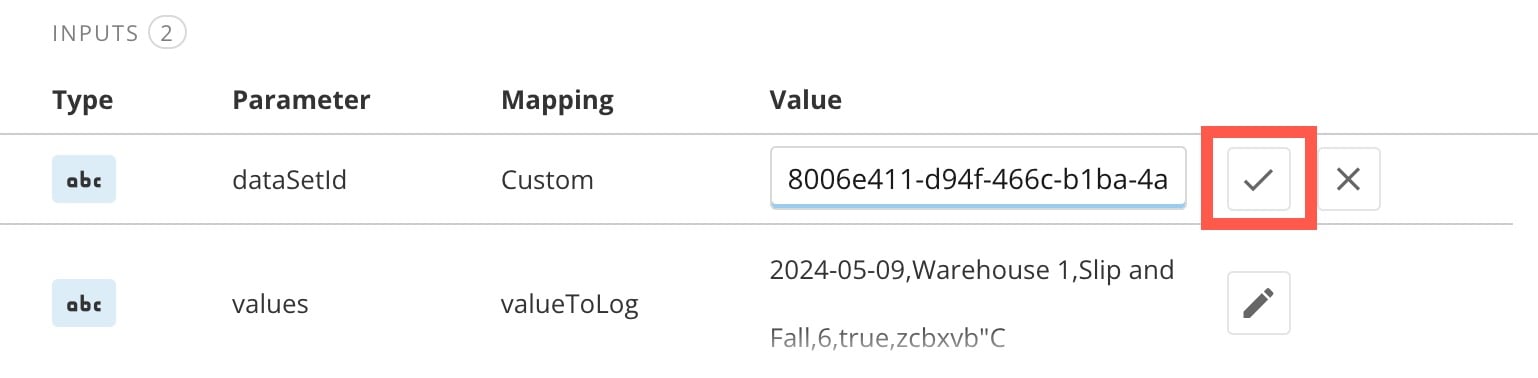
After making your changes, make sure to select <InlineImage src="/images/kb/ka0Vq0000009THK-00N5w00000Ri7BU-0EM5w000006uPKg.jpg" /> **Keep** to save them.
<Frame>
  <img alt="keep changes.jpg" src="https://mintcdn.com/domoinc-openapi-sync-dataflows/t-REVUfgwLiw_Ine/images/kb/ka0Vq0000009THK-00N5w00000Ri7BU-0EMVq000002HgGD.jpg?fit=max&auto=format&n=t-REVUfgwLiw_Ine&q=85&s=1df0c7ee99fee779eaf2409dae980d75" style={{width: 643, height: 158}} width="1538" height="378" data-path="images/kb/ka0Vq0000009THK-00N5w00000Ri7BU-0EMVq000002HgGD.jpg" />
</Frame>

Change as many data inputs on the shape as needed before selecting the **Retry** option in the banner.

### Cancel Workflow Executions

If you have a workflow execution in an In Progress status and you know it will never reach a Completed status, it is best practice to cancel it so that it displays properly in the logs and doesn't get updated by mistake.

If a User Task updates to Canceled, the task automatically voids in [Task Center](/s/article/000005172).