> ## Documentation Index
> Fetch the complete documentation index at: https://domoinc-openapi-sync-dataflows.mintlify.site/llms.txt
> Use this file to discover all available pages before exploring further.
# Workbench Enterprise | Implementation Guide
export const InlineImage = ({src, alt = '', height = '1.6em'}) => {
return  ;
};
### Intro
Workbench Enterprise is a web-based alternative to our existing on-prem Workbench solution that includes some powerful new capabilities:
* **Multi-user —**
Multiple users can access and manage your pool of Workbench jobs.
* **Web-based —**
You can use different platforms/browsers to remotely access and manage Workbench jobs even though the web server remains on-prem.
* **Multi-platform —**
Works on Linux, Windows, and macOS.
* **High availability —**
Better failover logic between jobs and the capability to split up large jobs between many different worker nodes on the server.
These capabilities mean managing Workbench jobs is easier, particularly in cases where you are running an exceptionally high volume of jobs, as well as tighter security around Workbench jobs and improved reliability for more complex jobs.
### Prerequisites
You must have the following to use Workbench Enterprise:
* Docker installed on your machine
* (Conditional) If you want to use an existing RabbitMQ account, provide the credentials
* The Workbench Enterprise grants—see below.
**Note:** If used, RabbitMQ encrypts all communication between the Control Center and the nodes. Only one RabbitMQ is required. If you have hundreds of nodes, you may consider linking multiple RabbitMQ instances to avoid overloading.
### Required Grants
There are three grants required to use Workbench Enterprise:
* **Login to Workbench Enterprise —**
Required to log in to Workbench Enterprise. All users who want to use Workbench Enterprise must have this grant enabled for their role.
* **Create Jobs in Workbench Enterprise —**
Allows the creation of jobs in Workbench Enterprise.
* **Manage Workbench Enterprise —**
Allows a user to edit all jobs and configurations in Workbench Enterprise.
### Configure Workbench Enterprise
The following sections describe the different locations and required steps to configure Workbench Enterprise.
# Domo Configuration
1. From the main nav, select
**More**
>
**Admin **.****
The Admin Settings display.
2. Under
**Authentication**, select **Workbench Enterprise**.
The **Workbench Enterprise** page displays.
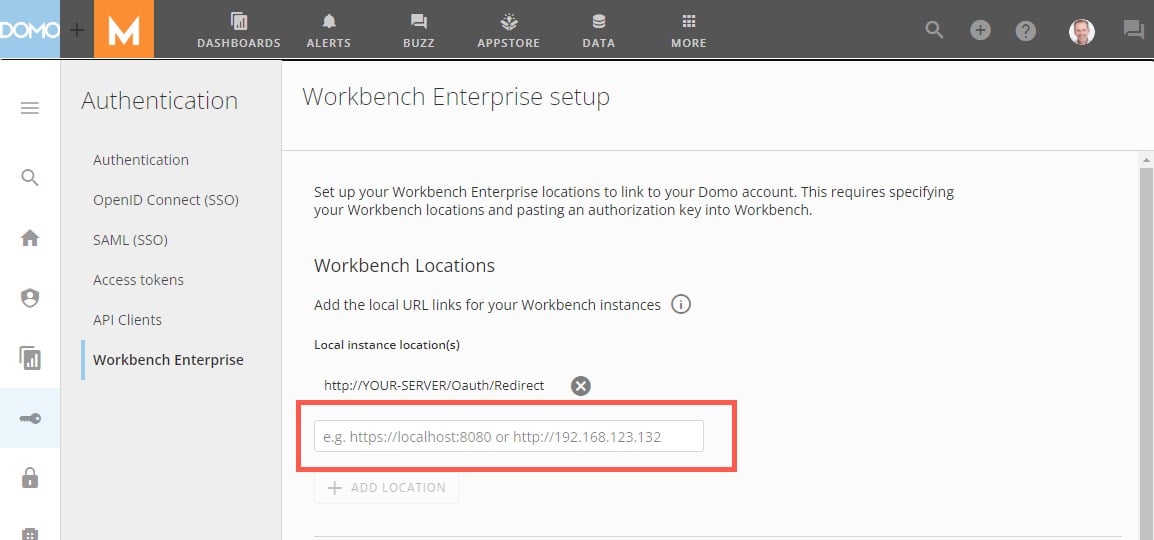
3. Enter the URL(s) for your Workbench Enterprise instance so that you can use OAuth for secure access.
;
};
### Intro
Workbench Enterprise is a web-based alternative to our existing on-prem Workbench solution that includes some powerful new capabilities:
* **Multi-user —**
Multiple users can access and manage your pool of Workbench jobs.
* **Web-based —**
You can use different platforms/browsers to remotely access and manage Workbench jobs even though the web server remains on-prem.
* **Multi-platform —**
Works on Linux, Windows, and macOS.
* **High availability —**
Better failover logic between jobs and the capability to split up large jobs between many different worker nodes on the server.
These capabilities mean managing Workbench jobs is easier, particularly in cases where you are running an exceptionally high volume of jobs, as well as tighter security around Workbench jobs and improved reliability for more complex jobs.
### Prerequisites
You must have the following to use Workbench Enterprise:
* Docker installed on your machine
* (Conditional) If you want to use an existing RabbitMQ account, provide the credentials
* The Workbench Enterprise grants—see below.
**Note:** If used, RabbitMQ encrypts all communication between the Control Center and the nodes. Only one RabbitMQ is required. If you have hundreds of nodes, you may consider linking multiple RabbitMQ instances to avoid overloading.
### Required Grants
There are three grants required to use Workbench Enterprise:
* **Login to Workbench Enterprise —**
Required to log in to Workbench Enterprise. All users who want to use Workbench Enterprise must have this grant enabled for their role.
* **Create Jobs in Workbench Enterprise —**
Allows the creation of jobs in Workbench Enterprise.
* **Manage Workbench Enterprise —**
Allows a user to edit all jobs and configurations in Workbench Enterprise.
### Configure Workbench Enterprise
The following sections describe the different locations and required steps to configure Workbench Enterprise.
# Domo Configuration
1. From the main nav, select
**More**
>
**Admin **.****
The Admin Settings display.
2. Under
**Authentication**, select **Workbench Enterprise**.
The **Workbench Enterprise** page displays.
3. Enter the URL(s) for your Workbench Enterprise instance so that you can use OAuth for secure access.
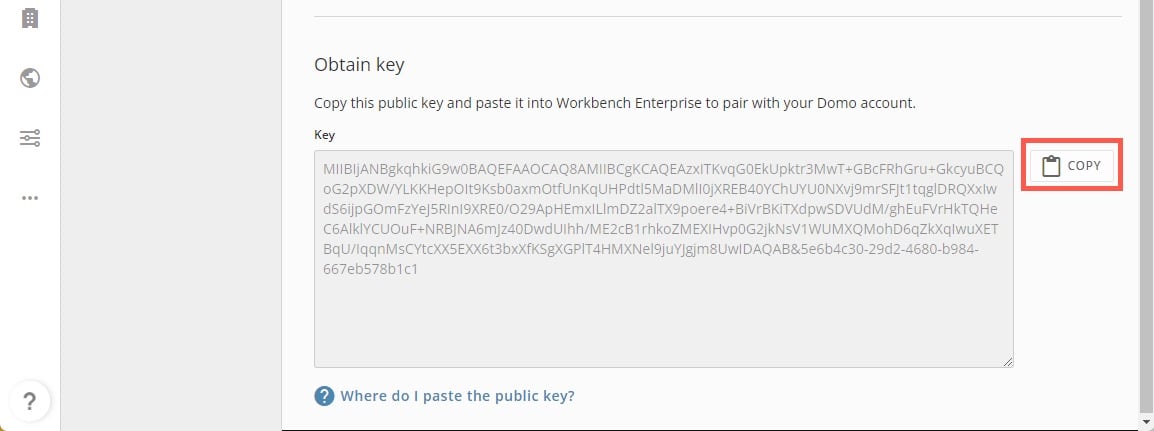
 4. Select
**Generate Key**.
The key displays in the **Key** field.
5. Select
**Copy** to copy the key to your clipboard.
4. Select
**Generate Key**.
The key displays in the **Key** field.
5. Select
**Copy** to copy the key to your clipboard.
 # Download Docker Images
Download the latest Docker images by running the following commands in a terminal window such as Windows command prompt, Mac terminal, or Linux terminal. When running Docker images on an ARM architecture, you will use the tag `arm-latest`:
```bash theme={"dark"}
docker pull public.ecr.aws/domo/workbench/workbenchenterprise:latest
docker pull rabbitmq:management
```
# Launch the Docker Image
On your local system, create a directory to store the Workbench Enterprise configuration and long-term storage.
For example, on Linux, your directory could be:
/usr/share/Domo Run the following Docker commands with the new file directory inserted in the highlighted section below. When running Docker images on an ARM architecture, you will use the tag `arm-latest`:
```bash theme={"dark"}
docker run -p 80:8080 --mount type=bind,source=/usr/share/Domo,target=/usr/share/Domo --mount type=bind,source=/usr/share/Domo,target=/app/Data public.ecr.aws/domo/workbench/workbenchenterprise:latest
```
This can run locally on any port you choose.
If you want to use a reverse proxy and access it via HTTPS, use 443:8080. See how to [configure a reverse proxy](#configure_reverse_proxy) below.
You can also use a specific port if specified in the URL. For example, -p 1337:8080 would mean the URL would be http\://\[customdomain]:1337, where \[customdomain] is the IP or domain that you would like to access the web server.
```bash theme={"dark"}
docker run -d -p 5672:5672 -p 15672:15672 --mount type=bind,source=/usr/share/Domo/rabbitmq,target=/var/lib/rabbitmq/mnesia/ rabbitmq:management
```
You can now open Workbench Enterprise by navigating to `http://`.
# Configure a Reverse Proxy
You can use a reverse proxy together with Docker to enable browsing with HTTPS instead of HTTP with a certificate that you provide.
Here is an example of a Nginx reverse proxy setup that works with Workbench Enterprise:
```http theme={"dark"}
# Complete Nginx Docker reverse proxy config file
events {
worker_connections 4096;
}
http{
server {
listen 80;
listen [::]:80;
server_name {Your-server-name}; #The IP of your Workbench Enterprise
location / {
proxy_set_header Host $host;
proxy_set_header X-Real-IP $remote_addr;
proxy_set_header X-Forwarded-For $proxy_add_x_forwarded_for;
proxy_set_header Upgrade $http_upgrade;
proxy_set_header Connection $http_connection;
proxy_pass {Your-passthrough-location};
}
}
}
```
# One-Time Setup
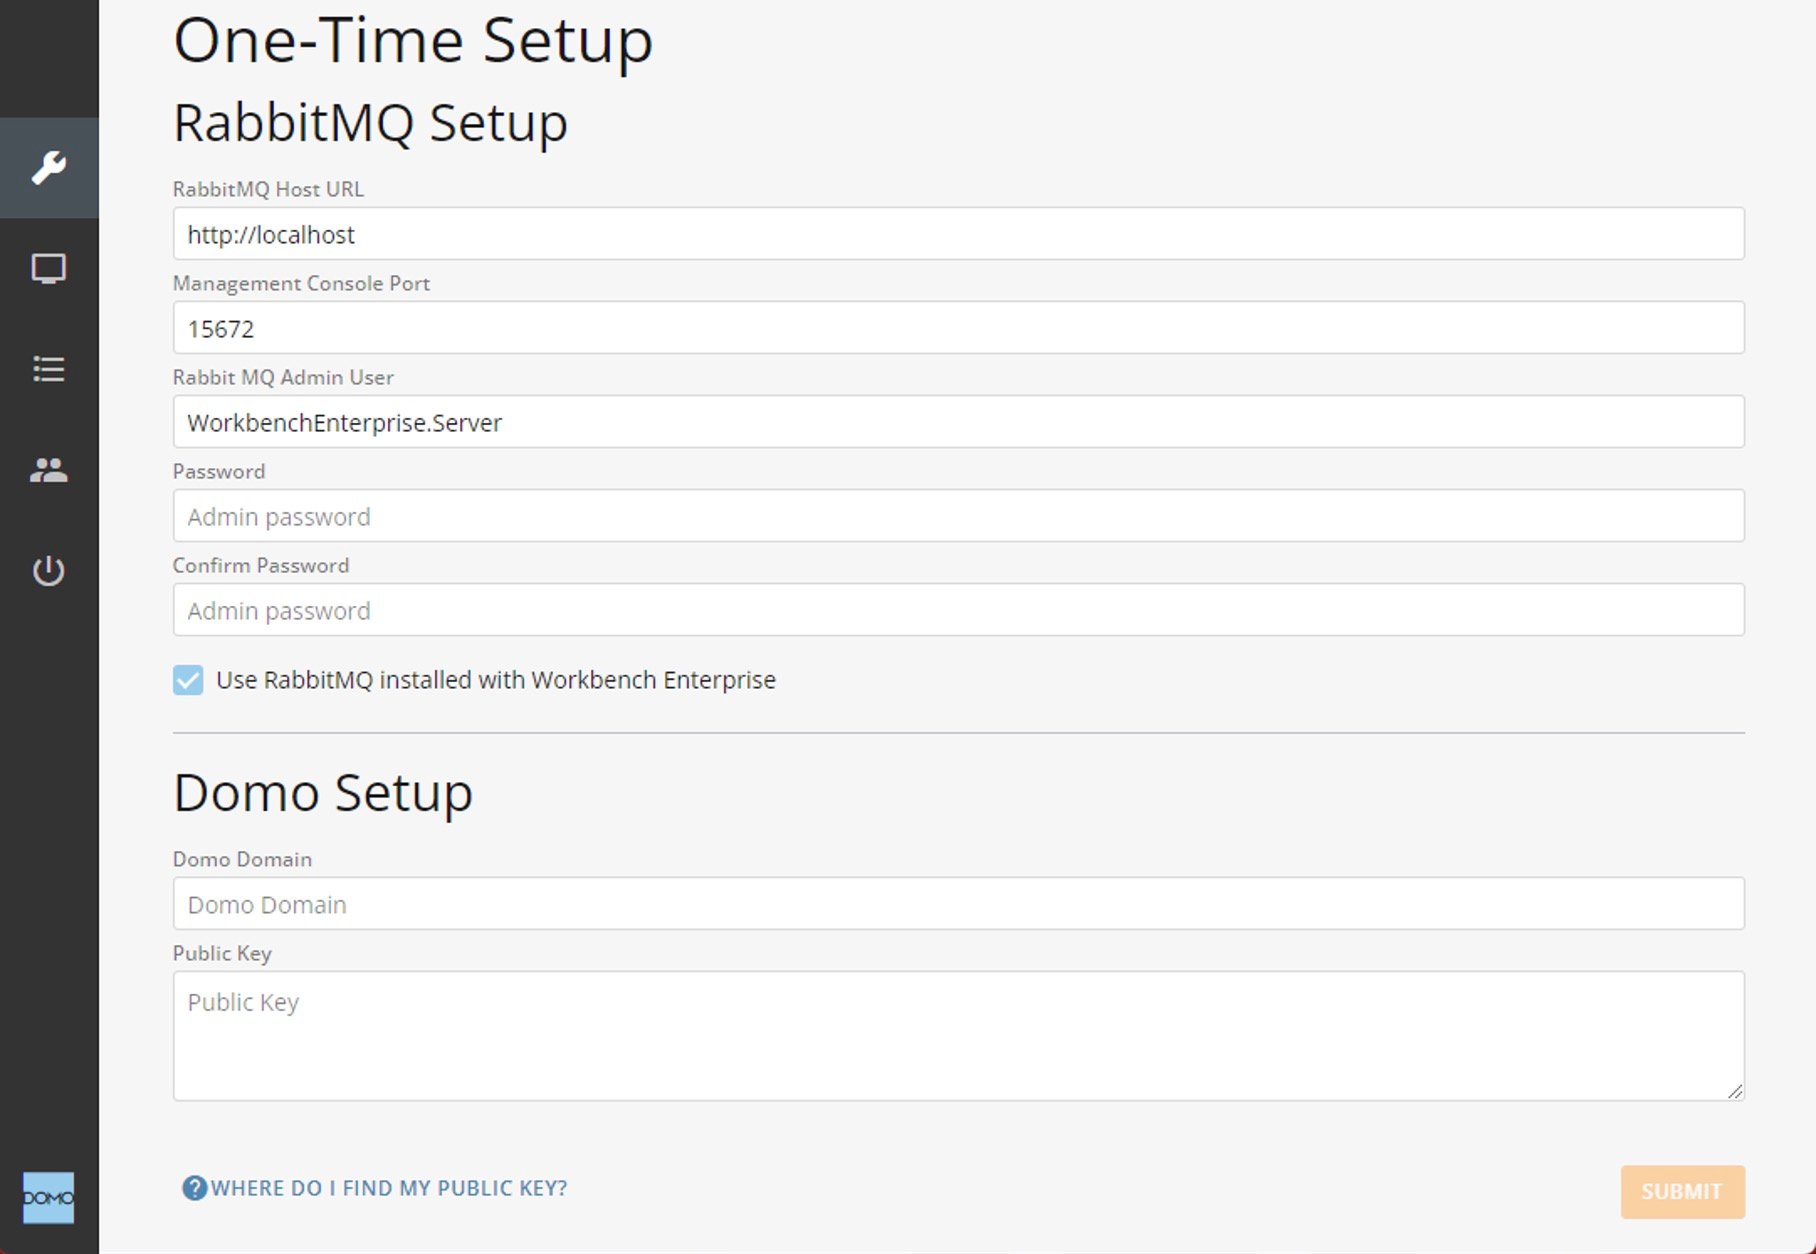
On the **One-Time Setup** page, you must enter the following information:
1. Under
**RabbitMQ Setup**, enter all required credentials in the appropriate fields.
* If you have an existing server you want to use, you must enter an admin credential.
* If you are using the RabbitMQ Server from the Docker command posted earlier, you are setting up the admin credentials and do not need existing ones.
2. Under
**Domo Setup**, enter your Domo domain.
3. Paste the key you copied to your clipboard above from the Workbench Authentication.
4. Select
**Submit**.
You are redirected to the Workbench Enterprise login page and can give Workbench Enterprise access to your Domo instance.
# Download Docker Images
Download the latest Docker images by running the following commands in a terminal window such as Windows command prompt, Mac terminal, or Linux terminal. When running Docker images on an ARM architecture, you will use the tag `arm-latest`:
```bash theme={"dark"}
docker pull public.ecr.aws/domo/workbench/workbenchenterprise:latest
docker pull rabbitmq:management
```
# Launch the Docker Image
On your local system, create a directory to store the Workbench Enterprise configuration and long-term storage.
For example, on Linux, your directory could be:
/usr/share/Domo Run the following Docker commands with the new file directory inserted in the highlighted section below. When running Docker images on an ARM architecture, you will use the tag `arm-latest`:
```bash theme={"dark"}
docker run -p 80:8080 --mount type=bind,source=/usr/share/Domo,target=/usr/share/Domo --mount type=bind,source=/usr/share/Domo,target=/app/Data public.ecr.aws/domo/workbench/workbenchenterprise:latest
```
This can run locally on any port you choose.
If you want to use a reverse proxy and access it via HTTPS, use 443:8080. See how to [configure a reverse proxy](#configure_reverse_proxy) below.
You can also use a specific port if specified in the URL. For example, -p 1337:8080 would mean the URL would be http\://\[customdomain]:1337, where \[customdomain] is the IP or domain that you would like to access the web server.
```bash theme={"dark"}
docker run -d -p 5672:5672 -p 15672:15672 --mount type=bind,source=/usr/share/Domo/rabbitmq,target=/var/lib/rabbitmq/mnesia/ rabbitmq:management
```
You can now open Workbench Enterprise by navigating to `http://`.
# Configure a Reverse Proxy
You can use a reverse proxy together with Docker to enable browsing with HTTPS instead of HTTP with a certificate that you provide.
Here is an example of a Nginx reverse proxy setup that works with Workbench Enterprise:
```http theme={"dark"}
# Complete Nginx Docker reverse proxy config file
events {
worker_connections 4096;
}
http{
server {
listen 80;
listen [::]:80;
server_name {Your-server-name}; #The IP of your Workbench Enterprise
location / {
proxy_set_header Host $host;
proxy_set_header X-Real-IP $remote_addr;
proxy_set_header X-Forwarded-For $proxy_add_x_forwarded_for;
proxy_set_header Upgrade $http_upgrade;
proxy_set_header Connection $http_connection;
proxy_pass {Your-passthrough-location};
}
}
}
```
# One-Time Setup
On the **One-Time Setup** page, you must enter the following information:
1. Under
**RabbitMQ Setup**, enter all required credentials in the appropriate fields.
* If you have an existing server you want to use, you must enter an admin credential.
* If you are using the RabbitMQ Server from the Docker command posted earlier, you are setting up the admin credentials and do not need existing ones.
2. Under
**Domo Setup**, enter your Domo domain.
3. Paste the key you copied to your clipboard above from the Workbench Authentication.
4. Select
**Submit**.
You are redirected to the Workbench Enterprise login page and can give Workbench Enterprise access to your Domo instance.
 # Log In
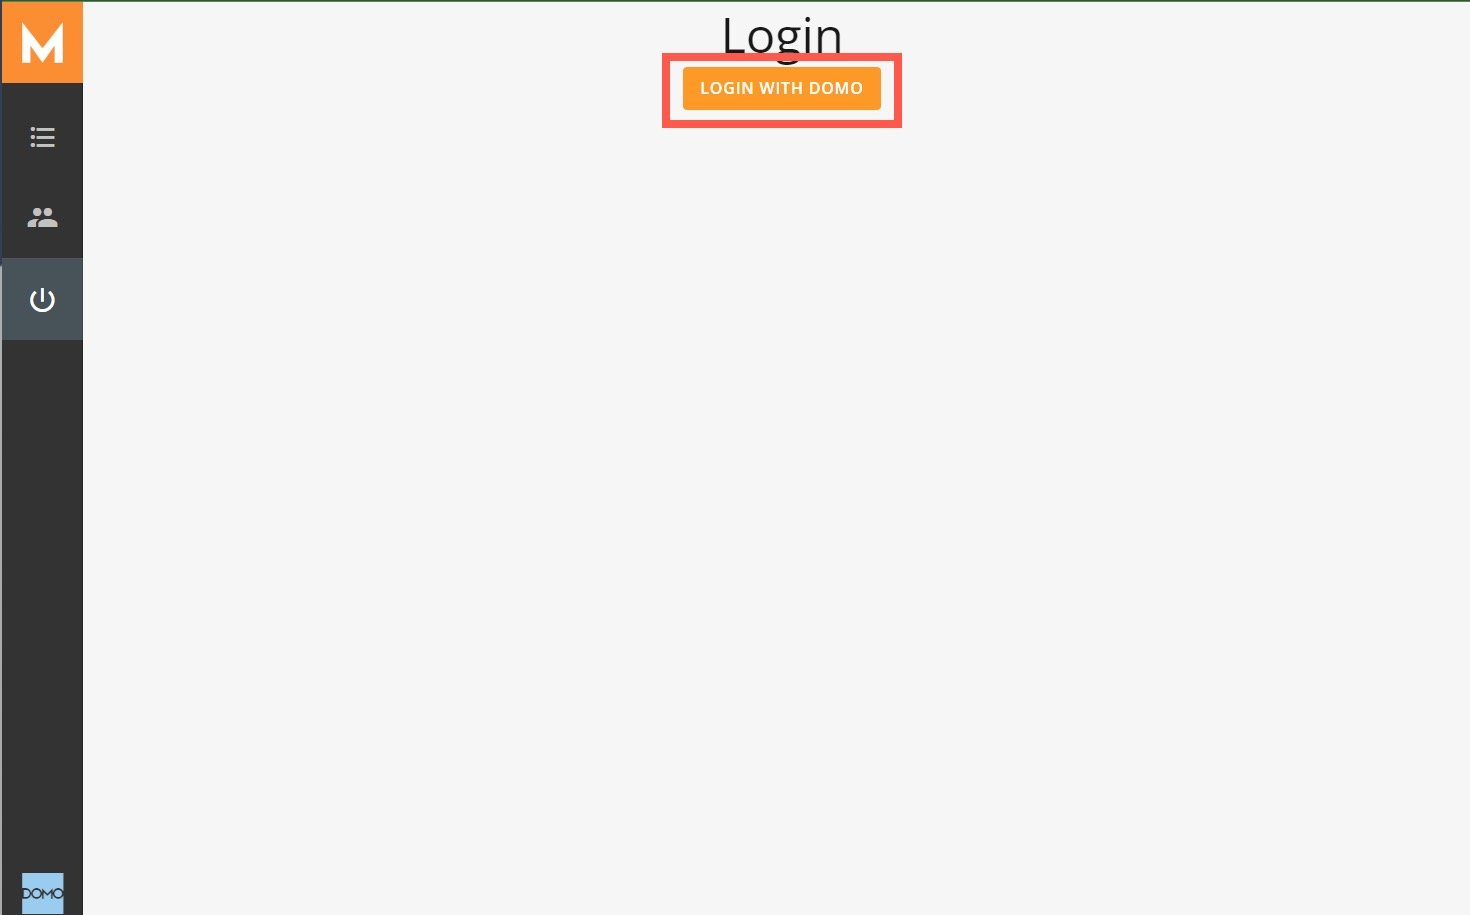
On the Workbench Enterprise login page, select **Login With Domo**.
# Log In
On the Workbench Enterprise login page, select **Login With Domo**.
 # Configure Your First Node
**Note:** Nodes currently work on Windows and Linux. This section contains instructions for configuration in each.
To perform these steps, you must have administrator access to your machine.
1. As an administrator for your machine, launch your web browser and navigate to your Workbench Enterprise server.
2. Log in to Workbench Enterprise.
3. Go to
**Nodes**.
4. Download the Windows package.
5. Extract the ZIP file and move the folder to a known location.
6. From the
**Start** menu on your machine, launch Command Prompt as an administrator. Follow the steps below depending on your system
##### Windows
1. Navigate to the folder where you placed the ZIP file and register your Workbench node as a Windows service by entering
```bash theme={"dark"}
EnterpriseThinClient.exe -i
```
* A protection mechanism exists to prevent the ThinClient from being run in standalone mode when it's installed as a service. The service the ThinClient creates should be set up to launch automatically and restart on failure.
* After it's installed as a service, the ThinClient must be managed through the service for all subsequent use.
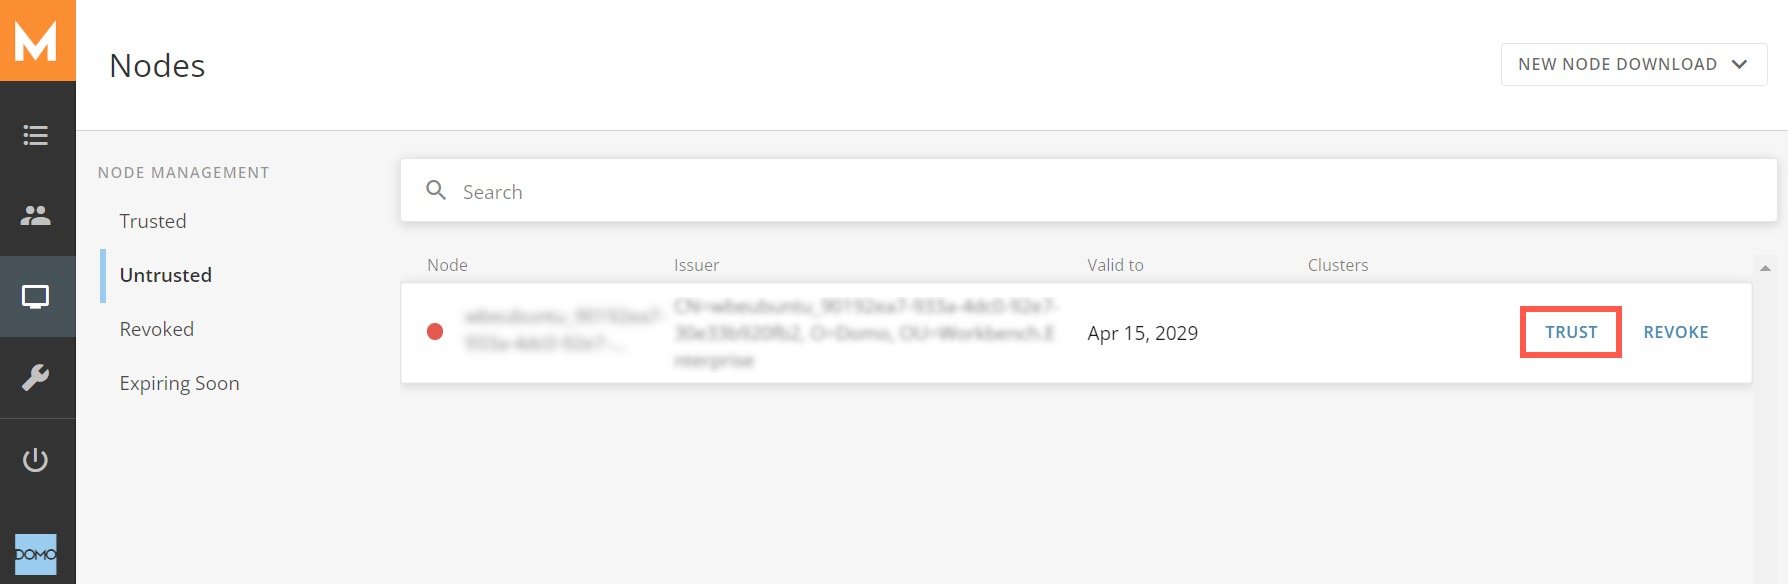
2. In Workbench Enterprise, go to **Nodes** > **Untrusted**.
3. Locate the node and select **Trust** to enable Workbench Enterprise to run jobs on the node.
# Configure Your First Node
**Note:** Nodes currently work on Windows and Linux. This section contains instructions for configuration in each.
To perform these steps, you must have administrator access to your machine.
1. As an administrator for your machine, launch your web browser and navigate to your Workbench Enterprise server.
2. Log in to Workbench Enterprise.
3. Go to
**Nodes**.
4. Download the Windows package.
5. Extract the ZIP file and move the folder to a known location.
6. From the
**Start** menu on your machine, launch Command Prompt as an administrator. Follow the steps below depending on your system
##### Windows
1. Navigate to the folder where you placed the ZIP file and register your Workbench node as a Windows service by entering
```bash theme={"dark"}
EnterpriseThinClient.exe -i
```
* A protection mechanism exists to prevent the ThinClient from being run in standalone mode when it's installed as a service. The service the ThinClient creates should be set up to launch automatically and restart on failure.
* After it's installed as a service, the ThinClient must be managed through the service for all subsequent use.
2. In Workbench Enterprise, go to **Nodes** > **Untrusted**.
3. Locate the node and select **Trust** to enable Workbench Enterprise to run jobs on the node.
 ##### Linux
1. Navigate to the folder where you placed the ZIP file and register your Workbench node as a Linux daemon by completing the following steps:
* Use chmod to update the ACL on EnterpriseThinClient to allow execution.
* Launch the EnterpriseThinClient -i
2. In Workbench Enterprise, go to **Nodes** > **Untrusted**.
3. Locate the node you added and select **Trust** to enable Workbench Enterprise to run jobs on the node.
**Nodes:**
* There is no limit to the number of nodes that can be connected to Workbench Enterprise.
* Jobs are not tied to specific nodes. They can be tied to "clusters," which are assigned to nodes.
* The job will always execute on the first available node. If the job is assigned to a cluster, it will execute on the first node available in that cluster. If a node goes down, the job will execute on the next available node.
* There is no Workbench Enterprise master node. All nodes are treated the same way.
# Configure Your First Shared Credential
To perform these steps, you must be logged in to Workbench Enterprise as an administrator.
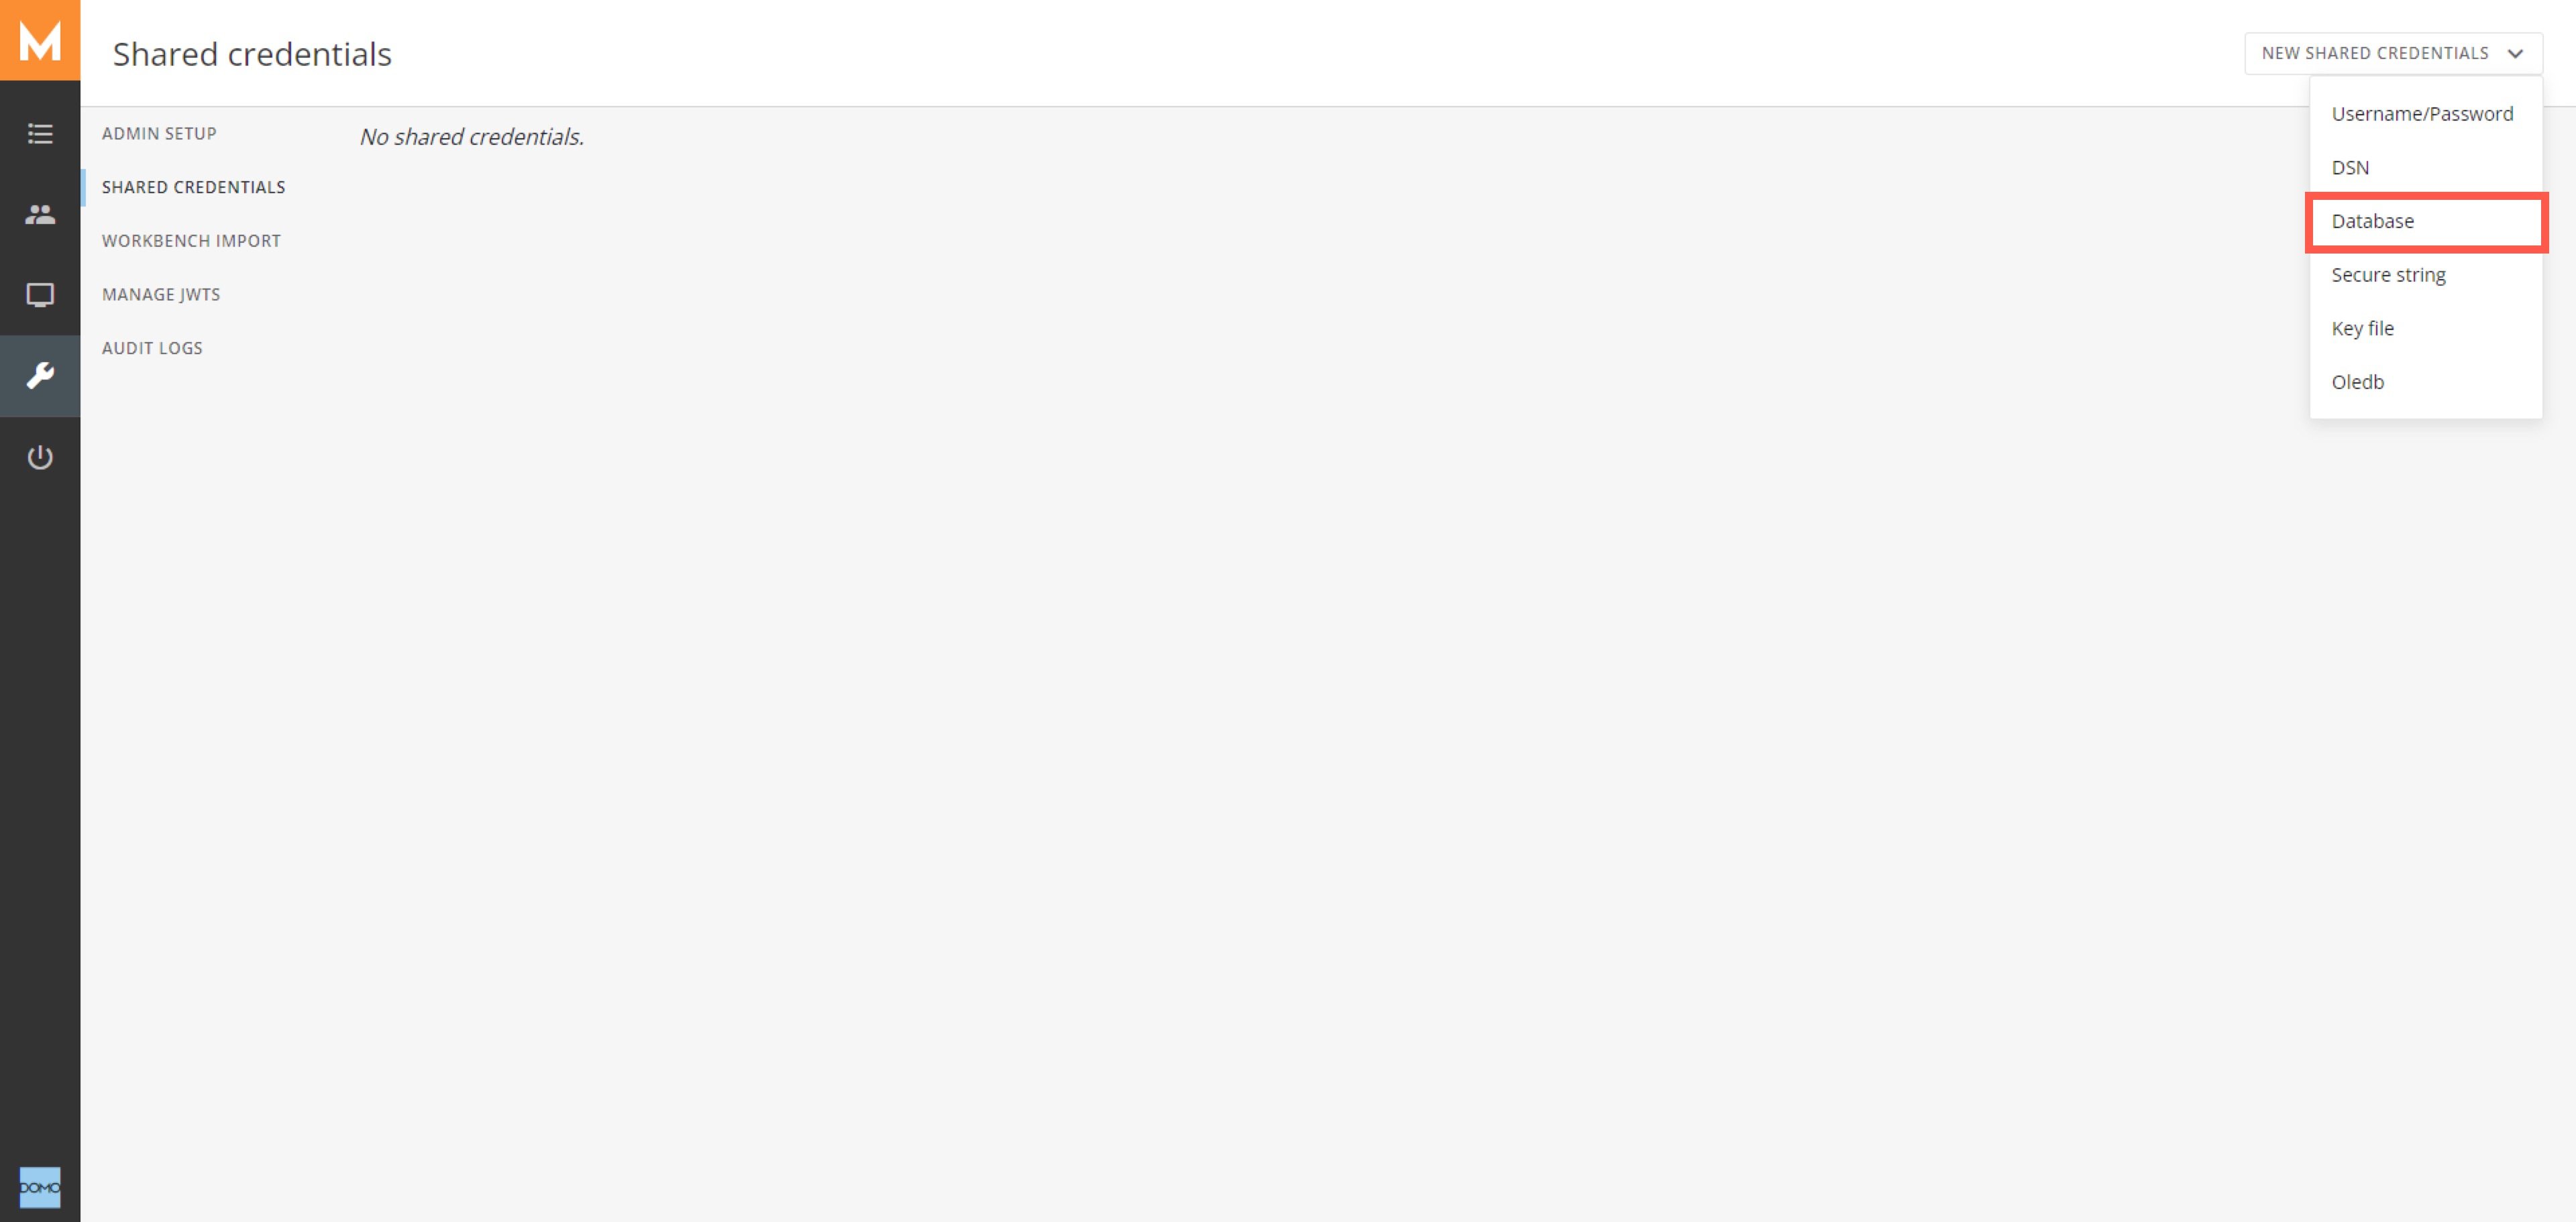
1. Inside Workbench Enterprise, go to **Admin** > **Shared Credentials**.
2. Select **New Shared Credentials** > **Database** to open the creation modal.
##### Linux
1. Navigate to the folder where you placed the ZIP file and register your Workbench node as a Linux daemon by completing the following steps:
* Use chmod to update the ACL on EnterpriseThinClient to allow execution.
* Launch the EnterpriseThinClient -i
2. In Workbench Enterprise, go to **Nodes** > **Untrusted**.
3. Locate the node you added and select **Trust** to enable Workbench Enterprise to run jobs on the node.
**Nodes:**
* There is no limit to the number of nodes that can be connected to Workbench Enterprise.
* Jobs are not tied to specific nodes. They can be tied to "clusters," which are assigned to nodes.
* The job will always execute on the first available node. If the job is assigned to a cluster, it will execute on the first node available in that cluster. If a node goes down, the job will execute on the next available node.
* There is no Workbench Enterprise master node. All nodes are treated the same way.
# Configure Your First Shared Credential
To perform these steps, you must be logged in to Workbench Enterprise as an administrator.
1. Inside Workbench Enterprise, go to **Admin** > **Shared Credentials**.
2. Select **New Shared Credentials** > **Database** to open the creation modal.
 3. Enter the values for the shared credential in the **Database** modal.
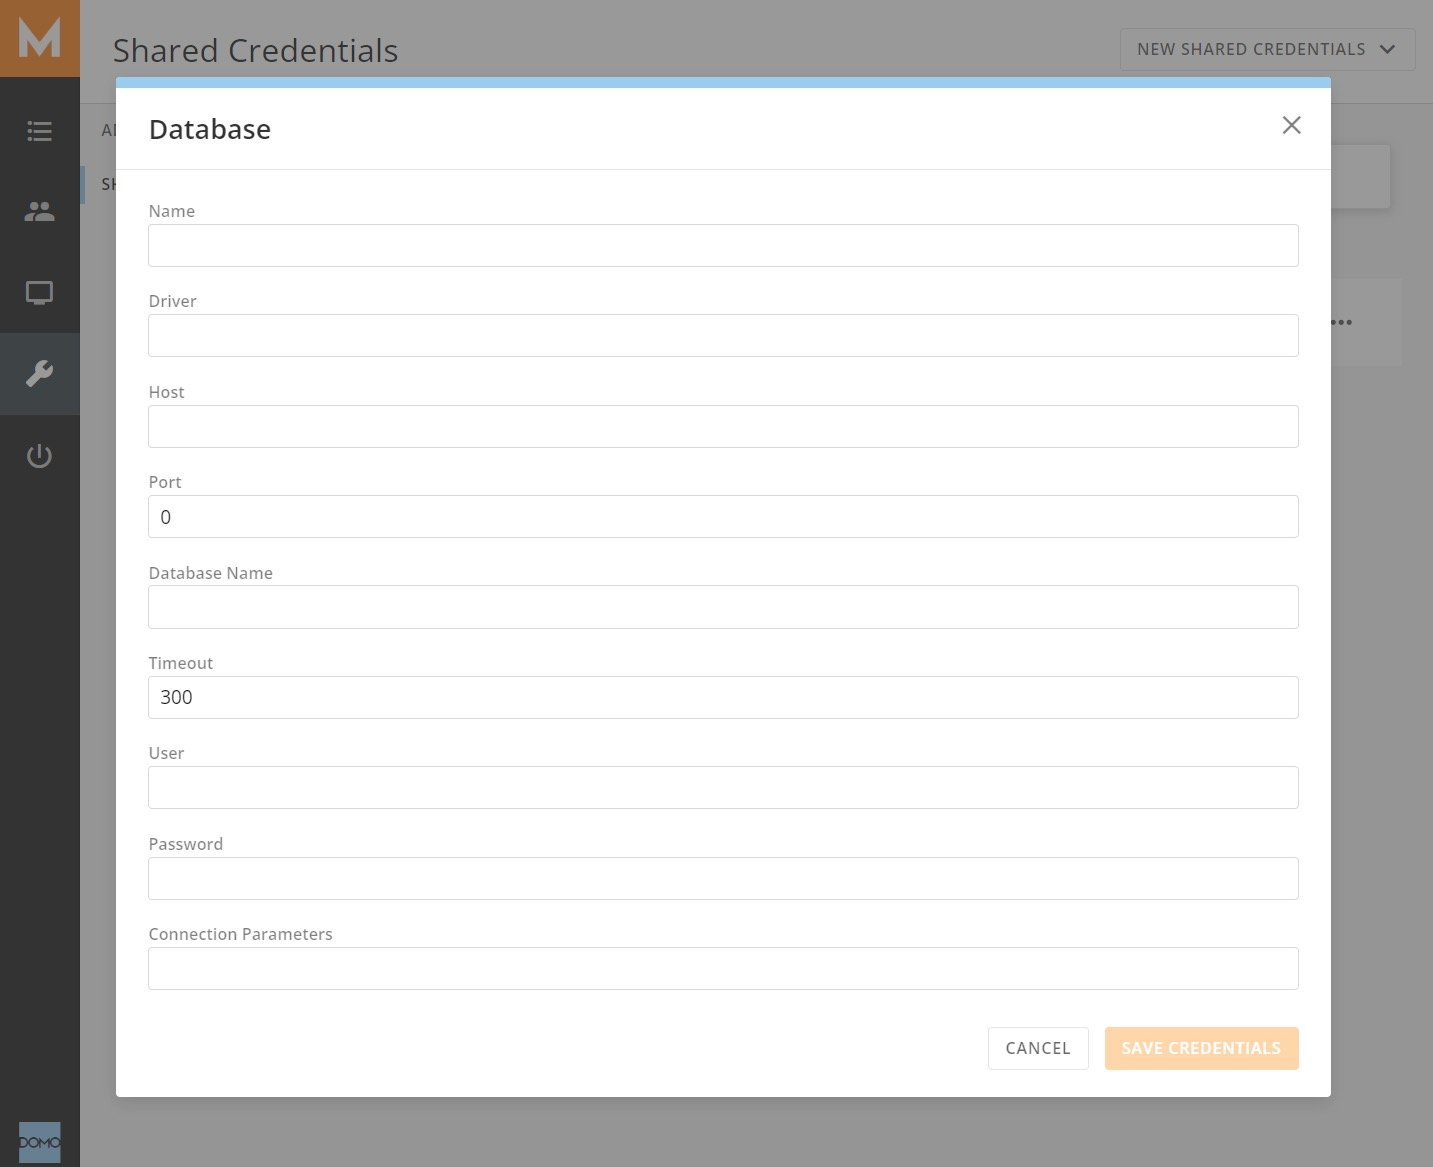 4. Select **Save Credentials**.
# Configure Your First Job
1. Inside Workbench Enterprise, select **Jobs** in the left navigation.
2. Select **New Job**.
3. Enter a name for your job and select **Submit**.
4. In the jobs list, locate and select your job.
5. In the job details view, go to the **Configure** tab.
6. Under **Data**, change the Connection Type to Connection String Builder.
7. Select **Use a database shared credential**.
8. Select the shared credential you configured earlier.
9. Enter the query for your job.
10. Select **Save**.
11. Select **Preview**.
# Import a Job to Workbench Enterprise
Follow these steps to import Workbench jobs into Workbench Enterprise:
1. In your previous Workbench installation, create a backup file that contains your job.
2. In Workbench Enterprise, go to **Admin** > **Workbench Import**.
4. Select **Save Credentials**.
# Configure Your First Job
1. Inside Workbench Enterprise, select **Jobs** in the left navigation.
2. Select **New Job**.
3. Enter a name for your job and select **Submit**.
4. In the jobs list, locate and select your job.
5. In the job details view, go to the **Configure** tab.
6. Under **Data**, change the Connection Type to Connection String Builder.
7. Select **Use a database shared credential**.
8. Select the shared credential you configured earlier.
9. Enter the query for your job.
10. Select **Save**.
11. Select **Preview**.
# Import a Job to Workbench Enterprise
Follow these steps to import Workbench jobs into Workbench Enterprise:
1. In your previous Workbench installation, create a backup file that contains your job.
2. In Workbench Enterprise, go to **Admin** > **Workbench Import**.
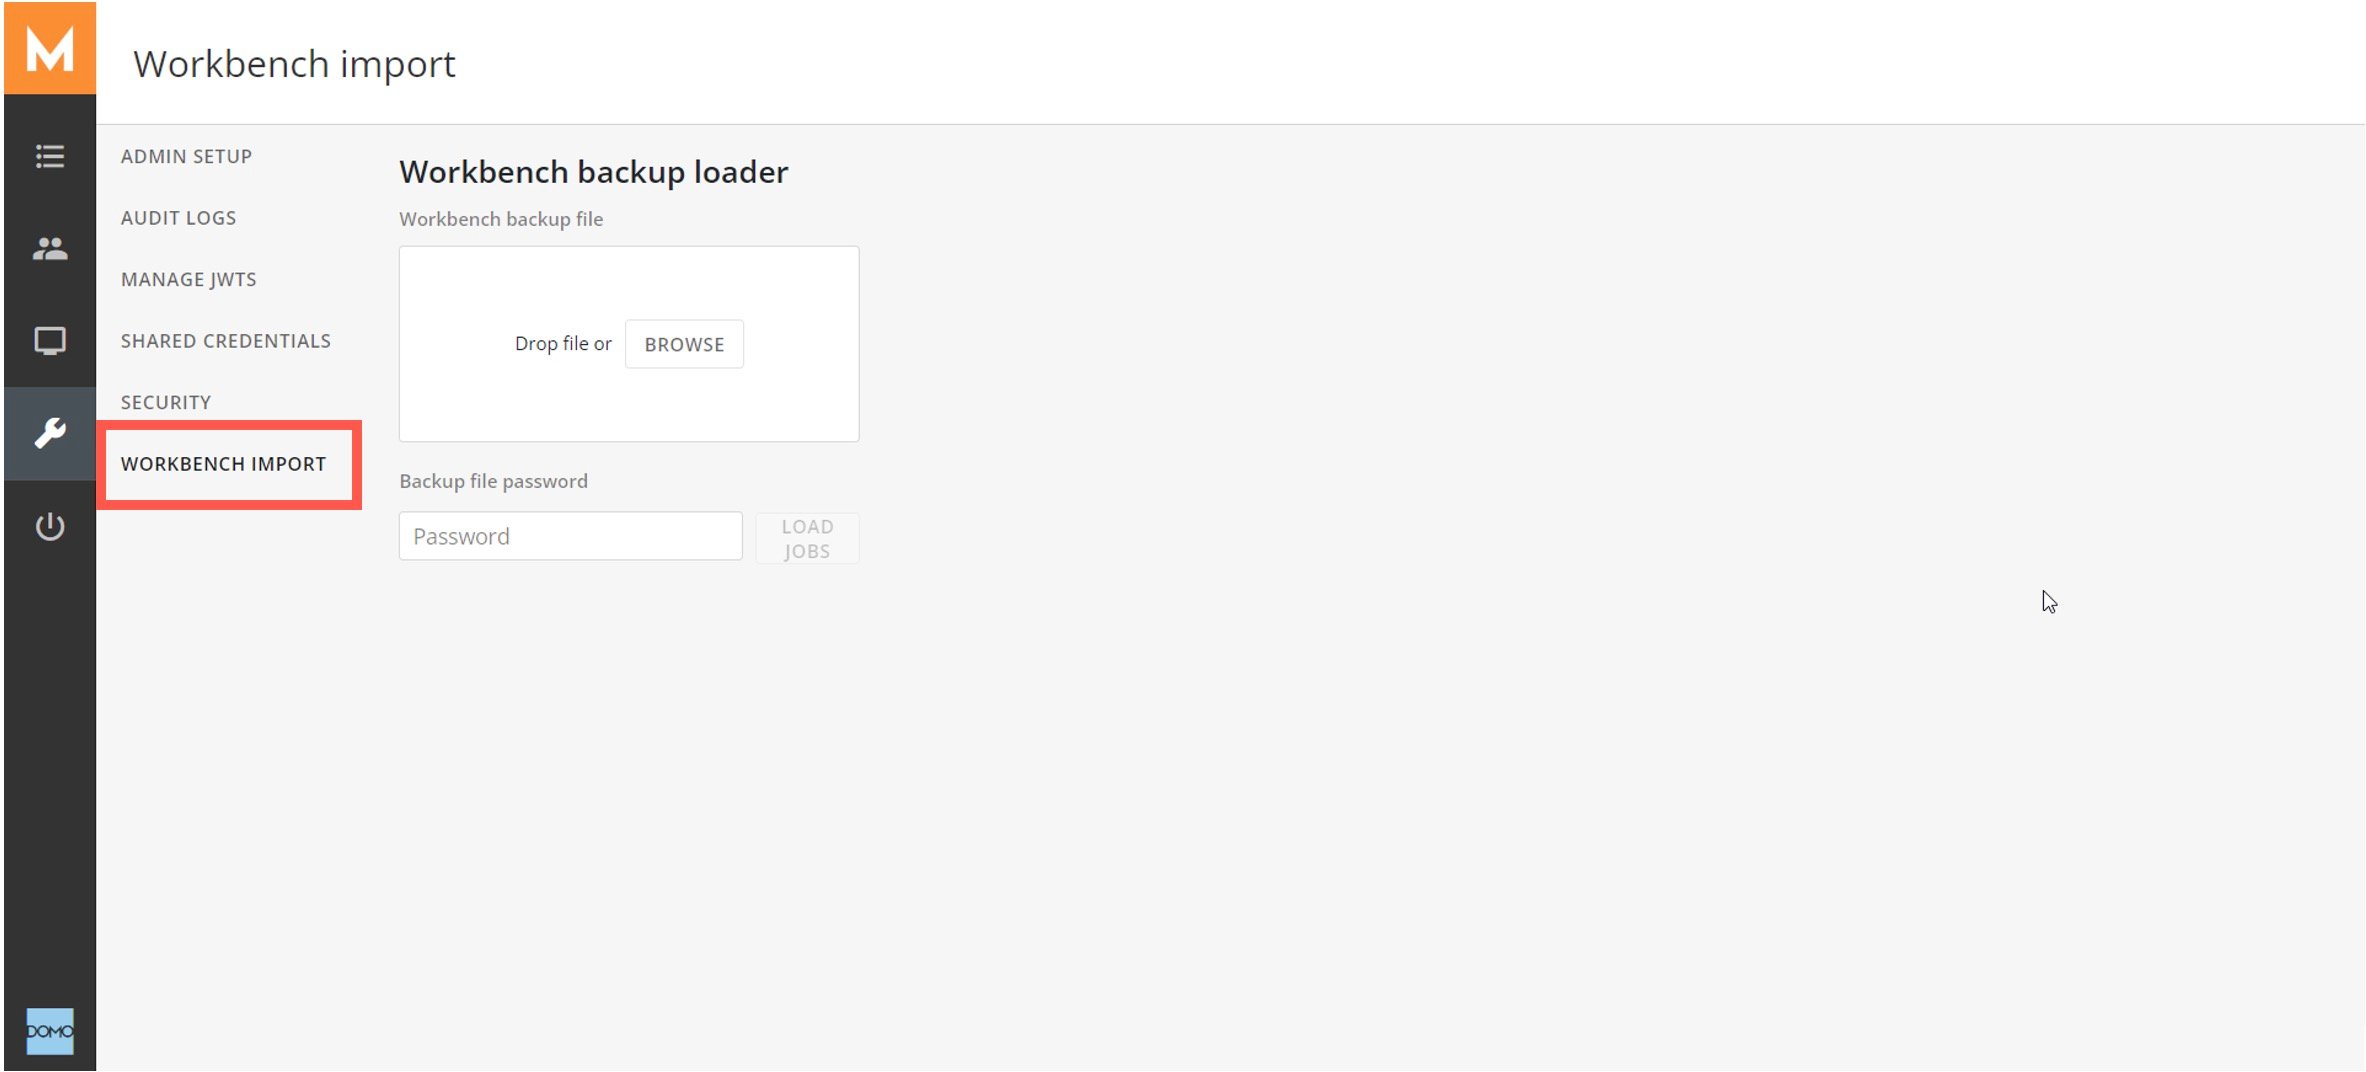 3. Drop your Workbench backup file in the designated space.
4. Under **Backup file password**, enter the password for your backup file and select **Load Jobs**.
5. Select the jobs you want to import from the list and assign them a cluster.
6. When you are ready, select **Import**.
# Run Your First Job
After following the steps to [configure your first job](#configure_first_job), do the following:
1. Inside Workbench Enterprise, select **Jobs** in the left navigation.
2. In the jobs list, locate the job you want to run.
3. Select **More** > **Execute**.
### Share Credentials
Workbench Enterprise admins can share credentials. In the left navigation, go to **Admin** > **Shared Credentials**.
### Use File Watch
You can use File Watch if the plugin you are using supports it. Follow these steps to configure File Watch:
1. Find and select your job in the jobs list.
3. Drop your Workbench backup file in the designated space.
4. Under **Backup file password**, enter the password for your backup file and select **Load Jobs**.
5. Select the jobs you want to import from the list and assign them a cluster.
6. When you are ready, select **Import**.
# Run Your First Job
After following the steps to [configure your first job](#configure_first_job), do the following:
1. Inside Workbench Enterprise, select **Jobs** in the left navigation.
2. In the jobs list, locate the job you want to run.
3. Select **More** > **Execute**.
### Share Credentials
Workbench Enterprise admins can share credentials. In the left navigation, go to **Admin** > **Shared Credentials**.
### Use File Watch
You can use File Watch if the plugin you are using supports it. Follow these steps to configure File Watch:
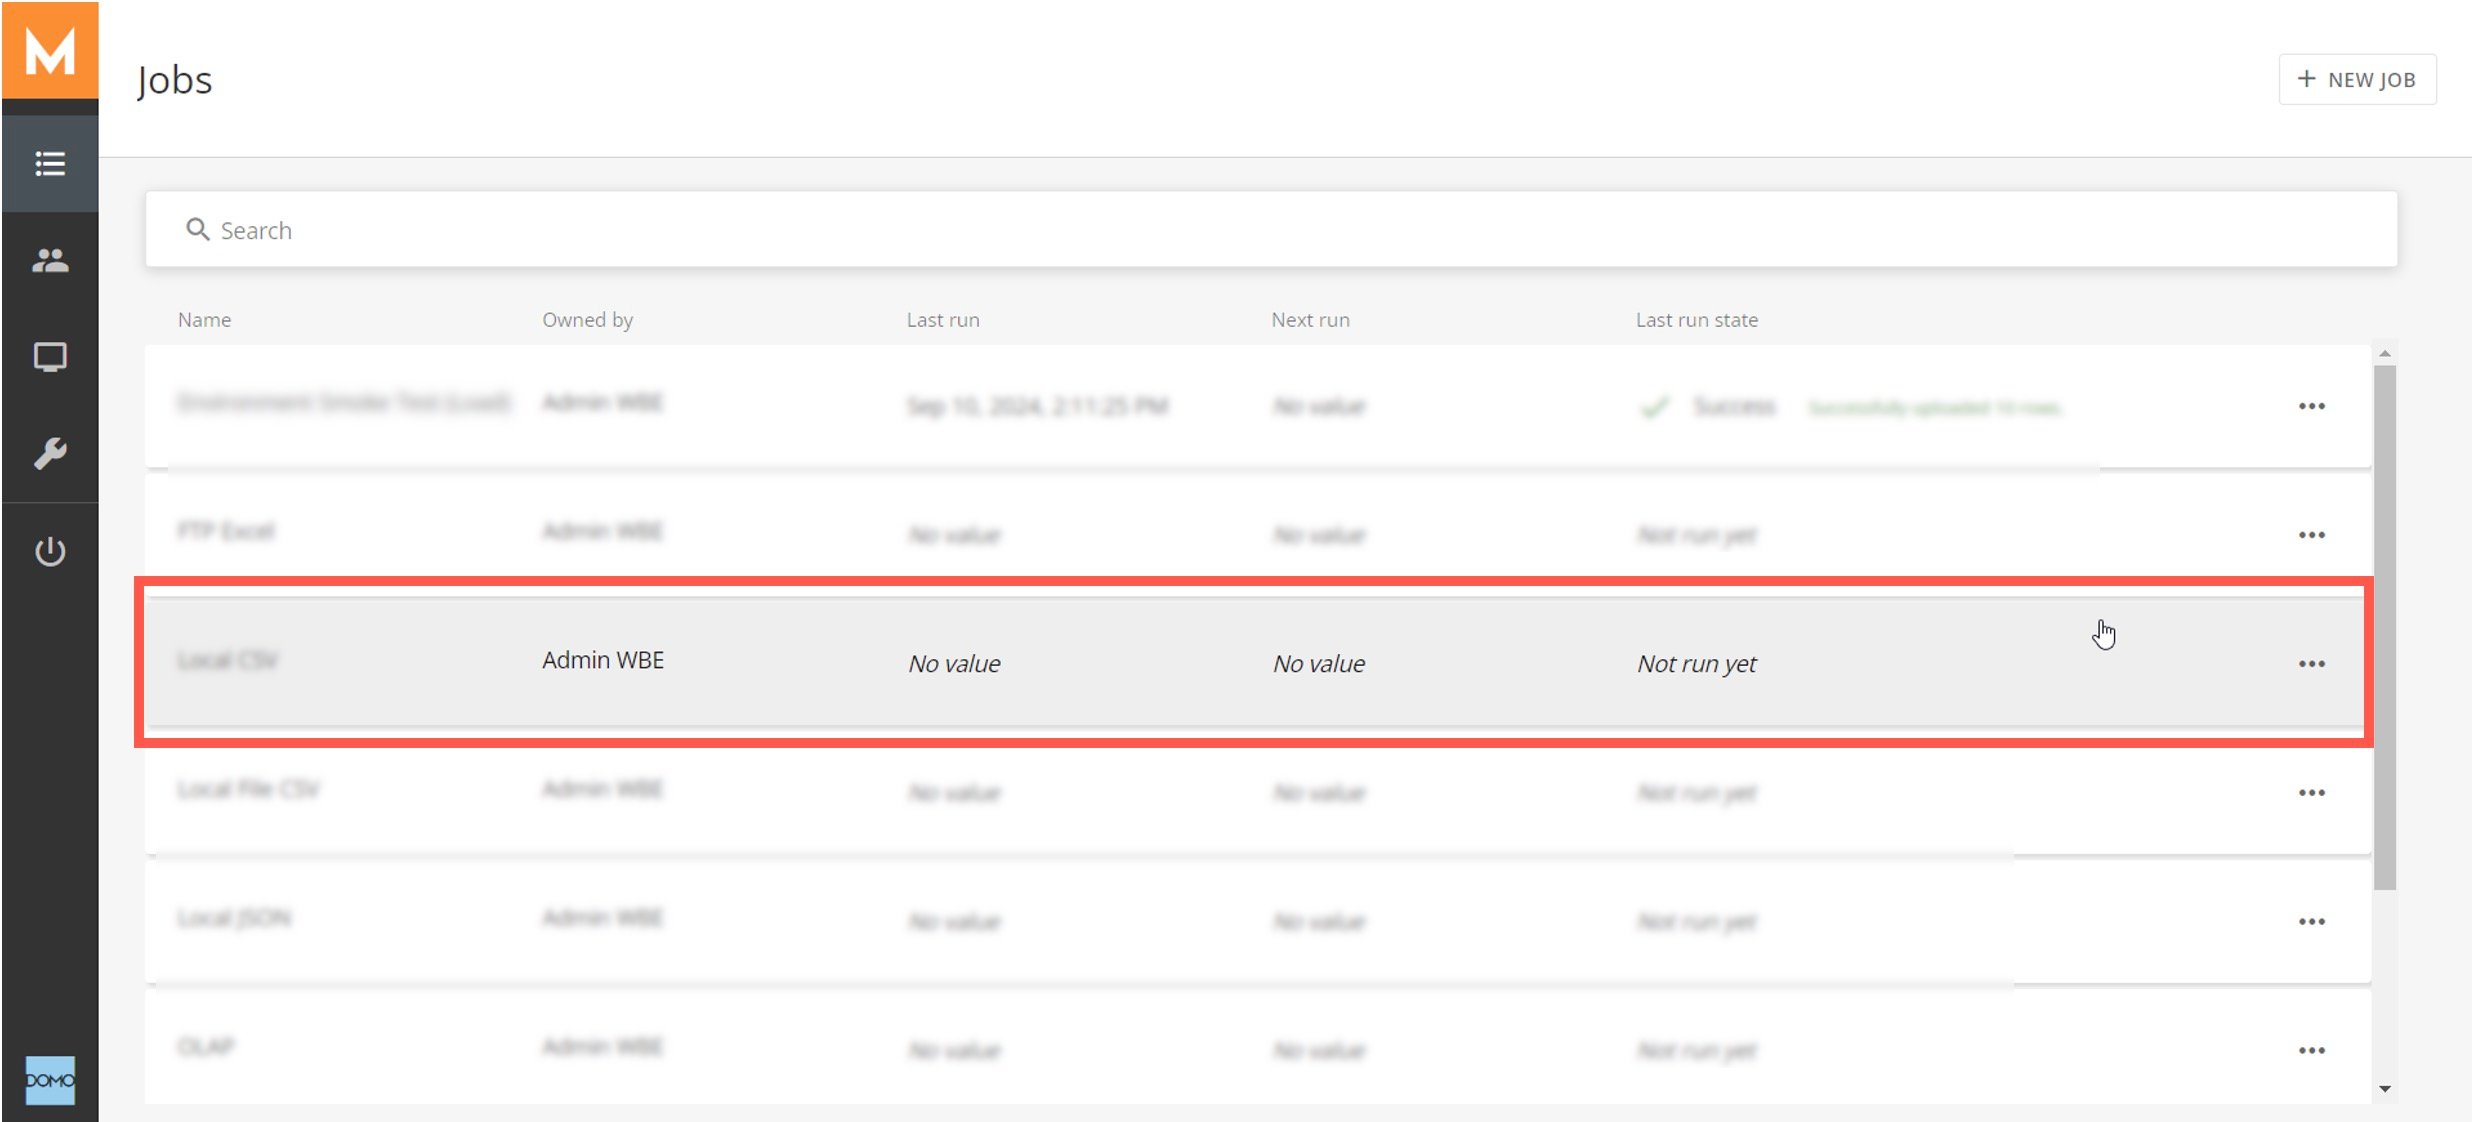
1. Find and select your job in the jobs list.
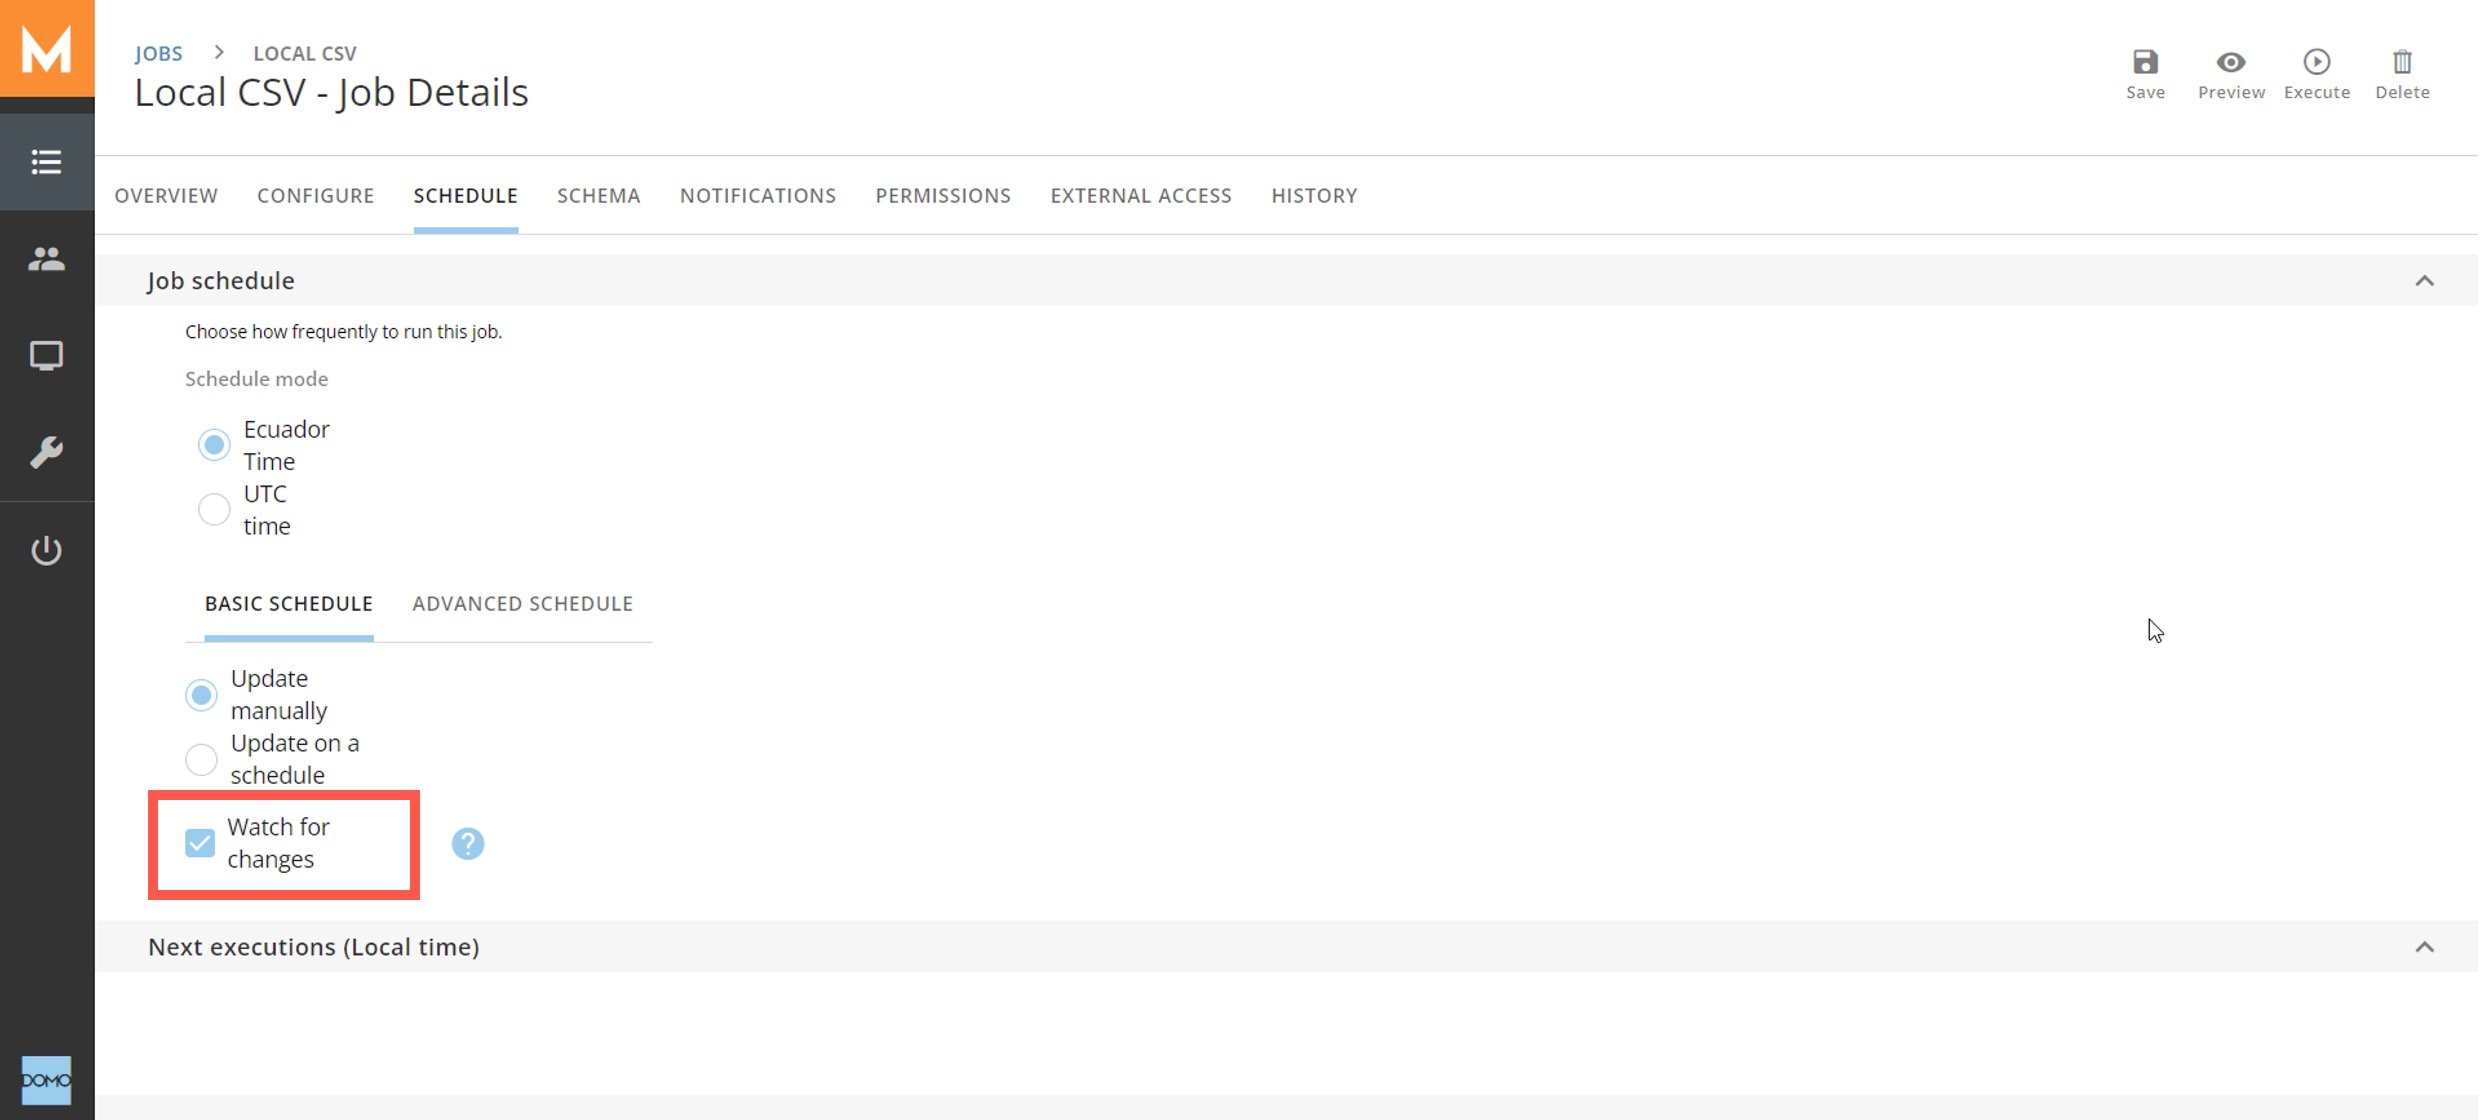
 2. In the **Schedule** tab of the job details, check the box labeled **Watch for changes** in the **Basic Schedule** OR **Advanced Schedule** tab.
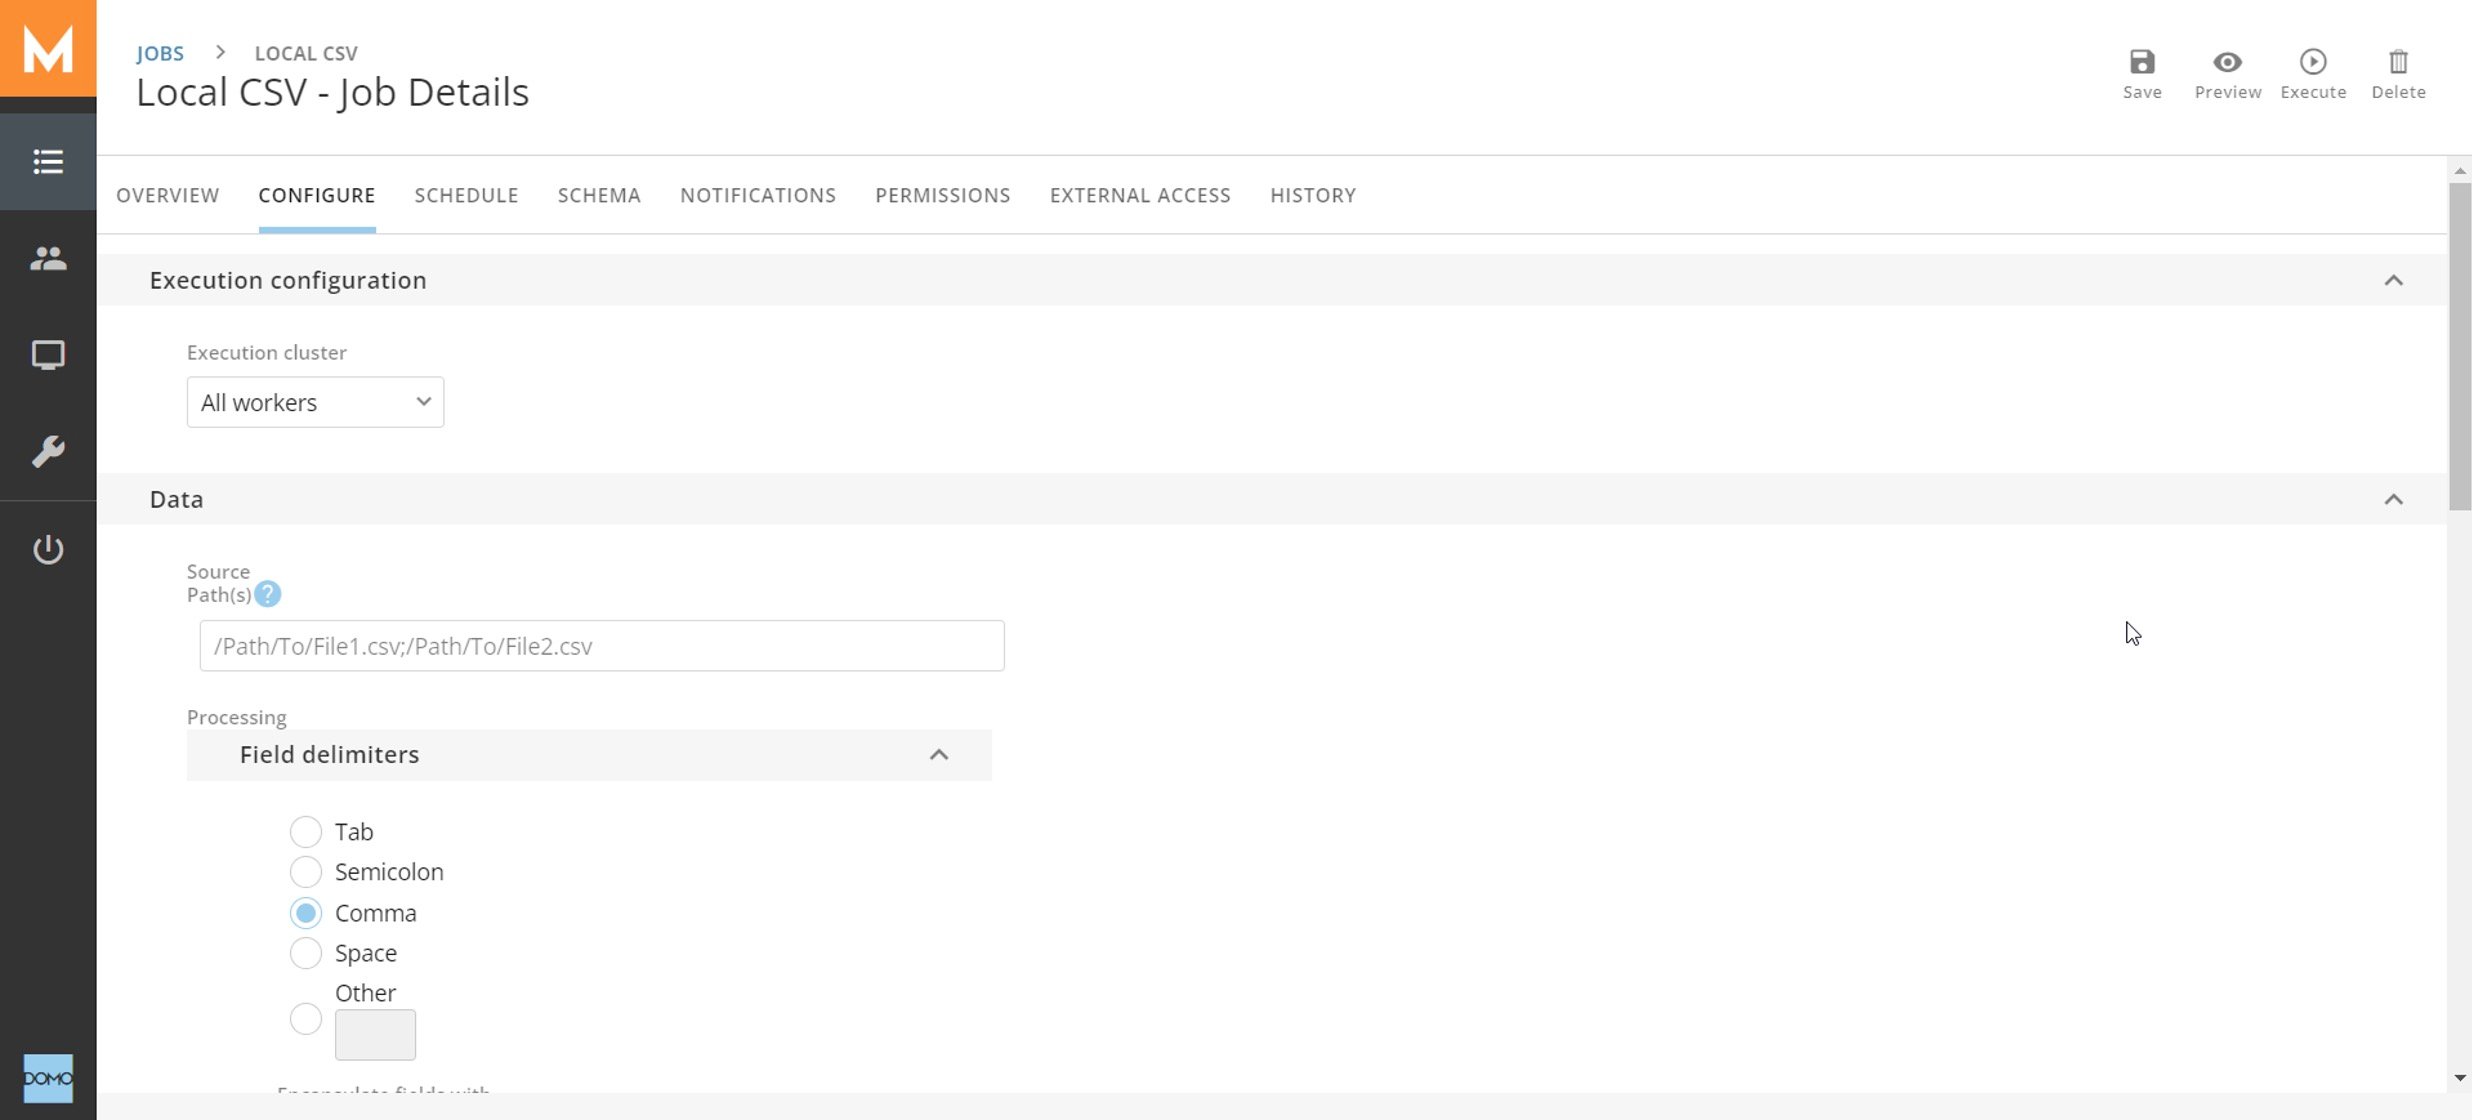
 WBE will begin monitoring changes to your source. In the example below, WBE will watch for changes in File2.csv. If the file changes, the job will execute.
 **Tip:** Learn how to [launch Workbench Enterprise jobs with third-party tools](/s/article/000005587).
### FAQ
##### Connectivity
JDBC is specific to Java-based technologies. Workbench Enterprise is not Java-based, so it can't connect to JDBC drivers. Generally, if a JDBC driver exists, an ODBC driver also exists.
Yes, this is supported.
##### Upgrading & Plug-ins
The Control Center needs to be updated manually because it is a docker container. The nodes, by default, update automatically to be on the same version as the Control Center. This can be disabled on a per-node basis so that they can be manually updated within the Control Center.
No, plug-ins built for Workbench are specific to Workbench, and the same is true for Workbench Enterprise.
Currently, every plug-in works in every environment as long as the environment supports it and is properly configured.
ODBC is harder to configure on Linux.
**Tip:** Learn how to [launch Workbench Enterprise jobs with third-party tools](/s/article/000005587).
### FAQ
##### Connectivity
JDBC is specific to Java-based technologies. Workbench Enterprise is not Java-based, so it can't connect to JDBC drivers. Generally, if a JDBC driver exists, an ODBC driver also exists.
Yes, this is supported.
##### Upgrading & Plug-ins
The Control Center needs to be updated manually because it is a docker container. The nodes, by default, update automatically to be on the same version as the Control Center. This can be disabled on a per-node basis so that they can be manually updated within the Control Center.
No, plug-ins built for Workbench are specific to Workbench, and the same is true for Workbench Enterprise.
Currently, every plug-in works in every environment as long as the environment supports it and is properly configured.
ODBC is harder to configure on Linux.