 8. Scroll below and select
**APIs & Services** under **Quick access**.
#### Enabling APIs
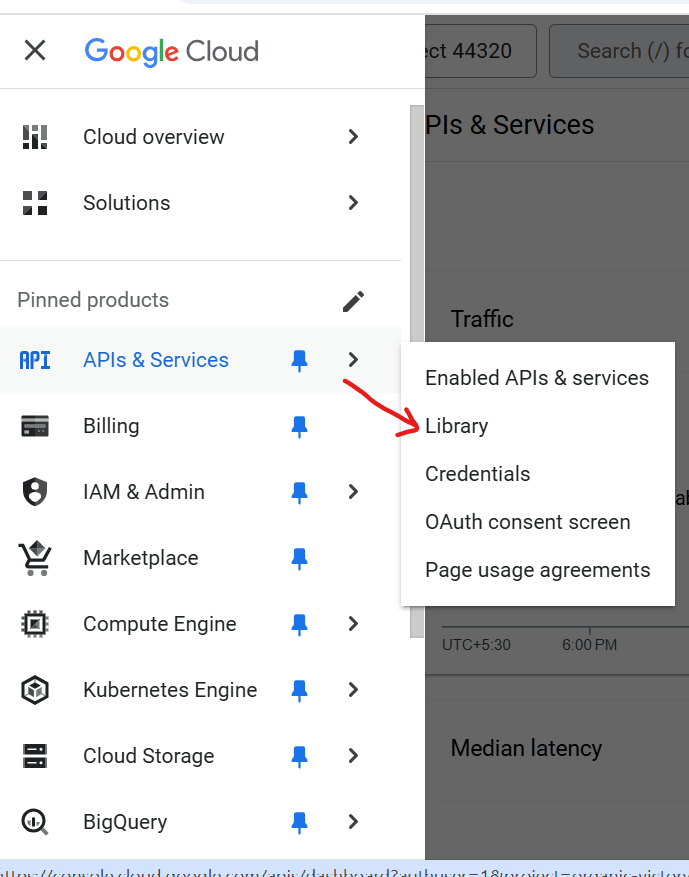
9. On the left navigation menu, select **APIs & Services** > **Library**.
8. Scroll below and select
**APIs & Services** under **Quick access**.
#### Enabling APIs
9. On the left navigation menu, select **APIs & Services** > **Library**.
 10. Scroll down the page and under
**Google Workspace** select **Google Drive API**.
The **Google Drive API** page opens.
11. Click
**Enable**, which allows the API to be used with your project.
You will be returned to the **APIs & Services** page.
#### Setting up OAuth 2.0
12. In the
**APIs and Services page**, select **OAuth consent screen**.
10. Scroll down the page and under
**Google Workspace** select **Google Drive API**.
The **Google Drive API** page opens.
11. Click
**Enable**, which allows the API to be used with your project.
You will be returned to the **APIs & Services** page.
#### Setting up OAuth 2.0
12. In the
**APIs and Services page**, select **OAuth consent screen**.
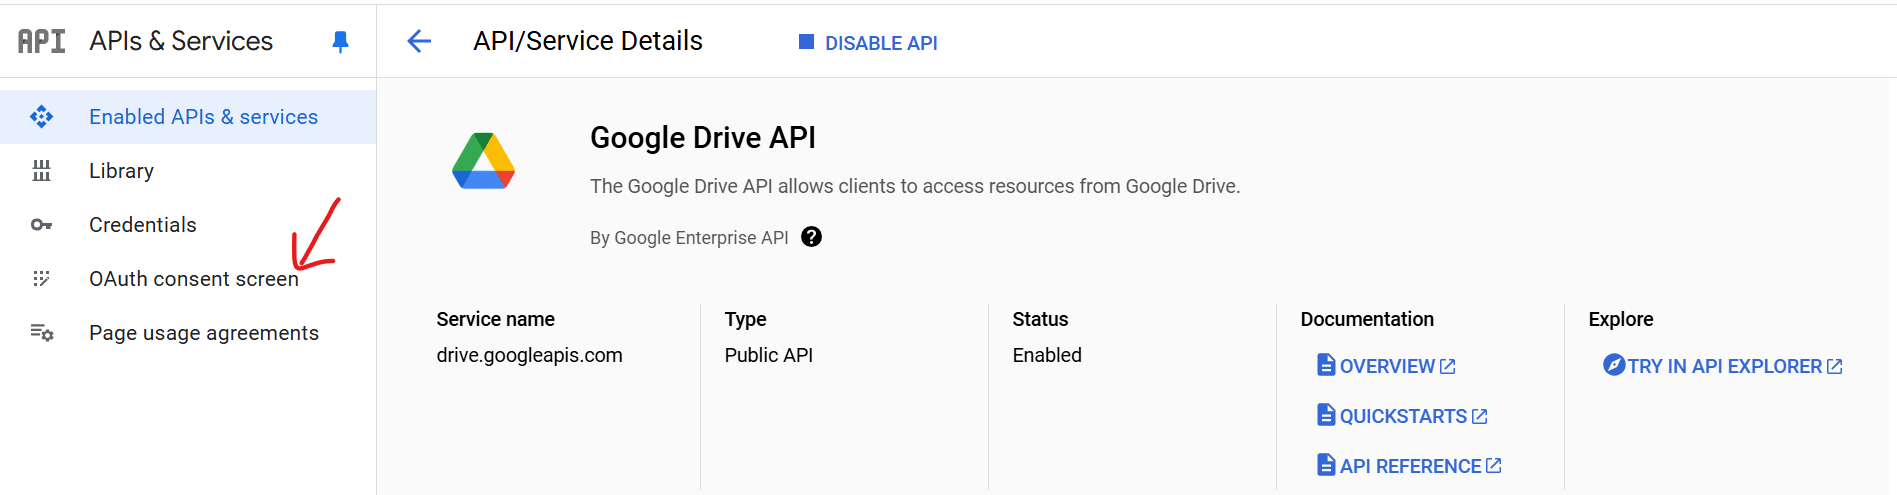 The **OAuth consent screen** opens.
13. Under
**User Type**, select the **External** radio button, and click **CREATE**.
A new page appears where you can configure your OAuth consent screen.
14. In the
**App name** field, enter the app name (It is recommended that you enter the app name as **Google Drive Metadata Connector**).
15. In the
**User support email** drop-down field, select the email (It is recommended to use your email, you will be able to add users in a later step).
16. You don't have to add an
**App logo** or **App domain**.
17. Under
**Authorized domains** section, click **+ ADD DOMAIN**, and in the **Authorized domain** field that appears enter **[domo.com](http://domo.com)**.
18. Under
**Developer contact information**, enter your email address, and click **SAVE AND CONTUNUE**.
The next step in the app registration process, **Scopes** appears.
#### OAuth 2.0: Scopes
19. Select
**ADD OR REMOVE SCOPES**.
The **OAuth consent screen** opens.
13. Under
**User Type**, select the **External** radio button, and click **CREATE**.
A new page appears where you can configure your OAuth consent screen.
14. In the
**App name** field, enter the app name (It is recommended that you enter the app name as **Google Drive Metadata Connector**).
15. In the
**User support email** drop-down field, select the email (It is recommended to use your email, you will be able to add users in a later step).
16. You don't have to add an
**App logo** or **App domain**.
17. Under
**Authorized domains** section, click **+ ADD DOMAIN**, and in the **Authorized domain** field that appears enter **[domo.com](http://domo.com)**.
18. Under
**Developer contact information**, enter your email address, and click **SAVE AND CONTUNUE**.
The next step in the app registration process, **Scopes** appears.
#### OAuth 2.0: Scopes
19. Select
**ADD OR REMOVE SCOPES**.
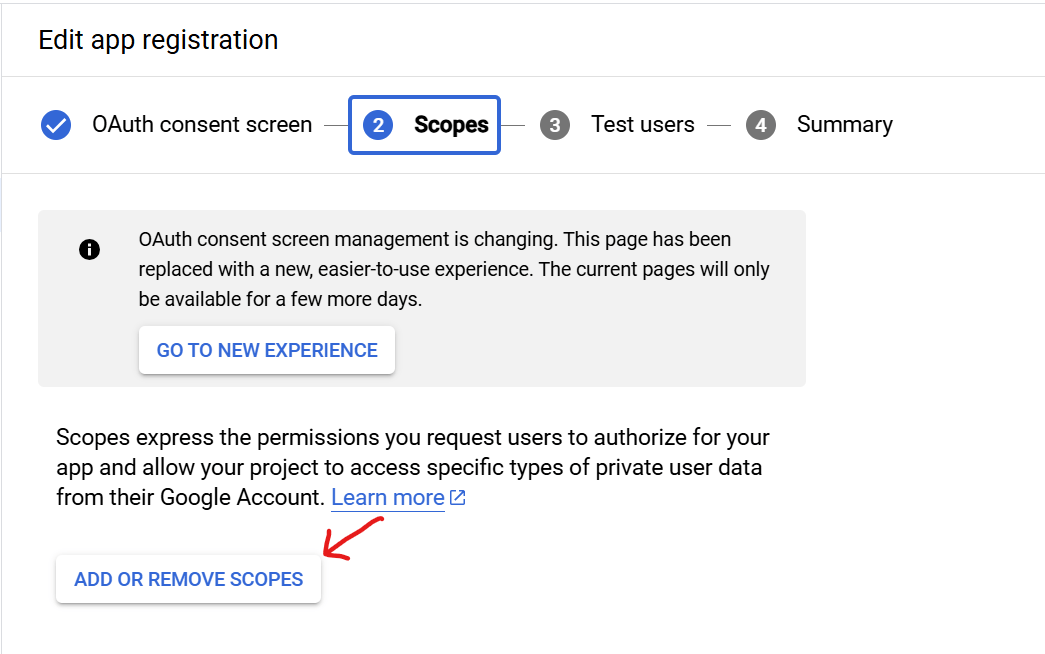 The **Update selected scopes** window appears.
20. In the
**Enter property name or value** search field, enter **[https://www.googleapis.com/auth/drive.metadata.readonly](https://www.googleapis.com/auth/drive.metadata.readonly)** (this is the Google Drive Metadata scope, and must be entered exactly as provided).
The **Update selected scopes** window appears.
20. In the
**Enter property name or value** search field, enter **[https://www.googleapis.com/auth/drive.metadata.readonly](https://www.googleapis.com/auth/drive.metadata.readonly)** (this is the Google Drive Metadata scope, and must be entered exactly as provided).
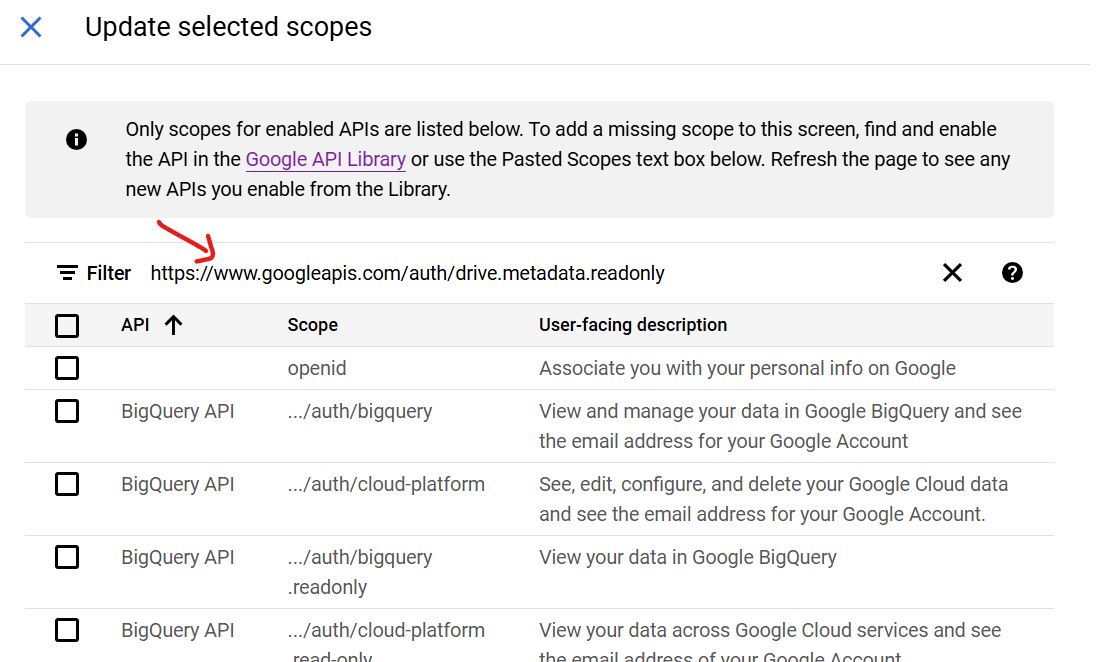 21. After entering the scope, click the suggestion under
**Values**.
21. After entering the scope, click the suggestion under
**Values**.
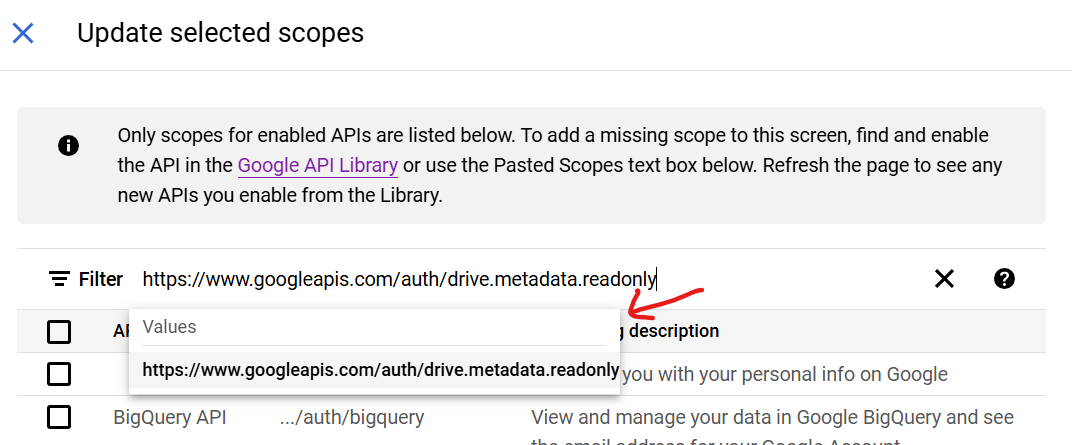 22. Select the
**Google Drive API** checkbox, select **UPDATE**, and click **SAVE AND CONTINUE**. You should ensure to verify that you that the scope you entered is listed under **Your restricted scopes** section in the **Scopes** window. The scope appears as **.../auth/drive.metadata.readonly**.
**Note:** Its is really important that the scope is copied correctly as provided, as the scope need to match the scope used by the connector.
22. Select the
**Google Drive API** checkbox, select **UPDATE**, and click **SAVE AND CONTINUE**. You should ensure to verify that you that the scope you entered is listed under **Your restricted scopes** section in the **Scopes** window. The scope appears as **.../auth/drive.metadata.readonly**.
**Note:** Its is really important that the scope is copied correctly as provided, as the scope need to match the scope used by the connector.
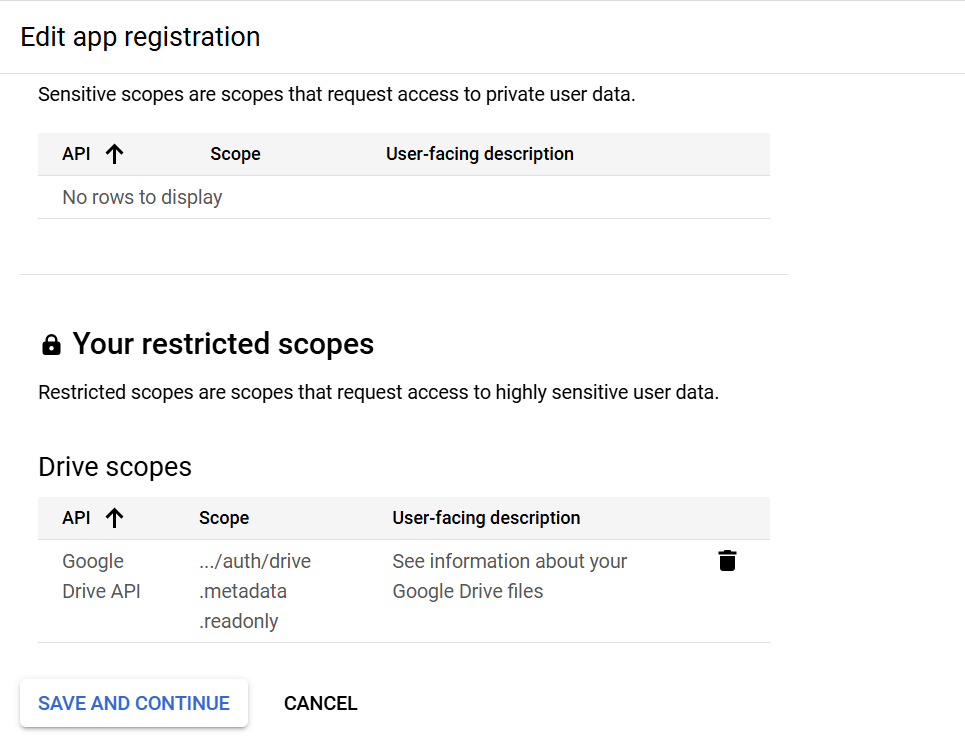 23. Once you have confirmed that the scope has been added, click
**SAVE AND CONTINUE**.
When you click Save And Continue the **Scopes** window closes and the the next step in the OAuth process, which is **Test Users** window opens.
#### OAuth 2.0: Test Users
This page enables you to configure the Test users. These users will be able to use the connector with the credentials created in this process. Up to 100 users can be added without publishing the app through Google.
24. Select
**+ ADD USERS**.
The **Add users** window appears.
25. In the
**Add users** window, enter the email addresses associated with the Google accounts of the users who will be able to use the credentials created in the project for the OAuth 2.0 process.
**Note**: It is recommended that you add anyone from your Domo Instance who will be using the connector. The list of users added will not have access to the Google Cloud Console project or your Google Drive. It only allow them to use the credentials created to complete the OAuth 2.0 process.
26. Once you have added the necessary users, click
**ADD**. The users can be added or removed later as well.
**Note**: Even if an email is used elsewhere (that is for the **User Support Email)**, you still need to add the user as a Test user.
27. Click
**SAVE AND CONTINUE**.
The **Summary** page appears.
#### OAuth 2.0: Summary
28. Ensure that all the information is correct, and click
**BACK TO DASHBOARD**.
you will be navigated back to the **OAuth consent screen**.
### Creating a Client ID
29. In the OAuth consent screen, click
**Credentials**.
23. Once you have confirmed that the scope has been added, click
**SAVE AND CONTINUE**.
When you click Save And Continue the **Scopes** window closes and the the next step in the OAuth process, which is **Test Users** window opens.
#### OAuth 2.0: Test Users
This page enables you to configure the Test users. These users will be able to use the connector with the credentials created in this process. Up to 100 users can be added without publishing the app through Google.
24. Select
**+ ADD USERS**.
The **Add users** window appears.
25. In the
**Add users** window, enter the email addresses associated with the Google accounts of the users who will be able to use the credentials created in the project for the OAuth 2.0 process.
**Note**: It is recommended that you add anyone from your Domo Instance who will be using the connector. The list of users added will not have access to the Google Cloud Console project or your Google Drive. It only allow them to use the credentials created to complete the OAuth 2.0 process.
26. Once you have added the necessary users, click
**ADD**. The users can be added or removed later as well.
**Note**: Even if an email is used elsewhere (that is for the **User Support Email)**, you still need to add the user as a Test user.
27. Click
**SAVE AND CONTINUE**.
The **Summary** page appears.
#### OAuth 2.0: Summary
28. Ensure that all the information is correct, and click
**BACK TO DASHBOARD**.
you will be navigated back to the **OAuth consent screen**.
### Creating a Client ID
29. In the OAuth consent screen, click
**Credentials**.
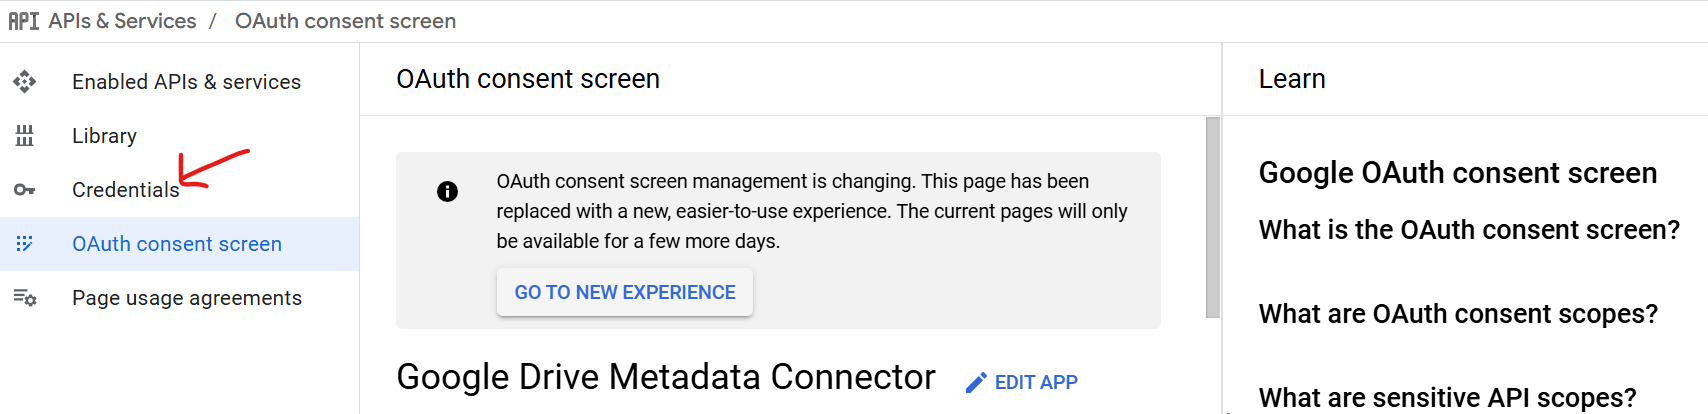 30. Click
**+ CREATE CREDENTIALS** > **OAuth client ID**.
31. From the
**Application type** drop-down list, select **Web application**.
32. In the
**Name** field, enter a client name (it is recommended that you use the client name as Domo Drive Connector Client).
33. Scroll to the
**Authorized redirect URIs** section, and click **+ ADD URI**.
34. In the URIs text box, enter **[https://oauth.domo.com/api/data/v2/oauth/providers/google-drive-metadata-98e4dc30-1712-4b80-85ec-ed6cf3cb1e6b/exchange](https://oauth.domo.com/api/data/v2/oauth/providers/google-drive-metadata-98e4dc30-1712-4b80-85ec-ed6cf3cb1e6b/exchange)**.
35. Click
**CREATE**.
36. A pop-up window appears with the generated
**Client ID** and **Client secret**. Ensure to save the Client ID and Client secret in a secure place, but you can also view in your cloud console by navigating back to the **Credentials** Dashboard. These credentials can also be downloaded in JSON format.
## Connecting to Your Google Drive Metadata Account
This section enumerates the options in the **Credentials** and **Details** panes on the Google Drive Metadata Connector page. The components of the other panes on this page, **Scheduling**, and **Name & Describe Your DataSet**, are universal across most connector types and are discussed in great detail in [Adding a DataSet Using a Connector](https://domo-support.domo.com/s/article/360042926274?language=en_US "Adding a DataSet Using a Connector").
## Credentials Pane
Once you have entered valid Google Drive Metadata credentials, you can use the same account at any time to create a new Google Drive Metadata DataSet. You can manage connector accounts in the **Accounts** tab in the Data Center. For more information about this tab, see [Manage Connector/Adapter Accounts](https://domo-support.domo.com/s/article/360042926054?language=en_US "Manage Connector/Adapter Accounts").
## Details Pane
Select the Google Drive Metadata report you want to run. The following reports are available:
30. Click
**+ CREATE CREDENTIALS** > **OAuth client ID**.
31. From the
**Application type** drop-down list, select **Web application**.
32. In the
**Name** field, enter a client name (it is recommended that you use the client name as Domo Drive Connector Client).
33. Scroll to the
**Authorized redirect URIs** section, and click **+ ADD URI**.
34. In the URIs text box, enter **[https://oauth.domo.com/api/data/v2/oauth/providers/google-drive-metadata-98e4dc30-1712-4b80-85ec-ed6cf3cb1e6b/exchange](https://oauth.domo.com/api/data/v2/oauth/providers/google-drive-metadata-98e4dc30-1712-4b80-85ec-ed6cf3cb1e6b/exchange)**.
35. Click
**CREATE**.
36. A pop-up window appears with the generated
**Client ID** and **Client secret**. Ensure to save the Client ID and Client secret in a secure place, but you can also view in your cloud console by navigating back to the **Credentials** Dashboard. These credentials can also be downloaded in JSON format.
## Connecting to Your Google Drive Metadata Account
This section enumerates the options in the **Credentials** and **Details** panes on the Google Drive Metadata Connector page. The components of the other panes on this page, **Scheduling**, and **Name & Describe Your DataSet**, are universal across most connector types and are discussed in great detail in [Adding a DataSet Using a Connector](https://domo-support.domo.com/s/article/360042926274?language=en_US "Adding a DataSet Using a Connector").
## Credentials Pane
Once you have entered valid Google Drive Metadata credentials, you can use the same account at any time to create a new Google Drive Metadata DataSet. You can manage connector accounts in the **Accounts** tab in the Data Center. For more information about this tab, see [Manage Connector/Adapter Accounts](https://domo-support.domo.com/s/article/360042926054?language=en_US "Manage Connector/Adapter Accounts").
## Details Pane
Select the Google Drive Metadata report you want to run. The following reports are available:
| Menu | Description | ||||
| {" "} Report{" "} |
|
||||
| {" "} File Name Contains{" "} | {" "} Enter the word(s) for which you would like to filter the file names.{" "} | ||||
| {" "} File Location{" "} | {" "} Enter the name of the location or the folder that contains the files for which you would like to receive the data. Note that "Shared with Me" and "My Drive" are considered their own, separate locations.{" "} |