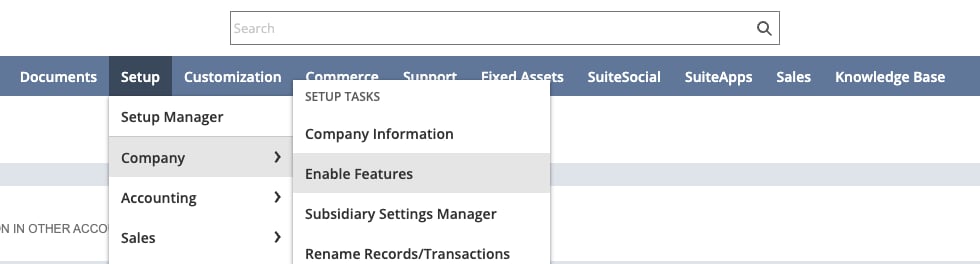
 2. Click the **SuiteCloud** subtab.
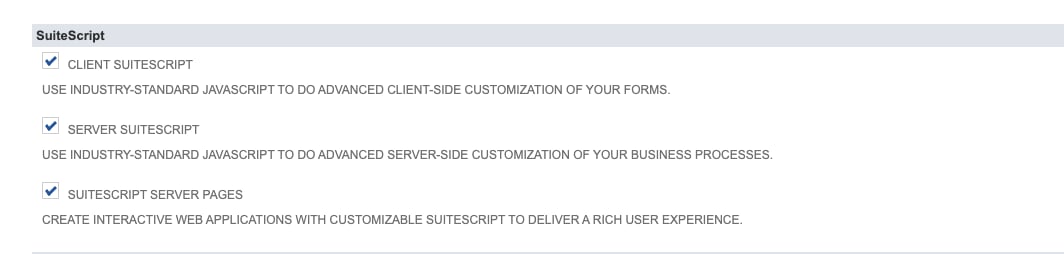
3. In the SuiteScript section, select the following checkboxes:
* **Client SuiteScript**. Select **I Agree** on the SuiteCloud Terms of Service page.
* **Server SuiteScript**. Select **I Agree** on the SuiteCloud Terms of Service page.
**Note:** You must enable both the Client SuiteScript and Server SuiteScript features to use the OAuth 2.0 feature for RESTlets.
2. Click the **SuiteCloud** subtab.
3. In the SuiteScript section, select the following checkboxes:
* **Client SuiteScript**. Select **I Agree** on the SuiteCloud Terms of Service page.
* **Server SuiteScript**. Select **I Agree** on the SuiteCloud Terms of Service page.
**Note:** You must enable both the Client SuiteScript and Server SuiteScript features to use the OAuth 2.0 feature for RESTlets.
 4. In the **Manage Authentication** section, select the **OAuth 2.0** checkbox. Click **I Agree** on the SuiteCloud Terms of Service page.
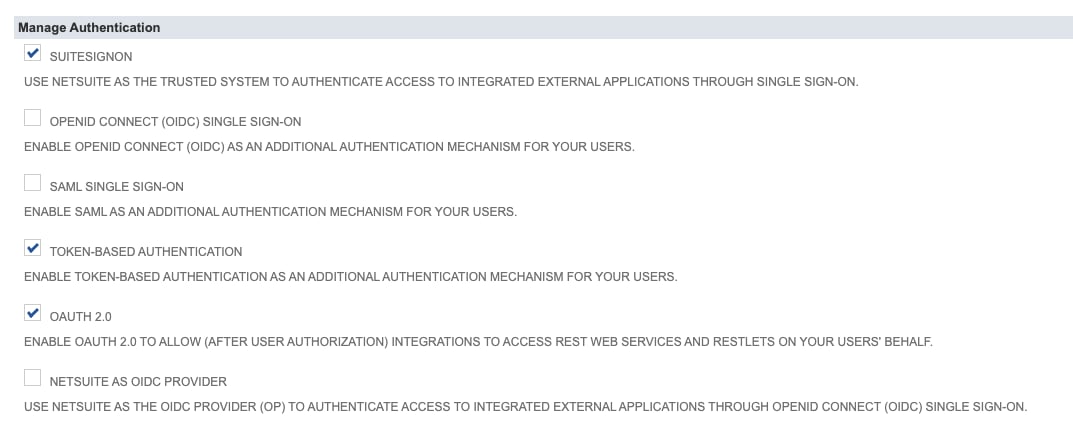 5. Click **Save**.
**Note:** The **Manage OAuth 2.0 Authorized Applications** link becomes available in the Settings portlet for users with a role that has been assigned Log in Using OAuth 2.0 Access Token permission. Users can only list their own OAuth 2.0 authorized applications through this link. Administrators and users with OAuth 2.0 Authorized Applications Management permission can list all authorized applications in the account on **Setup** > **Users/Roles** > **OAuth 2.0 Authorized Applications**.
## Create Integration Records for Applications to Use OAuth 2.0
#### To create an integration record for an application:
1. Go to **Setup** > **Integration** > **Manage Integrations** > **New**.
2. Enter a name for your application in the **Name** field.
3. Enter a description in the **Description** field, if required.
4. Select Enabled in the **State** field.
5. Enter a note in the **Note** field, if required
6. On the **Authentication** tab, select the appropriate checkboxes for your application:
* Under OAuth 2.0 Tab
* Check/Enable Authorization Code Grant
* Enter the Redirect URI:
[https://oauth.domo.com/api/data/v1/oauth/providers/netsuite-jdbc-oauth/exchange](https://oauth.domo.com/api/data/v1/oauth/providers/netsuite-jdbc-oauth/exchange)
* Refresh token validity (in hours): 720
* Scope > Check SuiteAnalytics Connect
* OAuth 2.0 Consent Policy > Always Ask
5. Click **Save**.
**Note:** The **Manage OAuth 2.0 Authorized Applications** link becomes available in the Settings portlet for users with a role that has been assigned Log in Using OAuth 2.0 Access Token permission. Users can only list their own OAuth 2.0 authorized applications through this link. Administrators and users with OAuth 2.0 Authorized Applications Management permission can list all authorized applications in the account on **Setup** > **Users/Roles** > **OAuth 2.0 Authorized Applications**.
## Create Integration Records for Applications to Use OAuth 2.0
#### To create an integration record for an application:
1. Go to **Setup** > **Integration** > **Manage Integrations** > **New**.
2. Enter a name for your application in the **Name** field.
3. Enter a description in the **Description** field, if required.
4. Select Enabled in the **State** field.
5. Enter a note in the **Note** field, if required
6. On the **Authentication** tab, select the appropriate checkboxes for your application:
* Under OAuth 2.0 Tab
* Check/Enable Authorization Code Grant
* Enter the Redirect URI:
[https://oauth.domo.com/api/data/v1/oauth/providers/netsuite-jdbc-oauth/exchange](https://oauth.domo.com/api/data/v1/oauth/providers/netsuite-jdbc-oauth/exchange)
* Refresh token validity (in hours): 720
* Scope > Check SuiteAnalytics Connect
* OAuth 2.0 Consent Policy > Always Ask
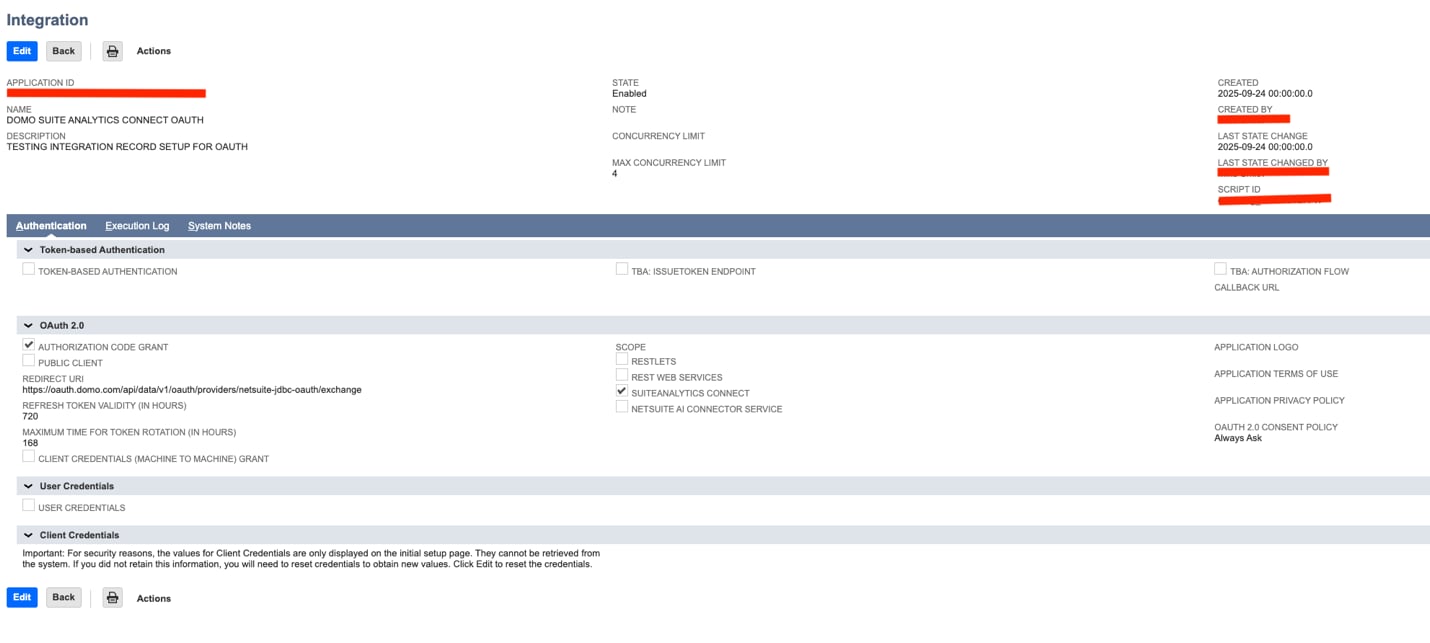 7. Click **Save**.
Once the integration is created successfully Consumer Key/Client ID & Consumer Secret/Client Secret are shown under Client Credentials Tab.
**Note**: For security reasons, the values for Client Credentials are only displayed on the initial setup page. They cannot be retrieved from the system. If you did not retain this information, you will need to reset your credentials to obtain new values. Click Edit to reset the credentials.
## Connecting to Your NetSuite JDBC OAuth Account
This section enumerates the options in the **Credentials** and **Details** panes on the NetSuite JDBC OAuth Connector page. The components of the other panes on this page, **Scheduling**, and **Name & Describe Your DataSet**, are universal across most connector types and are discussed in great detail in [Adding a DataSet Using a Connector](https://domo-support.domo.com/s/article/360042926274?language=en_US "Adding a DataSet Using a Connector").
## Credentials Pane
This pane contains fields for entering credentials to connect to your NetSuite JDBC OAuth account. The following table describes what is needed for each field:
7. Click **Save**.
Once the integration is created successfully Consumer Key/Client ID & Consumer Secret/Client Secret are shown under Client Credentials Tab.
**Note**: For security reasons, the values for Client Credentials are only displayed on the initial setup page. They cannot be retrieved from the system. If you did not retain this information, you will need to reset your credentials to obtain new values. Click Edit to reset the credentials.
## Connecting to Your NetSuite JDBC OAuth Account
This section enumerates the options in the **Credentials** and **Details** panes on the NetSuite JDBC OAuth Connector page. The components of the other panes on this page, **Scheduling**, and **Name & Describe Your DataSet**, are universal across most connector types and are discussed in great detail in [Adding a DataSet Using a Connector](https://domo-support.domo.com/s/article/360042926274?language=en_US "Adding a DataSet Using a Connector").
## Credentials Pane
This pane contains fields for entering credentials to connect to your NetSuite JDBC OAuth account. The following table describes what is needed for each field:
Field | Description |
|---|---|
| Service Host | Enter the name of your NetSuite Service Host. For more information, see the Prerequisites section. |
| Service Port | Enter your NetSuite Service Port number. For more information, see the Prerequisites section. |
| Service Data Source | Enter the name of your NetSuite Service Data Source. For more information, see the Prerequisites section. |
| Role ID | Enter your NetSuite Role ID number. For more information, see the Prerequisites section. |
| Account ID | Enter your NetSuite Account ID number. For more information, see the Prerequisites section. |
| Username | Enter your NetSuite username. |
Consumer Key/ Client ID | Enter the Client ID associated with your NetSuite account. |
Consumer Secret/ Client Secret | Enter the Client Secret associated with your NetSuite account. |
Menu | Description |
|---|---|
| Query | To select the data you want to import, enter a Structured Query Language (SQL) query into the Query field. Using the Query Helper If you need assistance in creating a simple query, use the Query Helper :
|
| Database Tables | If you already have your query, you can ignore this section and enter it directly into the Query field. The Query Helper assists you in building a basic SQL query. Steps to Generate a Query Follow these steps to generate a query using the Query Helper:
|
| Table Columns | You can browse and select the available columns within the table chosen from the Database Tables menu. Selecting a column will automatically include it in the sample SQL query that appears in the Query Helper field. |
| Query Helper | The Query Helper field displays a sample SQL query based on the columns you select in the Table Columns field.
|