> ## Documentation Index
> Fetch the complete documentation index at: https://domoinc-openapi-sync-dataflows.mintlify.site/llms.txt
> Use this file to discover all available pages before exploring further.

# Connecting to SAP HANA Data in Workbench 5

export const InlineImage = ({src, alt = '', height = '1.6em'}) => {
  return <img noZoom src={src} alt={alt} style={{
    display: 'inline',
    verticalAlign: 'start',
    height: height,
    margin: '0'
  }} />;
};

## Intro

The Domo SAP HANA Plugin allows you to create jobs in Workbench 5 to get the Data from your SAP HANA database in Domo. The SAP HANA plugin uses SAP HANA ODBC driver for connecting to your database. Thus, you will need to install the SAP HANA ODBC driver for using this plugin.

The SAP HANA plugin also supports end-to-end trace. For more info please see [End-to-end tracing](#h_01ES70X2XWTZ3T9P2BPEC7S0VT "Connecting to SAP HANA Data in Workbench 5") section.

This tutorial teaches you how to use the Domo SAP HANA ODBC Plugin to connect to your SAP HANA data.

## Prerequisites

* Windows 10 64-bit operating system
* Domo Workbench
* SAP HANA ODBC Driver
* SAP HANA Plugin

## Installing the SAP HANA ODBC Driver

You can download the SAP HANA ODBC driver from SAP Support Package Stack.

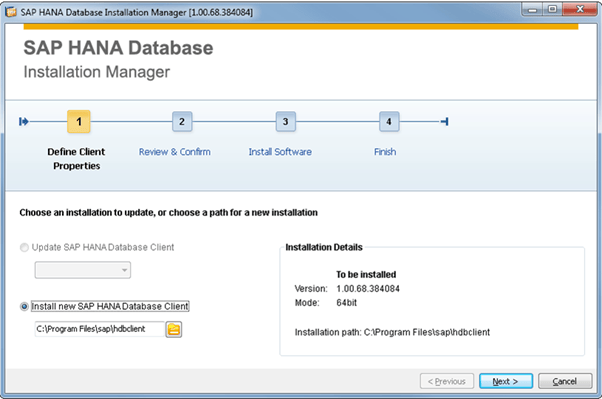
1. Launch hdbsetup.exe in HDB\_CLIENT\_WINDOWS\_X86\_64. The
   **Install new SAP HANA Database Client** option is automatically selected.

<Frame>
  <img alt="clipboard_e52f242b7f83114904a870a4ceb08ca85.png" src="https://mintcdn.com/domoinc-openapi-sync-dataflows/wsUUuFj2iQGL8oiS/images/kb/ka05w00000123rn-00N5w00000Ri7BU-0EM5w000005vPKx.png?fit=max&auto=format&n=wsUUuFj2iQGL8oiS&q=85&s=d4e9b83538e81a1834d4a559482b0ed7" width="602" height="399" data-path="images/kb/ka05w00000123rn-00N5w00000Ri7BU-0EM5w000005vPKx.png" />
</Frame>

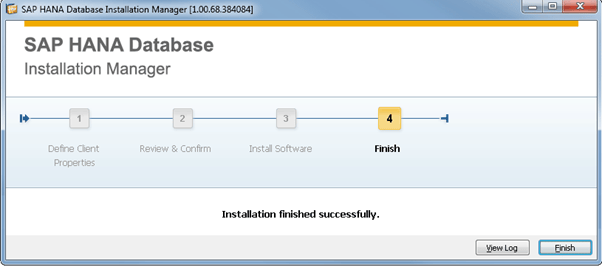
2. Click
   **Install** and wait for the installation to finish.
<Frame>
  <img alt="clipboard_e43201196b8dddebc921ba9e81e9ed7ae.png" src="https://mintcdn.com/domoinc-openapi-sync-dataflows/wsUUuFj2iQGL8oiS/images/kb/ka05w00000123rn-00N5w00000Ri7BU-0EM5w000005vPKy.png?fit=max&auto=format&n=wsUUuFj2iQGL8oiS&q=85&s=966ae0e50cc71ee6ef738cd44bc28408" width="602" height="267" data-path="images/kb/ka05w00000123rn-00N5w00000Ri7BU-0EM5w000005vPKy.png" />
</Frame>

3. Click
   **Finish**.

## Installing the SAP HANA Data Provider Plugin in Domo Workbench

All Workbench plugins are contained within Dynamic Link Libraries (DLLs). You can add plugins to Workbench by selecting the desired DLL on your machine or network.

### Adding SAP HANA plugin to Workbench
<Note>
  **Note:** Your SAP HANA plugin must be located in a subdirectory of the chosen directory.
</Note>

1. Click <InlineImage src="/images/kb/ka05w00000123rn-00N5w00000Ri7BU-0EM5w000005vPLz.png" /> in the left-hand icon bar.

2. Click
   **Plugins** in the **More** pane. (If you do not see this pane, click <InlineImage src="/images/kb/ka05w00000123rn-00N5w00000Ri7BU-0EM5w000005vPLv.png" /> to expand it.) The **Plugin Manager** opens.

3. Under
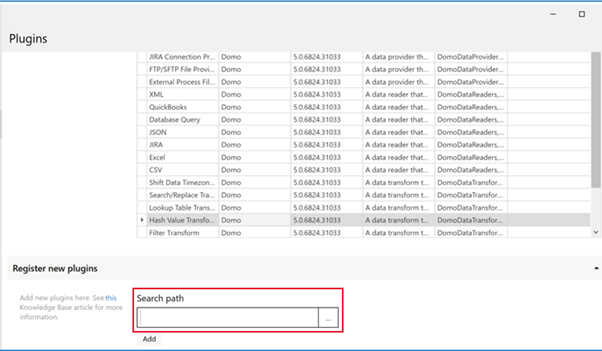
   **Register new plugins** click the ellipsis (**...**) next to the **Search path** field.

   <Frame>
     <img alt="clipboard_e4efaf33bb01785ea914d5012fba1ea4e.png" src="https://mintcdn.com/domoinc-openapi-sync-dataflows/wsUUuFj2iQGL8oiS/images/kb/ka05w00000123rn-00N5w00000Ri7BU-0EM5w000005vPLx.png?fit=max&auto=format&n=wsUUuFj2iQGL8oiS&q=85&s=c7ba5e58dbe21b315e4989f1ed70035c" width="602" height="351" data-path="images/kb/ka05w00000123rn-00N5w00000Ri7BU-0EM5w000005vPLx.png" />
   </Frame>

4. On your machine or network, locate and open the folder that contains a folder with all DLLs of SAP HANA Plugin.

5. Click
   **Add** after you have chosen your directory.

## Connecting to the SAP HANA Data

### Creating a SAP HANA DataSet job in Workbench 5

1. Click the
   <InlineImage src="/images/kb/ka05w00000123rn-00N5w00000Ri7BU-0EM5w000005vPM0.png" /> icon in the left-hand icon bar.

2. Click the
   **+** button in the top right corner of the jobs listing pane.

3. Select the desired account (Domo instance) in the
   **Domo Domain** dropdown menu. If you have only one account set up, that account is already chosen for you and the menu is unavailable.

4. In the
   **Name** field, enter a name for the DataSet Job.

This is the name of the job as it appears in Workbench, *not* the name of the uploaded DataSet in Domo.

5. In the
   **Transport Type** menu, select **SAP HANA Data Provider**.

6. In the
   **Reader Type** menu, select **Database Query**.

7. In the
   **DataSet Name** field, enter the name of the DataSet. This is the name of the uploaded DataSet in Domo. This is the *only* setting you can change after saving the new job.

8. In the
   **DataSet Type** field, select the type of DataSet in the dropdown.

The DataSet type you select or enter here is reflected as the connector type in Domo after you execute the job.

9. Enter a description for the DataSet if desired.

This is the description of the DataSet as it appears in Domo.

10. Click
    **Create**.

A new SAP HANA DataSet Job is added to the list of jobs for the currently authenticated account. Note that after creating the job, you cannot edit any of the settings you just configured except for the DataSet name. If you want to change any of the other settings, you must create a new job.

11. Click the
    **Configure** subtab.

12. Click the
    **Edit** button under "Source." A panel opens with options for configuring your SAP HANA connection and defining your query.

13. In the
    **Connection Type** field, select a connection option.

The following table describes the available options:

<table border="1" cellpadding="0" cellspacing="0" data-aura-rendered-by="33:195;a"><tbody><tr><td colspan="1" rowspan="1" valign="top" width="204"><b> Option </b></td><td colspan="1" rowspan="1" valign="top" width="397"><b> Description </b></td></tr><tr><td colspan="1" rowspan="1" valign="top" width="204"> System DSN </td><td colspan="1" rowspan="1" valign="top" width="397"> Select your SAP HANA DSN. </td></tr><tr><td colspan="1" rowspan="1" valign="top" width="204"> Connection Builder </td><td colspan="1" rowspan="1" valign="top" width="397"> Enter details for your SAP HANA connection, such as login credentials, server URL, database name, and port. </td></tr><tr><td colspan="1" rowspan="1" valign="top" width="204"> Connection String </td><td colspan="1" rowspan="1" valign="top" width="397"> Enter a single string for your connection. </td></tr></tbody></table>

14. (Conditional) Do one of the following:

* If you selected **System DSN** as your **Connection Type**...

  1. In the **System DSN** menu, select the desired system DSN from those available in your system. Please note that only the DSNs created for SAP HANA ODBC driver will be listed in the options.
  2. (Conditional) If this DSN connection requires credentials to connect, set **Required Credentials** to **On**, then enter your username and password in the appropriate fields. Otherwise set **Required Credentials** to **Off**.

* If you selected **Connection Builder** as your **Connection Type**...

  1. Enter the appropriate information in the fields. Some parameters may or may not be required, depending on your connection.

     You can use the following table for reference:

     <table border="1" cellpadding="0" cellspacing="0" data-aura-rendered-by="33:195;a"><tbody><tr><td colspan="1" rowspan="1" valign="top" width="196"><b> Field </b></td><td colspan="1" rowspan="1" valign="top" width="405"><b> Description </b></td></tr><tr><td colspan="1" rowspan="1" valign="top" width="196"> Server </td><td colspan="1" rowspan="1" valign="top" width="405"> Specify the server name or URL for your database. </td></tr><tr><td colspan="1" rowspan="1" valign="top" width="196"> Database </td><td colspan="1" rowspan="1" valign="top" width="405"> Specify the name of your database to access. </td></tr><tr><td colspan="1" rowspan="1" valign="top" width="196"> Port </td><td colspan="1" rowspan="1" valign="top" width="405"> Enter the port number where your database is found. The default port in the SAP HANA plugin is 30015 </td></tr><tr><td colspan="1" rowspan="1" valign="top" width="196"> Username </td><td colspan="1" rowspan="1" valign="top" width="405"> Specify the username you use to connect to your database. </td></tr><tr><td colspan="1" rowspan="1" valign="top" width="196"> Password </td><td colspan="1" rowspan="1" valign="top" width="405"> Specify the password you use to connect to your database. </td></tr><tr><td colspan="1" rowspan="1" valign="top"> Requires 32-bit Execution </td><td colspan="1" rowspan="1" valign="top"> Select this check box if you want to use 32-bit SAP HANA Driver for connection. Please note that you will need a 32-bit SAP HANA Driver already installed on the system. </td></tr></tbody></table>

* If you selected **Connection String** as your **Connection Type...**

  1. Enter a connection string to connect to the data source.

  2. Select this check box **Requires 32-bit Execution** if you want to use the 32-bit SAP HANA Driver.

15. Click **Apply**.

## End-to-end tracing

The SAP HANA plugin support end-to-end trace functionality of SAP HANA database. Every connection made using the plugin with the SAP HANA Database has 2 session variables: APPLICATION and APPLICATIONUSER. By default, SAP HANA plugin sets the **APPLICATION** session variable as **DOMO** and **APPLICATIONUSER** session variable as-

a. **Windows user**, if the workbench Job is set to use impersonation

b. **Domo user** otherwise

If you want to explicitly specify the values for the session variables (APPLICATION and APPLICATIONUSER session variables), you can use any of the following approaches:

* ### Adding the session variables to the connection string

You can select the connection type as Connection String, and add the required session variables to the connection string. More information on setting a session variable in HANA connection strings can be found at the SAP Help Portal as [Setting Session-Specific Client Information](https://help.sap.com/viewer/0eec0d68141541d1b07893a39944924e/2.0.04/en-US/e90fa1f0e06e4840aa3ee2278afae16b.html).

Example connection string:

DSN=HANADataSource;UID=myUser;PWD=myPassword;sessionVariable:APPLICATION=myapp;sessionVariable:APPLICATIONUSER=user1

* ### Setting up the DSNs with the session variable

DOMO Workbench relies on an ODBC Data Source Name (DSN) when connecting to a database. The data source is defined by the end user in the ODBC Administrator, which in turn calls the SAP HANA ODBC driver.

1. From your Windows 10 desktop, click the
   **Start** Button and search for ODBC Data Sources. Click ODBC Data Sources (64-bit).

<Note>
  **Note:** An ODBC Data Source is NOT the same thing as a Domo DataSet.
</Note>

2. From the
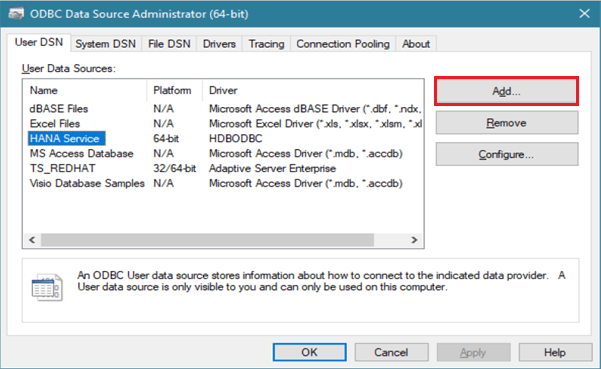
   **ODBC Source Administrator** window, select **HANA Service** and click **Add….**

<Frame>
  <img alt="clipboard_ec65dd5c45eb58621e40f2fa69002dda3.png" src="https://mintcdn.com/domoinc-openapi-sync-dataflows/wsUUuFj2iQGL8oiS/images/kb/ka05w00000123rn-00N5w00000Ri7BU-0EM5w000005vPLw.png?fit=max&auto=format&n=wsUUuFj2iQGL8oiS&q=85&s=a5a2ea63bd98e4cb4cfa980bfce0e2cd" width="601" height="369" data-path="images/kb/ka05w00000123rn-00N5w00000Ri7BU-0EM5w000005vPLw.png" />
</Frame>

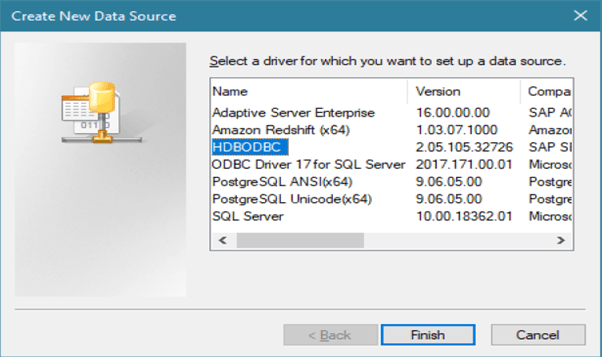
3. Select the SAP HANA ODBC driver
   **(HDODBC)** and click **Finish**.
<Frame>
  <img alt="clipboard_e8c62705a464c3bad59f705c39136ad91.png" src="https://mintcdn.com/domoinc-openapi-sync-dataflows/wsUUuFj2iQGL8oiS/images/kb/ka05w00000123rn-00N5w00000Ri7BU-0EM5w000005vPLt.png?fit=max&auto=format&n=wsUUuFj2iQGL8oiS&q=85&s=3ad489f555b3849397e5386fd3b4261a" width="602" height="357" data-path="images/kb/ka05w00000123rn-00N5w00000Ri7BU-0EM5w000005vPLt.png" />
</Frame>

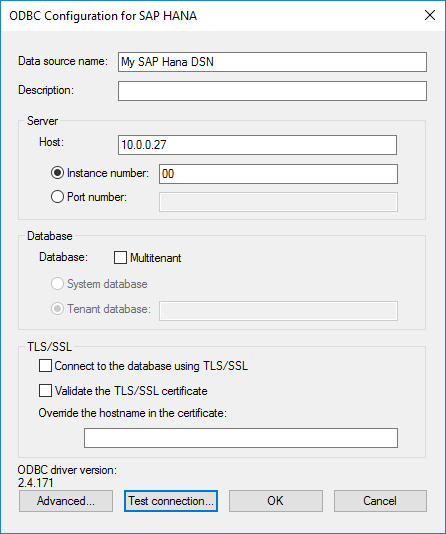
4. Enter a name for the data source, host IP, instance number or port number for your SAP HANA database.
<Frame>
  <img alt="clipboard_e143f0b24469f94e0e03e55ee383d2922.png" src="https://mintcdn.com/domoinc-openapi-sync-dataflows/wsUUuFj2iQGL8oiS/images/kb/ka05w00000123rn-00N5w00000Ri7BU-0EM5w000005vPM1.png?fit=max&auto=format&n=wsUUuFj2iQGL8oiS&q=85&s=3a952fdc21d96edd9dd3b14942e09cfd" width="446" height="534" data-path="images/kb/ka05w00000123rn-00N5w00000Ri7BU-0EM5w000005vPM1.png" />
</Frame>

5. Click the
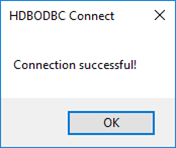
   **Test Connection** button to check if the configurations are correct. You will see a success message as below if the DSN is configured correctly.
<Frame>
  <img alt="clipboard_ece3c74911b01da5bfab2af08502a2cae.png" src="https://mintcdn.com/domoinc-openapi-sync-dataflows/wsUUuFj2iQGL8oiS/images/kb/ka05w00000123rn-00N5w00000Ri7BU-0EM5w000005vPLs.png?fit=max&auto=format&n=wsUUuFj2iQGL8oiS&q=85&s=052a9ea4a91d217bd81e15bd396e42be" width="176" height="148" data-path="images/kb/ka05w00000123rn-00N5w00000Ri7BU-0EM5w000005vPLs.png" />
</Frame>

6. Once it is configured, Click on
   **Advanced**.

7. Click
   **Add**.

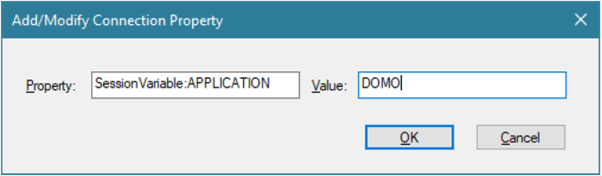
8. In the
   **Add/Modify Connection** window, enter the **SessionVariable:APPLICATION** connection property.
<Note>
  **Note:** SessionVariable is case insensitive.
</Note>

<Frame>
  <img alt="clipboard_ea56a76340c29b89d55907e6734e8820e.png" src="https://mintcdn.com/domoinc-openapi-sync-dataflows/wsUUuFj2iQGL8oiS/images/kb/ka05w00000123rn-00N5w00000Ri7BU-0EM5w000005vPLy.png?fit=max&auto=format&n=wsUUuFj2iQGL8oiS&q=85&s=b09938f010736ea522a8e76b420bd941" width="602" height="176" data-path="images/kb/ka05w00000123rn-00N5w00000Ri7BU-0EM5w000005vPLy.png" />
</Frame>

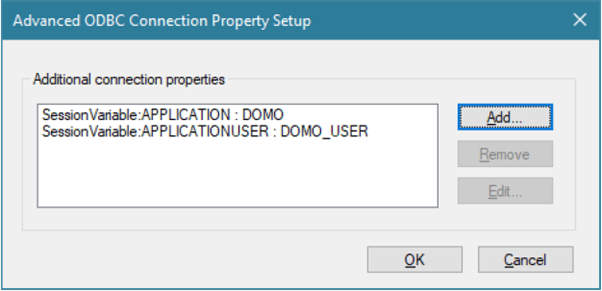
9. Similarly, add
   **SessionVariable:APPLICATIONUSER** connection property.
<Note>
  **Note:** The APPLICATIONUSER can be the Domo user you are logged in as. It is not necessary to be the database user.
</Note>

10. Your session variables will appear like this.

<Frame>
  <img alt="clipboard_e19747a8ad88f3a58d97d3f5467219f15.png" src="https://mintcdn.com/domoinc-openapi-sync-dataflows/wsUUuFj2iQGL8oiS/images/kb/ka05w00000123rn-00N5w00000Ri7BU-0EM5w000005vPLu.png?fit=max&auto=format&n=wsUUuFj2iQGL8oiS&q=85&s=24976dd61b42ed081fbfbcc517d94fad" width="602" height="291" data-path="images/kb/ka05w00000123rn-00N5w00000Ri7BU-0EM5w000005vPLu.png" />
</Frame>