> ## Documentation Index
> Fetch the complete documentation index at: https://domoinc-openapi-sync-dataflows.mintlify.site/llms.txt
> Use this file to discover all available pages before exploring further.

# Create a SQL DataFlow

export const InlineImage = ({src, alt = '', height = '1.6em'}) => {
  return <img noZoom src={src} alt={alt} style={{
    display: 'inline',
    verticalAlign: 'start',
    height: height,
    margin: '0'
  }} />;
};

### Intro

Create DataFlows to combine and transform your data using SQL queries. This is a more technical DataFlow solution than using Magic ETL but may provide a greater breadth of options. Learn how to [create a Magic ETL DataFlow](https://domo-support.domo.com/s/article/360055259234?language=en_US).

<Warning>
  **Important:** Input DataSets in a DataFlow cannot be restricted by PDP policies—all available rows *must* pass through the DataFlow. Because of this, you must apply PDP policies to the output DataSets generated by a DataFlow.

  When you build a DataFlow using an input DataSet with PDP policies in place, the DataFlow breaks unless at least one of the following criteria applies:

  * You have an Admin security profile or a custom role with the Manage DataFlows grant enabled.
  * You are the DataSet owner.
  * You are part of the "All Rows" policy. This gives you access to all of the rows in the DataSet.

  For more information about using PDP with DataFlows, see PDP and DataFusions/DataFlows.
</Warning>

You access the interface for creating a SQL DataFlow from the Data Center. For more information about the Data Center, see [Data Center Layout](https://domo-support.domo.com/s/article/360047553253?language=en_US).

***

### Create a SQL DataFlow

Follow the steps below to create a SQL DataFlow.

<Note>
  **Notes:**

  * Redshift does NOT support stored procedures, as documented
    [here](http://docs.aws.amazon.com/redshift/latest/dg/c_unsupported-postgresql-features.html) <InlineImage src="/images/kb/ka0Vq000000GoaL-00N5w00000Ri7BU-0EMVq000005kLBR.jpg" />. The alternative is to use a MySQL DataFlow—MySQL supports stored procedures.

  * Redshift DataFlows are NOT supported on Azure environments. If you have an Azure-backed environment (rather than a default AWS environment), Redshift DataFlows will not work.
</Note>

**To begin:** Go to the Data Center (select **Data** in the Domo navigation).

1. Select **Transform Data** > **SQL Transforms**.

   The DataFlow creation screen displays.
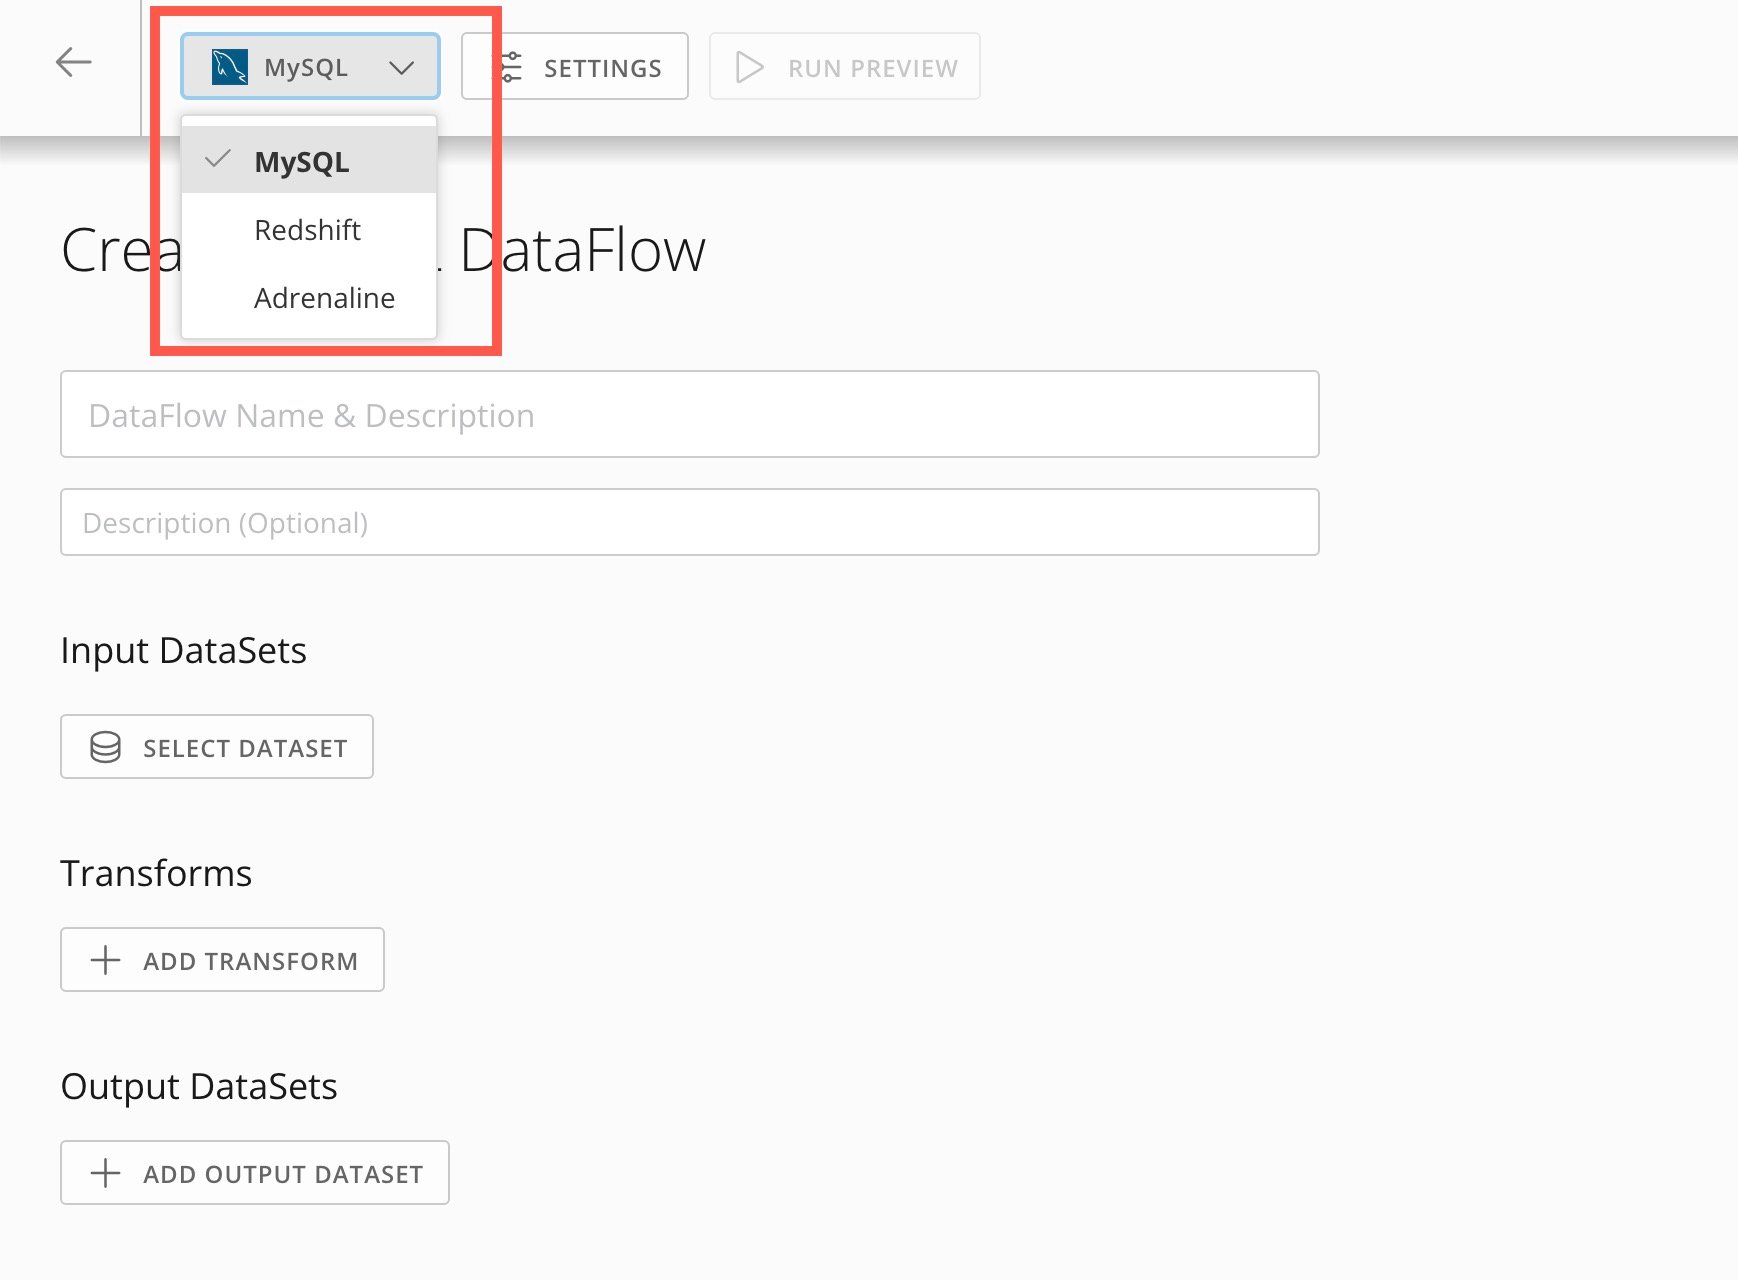
2. Use the dropdown to choose whether to use MySQL, Redshift, or Adrenaline.

   <Frame>
     <img alt="" src="https://mintcdn.com/domoinc-openapi-sync-dataflows/A9i3nBOZVO7rHlrv/images/kb/ka0Vq000000GoaL-00N5w00000Ri7BU-0EMVq000005kMlp.jpg?fit=max&auto=format&n=A9i3nBOZVO7rHlrv&q=85&s=9daeca9449e80383e8c27bf5d984a96b" style={{width: 649, height: 478}} width="1738" height="1280" data-path="images/kb/ka0Vq000000GoaL-00N5w00000Ri7BU-0EMVq000005kMlp.jpg" />
   </Frame>
3. Enter a name and optional description for the DataFlow.
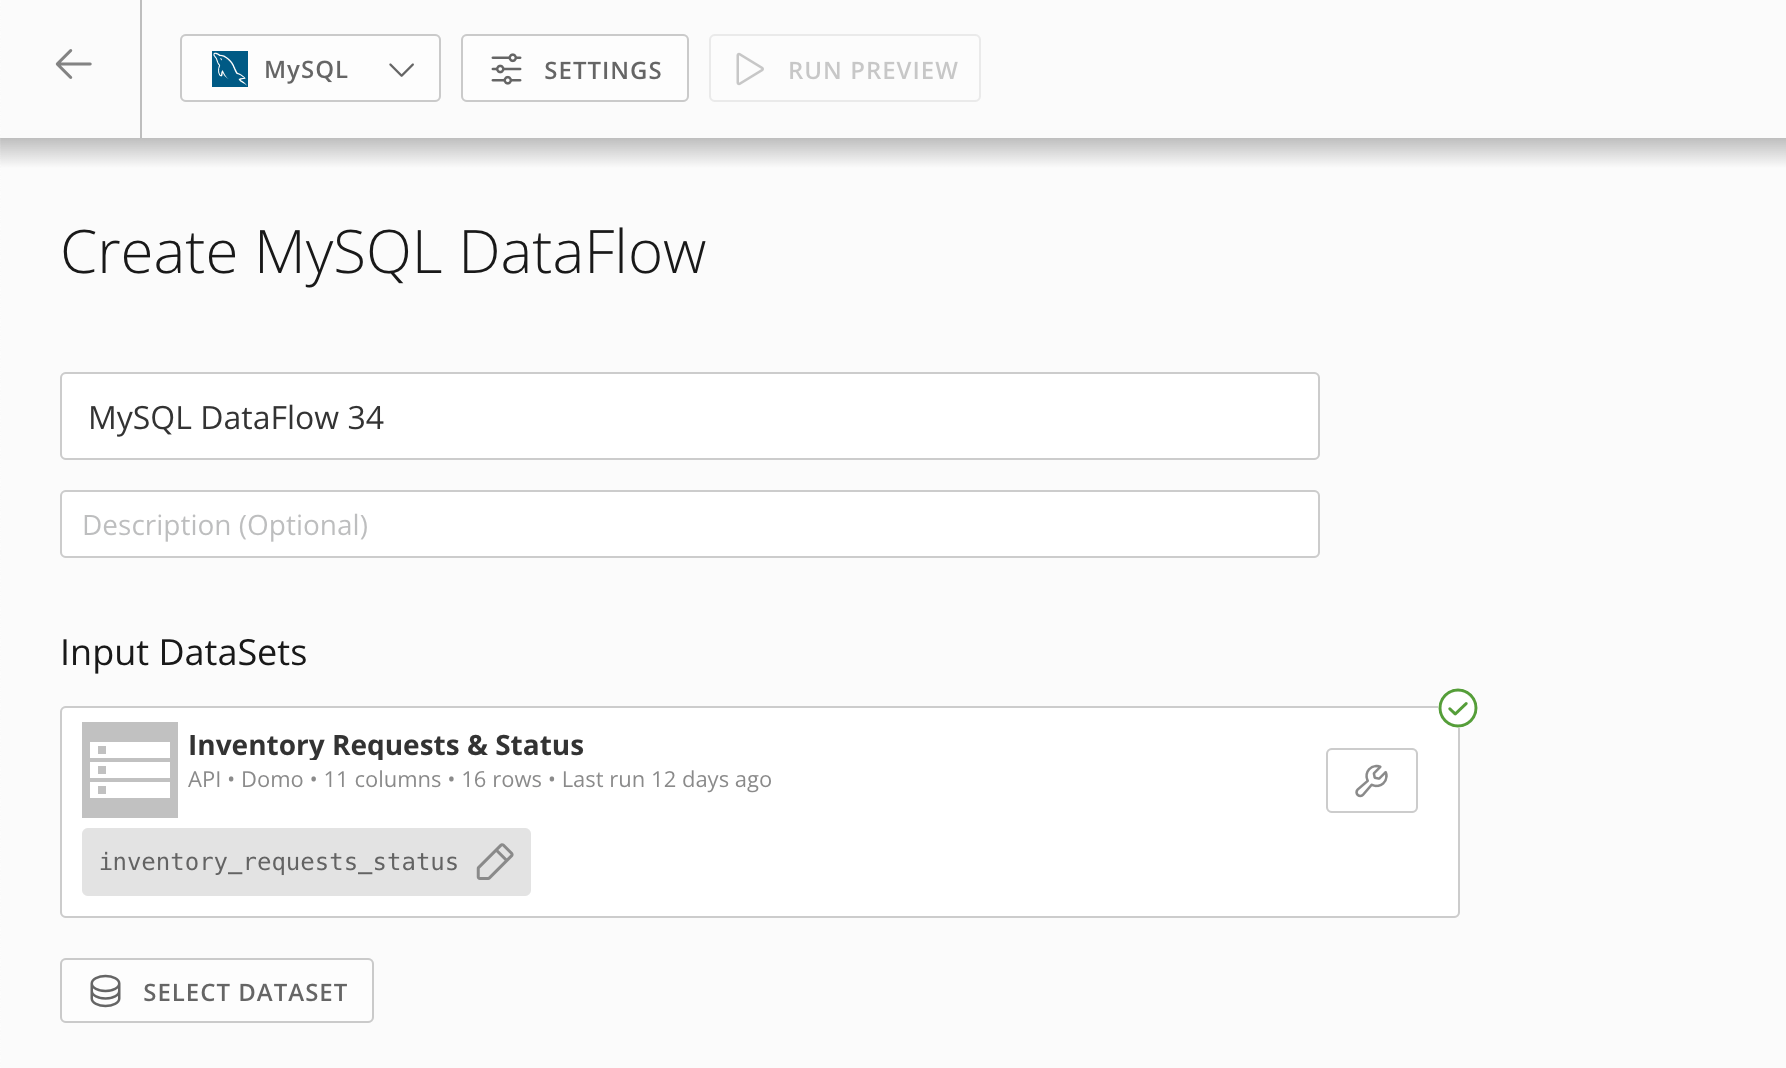
4. Use **Select DataSet** to choose a DataSet that *already exists* in Domo. You cannot upload other DataSets during the DataFlow creation process. Learn how to [add new DataSets to Domo](/s/article/360042926274) via connector.
   <Warning>
     **Important:** The name of the DataSet and each column's name in the DataSet **MUST** be 64 characters or less (including spaces.) This is a limitation of the MySQL engine.
   </Warning>

   Your DataSet displays in the DataFlow creation screen.

   <Frame>
     <img alt="" src="https://mintcdn.com/domoinc-openapi-sync-dataflows/A9i3nBOZVO7rHlrv/images/kb/ka0Vq000000GoaL-00N5w00000Ri7BU-0EMVq000005kKFO.jpg?fit=max&auto=format&n=A9i3nBOZVO7rHlrv&q=85&s=7e52be6b14a686a4a496ef8cedc51864" style={{width: 753, height: 450}} width="1786" height="1068" data-path="images/kb/ka0Vq000000GoaL-00N5w00000Ri7BU-0EMVq000005kKFO.jpg" />
   </Frame>
5. (Optional) Select **More** > **Edit** to open the DataSet preview.

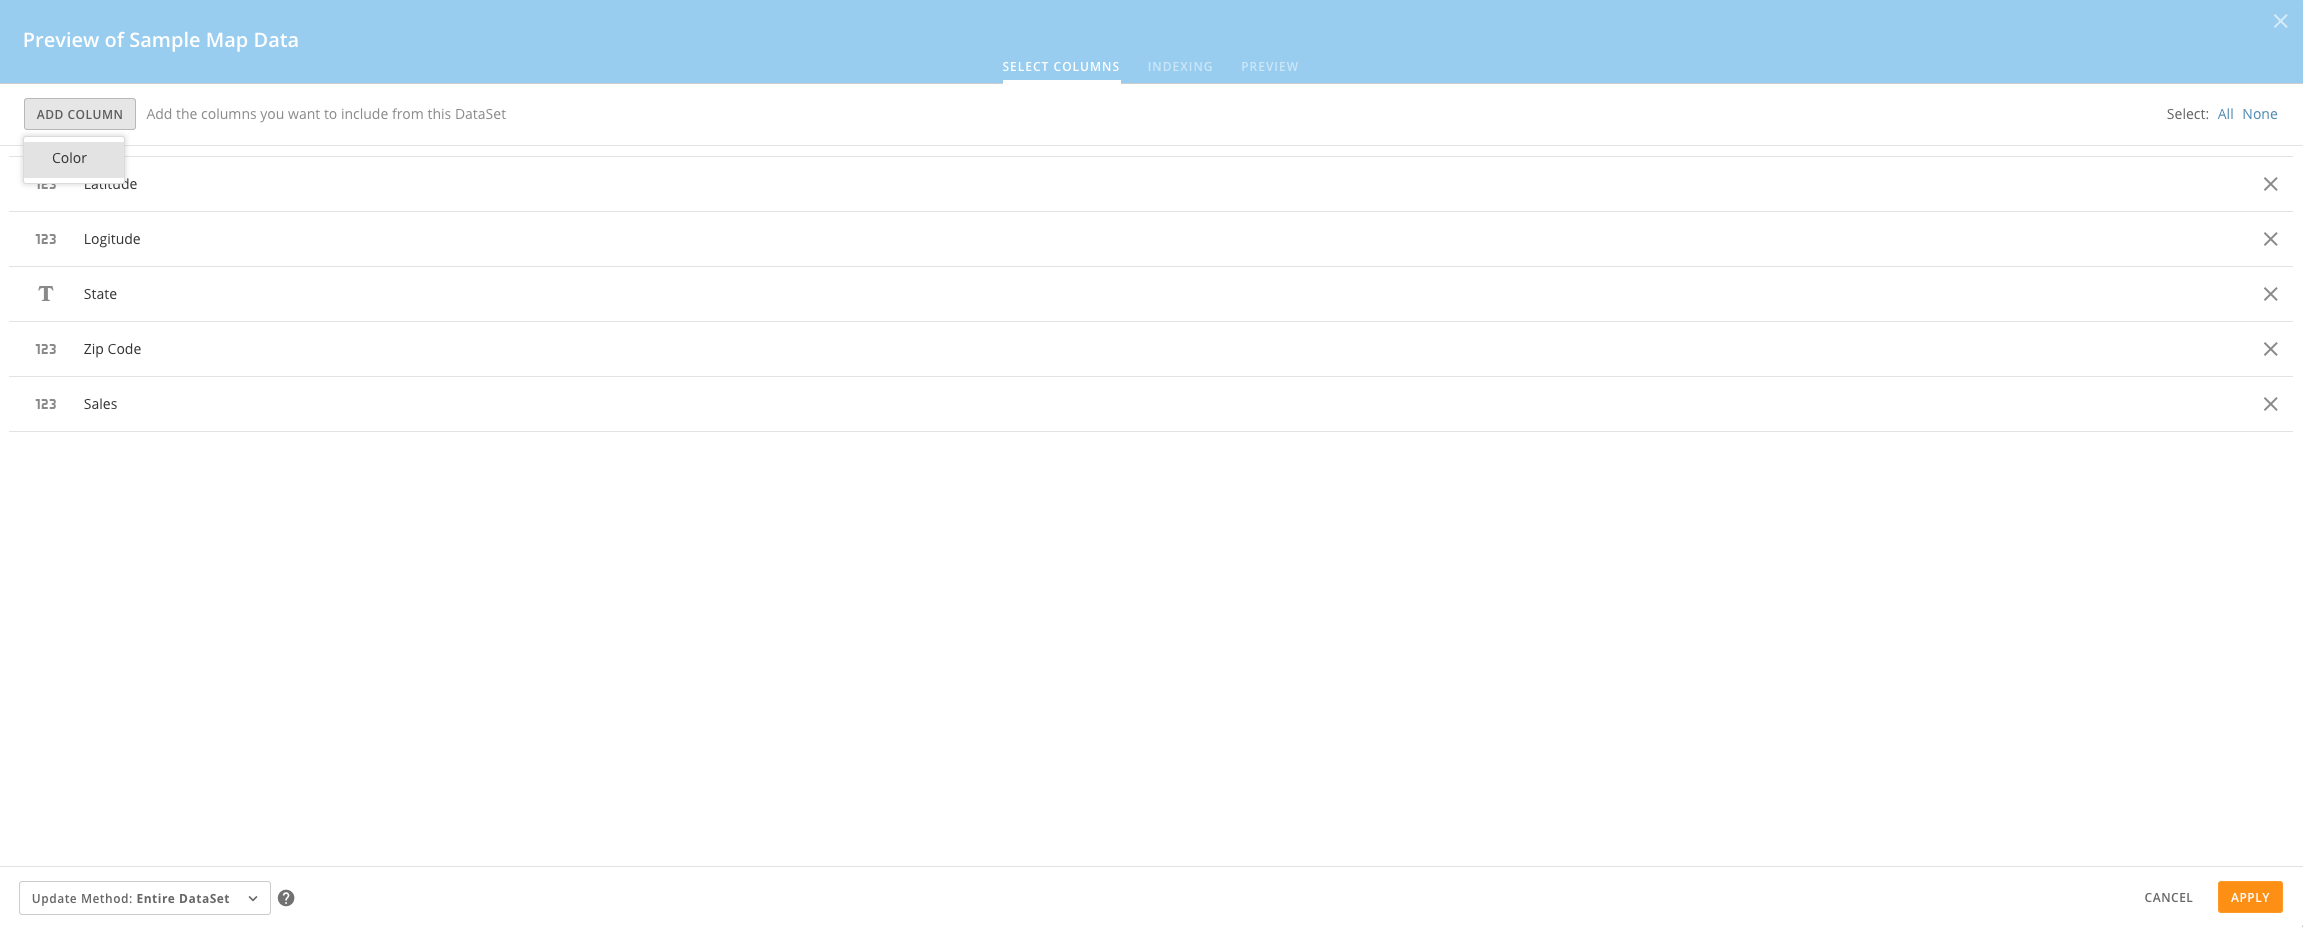
   1. (Optional) Under the **Select Columns** tab, you can remove columns you don't want to include in the DataSet by clicking the "X" to the right of the column name, or remove all columns by clicking **None**.

      You can also add individual columns back into the DataSet by clicking **Add Column** and selecting the columns, or add all columns back into the DataSet by clicking **All**.
      <Frame>
        <img alt="SQL_DataFlow_2.png" src="https://mintcdn.com/domoinc-openapi-sync-dataflows/A9i3nBOZVO7rHlrv/images/kb/ka0Vq000000GoYn-00N5w00000Ri7BU-0EM5w000005vOv5.png?fit=max&auto=format&n=A9i3nBOZVO7rHlrv&q=85&s=5fe12f7e4fbfc72b4cc65381a7585f6b" width="2303" height="927" data-path="images/kb/ka0Vq000000GoYn-00N5w00000Ri7BU-0EM5w000005vOv5.png" />
      </Frame>

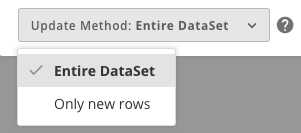
   2. (Select how the DataSet will be processed. Options include processing the Entire DataSet or Only new rows appended since the last DataFlow run.
      <Note>
        **Note:** This feature is currently in Beta. To be added to the Beta, please reach out to your Customer Success Manager (CSM).
      </Note>

      <Frame>
        <img alt="SQL_DataFlow_3.png" src="https://mintcdn.com/domoinc-openapi-sync-dataflows/A9i3nBOZVO7rHlrv/images/kb/ka0Vq000000GoYn-00N5w00000Ri7BU-0EM5w000005vOv6.png?fit=max&auto=format&n=A9i3nBOZVO7rHlrv&q=85&s=34f1959ba8037ec53e7a31c1d45c09d2" width="301" height="133" data-path="images/kb/ka0Vq000000GoYn-00N5w00000Ri7BU-0EM5w000005vOv6.png" />
      </Frame>

      <Warning>
        **Important:** You can only use the DataFlow append processing method if that input DataSet is configured to update with an append method. For more information on scheduling your DataSet with an append type update, see [Basic Scheduling of a DataSet](/s/article/360042926274).
      </Warning>

      <Tip>
        **Tip:** If your input DataSet has a large number of rows, try using the append processing method. This will allow your DataFlow to run much quicker if it's only processing the new rows.
      </Tip>

   3. Select as many additional input DataSets as you want by repeating step 5.

   4. (Optional) Add transforms by doing the following:

      1. Click **Add Transform**.

         A **Transform** dialog appears with various options. For more detailed information about these options, see [Understanding Transform and Output DataSet options](#h_52a4a3c9-54f3-4f82-bd0f-19e98e3de89c "Creating an SQL DataFlow").
      2. Enter SQL code to make the desired transformations to the input DataSet(s).
      3. Click **Apply**.

   5. Click **Add Output DataSet**.

      An **Output DataSet** dialog appears with various options. For more detailed information about these options, see [Understanding Transform and Output DataSet options](#h_52a4a3c9-54f3-4f82-bd0f-19e98e3de89c "Creating an SQL DataFlow").

      1. Enter SQL code to indicate how you want the input DataSets to be combined.

         If you have transformed the input DataSets in the **Transform** dialog, those transformations are applied here.
      2. (Optional) Add additional output DataSets by repeating the previous two steps.
      3. Click **Done**.

   6. Schedule your DataFlow in the **Settings** pane. For more information on the different scheduling options, see [Advanced DataFlow Triggering](/s/article/000005216).

      <Note>
        **Note:** If a schedule hasn't been specified, your DataFlow will default to a manual schedule.
      </Note>

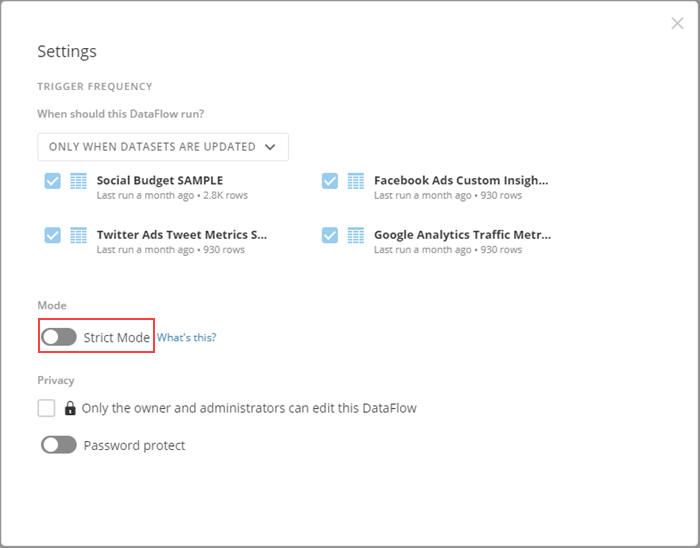
   7. (Conditional) If you want to run the DataFlow in Strict Mode, click the **Settings** button at the top of the screen then toggle the **Strict Mode** option to on.

      For more information about this option, see [Understanding Strict Mode](#h_22fa7019-6ad8-409c-bd7b-9c58c3c06c05 "Creating an SQL DataFlow").

      <Frame>
        <img alt="sql_dataflow_strict_mode.png" src="https://mintcdn.com/domoinc-openapi-sync-dataflows/A9i3nBOZVO7rHlrv/images/kb/ka0Vq000000GoYn-00N5w00000Ri7BU-0EM5w000005vOtn.png?fit=max&auto=format&n=A9i3nBOZVO7rHlrv&q=85&s=d560ecf16be1314bbdd95eb2afcdb72b" width="700" height="548" data-path="images/kb/ka0Vq000000GoYn-00N5w00000Ri7BU-0EM5w000005vOtn.png" />
      </Frame>

   8. (Conditional) Do one of the following to save your DataFlow:

      * If you want to run the script that outputs this DataFlow to a usable DataSet in Domo, click the orange down arrow in the upper right corner of the screen, select **Save and Run**, enter a version description if desired, then click **Save** to confirm.

        This starts the process of generating DataSets from the DataFlow. This generation process may take from a minute to an hour or more, depending on the size of the input DataSets. In addition to generating DataSets, a card for the DataFlow is added to the **DataFlows** listing in the Data Center.
      * If you want to save this DataFlow without outputting it to DataSets at this time, click **Save**, enter a version description if desired, then click **Save** again to confirm. A card for the DataFlow is added to the **DataFlows** listing in the Data Center, but no DataSets are generated. You can run the DataFlow to output DataSets at any time by mousing over the card for the DataFlow in the **DataFlows** listing, clicking <InlineImage src="/images/kb/ka0Vq000000GoaL-00N5w00000Ri7BU-0EM5w000005vOvG.jpg" />, and selecting **Run**. This option and the other options available in this menu are discussed later in this topic.
   When you save a DataFlow, an entry for this version is added to the **Versions** tab in the Details view for the DataFlow. If you entered a description when saving, that description is shown in the entry for the DataFlow. For more information about versions, see [Viewing the Version History for a DataFlow](/s/article/360042923074 "Viewing the Version History for a DataFlow").

<Note>
  **Note:** Many users ask why output DataSets for a DataFlow are not marked as "Updated" when the DataFlow runs successfully. This is usually because the data has not actually changed—no update has occurred. Therefore, the DataSets do not show as updated.
</Note>

# Understand Transforms and Output DataSet Options

When creating a new transform, you can choose to create either a table- or SQL-type transform.

* A **Table Transform** creates a new table using a SELECT statement and will always generate an output table. Due to an output table being generated, you can create [easy indexes](#h_37ff9919-86a9-4b5d-b90a-78362ccda2d3 "Creating an SQL DataFlow") based on these tables.
* A **SQL Transform** creates a table that typically doesn't include a SELECT statement such as a stored procedure. This type of transform does not generate an output table.

Both Transforms and output DataSets support the **Run to here** option. With Run to here, you can choose to run the DataFlow only up to the selected transform. In the case of very large DataFlows with numerous transforms or outputs, this may help you save time when testing your DataFlow's code. To use this option, select **Run to here** in the wrench menu for the transform or output DataSet, or open the editor for the transform or output DataSet, click the arrow next to the **Run SQL** menu, and select **Run to here**.

You can also add transforms either above or below a given transform in your DataFlow. To do this, select **Add transform above** or **Add transform below** in the wrench menu for the transform, then select whether you want to create a table- or SQL-type transform.

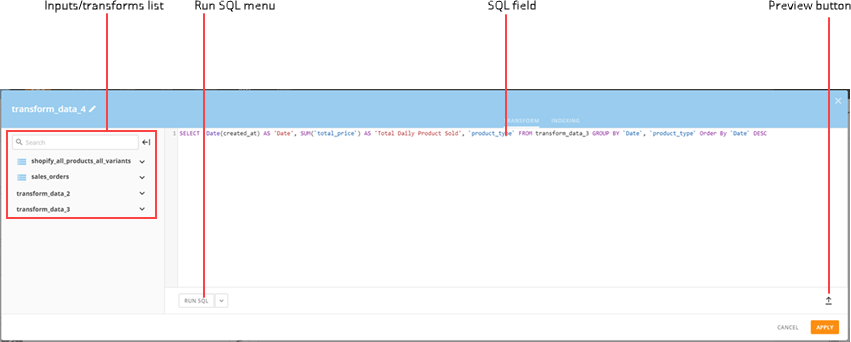
The following screenshot shows you the main components of the **Transform** dialog.

<Frame>
  <img alt="dataflow_transform_ui_new.png" src="https://mintcdn.com/domoinc-openapi-sync-dataflows/A9i3nBOZVO7rHlrv/images/kb/ka0Vq000000GoYn-00N5w00000Ri7BU-0EM5w000005vOtl.png?fit=max&auto=format&n=A9i3nBOZVO7rHlrv&q=85&s=e1de84c54688fc3c6ee0a3d83898f1d4" width="851" height="342" data-path="images/kb/ka0Vq000000GoYn-00N5w00000Ri7BU-0EM5w000005vOtl.png" />
</Frame>

You can use the following table to learn more about these components:
<table border="1" cellpadding="1" cellspacing="1" data-aura-rendered-by="33:208;a"><thead><tr><th colspan="1" rowspan="1"><p> Component </p></th><th colspan="1" rowspan="1"><p> Description </p></th></tr></thead><tbody><tr><td colspan="1" rowspan="1"><p> Inputs/Transforms List </p></td><td colspan="1" rowspan="1"><p> Shows the names of all input DataSets you have selected for this DataFlow for your convenience in writing SQL statements. In addition, any previously created transforms appear here. These names appear in both the <b> Transform </b> and <b> Output DataSet </b> dialogs. If you transform one or more input DataSets in the <b> Transform </b> dialog, those transforms are applied to the input DataSets when you refer to them in the <b> Output DataSet </b> dialog. </p><p> Clicking on an input DataSet opens a list of all columns in the DataSet and their data types (decimal, text, date/time, etc.). </p></td></tr><tr><td colspan="1" rowspan="1"><p> Run SQL menu </p></td><td colspan="1" rowspan="1"><p> Provides access to several options: </p><ul><ul><li><p><b> Run SQL </b>. Lets you run a test to determine whether your SQL is valid. </p></li><li><p><b> Run to here </b>. Runs all previous transforms to this point. </p></li><li><p><b> Explain SQL </b>. Shows the explain plan for the SQL—an ordered list of the steps the database will make when executing the query. This can be used to help you optimize your queries. However, because these steps are highly complex and technical, this feature is recommended for advanced users only. </p><div class="mdx-embed"><Note><b> Note: </b> Because MySQL determines which indexes are needed to improve run-time efficiency, not all of your index transforms may show up in the Explain SQL if MySQL determined that running the index would cause inefficiencies. </Note>
</div></li></ul></ul></td></tr><tr><td colspan="1" rowspan="1"><p> SQL field </p></td><td colspan="1" rowspan="1"><p> Lets you create SQL code to transform and/or combine your input DataSets. The field contains an autocomplete feature for your convenience in writing code. <a id="preview_the_data" target="_blank" /></p></td></tr><tr><td colspan="1" rowspan="1"> Preview button </td><td colspan="1" rowspan="1"> Expands/Collapses the preview area at the bottom of the pane after you have chosen <b> Run SQL </b> or <b> Run to here </b>. </td></tr></tbody></table>

### Preview the Data

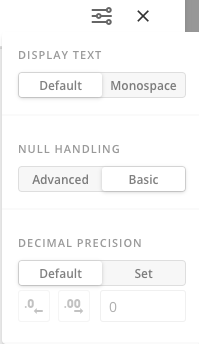
The preview will display in the transform after you have chosen **Run SQL** or **Run to here**. You can select options in the preview menu <InlineImage src="/images/kb/ka0Vq000000GoaL-00N5w00000Ri7BU-0EM5w000005vOvA.png" /> to allow you to change how the results are displayed in the preview table for easier viewing.

<Note>
  **Note:** These settings do not affect the transform itself or how the data will be output. It only affects how the results are displayed in the preview table.
</Note>

<Frame>
  <img alt="SQL_DataFlow.png" src="https://mintcdn.com/domoinc-openapi-sync-dataflows/A9i3nBOZVO7rHlrv/images/kb/ka0Vq000000GoYn-00N5w00000Ri7BU-0EM5w000005vOv7.png?fit=max&auto=format&n=A9i3nBOZVO7rHlrv&q=85&s=00f29b5032c9ecc94be1893ec9bdcb83" width="199" height="344" data-path="images/kb/ka0Vq000000GoYn-00N5w00000Ri7BU-0EM5w000005vOv7.png" />
</Frame>

The following components are available:
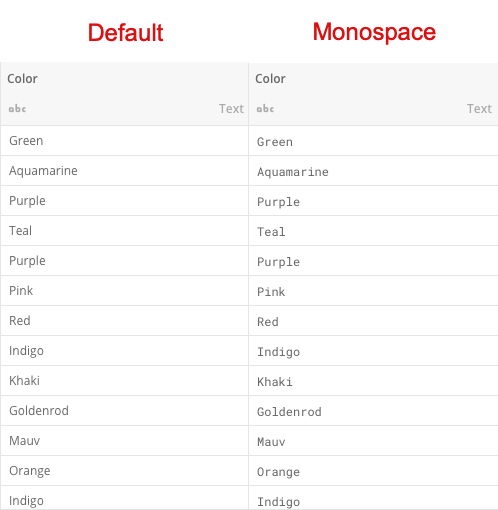
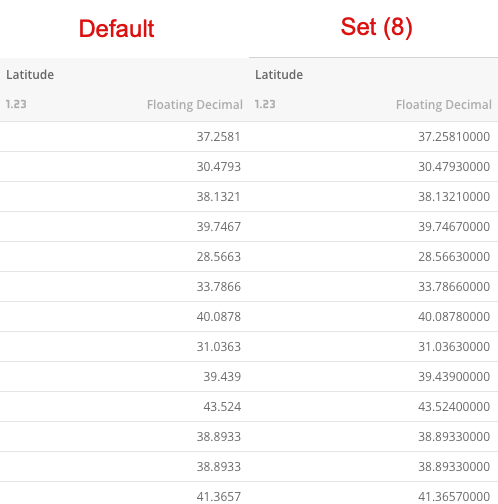
<table class="mt-responsive-table" data-aura-rendered-by="33:208;a"><thead><tr><th colspan="1" rowspan="1"> Component </th><th colspan="1" rowspan="1"> Description </th></tr></thead><tbody><tr><td colspan="1" rowspan="1"> Display Text </td><td colspan="1" rowspan="1"><ul><li><b> Default </b> - Displays the text in the standard font. </li><li><b> Monospace </b> - Displays the text with more spacing in between the letters. </li></ul><p class="mt-indent-1 wysiwyg-text-align-center"><img alt="SQL_DataFlow_Display_Text.png" src="https://mintcdn.com/domoinc-openapi-sync-dataflows/A9i3nBOZVO7rHlrv/images/kb/ka0Vq000000GoYn-00N5w00000Ri7BU-0EM5w000005vOvI.png?fit=max&auto=format&n=A9i3nBOZVO7rHlrv&q=85&s=001c0de962c640d54637fe35c7736cae" width="498" height="510" data-path="images/kb/ka0Vq000000GoYn-00N5w00000Ri7BU-0EM5w000005vOvI.png" /></p></td></tr><tr><td colspan="1" rowspan="1"> Null Handling </td><td colspan="1" rowspan="1"><ul><li><b> Advanced </b> - Displays the word <em> null </em> or <em> empty string </em> to specify which type of value is being displayed in the column. </li><li><b> Basic </b> - Shows blank cells in the table. (This is the default setting.) </li></ul></td></tr><tr><td colspan="1" rowspan="1"> Decimal Precision </td><td colspan="1" rowspan="1"><ul><li><b> Default </b> - Displays the number as it appears in the DataSet. </li><li><b> Set </b> - Displays a specified amount of decimal places. <a id="easy_indexing" target="_blank" /></li></ul><p class="mt-indent-1 wysiwyg-text-align-center"><img alt="SQL_DataFlow_Decimal_Precision.png" src="https://mintcdn.com/domoinc-openapi-sync-dataflows/A9i3nBOZVO7rHlrv/images/kb/ka0Vq000000GoYn-00N5w00000Ri7BU-0EM5w000005vOvK.png?fit=max&auto=format&n=A9i3nBOZVO7rHlrv&q=85&s=753eaaba92333ba4fa3f795c3378e653" width="498" height="504" data-path="images/kb/ka0Vq000000GoYn-00N5w00000Ri7BU-0EM5w000005vOvK.png" /></p></td></tr></tbody></table>

### Easy Indexing

An index is a data structure that improves the speed of operations in a table. With **Easy Indexing**, you can quickly add an index on one or more columns right to your input DataSet or table transform.

**To create an index in an input DataSet or transform,**

1. Open the editor for the input DataSet or transform.
2. Select the **Indexing** tab.

   <Frame>
     <img alt="" src="https://mintcdn.com/domoinc-openapi-sync-dataflows/KCcJNfmszCLwcqSc/images/kb/ka05w00000123i9-00N5w00000Ri7BU-0EM5w000005vOvB.png?fit=max&auto=format&n=KCcJNfmszCLwcqSc&q=85&s=c207730d52c46db55069943a93e5e7ce" width="1597" height="284" data-path="images/kb/ka05w00000123i9-00N5w00000Ri7BU-0EM5w000005vOvB.png" />
   </Frame>
3. Choose your Index Type.
4. Select which column to apply the index.
5. Click **Done**.

**Video - SQL Explain Plans**

<iframe allowfullscreen="allowfullscreen" frameborder="1" height="315" src="//www.youtube-nocookie.com/embed/JNTAv04HC1Y" width="560" />

### Understand Strict Mode

Strict Mode controls how MySQL handles invalid or missing values in data-change statements and also affects the handling of division by zero, zero dates, and zeroes in dates. Learn more in the [MySQL documentation](https://dev.mysql.com/doc/refman/5.6/en/sql-mode.html#sql-mode-strict) <InlineImage src="/images/kb/ka0Vq000000GoaL-00N5w00000Ri7BU-0EMVq000005kPJt.jpg" />.

### Best Practices for Creating DataFlows

Each DataFlow should meet the following criteria:

* Each step of the transformation has a descriptive name.
* There is a description of the input DataSets being merged or manipulated and the DataSet being created
* The data owner is indicated.
* The output DataSet and the DataFlow have the same name. This allows for easy identification of which DataSets are produced by which DataFlows in the Domo Data Center.

#### MySQL DataFlow Overview (video)

<iframe allowfullscreen="allowfullscreen" frameborder="1" height="315" src="//www.youtube-nocookie.com/embed/-S7u5Xoc3-g" width="560" />

#### Combining DataSets Using DataFlows (video)

<iframe allowfullscreen="allowfullscreen" frameborder="1" height="315" src="//www.youtube-nocookie.com/embed/Tk93oON0fxY" width="560" />