> ## Documentation Index
> Fetch the complete documentation index at: https://domoinc-openapi-sync-dataflows.mintlify.site/llms.txt
> Use this file to discover all available pages before exploring further.
# Page Filters and Filter Views on Dashboards
export const InlineImage = ({src, alt = '', height = '1.6em'}) => {
return  ;
};
### Intro
You can apply Page Filters to all the cards on a dashboard that are powered by a single DataSet. When a Page Filter is applied to a card, the card displays with a filter icon, allowing you to identify it as filtered.
For example, you could set a "Region" Page Filter and configure it to display only the data for the "Midwest" region. All cards on the dashboard that are powered by the same DataSet display only the data for the Midwest region.
After creating a Page Filter, you can save it as a reusable Filter View that is available for you, others, and as a default view for every person the first time they visit the dashboard.
This article describes how to create and use Page Filters and Filter Views.
**PDP:** If Personalized Data Permissions (PDP) are enabled for the selected DataSet, your filter options are limited to what is available through your policy. If you part of the All Rows policy for the DataSet, you can choose whether to filter on all data or select specific policies. To learn more about PDP, see [Personalized Data Permissions (PDP)](/s/article/360042934614 "Personalized Data Permissions (PDP)").
When adding Date Filters, you can apply filters to a range of dates or to individual time units.
**Important:** For all cards after the first, you must use the **Existing Data** option and select your original DataSet. If you re-add the same DataSet using the **Excel** or **Google** options, filtering does not work.
**Note:** If you have a Participant default security role, you cannot share Filter Views or set default Filter Views for the dashboard, but you can add and save Filter Views for personal use. Participants can also select a filter shared with them, make changes to the filter and save it as a new Filter View. The original shared Filter View will not be affected. If you have an Admin, Privileged, or Editor default security role, you can create, share, and edit existing shared views, or set a shared Filter View as the default. You can also do this if you have a custom role with the Edit Pages grant enabled. Learn more about [default security roles](/s/article/360043438973).
***
### Filter Options
To apply Page Filters to a dashboard, the filter bar must be visible.
The following three kinds of users can access the filter options to control a) whether the filter bar is visible, b) if others can add new filters, and c) if the filter icon displays on affected cards:
* Dashboard owners
* People with an Admin system role
* People with a custom role with the Manage All Cards, Pages, and Apps (App Studio) grant enabled
These users can make changes to the filter options by following these steps:
1. Navigate to the dashboard in Domo for which you want to update the filter options.
2. Select
**Settings menu** (wrench icon).
;
};
### Intro
You can apply Page Filters to all the cards on a dashboard that are powered by a single DataSet. When a Page Filter is applied to a card, the card displays with a filter icon, allowing you to identify it as filtered.
For example, you could set a "Region" Page Filter and configure it to display only the data for the "Midwest" region. All cards on the dashboard that are powered by the same DataSet display only the data for the Midwest region.
After creating a Page Filter, you can save it as a reusable Filter View that is available for you, others, and as a default view for every person the first time they visit the dashboard.
This article describes how to create and use Page Filters and Filter Views.
**PDP:** If Personalized Data Permissions (PDP) are enabled for the selected DataSet, your filter options are limited to what is available through your policy. If you part of the All Rows policy for the DataSet, you can choose whether to filter on all data or select specific policies. To learn more about PDP, see [Personalized Data Permissions (PDP)](/s/article/360042934614 "Personalized Data Permissions (PDP)").
When adding Date Filters, you can apply filters to a range of dates or to individual time units.
**Important:** For all cards after the first, you must use the **Existing Data** option and select your original DataSet. If you re-add the same DataSet using the **Excel** or **Google** options, filtering does not work.
**Note:** If you have a Participant default security role, you cannot share Filter Views or set default Filter Views for the dashboard, but you can add and save Filter Views for personal use. Participants can also select a filter shared with them, make changes to the filter and save it as a new Filter View. The original shared Filter View will not be affected. If you have an Admin, Privileged, or Editor default security role, you can create, share, and edit existing shared views, or set a shared Filter View as the default. You can also do this if you have a custom role with the Edit Pages grant enabled. Learn more about [default security roles](/s/article/360043438973).
***
### Filter Options
To apply Page Filters to a dashboard, the filter bar must be visible.
The following three kinds of users can access the filter options to control a) whether the filter bar is visible, b) if others can add new filters, and c) if the filter icon displays on affected cards:
* Dashboard owners
* People with an Admin system role
* People with a custom role with the Manage All Cards, Pages, and Apps (App Studio) grant enabled
These users can make changes to the filter options by following these steps:
1. Navigate to the dashboard in Domo for which you want to update the filter options.
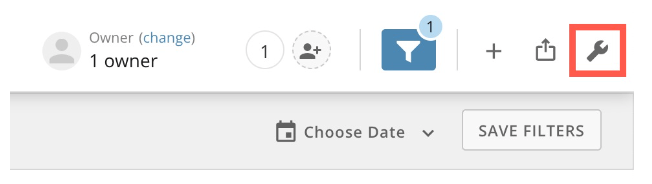
2. Select
**Settings menu** (wrench icon).
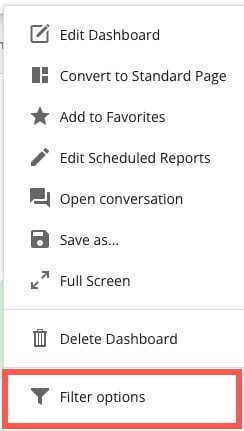
 3. In the settings menu, select **Filter options** and open the **Filter options** modal.
 4. In the **Filter options** modal, you can change the following settings:
* **Show filter bar —** Turn off/on the filter bar with the toggle. It is on by default. When the filter bar is on, you can enable/disable the following settings:
* Allow adding of new filters
* Allow global date filters
* Allow segments
**Note:** Turning off the filter bar clears all filters from the dashboard. Any saved Filter Views are still saved but are not accessible when the filter bar is off.
* (Conditional) If the filter bar is enabled, you can check the boxes for any/all of the following:
* Allow adding of new filters
* Allow global date filters
* Allow segments\
These settings are enabled by default.
* Toggle the switch labeled **Show filter and PDP** **icons**.
4. In the **Filter options** modal, you can change the following settings:
* **Show filter bar —** Turn off/on the filter bar with the toggle. It is on by default. When the filter bar is on, you can enable/disable the following settings:
* Allow adding of new filters
* Allow global date filters
* Allow segments
**Note:** Turning off the filter bar clears all filters from the dashboard. Any saved Filter Views are still saved but are not accessible when the filter bar is off.
* (Conditional) If the filter bar is enabled, you can check the boxes for any/all of the following:
* Allow adding of new filters
* Allow global date filters
* Allow segments\
These settings are enabled by default.
* Toggle the switch labeled **Show filter and PDP** **icons**.
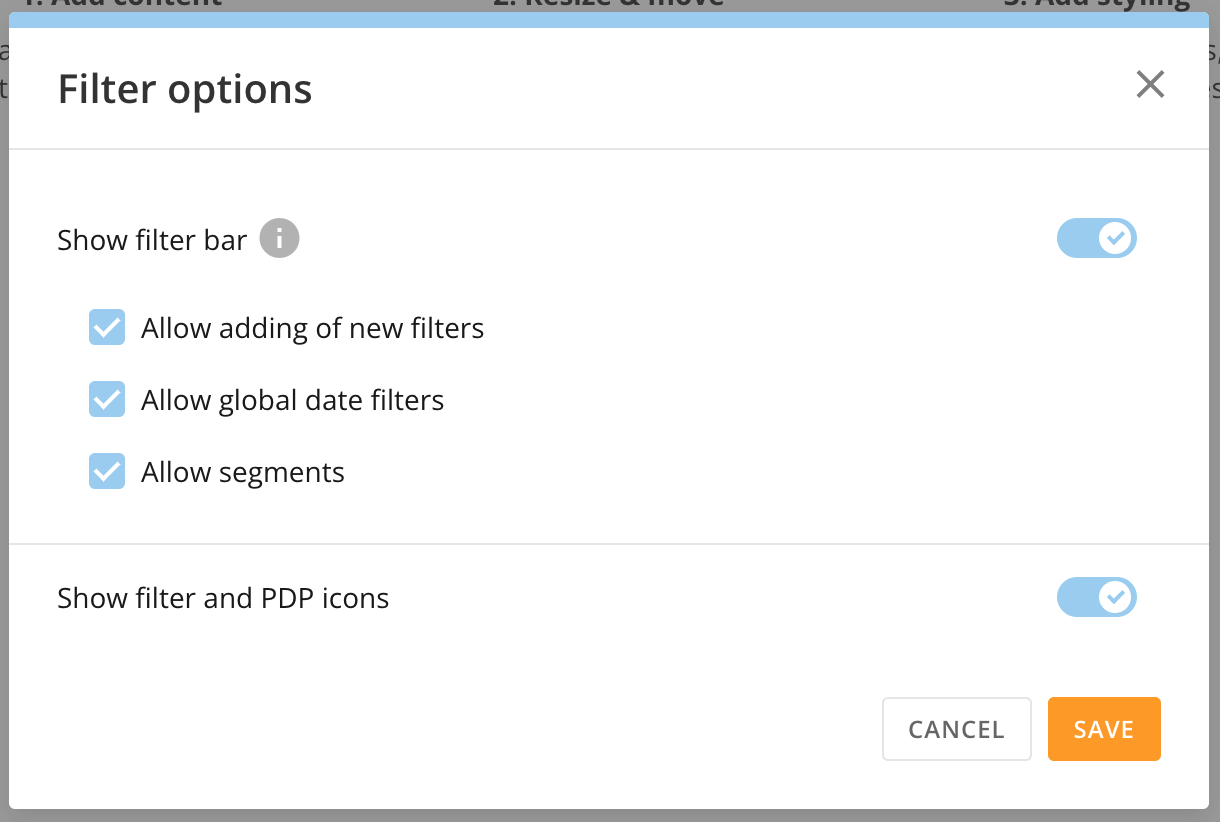 5. After making all your changes, select **Save** to keep your changes or **Cancel** to discard them.
***
Learn about [Default Security Roles](/s/article/360043438953) and [Managing Custom Roles](/s/article/360043438973).
***
### Show/Hide Filter Bar
If the [filter options](#filter_options) have been configured to show the filter bar, do the following to display the filter bar:
At the top of the dashboard, s elect **Show Page** **filters** to display the filter bar.
**Note:** The **Shared** system page does not have this option. Learn more about [system pages](https://domo-support.domo.com/s/article/360043428553?language=en_US#system_pages).
5. After making all your changes, select **Save** to keep your changes or **Cancel** to discard them.
***
Learn about [Default Security Roles](/s/article/360043438953) and [Managing Custom Roles](/s/article/360043438973).
***
### Show/Hide Filter Bar
If the [filter options](#filter_options) have been configured to show the filter bar, do the following to display the filter bar:
At the top of the dashboard, s elect **Show Page** **filters** to display the filter bar.
**Note:** The **Shared** system page does not have this option. Learn more about [system pages](https://domo-support.domo.com/s/article/360043428553?language=en_US#system_pages).
 The filter bar displays with the following items:
* The **Filter Views** menu
Learn about [Filter Views](#filter_views).
* The
**Add Filter** option.
Learn how to apply a Page Filter.
* A date picker
* The **Save Filters** option
The filter bar displays with the following items:
* The **Filter Views** menu
Learn about [Filter Views](#filter_views).
* The
**Add Filter** option.
Learn how to apply a Page Filter.
* A date picker
* The **Save Filters** option
 ### Apply Page Filters
Follow these steps to apply a Page Filter to cards on a dashboard:
1. Navigate to the dashboard to which you want to add a Page Filter.
2. [Show the filter bar](#show_hide_filter_bar).
3. To add a Page Filter, select
**Add Filter**.
### Apply Page Filters
Follow these steps to apply a Page Filter to cards on a dashboard:
1. Navigate to the dashboard to which you want to add a Page Filter.
2. [Show the filter bar](#show_hide_filter_bar).
3. To add a Page Filter, select
**Add Filter**.
 A list of all column names used in DataSets in cards on this dashboard appears. If a column name is used in more than one DataSet, an arrow appears to the right of the name so you can filter down to the desired DataSet.
4. Select the name of the column you want to filter.
**Note:**
If the column name is used in more than one DataSet and you want to filter to show just the rows in a specific DataSet, you can click the arrow next to the column name to bring up a dialog with the names of all the applicable DataSets. Check the boxes for all the DataSets you want to show rows for (or select all by checking the **Select all** box).
If you select a column that appears in more than one DataSet without filtering down to a specific DataSet, the columns from the DataSet powering the most cards on the dashboard are used for the filter.
After you select a column or DataSets, a **Filter** button displays in the ribbon and a modal opens where you can select your filters. The interface components of the modal differ depending on whether the column or row you selected contains series, amount, or date data.
5. Do one of the following:
1. (Conditional) If the selected column contains string data,
A list of all column names used in DataSets in cards on this dashboard appears. If a column name is used in more than one DataSet, an arrow appears to the right of the name so you can filter down to the desired DataSet.
4. Select the name of the column you want to filter.
**Note:**
If the column name is used in more than one DataSet and you want to filter to show just the rows in a specific DataSet, you can click the arrow next to the column name to bring up a dialog with the names of all the applicable DataSets. Check the boxes for all the DataSets you want to show rows for (or select all by checking the **Select all** box).
If you select a column that appears in more than one DataSet without filtering down to a specific DataSet, the columns from the DataSet powering the most cards on the dashboard are used for the filter.
After you select a column or DataSets, a **Filter** button displays in the ribbon and a modal opens where you can select your filters. The interface components of the modal differ depending on whether the column or row you selected contains series, amount, or date data.
5. Do one of the following:
1. (Conditional) If the selected column contains string data,
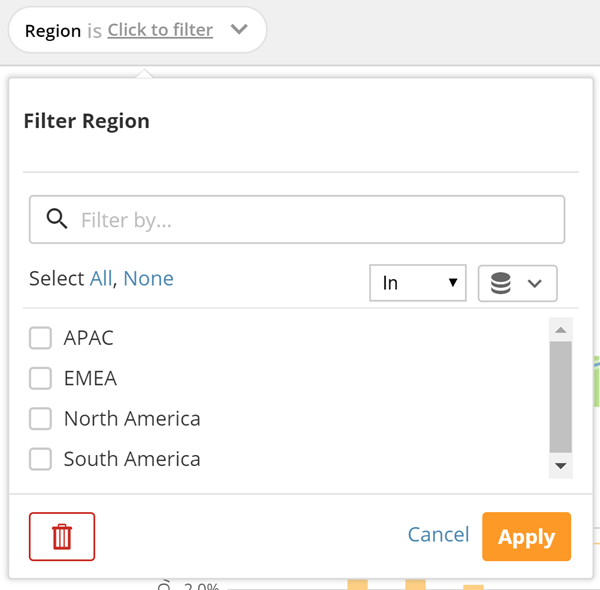 1. Select the checkboxes for each series you want to show in the cards on this dashboard.
You can choose all of the checkboxes by selecting **All** or deselect all of the checkboxes by selecting **None**.
You can filter the series that appear in the list by entering a keyword or a string of characters found in a keyword in the **Filter by** field.
**Important:** Finally, if you want to load values from a specific DataSet, you can select **DataSet options** then choose the desired DataSet. This loads the unique values on that DataSet but applies to all DataSets with that same column name.
While filters persist, the DataSet selected for values in the DataSet dropdown DOES NOT persist and is shown only to make selections in the current user's session.
2. Specify whether the items you have checked appear or do not appear in your chart by selecting **In** or **Not In** from the menu in the top right.
3. Select **Apply**.
2. (Conditional) If the selected column contains amount data, do one of the following.
1. Select the checkboxes for each series you want to show in the cards on this dashboard.
You can choose all of the checkboxes by selecting **All** or deselect all of the checkboxes by selecting **None**.
You can filter the series that appear in the list by entering a keyword or a string of characters found in a keyword in the **Filter by** field.
**Important:** Finally, if you want to load values from a specific DataSet, you can select **DataSet options** then choose the desired DataSet. This loads the unique values on that DataSet but applies to all DataSets with that same column name.
While filters persist, the DataSet selected for values in the DataSet dropdown DOES NOT persist and is shown only to make selections in the current user's session.
2. Specify whether the items you have checked appear or do not appear in your chart by selecting **In** or **Not In** from the menu in the top right.
3. Select **Apply**.
2. (Conditional) If the selected column contains amount data, do one of the following.
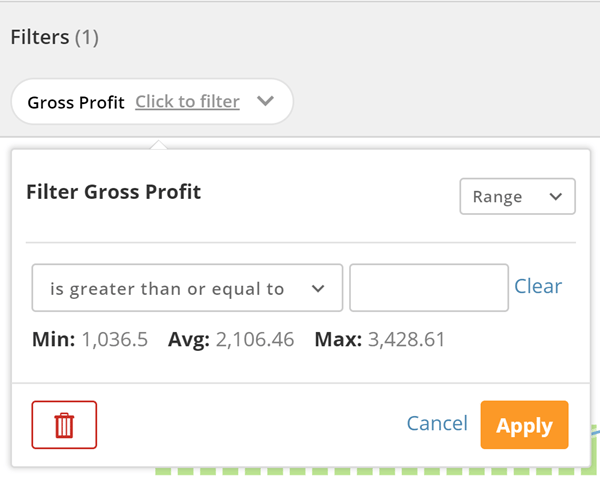 1. If you want to filter amounts based on a range, follow these steps:
1. Leave the menu in the upper right corner set to **Range**.
2. Select a condition statement from the menu.
One or more fields may display, depending on the condition statement.
3. (Conditional) If one or more fields display when you select a condition statement, enter the desired amounts in the fields.
For example, if you wanted your Cards to show information for amounts between 200,000 and 300,000, you would select **is between** from the menu, enter "200,000" in the first field, and enter "300,000" in the second field.
2. If you want to filter amounts based on specific values from your DataSet, follow these steps:
1. Click **Selection** in the menu.
2. Check the boxes for all of the values you want to filter on.
You can select all of the checkboxes by clicking **All** or deselect all of the checkboxes by clicking **None.** Or you can filter the values that appear in the list by entering a string of numbers in the **Filter by** field.
If you want to load values from a specific DataSet, you can click **DataSet options** then choose the desired DataSet. This will load the unique values on that DataSet but apply to all DataSets with that same column name.
3. Finally, you can specify whether the items you have checked appear or do not appear in your chart by selecting **In** or **Not In** from the menu in the top right.
4. Select **Apply**.
3. (Conditional) If the selected column contains date data, do one of the following:
1. If you want to filter amounts based on a range, follow these steps:
1. Leave the menu in the upper right corner set to **Range**.
2. Select a condition statement from the menu.
One or more fields may display, depending on the condition statement.
3. (Conditional) If one or more fields display when you select a condition statement, enter the desired amounts in the fields.
For example, if you wanted your Cards to show information for amounts between 200,000 and 300,000, you would select **is between** from the menu, enter "200,000" in the first field, and enter "300,000" in the second field.
2. If you want to filter amounts based on specific values from your DataSet, follow these steps:
1. Click **Selection** in the menu.
2. Check the boxes for all of the values you want to filter on.
You can select all of the checkboxes by clicking **All** or deselect all of the checkboxes by clicking **None.** Or you can filter the values that appear in the list by entering a string of numbers in the **Filter by** field.
If you want to load values from a specific DataSet, you can click **DataSet options** then choose the desired DataSet. This will load the unique values on that DataSet but apply to all DataSets with that same column name.
3. Finally, you can specify whether the items you have checked appear or do not appear in your chart by selecting **In** or **Not In** from the menu in the top right.
4. Select **Apply**.
3. (Conditional) If the selected column contains date data, do one of the following:
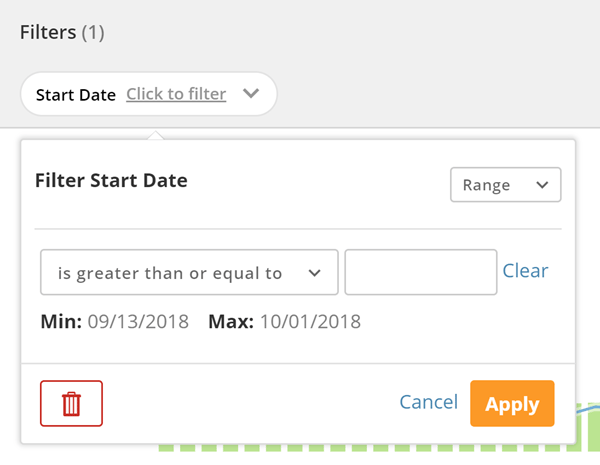 1. If you want to filter dates based on a range...
1. Leave the dropdown menu in the upper right corner set to **Range**.
2. Select a condition statement from the menu.
One or more fields may appear, depending on the condition statement.
3. Enter the desired dates in the fields as necessary.
For example, if you wanted your Cards to show information for dates between 1-31-2014 and 4-30-2015, you would select **is between** from the menu, select January 1, 2014 in the first field, and select April 30, 2015 in the second field.
2. If you want to filter dates based on specific dates from your DataSet, follow these steps:
1. Select **Selection** in the dropdown menu in the upper right corner.
2. Check the boxes for all of the dates you want to filter on.
You can select all of the checkboxes by clicking **All** or deselect all of the checkboxes by clicking **None.** Or you can filter the dates that appear in the list by entering a filter string in the **Filter by** field. (For example, if you wanted to filter down to dates from 2010, you would enter "2010" into this field.)
If you want to load values from a specific DataSet, you can click then choose the desired DataSet. This will load the unique values on that DataSet but apply to all DataSets with that same column name.
Finally, you can specify whether the dates you have checked appear or do not appear in your chart by selecting **In** or **Not In** from the menu in the top right.
3. Click **Apply**.
The affected cards on the dashboard update to reflect the filters you have selected. An icon appears on each affected card.
**Note:** You can also use Aggregated Filters to filter a dashboard. For more information, see [Aggregated Filters](/s/article/4403489663127).
### Edit a Page Filter
1. Select
**Show Page filters** to display the filter bar.
2. In the filter bar, select the pill for the filter you want to edit.
1. If you want to filter dates based on a range...
1. Leave the dropdown menu in the upper right corner set to **Range**.
2. Select a condition statement from the menu.
One or more fields may appear, depending on the condition statement.
3. Enter the desired dates in the fields as necessary.
For example, if you wanted your Cards to show information for dates between 1-31-2014 and 4-30-2015, you would select **is between** from the menu, select January 1, 2014 in the first field, and select April 30, 2015 in the second field.
2. If you want to filter dates based on specific dates from your DataSet, follow these steps:
1. Select **Selection** in the dropdown menu in the upper right corner.
2. Check the boxes for all of the dates you want to filter on.
You can select all of the checkboxes by clicking **All** or deselect all of the checkboxes by clicking **None.** Or you can filter the dates that appear in the list by entering a filter string in the **Filter by** field. (For example, if you wanted to filter down to dates from 2010, you would enter "2010" into this field.)
If you want to load values from a specific DataSet, you can click then choose the desired DataSet. This will load the unique values on that DataSet but apply to all DataSets with that same column name.
Finally, you can specify whether the dates you have checked appear or do not appear in your chart by selecting **In** or **Not In** from the menu in the top right.
3. Click **Apply**.
The affected cards on the dashboard update to reflect the filters you have selected. An icon appears on each affected card.
**Note:** You can also use Aggregated Filters to filter a dashboard. For more information, see [Aggregated Filters](/s/article/4403489663127).
### Edit a Page Filter
1. Select
**Show Page filters** to display the filter bar.
2. In the filter bar, select the pill for the filter you want to edit.
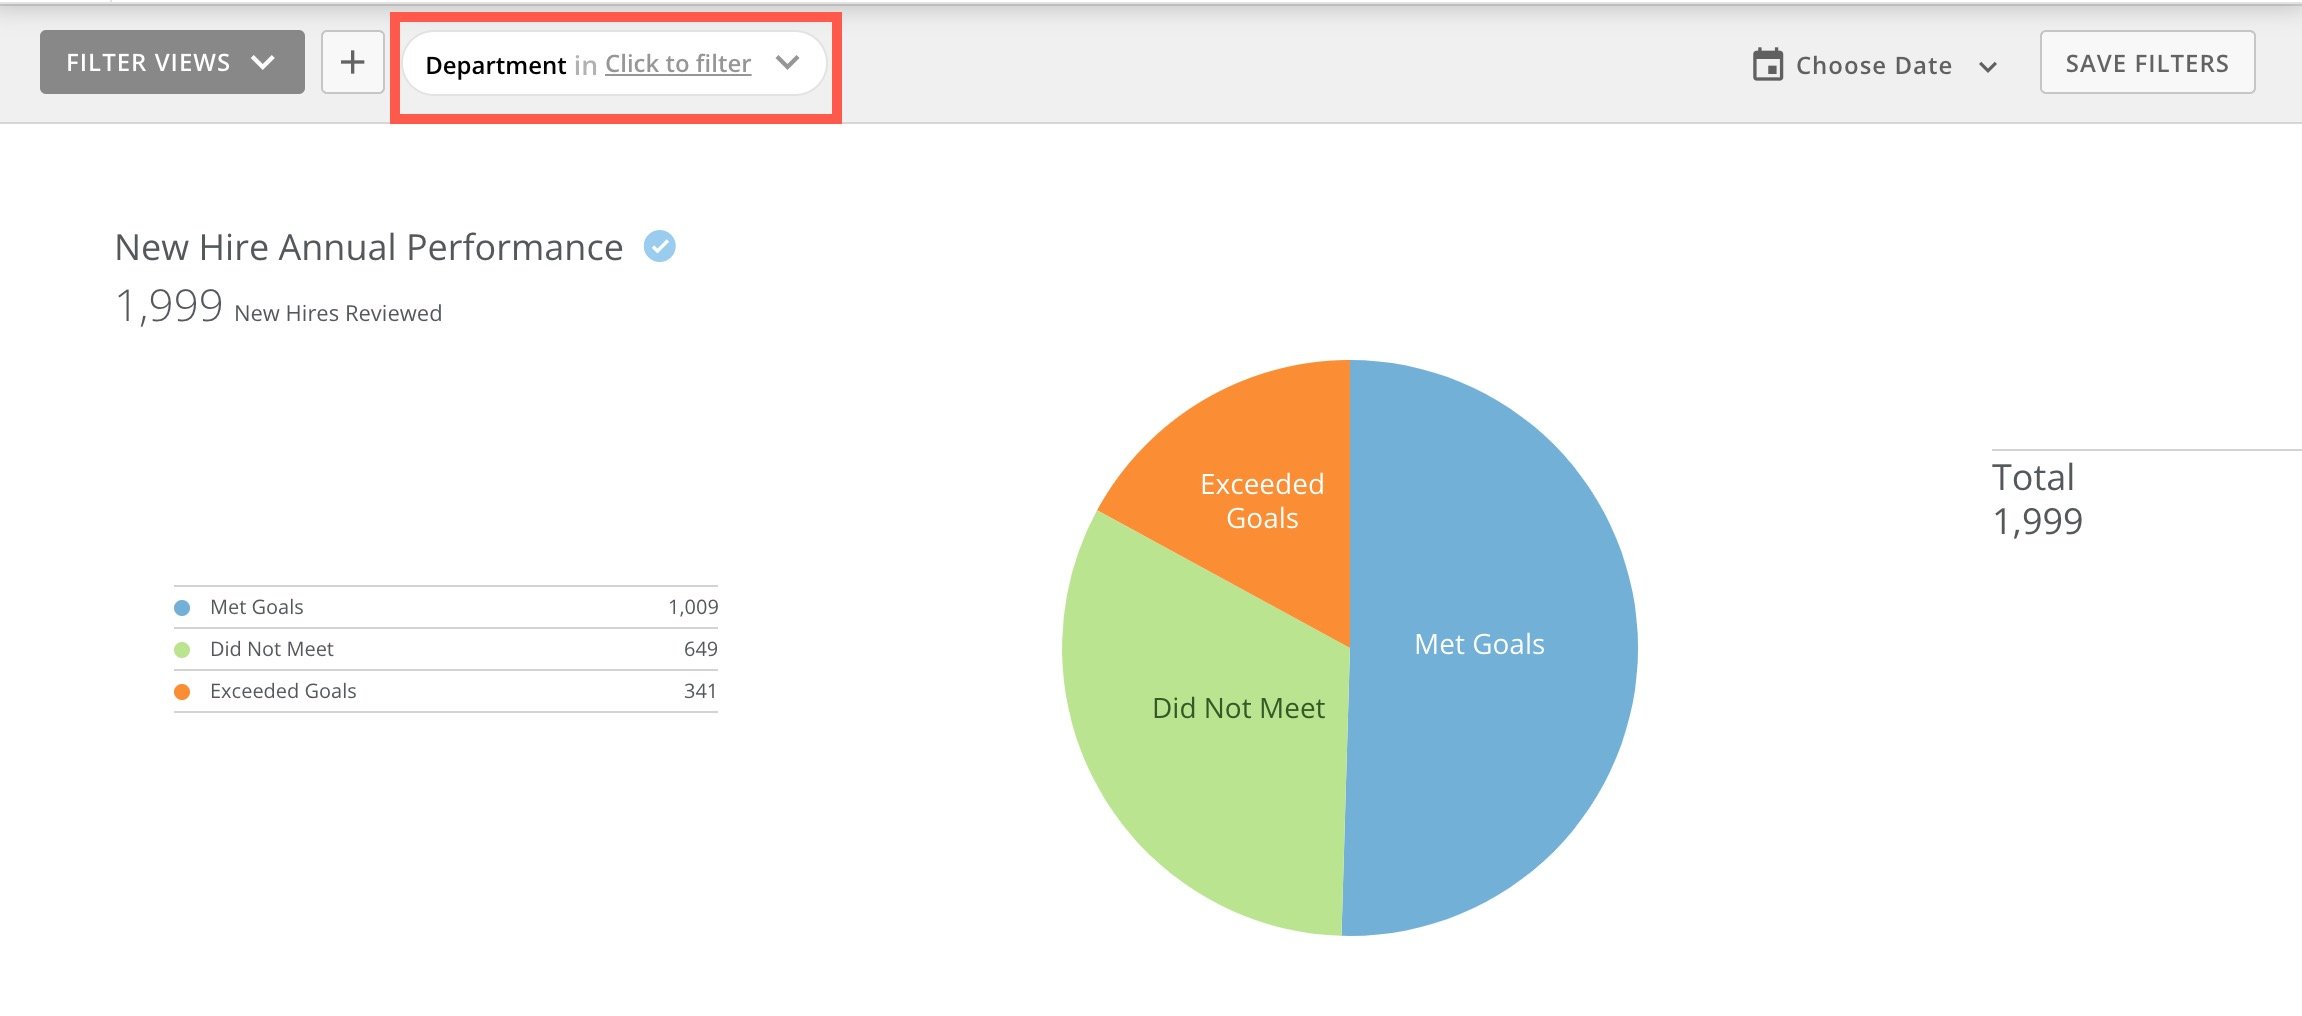 3. Edit the filter settings.
4. Select **Apply**.
3. Edit the filter settings.
4. Select **Apply**.
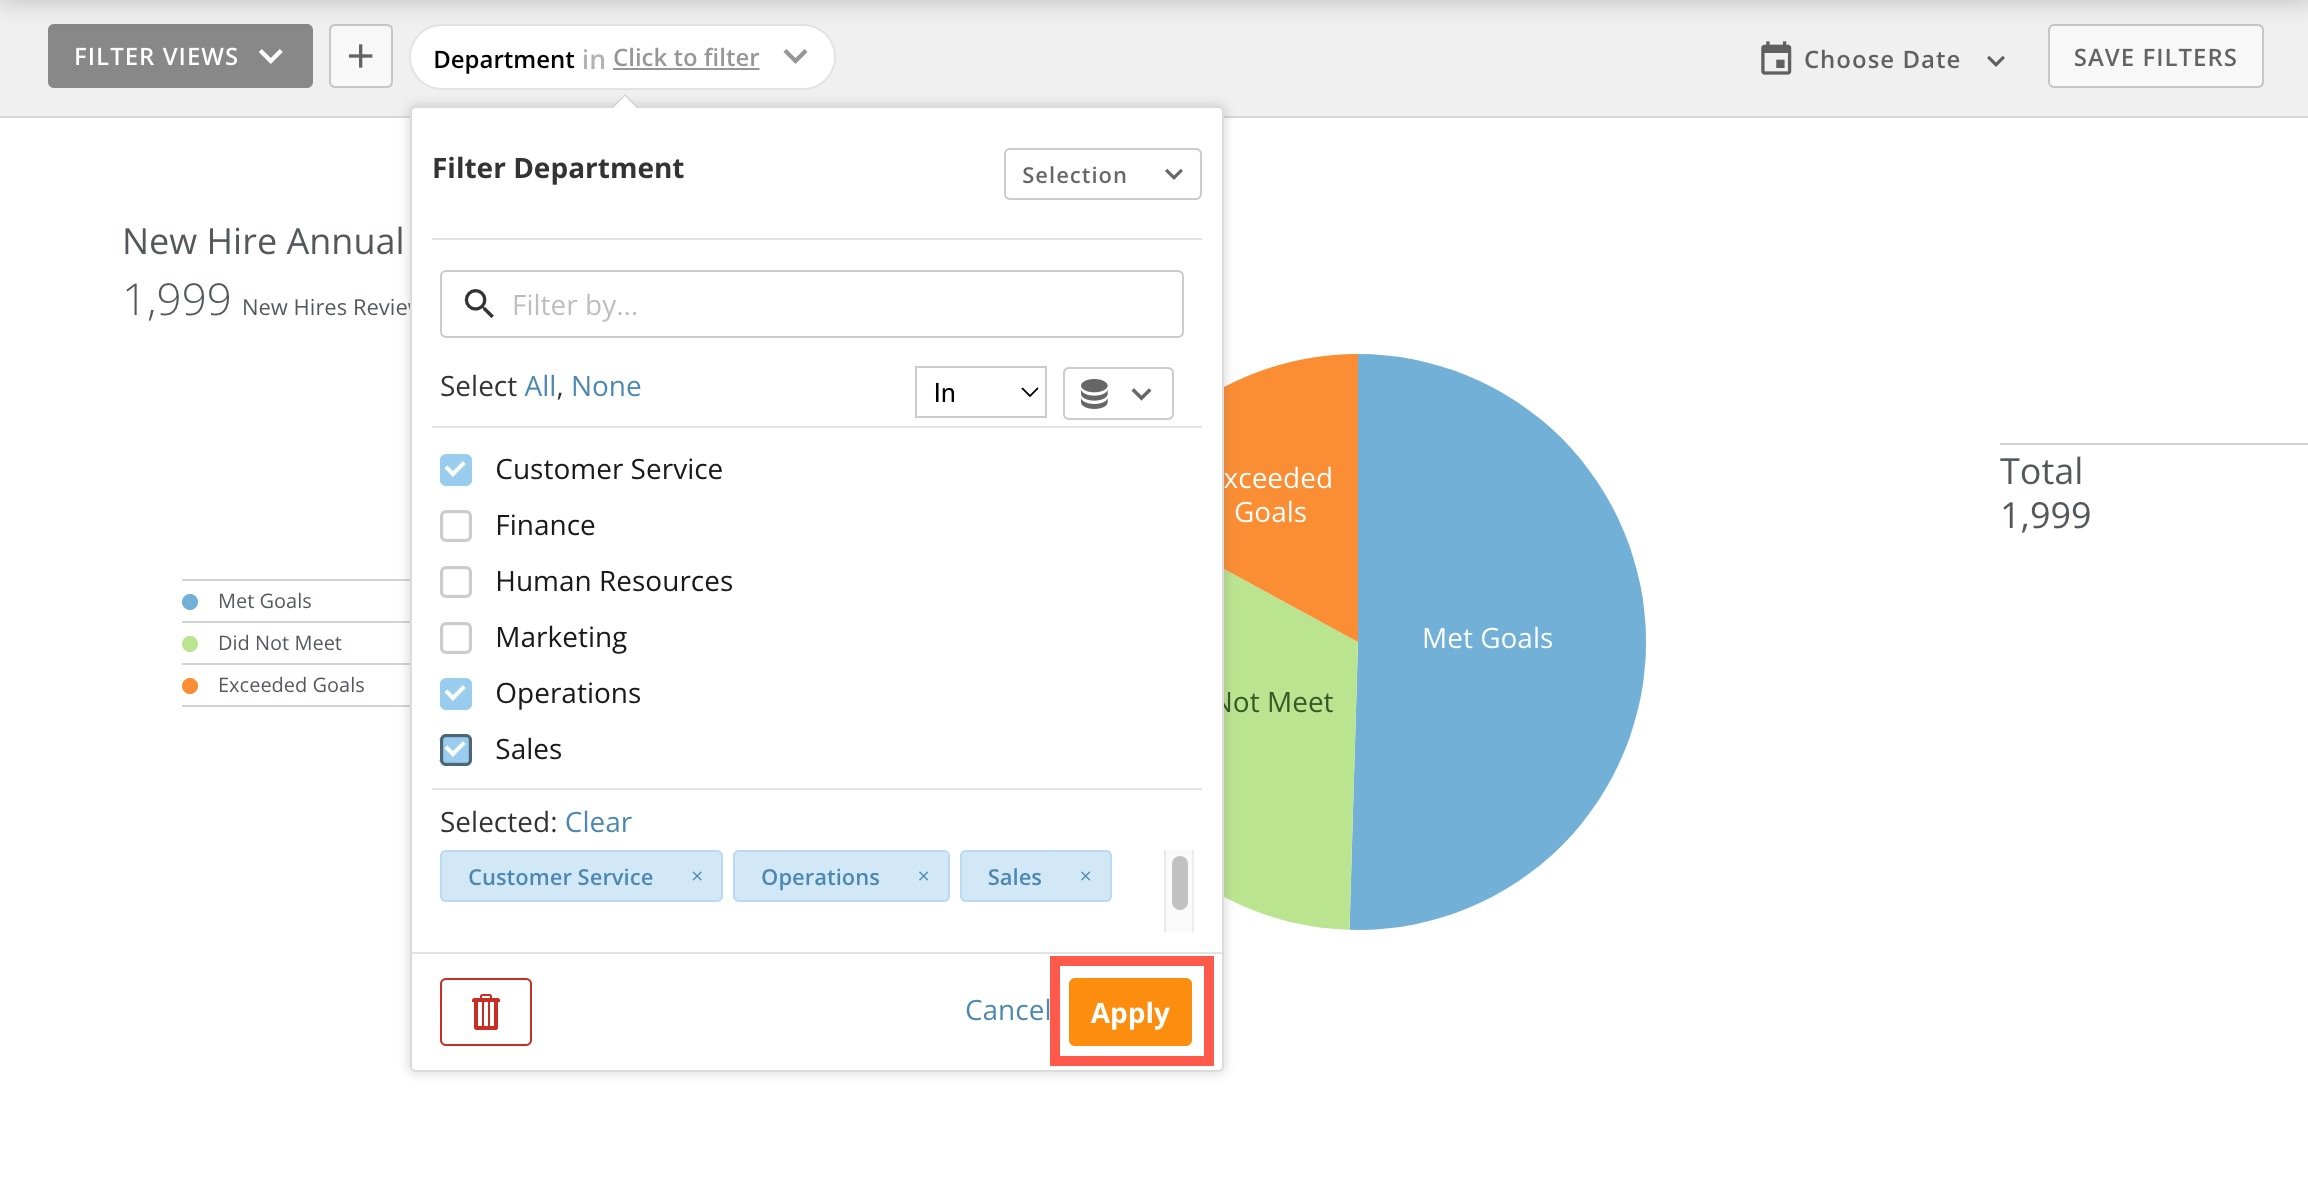 ### Remove a Page Filter
1. Select
**Show Page filters** to display the filter bar.
2. In the filter bar, select the pill for the filter you want to remove.
3. In the filter settings, select
**Delete**.
### Remove a Page Filter
1. Select
**Show Page filters** to display the filter bar.
2. In the filter bar, select the pill for the filter you want to remove.
3. In the filter settings, select
**Delete**.
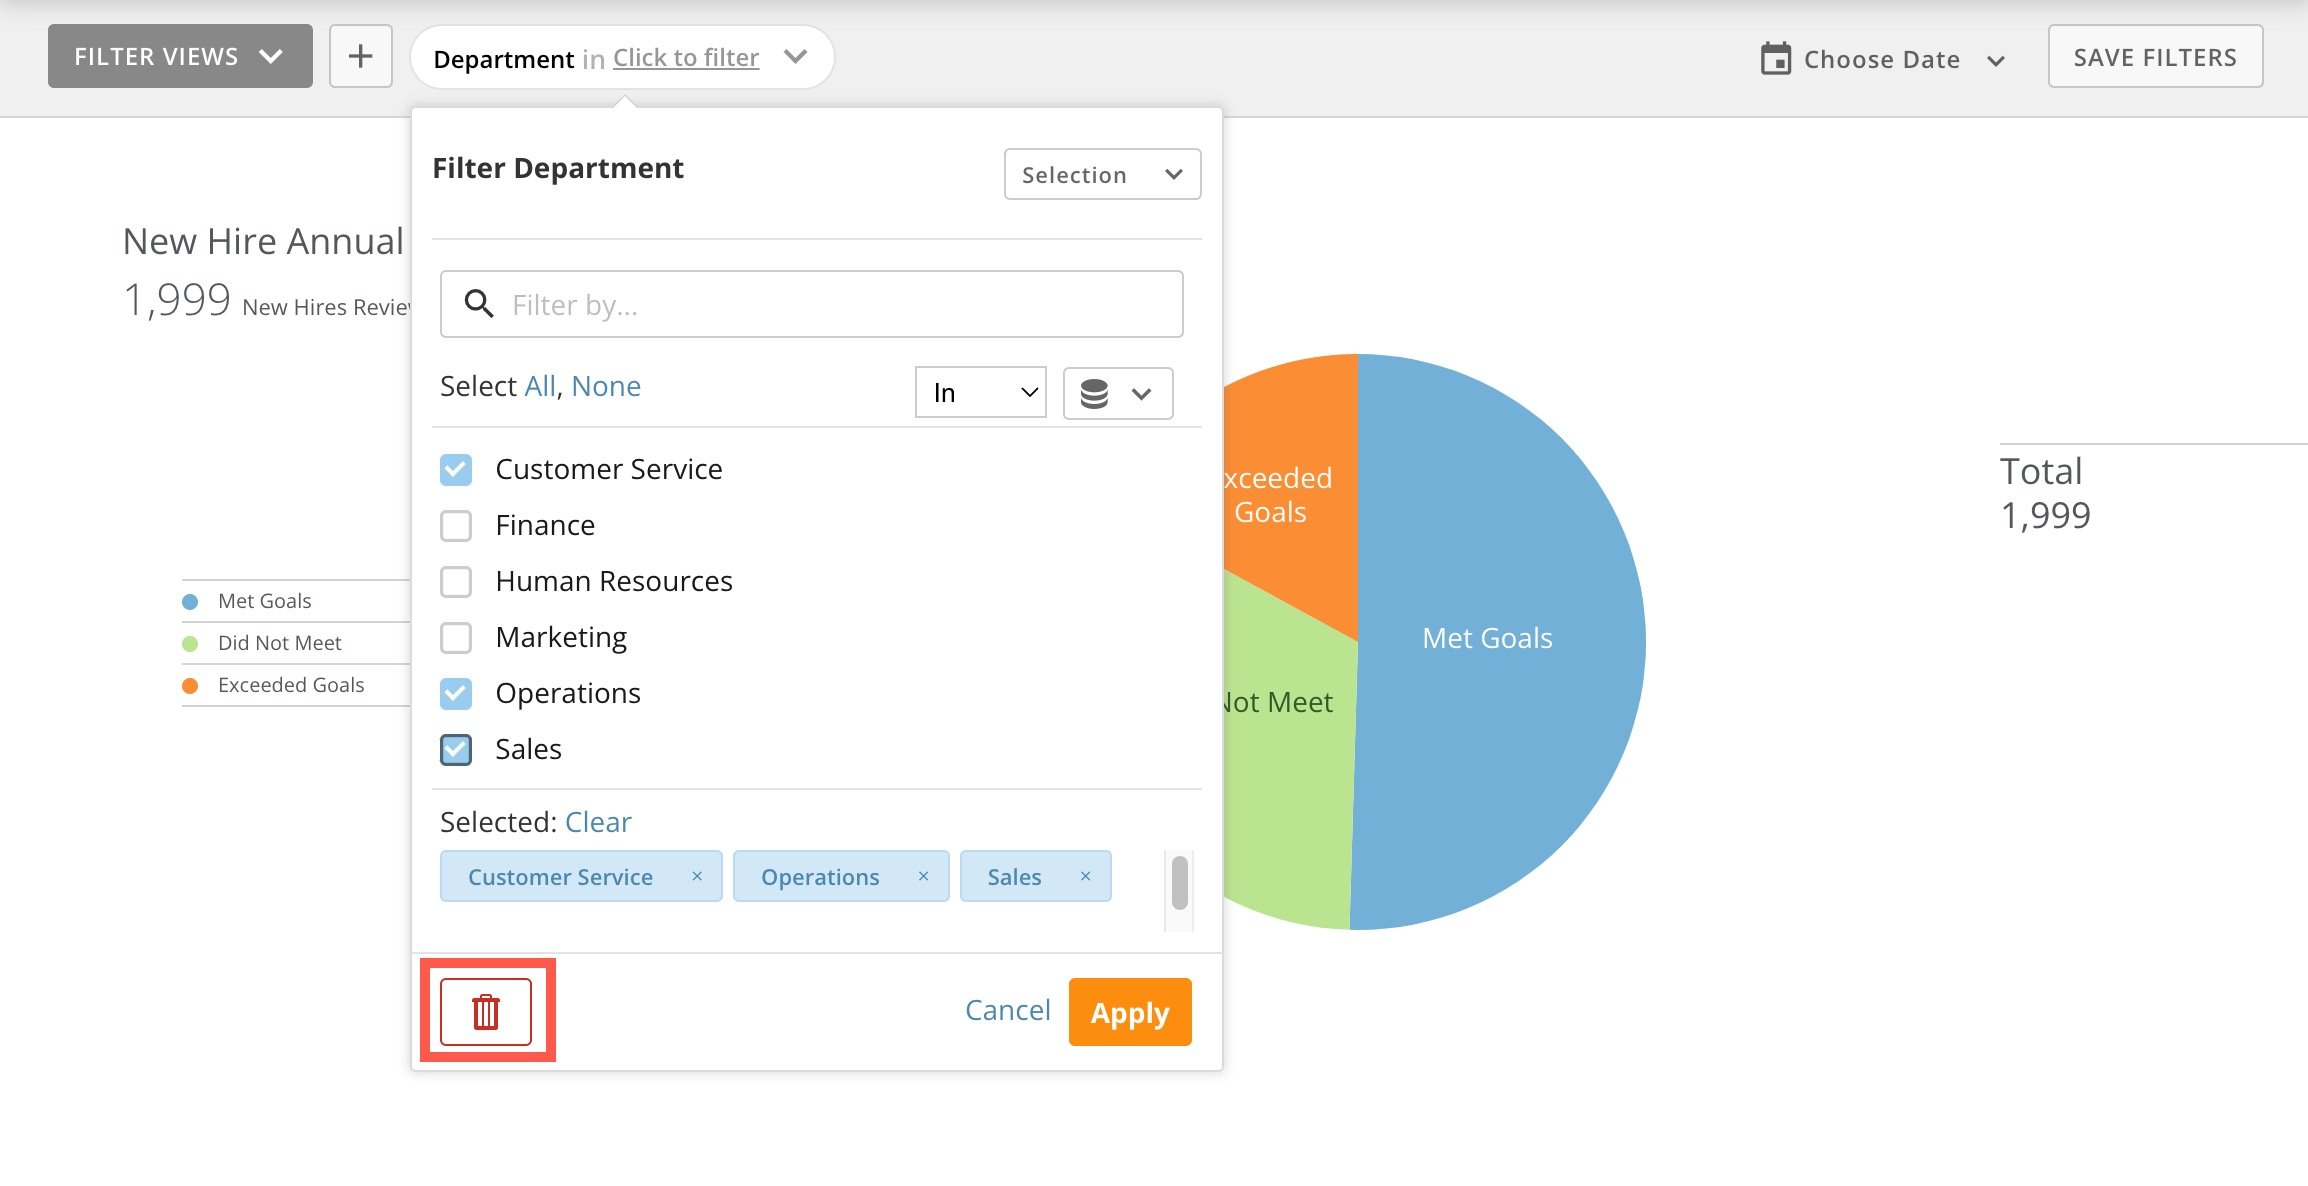 This filter is removed, and all of the cards that used the filter reflect the change.
### Hide Page Filters
When the Page Filters are showing, select **Hide** **Page filters** at the top of the dashboard to hide the filter bar.
After hiding the Page Filters, all of the affected cards are updated. However, hiding filters in this way does *not* completely deactivate them. If you want to deactivate filters, you must [remove](#remove_filters) them.
Reapply the hidden Filters by selecting **Show Page filters**.
**Note:** Turning off Page Filters does *not* remove the Filter for all users. The only way to make a Filter on a Card apply to all users is to apply a Filter while editing a Card. Consequently, you cannot persist a Page Filter to multiple Cards for all users.
### Filter Views
Filter Views allow you to customize a dashboard for all audiences. With Filter Views, you can do all of the following:
* Create and save your own filters without affecting anyone else's view.
* Curate and share important views to create alignment on a specific perspective.
* Provide any number of personalized data stories for any person in any role.
* Designate which saved Filter View is the default for first-time dashboard visitors.
Anyone with a default security role of Participant or higher can add, rename, copy, and delete their own Filter Views.
* To share Filter Views with all dashboard visitors or set them as the default view for a LOCKED dashboard, you must either be the dashboard owner or have a role with the Manage All Cards, Pages, and Apps (App Studio) or Edit Pages grant enabled.
* For UNLOCKED dashboards, anyone with a system role of Editor or higher can share Filter Views and set default views.
**Important:** You can only save a Filter View with a value of 253 characters or less.
***
Learn about [Managing Custom Roles](/s/article/360043438973).
Learn how to [Lock and Unlock Dashboard Content](/s/article/360042923814).
***
# Save a Filter View
After you save a Filter View, it is added to your **Filter Views** menu in the filter bar. From this menu, you can choose this Filter View anytime you visit this dashboard to quickly apply the filter.
This filter is removed, and all of the cards that used the filter reflect the change.
### Hide Page Filters
When the Page Filters are showing, select **Hide** **Page filters** at the top of the dashboard to hide the filter bar.
After hiding the Page Filters, all of the affected cards are updated. However, hiding filters in this way does *not* completely deactivate them. If you want to deactivate filters, you must [remove](#remove_filters) them.
Reapply the hidden Filters by selecting **Show Page filters**.
**Note:** Turning off Page Filters does *not* remove the Filter for all users. The only way to make a Filter on a Card apply to all users is to apply a Filter while editing a Card. Consequently, you cannot persist a Page Filter to multiple Cards for all users.
### Filter Views
Filter Views allow you to customize a dashboard for all audiences. With Filter Views, you can do all of the following:
* Create and save your own filters without affecting anyone else's view.
* Curate and share important views to create alignment on a specific perspective.
* Provide any number of personalized data stories for any person in any role.
* Designate which saved Filter View is the default for first-time dashboard visitors.
Anyone with a default security role of Participant or higher can add, rename, copy, and delete their own Filter Views.
* To share Filter Views with all dashboard visitors or set them as the default view for a LOCKED dashboard, you must either be the dashboard owner or have a role with the Manage All Cards, Pages, and Apps (App Studio) or Edit Pages grant enabled.
* For UNLOCKED dashboards, anyone with a system role of Editor or higher can share Filter Views and set default views.
**Important:** You can only save a Filter View with a value of 253 characters or less.
***
Learn about [Managing Custom Roles](/s/article/360043438973).
Learn how to [Lock and Unlock Dashboard Content](/s/article/360042923814).
***
# Save a Filter View
After you save a Filter View, it is added to your **Filter Views** menu in the filter bar. From this menu, you can choose this Filter View anytime you visit this dashboard to quickly apply the filter.
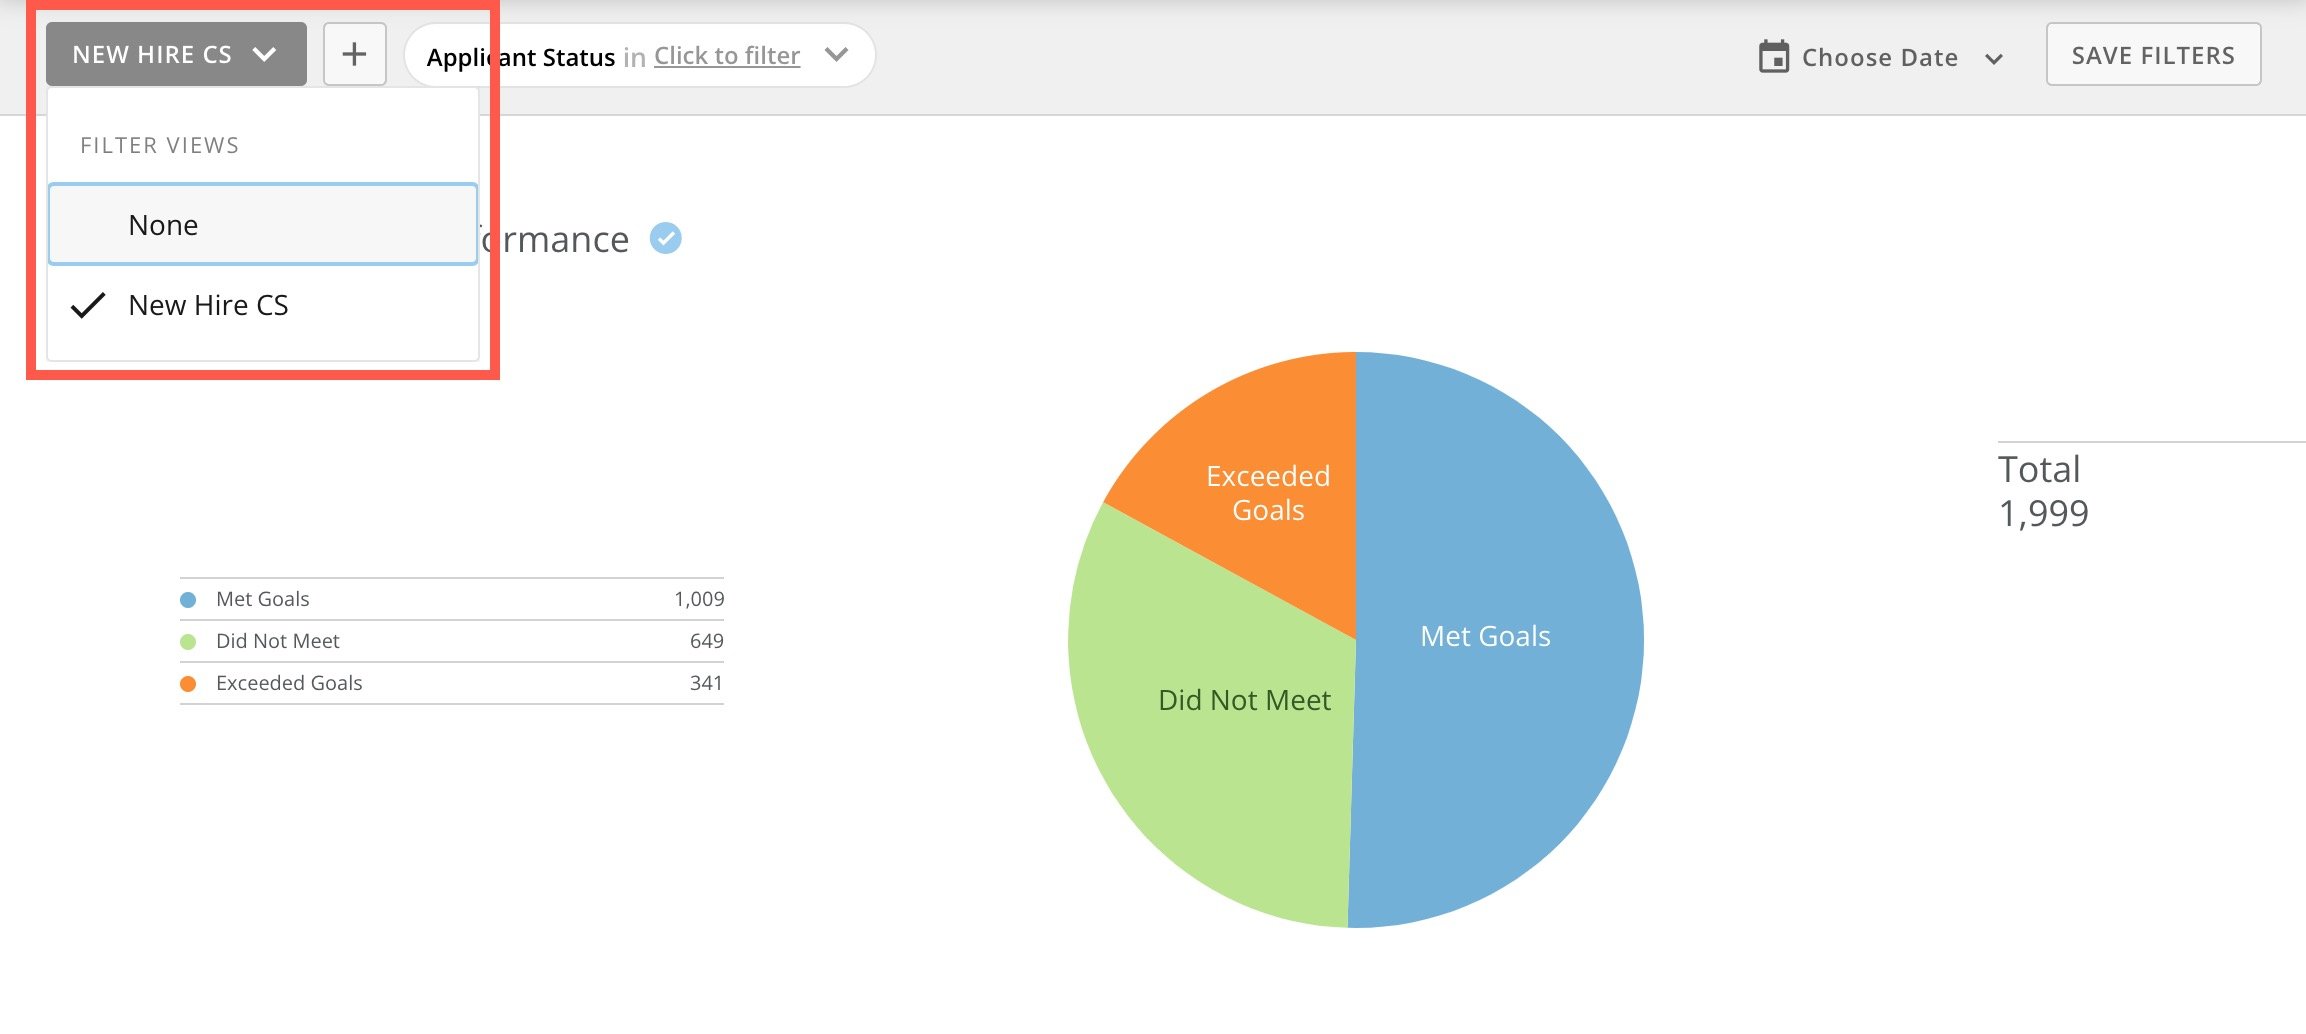 You are the only one who sees filters you have created *unless* a Filter has been designated as the default filter for the dashboard or is shared with everyone, in which case anyone can select and view it. However, a configured default filter does not mean people are required to use it. Individuals can still create and set their own Filter Views.
When a default Filter View is configured, that filter loads anytime someone visits the dashboard for the first time. For all other visits, any filters you configured the last time you were on the dashboard will load again so you can begin where you ended.
Follow these steps to create and save a Filter View:
1. Create a filter as described in
[Apply Page Filters](https://domo-support.domo.com/s/article/360042923914?language=en_US#apply_page_filters "Applying Page-Level Filters (with Filter Views)"), above.
2. Select
**Save Filters** in the ribbon.
You are the only one who sees filters you have created *unless* a Filter has been designated as the default filter for the dashboard or is shared with everyone, in which case anyone can select and view it. However, a configured default filter does not mean people are required to use it. Individuals can still create and set their own Filter Views.
When a default Filter View is configured, that filter loads anytime someone visits the dashboard for the first time. For all other visits, any filters you configured the last time you were on the dashboard will load again so you can begin where you ended.
Follow these steps to create and save a Filter View:
1. Create a filter as described in
[Apply Page Filters](https://domo-support.domo.com/s/article/360042923914?language=en_US#apply_page_filters "Applying Page-Level Filters (with Filter Views)"), above.
2. Select
**Save Filters** in the ribbon.
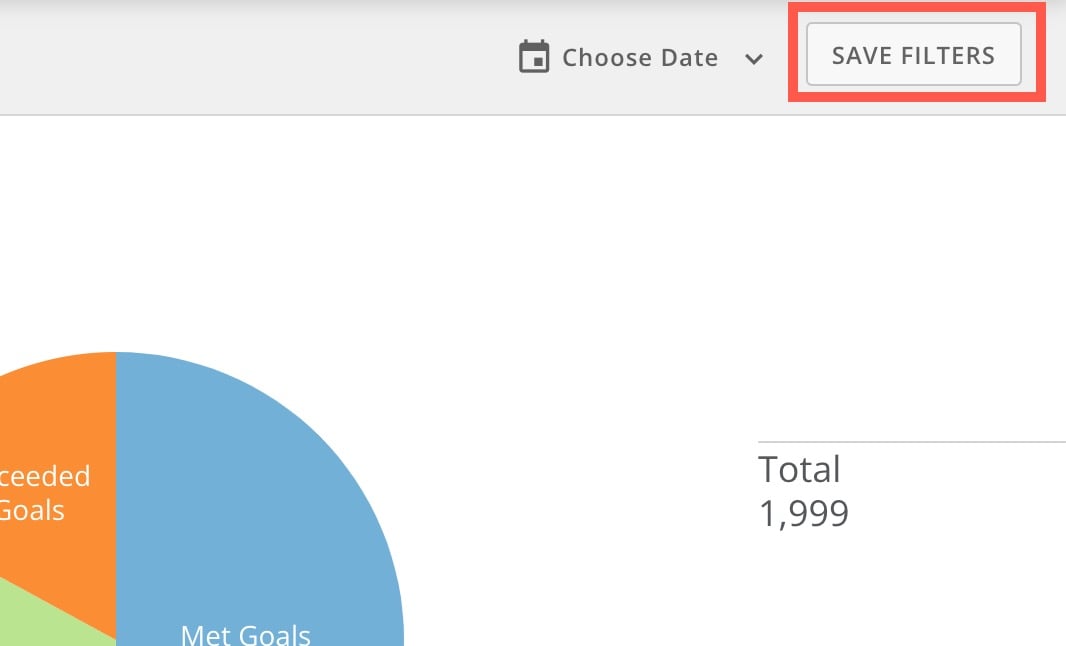 3. Select
**Create New Filter View** to open the **Save filters** modal.
4. Enter a descriptive name for the new filter. The maximum character length is 30.
5. (Optional) To save this as the default filter for the dashboard, check the box labeled
**Set as default** **for everyone**. Note that if a default filter already exists for this dashboard, the new filter will replace it as the default.
3. Select
**Create New Filter View** to open the **Save filters** modal.
4. Enter a descriptive name for the new filter. The maximum character length is 30.
5. (Optional) To save this as the default filter for the dashboard, check the box labeled
**Set as default** **for everyone**. Note that if a default filter already exists for this dashboard, the new filter will replace it as the default.
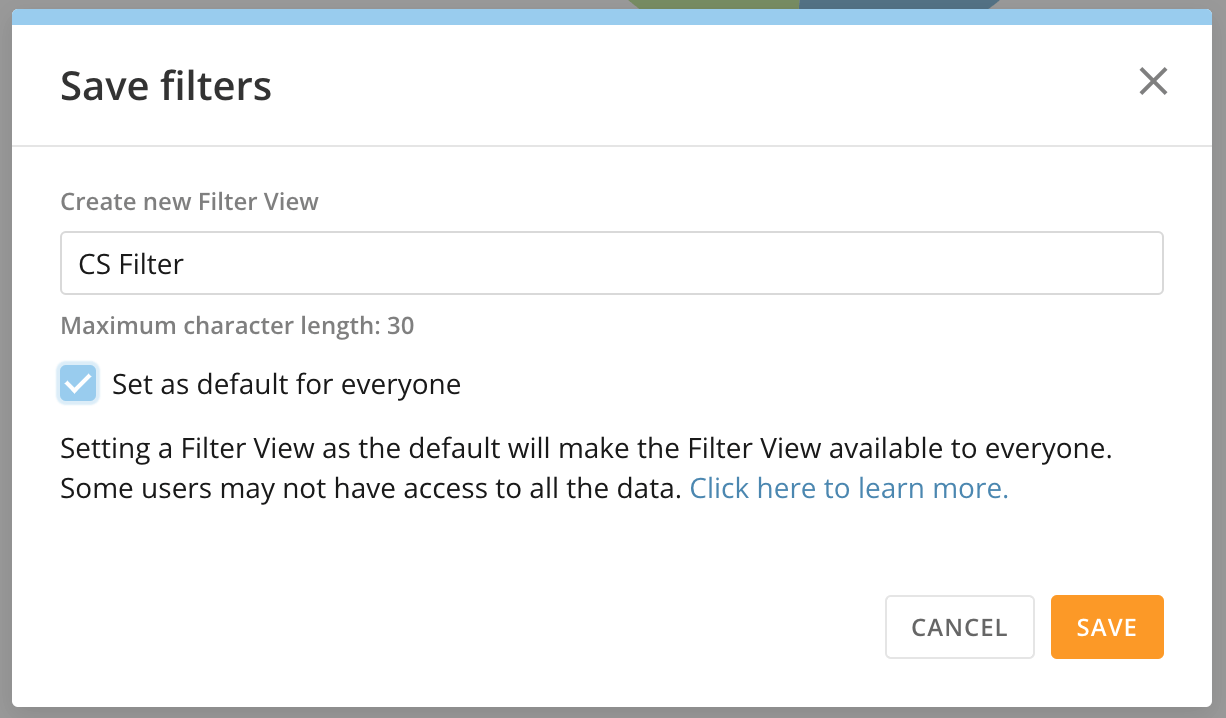 6. Select
**Save**.
The new view is added to your **Filter Views** menu.
# Update a Filter View
If you make a change to a filter, that change is not applied automatically to any Filter Views that include it. To update a Filter View, you must do it manually.
Follow these steps to update a Filter View:
1. Follow the steps to
[edit a filter](#edit_a_page_filter), then return here.
2. In the filter bar, select **Save Filters**.
3. Select **Update Existing Filter View**.
4. Choose the Filter View to update.
6. Select
**Save**.
The new view is added to your **Filter Views** menu.
# Update a Filter View
If you make a change to a filter, that change is not applied automatically to any Filter Views that include it. To update a Filter View, you must do it manually.
Follow these steps to update a Filter View:
1. Follow the steps to
[edit a filter](#edit_a_page_filter), then return here.
2. In the filter bar, select **Save Filters**.
3. Select **Update Existing Filter View**.
4. Choose the Filter View to update.
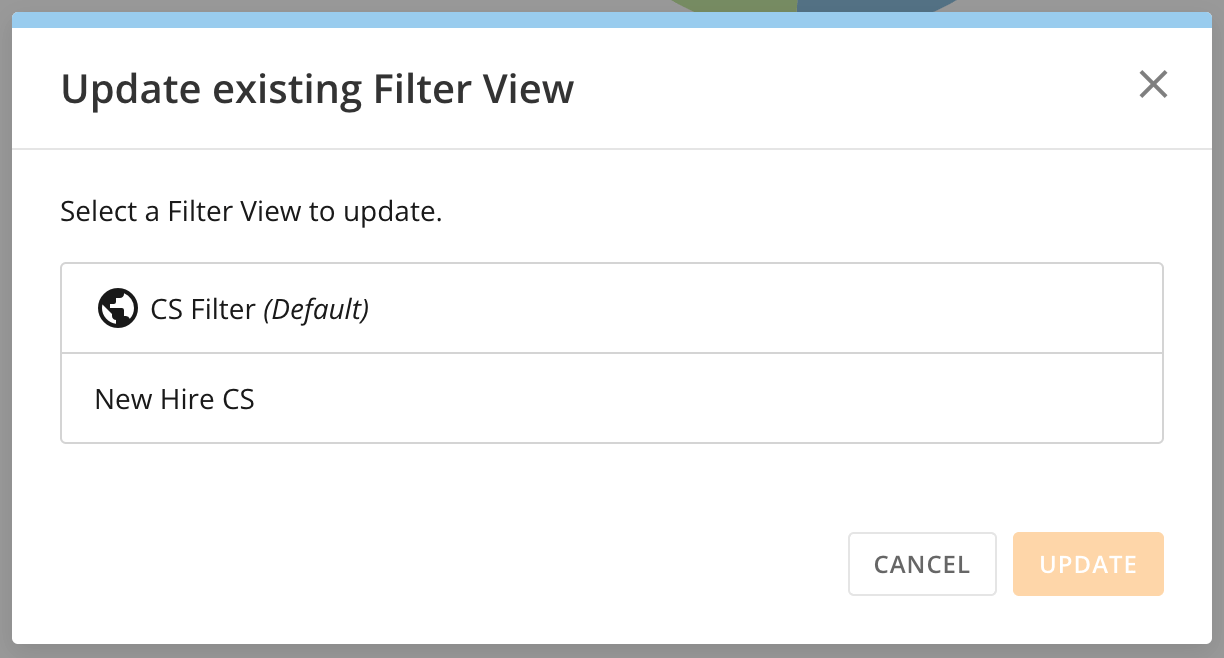 5. Select **Update**.
# Rename a Filter View
You can rename any Filter view you have created, as long as you meet the following criteria:
* You are the dashboard owner
* You have a role with the Manage All Cards, Pages, and Apps (App Studio) or Edit Pages grant enabled
* The dashboard is unlocked and you have a system role of Editor or higher
For more information about custom roles, see [Managing Custom Roles](/s/article/360043438973 "Managing Custom Roles").
Follow these steps to rename a Filter View:
1. Select the Filter Views dropdown.
5. Select **Update**.
# Rename a Filter View
You can rename any Filter view you have created, as long as you meet the following criteria:
* You are the dashboard owner
* You have a role with the Manage All Cards, Pages, and Apps (App Studio) or Edit Pages grant enabled
* The dashboard is unlocked and you have a system role of Editor or higher
For more information about custom roles, see [Managing Custom Roles](/s/article/360043438973 "Managing Custom Roles").
Follow these steps to rename a Filter View:
1. Select the Filter Views dropdown.
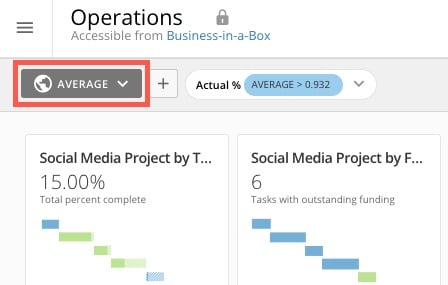 2. Hover over the Filter View you want to rename and
**More** (three vertical dots icon).
3. Select **Rename** and enter a name for the Filter View.
4. Select **Save**.
# Copy a Filter View
You can copy any Filter View on a dashboard, even those you haven't created or that are set to default. This is a good way to make small changes to an existing configuration without having to rebuild it.
1. Select the **Filter Views** dropdown.
2. Hover over the Filter View you want to copy and select
**More** (three vertical dots icon).
3. Select **Copy** and enter a new descriptive name for the Filter View.
2. Hover over the Filter View you want to rename and
**More** (three vertical dots icon).
3. Select **Rename** and enter a name for the Filter View.
4. Select **Save**.
# Copy a Filter View
You can copy any Filter View on a dashboard, even those you haven't created or that are set to default. This is a good way to make small changes to an existing configuration without having to rebuild it.
1. Select the **Filter Views** dropdown.
2. Hover over the Filter View you want to copy and select
**More** (three vertical dots icon).
3. Select **Copy** and enter a new descriptive name for the Filter View.
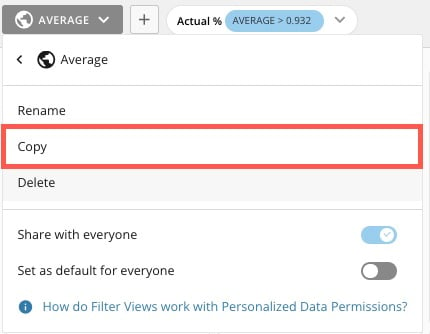 4. Select **Save**.
# Share a Filter View
If you want a Filter View to be available for all of a dashboard's visitors without making it the default view, you can share the Filter View using the steps below.
You can only do this if one of the following is true:
* You are the dashboard owner
* You have a role with the Manage All Cards, Pages, and Apps (App Studio) or the Edit Pages grant enabled
* The dashboard is unlocked and you have a system role of Editor or higher.
Follow these steps to delete a Filter View:
1. In the filter bar, select the Filter Views dropdown to view all available Filter Views.
4. Select **Save**.
# Share a Filter View
If you want a Filter View to be available for all of a dashboard's visitors without making it the default view, you can share the Filter View using the steps below.
You can only do this if one of the following is true:
* You are the dashboard owner
* You have a role with the Manage All Cards, Pages, and Apps (App Studio) or the Edit Pages grant enabled
* The dashboard is unlocked and you have a system role of Editor or higher.
Follow these steps to delete a Filter View:
1. In the filter bar, select the Filter Views dropdown to view all available Filter Views.
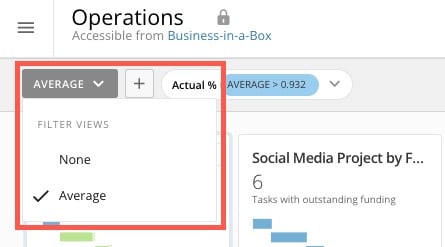 2. Hover over the Filter View you want to share and select
**More** (three vertical dots icon).
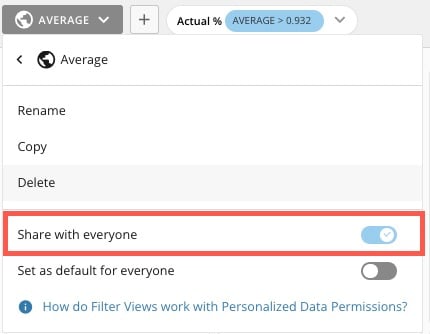
3. Toggle the switch labeled **Share with everyone**.
While all viewers can now see the Filter View, some viewers may not be able to view all the data.
2. Hover over the Filter View you want to share and select
**More** (three vertical dots icon).
3. Toggle the switch labeled **Share with everyone**.
While all viewers can now see the Filter View, some viewers may not be able to view all the data.
 ***
Learn about [Managing Custom Roles](/s/article/360043438973 "Managing Custom Roles").
Learn how to [lock/unlock dashboard content](/s/article/360042923814).
***
# Delete a Filter View
You can delete any Filter View you have created.
You can only delete a default Filter View if one of the following is true:
* You own the dashboard
* You have a role with the Manage All Cards, Pages, and Apps (App Studio) or Edit Pages grant enabled
* The dashboard is unlocked and you have a system role of Editor or higher
Follow these steps to delete a Filter View:
1. In the filter bar, select the Filter Views dropdown to view all available Filter Views
2. In the menu, hover over the Filter View you want to delete and select
**More** (three vertical dots icon).
***
Learn about [Managing Custom Roles](/s/article/360043438973 "Managing Custom Roles").
Learn how to [lock/unlock dashboard content](/s/article/360042923814).
***
# Delete a Filter View
You can delete any Filter View you have created.
You can only delete a default Filter View if one of the following is true:
* You own the dashboard
* You have a role with the Manage All Cards, Pages, and Apps (App Studio) or Edit Pages grant enabled
* The dashboard is unlocked and you have a system role of Editor or higher
Follow these steps to delete a Filter View:
1. In the filter bar, select the Filter Views dropdown to view all available Filter Views
2. In the menu, hover over the Filter View you want to delete and select
**More** (three vertical dots icon).
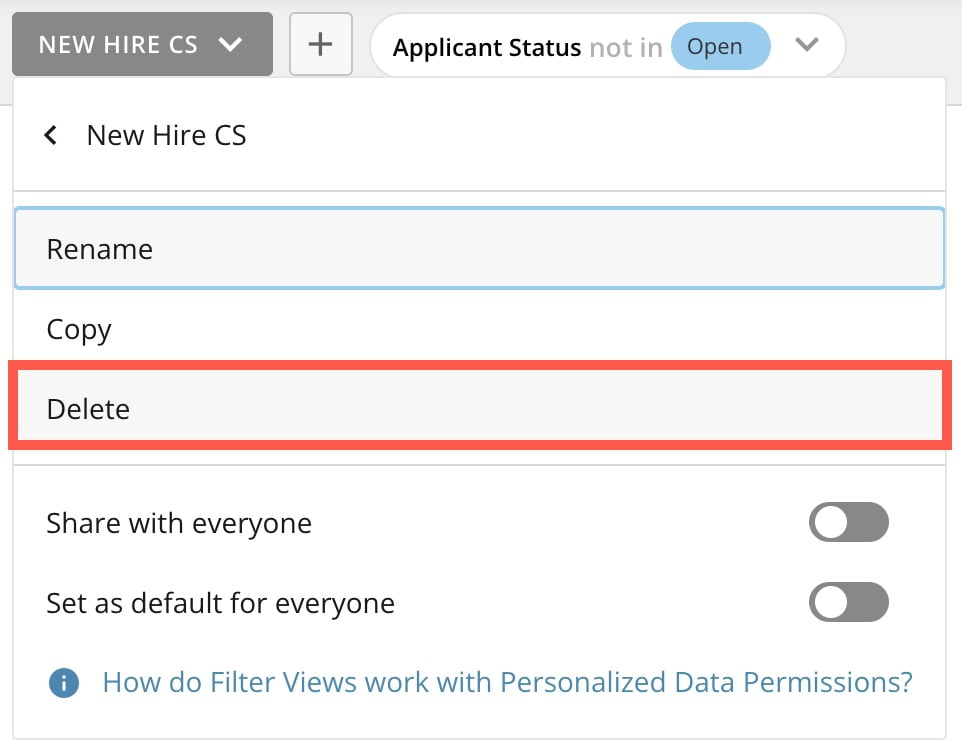
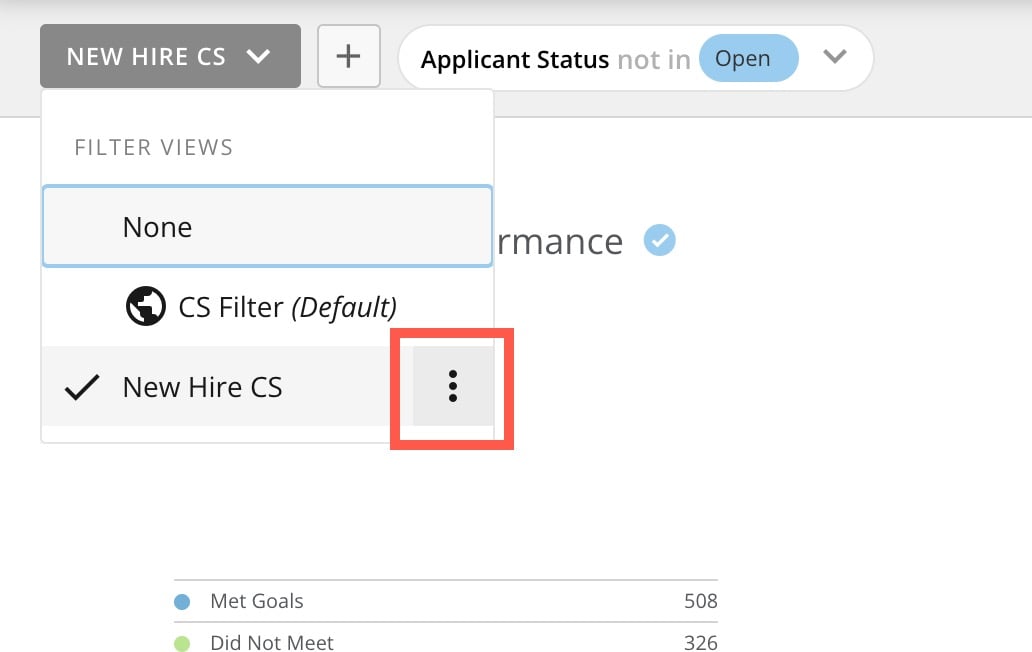 3. In the action menu, select **Delete**.
 ***
Learn about [Managing Custom Roles](/s/article/360043438973 "Managing Custom Roles").
***
### Apply Dynamic Date Range Filters
You can use Dynamic Date Range Filters to adjust the date range window for all the cards on a dashboard. You can then save these filters and use them as the default for all dashboard viewers or save them to different [Filter Views](#filter_views). Dynamic Date Range Filters can save time for dashboard viewers. Additionally, with Dynamic Date Range Filters, the date range data for your cards automatically carries over when the current period ends.
**Note:** Dynamic Date Range Filters only apply to Visualization Cards and Sumo Cards. They do not work for Doc Cards, Poll Cards, Notebook Cards, and Custom Apps.
**Important:** Dynamic Date Range Filters do not work on a card if the **Graph By** for the card has been set to **None** within Analyzer.
Apply Dynamic Date Range Filters by selecting **Choose Date** dashboard filter bar and choosing options from the **Date range** and **Graph by** dropdowns.
***
Learn about [Managing Custom Roles](/s/article/360043438973 "Managing Custom Roles").
***
### Apply Dynamic Date Range Filters
You can use Dynamic Date Range Filters to adjust the date range window for all the cards on a dashboard. You can then save these filters and use them as the default for all dashboard viewers or save them to different [Filter Views](#filter_views). Dynamic Date Range Filters can save time for dashboard viewers. Additionally, with Dynamic Date Range Filters, the date range data for your cards automatically carries over when the current period ends.
**Note:** Dynamic Date Range Filters only apply to Visualization Cards and Sumo Cards. They do not work for Doc Cards, Poll Cards, Notebook Cards, and Custom Apps.
**Important:** Dynamic Date Range Filters do not work on a card if the **Graph By** for the card has been set to **None** within Analyzer.
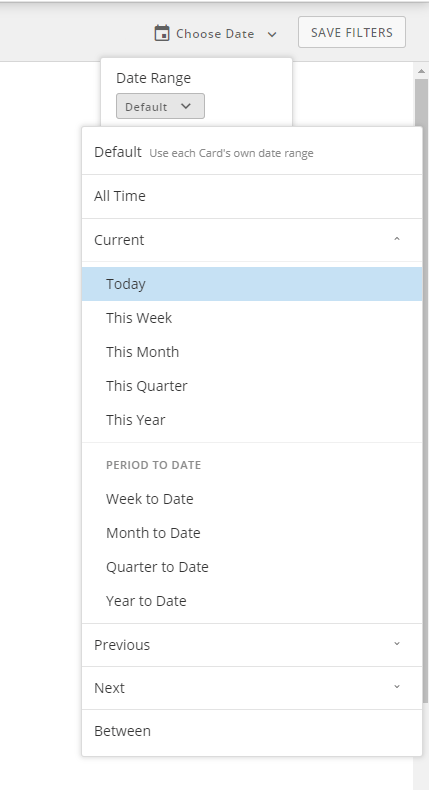
Apply Dynamic Date Range Filters by selecting **Choose Date** dashboard filter bar and choosing options from the **Date range** and **Graph by** dropdowns.
 The filters you choose here are applied to all cards on the dashboard that have had a [date column applied in Analyzer](/s/article/360043428713 "Applying DataSet Columns to Your Chart"). Filters are applied to each card's unique date column and take into account date filters already set for the card.
For example, if a dashboard contains a card powered by the `Sales Dates` column and the dates are filtered in Analyzer to show March–June, if Dynamic Date Range Filters are configured for the dashboard, the Filters are applied to the `Sales Dates` column and only work within the March–June time period. If the Dynamic Date Range Filters are set outside that time period, the card displays the message "No data in filtered range."
You can choose cards that will not be affected by the dynamic date, by disabling the **Allow global date filters** option. Learn how to do this above under [Filter Options](#filter_options). The dynamic date is also not applied to the card if you have chosen the **Hide Date on Card Details** option for the card.
Most of the options for Dynamic Date Range Filters are the same as those for filtering dates in Analyzer. The options include:
* ****Date Range —**** Choose the range of data shown for all cards on the dashboard being powered by date columns. By default this is set to ****Default****, meaning that all cards use their own date ranges. Other options include the current date period, period-to-date options such as **Week to Date**, previous periods, future periods, and a custom range.
* ****Graph By —**** Choose the date grain for all cards on the dashboard being powered by date columns. The date grain determines whether the data is shown by week, by month, or another option. By default no date grain is selected, meaning the cards use the same date grain used in their powering DataSets.
For example, if data for a card is by week in the DataSet, it is automatically graphed by week in the card.
**Note:** The **Graph By** option does not impact Single Value charts. This is to ensure best data practices as Graph By impacts which row is returned in the chart query.
### Apply Card-to-Card Interaction Filters
When you apply Card-to-Card Filters on a dashboard, you can hover over a specific element in a card to highlight that same element in all other cards on the dashboard that share it, accelerating your ability to make correlations between your cards.
For example, a manager in a retail department has access to a Domo dashboard that includes several cards related to the company's profits and spending, as shown below.
The filters you choose here are applied to all cards on the dashboard that have had a [date column applied in Analyzer](/s/article/360043428713 "Applying DataSet Columns to Your Chart"). Filters are applied to each card's unique date column and take into account date filters already set for the card.
For example, if a dashboard contains a card powered by the `Sales Dates` column and the dates are filtered in Analyzer to show March–June, if Dynamic Date Range Filters are configured for the dashboard, the Filters are applied to the `Sales Dates` column and only work within the March–June time period. If the Dynamic Date Range Filters are set outside that time period, the card displays the message "No data in filtered range."
You can choose cards that will not be affected by the dynamic date, by disabling the **Allow global date filters** option. Learn how to do this above under [Filter Options](#filter_options). The dynamic date is also not applied to the card if you have chosen the **Hide Date on Card Details** option for the card.
Most of the options for Dynamic Date Range Filters are the same as those for filtering dates in Analyzer. The options include:
* ****Date Range —**** Choose the range of data shown for all cards on the dashboard being powered by date columns. By default this is set to ****Default****, meaning that all cards use their own date ranges. Other options include the current date period, period-to-date options such as **Week to Date**, previous periods, future periods, and a custom range.
* ****Graph By —**** Choose the date grain for all cards on the dashboard being powered by date columns. The date grain determines whether the data is shown by week, by month, or another option. By default no date grain is selected, meaning the cards use the same date grain used in their powering DataSets.
For example, if data for a card is by week in the DataSet, it is automatically graphed by week in the card.
**Note:** The **Graph By** option does not impact Single Value charts. This is to ensure best data practices as Graph By impacts which row is returned in the chart query.
### Apply Card-to-Card Interaction Filters
When you apply Card-to-Card Filters on a dashboard, you can hover over a specific element in a card to highlight that same element in all other cards on the dashboard that share it, accelerating your ability to make correlations between your cards.
For example, a manager in a retail department has access to a Domo dashboard that includes several cards related to the company's profits and spending, as shown below.
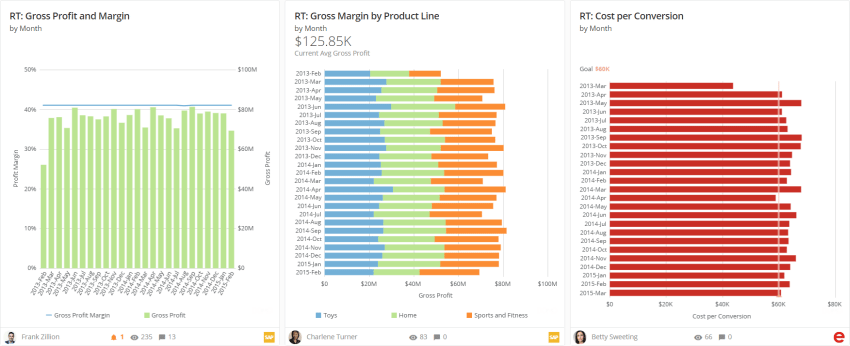 All of these cards show different but related data for roughly the same time period with a monthly date grain. The manager can drill into each card one at a time and see data for a given month.
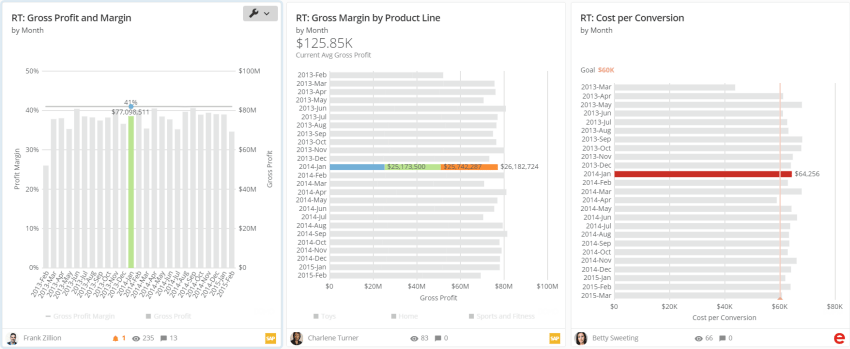
This is useful, but the manager wants to compare data for all of the different cards across the month of January. With Card-to-Card Filters, they can hover over the bar for that month in any of the cards, and the same bar highlights in all of the others, as shown below.
All of these cards show different but related data for roughly the same time period with a monthly date grain. The manager can drill into each card one at a time and see data for a given month.
This is useful, but the manager wants to compare data for all of the different cards across the month of January. With Card-to-Card Filters, they can hover over the bar for that month in any of the cards, and the same bar highlights in all of the others, as shown below.
 **Tip:** Card-to-Card Filters work best when all cards are sized Large or Full. Learn about [Changing the Size of Cards on a Dashboard](/s/article/360042923594 "Changing the Size of Cards in a Page").
With Card-to-Card Filters, you can also select a chart element to apply a Filter for that element to all cards on the dashboard. For example, if you selected a bar for "2024-Jan," all cards would be filtered to that month. This also works for rows in tables. You can turn off this Filter by selecting the element again.
Card-to-Card Filters are automatically enabled in dashboards. In Standard Pages, they can be toggled on or off by Page owners, users with an Admin default security role, or users with a custom role with the (admin-level) Manage All Cards, Pages, and Apps (App Studio) grant enabled. They can do this by selecting **Settings menu** > **Turn on interaction filters**.
**Tip:** Card-to-Card Filters work best when all cards are sized Large or Full. Learn about [Changing the Size of Cards on a Dashboard](/s/article/360042923594 "Changing the Size of Cards in a Page").
With Card-to-Card Filters, you can also select a chart element to apply a Filter for that element to all cards on the dashboard. For example, if you selected a bar for "2024-Jan," all cards would be filtered to that month. This also works for rows in tables. You can turn off this Filter by selecting the element again.
Card-to-Card Filters are automatically enabled in dashboards. In Standard Pages, they can be toggled on or off by Page owners, users with an Admin default security role, or users with a custom role with the (admin-level) Manage All Cards, Pages, and Apps (App Studio) grant enabled. They can do this by selecting **Settings menu** > **Turn on interaction filters**.
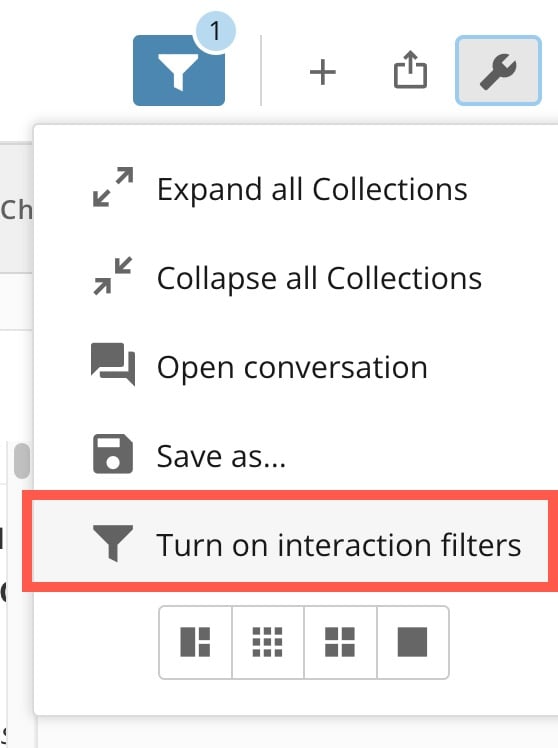 When this option is enabled for a System Page, all users, including Participants, can hover over cards to see Card-to-Card Filters in action.
Disable Card-to-Card Filters by selecting **Settings menu** (wrench icon) > **Turn off interaction filters**. When the option is disabled, Participant-level users cannot apply Card-to-Card Filters.
### Use Filter Cards to Filter Card Content
Filter Cards allow you to apply filters to all of the cards on a dashboard. There are three main types of Filter Cards: Slicer, Checkbox, and Radio Button Cards; Range Selector Cards; and Date Selector Cards. You can build these cards in Analyzer.
**Note:** To use Filter Cards (like Date Selector Cards), [Card-to-Card Filters](#apply_card_to_card_filters) must be turned on.
If Card-to-Card Filters are not turned on, selecting a filter opens the Details view for the card instead of applying the filter.
Learn how to use the following Filter Cards with Page Filters:
* [Slicer, Checkbox Selector, and Radio Button Selector Cards](#slicer_checkbox_and_radio_button_cards)
* [Range Selector Cards](#range_selector_cards)
* [Date Selector Cards](#date_selector_cards).
# Slicer, Checkbox Selector, and Radio Button Selector Cards
Slicer, Checkbox Selector, and Radio Button Selector cards contain filters from a DataSet column. After you add one of these cards to a dashboard, you can select any of the filters in the card to apply it to all the cards on the dashboard.
With Slicer and Checkbox Selector cards, you can apply as many filters as you want simultaneously.
When this option is enabled for a System Page, all users, including Participants, can hover over cards to see Card-to-Card Filters in action.
Disable Card-to-Card Filters by selecting **Settings menu** (wrench icon) > **Turn off interaction filters**. When the option is disabled, Participant-level users cannot apply Card-to-Card Filters.
### Use Filter Cards to Filter Card Content
Filter Cards allow you to apply filters to all of the cards on a dashboard. There are three main types of Filter Cards: Slicer, Checkbox, and Radio Button Cards; Range Selector Cards; and Date Selector Cards. You can build these cards in Analyzer.
**Note:** To use Filter Cards (like Date Selector Cards), [Card-to-Card Filters](#apply_card_to_card_filters) must be turned on.
If Card-to-Card Filters are not turned on, selecting a filter opens the Details view for the card instead of applying the filter.
Learn how to use the following Filter Cards with Page Filters:
* [Slicer, Checkbox Selector, and Radio Button Selector Cards](#slicer_checkbox_and_radio_button_cards)
* [Range Selector Cards](#range_selector_cards)
* [Date Selector Cards](#date_selector_cards).
# Slicer, Checkbox Selector, and Radio Button Selector Cards
Slicer, Checkbox Selector, and Radio Button Selector cards contain filters from a DataSet column. After you add one of these cards to a dashboard, you can select any of the filters in the card to apply it to all the cards on the dashboard.
With Slicer and Checkbox Selector cards, you can apply as many filters as you want simultaneously.
With Radio Button Selector Cards, you can apply only one filter at a time.
You can deactivate a filter by selecting it a second time.
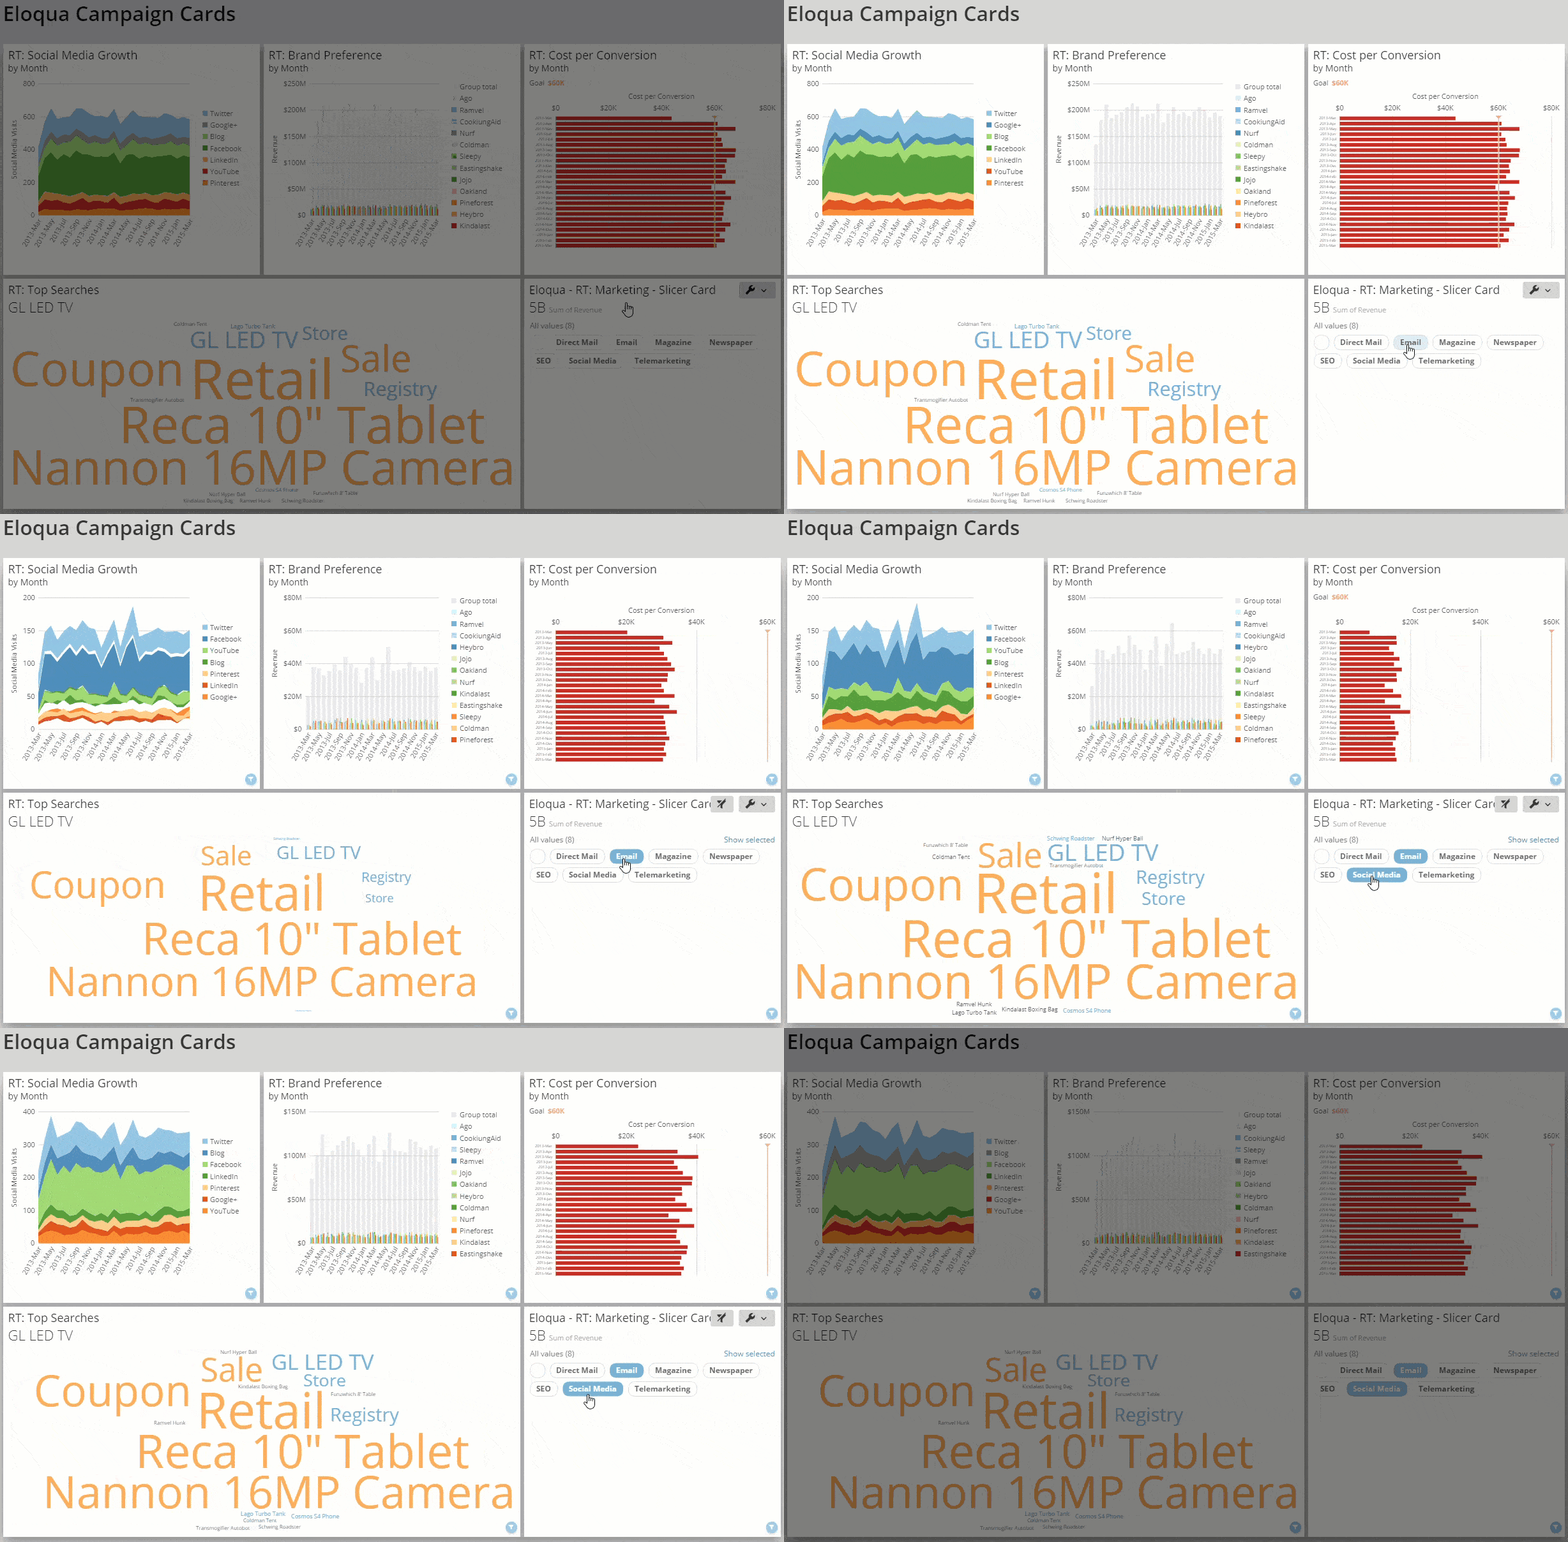
The following animated GIF shows an example of this. Here, the marketing manager wants to view Eloqua campaign data for email and social media channels. Instead of having to configure Page Filters, all they have to do is select all of these filters in the Slicer Cards. Selecting the pills for **Email** and **Social Media** in the "Eloqua — RT Marketing — Slicer Card." All of the other cards on the dashboard are then filtered accordingly.
 ***
* Learn more about
[Slicer, Checkbox Selector, and Radio Button Selector Cards](/s/article/360043429313 "Slicer, Checkbox, and Radio Button Cards")
* Explore
[chart properties](https://domo-support.domo.com/s/topic/0TO5w000000ZaodGAC/chart-properties?language=en_US)
***
# Range Selector Cards
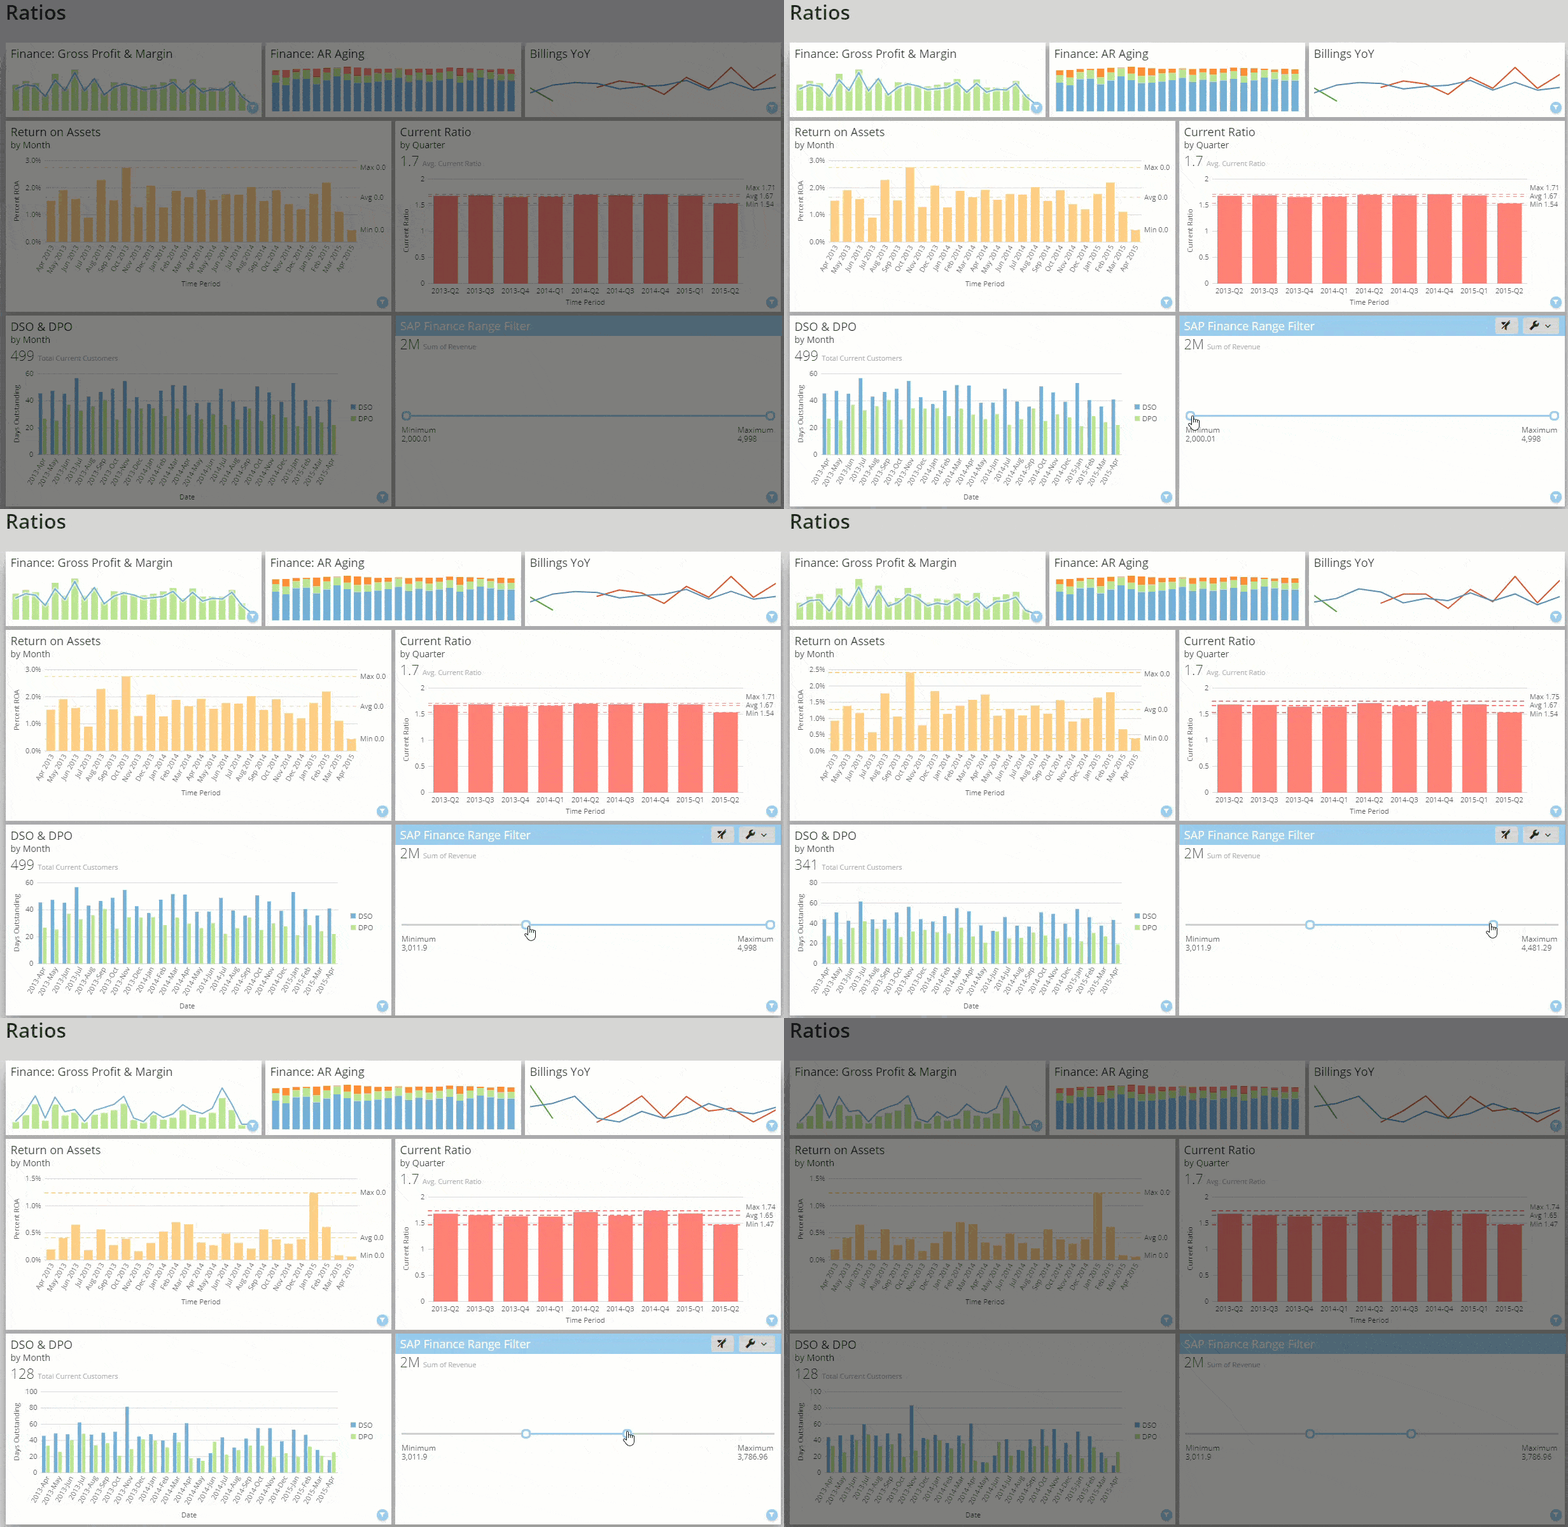
Range Selector Cards let you filter all cards on a dashboard to reflect a selected range of values or dates. A slider appears with a minimum and maximum value. When you change these minimum and maximum values, all cards on the dashboard update to show data within the new range. In the following GIF, the minimum value (originally set to 2,000) is set to 3,011, and the maximum value (originally 4,998) is set to 3786. All other cards on the dashboard update to reflect the new range.
***
* Learn more about
[Range Selector Cards](/s/article/360042924954)
* Explore
[chart properties](https://domo-support.domo.com/s/topic/0TO5w000000ZaodGAC/chart-properties?language=en_US)
***
# Date Selector Cards
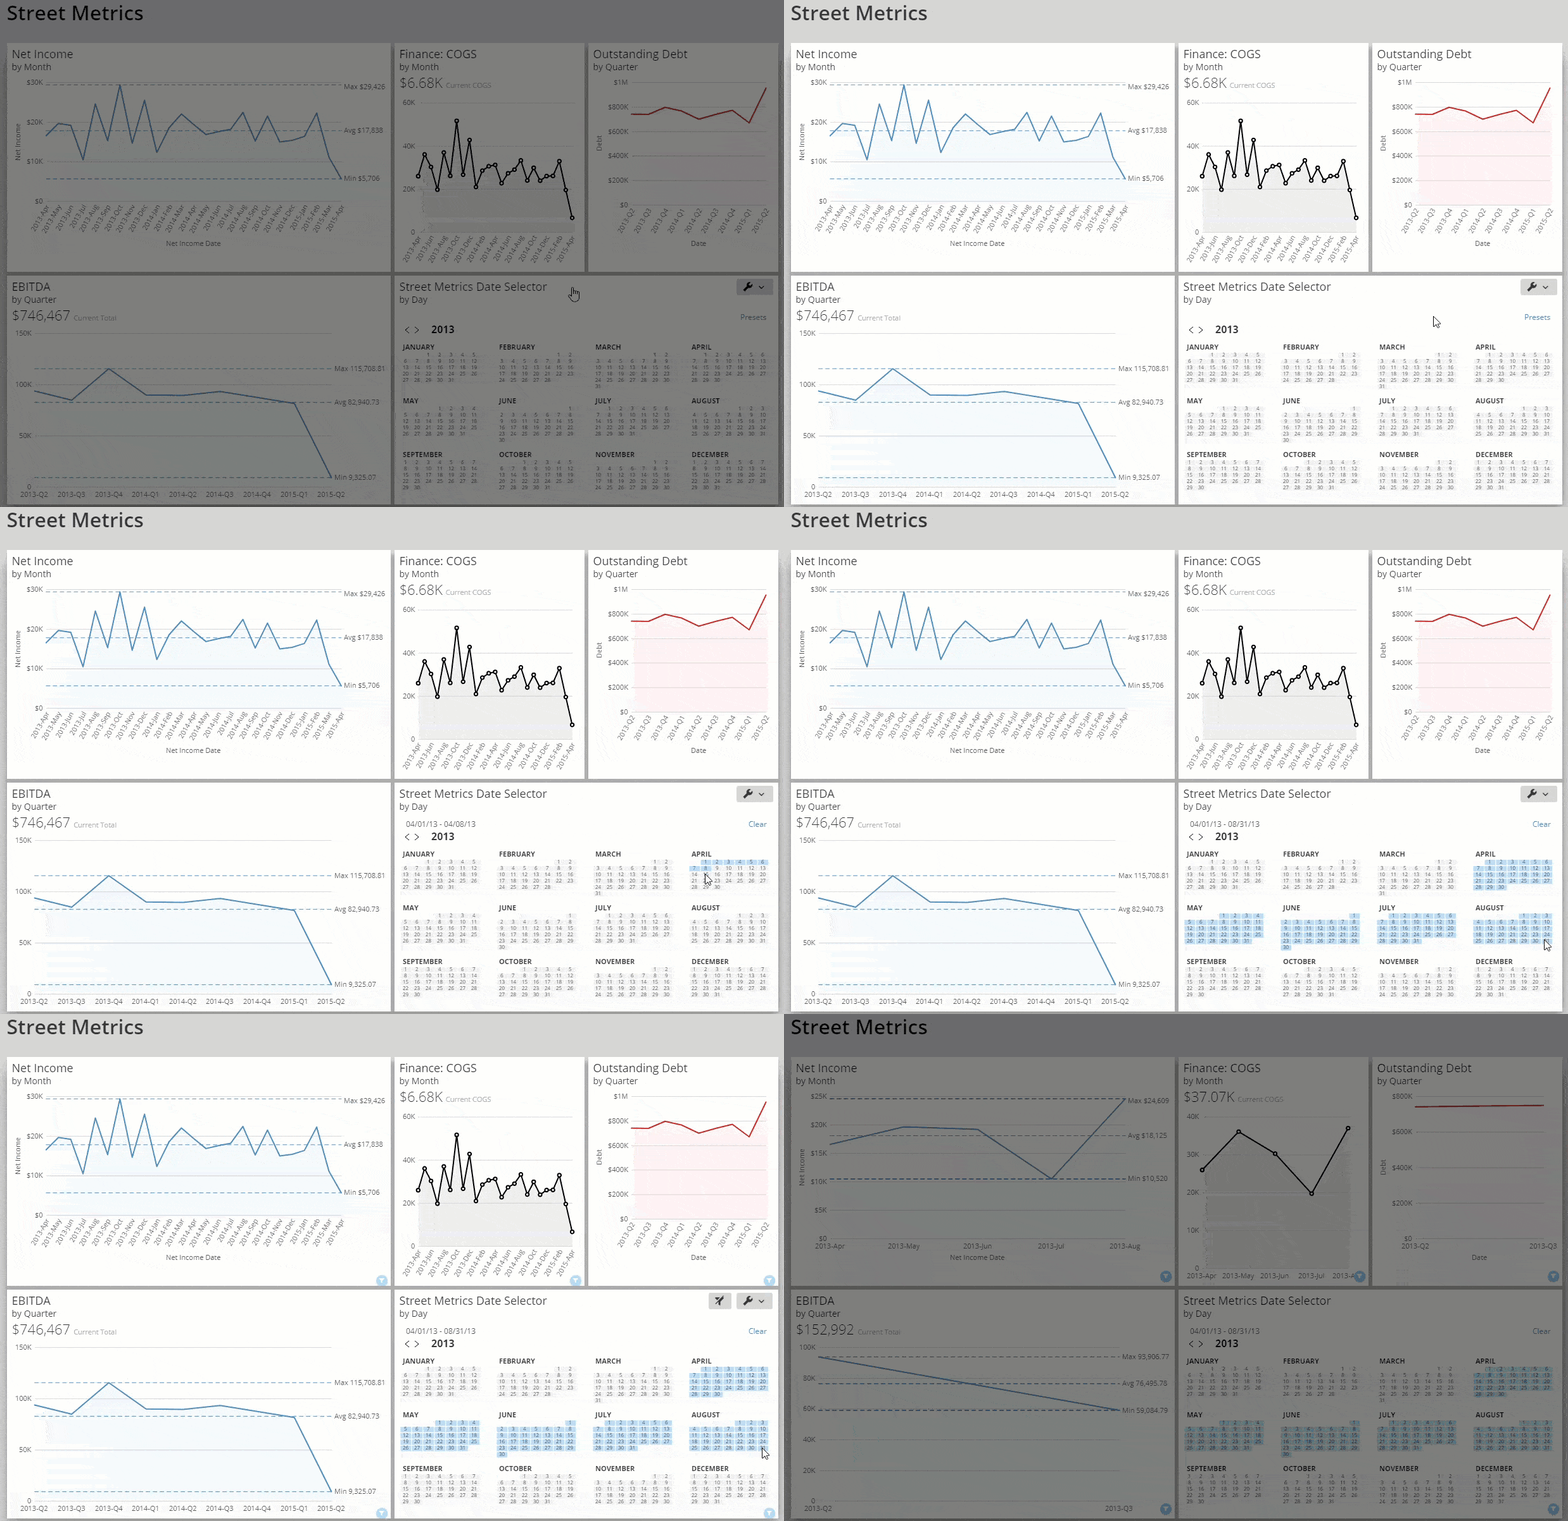
By default, a Date Selector Card displays a series of dates in calendar format, in either a yearly or monthly view (depending on your [Chart Properties](https://domo-support.domo.com/s/topic/0TO5w000000ZaodGAC/chart-properties?language=en_US) settings). You can click and drag over a range of dates in the Date Selector Card to filter all other cards on the dashboard to show data for those dates. In the following GIF, all the dates from April 1st to August 31st are highlighted in the "Street Metrics Date Selector" card. The four other cards in the dashboard reflect this selected range.
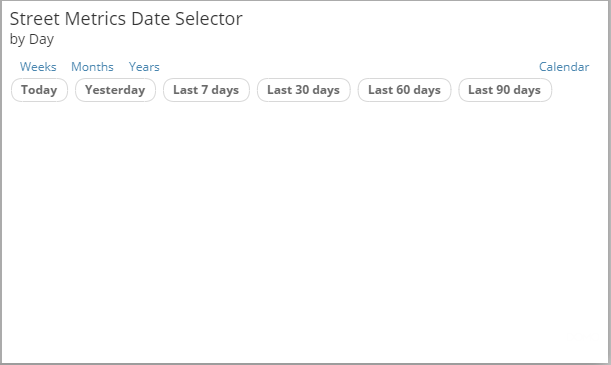
You can select **Presets** on the Date Selector Card to display several premade date filters.
**Note:** Using a **Presets** filter acts as a Global Date Filter on the dashboard (like using the dynamic date range filter) and filters all cards on the dashboard, not just the cards that contain the same date column as your Filter Card.
***
* Learn more about
[Slicer, Checkbox Selector, and Radio Button Selector Cards](/s/article/360043429313 "Slicer, Checkbox, and Radio Button Cards")
* Explore
[chart properties](https://domo-support.domo.com/s/topic/0TO5w000000ZaodGAC/chart-properties?language=en_US)
***
# Range Selector Cards
Range Selector Cards let you filter all cards on a dashboard to reflect a selected range of values or dates. A slider appears with a minimum and maximum value. When you change these minimum and maximum values, all cards on the dashboard update to show data within the new range. In the following GIF, the minimum value (originally set to 2,000) is set to 3,011, and the maximum value (originally 4,998) is set to 3786. All other cards on the dashboard update to reflect the new range.
***
* Learn more about
[Range Selector Cards](/s/article/360042924954)
* Explore
[chart properties](https://domo-support.domo.com/s/topic/0TO5w000000ZaodGAC/chart-properties?language=en_US)
***
# Date Selector Cards
By default, a Date Selector Card displays a series of dates in calendar format, in either a yearly or monthly view (depending on your [Chart Properties](https://domo-support.domo.com/s/topic/0TO5w000000ZaodGAC/chart-properties?language=en_US) settings). You can click and drag over a range of dates in the Date Selector Card to filter all other cards on the dashboard to show data for those dates. In the following GIF, all the dates from April 1st to August 31st are highlighted in the "Street Metrics Date Selector" card. The four other cards in the dashboard reflect this selected range.
You can select **Presets** on the Date Selector Card to display several premade date filters.
**Note:** Using a **Presets** filter acts as a Global Date Filter on the dashboard (like using the dynamic date range filter) and filters all cards on the dashboard, not just the cards that contain the same date column as your Filter Card.
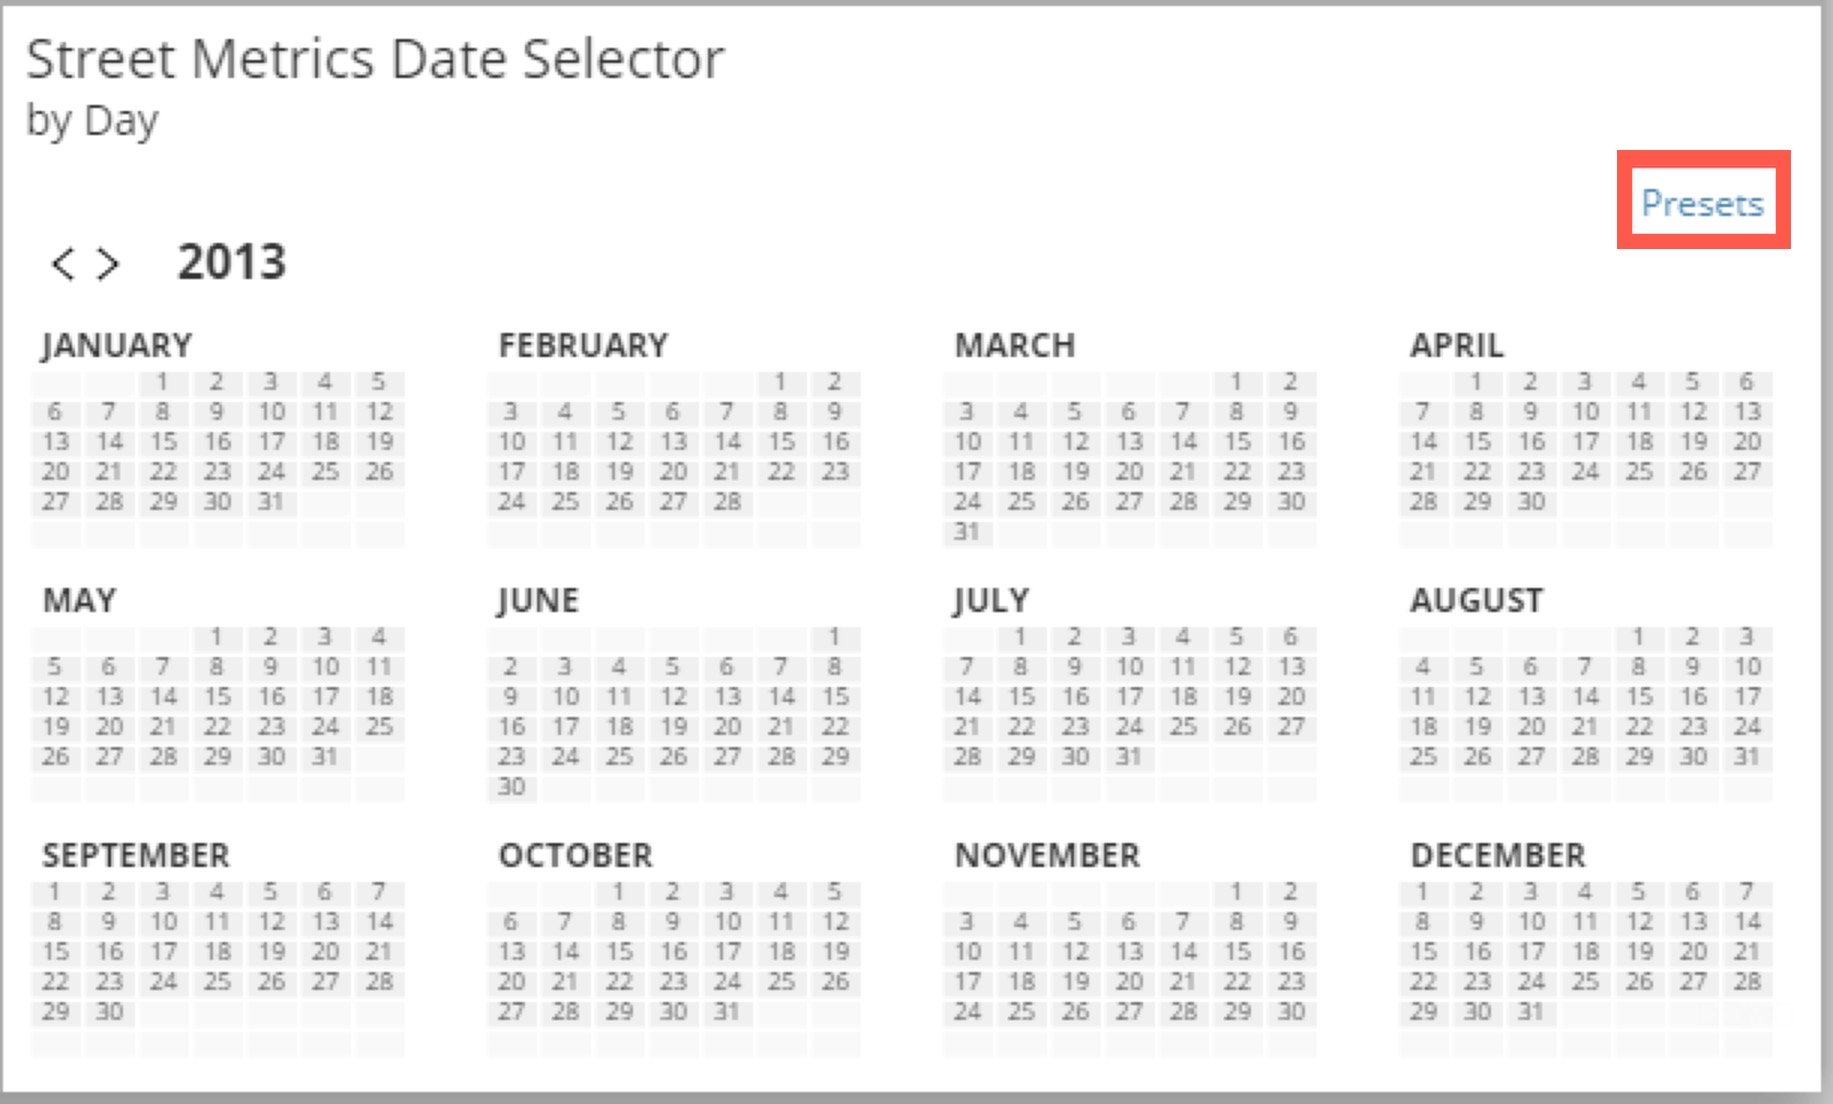 The premade filters display in groups of Day filters, Week filter, Month filters, and year filters. The default view is the day filters, as in the example below.
Select **Weeks**, **Months**, and **Years** to see the available filters in those groups.
Choose a filter pill to apply it.
 You can clear filters from a Date Selector Card by hovering over the card and selecting **Clear**.
***
* Learn about
[Date Selector Cards](/s/article/360042924474)
* Explore
[chart properties](https://domo-support.domo.com/s/topic/0TO5w000000ZaodGAC/chart-properties?language=en_US)
***
You can clear filters from a Date Selector Card by hovering over the card and selecting **Clear**.
***
* Learn about
[Date Selector Cards](/s/article/360042924474)
* Explore
[chart properties](https://domo-support.domo.com/s/topic/0TO5w000000ZaodGAC/chart-properties?language=en_US)
***