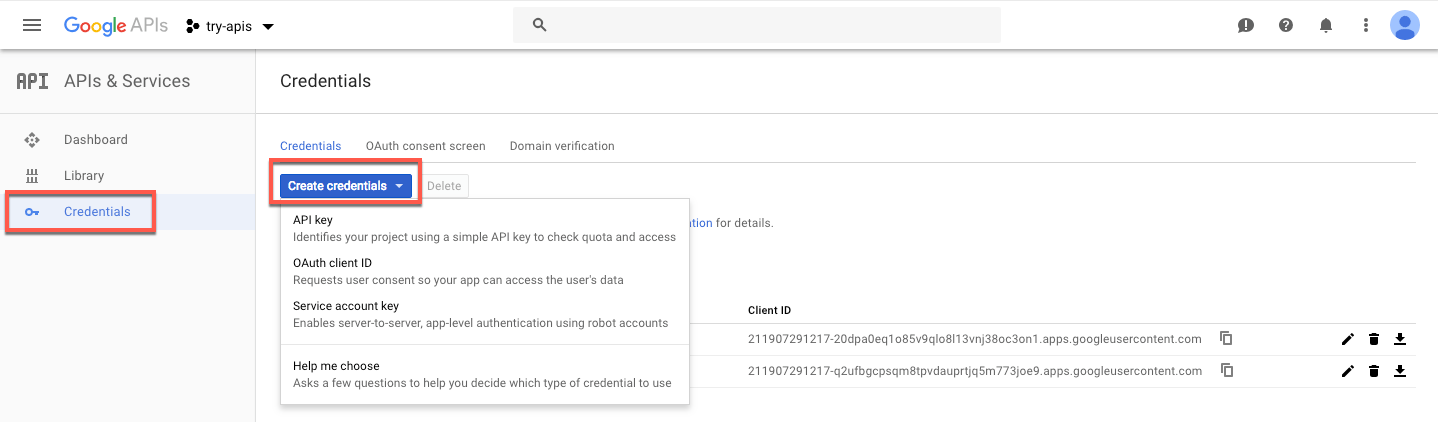
 3. Select the OAuth Client ID from the drop-down list.
4. Choose Web application under Application type.
5. Enter the redirect URL:
[https://oauth.domo.com/api/data/v1/oauth/providers/doubleclick-cm/exchange](https://oauth.domo.com/api/data/v1/oauth/providers/doubleclick-cm/exchange)
3. Select the OAuth Client ID from the drop-down list.
4. Choose Web application under Application type.
5. Enter the redirect URL:
[https://oauth.domo.com/api/data/v1/oauth/providers/doubleclick-cm/exchange](https://oauth.domo.com/api/data/v1/oauth/providers/doubleclick-cm/exchange)
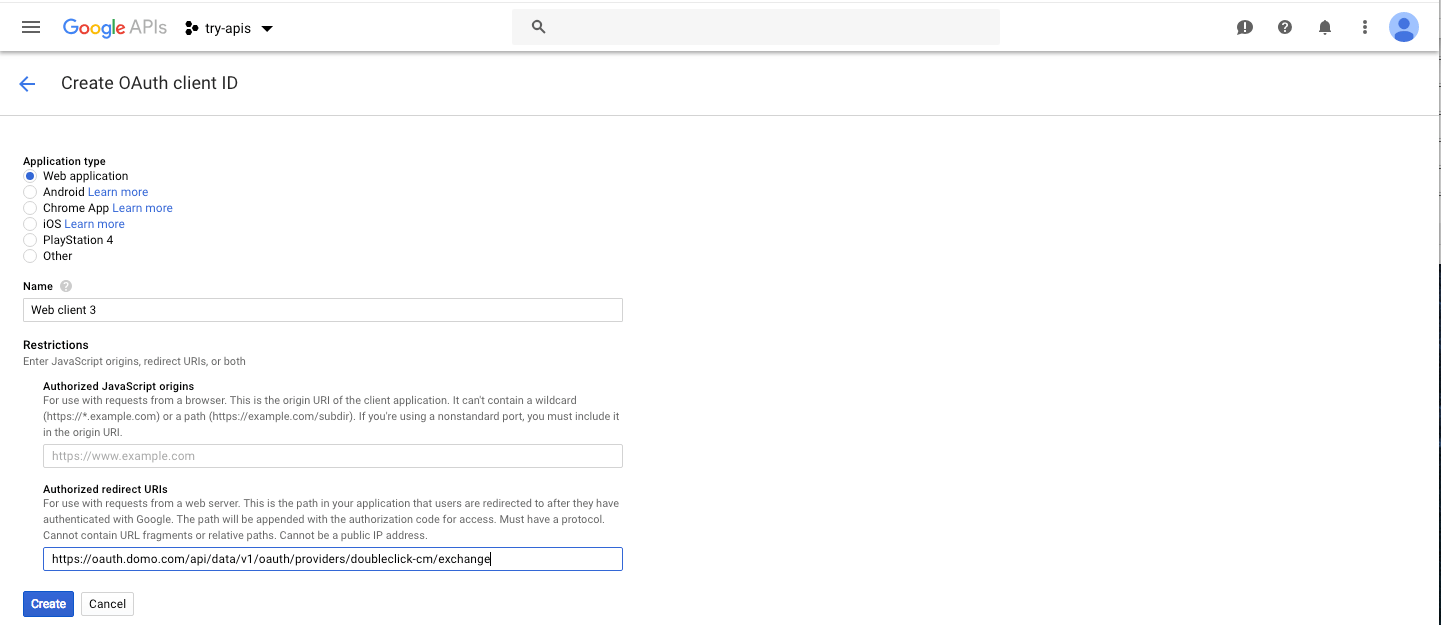 6. Click
**Create**.
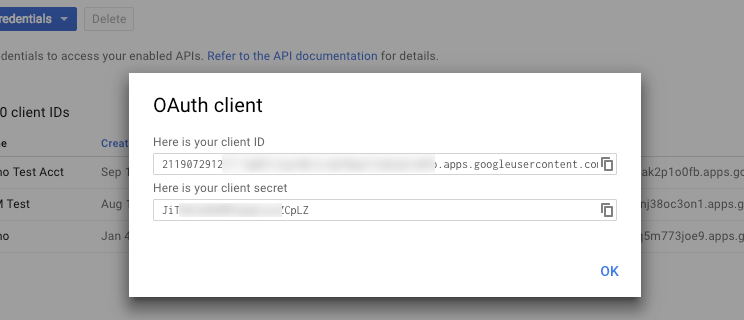
7. A window will pop up giving you the newly created Client ID and Client Secret.
6. Click
**Create**.
7. A window will pop up giving you the newly created Client ID and Client Secret.
 Before you can authenticate, you must also do the following:
1. Enable access to the DCM/DFA Reporting and Trafficking API.
2. Register this redirect URL:
[https://oauth.domo.com/api/data/v1/oauth/providers/doubleclick-cm/exchange](https://oauth.domo.com/api/data/v1/oauth/providers/doubleclick-cm/exchange)
For more information, visit [https://developers.google.com/double...rs/authorizing](https://developers.google.com/doubleclick-advertisers/authorizing "https://developers.google.com/doubleclick-advertisers/authorizing").
## Connecting to Your Google Campaign Manager Enterprise Account
This section enumerates the options in the **Credentials** and **Details** panes in the Google Campaign Manager Enterprise Connector page. The components of the other panes in this page, **Scheduling** and **Name & Describe Your DataSet**, are universal across most connector types and are discussed in greater length in [Adding a DataSet Using a Connector](https://domo-support.domo.com/s/article/360042926274?language=en_US "Adding a DataSet Using a Connector").
### Credentials Pane
This pane contains fields for entering credentials to connect to your Google Campaign Manager Enterprise account. The following table describes what is needed for each field:
Before you can authenticate, you must also do the following:
1. Enable access to the DCM/DFA Reporting and Trafficking API.
2. Register this redirect URL:
[https://oauth.domo.com/api/data/v1/oauth/providers/doubleclick-cm/exchange](https://oauth.domo.com/api/data/v1/oauth/providers/doubleclick-cm/exchange)
For more information, visit [https://developers.google.com/double...rs/authorizing](https://developers.google.com/doubleclick-advertisers/authorizing "https://developers.google.com/doubleclick-advertisers/authorizing").
## Connecting to Your Google Campaign Manager Enterprise Account
This section enumerates the options in the **Credentials** and **Details** panes in the Google Campaign Manager Enterprise Connector page. The components of the other panes in this page, **Scheduling** and **Name & Describe Your DataSet**, are universal across most connector types and are discussed in greater length in [Adding a DataSet Using a Connector](https://domo-support.domo.com/s/article/360042926274?language=en_US "Adding a DataSet Using a Connector").
### Credentials Pane
This pane contains fields for entering credentials to connect to your Google Campaign Manager Enterprise account. The following table describes what is needed for each field:
Field | Description |
|---|---|
| Client ID | Enter your Google API client ID. |
| Client Secret | Enter your Google API client secret. |
Menu | Description | ||||||
|---|---|---|---|---|---|---|---|
Report | Select a Google Campaign Manager Enterprise report option. Currently only one option is available.
| ||||||
| User Profiles | Select the user profile you want to pull data for. | ||||||
| How would you like to select the DCM report? | Select how you would like to select the DCM report. Select 'Manual' if your report can't be found in the 'Prepopulated Dropdown.' | ||||||
| Scope | Select whether you want to pull data for all reports in your account ( All ) or only your own reports ( Mine ). | ||||||
| Type | Select the report type. | ||||||
| Report Name | Enter the report name. | ||||||
| Floodlight Config Id | Enter the floodlight ID to show the data in this report for. All advertisers associated with this ID will automatically be added. | ||||||
| Select the dimensions | Select the dimensions. | ||||||
| Select the metric | Select the metrics. | ||||||
| DCM Reports | Select the DCM report you want to pull from Google Campaign Manager. | ||||||
| Report Id | Enter the DCM Report Id you would like to run. This can be used if the report you want can't be found in the DCM Reports dropdown. | ||||||
| Report dates selection | Select the date to run the report on. | ||||||
| Custom Report Date | Enter the custom date (in YYYY-MM-DD format.) |