> ## Documentation Index
> Fetch the complete documentation index at: https://domoinc-openapi-sync-dataflows.mintlify.site/llms.txt
> Use this file to discover all available pages before exploring further.

# Shopify Connector

## Intro

Shopify is an e-commerce platform that enables individuals and businesses to create online stores. To learn more about the Shopify API, go to [https://docs.shopify.com/api](https://docs.shopify.com/api "https://docs.shopify.com/api").

The Shopify connector is a "Cloud App" connector, meaning it retrieves data stored in the cloud. In the Data Center, you can access the connector page for this and other Cloud App connectors by clicking **Cloud App** in the toolbar at the top of the window.

This topic discusses the fields and menus that are specific to the Shopify connector user interface. For general information about adding DataSets, setting update schedules, and editing DataSet information, see [Adding a DataSet Using a Connector](/s/article/360042926274 "Adding a DataSet Using a Connector").

<table class="mt-responsive-table" data-aura-rendered-by="33:207;a"><tbody><tr><td class="mt-noheading" colspan="1" rowspan="1"><p><b> Primary Use Cases </b></p></td><td class="mt-noheading" colspan="1" rowspan="1"><p> This connector is appropriate for retrieving data for ecommerce sales, inventory, deliveries, and the like. It also supports blog and marketing information. </p></td></tr><tr><td class="mt-noheading" colspan="1" rowspan="1"><b> Primary Metrics </b></td><td class="mt-noheading" colspan="1" rowspan="1"> Returns sales information for your ecommerce shop. You can also get metrics on the blog and marketing side of your business. </td></tr><tr><td class="mt-noheading" colspan="1" rowspan="1"><p><b> Primary Company Roles </b></p></td><td class="mt-noheading" colspan="1" rowspan="1"><ul><li><p> Warehouse managers </p></li><li><p> Ecommerce shop admins </p></li><li><p> Online sales </p></li><li><p> Owner/C-Suite </p></li></ul></td></tr><tr><td class="mt-noheading" colspan="1" rowspan="1"><p><b> Average Implementation Time </b></p></td><td class="mt-noheading" colspan="1" rowspan="1"><p> Less than an hour </p></td></tr><tr><td class="mt-noheading" colspan="1" rowspan="1"><p><b> Ease of Use (on a 1-to-10 scale with 1 being easiest) </b></p></td><td class="mt-noheading" colspan="1" rowspan="1"><p> 2 </p></td></tr></tbody></table>

## Prerequisites

Before connecting a Shopify store to Domo, you must install the Domo Shopify app ([https://apps.shopify.com/domo-inc](https://apps.shopify.com/domo-inc "https://apps.shopify.com/domo-inc") ) from your Shopify instance. You need to install the app in every store for which you want to connect to Domo.

**Follow the steps below to install the app and configure the connector:**

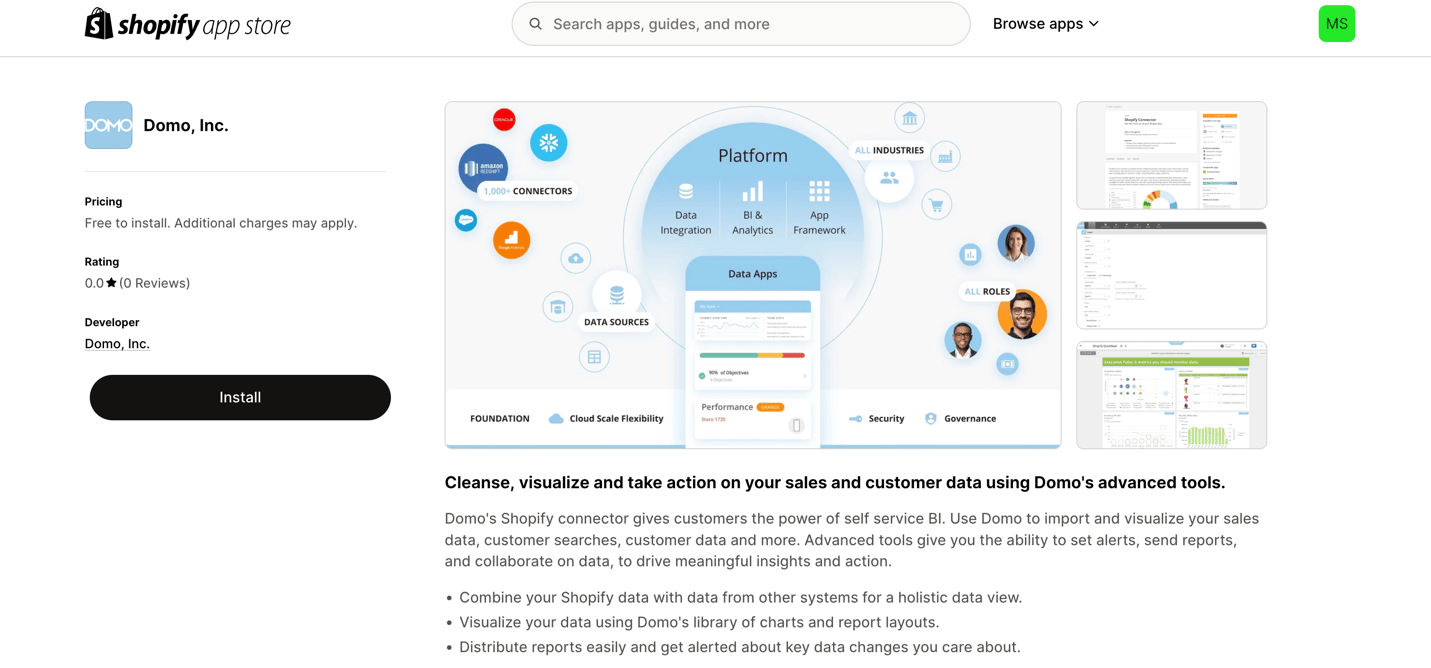
1. Navigate to [https://apps.shopify.com/domo-inc](https://apps.shopify.com/domo-inc).

   The below screen appears.

   **Note:** Ensure that you have selected the correct store in the top right corner of your page.

<Frame>
  <img alt="A screenshot of a computerAI-generated content may be incorrect." src="https://mintcdn.com/domoinc-openapi-sync-dataflows/Gw_GOG2-ZFDgkOCF/images/kb/ka0Vq000000IONF-00N5w00000Ri7BU-0EMVq000006TauH.jpg?fit=max&auto=format&n=Gw_GOG2-ZFDgkOCF&q=85&s=bb05acb365a4c505974b3048172161fd" style={{width: 684, height: 319}} width="1431" height="668" data-path="images/kb/ka0Vq000000IONF-00N5w00000Ri7BU-0EMVq000006TauH.jpg" />
</Frame>

2. Click **Install**, to install the Domo app in your store.

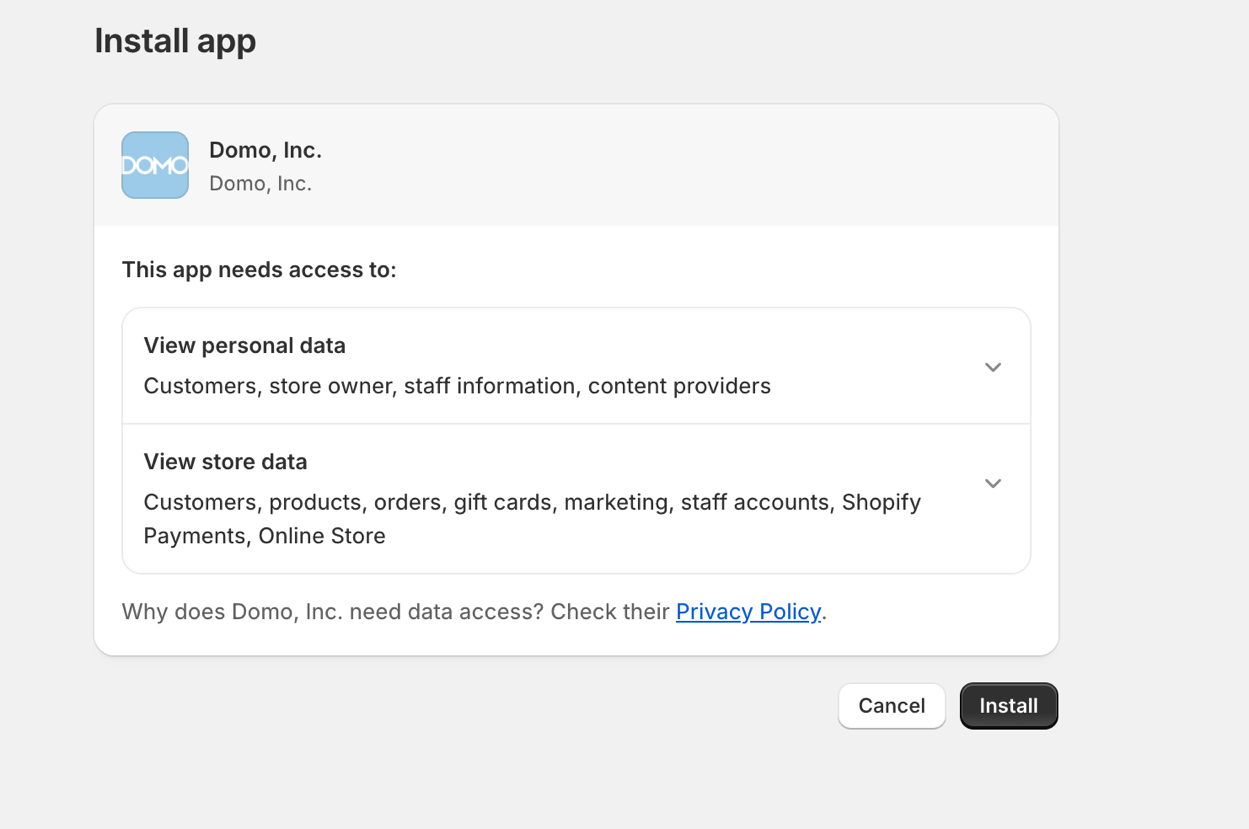
   The **Install app** page opens.

3. From the **Install app** page, you will be prompted to confirm the Domo app's access to your store.

   **Note:** The data access request is for objects that can be pulled through the connector. If you are comfortable providing read access to the data, then click **Install**. Domo will only pull the data you select and on your selected schedule. Domo will not pull any data from Shopify that you do not request.
   <Frame>
     <img alt="A screenshot of a computerAI-generated content may be incorrect." src="https://mintcdn.com/domoinc-openapi-sync-dataflows/Gw_GOG2-ZFDgkOCF/images/kb/ka0Vq000000IONF-00N5w00000Ri7BU-0EMVq000006Tb3x.jpg?fit=max&auto=format&n=Gw_GOG2-ZFDgkOCF&q=85&s=c5d95454b44e27c6f699ff50e92fc4d3" style={{width: 539, height: 358}} width="1249" height="829" data-path="images/kb/ka0Vq000000IONF-00N5w00000Ri7BU-0EMVq000006Tb3x.jpg" />
   </Frame>

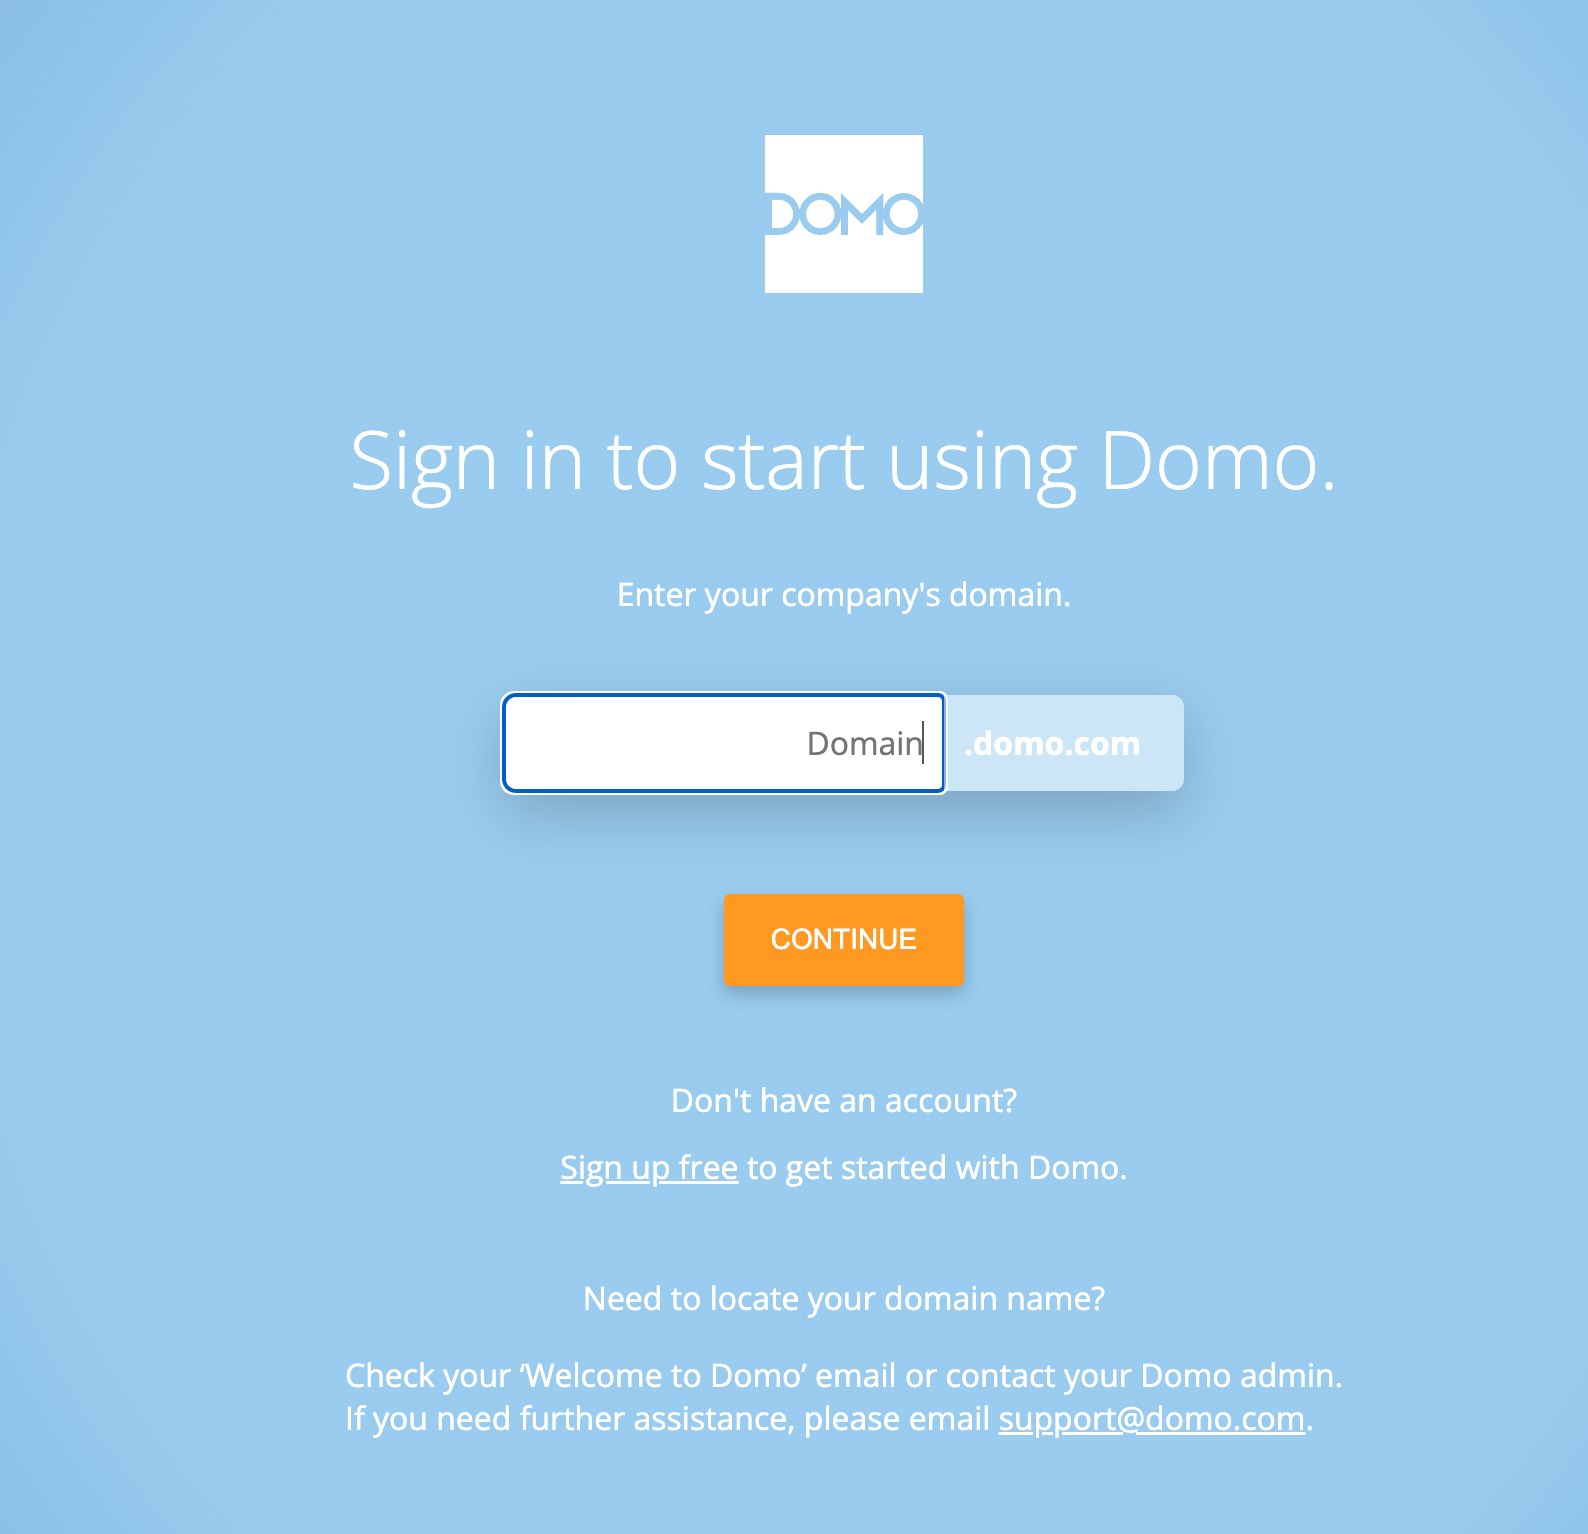
4. When you click **Install**, a new window opens, from where you will be asked to sign in to Domo. Enter your Domo instance name and click **Continue**.

   **Note:** If you have not previously logged in to the Domo specified instance, you will be asked to log in. If you do not have a Domo instance, then click the **Sign up free** link to obtain a Domo instance.
   <Frame>
     <img alt="A screenshot of a computerAI-generated content may be incorrect." src="https://mintcdn.com/domoinc-openapi-sync-dataflows/Gw_GOG2-ZFDgkOCF/images/kb/ka0Vq000000IONF-00N5w00000Ri7BU-0EMVq000006Tb2M.jpg?fit=max&auto=format&n=Gw_GOG2-ZFDgkOCF&q=85&s=9bf1b09c37be6450ff4eddd9ad274980" style={{width: 517, height: 499}} width="1588" height="1534" data-path="images/kb/ka0Vq000000IONF-00N5w00000Ri7BU-0EMVq000006Tb2M.jpg" />
   </Frame>

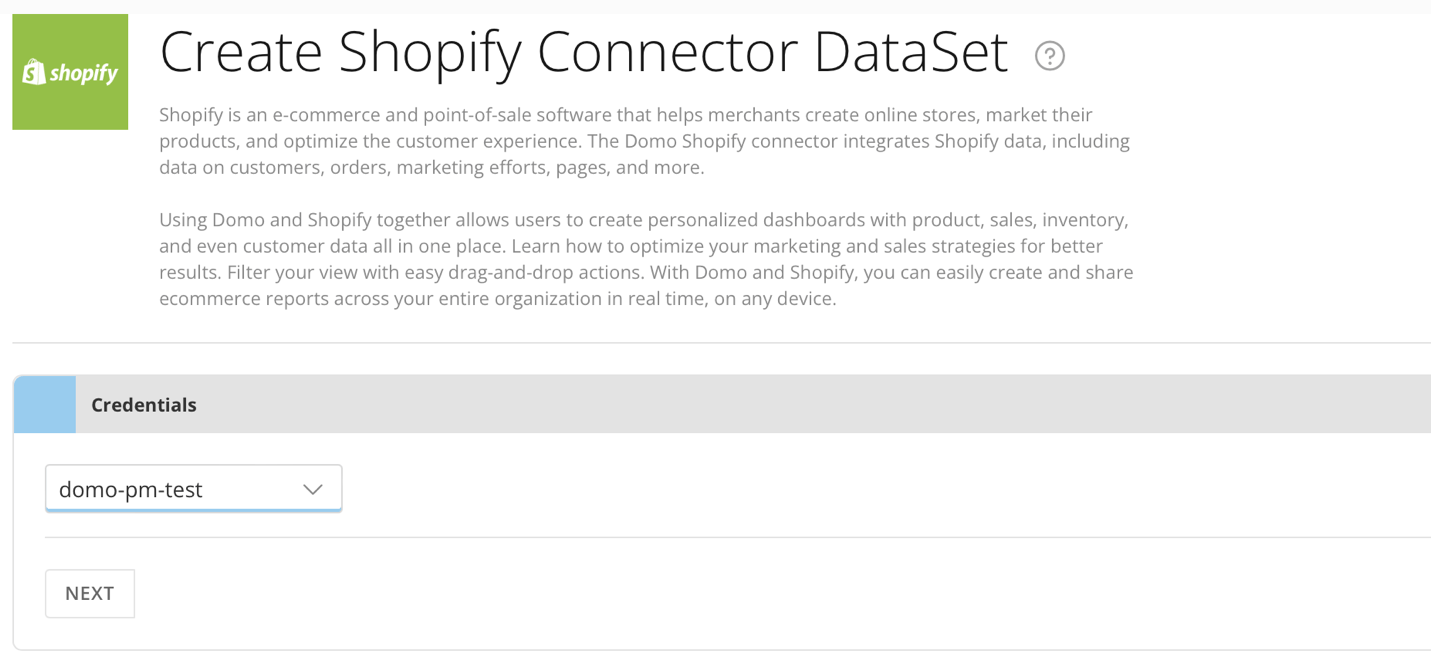
5. After logging in, you will be redirected to the connector power up experience. You will be able to view the account populated in the Credentials section, which is same as the name of the store from which you installed the Domo app.
<Frame>
  <img alt="A screenshot of a computerAI-generated content may be incorrect." src="https://mintcdn.com/domoinc-openapi-sync-dataflows/Gw_GOG2-ZFDgkOCF/images/kb/ka0Vq000000IONF-00N5w00000Ri7BU-0EMVq000006TbyP.jpg?fit=max&auto=format&n=Gw_GOG2-ZFDgkOCF&q=85&s=d3803ea4ad69ab2d272e2c46efe0a684" style={{width: 568, height: 262}} width="1431" height="661" data-path="images/kb/ka0Vq000000IONF-00N5w00000Ri7BU-0EMVq000006TbyP.jpg" />
</Frame>

6. Click **Next** to select the report that you wish to pull, select the options for the report, and set the dataset name and scheduling duration.

## Connecting to Your Shopify Account

To connect to your Shopify account, refer to the prerequisites section.

The components of the other panes in this page, **Scheduling** and **Name & Describe Your DataSet**, are universal across most connector types and are discussed in greater length in [Adding a DataSet Using a Connector](/s/article/360042926274 "Adding a DataSet Using a Connector").

## Details Pane

This pane contains one primary menu, **Report**, and other menus that appear depending on the report you select.

<Note>
  **Note:** Currently you can enter only one search string in fields that request search strings, such as **Order Name**.
</Note>

<table border="1" cellpadding="1" cellspacing="1" data-aura-rendered-by="33:207;a"><thead><tr><th colspan="1" rowspan="1"><p> Menu </p></th><th colspan="1" rowspan="1"><p> Description </p></th></tr></thead><tbody><tr><td colspan="1" rowspan="1"><p> Report </p></td><td colspan="1" rowspan="1"><p> Select the desired Shopify report. The following reports are available: </p><table border="1" cellpadding="1" cellspacing="1"><tbody><tr><td colspan="1" rowspan="1"><p><b> Report Name </b></p></td><td colspan="1" rowspan="1"><p><b> Description </b></p></td></tr><tr><td colspan="1" rowspan="1"><p> Application Charges </p></td><td colspan="1" rowspan="1"><p> Receives data about Shopify Application Charges. </p></td></tr><tr><td colspan="1" rowspan="1"><p> Application Credits </p></td><td colspan="1" rowspan="1"><p> Receives data about Shopify Application Credits. </p></td></tr><tr><td colspan="1" rowspan="1"><p> Articles </p></td><td colspan="1" rowspan="1"><p> Receives data about Shopify Blog Articles. </p></td></tr><tr><td colspan="1" rowspan="1"><p> Assets </p></td><td colspan="1" rowspan="1"><p> Receives data about Shopify Assets. </p></td></tr><tr><td colspan="1" rowspan="1"> Blogs </td><td colspan="1" rowspan="1"> Receives data about Shopify Blogs. </td></tr><tr><td colspan="1" rowspan="1"> Carrier Services </td><td colspan="1" rowspan="1"> Receives data about Shopify Carrier Services. </td></tr><tr><td colspan="1" rowspan="1"> Checkouts </td><td colspan="1" rowspan="1"> Receives data about Shopify Checkouts. </td></tr><tr><td colspan="1" rowspan="1"> Collects </td><td colspan="1" rowspan="1"> Returns information about collections, such as creation and last update times, product IDs, and collection IDs. </td></tr><tr><td colspan="1" rowspan="1"> Comments </td><td colspan="1" rowspan="1"> Receives data about Shopify Blog Article Comments. </td></tr><tr><td colspan="1" rowspan="1"> Countries </td><td colspan="1" rowspan="1"> Receives data about Shopify Countries. </td></tr><tr><td colspan="1" rowspan="1"> Custom Collections </td><td colspan="1" rowspan="1"> Receives data about Shopify Custom Collections. </td></tr><tr><td colspan="1" rowspan="1"> Customers </td><td colspan="1" rowspan="1"> Receives data about Shopify Customers. </td></tr><tr><td colspan="1" rowspan="1"><p> Customers Using GraphQL </p></td><td colspan="1" rowspan="1"> Receives data about Shopify Customers using GraphQL. </td></tr><tr><td colspan="1" rowspan="1"> Disputes </td><td colspan="1" rowspan="1"> Receives data about Shopify Disputes. </td></tr><tr><td colspan="1" rowspan="1"> Discount Codes </td><td colspan="1" rowspan="1"> Receives data about Shopify Discount Codes. </td></tr><tr><td colspan="1" rowspan="1"> Draft Orders </td><td colspan="1" rowspan="1"> Receives data about Shopify Draft Orders. </td></tr><tr><td colspan="1" rowspan="1"><p> Execute GraphQL Query </p></td><td colspan="1" rowspan="1"> Executes your GraphQL Query. </td></tr><tr><td colspan="1" rowspan="1"> Fulfillments </td><td colspan="1" rowspan="1"> Receives data about Shopify Fulfillments. </td></tr><tr><td colspan="1" rowspan="1"> Gift Cards (Shopify Plus) </td><td colspan="1" rowspan="1"><p> Receives data about Shopify Gift Cards. </p><p><b> Note </b>: This requires Shopify Plus subscription. </p></td></tr><tr><td colspan="1" rowspan="1"> Inventory Items </td><td colspan="1" rowspan="1"> Recieves data about Shopify Inventory Items. This report complements the Product Variants report. </td></tr><tr><td colspan="1" rowspan="1"><p> Inventory Items Using GraphQL </p></td><td colspan="1" rowspan="1"> Recieves data about Shopify Inventory Items using GraphQL API. This report complements the Product Variants report. </td></tr><tr><td colspan="1" rowspan="1"> Locations </td><td colspan="1" rowspan="1"> Receives data about Shopify Locations. </td></tr><tr><td colspan="1" rowspan="1"> Marketing Events </td><td colspan="1" rowspan="1"> Receives data about Shopify Marketing Events. </td></tr><tr><td colspan="1" rowspan="1"><p> Metafield Definitions </p></td><td colspan="1" rowspan="1"> Receives data about Shopify Metafield Definitions. </td></tr><tr><td colspan="1" rowspan="1"> Orders </td><td colspan="1" rowspan="1"> Receives data about Shopify Orders. </td></tr><tr><td colspan="1" rowspan="1"> Order Risks </td><td colspan="1" rowspan="1"> Receives data about Shopify Order Risks. </td></tr><tr><td colspan="1" rowspan="1"> Pages </td><td colspan="1" rowspan="1"> Receives data about Shopify Pages. </td></tr><tr><td colspan="1" rowspan="1"> Payouts </td><td colspan="1" rowspan="1"> Receives data about Shopify Payouts. </td></tr><tr><td colspan="1" rowspan="1"> Policies </td><td colspan="1" rowspan="1"> Receives data about Shopify Store Policies. </td></tr><tr><td colspan="1" rowspan="1"> Price Rules </td><td colspan="1" rowspan="1"> Receives data about Shopify Price Rules. </td></tr><tr><td colspan="1" rowspan="1"> Product Variants (Deprecated) </td><td colspan="1" rowspan="1"> This report has been deprecated. You can use the Product Variants with GraphQL report instead. </td></tr><tr><td colspan="1" rowspan="1"> Products (Deprecated) </td><td colspan="1" rowspan="1"> This report has been deprecated. You can use the Products with GraphQL report instead. </td></tr><tr><td colspan="1" rowspan="1"><p> Product Variants Using GraphQL </p></td><td colspan="1" rowspan="1"> Receives the data about Shopify Product Variants. </td></tr><tr><td colspan="1" rowspan="1"><p> Products Using GraphQL </p></td><td colspan="1" rowspan="1"> Receives the data about Shopify Products. </td></tr><tr><td colspan="1" rowspan="1"> Provinces of Country </td><td colspan="1" rowspan="1"> Receives data about Shopify Provinces of Countries. </td></tr><tr><td colspan="1" rowspan="1"> Recurring Application Charges </td><td colspan="1" rowspan="1"> Receives data about Shopify Recurring Application Charges. </td></tr><tr><td colspan="1" rowspan="1"> Redirects </td><td colspan="1" rowspan="1"> Receives data about Shopify Redirects. </td></tr><tr><td colspan="1" rowspan="1"> Refunds </td><td colspan="1" rowspan="1"> Receives data about Shopify Order Refunds. </td></tr><tr><td colspan="1" rowspan="1"> Resource Feedback </td><td colspan="1" rowspan="1"> Receives data about Shopify Resource Feedback. </td></tr><tr><td colspan="1" rowspan="1"> Script Tags </td><td colspan="1" rowspan="1"> Receives data about Shopify Script Tags. </td></tr><tr><td colspan="1" rowspan="1"> Shipping Zones </td><td colspan="1" rowspan="1"> Receives data about Shopify Shipping Zones. </td></tr><tr><td colspan="1" rowspan="1"> Shop </td><td colspan="1" rowspan="1"> Receives data about Shopify Shop. </td></tr><tr><td colspan="1" rowspan="1"> Smart Collections </td><td colspan="1" rowspan="1"> Receives data about Shopify Smart Collections. </td></tr><tr><td colspan="1" rowspan="1"> Themes </td><td colspan="1" rowspan="1"> Receives data about Shopify Themes. </td></tr><tr><td colspan="1" rowspan="1"> Transactions </td><td colspan="1" rowspan="1"> Receives data about Shopify Transactions. </td></tr><tr><td colspan="1" rowspan="1"> Usage Charges </td><td colspan="1" rowspan="1"> Receives data about Shopify Usage Charges. </td></tr><tr><td colspan="1" rowspan="1"> Webhooks </td><td colspan="1" rowspan="1"> Receives data about Shopify Webhooks. </td></tr></tbody></table></td></tr><tr><td colspan="1" rowspan="1"> Subreport </td><td colspan="1" rowspan="1"> Select a sub-report to filter the data. Selecting a sub-report will expand additional data available for the report. </td></tr><tr><td colspan="1" rowspan="1"> Date Filter </td><td colspan="1" rowspan="1"> Select the date type to filter the data. <b> Created </b> receives data based on its created date, <b> Published </b> receives data based on its published date, and <b> Updated </b> receives data based on its updated date. It should be noted that when the requested object is a subset of another object, the date will filter based on the parent object. For example, Fulfillments are a part of the Order object, so when requesting the Fulfillments report, your date selection will be filtered on the Orders those fulfillments belong to, not the fulfillments themselves. </td></tr><tr><td colspan="1" rowspan="1"> Financial Status </td><td colspan="1" rowspan="1"> Filter orders by their financial status. </td></tr><tr><td colspan="1" rowspan="1"> Duration </td><td colspan="1" rowspan="1"> Select the duration for the report (a Single Date, or a Date Range). </td></tr><tr><td colspan="1" rowspan="1"> Report Date </td><td colspan="1" rowspan="1"> Select the report date using relative or specific dates. Relative indicates the number of days from today or a specific date using the date selector. </td></tr><tr><td colspan="1" rowspan="1"> Select Specific Date </td><td colspan="1" rowspan="1"> Select the report date using the date selector. </td></tr><tr><td colspan="1" rowspan="1"> Days Back </td><td colspan="1" rowspan="1"> The number of days back that you would like to get data for. Specify either today or 0, yesterday or 1, or today or 7 to get data for 7 days into the past. </td></tr><tr><td colspan="1" rowspan="1"> Start Date </td><td colspan="1" rowspan="1"> Select the report start date using relative or specific dates. Relative indicates the number of days from today or a specific date using the date selector. </td></tr><tr><td colspan="1" rowspan="1"> Select Specific Start Date </td><td colspan="1" rowspan="1"> Select the report date using the date selector. </td></tr><tr><td colspan="1" rowspan="1"> Days Back To Start From </td><td colspan="1" rowspan="1"> The number of days back that you would like to get data from (start day). Specify either today or 0, yesterday or 1, or today-7 or 7 to get data for 7 days into the past. </td></tr><tr><td colspan="1" rowspan="1"> End Date </td><td colspan="1" rowspan="1"> Select the report end date using relative or specific dates. Relative indicates the number of days from today or a specific date using the date selector. </td></tr><tr><td colspan="1" rowspan="1"> Select Specific End Date </td><td colspan="1" rowspan="1"> Select the report date using the date selector. </td></tr><tr><td colspan="1" rowspan="1"> Days Back To End At </td><td colspan="1" rowspan="1"> The number of days back that you would like to get data to (end day). Specify either today or 0, yesterday or 1, or today-7 or 7 to get data for 7 days into the past. </td></tr><tr><td colspan="1" rowspan="1"> Status </td><td colspan="1" rowspan="1"> Select whether the report contains information for cancelled, closed, or open items. If you select <b> Any </b>, all items appear regardless of the status. </td></tr><tr><td colspan="1" rowspan="1"> Published Status </td><td colspan="1" rowspan="1"> Select whether the report contains information for published or unpublished items. If you select <b> Any </b>, both published and unpublished items will appear. </td></tr><tr><td colspan="1" rowspan="1"> Fulfillment Status </td><td colspan="1" rowspan="1"> Select whether the report contains information for partial, shipped, or unshipped orders. If you select <b> Any </b>, all items appear regardless of the fulfillment status. </td></tr><tr><td colspan="1" rowspan="1"> Backfill Data </td><td colspan="1" rowspan="1"> Select this checkbox, to retrieve new data with APPEND mode, only in consecutive runs of the dataset. </td></tr><tr><td colspan="1" rowspan="1"> Merge Mode </td><td colspan="1" rowspan="1"> Select this option if you want to merge the functionality when the sub-report is "None". Scheduling set below will not have any effect if this option is selected. Does not work for the first run. </td></tr><tr><td colspan="1" rowspan="1"> GraphQL Query </td><td colspan="1" rowspan="1"> Enter the GraphQL query to execute. For more information on Shopify GraphQL queries, refer to the Shopify API documentation. </td></tr></tbody></table>

### Other Panes

For information about the remaining sections of the connector interface, including how to configure scheduling, retry, and update options, see [Adding a DataSet Using a Connector](/s/article/360042926274 "Adding a DataSet Using a Connector").

## Troubleshooting

Ensure the **Shop Name** you enter in the **Credentials** pane is just the subdomain of your URL. For example, the **Shop Name** for [domo.shopify.com](http://domo.shopify.com) would be domo.

### FAQs

<AccordionGroup>
  <Accordion title="What endpoint is the base URL for this connector?">
    The base URL for the Shopify connector is `https://{shop-name}.myshopify.com/admin/api/{apiVersion}`.
  </Accordion>

  <Accordion title="Which endpoint does each report call in this connector?">
    <table border="1" cellpadding="1" cellspacing="1" data-aura-rendered-by="33:207;a"><thead><tr><th colspan="1" rowspan="1"><p> Report Name </p></th><th colspan="1" rowspan="1"><p> Endpoint URL </p></th></tr></thead><tbody><tr><td colspan="1" rowspan="1"><p> Application Charges </p></td><td colspan="1" rowspan="1"><p> /application\_charges.json </p></td></tr><tr><td colspan="1" rowspan="1"><p> Application Credits </p></td><td colspan="1" rowspan="1"><p> /application\_credits </p></td></tr><tr><td colspan="1" rowspan="1"><p> Articles </p></td><td colspan="1" rowspan="1"><p> /blogs/{blogIds}/articles.json </p></td></tr><tr><td colspan="1" rowspan="1"> Assets </td><td colspan="1" rowspan="1"> /themes/assets.json </td></tr><tr><td colspan="1" rowspan="1"> Blogs </td><td colspan="1" rowspan="1"> /blogs.json </td></tr><tr><td colspan="1" rowspan="1"> Carrier Services </td><td colspan="1" rowspan="1"> /carrier\_services </td></tr><tr><td colspan="1" rowspan="1"> Checkouts </td><td colspan="1" rowspan="1"> /checkouts.json </td></tr><tr><td colspan="1" rowspan="1"> Collects </td><td colspan="1" rowspan="1"> /collects.json </td></tr><tr><td colspan="1" rowspan="1"> Comments </td><td colspan="1" rowspan="1"> /comments.json </td></tr><tr><td colspan="1" rowspan="1"> Countries </td><td colspan="1" rowspan="1"> /countries.json </td></tr><tr><td colspan="1" rowspan="1"> Custom Collections </td><td colspan="1" rowspan="1"> /custom\_collections.json </td></tr><tr><td colspan="1" rowspan="1"> Customers </td><td colspan="1" rowspan="1"> /customers </td></tr><tr><td colspan="1" rowspan="1"> Discount Codes </td><td colspan="1" rowspan="1"> /price\_rules/discount\_codes </td></tr><tr><td colspan="1" rowspan="1"> Disputes </td><td colspan="1" rowspan="1"> /shopify\_payments/disputes </td></tr><tr><td colspan="1" rowspan="1"> Draft Orders </td><td colspan="1" rowspan="1"> /draft\_orders </td></tr><tr><td colspan="1" rowspan="1"><p> Execute GraphQL Query </p></td><td colspan="1" rowspan="1"><span><span dir="ltr"> /graphql.json </span></span></td></tr><tr><td colspan="1" rowspan="1"> Gift Cards (Shopify Plus) </td><td colspan="1" rowspan="1"> /gift\_cards </td></tr><tr><td colspan="1" rowspan="1"> Inventory Items </td><td colspan="1" rowspan="1"> /inventory\_items </td></tr><tr><td colspan="1" rowspan="1"><p> Inventory Items Using GraphQL </p></td><td colspan="1" rowspan="1"><span dir="ltr"> /graphql.json </span></td></tr><tr><td colspan="1" rowspan="1"> Fulfillments </td><td colspan="1" rowspan="1"> /orders/{orderId}/fulfillments </td></tr><tr><td colspan="1" rowspan="1"> Locations </td><td colspan="1" rowspan="1"> /locations </td></tr><tr><td colspan="1" rowspan="1"> Marketing Events </td><td colspan="1" rowspan="1"> /marketing\_events </td></tr><tr><td colspan="1" rowspan="1"><p> Metafield Definitions </p></td><td colspan="1" rowspan="1"><span dir="ltr"> /graphql.json </span></td></tr><tr><td colspan="1" rowspan="1"> Orders </td><td colspan="1" rowspan="1"> /orders </td></tr><tr><td colspan="1" rowspan="1"> Pages </td><td colspan="1" rowspan="1"> /pages </td></tr><tr><td colspan="1" rowspan="1"> Payouts </td><td colspan="1" rowspan="1"> /shopify\_payments/payouts </td></tr><tr><td colspan="1" rowspan="1"> Policies </td><td colspan="1" rowspan="1"> /policies </td></tr><tr><td colspan="1" rowspan="1"> Price Rules </td><td colspan="1" rowspan="1"> /price\_rules </td></tr><tr><td colspan="1" rowspan="1"> Product Variants (Deprecated) </td><td colspan="1" rowspan="1"> /products/{productId}/variants </td></tr><tr><td colspan="1" rowspan="1"> Products (Deprecated) </td><td colspan="1" rowspan="1"> /products </td></tr><tr><td colspan="1" rowspan="1"><p> Product Variants Using GraphQL </p></td><td colspan="1" rowspan="1"><span><span dir="ltr"> /graphql.json </span></span></td></tr><tr><td colspan="1" rowspan="1"><p> Products Using GraphQL </p></td><td colspan="1" rowspan="1"><span><span dir="ltr"> /graphql.json </span></span></td></tr><tr><td colspan="1" rowspan="1"> Provinces of Country </td><td colspan="1" rowspan="1"> /countries/provinces </td></tr><tr><td colspan="1" rowspan="1"> Recurring Application Charges </td><td colspan="1" rowspan="1"> /recurring\_application\_charges </td></tr><tr><td colspan="1" rowspan="1"> Redirects </td><td colspan="1" rowspan="1"> /redirects </td></tr><tr><td colspan="1" rowspan="1"> Refunds </td><td colspan="1" rowspan="1"> /orders/{orderId}/refunds </td></tr><tr><td colspan="1" rowspan="1"> Resource Feedback </td><td colspan="1" rowspan="1"> /resource\_feedback </td></tr><tr><td colspan="1" rowspan="1"> Order Risks </td><td colspan="1" rowspan="1"> /orders/{orderId}/risks </td></tr><tr><td colspan="1" rowspan="1"> Script Tags </td><td colspan="1" rowspan="1"> /script\_tags </td></tr><tr><td colspan="1" rowspan="1"> Shipping Zones </td><td colspan="1" rowspan="1"> /shipping\_zones </td></tr><tr><td colspan="1" rowspan="1"> Shop </td><td colspan="1" rowspan="1"> /shop </td></tr><tr><td colspan="1" rowspan="1"> Smart Collections </td><td colspan="1" rowspan="1"> /smart\_collections </td></tr><tr><td colspan="1" rowspan="1"> Themes </td><td colspan="1" rowspan="1"> /themes </td></tr><tr><td colspan="1" rowspan="1"> Transactions </td><td colspan="1" rowspan="1"> /orders/{orderId}/transactions </td></tr><tr><td colspan="1" rowspan="1"> Usage Charges </td><td colspan="1" rowspan="1"> /recurring\_application\_charges/usage\_charges </td></tr><tr><td colspan="1" rowspan="1"> Webhooks </td><td colspan="1" rowspan="1"> /webhooks </td></tr></tbody></table>
  </Accordion>

  <Accordion title="What kind of credentials do I need to power up this connector?">
    You need the name of your Shopify shop to power up this connector, and your Shopify username and password. Shop owners can use the connector without setting any additional permissions. However, if you have a limited user account - a **Staff** account, you will need to ensure that you have permissions to **Apps** and any other resources you wish to pull from the connector. Visit [Shopify documentation](https://help.shopify.com/en/manual/your-account/staff-accounts/staff-permissions "Shopify documentation").
  </Accordion>

  <Accordion title="Where do I get my Shopify shop name in the credentials section?">
    The Shopify shop name is found in your shop dashboard URL. For example, if your shop dashboard is [domo.shopify.com](http://domo.shopify.com), your shop name is "domo".
  </Accordion>

  <Accordion title="Can I use the same account for multiple datasets?">
    Yes
  </Accordion>

  <Accordion title="How often can the data be updated?">
    As often as needed.
  </Accordion>
</AccordionGroup>