> ## Documentation Index
> Fetch the complete documentation index at: https://domoinc-openapi-sync-dataflows.mintlify.site/llms.txt
> Use this file to discover all available pages before exploring further.

# Agemni Connector

export const InlineImage = ({src, alt = '', height = '1.6em'}) => {
  return <img noZoom src={src} alt={alt} style={{
    display: 'inline',
    verticalAlign: 'start',
    height: height,
    margin: '0'
  }} />;
};

## Intro

Agemni streamlines sales and back office functions within a single software platform. You connect to your Agemni account in the Data Center. This topic discusses the fields and menus that are specific to the Agemni connector user interface. General information for adding DataSets, setting update schedules, and editing DataSet information is discussed in [Adding a DataSet Using a Data Connector](/s/article/360042926274 "Adding a DataSet Using a Data Connector").

## Prerequisites

To connect to your Agemni account and create a DataSet, you must have Agemni username and password.

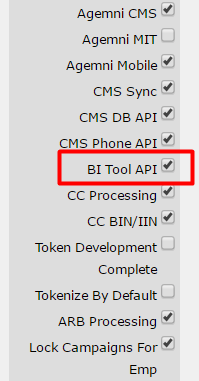
You must allow API access in Agemni by doing the following:

1. Go to the CMS site and open the page
   **Admin > Preferences**.
2. Check the
   **BI Tool API** checkbox.

<Frame>
  <img src="https://mintcdn.com/domoinc-openapi-sync-dataflows/blcgkVgnZv6gj_XY/images/kb/ka05w00000123GB-00N5w00000Ri7BU-0EM5w000005vO1y.png?fit=max&auto=format&n=blcgkVgnZv6gj_XY&q=85&s=5589b42580a70b80ec7ee1683cae6791" alt="" width="199" height="381" data-path="images/kb/ka05w00000123GB-00N5w00000Ri7BU-0EM5w000005vO1y.png" />
</Frame>

<Frame>
  <img src="https://mintcdn.com/domoinc-openapi-sync-dataflows/blcgkVgnZv6gj_XY/images/kb/ka05w00000123GB-00N5w00000Ri7BU-0EM5w000005vO1y.png?fit=max&auto=format&n=blcgkVgnZv6gj_XY&q=85&s=5589b42580a70b80ec7ee1683cae6791" alt="" width="199" height="381" data-path="images/kb/ka05w00000123GB-00N5w00000Ri7BU-0EM5w000005vO1y.png" />
</Frame>

## Connecting to Your Agemni Account

This section enumerates the options in the **Credentials** and **Details** panes in the Agemni Connector page. The components of the other panes in this page, **Scheduling** and **Name & Describe Your DataSet**, are universal across most connector types and are discussed in greater length in [Adding a DataSet Using a Data Connector](/s/article/360042926274 "Adding a DataSet Using a Data Connector").

### Credentials Pane

This pane contains fields for entering credentials to connect to your Agemni account. The following table describes what is needed for each field:

<table border="1" cellpadding="1" cellspacing="1" data-aura-rendered-by="33:195;a"><thead><tr><th colspan="1" rowspan="1"><p><span class="s1"> Field </span></p></th><th colspan="1" rowspan="1"><p><span class="s1"> Description </span></p></th></tr></thead><tbody><tr><td colspan="1" rowspan="1"><p> Username </p></td><td colspan="1" rowspan="1"><p> Enter your Agemni username. </p></td></tr><tr><td colspan="1" rowspan="1"><p> Password </p></td><td colspan="1" rowspan="1"><p> Enter your Agemni password. </p></td></tr><tr><td colspan="1" rowspan="1"> Site Id </td><td colspan="1" rowspan="1"> Enter your Site Id here. Site Id is typically the subdomain of where you log in. For example, if you logged into agemni at <a href="http://domo.agemni.com" rel="noopener" target="_blank"> domo.agemni.com </a>, you'd enter 'domo' here. </td></tr></tbody></table>

Once you have entered valid Agemni credentials, you can use the same account any time you go to create a new Agemni DataSet. You can manage connector accounts in the **Accounts** tab in the Data Center. For more information about this tab, see [Managing User Accounts for Connectors](/s/article/360042926054 "Managing User Accounts for Connectors").

### Details Pane

This pane contains a primary **Reports** menu, along with various other menus which may or may not appear depending on the report type you select.

<table border="1" cellpadding="1" cellspacing="1" data-aura-rendered-by="33:195;a"><thead><tr><th colspan="1" rowspan="1"><p> Menu </p></th><th colspan="1" rowspan="1"><p> Description </p></th></tr></thead><tbody><tr><td colspan="1" rowspan="1"><p> Report </p></td><td colspan="1" rowspan="1"><p> Select the Agemni report you want to run. The following reports are available: </p><table border="1" cellpadding="1" cellspacing="1"><tbody><tr><td colspan="1" rowspan="1"><p> Basic Leads </p></td><td colspan="1" rowspan="1"><p> Returns a basic lead data array based on the provided date filter. </p></td></tr><tr><td colspan="1" rowspan="1"><p> Employees </p></td><td colspan="1" rowspan="1"><p> Returns all employee data. </p></td></tr><tr><td colspan="1" rowspan="1"><p> Employee Time Cards </p></td><td colspan="1" rowspan="1"><p> Returns employee time card records and wage information based on the provided date filter. </p></td></tr><tr><td colspan="1" rowspan="1"><p> Lead Custom Fields </p></td><td colspan="1" rowspan="1"><p> Returns lead custom field metadata information (text, dropdown, and checkbox). </p></td></tr><tr><td colspan="1" rowspan="1"><p> Lead Custom Field Data </p></td><td colspan="1" rowspan="1"><p> Returns lead custom fields and their associated values. </p></td></tr><tr><td colspan="1" rowspan="1"><p> Leads </p></td><td colspan="1" rowspan="1"><p> Returns all leads data and work orders associated with it, based on the provided date filter. </p></td></tr><tr><td colspan="1" rowspan="1"><p> Work Order Appointment History </p></td><td colspan="1" rowspan="1"><p> Returns the appointment history log based on the appointment change date. </p></td></tr><tr><td colspan="1" rowspan="1"><p> Work Orders </p></td><td colspan="1" rowspan="1"><p> Returns work orders based on the provided date filter. </p></td></tr><tr><td colspan="1" rowspan="1"><p> Work Order Custom Fields </p></td><td colspan="1" rowspan="1"><p> Returns work order custom field metadata information (checkboxes). </p></td></tr><tr><td colspan="1" rowspan="1"><p> Work Order Custom Field Data </p></td><td colspan="1" rowspan="1"><p> Returns work order custom fields and their associated values. </p></td></tr></tbody></table></td></tr><tr><td colspan="1" rowspan="1"><p> Duration </p></td><td colspan="1" rowspan="1"><p> Select whether you want to pull data for a specific date or a date range. </p></td></tr><tr><td colspan="1" rowspan="1"><p> Report Date </p></td><td colspan="1" rowspan="1"><p> Select whether the report data is for a specific date or for a relative number of days back from today. </p></td></tr><tr><td colspan="1" rowspan="1"><p> Select Specific Date </p></td><td colspan="1" rowspan="1"><p> Select the date for the report. </p></td></tr><tr><td colspan="1" rowspan="1"><p> Days Back </p></td><td colspan="1" rowspan="1"><p> Enter the number of past days that should appear in the report. </p></td></tr><tr><td colspan="1" rowspan="1"><p> Start Date </p></td><td colspan="1" rowspan="1"><p> Specify whether the first date in your date range is a specific or relative date. You select the last date in your range in <b> End Date </b>. </p></td></tr><tr><td colspan="1" rowspan="1"><p> End Date </p></td><td colspan="1" rowspan="1"><p> Specify whether the second date in your date range is a specific or relative date. You select the first date in your range in <b> Start Date </b>. </p></td></tr><tr><td colspan="1" rowspan="1"><p> Select Specific Start Date </p></td><td colspan="1" rowspan="1"><p> Select the first date in your date range. </p></td></tr><tr><td colspan="1" rowspan="1"><p> Select Specific End Date </p></td><td colspan="1" rowspan="1"><p> Select the second date in your date range. </p></td></tr><tr><td colspan="1" rowspan="1"><p> Days Back to Start From </p></td><td colspan="1" rowspan="1"><p> Enter the number of the farthest day back that should be represented in the report. Combine with <b> Days Back to End At </b> to create a range of represented days. </p><p> For example, if you entered <span class="mt-font-courier-new"> 10 </span> for <b> Days Back to Start From </b> and <span class="mt-font-courier-new"> 5 </span> for <b> Days Back to End At </b>, the report would contain data for 10 days ago up until 5 days ago. </p></td></tr><tr><td colspan="1" rowspan="1"><p> Days Back to End At </p></td><td colspan="1" rowspan="1"><p> Enter the number of the most recent day back that should be represented in the report. Combine with <b> Days Back to Start From </b> to create a range of represented days. </p><p> For example, if you entered <span class="mt-font-courier-new"> 10 </span> for <b> Days Back to Start From </b> and <span class="mt-font-courier-new"> 5 </span> for <b> Days Back to End At </b>, the report would contain data for 10 days ago up until 5 days ago. </p></td></tr></tbody></table>

### Other Panes

For information about the remaining sections of the connector interface, including how to configure scheduling, retry, and update options, see [Adding a DataSet Using a Data Connector](/s/article/360042926274 "Adding a DataSet Using a Data Connector").

## FAQ

<AccordionGroup>
  <Accordion title="How often can the data be updated?">
    Datasets can be updated as often as once an hour.
  </Accordion>

  <Accordion title="Are there any API limits that I need to be aware of?">
    Agemni does not document any limits in their API.
  </Accordion>
</AccordionGroup>
