> ## Documentation Index
> Fetch the complete documentation index at: https://domoinc-openapi-sync-dataflows.mintlify.site/llms.txt
> Use this file to discover all available pages before exploring further.

# NetSuite App TBA Connector

## Intro

This version of the NetSuite connector uses NetSuite's SuiteScript 2.0 as well as token-based authentication (TBA). Use this version of the connector if you want to effectively gather all of your NetSuite data as securely as possible.

You connect to NetSuite in the Data Center. This topic discusses the fields and menus that are specific to the NetSuite App TBA connector user interface. General information for adding DataSets, setting update schedules, and editing DataSet information is discussed in [Adding a DataSet Using a Data Connector](https://domo-support.domo.com/s/article/360042926274?language=en_US "Adding a DataSet Using a Data Connector").

## Prerequisites

To connect to your NetSuite account and create a DataSet using this connector, you must have the following:

* Token ID
* Token Secret
* Account ID
* NetSuite Script Bundle ID
* NetSuite Deploy Bundle ID

Each of these items is discussed in more detail in the next two sections.

## Installing the NetSuite Bundle

Before you can connect to NetSuite data using this connector, you must first install the Domo Data Connection 2.0 bundle from NetSuite.

**To install the bundle,**

1. In NetSuite, select
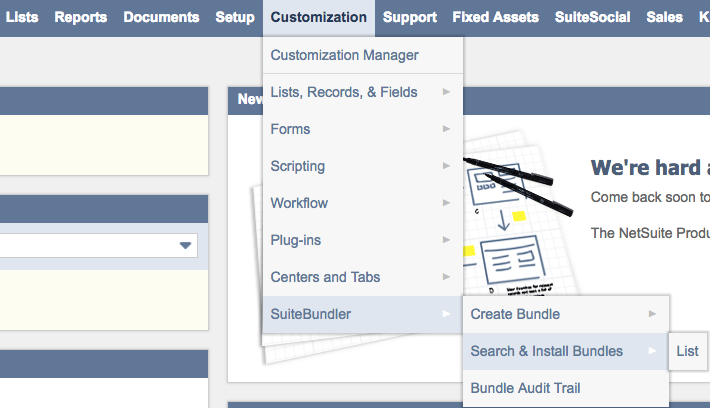
   **Customization > SuiteBundler > Search & Install Bundles.**

2. In the
   **Keywords** section, search for "Domo."

3. Click the search result for "Domo Data Connection 2.0."

4. Click
   **Install**.

5. Select
   **Customization > SuiteBundler > Search & Install Bundles > List**.

   <Frame>
     <img alt="NetSuiteAppTBA_BundlesPath.png" src="https://mintcdn.com/domoinc-openapi-sync-dataflows/RlWZB5sA8DQ5iXJ7/images/kb/ka0Vq0000000p8z-00N5w00000Ri7BU-0EM5w000005vO1S.png?fit=max&auto=format&n=RlWZB5sA8DQ5iXJ7&q=85&s=40c6e0c472fd8c4335cf9b3b10981e49" width="710" height="408" data-path="images/kb/ka0Vq0000000p8z-00N5w00000Ri7BU-0EM5w000005vO1S.png" />
   </Frame>

6. Locate "Domo Data Connection 2.0" in the list.

7. Make sure the install status is complete, indicated by a green checkmark.

## Connect to Your NetSuite Data in Domo

This section enumerates the options in the **Credentials** and **Details** panes in the NetSuite App TBA Connector page. The components of the other panes in this page, **Scheduling** and **Name & Describe Your DataSet**, are universal across most connector types and are discussed in greater length in [Adding a DataSet Using a Data Connector](https://domo-support.domo.com/s/article/360042926274?language=en_US "Adding a DataSet Using a Data Connector").

## Credentials Pane

This pane contains fields for to connecting to your NetSuite account. Each connection option is discussed in detail.

<table border="1" data-aura-rendered-by="33:201;a"><tbody><tr><td colspan="1" rowspan="1"><b> Field </b></td><td colspan="1" rowspan="1"><b> Description </b></td></tr><tr><td colspan="1" rowspan="1"><p> Saved Search ID </p></td><td colspan="1" rowspan="1"> Enter the custom search ID for the NetSuite saved search you wish to run. </td></tr><tr><td colspan="1" rowspan="1"><p> Search Type </p></td><td colspan="1" rowspan="1"> Select the Search Type. If do not want to select any search type, select the first blank option from the drop-down list. </td></tr><tr><td colspan="1" rowspan="1"><p> Token ID </p></td><td colspan="1" rowspan="1"> Enter the Token ID from the Access Token assigned to your account in NetSuite. </td></tr><tr><td colspan="1" rowspan="1"><p> Date Format </p></td><td colspan="1" rowspan="1"> Select the date format. </td></tr><tr><td colspan="1" rowspan="1"><p> Use SQLLite to Prevent duplicate records caused by modifying date during correct run </p></td><td colspan="1" rowspan="1"> Select this checkbox to remove duplicate records, by bringing only the most recently modified data. These duplicates are caused if your data is modified while the connector is running. Duplicates are removed using a SQLite query that keeps the most recently modified row, selecting by the \[row id]. <br /> Selecting checkbox will slow your connector run, so use this feature only when necessary. It only works when you select the update method as <b> Merge. </b></td></tr><tr><td colspan="1" rowspan="1"><p> Duplicate Row Handling </p></td><td colspan="1" rowspan="1"> Select an option to retain or remove the duplicate rows from your data. </td></tr><tr><td colspan="1" rowspan="1"><p> Use the checkbox to cache the results for the execution </p></td><td colspan="1" rowspan="1"> Use the checkbox to cache the results for the execution. <br /><b> Note: </b> Use this option to avoid the data discrepancy observed due to concurrent saved search updates. This will create a snapshot of the results at a certain time and pulls data from the snapshot. It does not contain concurrently updated data. </td></tr><tr><td colspan="1" rowspan="1"><p> Use the checkbox to convert the column with leading zeroes to string </p></td><td colspan="1" rowspan="1"> Use the checkbox to convert the column which contains data with leading zeroes to string. <br /><b> Note: </b> Selecting this checkbox will change the schema of an existing dataset. It will convert the existing Integer column to String. </td></tr><tr><td colspan="1" rowspan="1"><p> Folder ID </p></td><td colspan="1" rowspan="1"> Provide the folder ID from the NetSuite file cabinet where you wish to store the cache files. <br /><b> Note: </b> The files will be stored in the folder for caching, and the files will be removed after the import is completed. </td></tr></tbody></table>

Once you have connected to NetSuite, you can use the same account any time you go to create a new NetSuite App TBA DataSet. You can manage connector accounts in the **Accounts** tab in the Data Center. For more information about this tab, see [Managing User Accounts for Connectors](https://domo-support.domo.com/s/article/360042926054?language=en_US "Managing User Accounts for Connectors").

## Choosing Your Environment

In the **Environment** menu, select **Sandbox** if your Netsuite account is a sandbox account. You can find this by hovering over your name/account in the top right corner of NetSuite and clicking **View all roles**. Your environment should be listed under **Account Type**.

#### Obtaining Your Token ID and Token Secret

**To create a Token and ID and Token Secret,**

1. In NetSuite, choose the role you want to access data in.

2. Go to your main page by clicking the house icon in the top left corner of the screen.

3. In the
   **Settings** box in the bottom left corner, click **Manage Access Tokens**.

   <Frame>
     <img alt="NetSuiteAppTBA_TokenView.png" src="https://mintcdn.com/domoinc-openapi-sync-dataflows/RlWZB5sA8DQ5iXJ7/images/kb/ka0Vq0000000p8z-00N5w00000Ri7BU-0EM5w000005vO1V.png?fit=max&auto=format&n=RlWZB5sA8DQ5iXJ7&q=85&s=0339ba6ba60be9c9957b7ab8dcb4883a" width="396" height="798" data-path="images/kb/ka0Vq0000000p8z-00N5w00000Ri7BU-0EM5w000005vO1V.png" />
   </Frame>

   <Note>
     **Note:** If you have not configured your role to use access tokens, you will not see the **Manage Access Tokens** link. To enable access tokens for your role, do the following:

     1. Navigate to **Setup > Company > Enable Features**, then open the **SuiteCloud** tab.
     2. Under **Manage Authentication**, enable **Token-Based Authentication**.
   </Note>

4. Click **New Access Token** and choose "Domo Data Connection 2.0."

5. Choose a token name.

6. Click **Save**.

   Your Token ID and Token Secret should appear under the other information.

7. Store the newly generated credentials securely (they will not be shown again).

#### Finding Your Account ID

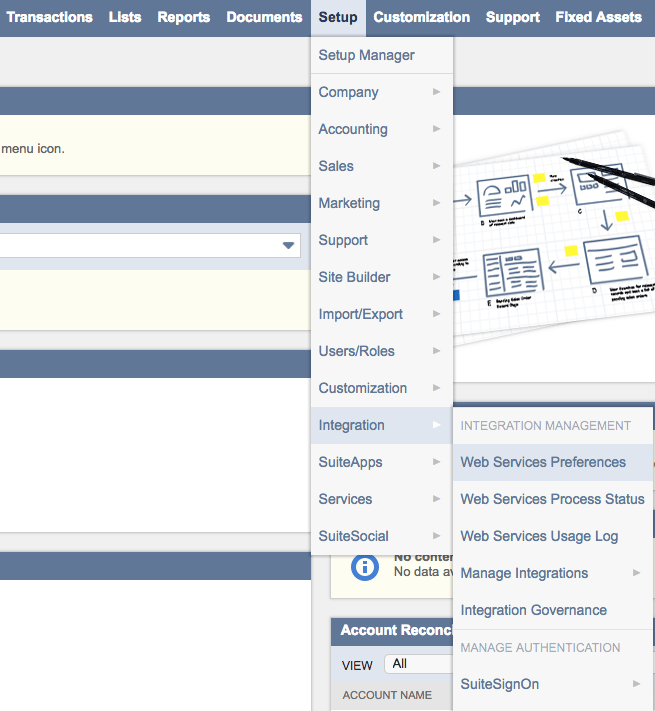
To find your account ID, select **Setup > Integration > Web Services Preferences** in NetSuite.

<Frame>
  <img alt="NetSuiteAppTBA_AccountPath.png" src="https://mintcdn.com/domoinc-openapi-sync-dataflows/RlWZB5sA8DQ5iXJ7/images/kb/ka0Vq0000000p8z-00N5w00000Ri7BU-0EM5w000005vO1Q.png?fit=max&auto=format&n=RlWZB5sA8DQ5iXJ7&q=85&s=a90dc2856c2dbfb1375c8a035035e540" width="655" height="711" data-path="images/kb/ka0Vq0000000p8z-00N5w00000Ri7BU-0EM5w000005vO1Q.png" />
</Frame>

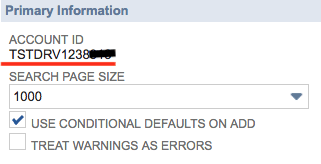
Your account ID will be located under "Primary Information."
<Frame>
  <img alt="NetSuiteAppTBA_AccountView2.png" src="https://mintcdn.com/domoinc-openapi-sync-dataflows/RlWZB5sA8DQ5iXJ7/images/kb/ka0Vq0000000p8z-00N5w00000Ri7BU-0EM5w000005vO1N.png?fit=max&auto=format&n=RlWZB5sA8DQ5iXJ7&q=85&s=2b7e972cdcd6ba8752a94fab03b619a8" width="321" height="164" data-path="images/kb/ka0Vq0000000p8z-00N5w00000Ri7BU-0EM5w000005vO1N.png" />
</Frame>

#### Finding Your Script ID and Deploy ID

**To find your script ID,**

1. In Netsuite, select
   **Customization > Scripting > Scripts**.
2. Click on Domo Data Connection 2.0.
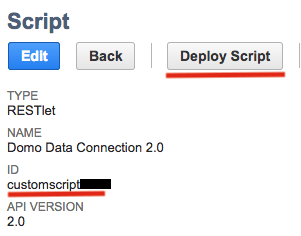
3. The script ID is found under ID in the form: customscriptXXXX. Note that, you need to enter the entire script id, including the word "customscript" as well.
   <Frame>
     <img alt="NetSuiteAppTBA_ScriptView.png" src="https://mintcdn.com/domoinc-openapi-sync-dataflows/RlWZB5sA8DQ5iXJ7/images/kb/ka0Vq0000000p8z-00N5w00000Ri7BU-0EM5w000005vO1T.png?fit=max&auto=format&n=RlWZB5sA8DQ5iXJ7&q=85&s=924e968f7ca3109f771c62c6f8e2d1ed" width="301" height="236" data-path="images/kb/ka0Vq0000000p8z-00N5w00000Ri7BU-0EM5w000005vO1T.png" />
   </Frame>

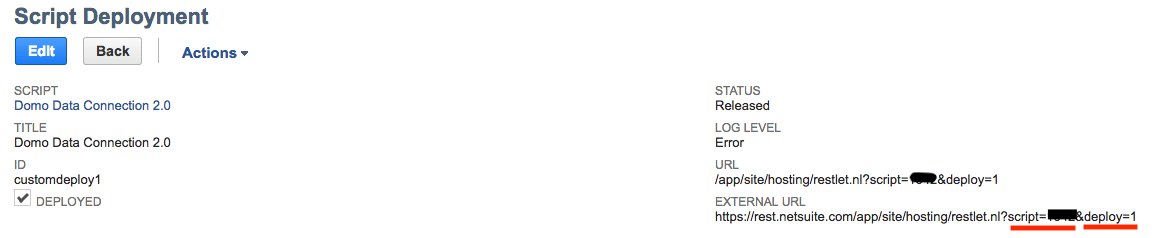
**To find your deploy ID,**

1. To obtain the deployment id, the script must first be deployed. To do this, click the Deploy Script box.
2. Go to
   **Customization -> Scripting -> Script Deployments**.
3. Now, find the
   **Domo Data Connection 2.0** script.
4. The deployment ID is found under ID in the form customdeployX. Note that you need to provide the entire deployment id, including the word "customdeploy" as well.
<Frame>
  <img alt="DeployView.png" src="https://mintcdn.com/domoinc-openapi-sync-dataflows/RlWZB5sA8DQ5iXJ7/images/kb/ka0Vq0000000p8z-00N5w00000Ri7BU-0EM5w000005vO1U.png?fit=max&auto=format&n=RlWZB5sA8DQ5iXJ7&q=85&s=8e73d64cd44e76e136bfbb3938a0516b" width="1168" height="238" data-path="images/kb/ka0Vq0000000p8z-00N5w00000Ri7BU-0EM5w000005vO1U.png" />
</Frame>

## Details Pane

This pane contains a single **Report** menu in which you enter the ID for the NetSuite saved search you want to pull into Domo.

The NetSuite App TBA connector *only* pulls in data from saved searches.

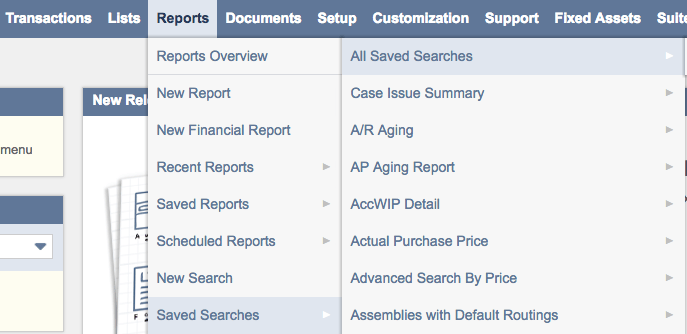
**To find the report ID for a saved search,**

1. In Netsuite, select
   **Reports > Saved Searches > All Saved Searches**.
   <Frame>
     <img alt="NetSuiteAppTBA_ReportView.png" src="https://mintcdn.com/domoinc-openapi-sync-dataflows/RlWZB5sA8DQ5iXJ7/images/kb/ka0Vq0000000p8z-00N5w00000Ri7BU-0EM5w000005vO1R.png?fit=max&auto=format&n=RlWZB5sA8DQ5iXJ7&q=85&s=cd15fcc9121a3fd95e9ea4bfe8f0b9d0" width="687" height="334" data-path="images/kb/ka0Vq0000000p8z-00N5w00000Ri7BU-0EM5w000005vO1R.png" />
   </Frame>

2. Locate the report you want to pull data from.

3. Copy the ID found in the
   **ID** column corresponding to the saved search you want.

   This will be in the form customsearchXXXX, where XXXX is the report ID.

   <Frame>
     <img alt="NetSuiteAppTBA_ReportPane.png" src="https://mintcdn.com/domoinc-openapi-sync-dataflows/RlWZB5sA8DQ5iXJ7/images/kb/ka0Vq0000000p8z-00N5w00000Ri7BU-0EM5w000005vO1O.png?fit=max&auto=format&n=RlWZB5sA8DQ5iXJ7&q=85&s=2362c0e44127bf3a4694d64af85d2efc" width="732" height="61" data-path="images/kb/ka0Vq0000000p8z-00N5w00000Ri7BU-0EM5w000005vO1O.png" />
   </Frame>

   <Tip>
     **Tip:** If the ID from the ID column does not work, click **View** and use the saved search ID in the URL.
   </Tip>

<table border="1" cellpadding="1" cellspacing="1" data-aura-rendered-by="33:201;a"><thead><tr><th colspan="1" rowspan="1"><p> Menu </p></th><th colspan="1" rowspan="1"><p> Description </p></th></tr></thead><tbody><tr><td colspan="1" rowspan="1"><p><span class=""> Saved Searched ID </span></p></td><td colspan="1" rowspan="1"><p><span /> Please provide the custom search ID for the NetSuite saved search you wish to run. <span /></p></td></tr><tr><td colspan="1" rowspan="1"><p><span class=""> Search Type </span></p></td><td colspan="1" rowspan="1"><p><span> Select the Search Type. If you wish to have no search type, select the blank option at the top and click save. </span></p></td></tr><tr><td colspan="1" rowspan="1"><p><span class=""> Date Format </span></p></td><td colspan="1" rowspan="1"><p><span> Select the date format. </span></p></td></tr><tr><td colspan="1" rowspan="1"><p><span class=""> Duplicate Row Handling </span></p></td><td colspan="1" rowspan="1"><p><span> Select an option to keep or remove the duplicate rows from your data. </span></p></td></tr><tr><td colspan="1" rowspan="1"><p><span class=""> Use SQLLite to Prevent duplicate records caused by modifying data during connector run </span></p></td><td colspan="1" rowspan="1"><p><span> Check this box to remove duplicate records, bringing in only the most recently modified data. These duplicates are caused if your data is modified while the connector is running. Duplicates are removed using a SQLite query that keeps the most recently modified row selecting by the \[row id]. <br /> Checking this box will slow your connector run, so use this feature only when necessary. It only works when you select the update method as <b> Merge. </b><b /></span></p></td></tr><tr><td colspan="1" rowspan="1"><p><span class=""> Use the checkbox to cache the results for the execution </span></p></td><td colspan="1" rowspan="1"><p><span> Use the checkbox to cache the results for the execution. <br /><b> Note: </b> Use this option to avoid the data discrepancy observed due to concurrent saved search updates. This will create a snapshot of a results at a certain time and will pull data from the snapshot. It will not contain concurrently updated data. </span></p></td></tr><tr><td colspan="1" rowspan="1"><p><span class=""> Folder ID </span></p></td><td colspan="1" rowspan="1"><p><span> Note: The Folder ID checkbox appears, when you select <b> Use the checkbox to cache the results for the execution </b> checkbox. </span></p><p><span> Please provide the folder ID from the NetSuite file cabinet where you wish to store the cache files. <br /><b> Note: </b> The files will be stored in that folder for caching, files will be removed after the import is completed. </span></p></td></tr></tbody></table>

## Other Panes

For information about the remaining sections of the connector interface, including how to configure scheduling, retry, and update options, see [Adding a DataSet Using a Data Connector](https://domo-support.domo.com/s/article/360042926274?language=en_US "Adding a DataSet Using a Data Connector").

## FAQ

<AccordionGroup>
  <Accordion title="Why do I need a script ID?">
    NetSuite requires a script to access their information (through Saved Searches). Domo's NetSuite App TBA connector interacts with this script to get your data.
  </Accordion>

  <Accordion title="What is the difference between this connector and other NetSuite connectors?">
    NetSuite App TBA uses the new version of the NetSuite API, which supports many new features. While this connector uses some of these new features to more efficiently provide data, it has the same functionality as the other NetSuite connectors.
  </Accordion>

  <Accordion title="How do I know my NetSuite data is being accessed securely?">
    The NetSuiteAppTBA uses token-based authentication, so Domo never sees your actual credentials. Your token can be revoked at any time through the NetSuite UI.
  </Accordion>

  <Accordion title="How do I know which NetSuite role the connector is using?">
    NetSuite roles are attached to the tokens you create. To use a different role in the NetSuite connector, you must create a new token in the role you desire. To do so...

    1. Hover over your name in the top right corner, then choose the role you wish to use from the dropdown.
    2. Follow the directions to create a token in this role.

    <Note>
      **Note** **:** All roles may not have the ability to create access tokens.
    </Note>
  </Accordion>
</AccordionGroup>