
> ## Documentation Index
> Fetch the complete documentation index at: https://domoinc-openapi-sync-dataflows.mintlify.site/llms.txt
> Use this file to discover all available pages before exploring further.

# Adobe Analytics Real Time API Connector

## Intro

Turn insights into real-time, data-driven responses with Adobe Analytics Real Time API. Use Domo's Adobe Analytics Real Time API Connector to retrieve data from a selected Adobe Analytics Report Suite. To learn more about the Adobe Analytics Real Time API, see ([https://marketing.adobe.com/developer/en\_US/get-started/introduction/c-introduction](https://marketing.adobe.com/developer/en_US/get-started/introduction/c-introduction "https://marketing.adobe.com/developer/en_US/get-started/introduction/c-introduction") ).

You can connect to your Adobe Analytics account in the Data Center. This topic discusses the fields and menus that are specific to the Adobe Analytics Real Time API connector user interface. To add add DataSets, set update schedules, and edit DataSet information, see [Adding a DataSet Using a Data Connector](https://domo-support.domo.com/s/article/360042926274?language=en_US "Adding a DataSet Using a Data Connector").

## Prerequisites

To connect to Adobe Analytics v2 and create a dataset, you must create an Adobe Analytics Service Account (JWT) project in the Adobe Developer Console and provide the following:

* Client ID (API Key)
* Client Secret
* Technical Account ID
* Organization ID
* Private Key for your Adobe integration in PEM format

### Creating a new OAuth project in Adobe Developer Console

To create a new project in Adobe Developer Console, do the following:

1. Log into [https://console.adobe.io/projects](https://console.adobe.io/projects "https://console.adobe.io/projects").
2. Click **Create new project** button.

<Frame>
  <img alt="New_Project_button.png" src="https://mintcdn.com/domoinc-openapi-sync-dataflows/2K-MJunolF8arvf9/images/kb/ka0Vq00000012UP-00N5w00000Ri7BU-0EM5w000005vO15.png?fit=max&auto=format&n=2K-MJunolF8arvf9&q=85&s=f67e86801237c322fd0c877caccd5498" width="847" height="101" data-path="images/kb/ka0Vq00000012UP-00N5w00000Ri7BU-0EM5w000005vO15.png" />
</Frame>

3. Click on **Add API** to start using the Adobe services.

<Frame>
  <img alt="Add_API.png" src="https://mintcdn.com/domoinc-openapi-sync-dataflows/2K-MJunolF8arvf9/images/kb/ka0Vq00000012UP-00N5w00000Ri7BU-0EM5w000005vO16.png?fit=max&auto=format&n=2K-MJunolF8arvf9&q=85&s=d81196c6e1cb5a2dfd9ae30ec15d4bea" width="889" height="301" data-path="images/kb/ka0Vq00000012UP-00N5w00000Ri7BU-0EM5w000005vO16.png" />
</Frame>

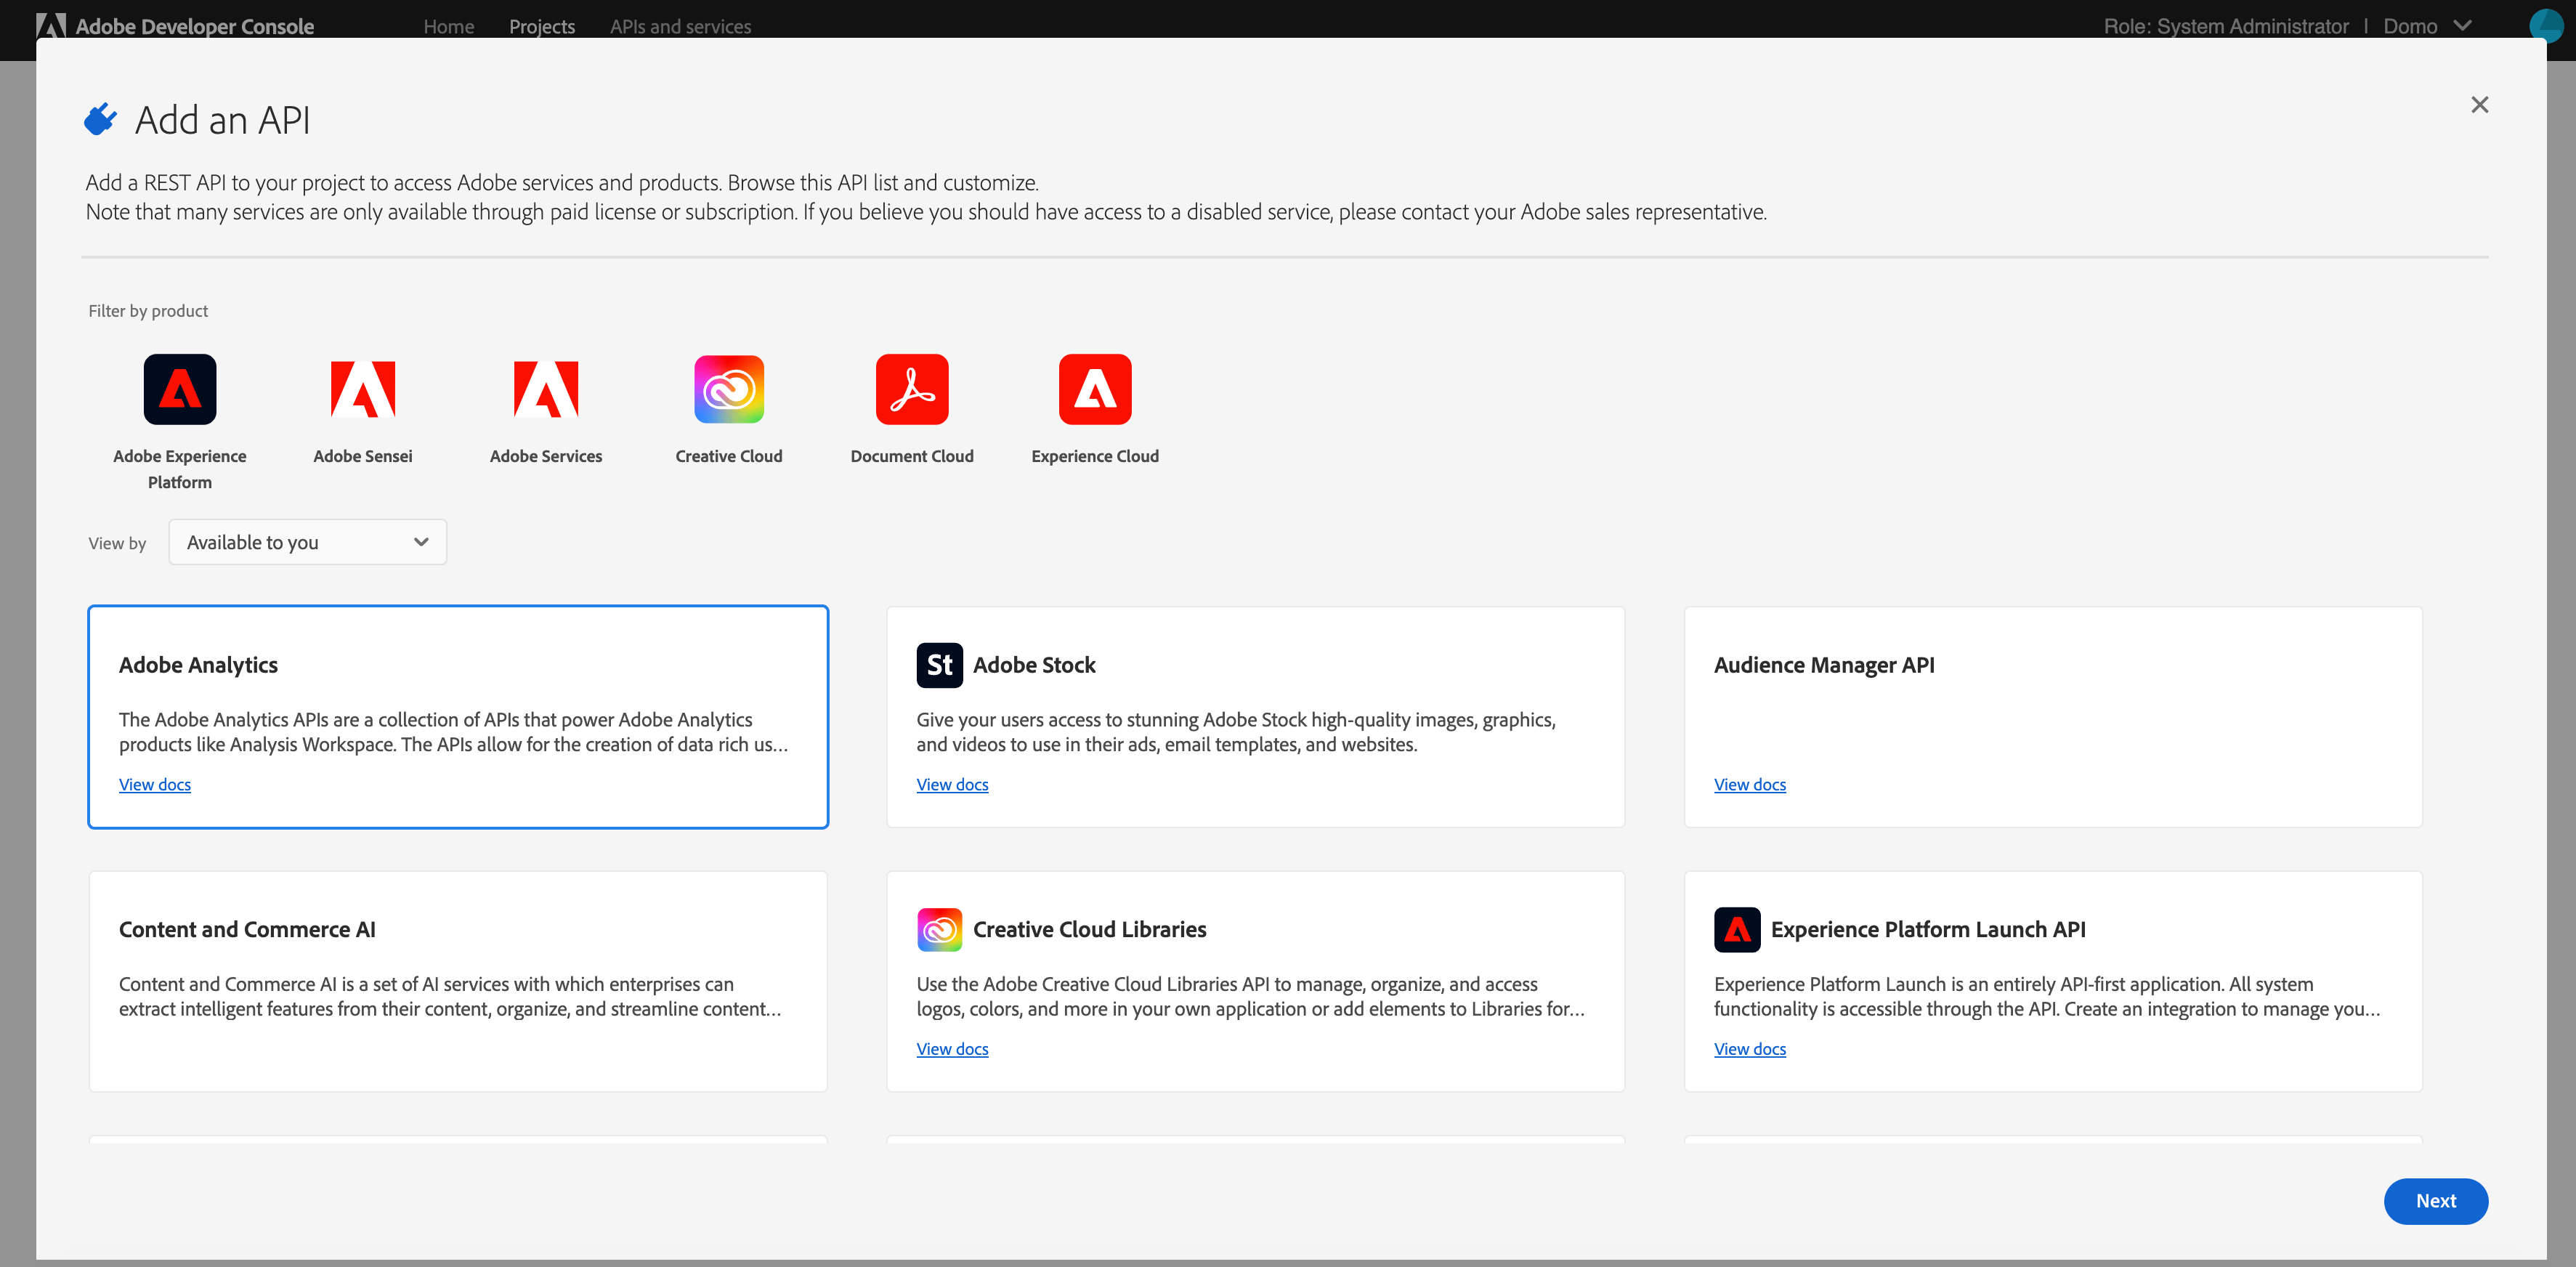
4. The APIs available to you will be listed in the **Add an API** window. Select **Adobe Analytics**.
<Frame>
  <img alt="Add_an_API-Adobe_Analytics.png" src="https://mintcdn.com/domoinc-openapi-sync-dataflows/2K-MJunolF8arvf9/images/kb/ka0Vq00000012UP-00N5w00000Ri7BU-0EM5w000005vO19.png?fit=max&auto=format&n=2K-MJunolF8arvf9&q=85&s=5cab7a57a078351f9f6307ddac7d29a8" width="3546" height="1744" data-path="images/kb/ka0Vq00000012UP-00N5w00000Ri7BU-0EM5w000005vO19.png" />
</Frame>

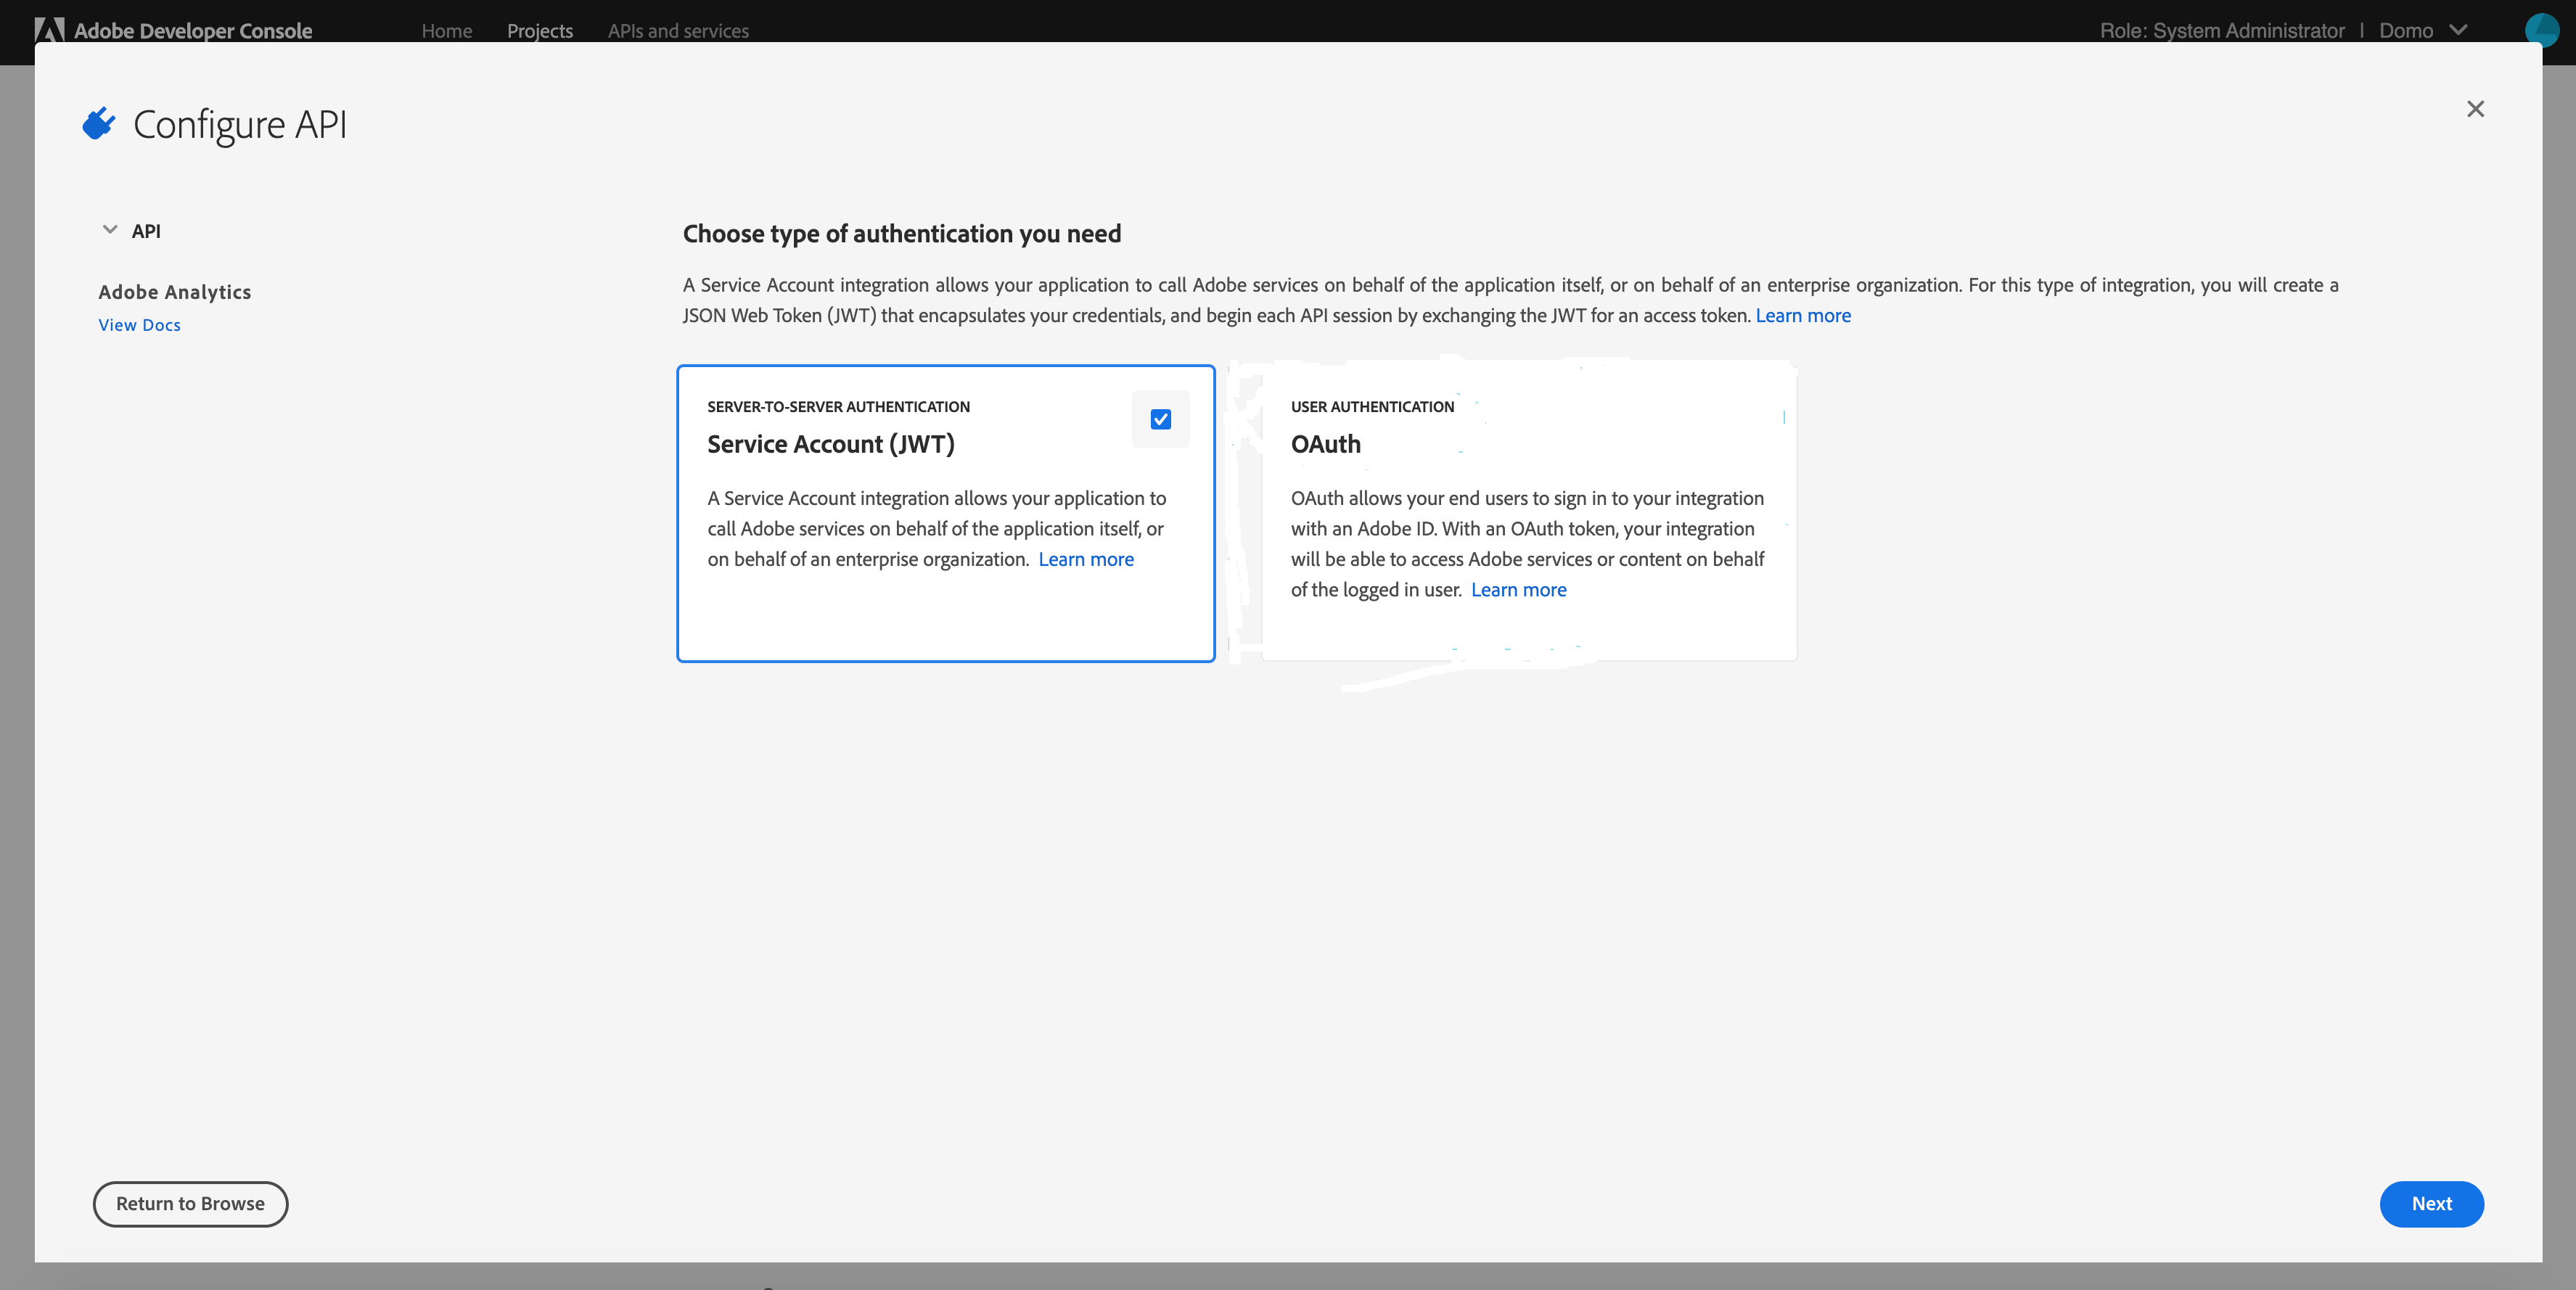
5. Now, you need to select the authentication type. Select **Service Account (JWT)** here.
<Frame>
  <img alt="OAuth-service_account_JWT.png" src="https://mintcdn.com/domoinc-openapi-sync-dataflows/2K-MJunolF8arvf9/images/kb/ka0Vq00000012UP-00N5w00000Ri7BU-0EM5w000005vO17.png?fit=max&auto=format&n=2K-MJunolF8arvf9&q=85&s=1703a9b50a97309cbfc2f4dbe3d0d490" width="3550" height="1778" data-path="images/kb/ka0Vq00000012UP-00N5w00000Ri7BU-0EM5w000005vO17.png" />
</Frame>

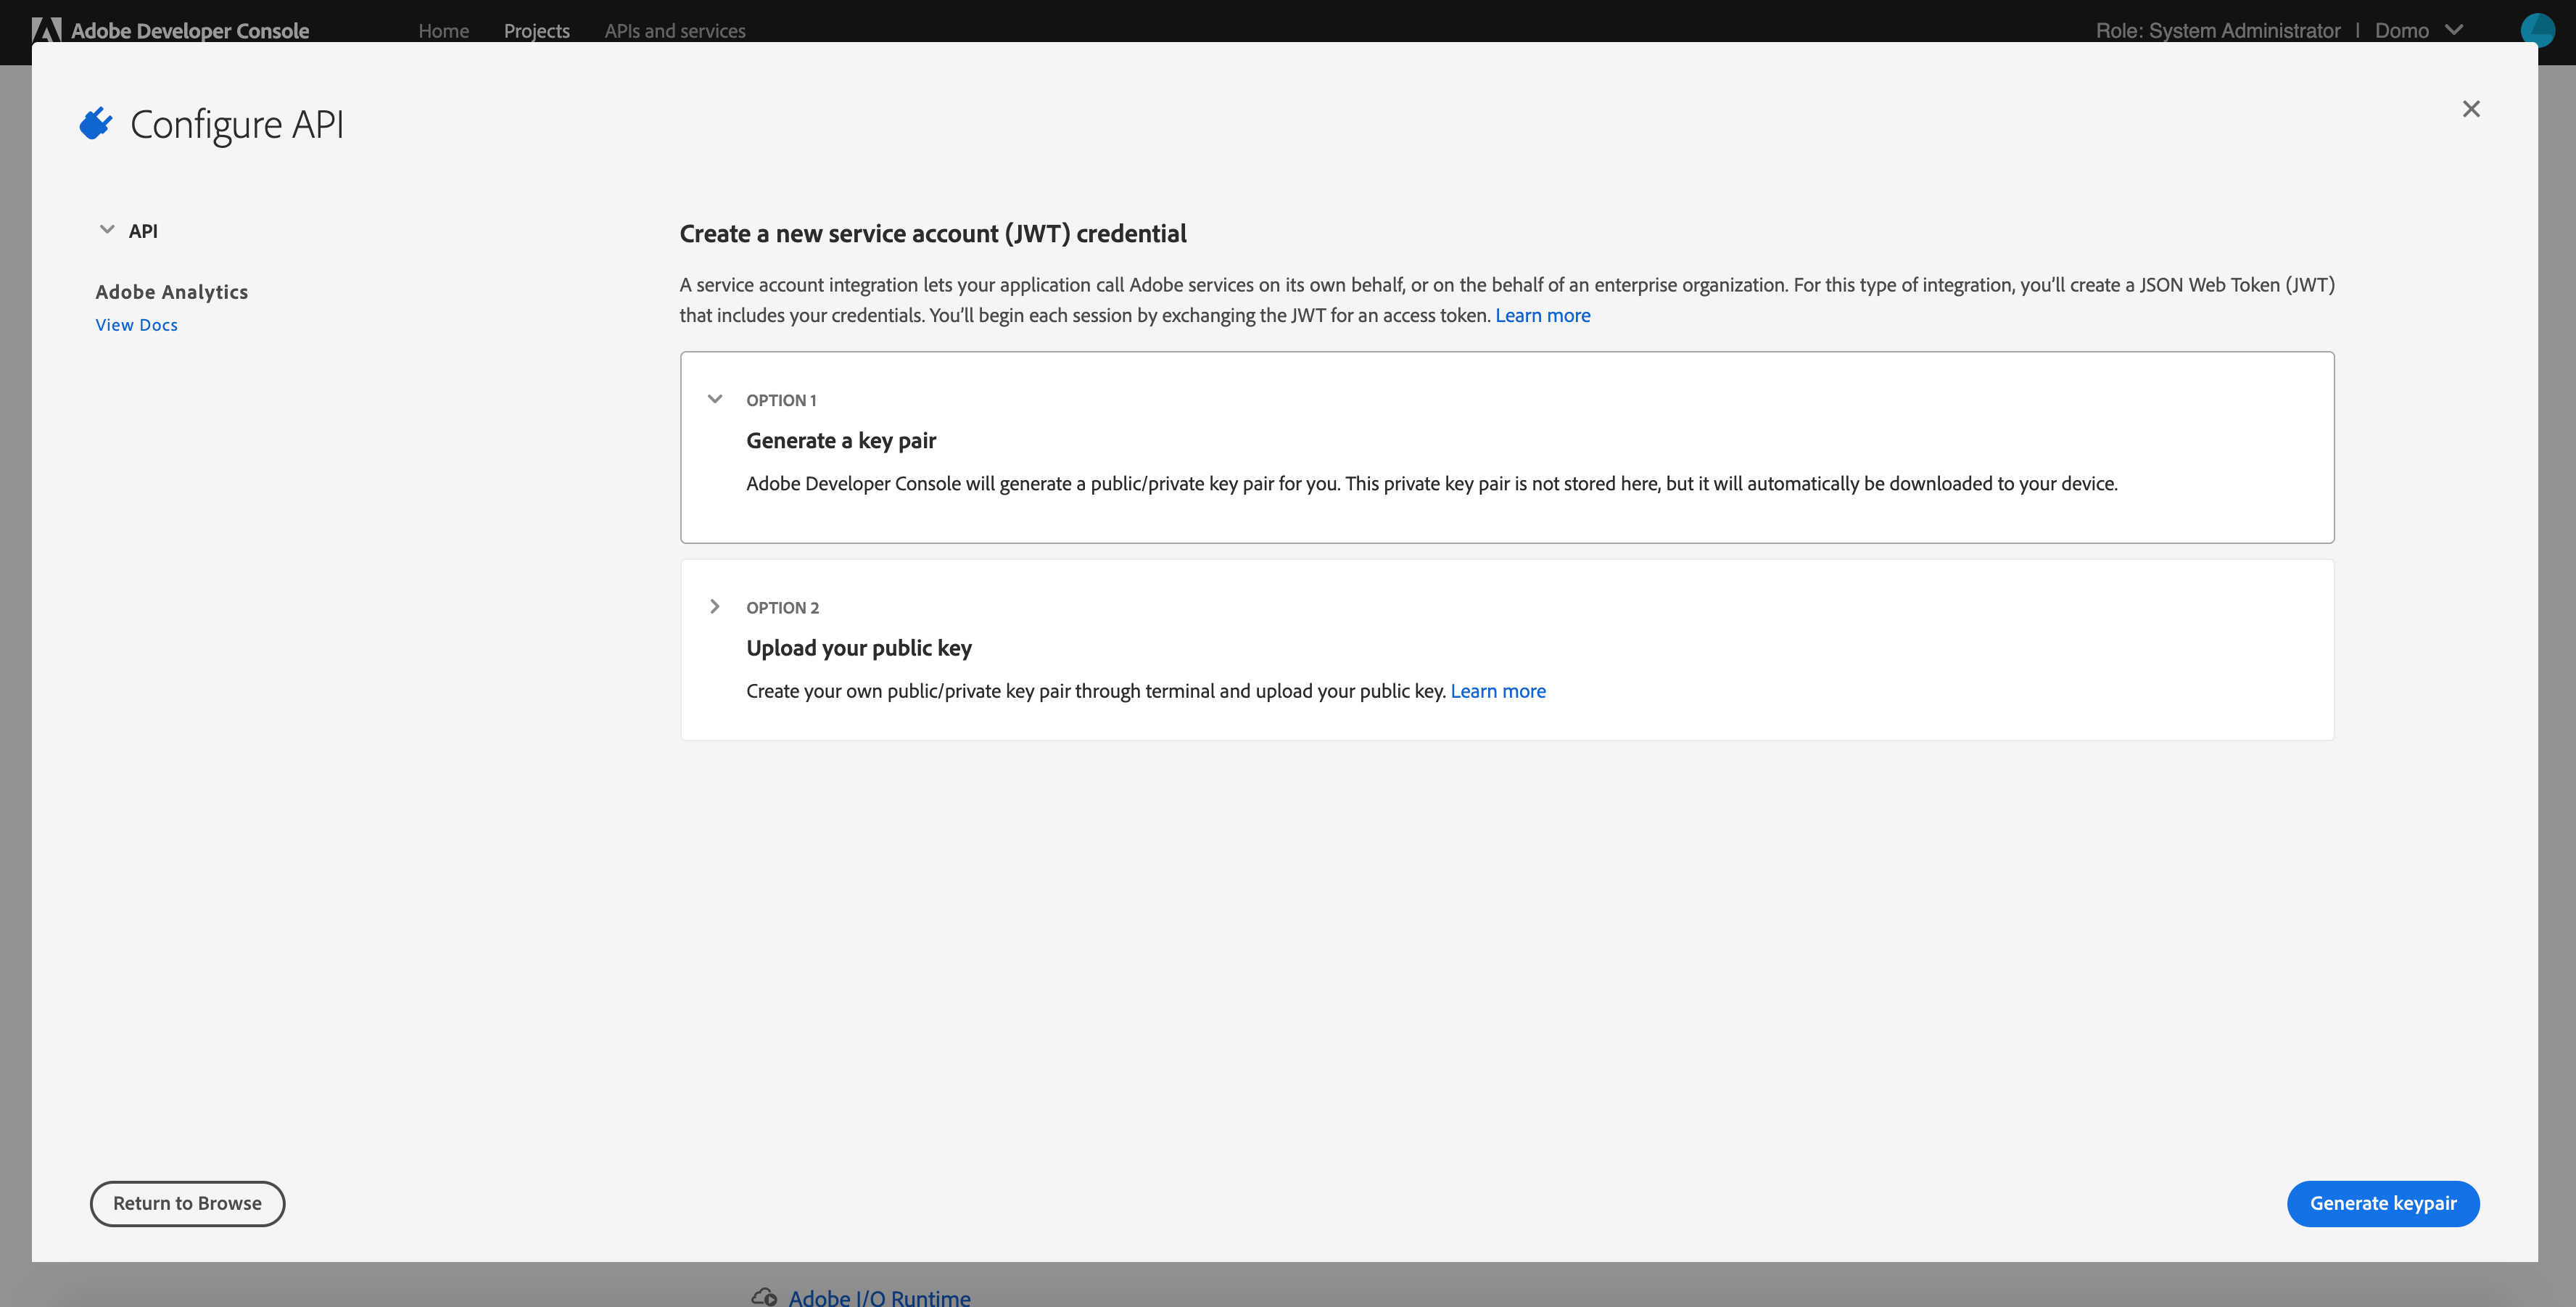
6. Select **Generate a key pair** and click **Generate Keypair**.
<Frame>
  <img alt="JWT_Creds.png" src="https://mintcdn.com/domoinc-openapi-sync-dataflows/2K-MJunolF8arvf9/images/kb/ka0Vq00000012UP-00N5w00000Ri7BU-0EM5w000005vO1B.png?fit=max&auto=format&n=2K-MJunolF8arvf9&q=85&s=73c76b1b1cc0238b3cf0e4b0ea135202" width="3552" height="1802" data-path="images/kb/ka0Vq00000012UP-00N5w00000Ri7BU-0EM5w000005vO1B.png" />
</Frame>

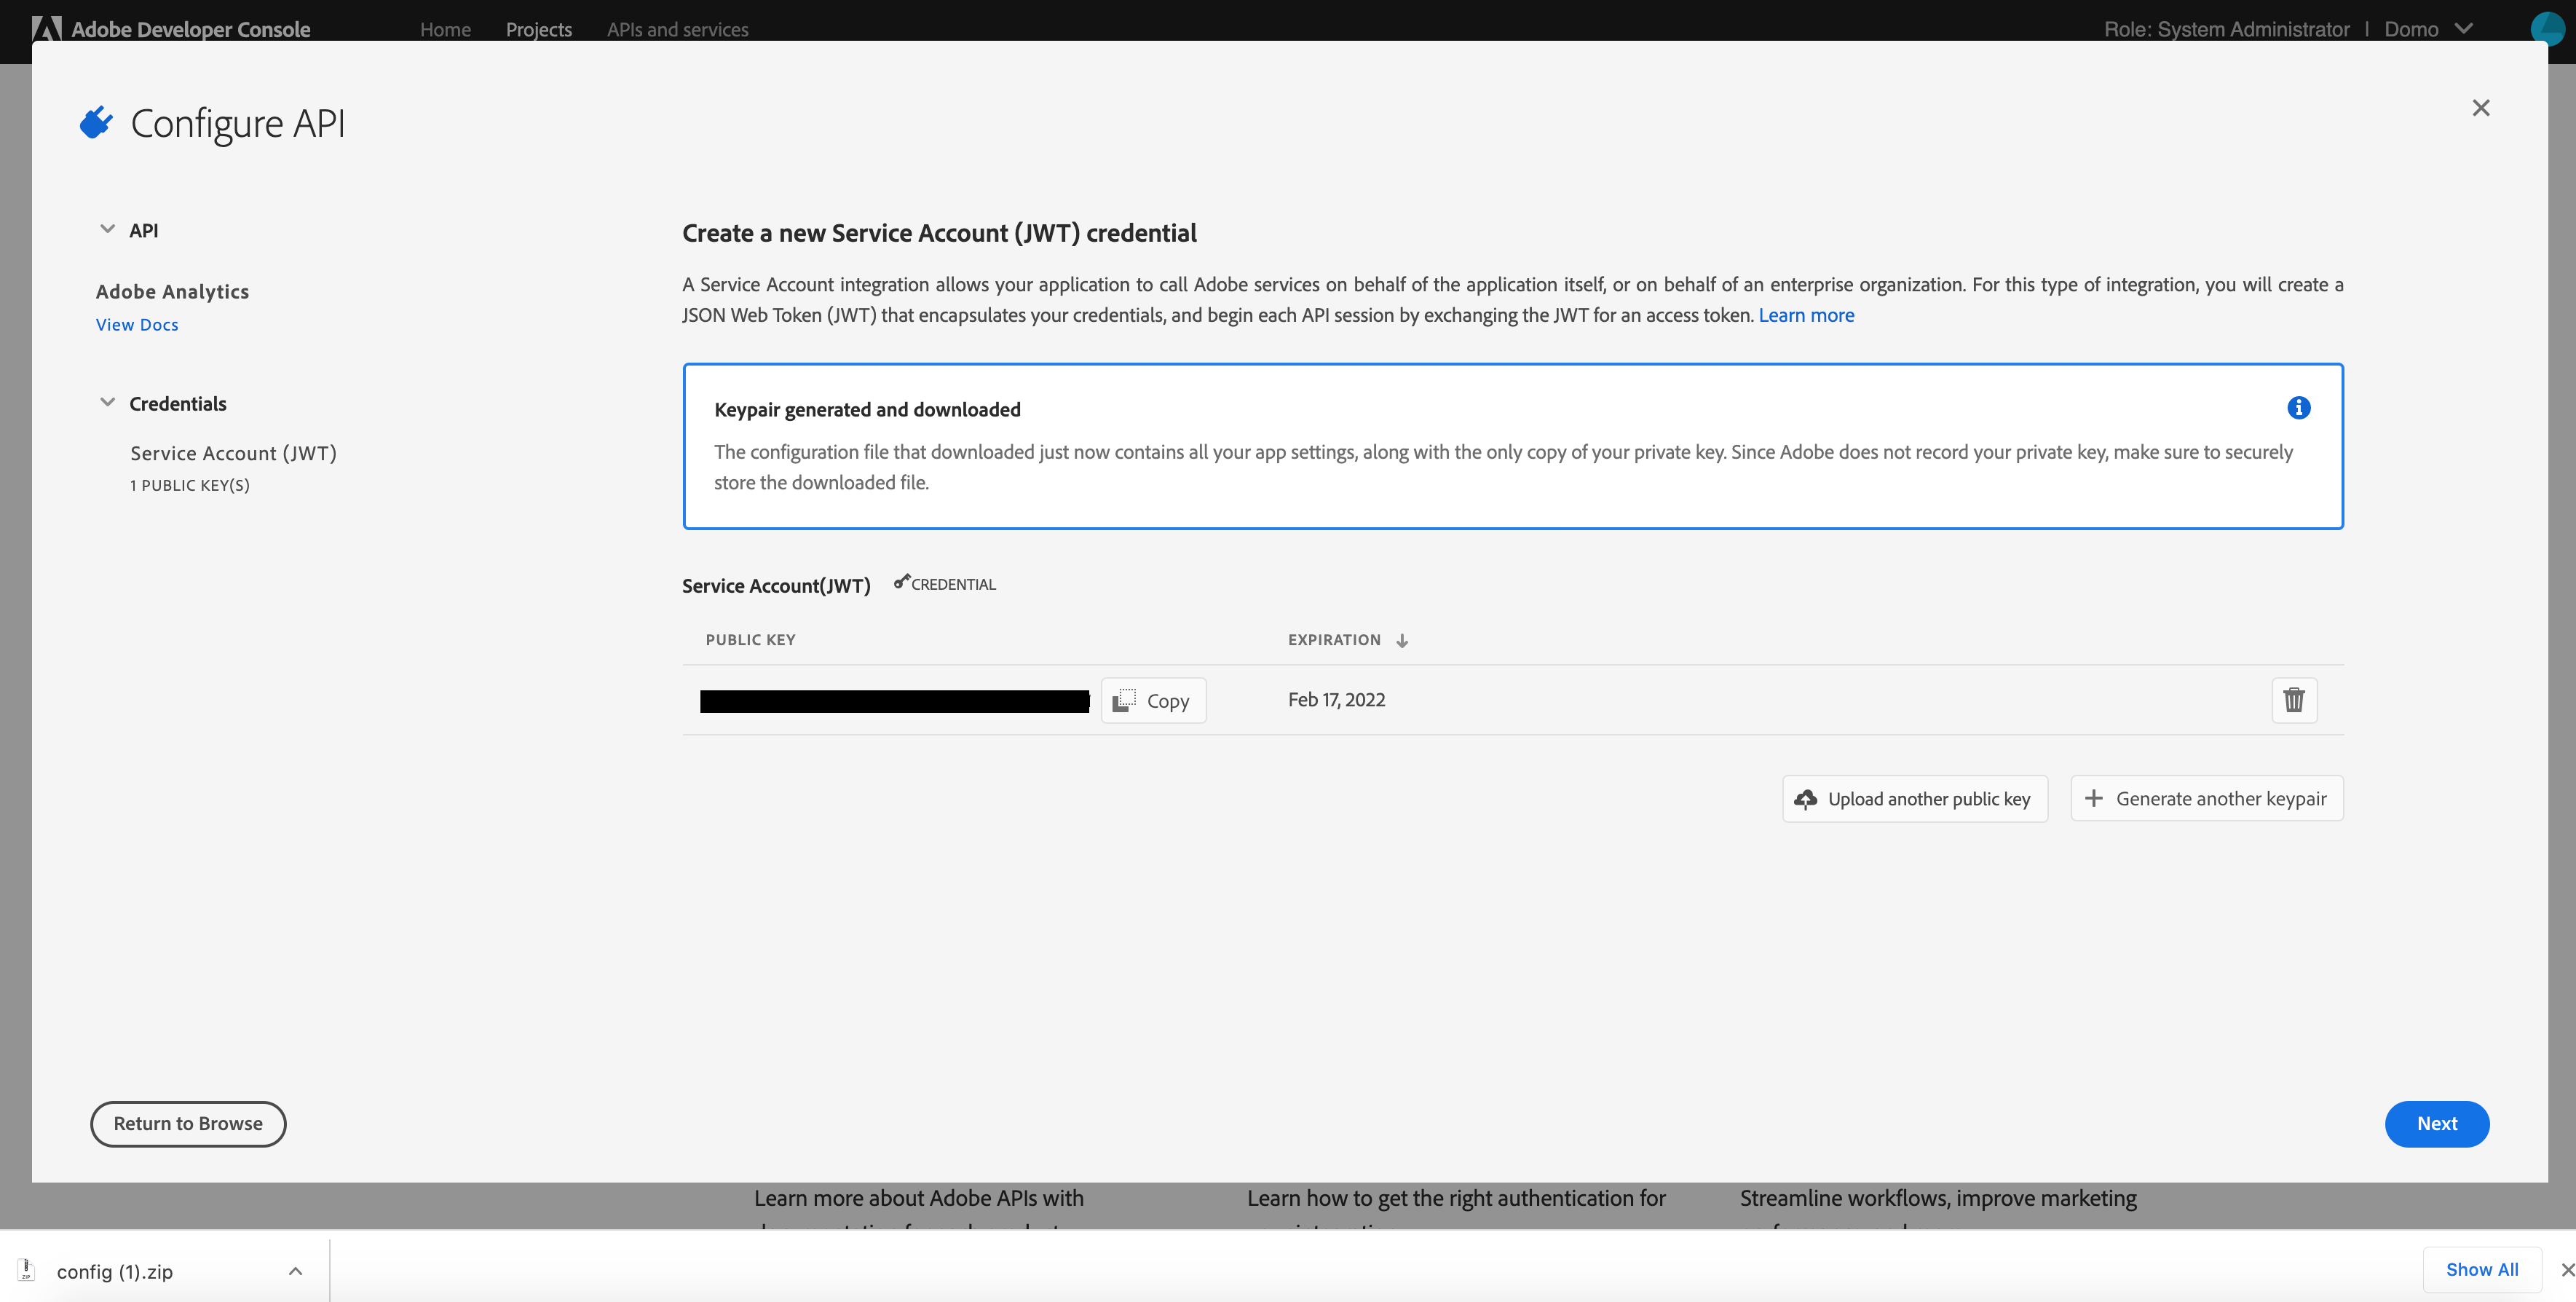
7. A new key pair will be generated and downloaded to your system. The public key will be uploaded to your JWT project. The private key will be downloaded.
<Frame>
  <img alt="JWT_KeyPair.png" src="https://mintcdn.com/domoinc-openapi-sync-dataflows/2K-MJunolF8arvf9/images/kb/ka0Vq00000012UP-00N5w00000Ri7BU-0EM5w000005vO18.png?fit=max&auto=format&n=2K-MJunolF8arvf9&q=85&s=beacf745e86d2a77b4d45246100c12a8" width="3538" height="1788" data-path="images/kb/ka0Vq00000012UP-00N5w00000Ri7BU-0EM5w000005vO18.png" />
</Frame>

8. Unzip the file "config.zip", open the directory "config", and open the file "private.key" with a basic text editor. This is the **Private Key** you will paste into Domo, in Credentials section.

9. Now, click **Next**.

10. Select the desired product profiles, then click **Save Configured API**.

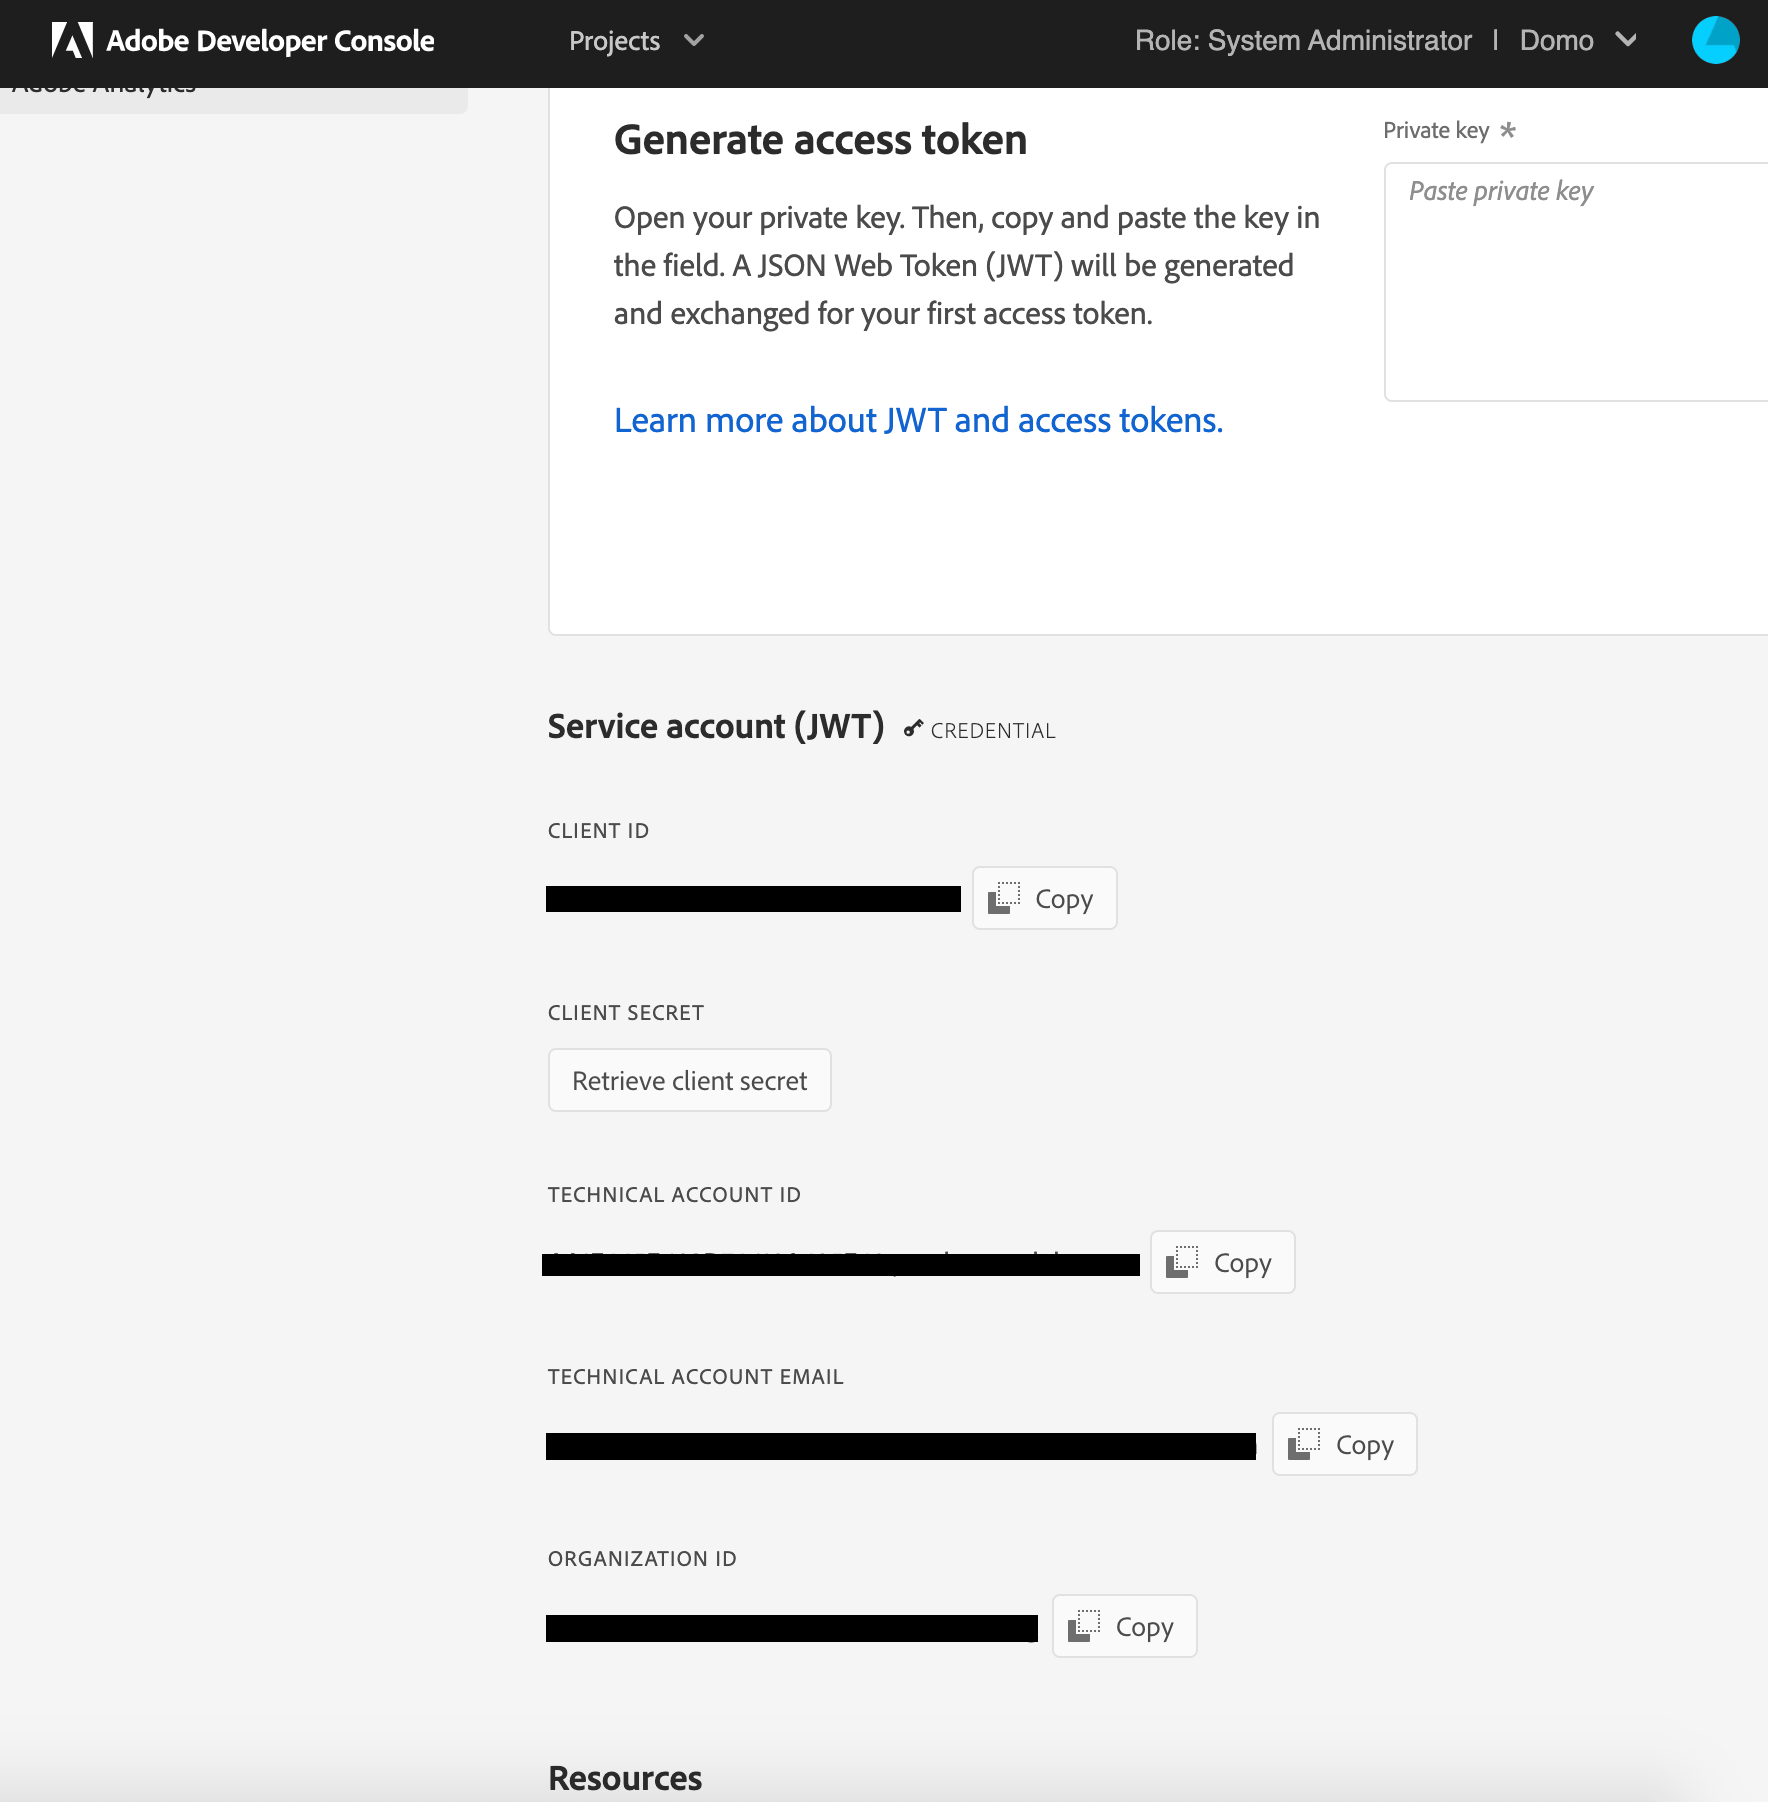
11. This takes you to the **Project APIs and Services** page. If you scroll down, you will see the **Client ID, Client Secret, Technical Account ID** and **Organization ID** that you will use to create the Adobe Analytics JWT account in Domo.
<Frame>
  <img alt="Generate_Access_Token.png" src="https://mintcdn.com/domoinc-openapi-sync-dataflows/2K-MJunolF8arvf9/images/kb/ka0Vq00000012UP-00N5w00000Ri7BU-0EM5w000005vO1A.png?fit=max&auto=format&n=2K-MJunolF8arvf9&q=85&s=8db6eb317c1a0fe3bf20aa3c7f329642" width="1768" height="1802" data-path="images/kb/ka0Vq00000012UP-00N5w00000Ri7BU-0EM5w000005vO1A.png" />
</Frame>

12. (Optional) Rename the project to something you will recognize later. Navigate to the **Project Overview** page, then click **Edit Project**.

## Connecting to Your Adobe Analytics Real Time API Account

This section enumerates the options in the **Credentials** and **Details** panes in the Adobe Analytics Real Time API Connector page. The components of the other panes in this page, **Scheduling** and **Name & Describe Your DataSet**, are universal across most connector types and are discussed in great detail in [Adding a DataSet Using a Data Connector](https://domo-support.domo.com/s/article/360042926274?language=en_US "Adding a DataSet Using a Data Connector").

### Credentials Pane

This pane contains fields for entering credentials to connect to your Adobe Analytics Real Time API account. The following table describes what is needed for each field:

<table border="1" cellpadding="1" cellspacing="1" data-aura-rendered-by="33:195;a"><thead><tr><th colspan="1" rowspan="1"><p><span class="s1"> Field </span></p></th><th colspan="1" rowspan="1"><p><span class="s1"> Description </span></p></th></tr></thead><tbody><tr><td colspan="1" rowspan="1"> Client ID (API Key) </td><td colspan="1" rowspan="1"> Enter your client ID. </td></tr><tr><td colspan="1" rowspan="1"> Client Secret </td><td colspan="1" rowspan="1"> Enter your client secret. </td></tr><tr><td colspan="1" rowspan="1"> Technical Account ID </td><td colspan="1" rowspan="1"> Enter your technical account ID. </td></tr><tr><td colspan="1" rowspan="1"> Organization ID </td><td colspan="1" rowspan="1"> Enter your organization ID. </td></tr><tr><td colspan="1" rowspan="1"> Private Key </td><td colspan="1" rowspan="1"> Paste the private key for your Adobe integration here, in PEM format. </td></tr></tbody></table>

For information about obtaining these credentials, see "Prerequisites," above.

Once you have entered valid Adobe Analytics Real Time API credentials, you can use the same account any time you go to create a new Adobe Analytics Real Time API DataSet. You can manage connector accounts in the **Accounts** tab in the Data Center. For more information about this tab, see [Managing User Accounts for Connectors](https://domo-support.domo.com/s/article/360042926054?language=en_US "Managing User Accounts for Connectors").

### Details Pane

This pane contains two primary menus, **Report Suite** and **Report Type**, along with various other menus which may or may not appear depending on the report type you select.

<table border="1" cellpadding="1" cellspacing="1"><thead><tr><th colspan="1" rowspan="1"><p> Menu </p></th><th colspan="1" rowspan="1"><p> Description </p></th></tr></thead><tbody><tr><td colspan="1" rowspan="1"> Company </td><td colspan="1" rowspan="1"> Enter your company's name as featured on Adobe Analytics, which is used as a parameter for the Company.GetEndpoint method (see <a href="https://github.com/AdobeDocs/analytics-1.4-apis/blob/master/docs/admin-api/methods/company/r_GetEndpoint.md" target="_blank" title="https://github.com/AdobeDocs/analytics-1.4-apis/blob/master/docs/admin-api/methods/company/r_GetEndpoint.md"> [https://github.com/AdobeDocs/analyti...GetEndpoint.md](https://github.com/AdobeDocs/analyti...GetEndpoint.md) </a> ) </td></tr><tr><td colspan="1" rowspan="1"><p> Report Suite </p></td><td colspan="1" rowspan="1"><p> Select the Adobe Analytics Report Suite you want to pull data from. </p></td></tr><tr><td colspan="1" rowspan="1"><p> Report Type </p></td><td colspan="1" rowspan="1"><p> Select a report type. The report type determines the set of inputs needed to configure the DataSet. </p><p> Report types are as follows: </p><table border="1" cellpadding="1" cellspacing="1"><tbody><tr><td colspan="1" rowspan="1"><p> Intermediate - Custom </p></td><td colspan="1" rowspan="1"><p> Lets you specify the elements, metrics, segments, and date-time information for your report. </p></td></tr><tr><td colspan="1" rowspan="1"><p> Advanced - Query </p></td><td colspan="1" rowspan="1"><p> Lets you pull data using an Adobe Analytics Web Service API Explorer Query. For more information about queries, see <a class="link-https" href="https://marketing.adobe.com/developer/api-explorer#Report.Queue" target="_blank" title="https://marketing.adobe.com/developer/api-explorer#Report.Queue"> [https://marketing.adobe.com/develope...r#Report.Queue](https://marketing.adobe.com/develope...r#Report.Queue) </a>. </p></td></tr></tbody></table></td></tr></tbody></table>

#### "Easy - Predefined" Report Type Options

<table border="1" cellpadding="1" cellspacing="1"><tbody><tr><td colspan="1" rowspan="1"><p> Predefined Report </p></td><td colspan="1" rowspan="1"><p> Select the report you want to run. For a list of report types, see the next section. </p></td></tr><tr><td colspan="1" rowspan="1"><p> Report </p></td><td colspan="1" rowspan="1"><p> Select a predefined report. These reports are available <em> only </em> when you select <b> Easy - Predefined </b> as your <b> Report Type </b>. </p><table border="1" cellpadding="1" cellspacing="1"><tbody><tr><td colspan="1" rowspan="1"><p> Base Metrics </p></td><td colspan="1" rowspan="1"><p> Returns data about page views; average time spent on website; unique visitors by month, week, and day; new visitors; etc. </p></td></tr><tr><td colspan="1" rowspan="1"><p> Commerce Metrics </p></td><td colspan="1" rowspan="1"><p> Returns data about number of visits, orders, checkouts, revenue, new and returning customers, etc. </p></td></tr><tr><td colspan="1" rowspan="1"><p> Existing Customer Campaigns </p></td><td colspan="1" rowspan="1"><p> Returns data about visits, orders, and revenue, broken down by existing customer campaign. </p></td></tr><tr><td colspan="1" rowspan="1"><p> Existing Customer Products </p></td><td colspan="1" rowspan="1"><p> Returns data about existing customer visits, orders, checkouts, and revenue, broken down by product. </p></td></tr><tr><td colspan="1" rowspan="1"><p> Mobile Device Types </p></td><td colspan="1" rowspan="1"><p> Returns data about mobile views, visits, and daily unique visitors, broken down by device type. </p></td></tr><tr><td colspan="1" rowspan="1"><p> Mobile Metrics </p></td><td colspan="1" rowspan="1"><p> Returns metrics about mobile device usage, such as device type, OS, views, visits, and daily unique visitors. </p></td></tr><tr><td colspan="1" rowspan="1"><p> Natural Search Conversion </p></td><td colspan="1" rowspan="1"><p> Returns data about number of visits, orders, and revenue, broken down by natural search keyword. </p></td></tr><tr><td colspan="1" rowspan="1"><p> Natural Search Visits </p></td><td colspan="1" rowspan="1"><p> Returns data about number of visits, page views, and daily unique visitors, broken down by natural search keyword. </p></td></tr><tr><td colspan="1" rowspan="1"><p> New Visitor Best Campaigns </p></td><td colspan="1" rowspan="1"><p> Returns data about visits, orders, revenue, and units, broken down by new visitor campaign. </p></td></tr><tr><td colspan="1" rowspan="1"><p> New Visitor Geo </p></td><td colspan="1" rowspan="1"><p> Returns data about visits, orders, revenue, and units, broken down by region. </p></td></tr><tr><td colspan="1" rowspan="1"><p> New Visitor Geo Country </p></td><td colspan="1" rowspan="1"><p> Returns data about visits, orders, revenue, and units, broken down by country. </p></td></tr><tr><td colspan="1" rowspan="1"><p> New Visitor Keywords </p></td><td colspan="1" rowspan="1"><p> Returns data about visits, orders, revenue, and units, broken down by paid search keyword. </p></td></tr><tr><td colspan="1" rowspan="1"><p> New Visitor Products </p></td><td colspan="1" rowspan="1"><p> Returns data about new customer visits, orders, checkouts, revenue, units, etc., broken down by product. </p></td></tr><tr><td colspan="1" rowspan="1"><p> New Visitor Traffic <br /> Source </p></td><td colspan="1" rowspan="1"><p> Returns data about visits, orders, revenue, and units, broken down by referrer type. </p></td></tr><tr><td colspan="1" rowspan="1"><p> Page Effectiveness </p></td><td colspan="1" rowspan="1"><p> Returns data about page visits, entries and exists, bounces, and bounce rate, broken down by page. </p></td></tr><tr><td colspan="1" rowspan="1"><p> Page Metrics </p></td><td colspan="1" rowspan="1"><p> Returns data about page views, visits, daily unique visitors, and exists, broken down by page. </p></td></tr><tr><td colspan="1" rowspan="1"><p> Paid Search Conversion </p></td><td colspan="1" rowspan="1"><p> Returns data about visits, orders, and revenue, broken down by paid search keyword. </p></td></tr><tr><td colspan="1" rowspan="1"><p> Paid Search Visits </p></td><td colspan="1" rowspan="1"><p> Returns data about page views, daily unique visitors, and visits, broken down by paid search keyword. </p></td></tr><tr><td colspan="1" rowspan="1"><p> Products and Categories </p></td><td colspan="1" rowspan="1"><p> Returns data about visits, orders, and revenue, broken down by product and category. </p></td></tr></tbody></table></td></tr></tbody></table>

#### "Intermediate - Custom" Report Type Options

<table border="1" cellpadding="1" cellspacing="1">
  <tbody>
    <tr>
      <td>
        <p>Metrics</p>
      </td>

      <td>
        <p>
          Select up to 30 metrics for your report. For more information about Adobe Analytics metrics, see

          <a class="link-https" href="https://marketing.adobe.com/developer/documentation/analytics-reporting-1-4/metrics" target="_blank" title="https://marketing.adobe.com/developer/documentation/analytics-reporting-1-4/metrics">
            [https://marketing.adobe.com/developer/documentation/analytics-reporting-1-4/metrics](https://marketing.adobe.com/developer/documentation/analytics-reporting-1-4/metrics)
          </a>

          .
        </p>
      </td>
    </tr>

    <tr>
      <td>
        <p>Elements</p>
      </td>

      <td>
        <p>Select up to four element names.</p>

        <p>
          An <em>element</em> is a structure that breaks down a report's metrics data. For example, you can generate a
          report that breaks down page views (metric) by the browsers used to access the page (element). The resulting
          report lists page views by browser type.
        </p>

        <p>
          For more information about elements, see

          <a class="link-https" href="https://marketing.adobe.com/developer/documentation/analytics-reporting-1-4/elements" target="_blank" title="https://marketing.adobe.com/developer/documentation/analytics-reporting-1-4/elements">
            [https://marketing.adobe.com/developer/documentation/analytics-reporting-1-4/elements](https://marketing.adobe.com/developer/documentation/analytics-reporting-1-4/elements)
          </a>

          .
        </p>
      </td>
    </tr>

    <tr>
      <td>
        <p>Additional Element Information</p>
      </td>

      <td>
        <p>
          Enter additional element information. Use the JSON format defined for elements in the

          <a class="link-https" href="https://marketing.adobe.com/developer/api-explorer" target="_blank" title="https://marketing.adobe.com/developer/api-explorer">
            API Explorer
          </a>

          for complete customization.
        </p>

        <p>For example:</p>

        ```json theme={"dark"}
        {
          "id": "(string)",
          "top": "(int)",
          "classification": "(string)",
          "parentID": "(string)",
          "pattern": [
            ["(string)"]
          ],
          "search": {
            "keywords": ["(string)"],
            "searches": ["(reportDescriptionSearch)"],
            "type": "(string)"
          },
          "selected": ["(string)"]
        }
        ```
      </td>
    </tr>

    <tr>
      <td>
        <p>Date Granularity</p>
      </td>

      <td>
        <p>
          Specify a minute interval as <code>minute:\[interval]</code>. The interval is an integer between 1 and 60.
        </p>

        <p>For example: <code>minute:3</code> reports the requested date range in 3-minute intervals.</p>
      </td>
    </tr>

    <tr>
      <td>
        <p>Sort Method (Optional)</p>
      </td>

      <td>
        <p>Enter a string indicating how you want the data to be sorted.</p>
        <p>For example:</p>
        mostpopular:.25:0:linear
      </td>
    </tr>

    <tr>
      <td>
        <p>Add Date Granularity</p>
      </td>

      <td>
        <p>
          Choose whether you would like to aggregate the data by the data granularity specified above or aggregate all
          the data.
        </p>
      </td>
    </tr>

    <tr>
      <td>
        <p>Duration</p>
      </td>

      <td>
        <p>Specify whether the data in this report is for a single date or a range of dates.</p>
      </td>
    </tr>

    <tr>
      <td>
        <p>Report Date</p>
      </td>

      <td>
        <p>
          Select whether the data in the report is for a specific date or for a relative date based on the selected
          <b>Date Granularity</b>.
        </p>

        <p>
          For example, if you selected <b>Date Granularity > Day</b>, you could select <b>Today</b> as your report
          date. Then, each time the data updated, it would show data for the current date.
        </p>
      </td>
    </tr>

    <tr>
      <td>
        <p>Select Specific Date</p>
      </td>

      <td>
        <p>Select the date you want to retrieve data for.</p>
      </td>
    </tr>

    <tr>
      <td>
        <p>Date From</p>
      </td>

      <td>
        <p>
          Specify whether the first date in your date range is a specific or relative date. You select the last date in
          your range in <b>Date To</b>. Options in these menus are determined by the selected <b>Date Granularity</b>.
        </p>

        <p>
          For example, if you selected <b>Date Granularity > Week</b>, you could then select <b>Date From > Last
          Week</b> and <b>Date To > This Week</b>. Each time your report updated, it would then show data for this
          week as well as last week.
        </p>
      </td>
    </tr>

    <tr>
      <td>
        <p>Date To</p>
      </td>

      <td>
        <p>
          Specify whether the last date in your date range is a specific or relative date. You select the first date in
          your range in <b>Date From</b>. Options in these menus are determined by the selected <b>Date Granularity</b>.
        </p>

        <p>
          For example, if you selected <b>Date Granularity > Week</b>, you could then select <b>Date From > Last
          Week</b> and <b>Date To > This Week</b>. Each time your report updated, it would then show data for this
          week as well as last week.
        </p>
      </td>
    </tr>
  </tbody>
</table>

#### "Advanced - Query" Report Type Options

<table border="1" cellpadding="1" cellspacing="1">
  <thead>
    <tr>
      <th colspan="1" rowspan="1"><p> Option </p></th>

      <th colspan="1" rowspan="1">
        <p> Description </p>
      </th>
    </tr>
  </thead>

  <tbody>
    <tr>
      <td colspan="1" rowspan="1">
        <p> Query </p>
      </td>

      <td colspan="1" rowspan="1">
        <p> Enter an Adobe Analytics Web Service API Explorer Query to pull data for your report. For more information about queries, see <a href="https://marketing.adobe.com/developer/api-explorer#Report.Queue" target="_blank" title="https://marketing.adobe.com/developer/api-explorer#Report.Queue"> [https://marketing.adobe.com/develope...r#Report.Queue](https://marketing.adobe.com/develope...r#Report.Queue) </a>. </p><p> For example: </p>

        ```json theme={"dark"}
        {"reportDescription":{
        "reportSuiteID":"thankyoudev",
        "dateFrom":"2014-09-07",
        "dateTo":"2014-09-07",
        "dateGranularity":"Day",
        "elements":[
        {"top":50,
        "selected":[],
        "classifications":[],
        "id":"page",
        "name":"Page"}],
        "metrics":[
        {"decimals":0,
        "id":"pageviews",
        "name":"Page Views"},
        {"decimals":0,
        "id":"visits",
        "name":"Visits"}],
        "segments":[],
        "locale":"en_US"}}
        ```
      </td>
    </tr>
  </tbody>
</table>

### Other Panes

For information about the remaining sections of the connector interface, including how to configure scheduling, retry, and update options, see [Adding a DataSet Using a Connector](https://domo-support.domo.com/s/article/360042926274?language=en_US "Adding a DataSet Using a Connector").

### FAQs

<AccordionGroup>
  <Accordion title="When should I use this connector?">
    Use this connector to pull in real-time data from Adobe Analytics using v1.4 of Adobe's API.
  </Accordion>

  <Accordion title="What's the difference between the Adobe Analytics v2 OAuth and Adobe Analytics Real Time API JWT connectors?">
    The Adobe Analytics v2 OAuth connector uses the OAuth authentication whereas the Adobe Analytics Real Time API JWT connector uses the JWT authentication. Adobe recommends that you use JWT authentication, as you will have to refresh the OAuth account every two weeks because the OAuth refresh token expires.
  </Accordion>

  <Accordion title="What version of the Adobe Analytics API does this connector use?">
    This connector uses version 1.4 of the Adobe Analytics API.
  </Accordion>

  <Accordion title="What kind of credentials do I need to power up this connector?">
    You need the Client ID (API Key), Client Secret, Technical Account ID, Organization ID, and Private Key associated with your Adobe Analytics Real Time API JWT project.
  </Accordion>

  <Accordion title="Are there any API limits that I need to know?">
    No
  </Accordion>

  <Accordion title="Which Adobe Analytics connector should I use?">
    Adobe recommends that you use Adobe Analytics Real Time API JWT authentication. Adobe OAuth refresh tokens expire after two weeks, which requires you to refresh your account.
  </Accordion>
</AccordionGroup>
