> ## Documentation Index
> Fetch the complete documentation index at: https://domoinc-openapi-sync-dataflows.mintlify.site/llms.txt
> Use this file to discover all available pages before exploring further.

# Snowflake Connector

export const InlineImage = ({src, alt = '', height = '1.6em'}) => {
  return <img noZoom src={src} alt={alt} style={{
    display: 'inline',
    verticalAlign: 'start',
    height: height,
    margin: '0'
  }} />;
};

**Note:** **Snowflake will no longer support the username and password authentication mechanism as of November 2025. As a result, this connector will be retired in November 2025 and will no longer function. Please consider using one of the following connection methods instead:**

* [Cloud Amplifier](https://domo-support.domo.com/s/article/4402322966807?language=en_US "Cloud Amplifier")
* [Snowflake Enterprise OAuth Connector](https://domo-support.domo.com/s/article/000005534?language=en_US "Snowflake Enterprise OAuth Connector")
* [Snowflake Key Pair Authentication Connector](https://domo-support.domo.com/s/article/360042931854?language=en_US "Snowflake Key Pair Authentication Connector")
* [Snowflake OAuth Connector](https://domo-support.domo.com/s/article/360061552054?language=en_US "Snowflake OAuth Connector")

## Intro

Snowflake is data warehouse that makes it easy to bring together all your data and make it available to all of the users and systems that need to analyze it. You can use Domo's Snowflake connector to retrieve data from a specified warehouse, database, and database schema by inputting an SQL query. For more information about the Snowflake API, go to [https://docs.snowflake.net/manuals](https://docs.snowflake.net/manuals "https://docs.snowflake.net/manuals").

The Snowflake connector is a "Database" connector, meaning it retrieves data from a database using a query. In the Data Center, you can access the connector page for this and other Database connectors by clicking **Database** in the toolbar at the top of the window.

This topic discusses the fields and menus that are specific to the Snowflake connector user interface. For general information about adding DataSets, setting update schedules, and editing DataSet information, see [Adding a DataSet Using a Connector](https://domo-support.domo.com/s/article/360042926274?language=en_US "Adding a DataSet Using a Connector").

## Prerequisites

To connect to a Snowflake database and create a DataSet, you must have the following:

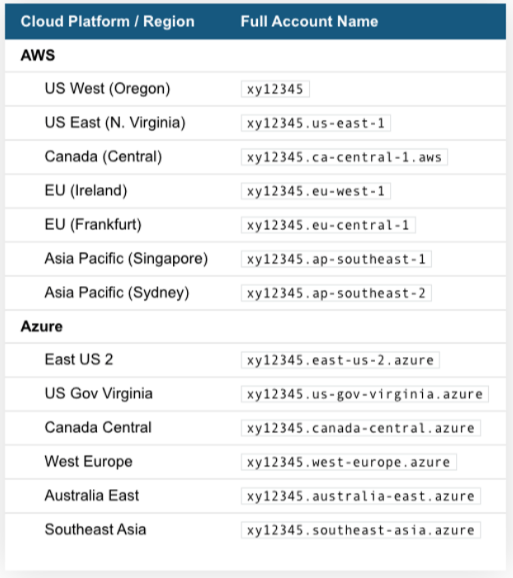
* The full name of your account (provided by Snowflake). This is the portion of your Snowflake URL immediately following
  https\://.

  Note that your full account name may include additional segments that identify the region and cloud platform where your account is hosted. The following table provides account name examples by cloud platform/region. For each row, it assumes your account name is "xy12345."

  <Frame>
    <img alt="snowflake_account_names.png" src="https://mintcdn.com/domoinc-openapi-sync-dataflows/blcgkVgnZv6gj_XY/images/kb/ka05w00000123Kt-00N5w00000Ri7BU-0EM5w000005vO5S.png?fit=max&auto=format&n=blcgkVgnZv6gj_XY&q=85&s=94e8a1fb7fbd352130ec6ddef81336bf" width="513" height="578" data-path="images/kb/ka05w00000123Kt-00N5w00000Ri7BU-0EM5w000005vO5S.png" />
  </Frame>

* The username and password for your Snowflake account.

## Connecting to Your Snowflake Account

This section enumerates the options in the **Credentials** and **Details** panes in the Snowflake Connector page. The components of the other panes in this page, **Scheduling** and **Name & Describe Your DataSet**, are universal across most connector types and are discussed in greater length in [Adding a DataSet Using a Connector](https://domo-support.domo.com/s/article/360042926274?language=en_US "Adding a DataSet Using a Connector").

### Credentials Pane

This pane contains fields for entering credentials to connect to your Snowflake account. The following table describes what is needed for each field:

<table border="1" cellpadding="1" cellspacing="1" data-aura-rendered-by="33:195;a"><thead><tr><th colspan="1" rowspan="1"><p> Field </p></th><th colspan="1" rowspan="1"><p> Description </p></th></tr></thead><tbody><tr><td colspan="1" rowspan="1"><p> Account Name </p></td><td colspan="1" rowspan="1"><p> Enter the name of your account (provided by Snowflake). For US West Region <b> account\_name </b>, and All other regions <b> account\_name.region\_id </b>. </p></td></tr><tr><td colspan="1" rowspan="1"><p> Host </p></td><td colspan="1" rowspan="1"><p> Enter the Host name (provided by Snowflake). For example, <a href="http://snowflakecomputing.com" rel="noopener" target="_blank"> snowflakecomputing.com </a><b>, </b><a href="http://snowflakecomputing.cn" rel="noopener" target="_blank"> snowflakecomputing.cn </a></p></td></tr><tr><td colspan="1" rowspan="1"><p> Username </p></td><td colspan="1" rowspan="1"><p> Enter the username associated with your Snowflake account. </p></td></tr><tr><td colspan="1" rowspan="1"><p> Password </p></td><td colspan="1" rowspan="1"><p> Enter the password associated with your Snowflake account. </p></td></tr><tr><td colspan="1" rowspan="1"><p> Role </p></td><td colspan="1" rowspan="1"><p> Enter your role. </p></td></tr></tbody></table>

After you have entered valid Snowflake credentials, you can use the same account in Domo any time you create a Snowflake DataSet. You can manage connector accounts in the **Accounts** tab in the Data Center. For more information about this tab, see [Manage Connector/Adapter Accounts](https://domo-support.domo.com/s/article/360042926054?language=en_US "Manage Connector/Adapter Accounts").

### Details Pane

This pane contains a number of fields and menus for entering your SQL query and specifying the location of the data you want to retrieve.

<table border="1" cellpadding="1" cellspacing="1" data-aura-rendered-by="33:195;a"><thead><tr><th colspan="1" rowspan="1"><p> Parameter </p></th><th colspan="1" rowspan="1"><p> Description </p></th></tr></thead><tbody><tr><td colspan="1" rowspan="1"><p> Query Type </p></td><td colspan="1" rowspan="1"><p> Select the query type. </p><table border="1"><tbody><tr><td colspan="1" rowspan="1"> Enter Query </td><td colspan="1" rowspan="1"> It enables an option to enter the user defined query. </td></tr><tr><td colspan="1" rowspan="1"> Query History </td><td colspan="1" rowspan="1"> It will fetch the data from the Snowflake query history for the last 70 days using the predefined query. </td></tr><tr><td colspan="1" rowspan="1"> Table Information </td><td colspan="1" rowspan="1"> It will fetch the metadata information about the objects created in your account. </td></tr><tr><td colspan="1" rowspan="1"> Warehouse Metering History </td><td colspan="1" rowspan="1"> It will fetch the warehouse usage and metering information for the last 70 days. </td></tr></tbody></table></td></tr><tr><td colspan="1" rowspan="1"><p> Query </p></td><td colspan="1" rowspan="1"><p> Enter the SQL query to use to retrieve your data. You can use the <b> Query Helper </b> parameter to help you write a usable SQL query. To use the <b> Query Helper </b>, do the following: </p><ol><li><p> Select your desired warehouse, database, database schema, database table, and table columns in each menu. </p></li><li><p> Copy the SQL statement that appears in the <b> Query Helper </b> field. </p></li><li><p> Paste the copied SQL statement into the <b> Query </b> field. </p></li></ol></td></tr><tr><td colspan="1" rowspan="1"><p> Warehouses </p></td><td colspan="1" rowspan="1"><p> Select the warehouse containing the data you want to retrieve. The list populates with all of the warehouses you have access to based on your credentials. </p></td></tr><tr><td colspan="1" rowspan="1"><p> Databases </p></td><td colspan="1" rowspan="1"><p> Select the database containing the data you want to retrieve. The list populates with all of the databases you have access to based on your credentials. </p></td></tr><tr><td colspan="1" rowspan="1"><p> Database Schema </p></td><td colspan="1" rowspan="1"><p> Select the database schema containing the data you want to retrieve. The list populates with all of the schemas you have access to based on your credentials. </p></td></tr><tr><td colspan="1" rowspan="1"><p> Database Objects </p></td><td colspan="1" rowspan="1"><p> Select the database object from the drop-down list. </p></td></tr><tr><td colspan="1" rowspan="1"><p> Database Tables (Optional) </p></td><td colspan="1" rowspan="1"><p> Select the database table you want to retrieve. The list populates with all of the tables you have access to based on your credentials. If you do not select a database table, the connector retrieves your entire database schema. </p></td></tr><tr><td colspan="1" rowspan="1"><p> Table Columns (Optional) </p></td><td colspan="1" rowspan="1"><p> Select the table columns you want to retrieve. The list populates with all of the columns you have access to based on your credentials. If you do not select a table column, the connector retrieves your entire selected database table. </p></td></tr><tr><td colspan="1" rowspan="1"><p> Query Helper (Optional) </p></td><td colspan="1" rowspan="1"><p> When you select warehouses, databases, schemas, tables, etc. from the above menus, a usable SQL query is built for you in this field. Copy and paste the SQL statement in this field into the <b> Query </b> field. For more information, see the entry for <b> Query </b>, above. </p></td></tr><tr><td colspan="1" rowspan="1"><p> Database Views </p></td><td colspan="1" rowspan="1"><p> Select the database view. </p></td></tr><tr><td colspan="1" rowspan="1"><p> View Columns </p></td><td colspan="1" rowspan="1"><p> Select which view columns you want to include in your report. </p></td></tr><tr><td colspan="1" rowspan="1"> Fetch Size (Optional) </td><td colspan="1" rowspan="1"> Enter a fetch size for memory performance. If this field is left blank, the default value of 1000 will be used. If the DataSet throws an "Out of memory" error, try decreasing the fetch size. </td></tr><tr><td colspan="1" rowspan="1"> Convert BIGINT to LONG </td><td colspan="1" rowspan="1"> Select this checkbox if you want to convert BIGINT columns to LONG. </td></tr><tr><td colspan="1" rowspan="1"> Disable NetWork Timeout </td><td colspan="1" rowspan="1"> Select this checkbox if you observe errors regarding network timeout. </td></tr><tr><td colspan="1" rowspan="1"> Query Tag </td><td colspan="1" rowspan="1"> This is an optional parameter that can be used to tag connector SQL executions in Snowflake as a <b> Query Tag </b>. </td></tr><tr><td colspan="1" rowspan="1"> Convert Columns to String </td><td colspan="1" rowspan="1"> Enter the column names separated by comma to convert the columns to string. For example, column1, column2, column3. </td></tr></tbody></table>

### <InlineImage src="/images/kb/ka0Vq000000FV1t-00N5w00000Ri7BU-0EM5w000005vO5s.png" /> Other Panes

For information about the remaining sections of the connector interface, including how to configure scheduling, retry, and update options, see [Adding a DataSet Using a Connector](https://domo-support.domo.com/s/article/360042926274?language=en_US "Adding a DataSet Using a Connector").

## FAQs

<AccordionGroup>
  <Accordion title="When should I use this connector?">
    This connector allows you to import your data into Domo from Snowflake using Snowflake's JDBC drivers. Use this connector with a Snowflake Account Name, local username, and password to ingest small to large datasets from Snowflake.
  </Accordion>

  <Accordion title="What permissions do I need on Snowflake?">
    You need the CREATE TABLE, COPY INTO, PUT, CREATE FILE FORMAT, REMOVE, and LIST permissions on Snowflake.
  </Accordion>

  <Accordion title="What kind of credentials do I need to power up this connector?">
    You need the account name (provided by Snowflake), your Snowflake username, and private key. If you are creating an encrypted private key then you will need a passphrase used to encrypt the private key file. You can also provide your role name.
  </Accordion>

  <Accordion title="Can I use the same account to create multiple datasets?">
    Yes
  </Accordion>

  <Accordion title="How do I find the Input Dataset ID?">
    Your Domo input dataset ID is in the URL of the dataset you are exporting data from. For example:
    `https://customer.domo.com/datasources/aaaaaaaa-bbbb-cccc-dddd-eeeeeeeeeeee/details/settings`
  </Accordion>

  <Accordion title="Are there any API limits I should be aware of?">
    This depends on your server configuration.
  </Accordion>

  <Accordion title="How frequently will my data update?">
    DataSets can run as often as every 15 minutes. However, depending on the runtime of the query, DataSets may need to run less frequently.
  </Accordion>

  <Accordion title="What should I be aware of while writing a query?">
    Make sure that all the words, table names, and field names are correctly spelled. Refer to the Query Helper field for query help.
  </Accordion>

  <Accordion title="Why can't I connect to my Snowflake database? Do I need to whitelist any IP addresses?">
    Before you can connect to a Snowflake database, you must also whitelist a number of IP addresses on your database server on the port you want to connect to. For the full list of IP addresses, see [Whitelisting IP Addresses for Connectors & Federated Adapters.](/s/article/360043630093 "Whitelisting IP Addresses for Connectors & Federated Adapters.")
  </Accordion>

  <Accordion title="Is this a Production-level connector?">
    Yes. This connector is designed for all-sized DataSets.
  </Accordion>

  <Accordion title="Why are the lists of warehouses, databases, schemas, etc. not populating correctly?">
    You only see content that you have access to based on the user role entered for your account in Snowflake. If you aren’t seeing something you are expecting, make sure that role has access to that warehouse, database, and table. etc.

    If you do not enter a role in Snowflake, the SYSADMIN role is used by default.
  </Accordion>

  <Accordion title="How do I get a client id and secret to use with this connector?">
    This connector uses Snowflake's built-in OAuth service. To get a client id and secret to use with this connector, you will need to create a security integration in Snowflake as described here: [https://docs.snowflake.com/en/user-guide/oauth-custom](https://docs.snowflake.com/en/user-guide/oauth-custom "https://docs.snowflake.com/en/user-guide/oauth-custom").

    When creating the integration, use the following for the OAUTH\_REDIRECT\_URI: [https://oauth.domo.com/api/data/v1/oauth/providers/snowflake-oauth/exchange](https://oauth.domo.com/api/data/v1/oauth/providers/snowflake-oauth/exchange "https://oauth.domo.com/api/data/v1/oauth/providers/snowflake-oauth/exchange").
  </Accordion>

  <Accordion title="Do I need to share the client id and secret with each user who wants to use this connector?">
    Yes, this connector requires each user who powers up the connector to provide the client id and secret. An alternative to this connector is the [Snowflake Enterprise OAuth Connector](https://domo-support.domo.com/s/article/000005534?language=en_US "Snowflake Enterprise OAuth Connector"). This connector enables Major Domos to save a client id and secret pair, which users can reference when powering this connector.
  </Accordion>
</AccordionGroup>
