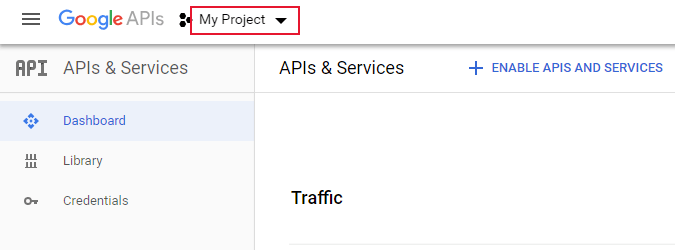
 3. Click
**New Project**.
3. Click
**New Project**.
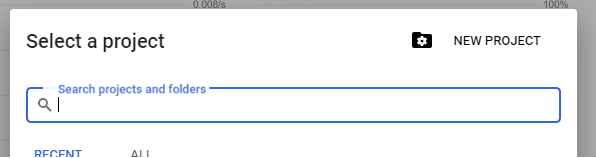 4. Name your project and select the parent folder.
5. Click
**Create**.
4. Name your project and select the parent folder.
5. Click
**Create**.
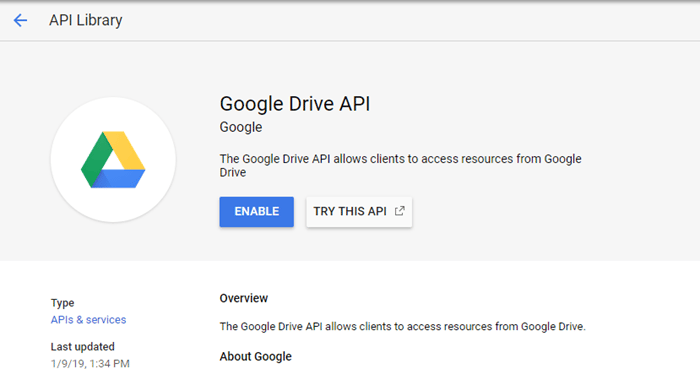
 2. Search for the Google Drive API.
3. Click
**Enable**.
2. Search for the Google Drive API.
3. Click
**Enable**.
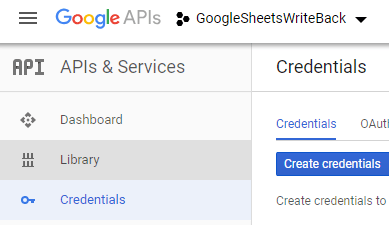
 ### Step 3: Creating a Service Account
To create a Service Account, do the following:
1. In the Google Developers Console, open the
**Credentials** tab.
2. Click
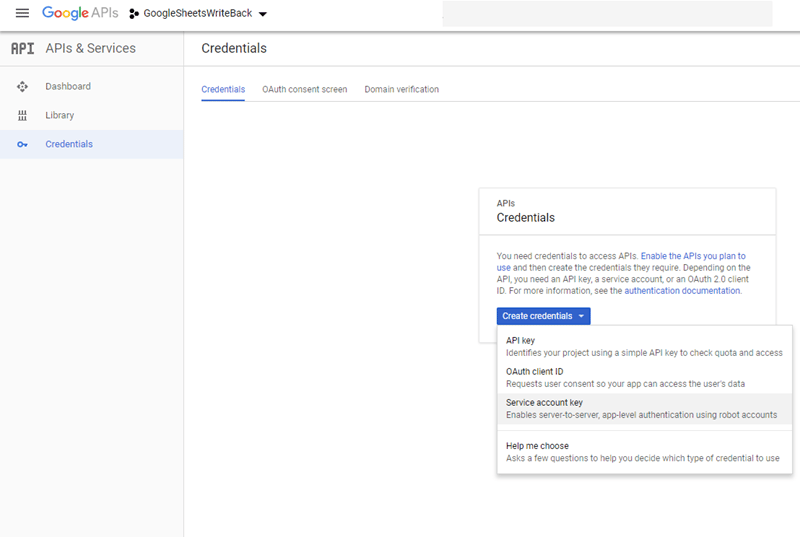
**Create credentials** then select **Service account key**.
### Step 3: Creating a Service Account
To create a Service Account, do the following:
1. In the Google Developers Console, open the
**Credentials** tab.
2. Click
**Create credentials** then select **Service account key**.
 3. Select
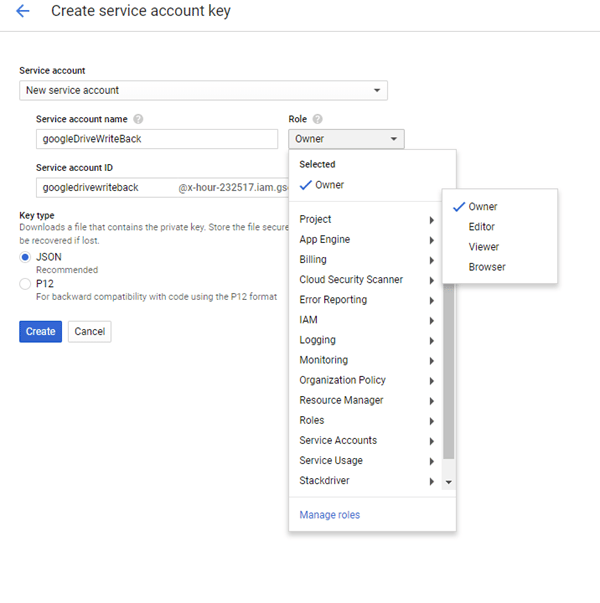
**New service account**.
4. Name the new service account.
5. In the
**Role** dropdown, select **Project > Owner**.
6. For the
**Key type**, select **JSON**.
3. Select
**New service account**.
4. Name the new service account.
5. In the
**Role** dropdown, select **Project > Owner**.
6. For the
**Key type**, select **JSON**.
 7. Click
**Create**, then **Save**.
8. Select a safe location for the file, as you will need it soon.
9. Once the file is created, click
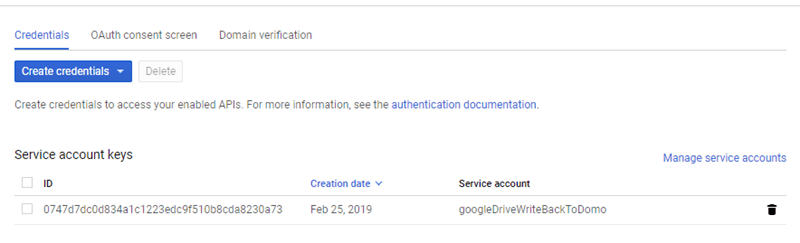
**Manage service accounts** on the far right.
7. Click
**Create**, then **Save**.
8. Select a safe location for the file, as you will need it soon.
9. Once the file is created, click
**Manage service accounts** on the far right.
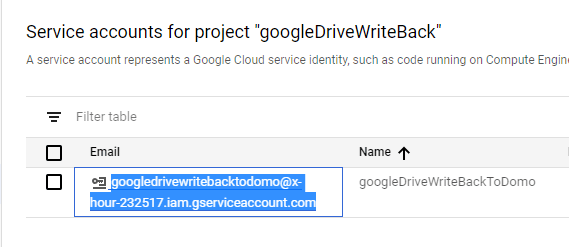
 10. Copy the email address for the project you created.
 11. Log into the Google Drive account ([https://www.google.com/drive](https://www.google.com/drive "https://www.google.com/drive") ) in which you want to save the files.
12. Create a new Google Drive folder.
11. Log into the Google Drive account ([https://www.google.com/drive](https://www.google.com/drive "https://www.google.com/drive") ) in which you want to save the files.
12. Create a new Google Drive folder.
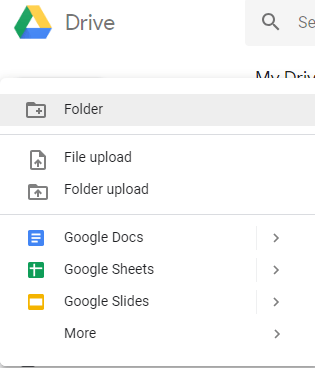 13. Go into the new folder and share it with the email address you copied in step 10.
14. Copy the URL into the folder, as you will need to refer to it later. It will look something like this:
[https://drive.google.com/drive/folders/1TOdpy2kki8-pealAGXWwCYF8EyiwxWMW](https://drive.google.com/drive/folders/1TOdpy2kki8-pealAGXWwCYF8EyiwxWMW)
### Step 4: Creating a Domo Client ID and Client Secret
To create a Domo client ID and client secret, do the following:
1. Navigate to [https://developer.domo.com](https://developer.domo.com "https://developer.domo.com") and log in.
2. Click
**New Client** (found under "My Account" in the top right corner).
3. Create a new client with Application Scopes of
**Data** and **User**.
13. Go into the new folder and share it with the email address you copied in step 10.
14. Copy the URL into the folder, as you will need to refer to it later. It will look something like this:
[https://drive.google.com/drive/folders/1TOdpy2kki8-pealAGXWwCYF8EyiwxWMW](https://drive.google.com/drive/folders/1TOdpy2kki8-pealAGXWwCYF8EyiwxWMW)
### Step 4: Creating a Domo Client ID and Client Secret
To create a Domo client ID and client secret, do the following:
1. Navigate to [https://developer.domo.com](https://developer.domo.com "https://developer.domo.com") and log in.
2. Click
**New Client** (found under "My Account" in the top right corner).
3. Create a new client with Application Scopes of
**Data** and **User**.
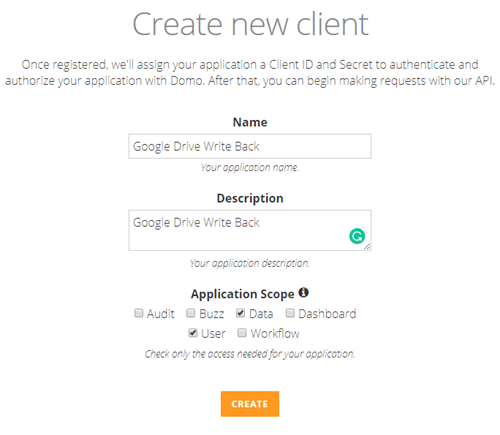 When you click **Create**, you will be redirected to the client ID and client secret.
4. Copy the client ID and client secret, as you will need them soon.
## Configuring the Connection
This section enumerates the options in the **Credentials** and **Details** panes in the Google Drive Writeback Connector page. The components of the other panes in this page, **Scheduling** and **Name & Describe Your DataSet**, are universal across most connector types and are discussed in greater length in [Adding a DataSet Using a Data Connector](/s/article/360042926274 "Adding a DataSet Using a Data Connector").
### Credentials Pane
This pane contains fields for entering credentials to connect to your Domo developer account as well as your Google Drive destination folder. The following table describes what is needed for each field:
When you click **Create**, you will be redirected to the client ID and client secret.
4. Copy the client ID and client secret, as you will need them soon.
## Configuring the Connection
This section enumerates the options in the **Credentials** and **Details** panes in the Google Drive Writeback Connector page. The components of the other panes in this page, **Scheduling** and **Name & Describe Your DataSet**, are universal across most connector types and are discussed in greater length in [Adding a DataSet Using a Data Connector](/s/article/360042926274 "Adding a DataSet Using a Data Connector").
### Credentials Pane
This pane contains fields for entering credentials to connect to your Domo developer account as well as your Google Drive destination folder. The following table describes what is needed for each field:
Field | Description |
|---|---|
Domo Client ID | Paste the Domo client ID you copied in Step 4: Creating a Domo Client ID and Client Secret, in the "Prerequisites" section above. |
Domo Client Secret | Paste the Domo client secret you copied in Step 4: Creating a Domo Client ID and Client Secret, in the "Prerequisites" section above. |
Service Token JSON | Paste the JSON Service Token you generated in Step 3: Creating a Service Account, in the "Prerequisites," above. |
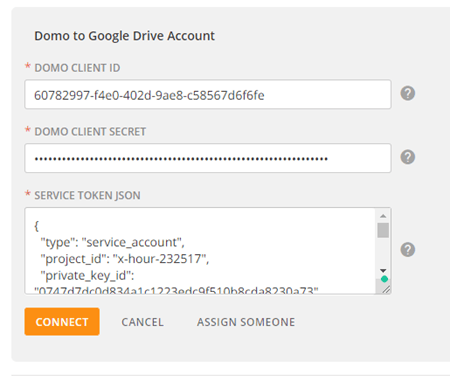 Once you have entered valid credentials, you can use the same account any time you go to set up a new Domo-Google Drive connection. You can manage connector accounts in the **Accounts** tab in the Data Center. For more information about this tab, see [Managing User Accounts for Connectors](/s/article/360042926054 "Managing User Accounts for Connectors").
### Details Pane
This pane contains a number of fields for specifying your data and indicating where it's going.
Once you have entered valid credentials, you can use the same account any time you go to set up a new Domo-Google Drive connection. You can manage connector accounts in the **Accounts** tab in the Data Center. For more information about this tab, see [Managing User Accounts for Connectors](/s/article/360042926054 "Managing User Accounts for Connectors").
### Details Pane
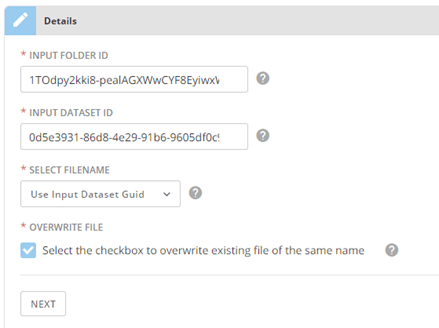
This pane contains a number of fields for specifying your data and indicating where it's going.
Menu | Description |
|---|---|
Input Folder ID | Enter the ID of the Google Drive folder you want to push your data to (which you should have copied in Step 3: Creating a Service Account, above). This is the portion of the URL after the last / . For example, in the URL [https://drive.google.com/drive/folders/1TOdpy2kki8-pealAGXWwCYF8EyiwxWMW](https://drive.google.com/drive/folders/1TOdpy2kki8-pealAGXWwCYF8EyiwxWMW) , the ID is 1TOdpy2kki8-pealAGXWwCYF8EyiwxWMW . |
Input DataSet ID | Enter the DataSet ID (GUID) for the DataSet you want to copy to Google Drive. You can find the ID by opening the details view for the DataSet in the Data Center and looking at the portion of the URL following datasources/ . For example, in the URL [https://mycompany.domo.com/datasources/845305d8-da3d-4107-a9d6-13ef3f86d4a4/details/overview](https://mycompany.domo.com/datasources/845305d8-da3d-4107-a9d6-13ef3f86d4a4/details/overview) , the DataSet ID is 845305d8-da3d-4107-a9d6-13ef3f86d4a4. |
Select Filename | Select whether you want to reference your DataSet using the Input DataSet ID or an output file name. |
Filename | Enter the output file name for your data. |
Overwrite File | Check this box if you want to overwrite existing files of the same name. |
 ### Other Panes
For information about the remaining sections of the connector interface, including how to configure scheduling, retry, and update options, see [Adding a DataSet Using a Data Connector](/s/article/360042926274 "Adding a DataSet Using a Data Connector").
### Other Panes
For information about the remaining sections of the connector interface, including how to configure scheduling, retry, and update options, see [Adding a DataSet Using a Data Connector](/s/article/360042926274 "Adding a DataSet Using a Data Connector").