Connect to Domo | Lets you connect to a specified Domo instance. You can be connected to multiple instances at once. If you are already connected to an instance, this button reads Connected . In this case, you can add new connections or delete connections using this option. |
Server Menu | Lets you select the connected Domo server you want to retrieve data from. Only appears if you have connected to more than one server. |
Search Field | Lets you search for Cards or pages in the connected Domo instance. |
Add Custom Query Table | Lets you import subsets of DataSets or single values into Word, based on aggregates, filters, limits, etc. Query tables are discussed in more detail later in this topic. |
Pages/Subpages | Provide access to the Cards and/or subpages located under them. Indicated using the icon. |
Cards | Let you open Cards in the sidebar, broken down into their individual components (such as visual content, summary number, etc.), which you can drag into your Word document as desired. Indicated using the icon. |
Apply Page Filters | Determines whether page filters are applied to the pages listed in the sidebar. |
Refresh Button
| Allows you to refresh the list of pages appearing in the sidebar. |
 The **add-in** displays this way:
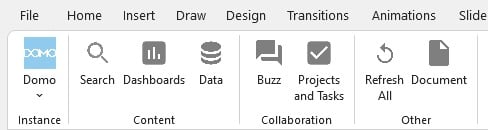 The Domo Microsoft Office **add-ins** support Excel, PowerPoint, and Word (Domo for Office); and Outlook (Domo for Outlook). With the **add-ins**, you receive the latest functionality as soon as it's released.
Download the **add-ins** from Microsoft AppSource using these links:
* [Domo for Office](https://appsource.microsoft.com/en-US/product/office/WA200005264?exp=ubp8)
* [Domo for Outlook](https://appsource.microsoft.com/en-US/product/office/WA200005307?exp=ubp8\&tab=Overview)
Learn more in our [Domo Add-ins for Microsoft 365 Apps User Guide](/s/article/000005143).
Learn how to [convert content](/s/article/000005409) inserted by plugins to work with the Domo add-ins.
The Domo Microsoft Office **add-ins** support Excel, PowerPoint, and Word (Domo for Office); and Outlook (Domo for Outlook). With the **add-ins**, you receive the latest functionality as soon as it's released.
Download the **add-ins** from Microsoft AppSource using these links:
* [Domo for Office](https://appsource.microsoft.com/en-US/product/office/WA200005264?exp=ubp8)
* [Domo for Outlook](https://appsource.microsoft.com/en-US/product/office/WA200005307?exp=ubp8\&tab=Overview)
Learn more in our [Domo Add-ins for Microsoft 365 Apps User Guide](/s/article/000005143).
Learn how to [convert content](/s/article/000005409) inserted by plugins to work with the Domo add-ins.
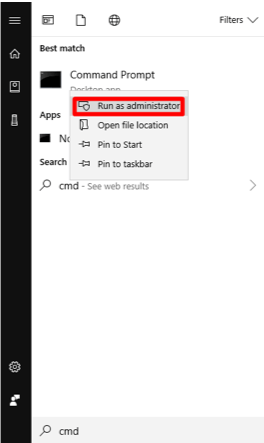 5. Navigate to the Domo Word Plugin download from your Admin Portal > Tool Downloads
6. In the command line terminal, run a command line using the file pathway that points to the Domo Word Plugin downloaded file similar to this:
5. Navigate to the Domo Word Plugin download from your Admin Portal > Tool Downloads
6. In the command line terminal, run a command line using the file pathway that points to the Domo Word Plugin downloaded file similar to this: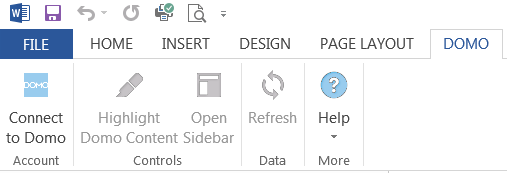 The following table describes the components of this tab:
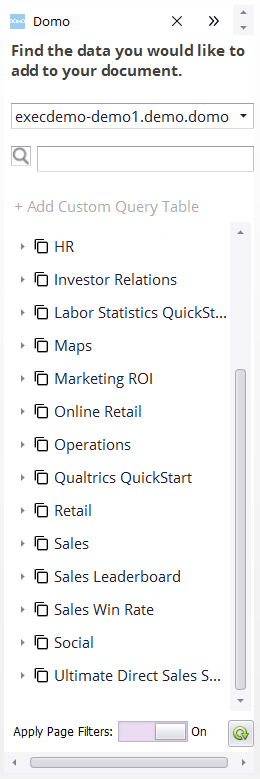 The following table describes the components of the sidebar:
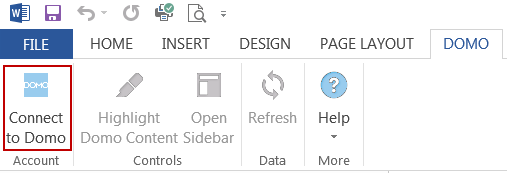 A dialog appears requesting that you add a connection.
2. Click the "+" button in the left pane.
3. Enter the URL for your Domo server in the field, then click **Authenticate**.
A dialog appears requesting that you add a connection.
2. Click the "+" button in the left pane.
3. Enter the URL for your Domo server in the field, then click **Authenticate**.
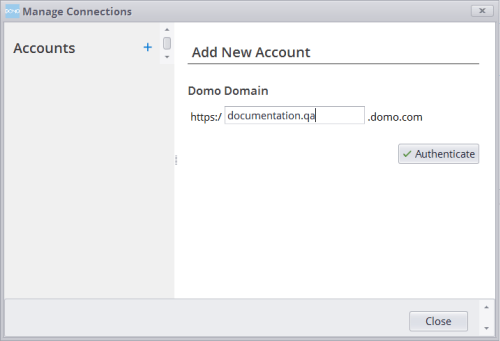 If you are already logged into the specified instance, you are authenticated automatically. Otherwise, a browser window opens prompting you to enter your credentials for the specified instance.
4. (Conditional) Enter your Domo credentials for the specified instance if prompted to do so.
You must have an "Admin" or "Privileged" security profile to connect.
If you have entered your credentials correctly, a checkmark appears next to the account name in the **Manage Connections** pane.
5. Click **Close**.
# Delete a Server Connection
You can delete a connection to a server in the same dialog in which you add a server connection.
**To delete a server connection,**
1. Click the **Connected** button on the left side of the Domo tab in Word.
2. Select the server you want to disconnect from.
3. Click **Delete.**
4. Click **Yes** to confirm the deletion.
# Test or Reauthorize Server Connections
If you need to reauthorize a connection for a server or test all of your connections, you can do so in the **Manage Connections** dialog.
**To test or reauthorize server connections,**
1. Click the **Connected** button on the left side of the Domo tab in Word.
2. Do one of the following:
* To test your connections, click **Test Connections**.
* To reauthorize a server, select the server you want to reauthorize, then click **Reauthorize**.
# Import Card Content into Word
After you have connected to a Domo server, you can import Visualization Card content from any page in that instance to which you have access. You do this by selecting the page and Card in the sidebar then choosing the components of the Card you want to import.
**To import Card content into Word,**
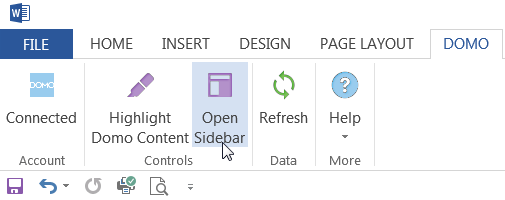
1. (Conditional) Open the sidebar if it is not open already, by clicking **Open Sidebar** in the Domo tab at the top of the screen.
If you are already logged into the specified instance, you are authenticated automatically. Otherwise, a browser window opens prompting you to enter your credentials for the specified instance.
4. (Conditional) Enter your Domo credentials for the specified instance if prompted to do so.
You must have an "Admin" or "Privileged" security profile to connect.
If you have entered your credentials correctly, a checkmark appears next to the account name in the **Manage Connections** pane.
5. Click **Close**.
# Delete a Server Connection
You can delete a connection to a server in the same dialog in which you add a server connection.
**To delete a server connection,**
1. Click the **Connected** button on the left side of the Domo tab in Word.
2. Select the server you want to disconnect from.
3. Click **Delete.**
4. Click **Yes** to confirm the deletion.
# Test or Reauthorize Server Connections
If you need to reauthorize a connection for a server or test all of your connections, you can do so in the **Manage Connections** dialog.
**To test or reauthorize server connections,**
1. Click the **Connected** button on the left side of the Domo tab in Word.
2. Do one of the following:
* To test your connections, click **Test Connections**.
* To reauthorize a server, select the server you want to reauthorize, then click **Reauthorize**.
# Import Card Content into Word
After you have connected to a Domo server, you can import Visualization Card content from any page in that instance to which you have access. You do this by selecting the page and Card in the sidebar then choosing the components of the Card you want to import.
**To import Card content into Word,**
1. (Conditional) Open the sidebar if it is not open already, by clicking **Open Sidebar** in the Domo tab at the top of the screen.
 2. (Optional) If you have connected to more than one Domo server, select the server you want to retrieve data from in the menu at the top of the sidebar.
3. In the sidebar, locate the page containing the content you want to import into Word, either by scrolling down the list (pages are shown in alphabetical order) or by entering the page name in the **Search** field.
Pages in the sidebar are indicated using the
2. (Optional) If you have connected to more than one Domo server, select the server you want to retrieve data from in the menu at the top of the sidebar.
3. In the sidebar, locate the page containing the content you want to import into Word, either by scrolling down the list (pages are shown in alphabetical order) or by entering the page name in the **Search** field.
Pages in the sidebar are indicated using the 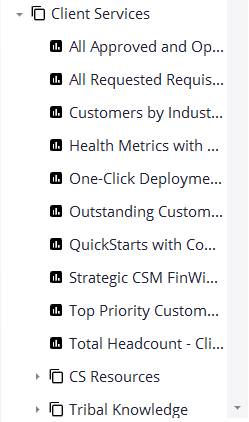 5. Click a Card name in the sidebar to display all of the individual components of that Card.
In the following screenshot, the user has clicked on a Card called "RT: Customer Satisfaction."
5. Click a Card name in the sidebar to display all of the individual components of that Card.
In the following screenshot, the user has clicked on a Card called "RT: Customer Satisfaction."
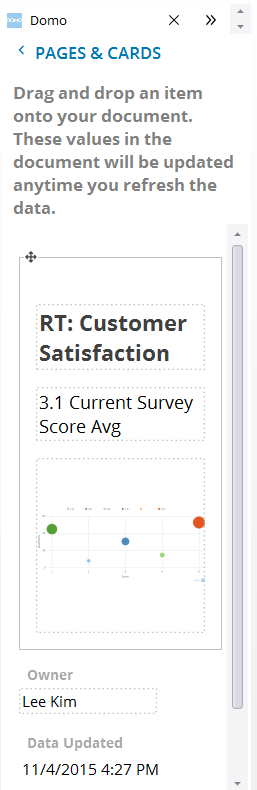 6. Drag the desired components into your Word document.
You can pull over the Card name, summary number, and visual content as a group by clicking anywhere outside the dotted lines in the large rectangle (the empty space will turn blue when you mouse over it) and dragging into your Word document.
6. Drag the desired components into your Word document.
You can pull over the Card name, summary number, and visual content as a group by clicking anywhere outside the dotted lines in the large rectangle (the empty space will turn blue when you mouse over it) and dragging into your Word document.
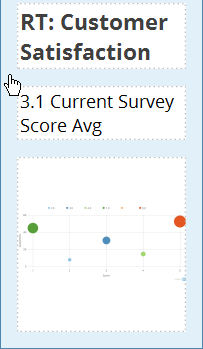 You can also pull any of these individually by clicking within the dotted lines for the component and dragging it. The Card owner, last update date/time, and last modified date/time can *only* be pulled individually.
7. (Optional) After you have dragged all the desired components into your Word document, you can highlight them as Domo content by clicking **Highlight Domo Content** in the **Domo** tab.
You can also pull any of these individually by clicking within the dotted lines for the component and dragging it. The Card owner, last update date/time, and last modified date/time can *only* be pulled individually.
7. (Optional) After you have dragged all the desired components into your Word document, you can highlight them as Domo content by clicking **Highlight Domo Content** in the **Domo** tab.
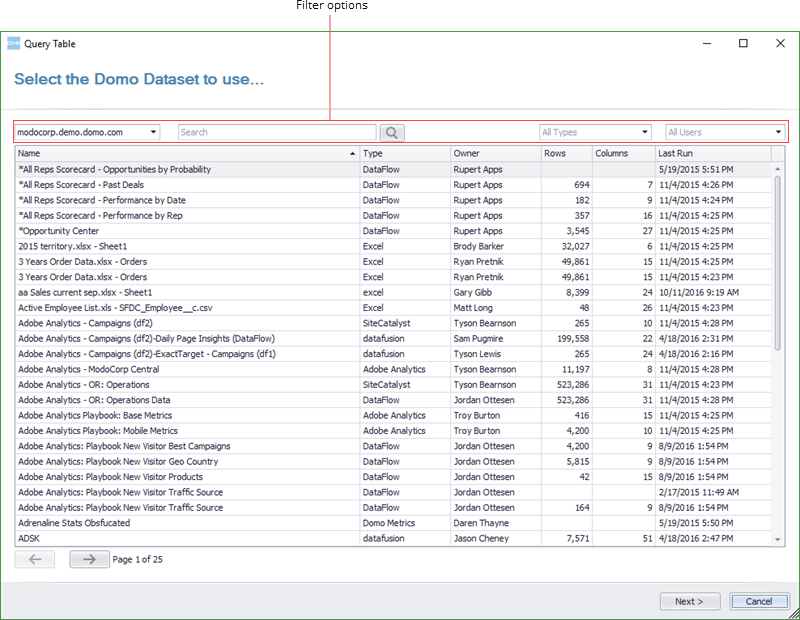 A dialog opens in which you can set filters, aggregate, select or deselect columns, and change the order of columns. A preview is provided so you can see changes you have made to the selected data.
3. Enter a name for the query table in the field at the top of the **DataSets** tab.
4. (Optional) Configure filters as follows:
1. Click the **Filter** tab if it is not open already.
2. In the first dropdown, select the column you want to filter.
3. In the second dropdown, select the comparison for the filter.
4. In the last dropdown, enter the value for the condition.
5. Click **R** **efresh** to show the changes in the query table.
A dialog opens in which you can set filters, aggregate, select or deselect columns, and change the order of columns. A preview is provided so you can see changes you have made to the selected data.
3. Enter a name for the query table in the field at the top of the **DataSets** tab.
4. (Optional) Configure filters as follows:
1. Click the **Filter** tab if it is not open already.
2. In the first dropdown, select the column you want to filter.
3. In the second dropdown, select the comparison for the filter.
4. In the last dropdown, enter the value for the condition.
5. Click **R** **efresh** to show the changes in the query table.
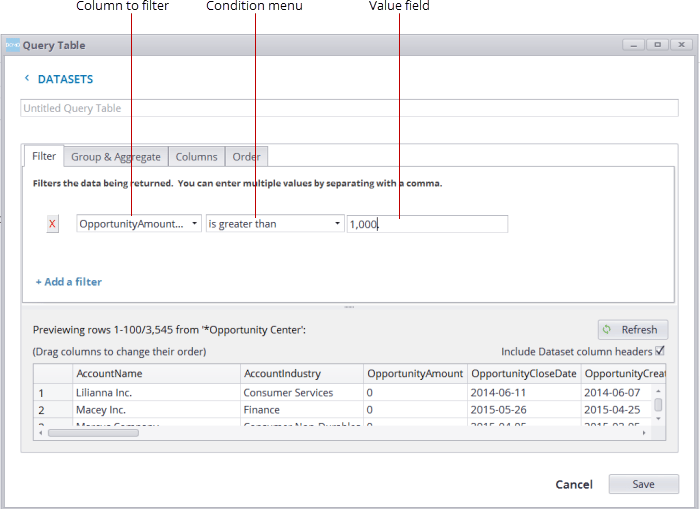 For example, if you wanted your query table to show only those rows in which your number of daily visitors is less than 20, you would select "Daily Visitors" in the first dropdown, select **is less than** in the second dropdown, and enter 20 in the last dropdown.
You can add additional filters by clicking **Add a filter** then repeating the previous step.
5. (Optional) To group a column (which combines all like rows in the column into a single row and aggregates the values in that row), do the following:
1. Click the **Group & Aggregate** tab.
2. In the menu on the left side of the tab, select the column you want to group.
3. Click **R** **efresh** to show the changes in the query table.
The following screenshot shows a preview of a DataSet that has not been grouped. Each "AccountName" row has its own unique values. For example, the account called "Parker, Inc." has an "OpportunityAmount" of 9,125.
For example, if you wanted your query table to show only those rows in which your number of daily visitors is less than 20, you would select "Daily Visitors" in the first dropdown, select **is less than** in the second dropdown, and enter 20 in the last dropdown.
You can add additional filters by clicking **Add a filter** then repeating the previous step.
5. (Optional) To group a column (which combines all like rows in the column into a single row and aggregates the values in that row), do the following:
1. Click the **Group & Aggregate** tab.
2. In the menu on the left side of the tab, select the column you want to group.
3. Click **R** **efresh** to show the changes in the query table.
The following screenshot shows a preview of a DataSet that has not been grouped. Each "AccountName" row has its own unique values. For example, the account called "Parker, Inc." has an "OpportunityAmount" of 9,125.
 If the user then selects "AccountIndustry" as the group by column, all of the like rows under "Account Industry" are combined, and all other columns are aggregated. This is shown in the following screenshot. Note that the "AccountName" column is given an aggregation of COUNT because the items in that column were strings, e.g. there were 555 accounts with an "AccountIndustry" of "Consumer Services." "OpportunityAmount," on the other hand, contained values, which can be summed to yield totals for each account industry.
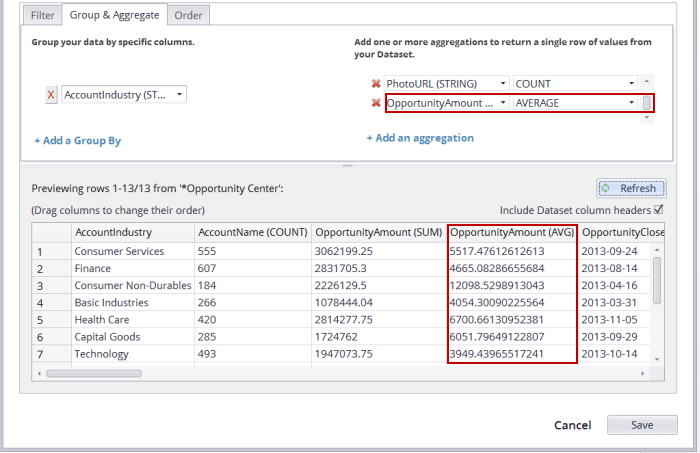
 Each data type has a default aggregation when grouping. Strings are counted, values are summed, and dates receive an aggregation of MIN (meaning the earliest date is shown). Though there is no way to change the aggregation for a column, if you want to see a particular column aggregated differently, you can do so by adding an aggregation using the menus on the right side of the tab. For example, if the user in the previous example wants to show the average "OpportunityAmount" for each industry, he can do so by choosing "OpportunityAmount" as the column to be aggregated and AVERAGE as the aggregation type. This is shown in the following screenshot, in which a new "OpportunityAmount (AVG)" column has been added.
 You can add additional groupings and aggregations by clicking **Add a Group By** and **Add an aggregation**, respectively.
Be aware that you can only add new aggregation columns in this way after specifying a grouping. If you add an aggregation without first doing a grouping, the data in your DataSet is consolidated into a single value, as explained in the next step.
6. (Optional) To aggregate your DataSet data into a single value (which is only possible if you haven't grouped columns as explained in step 5):
1. Click the **Group & Aggregate** tab.
2. In the first menu on the right side of the tab, select the column you want to aggregate.
3. In the second menu on the right side of the tab, select the desired aggregation.
For best results, choose "COUNT" or "DISTINCT COUNT" for string columns; "SUM," "MIN," "MAX," or "AVERAGE" for data columns; and "MIN" or "MAX" for date columns.
4. Click **R** **efresh** to show the changes in the query table.
You can add additional groupings and aggregations by clicking **Add a Group By** and **Add an aggregation**, respectively.
Be aware that you can only add new aggregation columns in this way after specifying a grouping. If you add an aggregation without first doing a grouping, the data in your DataSet is consolidated into a single value, as explained in the next step.
6. (Optional) To aggregate your DataSet data into a single value (which is only possible if you haven't grouped columns as explained in step 5):
1. Click the **Group & Aggregate** tab.
2. In the first menu on the right side of the tab, select the column you want to aggregate.
3. In the second menu on the right side of the tab, select the desired aggregation.
For best results, choose "COUNT" or "DISTINCT COUNT" for string columns; "SUM," "MIN," "MAX," or "AVERAGE" for data columns; and "MIN" or "MAX" for date columns.
4. Click **R** **efresh** to show the changes in the query table.
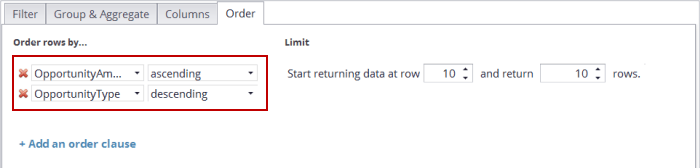 3. If you want to include another column to order by, click **Add an order clause** then repeat the instructions in the previous step.
4. Click **R** **efresh** to show the changes in the query table.
9. (Optional) Limit the rows of data returned by doing the following:
1. Enter the row number in which you want to begin returning data in the first dropdown under "Limit."
2. Specify the number of rows of data to return in the second dropdown.
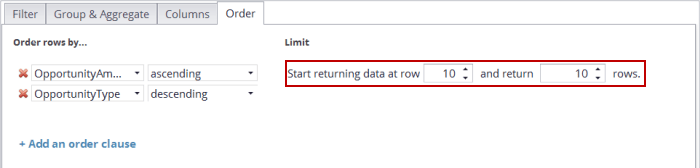
For example, if you only wanted to return rows 10 through 20, you would enter 10 in both dropdowns (the first signifying that the import should begin at row 10, and the second signifying that 10 rows of data should be imported).
3. If you want to include another column to order by, click **Add an order clause** then repeat the instructions in the previous step.
4. Click **R** **efresh** to show the changes in the query table.
9. (Optional) Limit the rows of data returned by doing the following:
1. Enter the row number in which you want to begin returning data in the first dropdown under "Limit."
2. Specify the number of rows of data to return in the second dropdown.
For example, if you only wanted to return rows 10 through 20, you would enter 10 in both dropdowns (the first signifying that the import should begin at row 10, and the second signifying that 10 rows of data should be imported).
 3. Click **R** **efresh** to show the changes in the query table.
10. Click **Save** when you are done making changes to the query table in the **DataSets** tab.
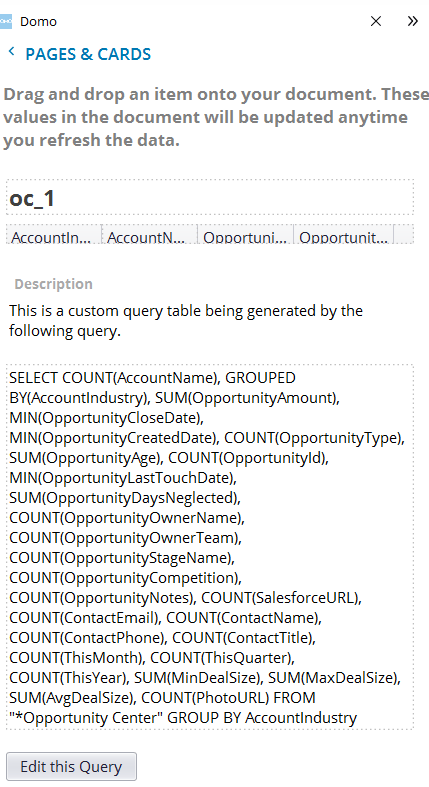
Your query table data now appears in the sidebar, broken up into components you can manipulate separately, similar to Cards. These components include the name of the query table; a preview of the query table's column headers if the table contains one or more columns OR the single value if you chose to aggregate the data; and the SQL query being used to generate the table. The following screenshot shows an example of a query table with columns:
3. Click **R** **efresh** to show the changes in the query table.
10. Click **Save** when you are done making changes to the query table in the **DataSets** tab.
Your query table data now appears in the sidebar, broken up into components you can manipulate separately, similar to Cards. These components include the name of the query table; a preview of the query table's column headers if the table contains one or more columns OR the single value if you chose to aggregate the data; and the SQL query being used to generate the table. The following screenshot shows an example of a query table with columns:
 11. Pull query table components into your document by dragging them from the sidebar into Word.
12. (Optional) If you need to open the wizard for this query table so you can make changes, you can do so by clicking **Edit this Query**.
13. (Optional) To delete this query, click **Delete this Query**.
# Refresh Domo Content
After you add Domo content (either Card components or query tables) to a Word document, you can refresh as necessary to update the data.
**To refresh your Domo content,**
1. Click **Refresh** in the **Domo** tab.
2. Click **Yes** to confirm.
# Troubleshooting
Several customers have reported an issue in which Microsoft disables the plugin after a crash; hence the plugin is still installed but is in a disabled state, so the **Domo** tab doesn't appear. Reinstalling the plugin leaves it in the disabled state. Below are instructions to re-enable the plugin.
**To re-enable the Word Plugin** **,**
1. Open Word.
2. Select **File > Options**.
3. Select **Add-ins**.
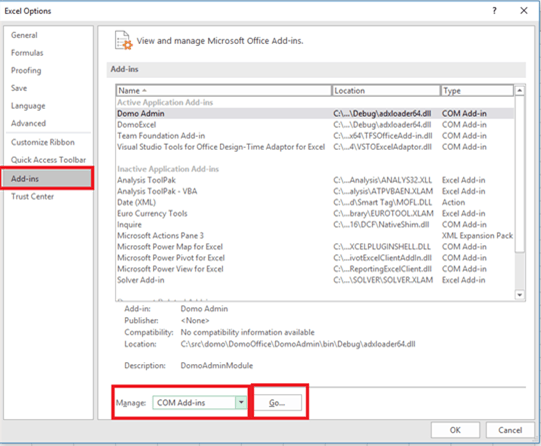
4. In the **Manage** dropdown, select **COM Add-ins**, then click **Go**.
11. Pull query table components into your document by dragging them from the sidebar into Word.
12. (Optional) If you need to open the wizard for this query table so you can make changes, you can do so by clicking **Edit this Query**.
13. (Optional) To delete this query, click **Delete this Query**.
# Refresh Domo Content
After you add Domo content (either Card components or query tables) to a Word document, you can refresh as necessary to update the data.
**To refresh your Domo content,**
1. Click **Refresh** in the **Domo** tab.
2. Click **Yes** to confirm.
# Troubleshooting
Several customers have reported an issue in which Microsoft disables the plugin after a crash; hence the plugin is still installed but is in a disabled state, so the **Domo** tab doesn't appear. Reinstalling the plugin leaves it in the disabled state. Below are instructions to re-enable the plugin.
**To re-enable the Word Plugin** **,**
1. Open Word.
2. Select **File > Options**.
3. Select **Add-ins**.
4. In the **Manage** dropdown, select **COM Add-ins**, then click **Go**.
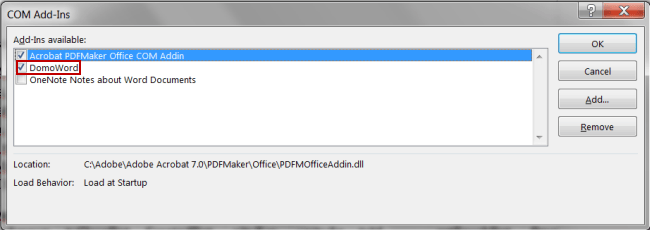
 5. Check the box next to **DomoWord** then click **OK**.
 If the box is already checked and the **Domo** tab still doesn't appear, make sure you don't have multiple versions of the plugin installed. You can remove extra instances by doing the following:
1. In the Windows Control Panel, go to **Add/Remove Programs**.
2. Remove all instances of "DomoWord."
3. Reinstall the plugin.
If the box is already checked and the **Domo** tab still doesn't appear, make sure you don't have multiple versions of the plugin installed. You can remove extra instances by doing the following:
1. In the Windows Control Panel, go to **Add/Remove Programs**.
2. Remove all instances of "DomoWord."
3. Reinstall the plugin.