> ## Documentation Index
> Fetch the complete documentation index at: https://domoinc-openapi-sync-dataflows.mintlify.site/llms.txt
> Use this file to discover all available pages before exploring further.

# Creating a New List in the Customer Portal

In the Domo Customer Portal, you can create lists of cases based on different criteria. This is especially useful for Admin-level users who want to be able to view just their own cases instead of the entire list of cases in their Domo instance. This walkthrough shows you how to do this.

**To create a list in the Customer Portal,**

1. Access the Customer Portal through support.domo.com.
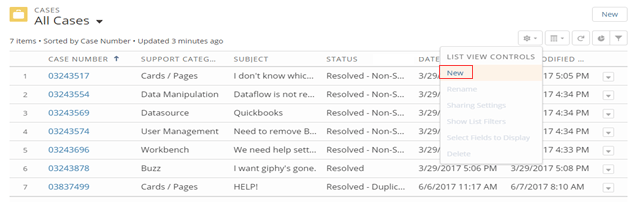
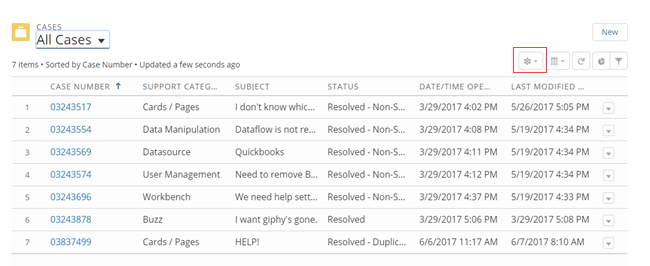
2. In the Portal, click the gear icon in the button bar in the top right corner.
   <Frame>
     <img alt="customer_portal_list_1.png" src="https://mintcdn.com/domoinc-openapi-sync-dataflows/PXbqzJKMKWWuwcKY/images/kb/ka05w00000123bR-00N5w00000Ri7BU-0EM5w000005vOdl.png?fit=max&auto=format&n=PXbqzJKMKWWuwcKY&q=85&s=f0e86c0dabe4cca99db531b5da8744e6" width="650" height="266" data-path="images/kb/ka05w00000123bR-00N5w00000Ri7BU-0EM5w000005vOdl.png" />
   </Frame>
3. Select **New** in the gear menu.

   <Frame>
     <img alt="customer_portal_list_2.png" src="https://mintcdn.com/domoinc-openapi-sync-dataflows/PXbqzJKMKWWuwcKY/images/kb/ka05w00000123bR-00N5w00000Ri7BU-0EM5w000005vOdi.png?fit=max&auto=format&n=PXbqzJKMKWWuwcKY&q=85&s=18a6713c2e030467b5ff478fd926daaa" width="641" height="202" data-path="images/kb/ka05w00000123bR-00N5w00000Ri7BU-0EM5w000005vOdi.png" />
   </Frame>
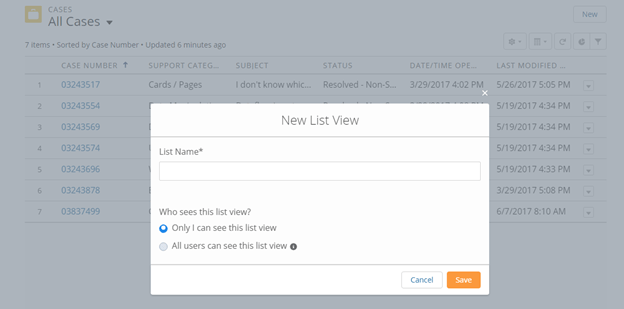
4. Enter a name for the new list.
5. Leave the default setting of **Only I can see this list view**.
6. Click **Save**.
   <Frame>
     <img alt="customer_portal_list_3.png" src="https://mintcdn.com/domoinc-openapi-sync-dataflows/PXbqzJKMKWWuwcKY/images/kb/ka05w00000123bR-00N5w00000Ri7BU-0EM5w000005vOdp.png?fit=max&auto=format&n=PXbqzJKMKWWuwcKY&q=85&s=2367b6bcf4ff504d4ec4514f5891008b" style={{width: 624, height: 309}} width="624" height="309" data-path="images/kb/ka05w00000123bR-00N5w00000Ri7BU-0EM5w000005vOdp.png" />
   </Frame>
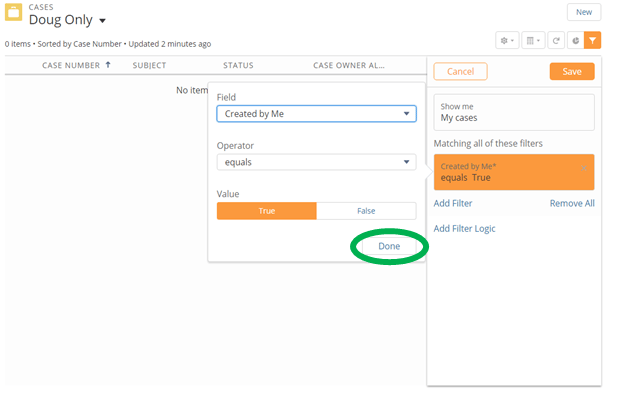
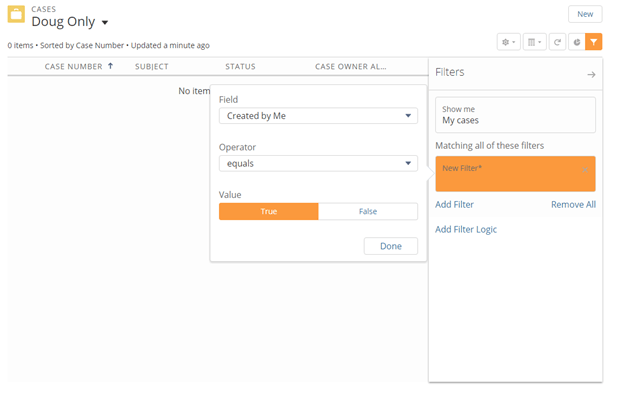
7. Add the desired filters.

   In this example, an Admin sets a filter allowing them to see only the cases they created as a specific user.
   <Frame>
     <img alt="customer_portal_list_4.png" src="https://mintcdn.com/domoinc-openapi-sync-dataflows/PXbqzJKMKWWuwcKY/images/kb/ka05w00000123bR-00N5w00000Ri7BU-0EM5w000005vOdn.png?fit=max&auto=format&n=PXbqzJKMKWWuwcKY&q=85&s=73fe7b6df1d03116aaf78c818512ca9b" width="624" height="398" data-path="images/kb/ka05w00000123bR-00N5w00000Ri7BU-0EM5w000005vOdn.png" />
   </Frame>
8. Click **Done**.

   <Frame>
     <img alt="customer_portal_list_5.png" src="https://mintcdn.com/domoinc-openapi-sync-dataflows/PXbqzJKMKWWuwcKY/images/kb/ka05w00000123bR-00N5w00000Ri7BU-0EM5w000005vOdr.png?fit=max&auto=format&n=PXbqzJKMKWWuwcKY&q=85&s=7e5b0273b7aff247e099ce127accc060" width="624" height="402" data-path="images/kb/ka05w00000123bR-00N5w00000Ri7BU-0EM5w000005vOdr.png" />
   </Frame>
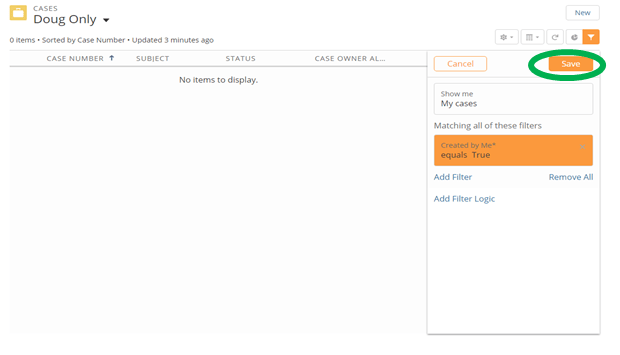
9. Click **Save**.

   <Frame>
     <img alt="customer_portal_list_6.png" src="https://mintcdn.com/domoinc-openapi-sync-dataflows/PXbqzJKMKWWuwcKY/images/kb/ka05w00000123bR-00N5w00000Ri7BU-0EM5w000005vOdg.png?fit=max&auto=format&n=PXbqzJKMKWWuwcKY&q=85&s=60e1a654ec8d49b1e8468b5d31b00a8b" width="620" height="355" data-path="images/kb/ka05w00000123bR-00N5w00000Ri7BU-0EM5w000005vOdg.png" />
   </Frame>

Your new list is now created.

For more information about the Support Portal, see [Getting Help](/s/article/360042922874 "Getting Help").