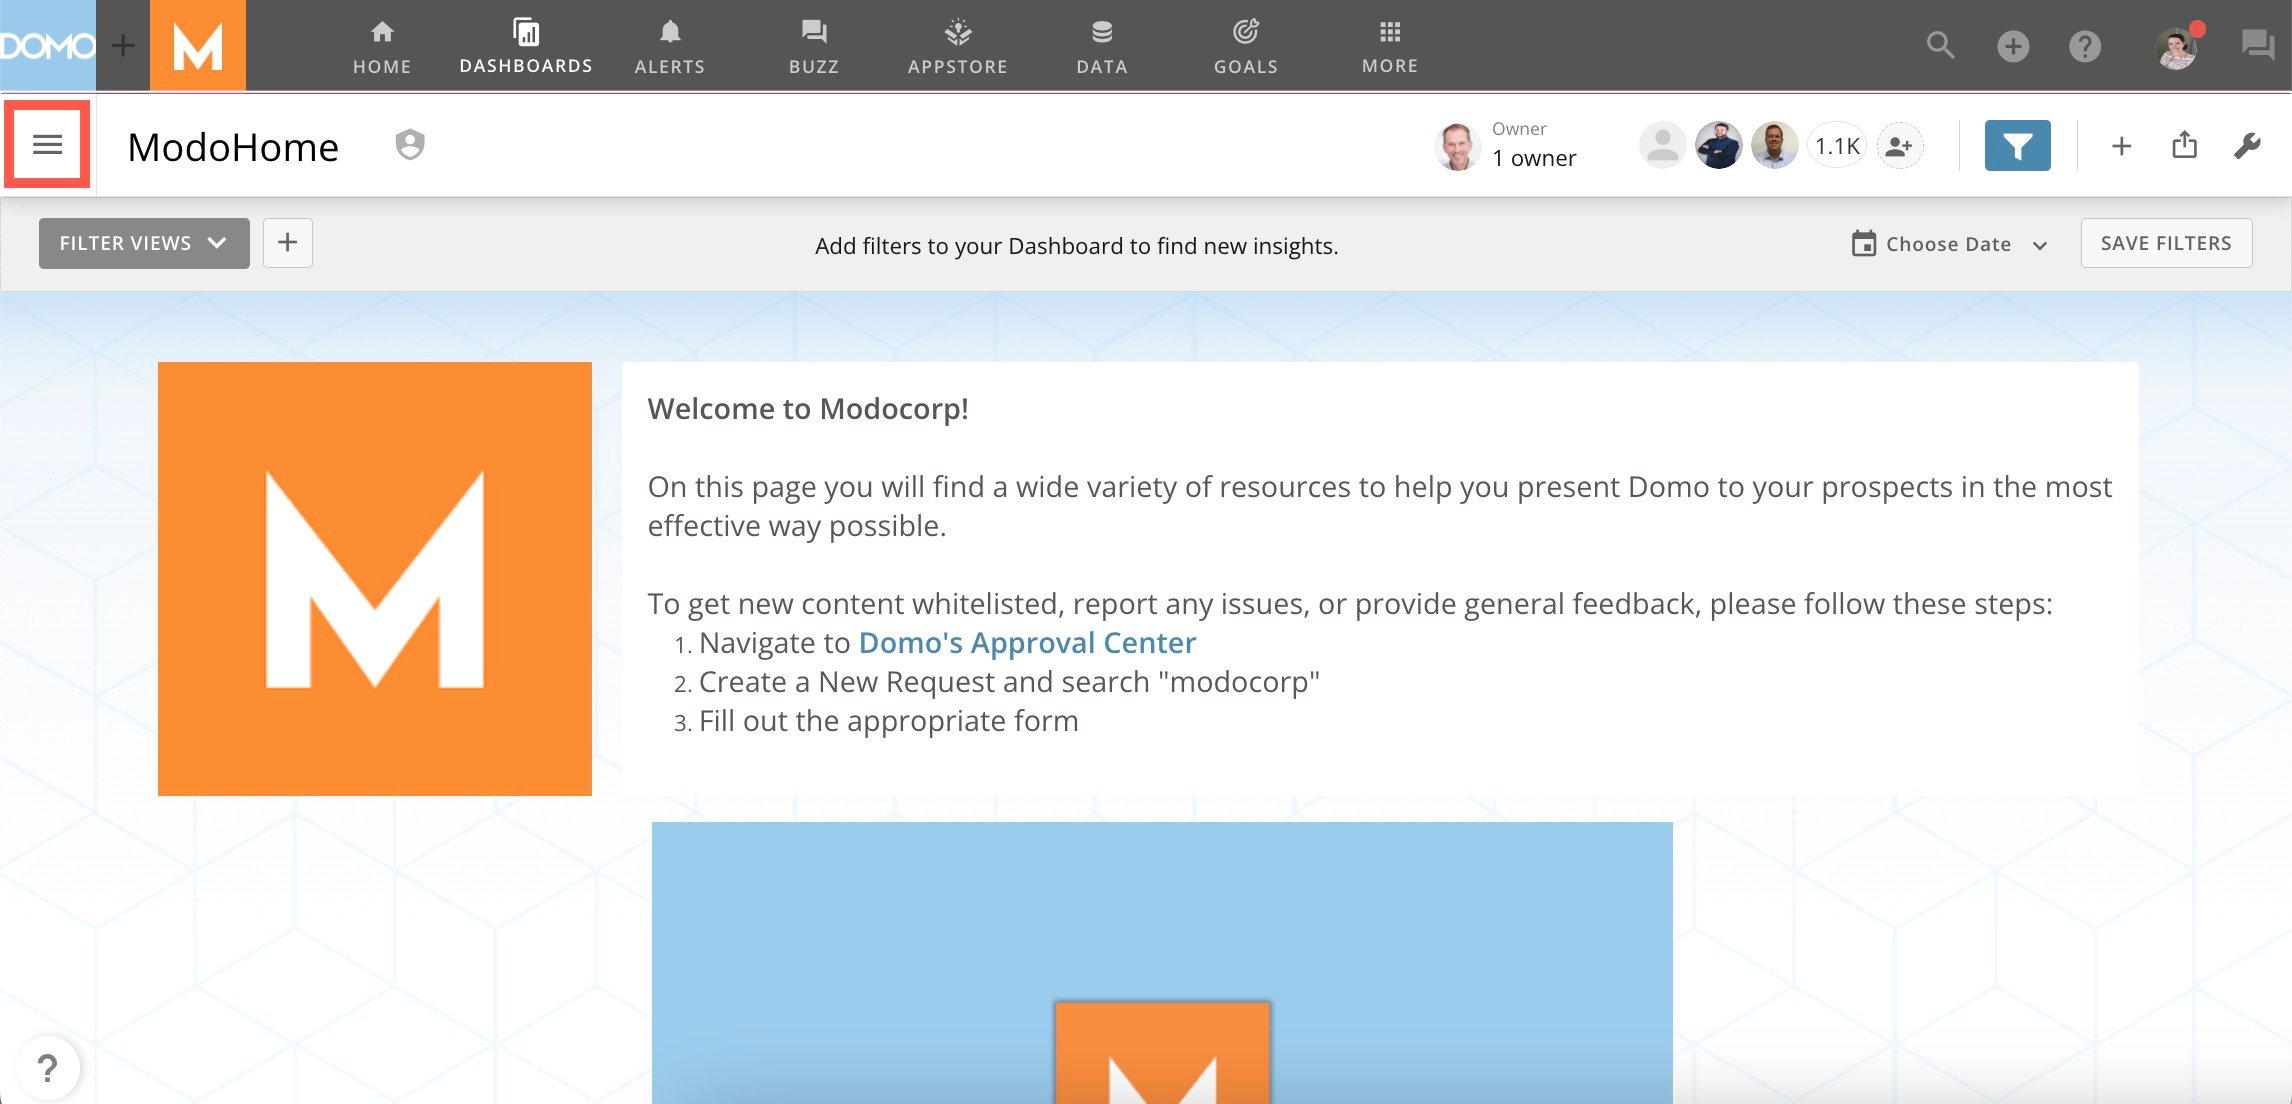
 Select
 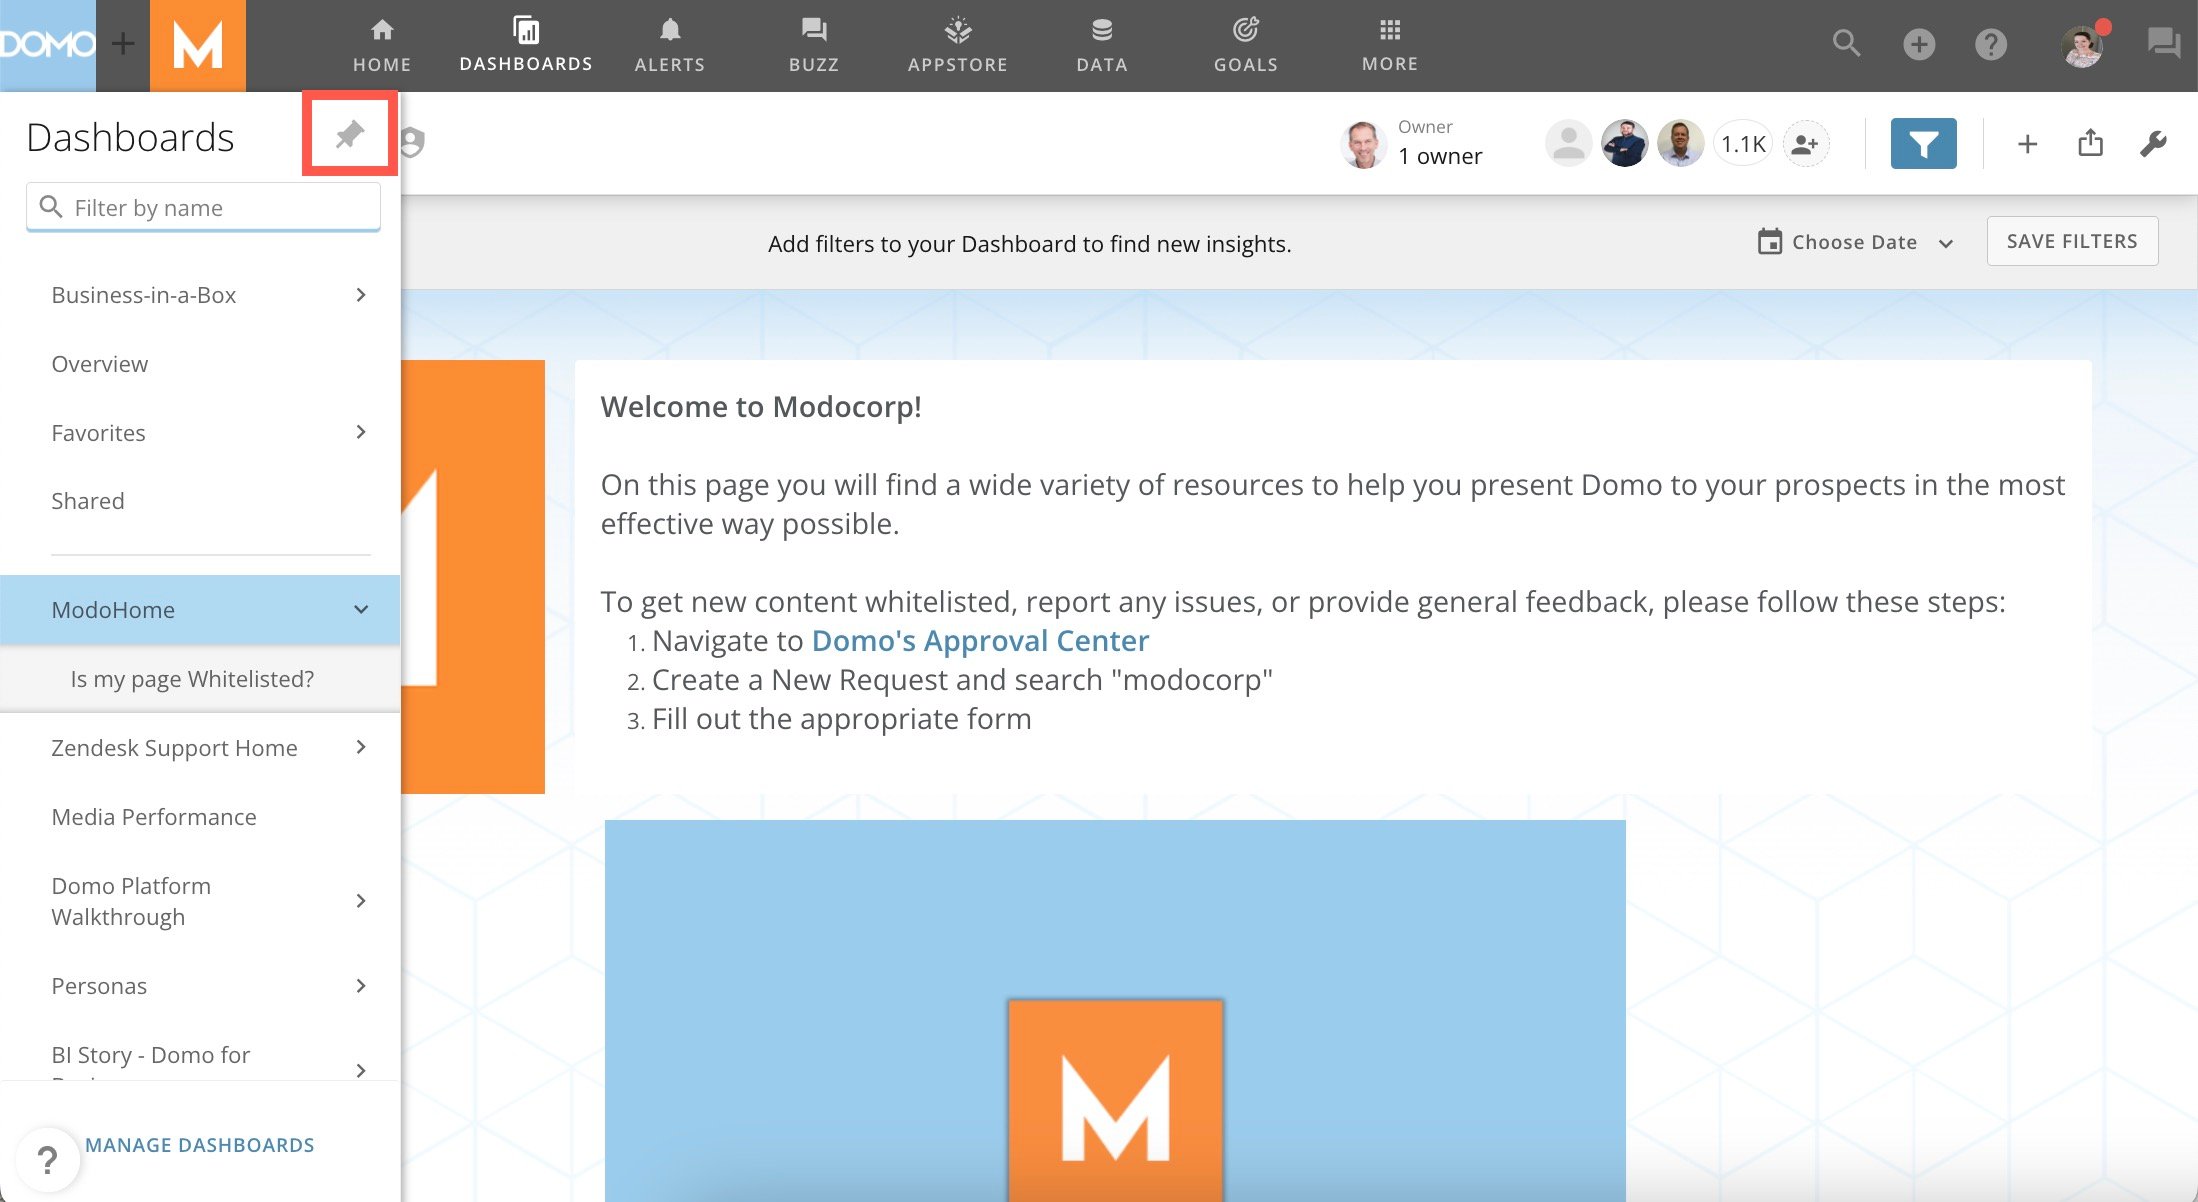 # Access Manage Dashboards Modal
In the **Dashboards** panel, select **Manage Dashboards** to open the **Manage Dashboards** modal.
# Access Manage Dashboards Modal
In the **Dashboards** panel, select **Manage Dashboards** to open the **Manage Dashboards** modal.
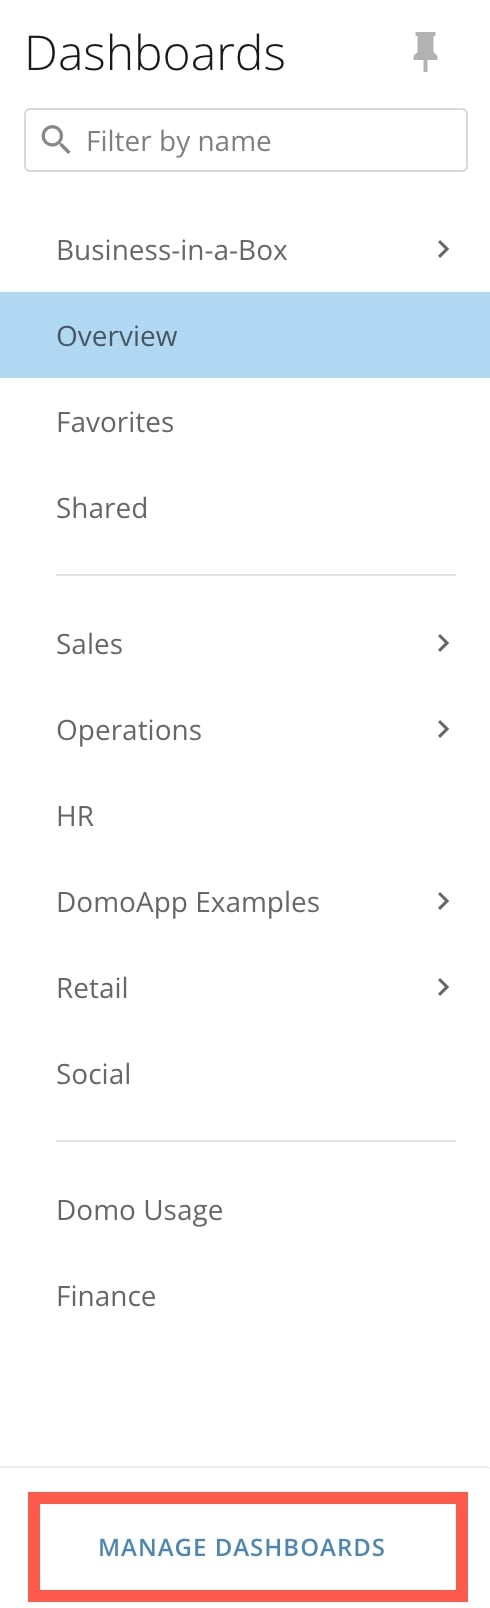 In the **Manage** **Dashboards** modal, you can [reorder](#reorder_dashboards) and [hide/unhide](#hide_unhide_dashboards) dashboards and sub-dashboards in your instance.
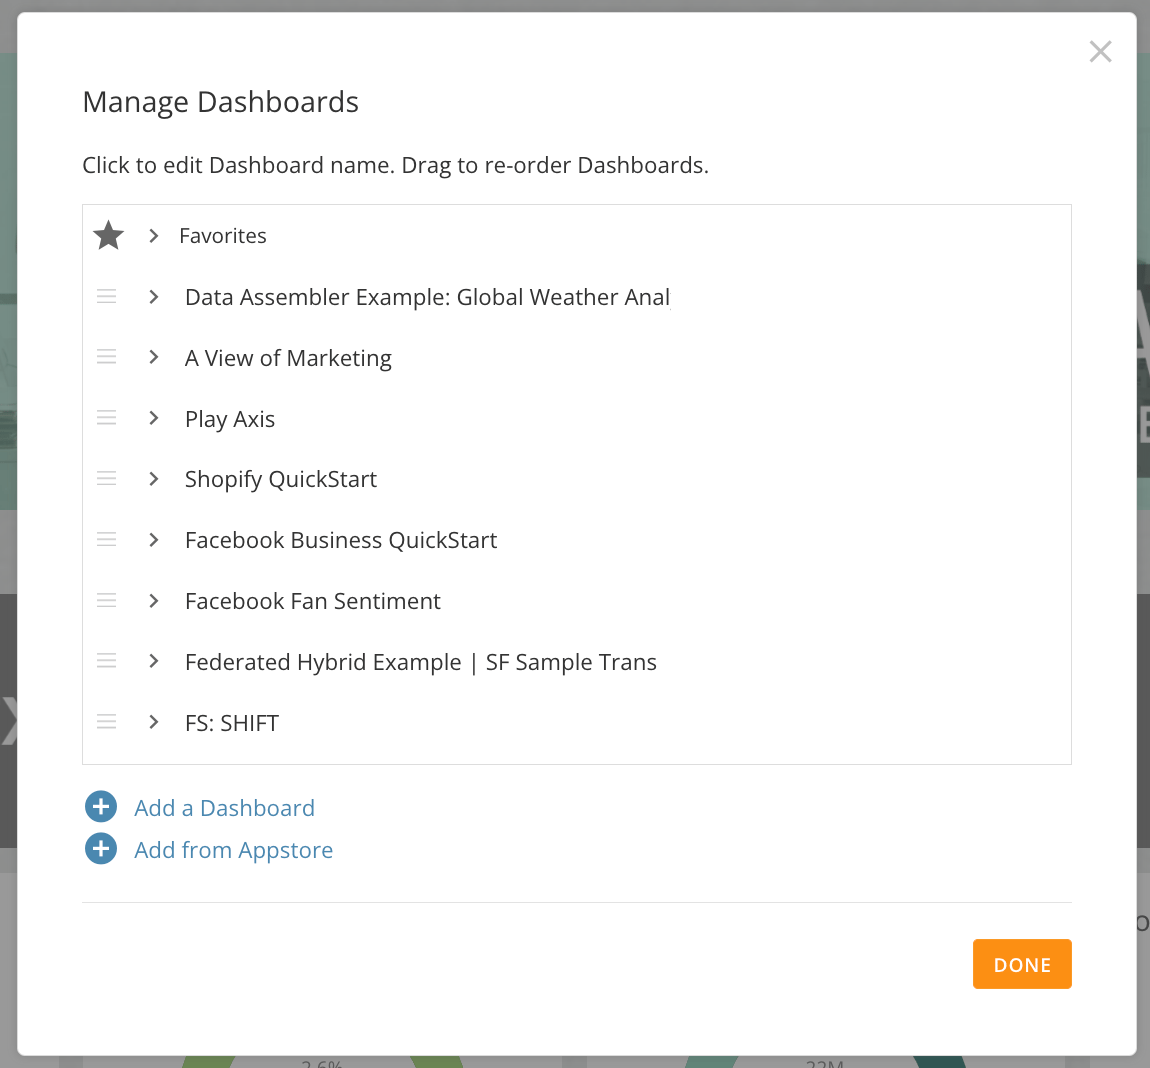 You can also expand/collapse and view sub-dashboards by selecting the horizontal (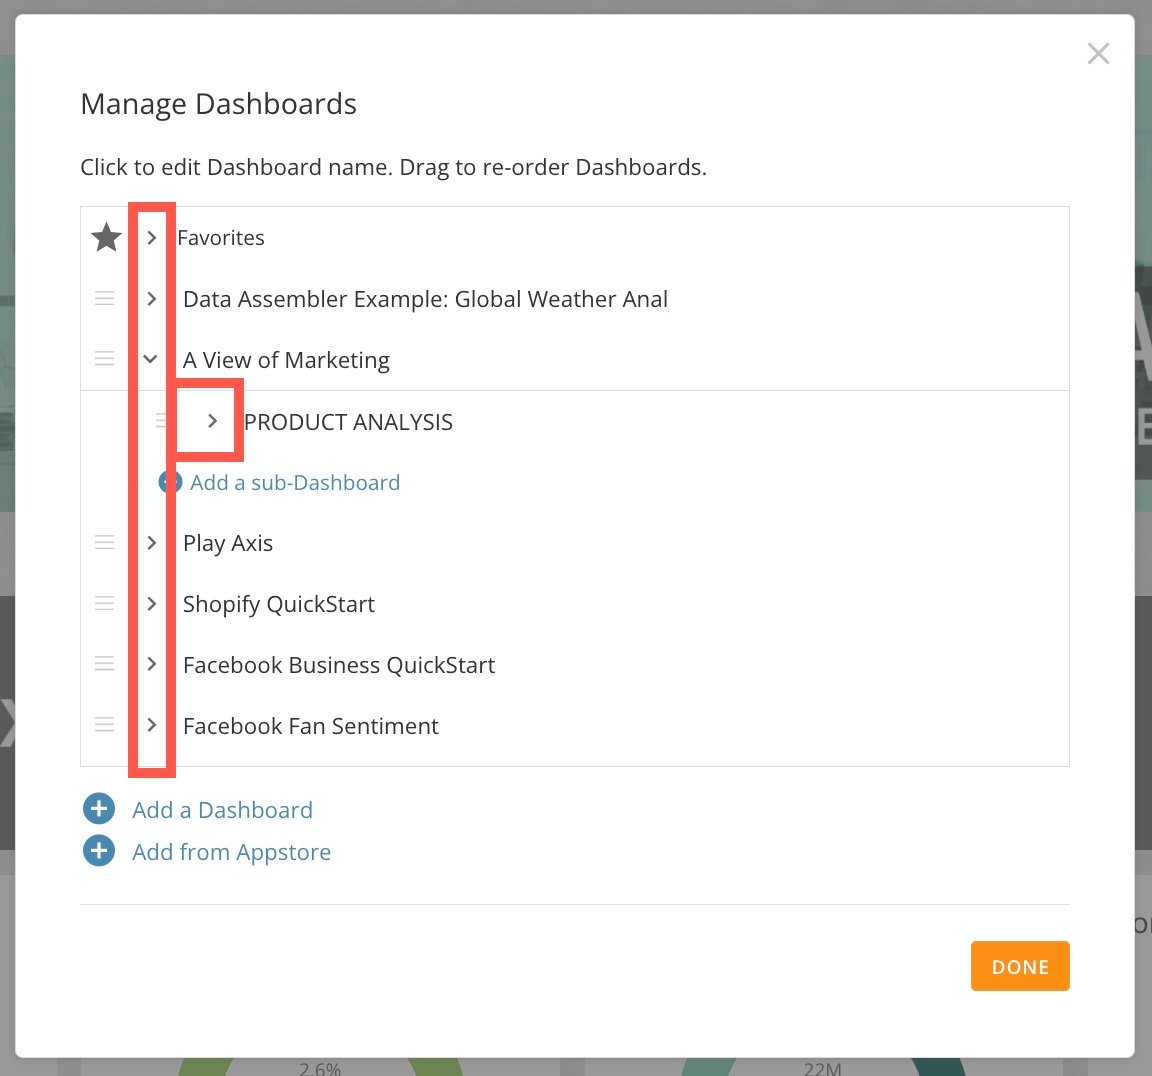
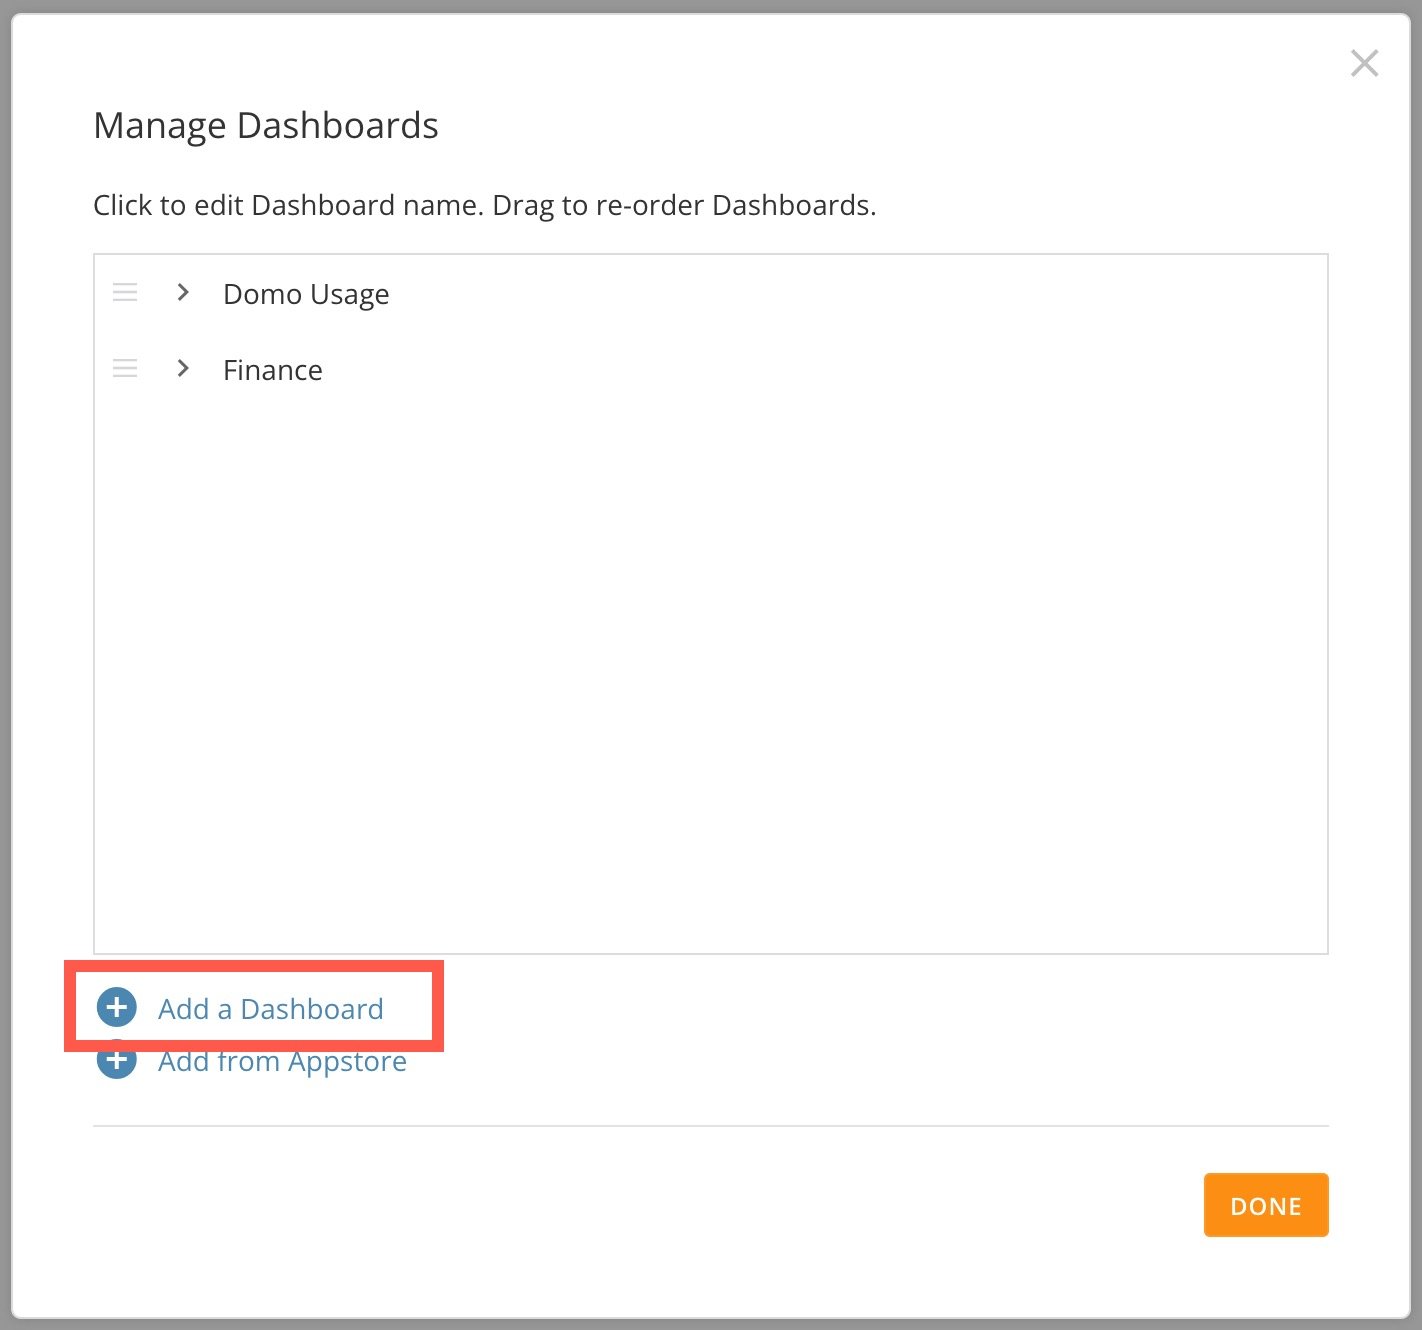 An editable field displays below the existing dashboards.
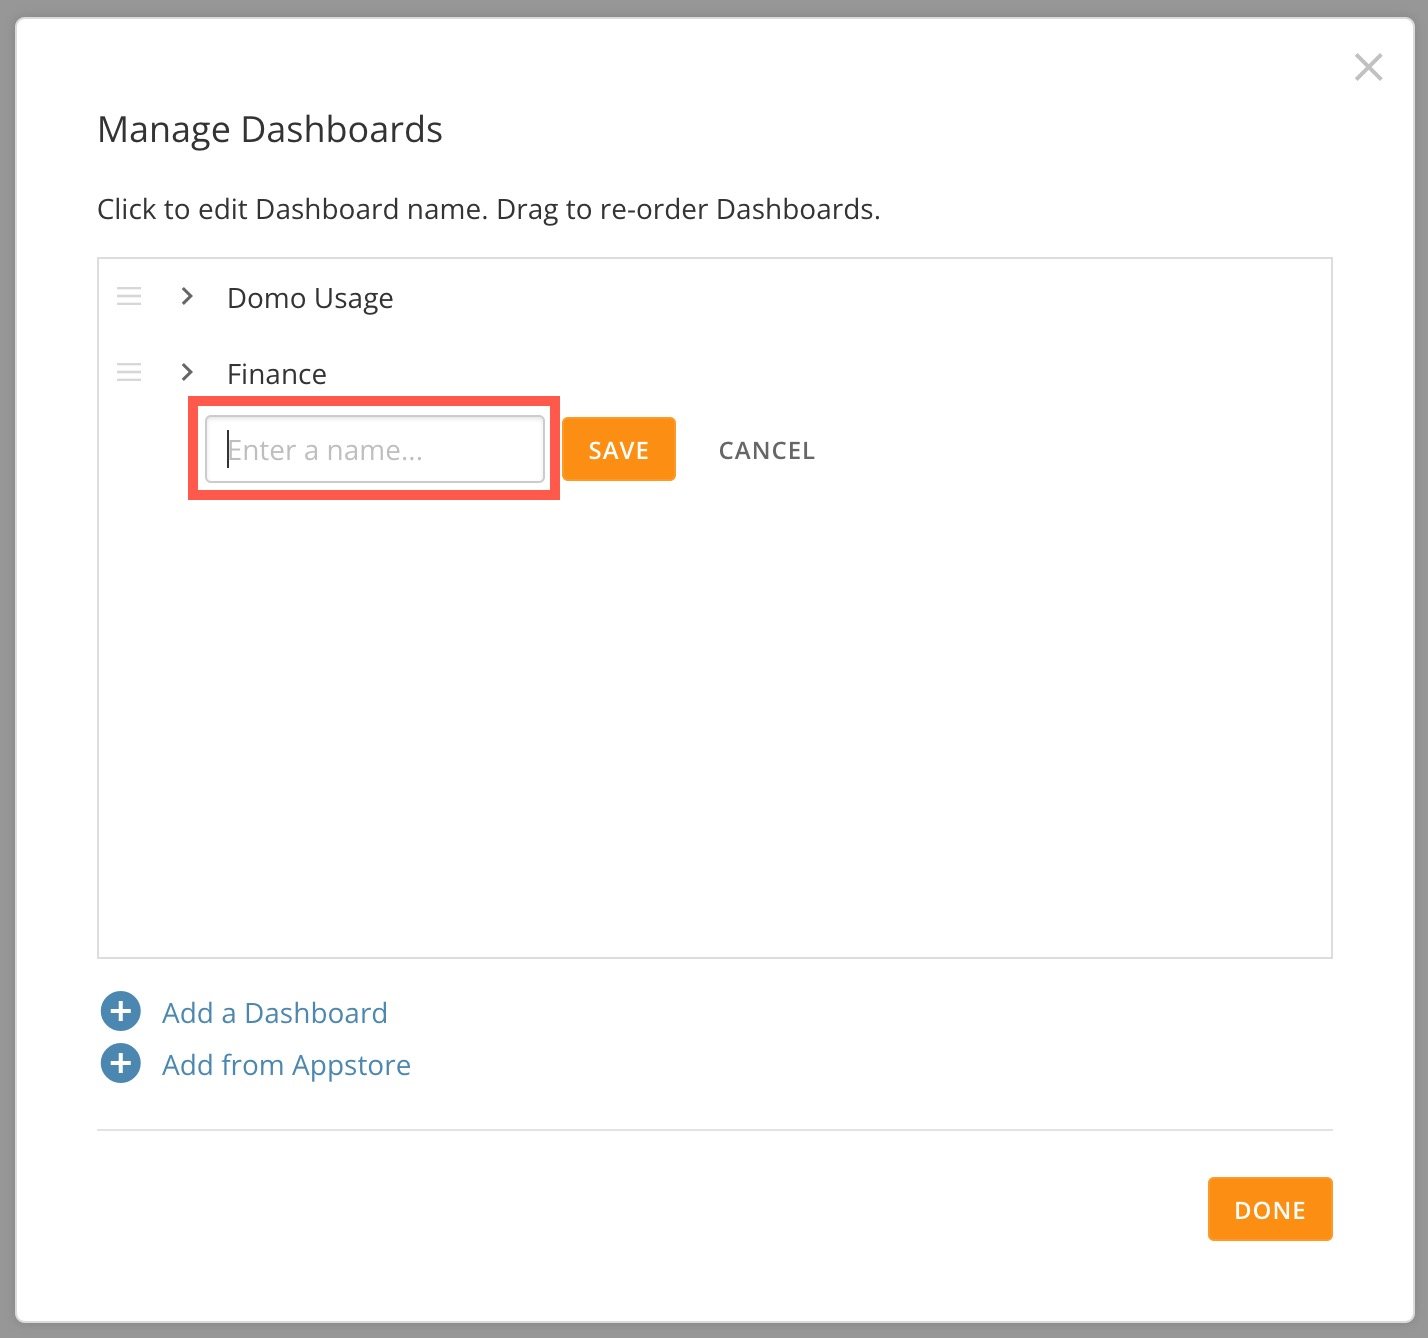 3. Enter a name for the new dashboard. Dashboard names can contain up to 25 characters.
4. Select **Save**.
3. Enter a name for the new dashboard. Dashboard names can contain up to 25 characters.
4. Select **Save**.
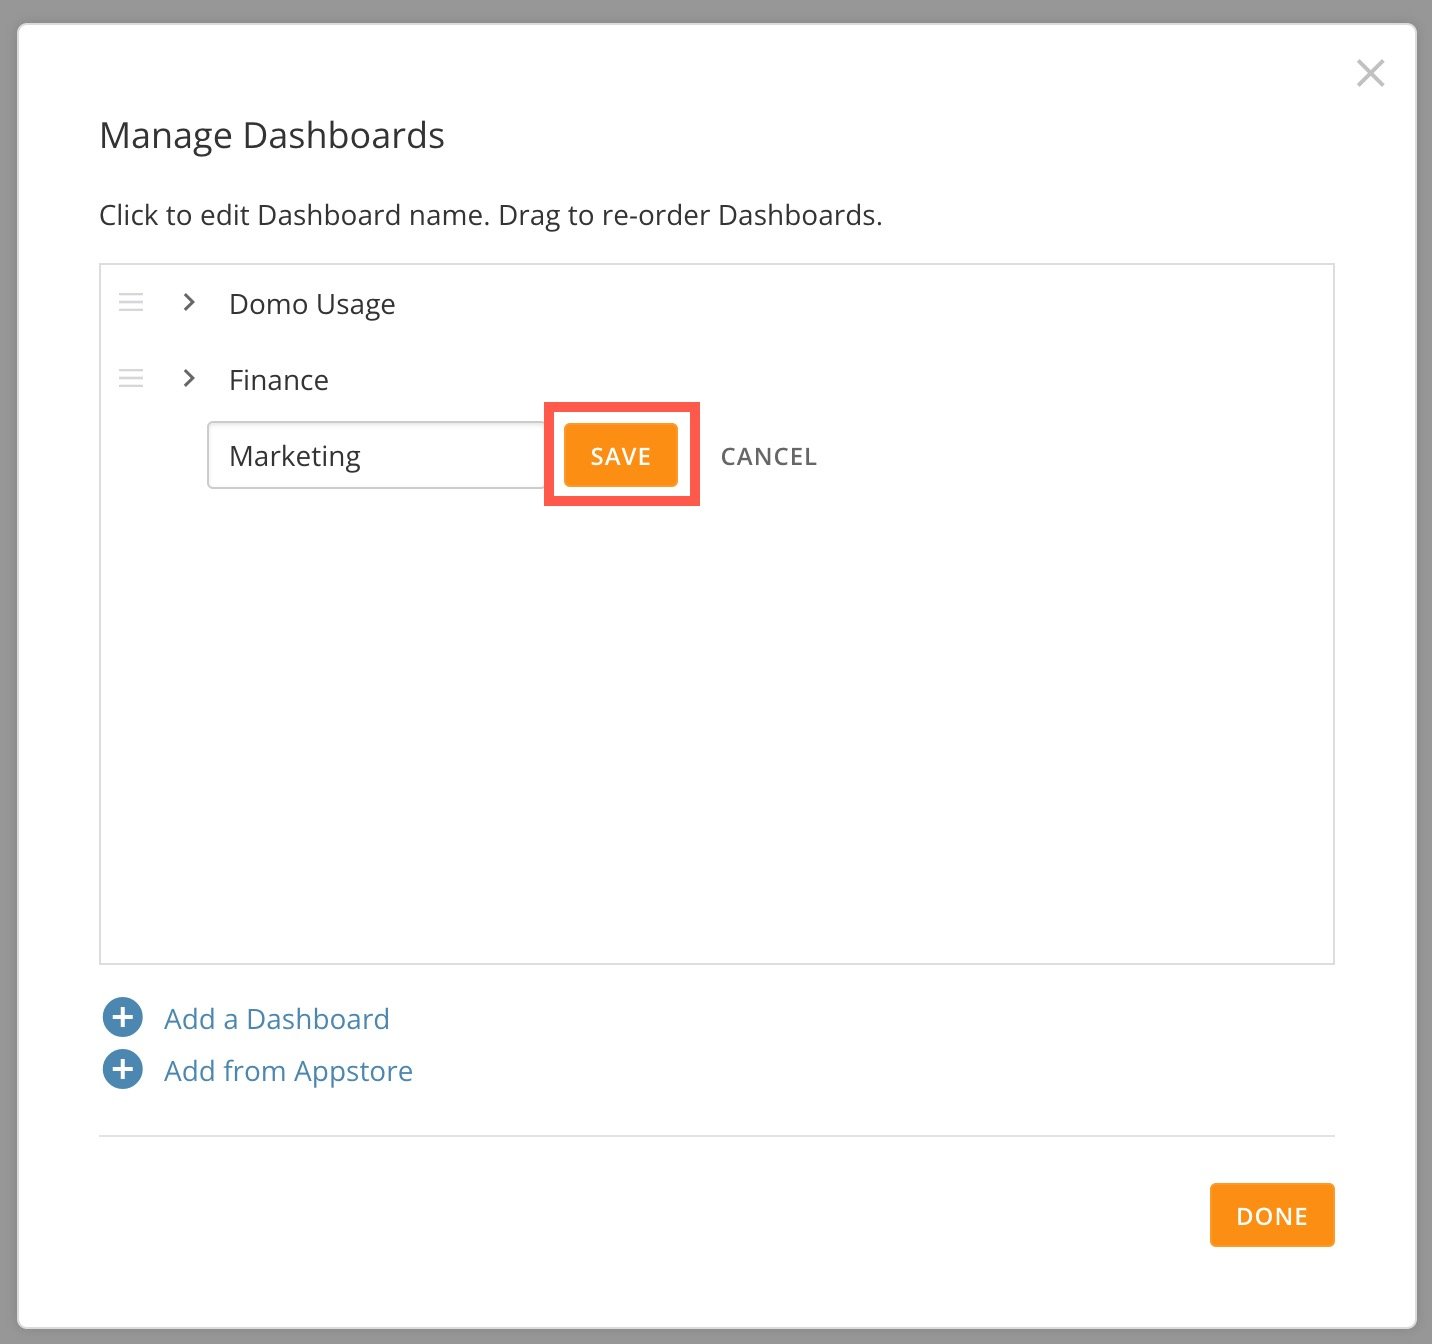 5. (Optional) Drag the new dashboard to where you want it in the list using the handle by the name.
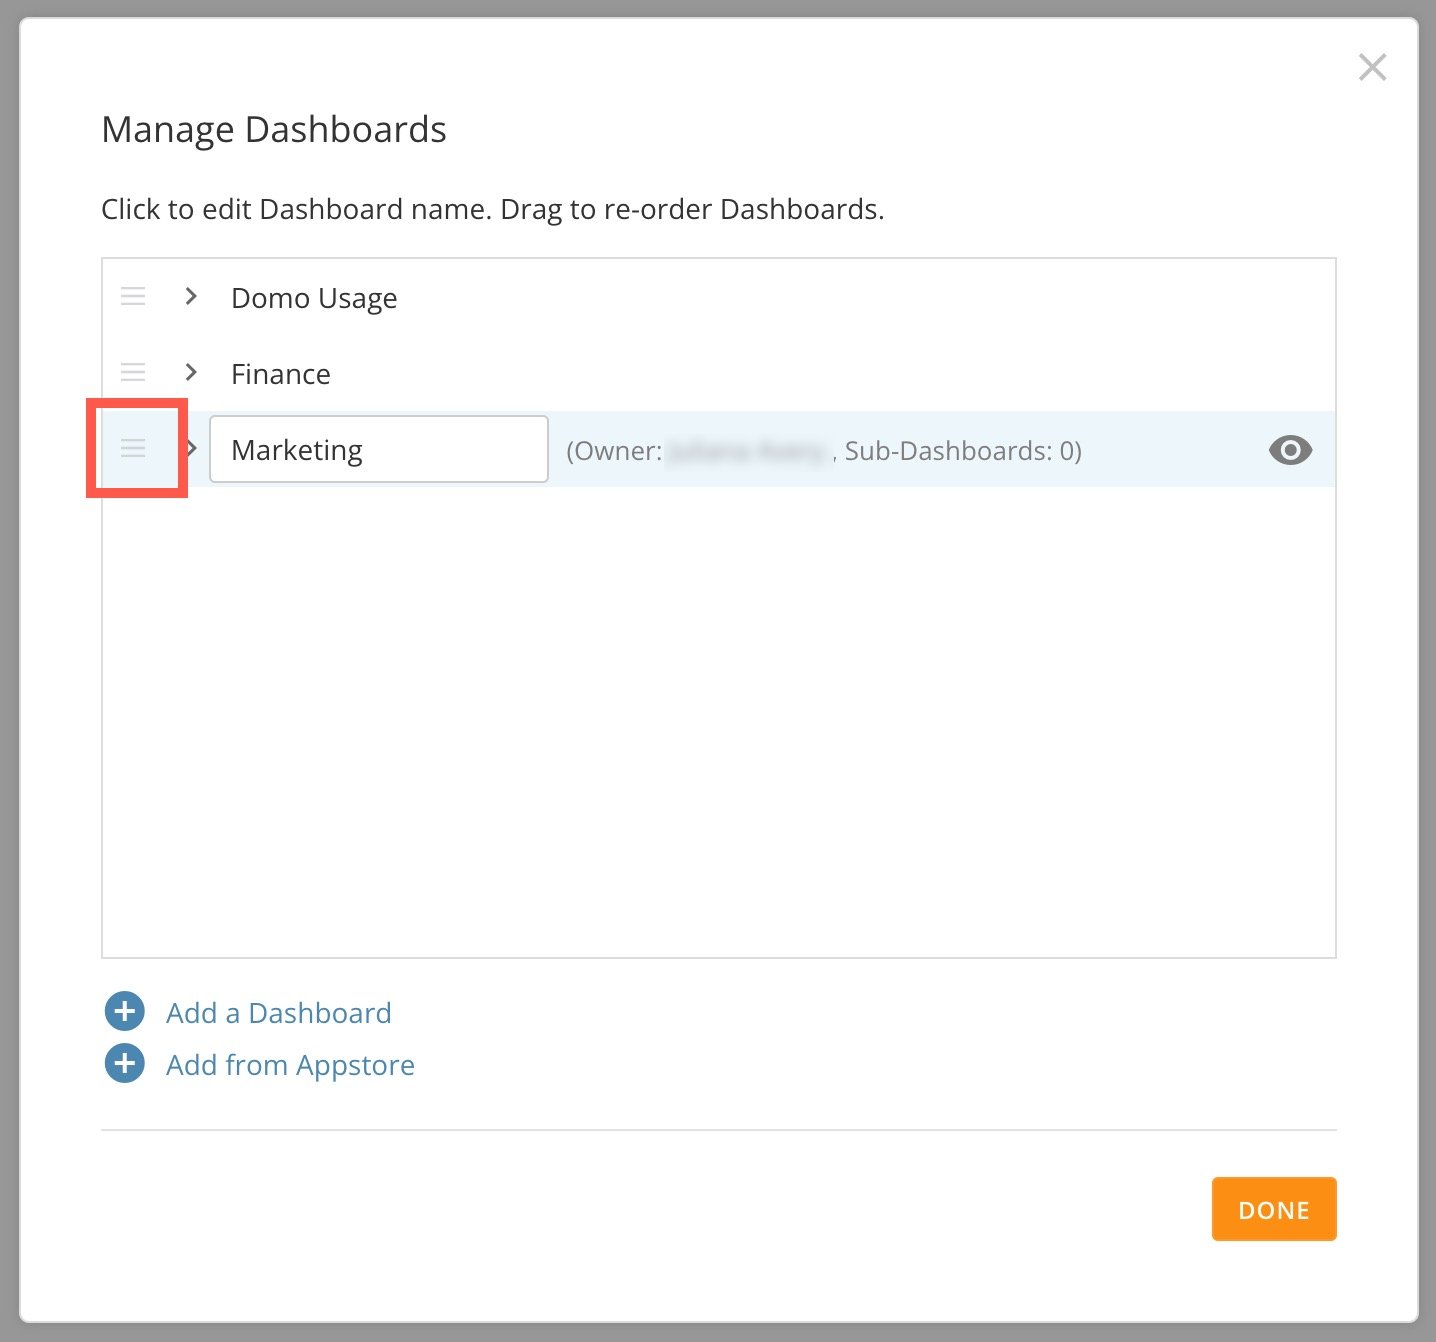 6. Select **Done** to close the modal.
# Add a Sub-dashboard
You can add a sub-dashboards to any top-level dashboard in Domo.
6. Select **Done** to close the modal.
# Add a Sub-dashboard
You can add a sub-dashboards to any top-level dashboard in Domo.
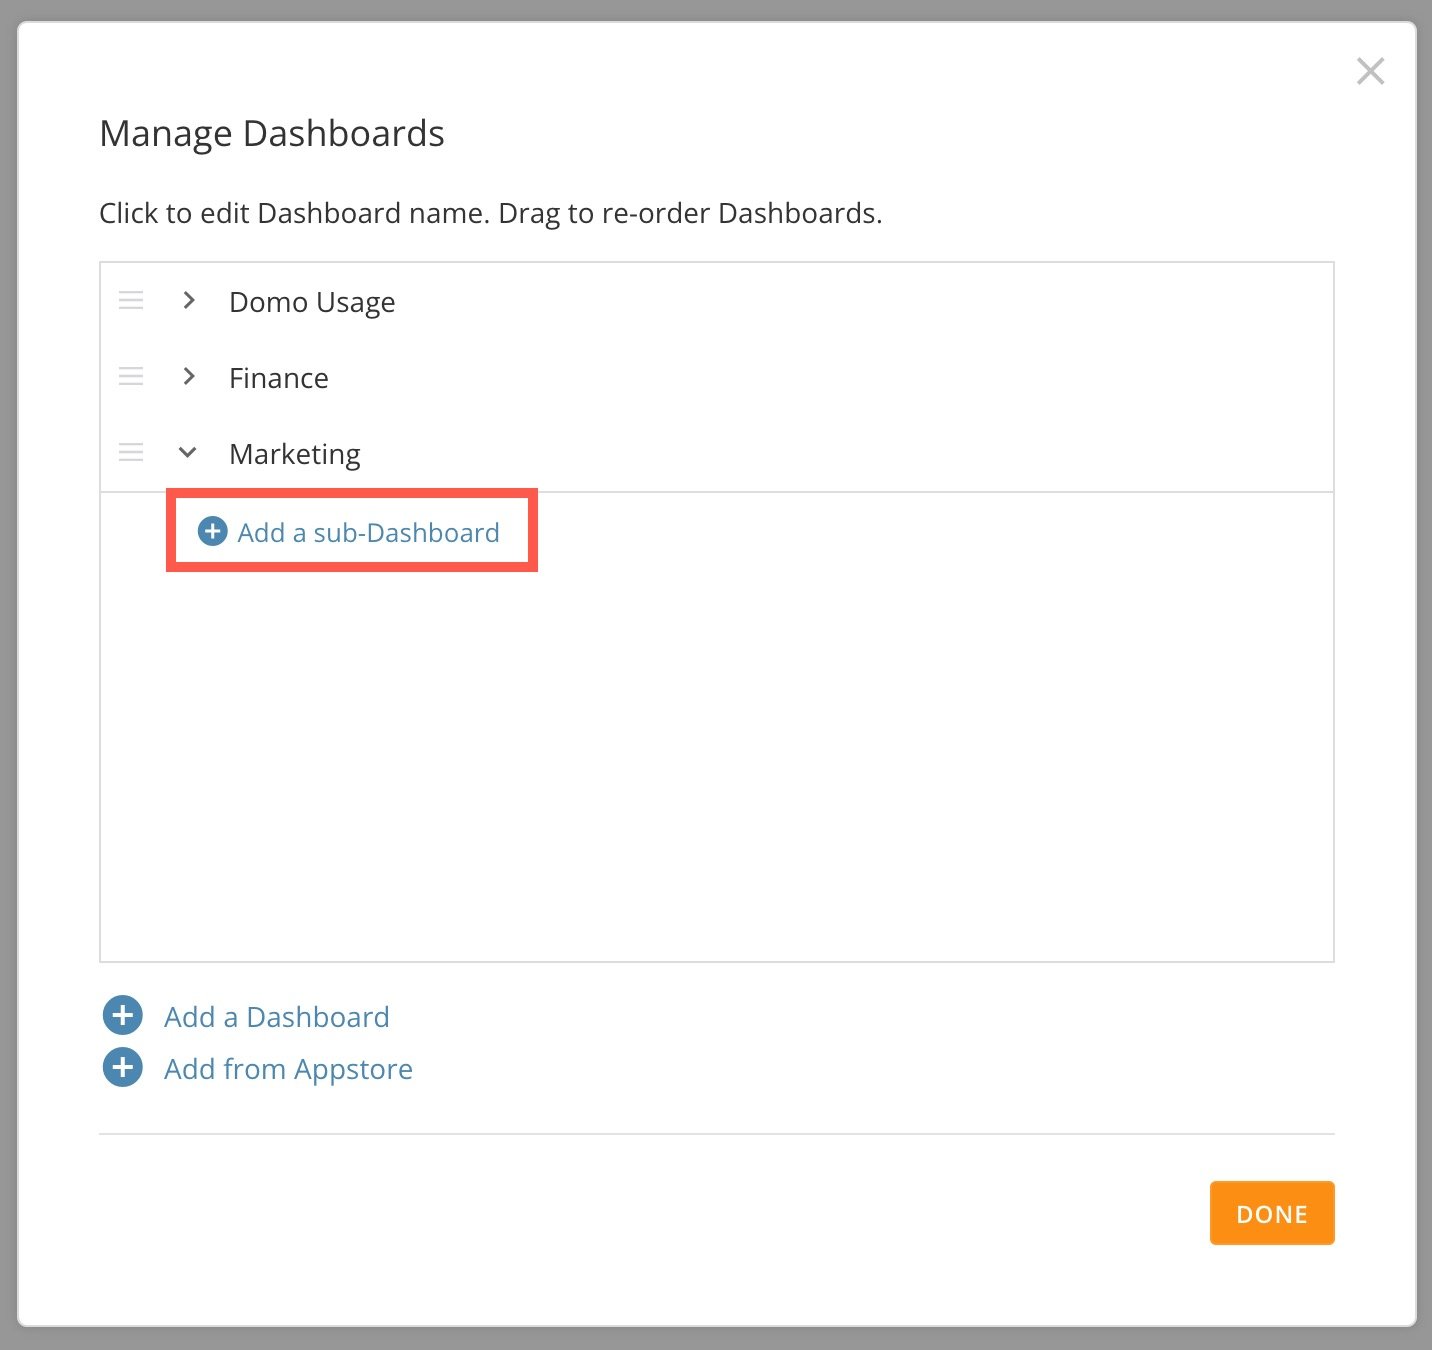 An editable field displays below any existing sub-dashboards of the parent dashboard.
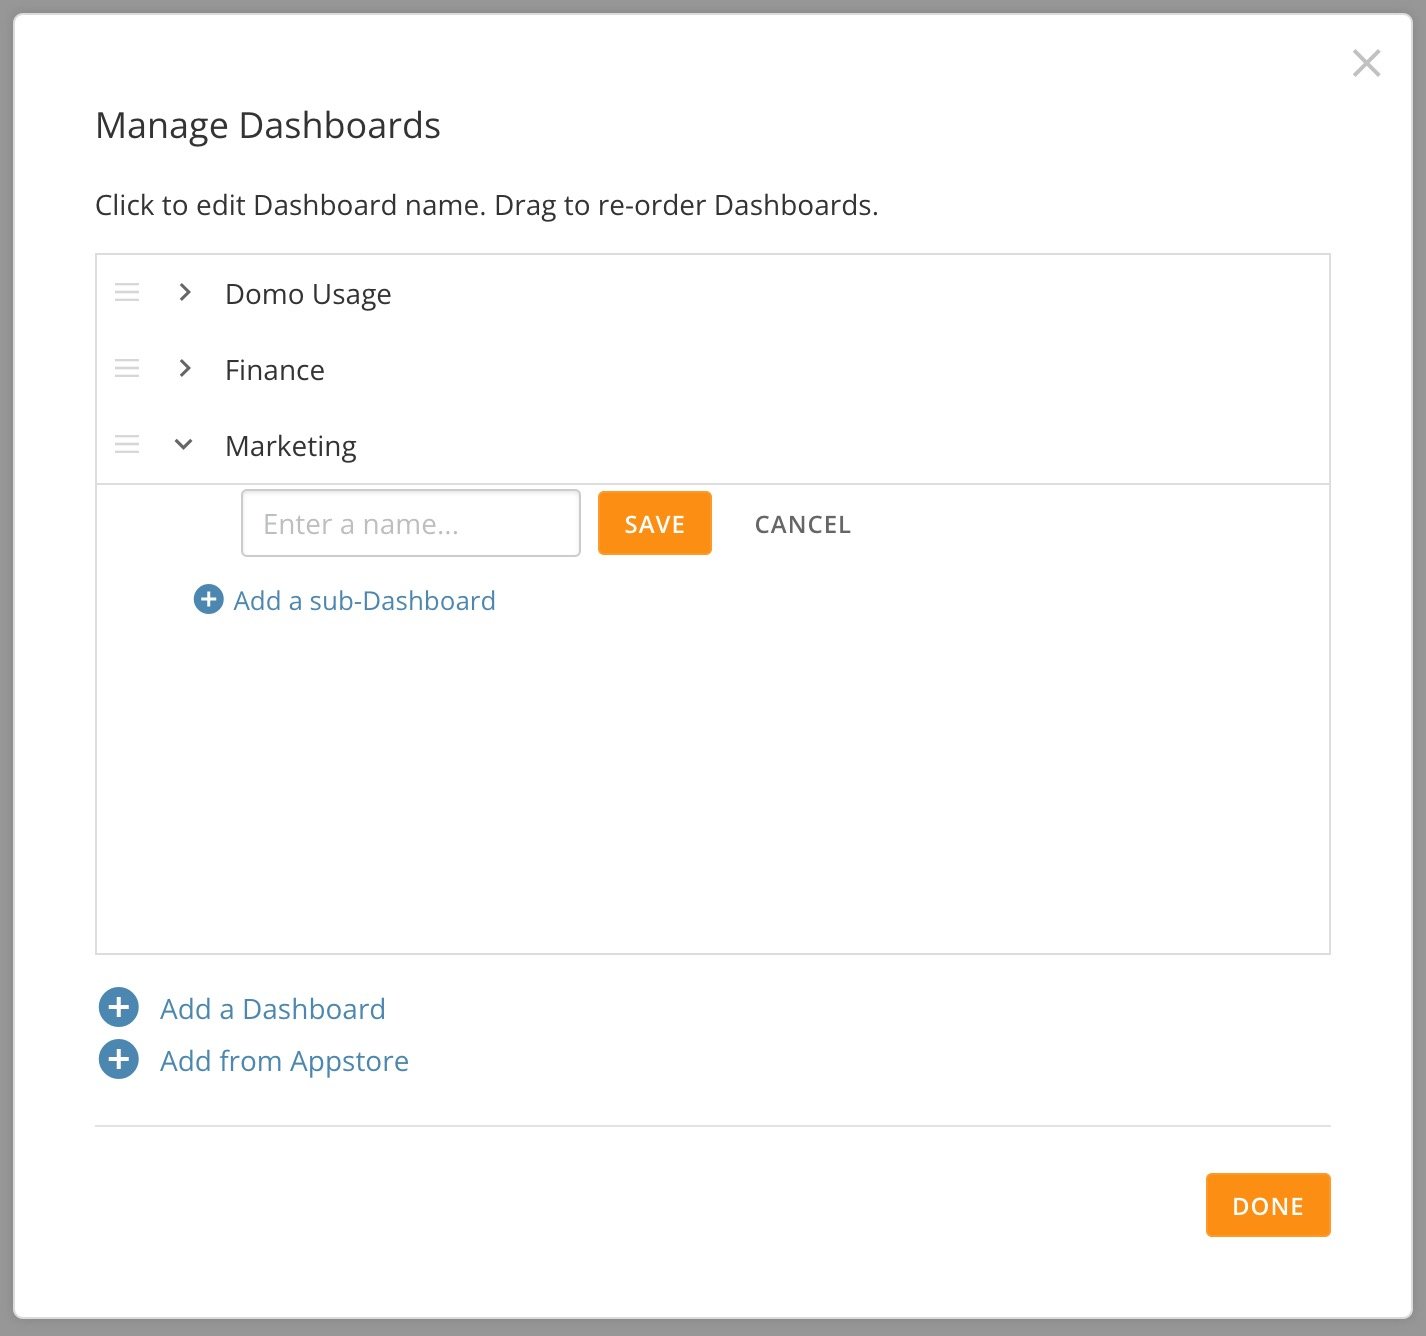 4. Enter a name for the new sub-dashboard. Names can contain up to 25 characters.
5. Select **Save**.
4. Enter a name for the new sub-dashboard. Names can contain up to 25 characters.
5. Select **Save**.
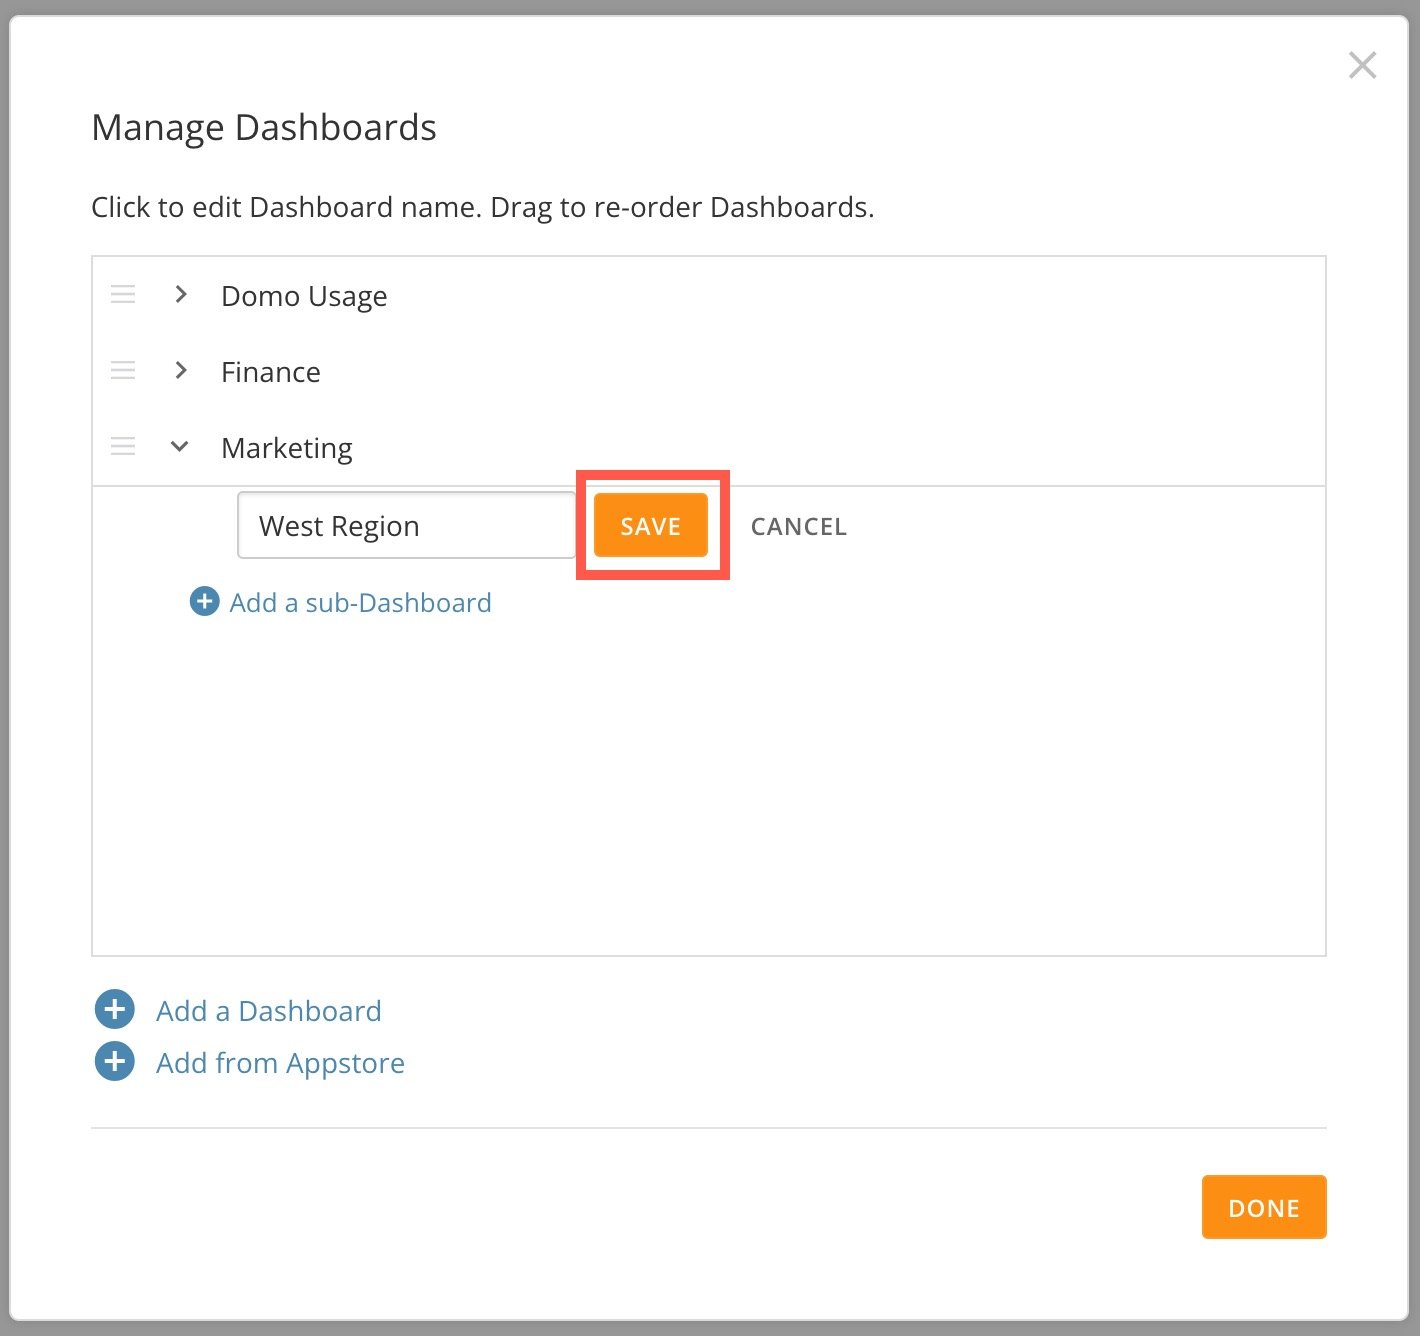 6. (Optional) Drag the new sub-dashboard to where you want it in the list of sub-dashboards of that dashboard using the handle by the name.
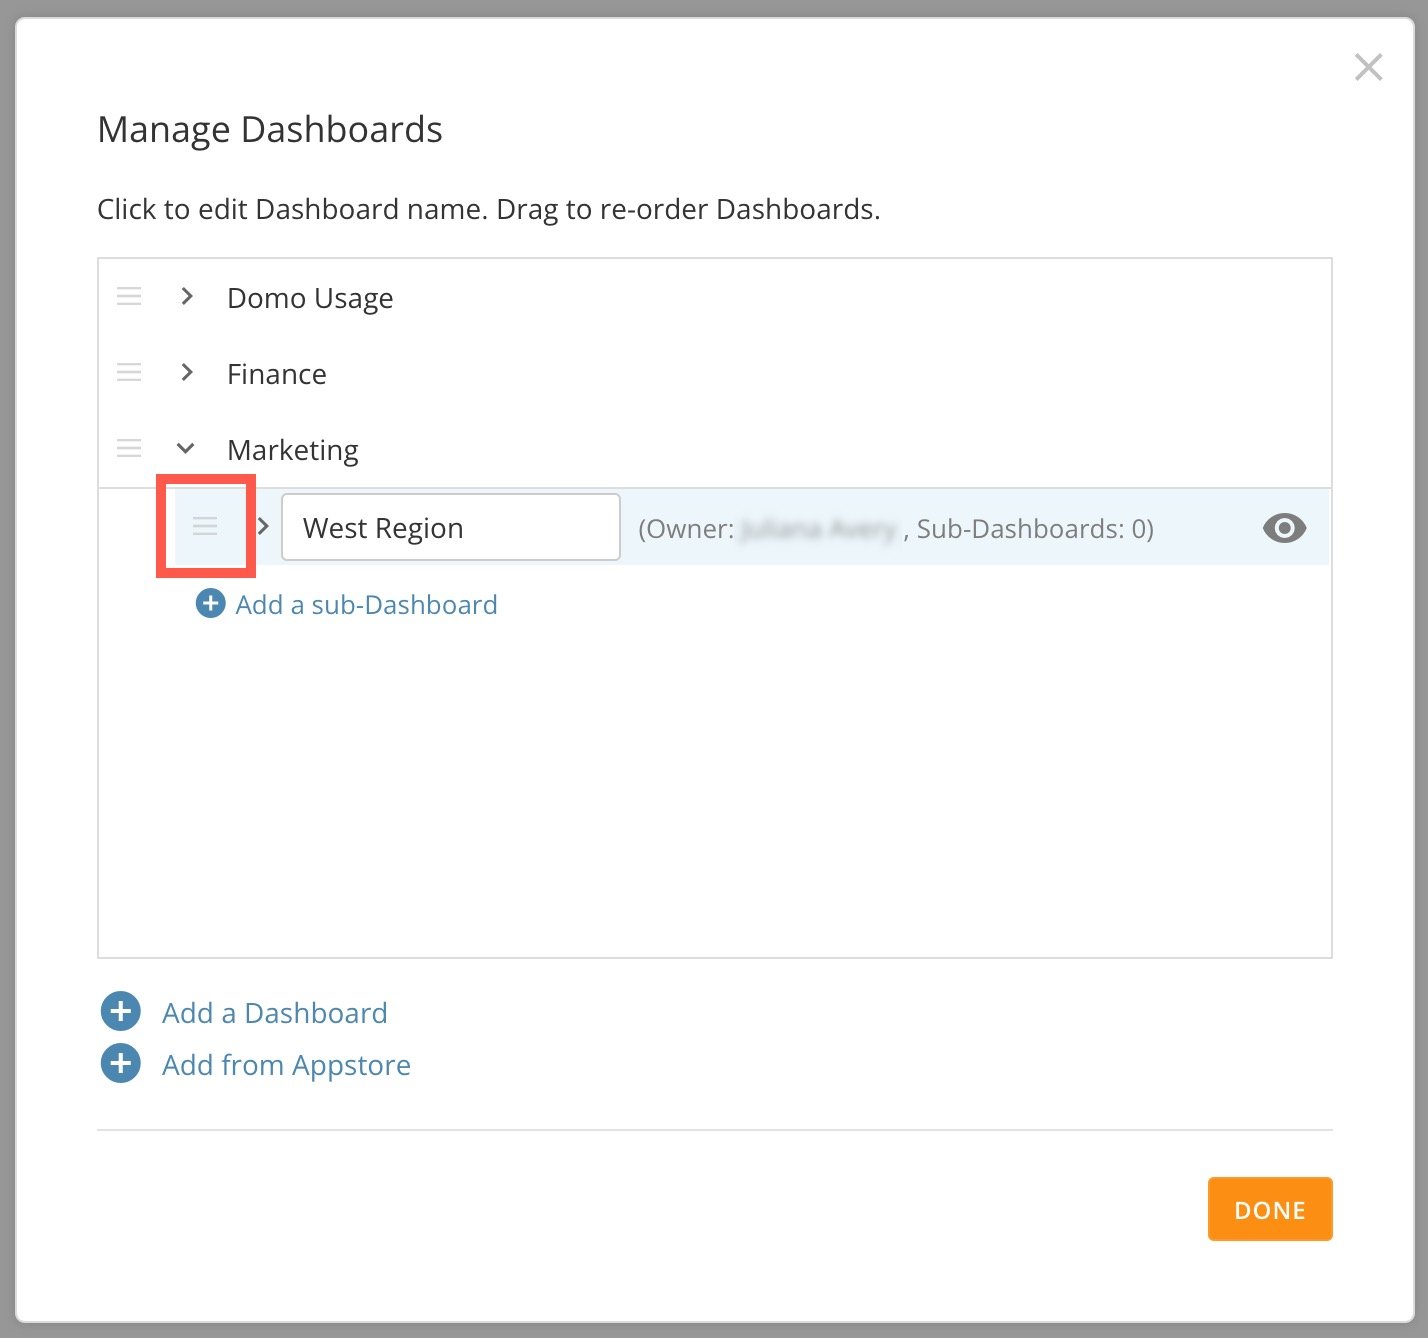 7. Select **Done** to close the modal.
# Rename Dashboard/Sub-dashboard
You can rename any dashboard or sub-dashboard in Domo to which you have access inside the Manage Dashboards modal. Follow the steps below.
1. [Access the **Manage Dashboards** modal.](#access_manage_dashboards_modal)
2. Locate the name of the dashboard/sub-dashboard you want to rename and select it.
7. Select **Done** to close the modal.
# Rename Dashboard/Sub-dashboard
You can rename any dashboard or sub-dashboard in Domo to which you have access inside the Manage Dashboards modal. Follow the steps below.
1. [Access the **Manage Dashboards** modal.](#access_manage_dashboards_modal)
2. Locate the name of the dashboard/sub-dashboard you want to rename and select it.
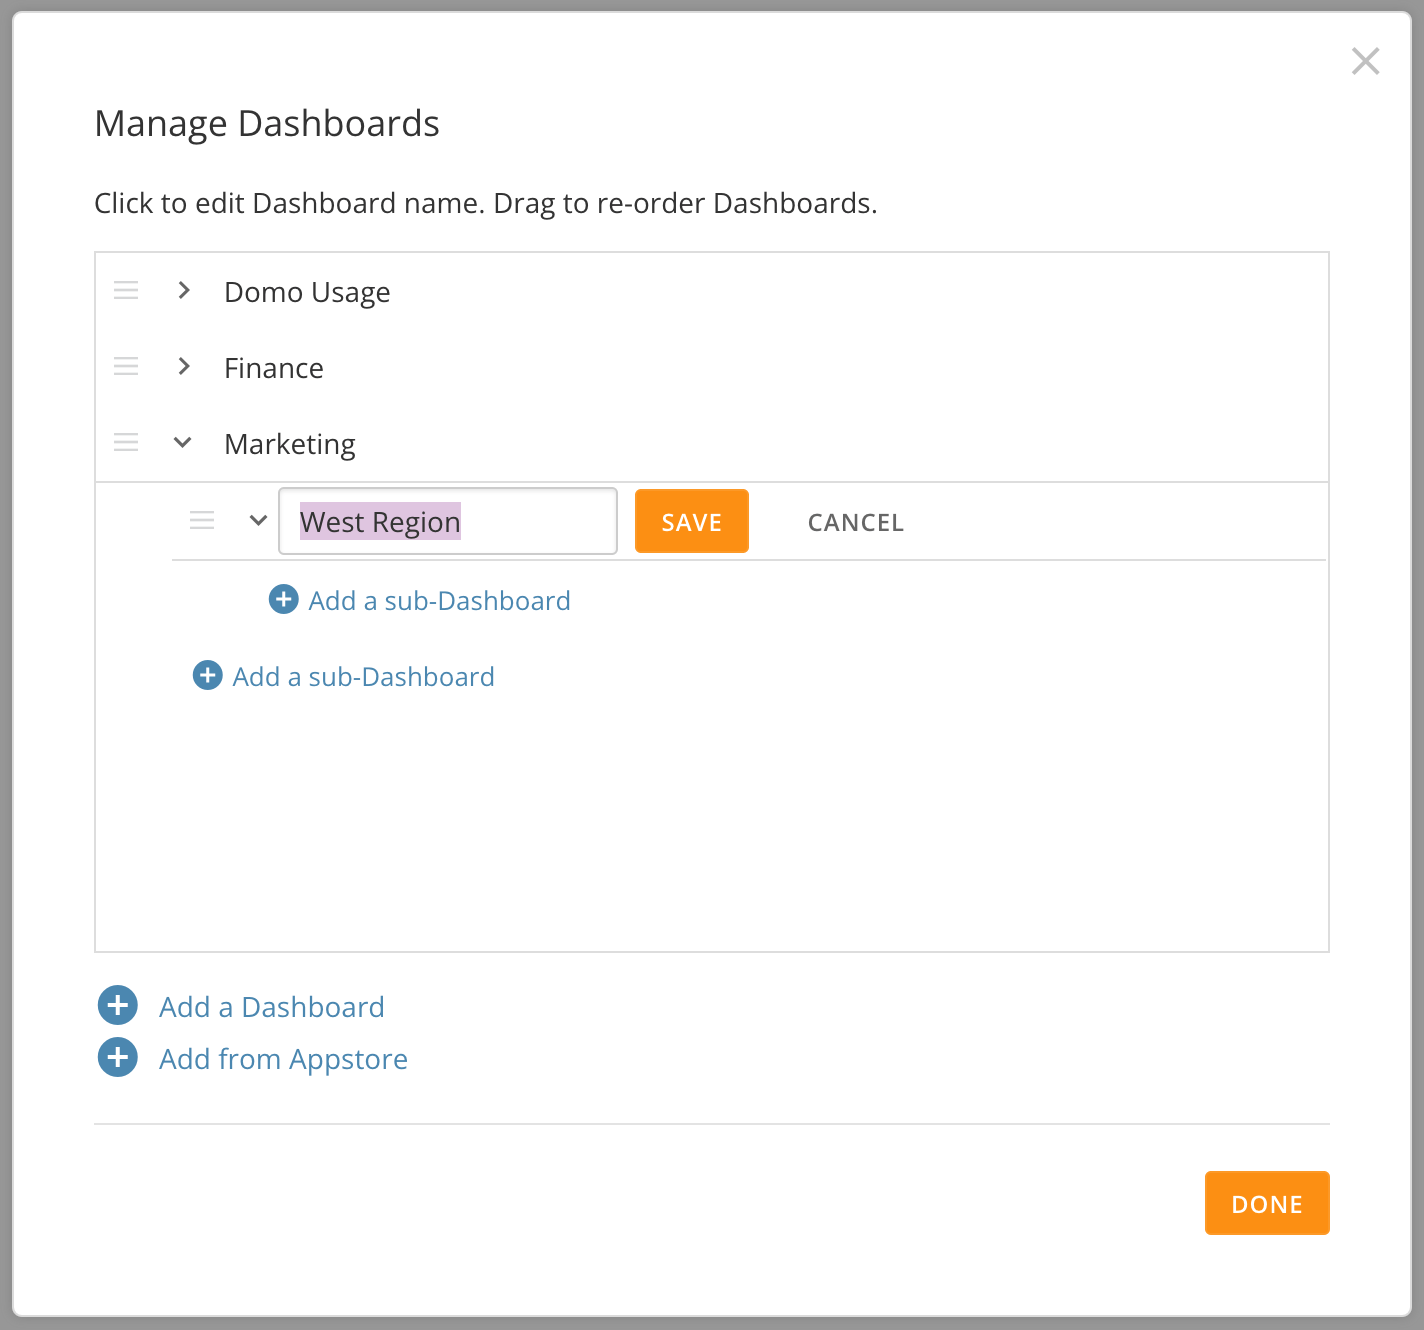 3. In the field, replace the current name with the new name. Names can contain up to 25 characters.
4. Select **Save**.
5. Select **Done** to close the modal.
# Reorder Dashboards/Sub-dashboards
In the Manage Dashboards modal, you can change the order of dashboards and sub-dashboards by dragging the handles beside the names. You can move a sub-dashboard above or below other sub-dashboards under the same top-level dashboard, but you cannot move it elsewhere in the hierarchy.
If you have an Admin default security role, you can change the hierarchical level of dashboards in the Admin Settings. See the Move Dashboards in the Hierarchy section below.
3. In the field, replace the current name with the new name. Names can contain up to 25 characters.
4. Select **Save**.
5. Select **Done** to close the modal.
# Reorder Dashboards/Sub-dashboards
In the Manage Dashboards modal, you can change the order of dashboards and sub-dashboards by dragging the handles beside the names. You can move a sub-dashboard above or below other sub-dashboards under the same top-level dashboard, but you cannot move it elsewhere in the hierarchy.
If you have an Admin default security role, you can change the hierarchical level of dashboards in the Admin Settings. See the Move Dashboards in the Hierarchy section below.
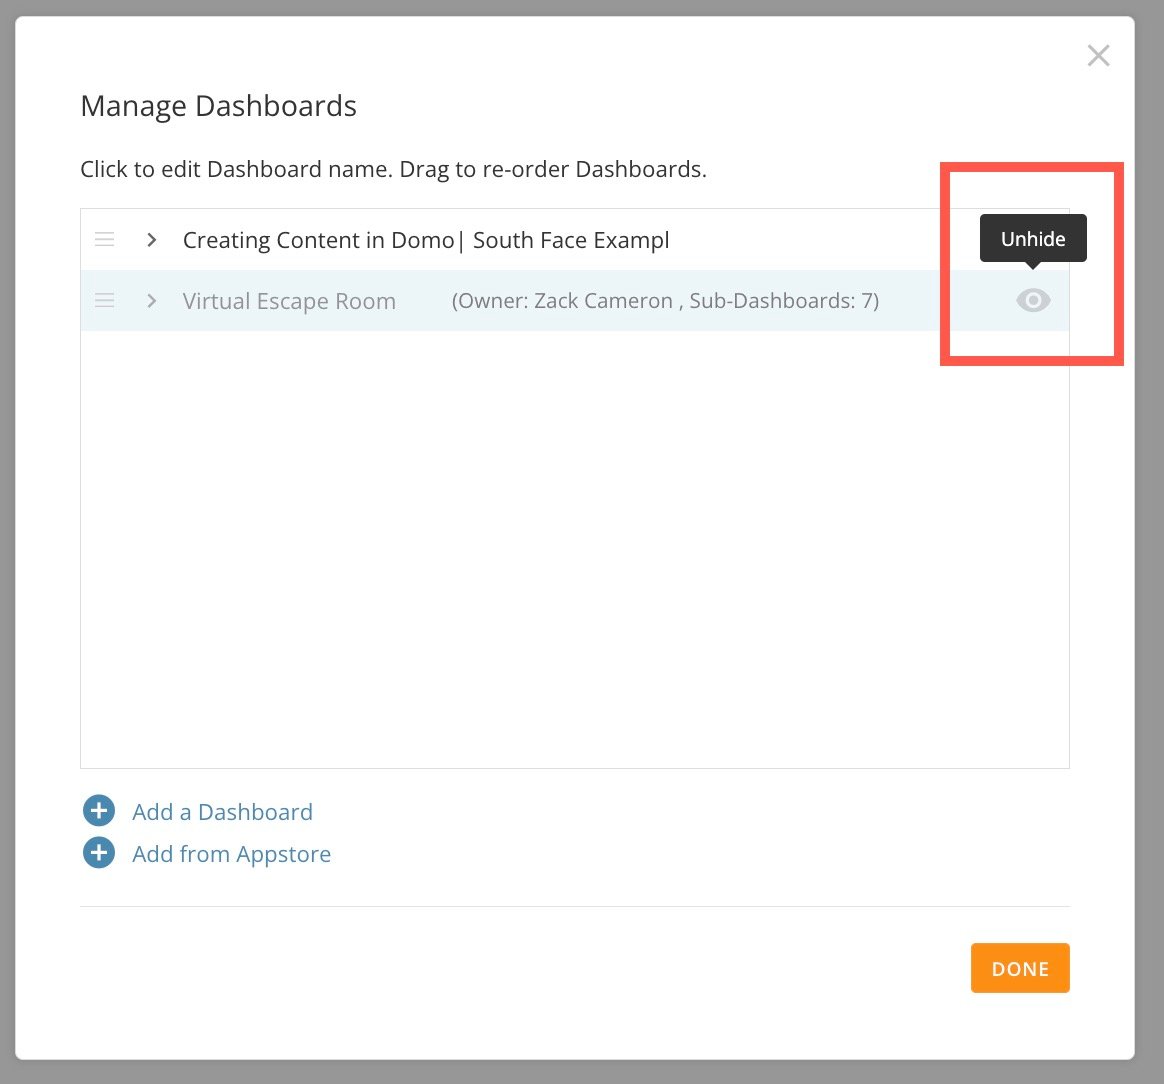
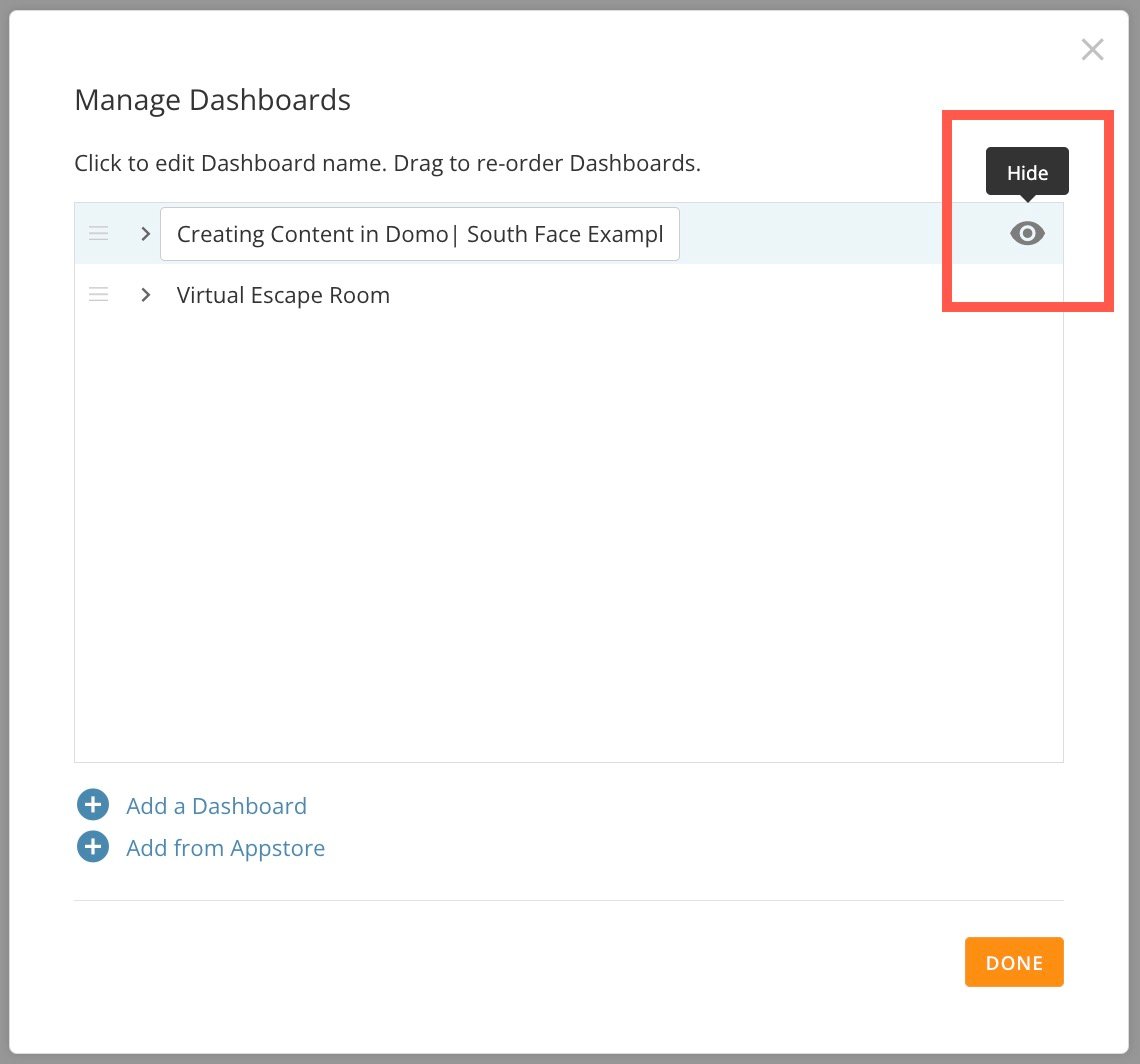 Follow the steps below to display a hidden dashboard/sub-dashboard. This option does not share a dashboard/sub-dashboard with anyone. This option personalizes your view of Domo. To learn about sharing a dashboard/sub-dashboard in Domo, see [Sharing and Removing Access to Cards and Dashboards](/s/article/360042932994).
1. [Access the **Manage Dashboards** modal.](#access_manage_dashboards_modal)
2. Locate the dashboard you want to unhide. It is grayed out.
3. Hover over the dashboard until the
Follow the steps below to display a hidden dashboard/sub-dashboard. This option does not share a dashboard/sub-dashboard with anyone. This option personalizes your view of Domo. To learn about sharing a dashboard/sub-dashboard in Domo, see [Sharing and Removing Access to Cards and Dashboards](/s/article/360042932994).
1. [Access the **Manage Dashboards** modal.](#access_manage_dashboards_modal)
2. Locate the dashboard you want to unhide. It is grayed out.
3. Hover over the dashboard until the
 # Change Dashboard Owner
You can change the dashboard owner if you have an Admin [default security role](/s/article/360043438953), a custom role with the (admin-level) Manage All Cards, Pages and Apps (App Studio) and Pages grant enabled, or if you are assigned as the dashboard owner. Change dashboard owners one dashboard at a time or change the owner of multiple dashboards at once in the Admin Settings.
# Change Dashboard Owner
You can change the dashboard owner if you have an Admin [default security role](/s/article/360043438953), a custom role with the (admin-level) Manage All Cards, Pages and Apps (App Studio) and Pages grant enabled, or if you are assigned as the dashboard owner. Change dashboard owners one dashboard at a time or change the owner of multiple dashboards at once in the Admin Settings.
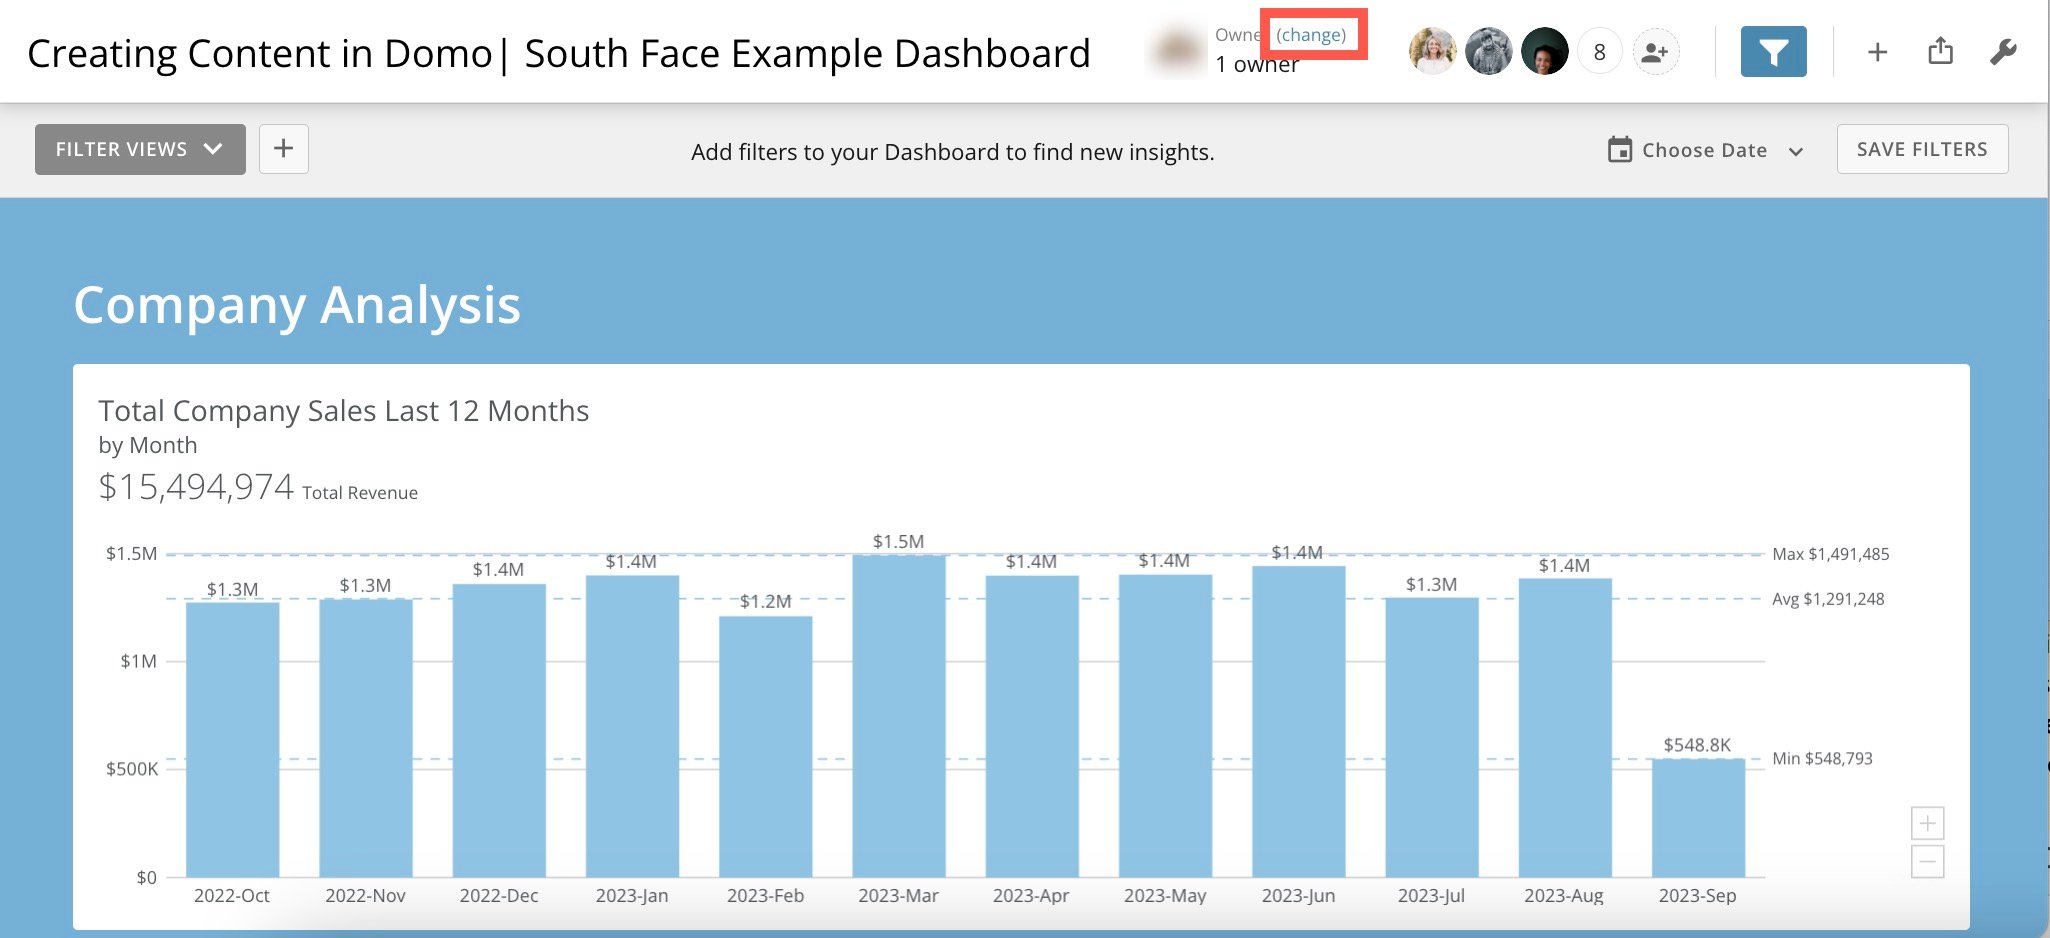 The **Manage Ownership** modal opens.
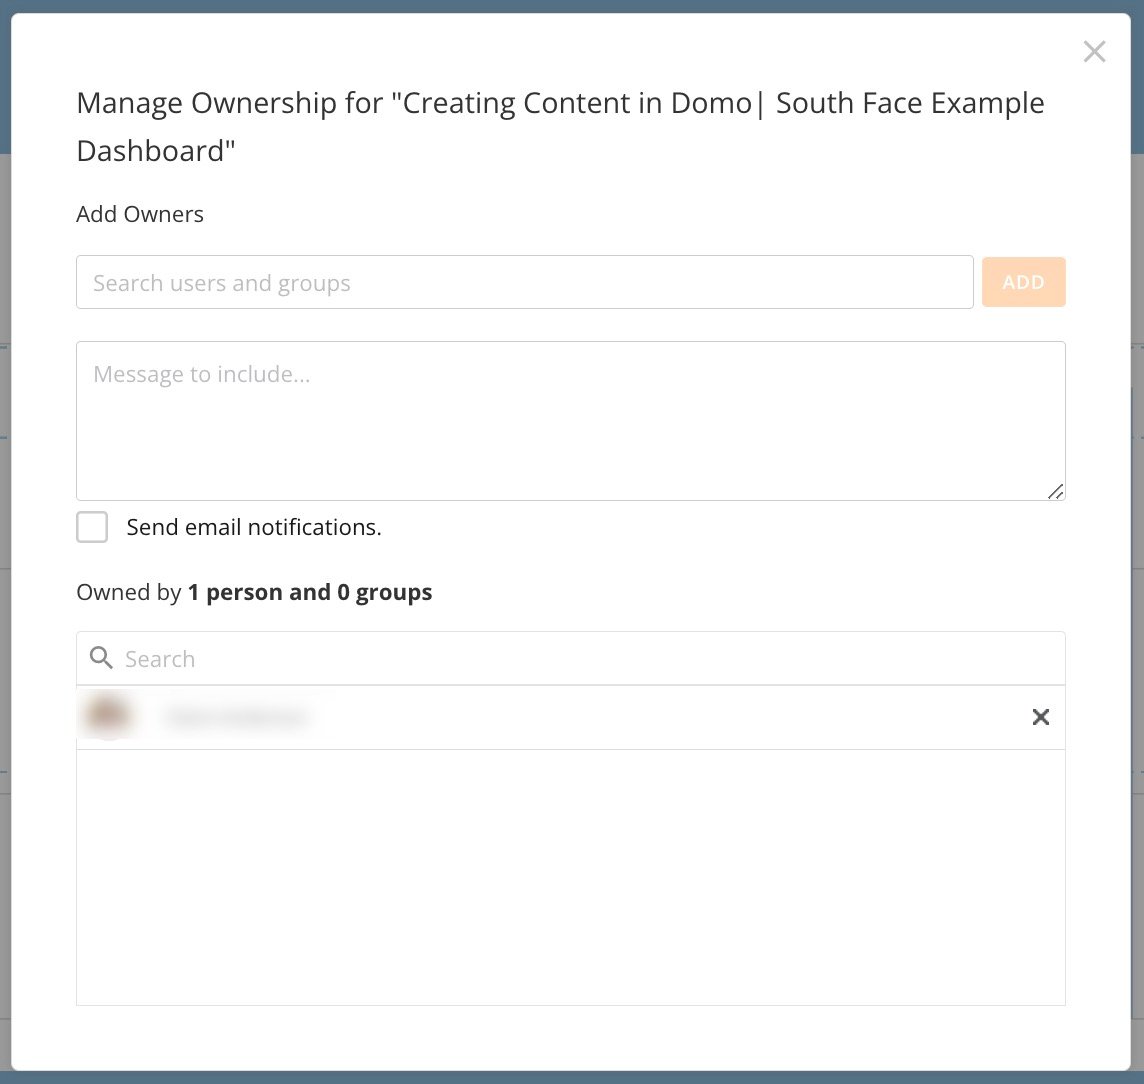 3. Search for and select users and groups to make owners.
4. (Optional) Write a message to the new owner(s) in the message field.
5. (Optional) Check the box labeled **Send email notifications** if you want to notify the new owners by email of the change in ownership.
6. Select **Add**.
Ownership of the Page is transferred to the user or group you selected.
# Change Dashboard Owner — Bulk
Follow these steps to change the owner of multiple dashboards at one time:
1. In the navigation header, select **More** > **Admin**.
2. In the **Content** menu, select **Dashboards** to display a list of all the dashboards in the instance.
3. Check the boxes for all dashboards you want to change the owner of. You can use the column filters to filter the cards in the list. You can also select or deselect all cards passed through your selected filters.
4. Select **Edit** > **Add dashboard owners** to display a modal.
3. Search for and select users and groups to make owners.
4. (Optional) Write a message to the new owner(s) in the message field.
5. (Optional) Check the box labeled **Send email notifications** if you want to notify the new owners by email of the change in ownership.
6. Select **Add**.
Ownership of the Page is transferred to the user or group you selected.
# Change Dashboard Owner — Bulk
Follow these steps to change the owner of multiple dashboards at one time:
1. In the navigation header, select **More** > **Admin**.
2. In the **Content** menu, select **Dashboards** to display a list of all the dashboards in the instance.
3. Check the boxes for all dashboards you want to change the owner of. You can use the column filters to filter the cards in the list. You can also select or deselect all cards passed through your selected filters.
4. Select **Edit** > **Add dashboard owners** to display a modal.
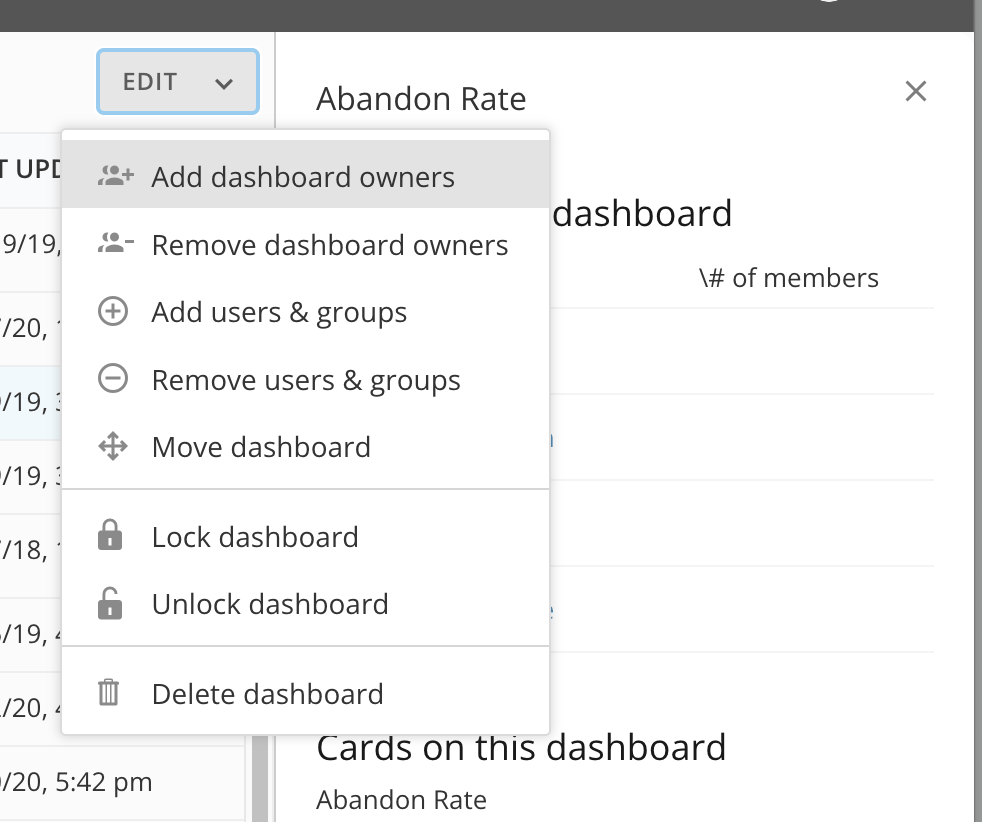 5. In the modal, enter the name of the new owner(s) or group(s) in the field.
The top results of your search appear automatically in a list as you enter characters and filter accordingly as you add or remove characters.
5. In the modal, enter the name of the new owner(s) or group(s) in the field.
The top results of your search appear automatically in a list as you enter characters and filter accordingly as you add or remove characters.
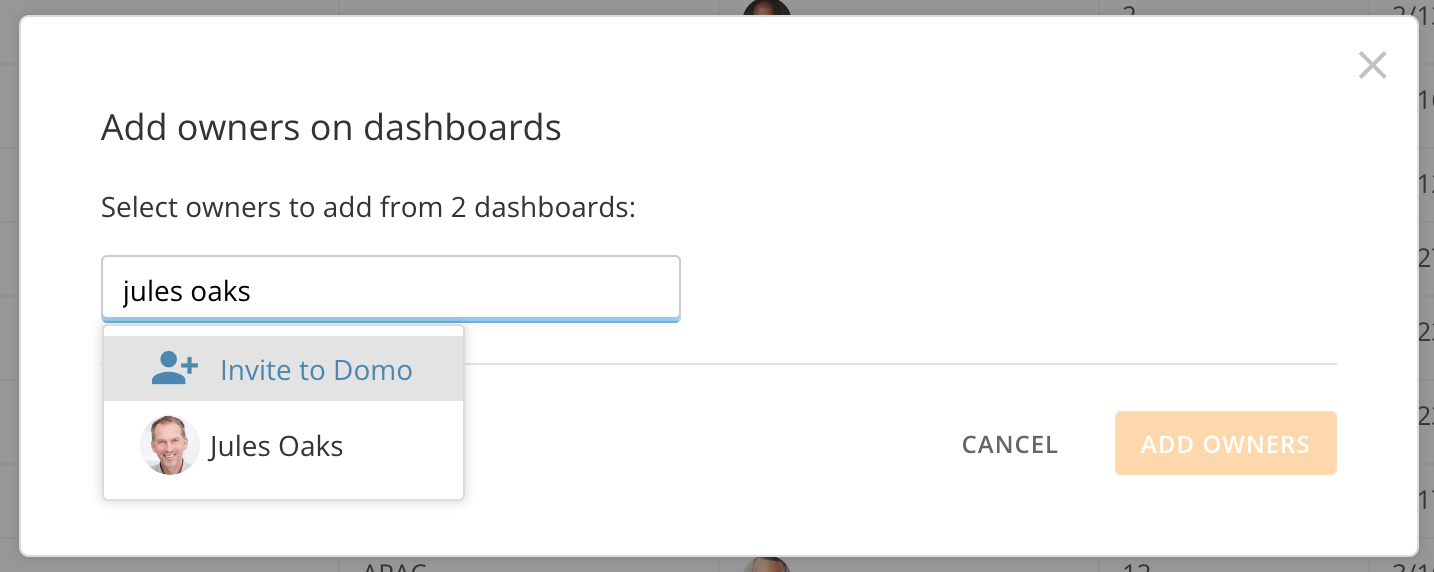 6. Select a user or group from the list.
The name of the user or group is added to the field.
7. Select **Add Owner**.
Ownership of all of the dashboards you selected is transferred to the new user(s) or group(s).
# Delete a Dashboard
While admins can [delete dashboards](#delete_dashboards) from inside the Admin Settings, all users can delete dashboards with the following exceptions:
* The system pages (Overview, Shared, Favorites) cannot be deleted.
* If someone doesn't own a dashboard, they don't have the option to delete it.
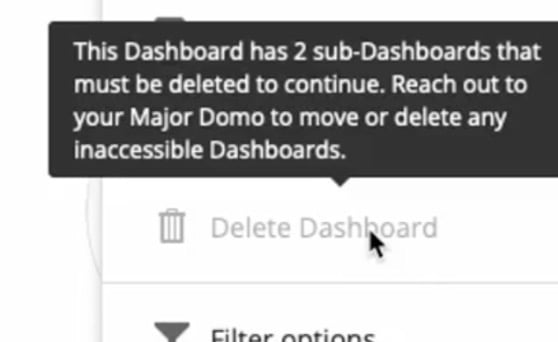
* If a dashboard has a sub-dashboard, the option to delete is disabled with the following tooltip: "This Dashboard has *x* sub-Dashboards that must be deleted to continue. Reach out to your Major Domo to move or delete any inaccessible Dashboards."
6. Select a user or group from the list.
The name of the user or group is added to the field.
7. Select **Add Owner**.
Ownership of all of the dashboards you selected is transferred to the new user(s) or group(s).
# Delete a Dashboard
While admins can [delete dashboards](#delete_dashboards) from inside the Admin Settings, all users can delete dashboards with the following exceptions:
* The system pages (Overview, Shared, Favorites) cannot be deleted.
* If someone doesn't own a dashboard, they don't have the option to delete it.
* If a dashboard has a sub-dashboard, the option to delete is disabled with the following tooltip: "This Dashboard has *x* sub-Dashboards that must be deleted to continue. Reach out to your Major Domo to move or delete any inaccessible Dashboards."
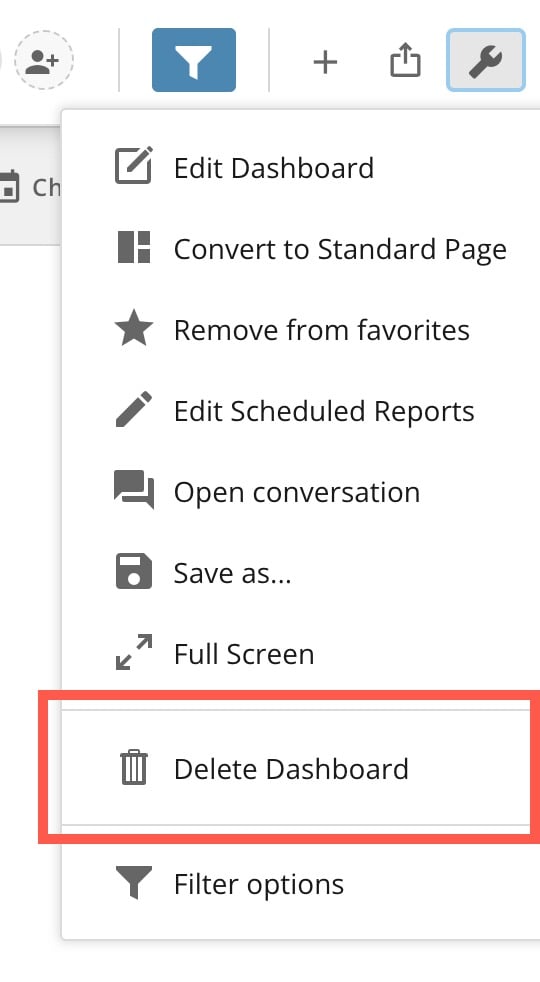 The *\
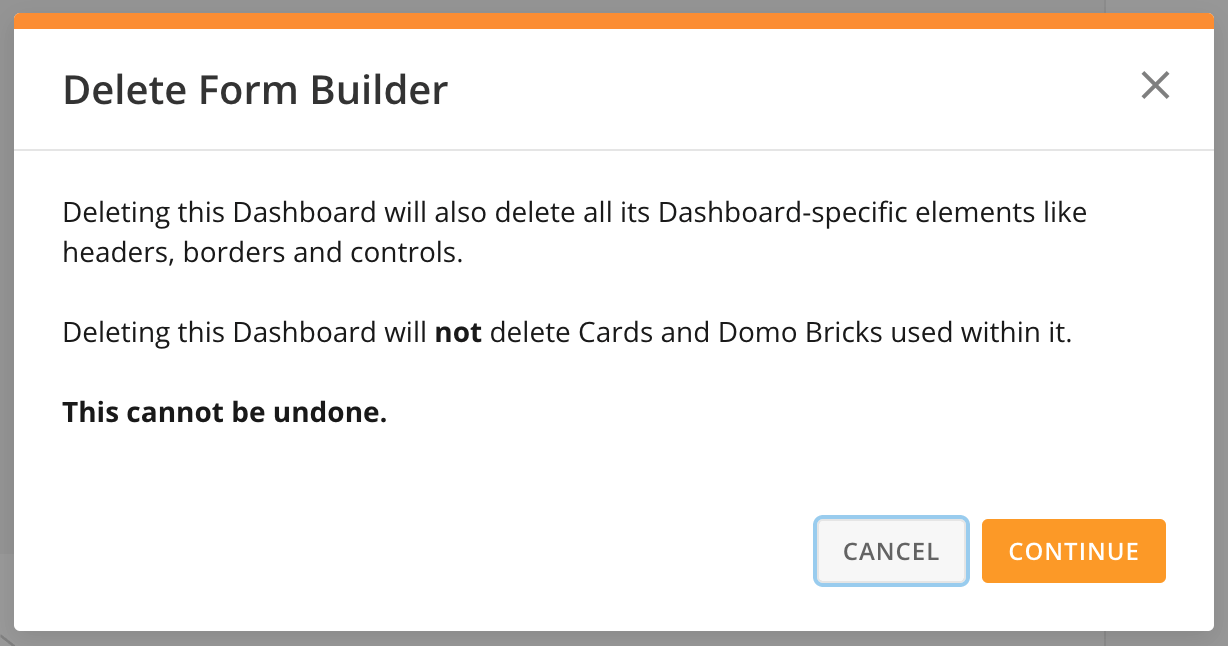 2. Select **Continue** to delete the dashboard or **Cancel** to close the modal without deleting the dashboard.
3. On the next screen of the modal, read through the conditions and check each box to confirm you understand the following:
* The number of dashboards that will be deleted from Domo permanently
* Certain dashboard elements such as borders, controls, and headers will be deleted permanently
* Deleting the dashboard will not delete cards, bricks, or other objects on the dashboard
2. Select **Continue** to delete the dashboard or **Cancel** to close the modal without deleting the dashboard.
3. On the next screen of the modal, read through the conditions and check each box to confirm you understand the following:
* The number of dashboards that will be deleted from Domo permanently
* Certain dashboard elements such as borders, controls, and headers will be deleted permanently
* Deleting the dashboard will not delete cards, bricks, or other objects on the dashboard
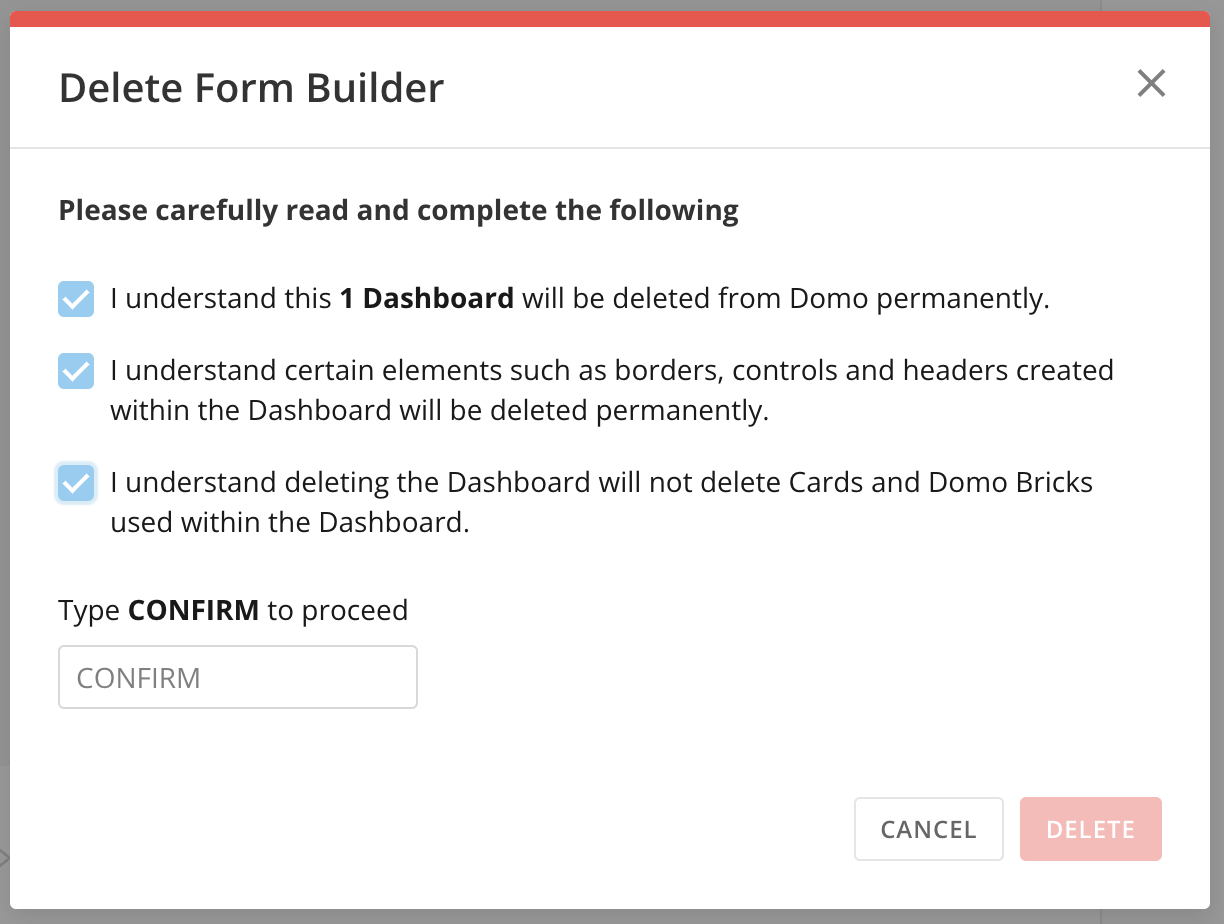 4. Type "CONFIRM" (all caps) to proceed.
5. Select **Delete** to permanently delete the dashboard or **Cancel** to close the modal and keep the dashboard.
# Locate the Dashboard ID
To locate a dashboard ID, navigate to the dashboard. In the URL, the dashboard ID displays a string of numbers as in this example: [https:// *mycompany*.domo.com/page/](https://mycompany.domo.com/page/123456789) [123456789](https://mycompany.domo.com/page/123456789).
In this image, the dashboard ID is 362278006.
4. Type "CONFIRM" (all caps) to proceed.
5. Select **Delete** to permanently delete the dashboard or **Cancel** to close the modal and keep the dashboard.
# Locate the Dashboard ID
To locate a dashboard ID, navigate to the dashboard. In the URL, the dashboard ID displays a string of numbers as in this example: [https:// *mycompany*.domo.com/page/](https://mycompany.domo.com/page/123456789) [123456789](https://mycompany.domo.com/page/123456789).
In this image, the dashboard ID is 362278006.
 ***
### Admin Tasks
Admins can perform the following tasks.
# Move Dashboards
Admins can move dashboards and change their position in the hierarchy. For example, they can change a top-level dashboard into a sub-dashboard by moving it under another top-level dashboard. Admins include those with an Admin default security role or a custom role with the Manage All Cards, Pages and Apps (App Studio) grant enabled. For more information about default security roles in Domo, see [Managing Roles](/s/article/360043428253 "Security Role Reference").
You can move dashboards one by one or multiple dashboards at a time.
When you move a dashboard, you can make it either a parent or sub-dashboard. When you turn a dashboard into a sub-dashboard, you must select a new parent dashboard. You can use any other parent dashboard or sub-dashboard as the new parent dashboard.
#### Permissions
When you move a dashboard, you must determine access to the dashboard.
***
### Admin Tasks
Admins can perform the following tasks.
# Move Dashboards
Admins can move dashboards and change their position in the hierarchy. For example, they can change a top-level dashboard into a sub-dashboard by moving it under another top-level dashboard. Admins include those with an Admin default security role or a custom role with the Manage All Cards, Pages and Apps (App Studio) grant enabled. For more information about default security roles in Domo, see [Managing Roles](/s/article/360043428253 "Security Role Reference").
You can move dashboards one by one or multiple dashboards at a time.
When you move a dashboard, you can make it either a parent or sub-dashboard. When you turn a dashboard into a sub-dashboard, you must select a new parent dashboard. You can use any other parent dashboard or sub-dashboard as the new parent dashboard.
#### Permissions
When you move a dashboard, you must determine access to the dashboard.
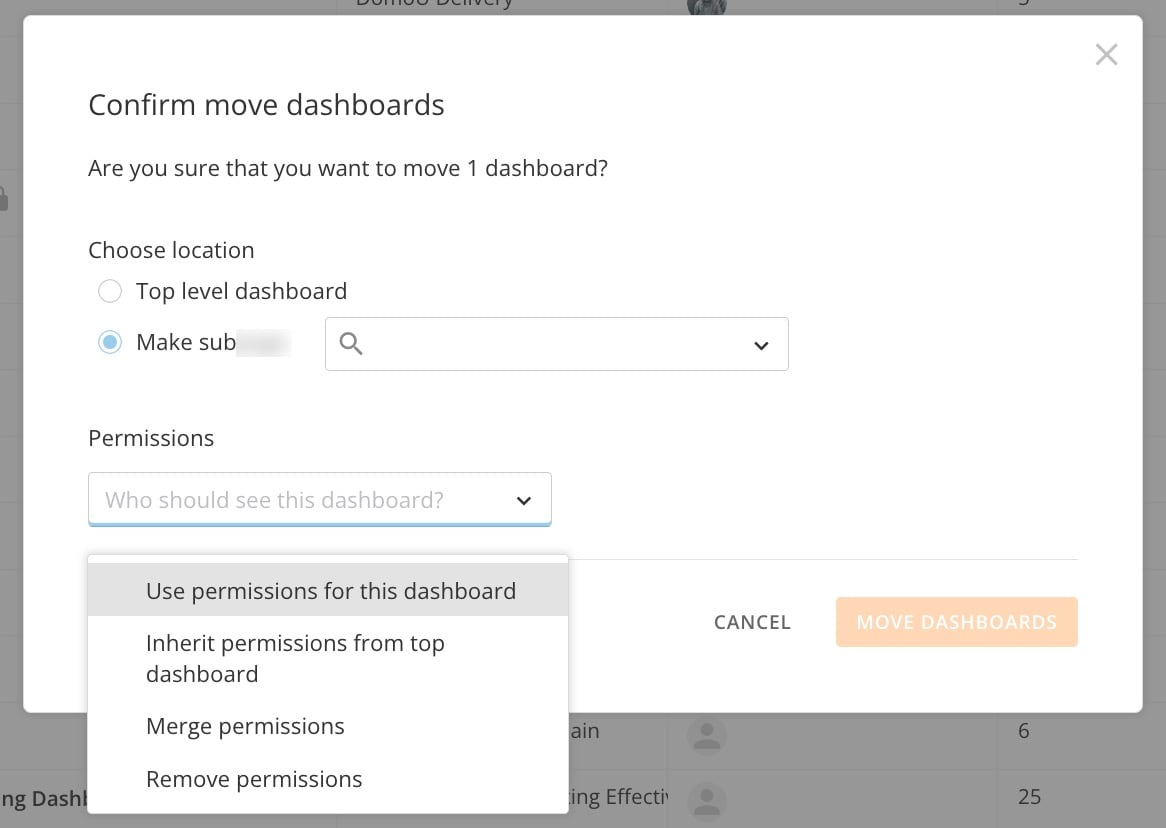 Use permissions to give access to the appropriate people. This table describes the available permissions:
Option | Description |
|---|---|
Use permissions for this dashboard | Current permissions for the dashboard remain the same. Only people with current access to this dashboard will be able to access it in the new location. |
Inherit permissions from top dashboard | This option is only available if you change the dashboard into a sub-dashboard. Only people with permission to the sub-dashboard's new parent dashboard can access the dashboard after the move. |
Merge permissions | This option is only available if you change the dashboard into a sub-dashboard. |
Remove permissions | Removes all permissions from the dashboard. |
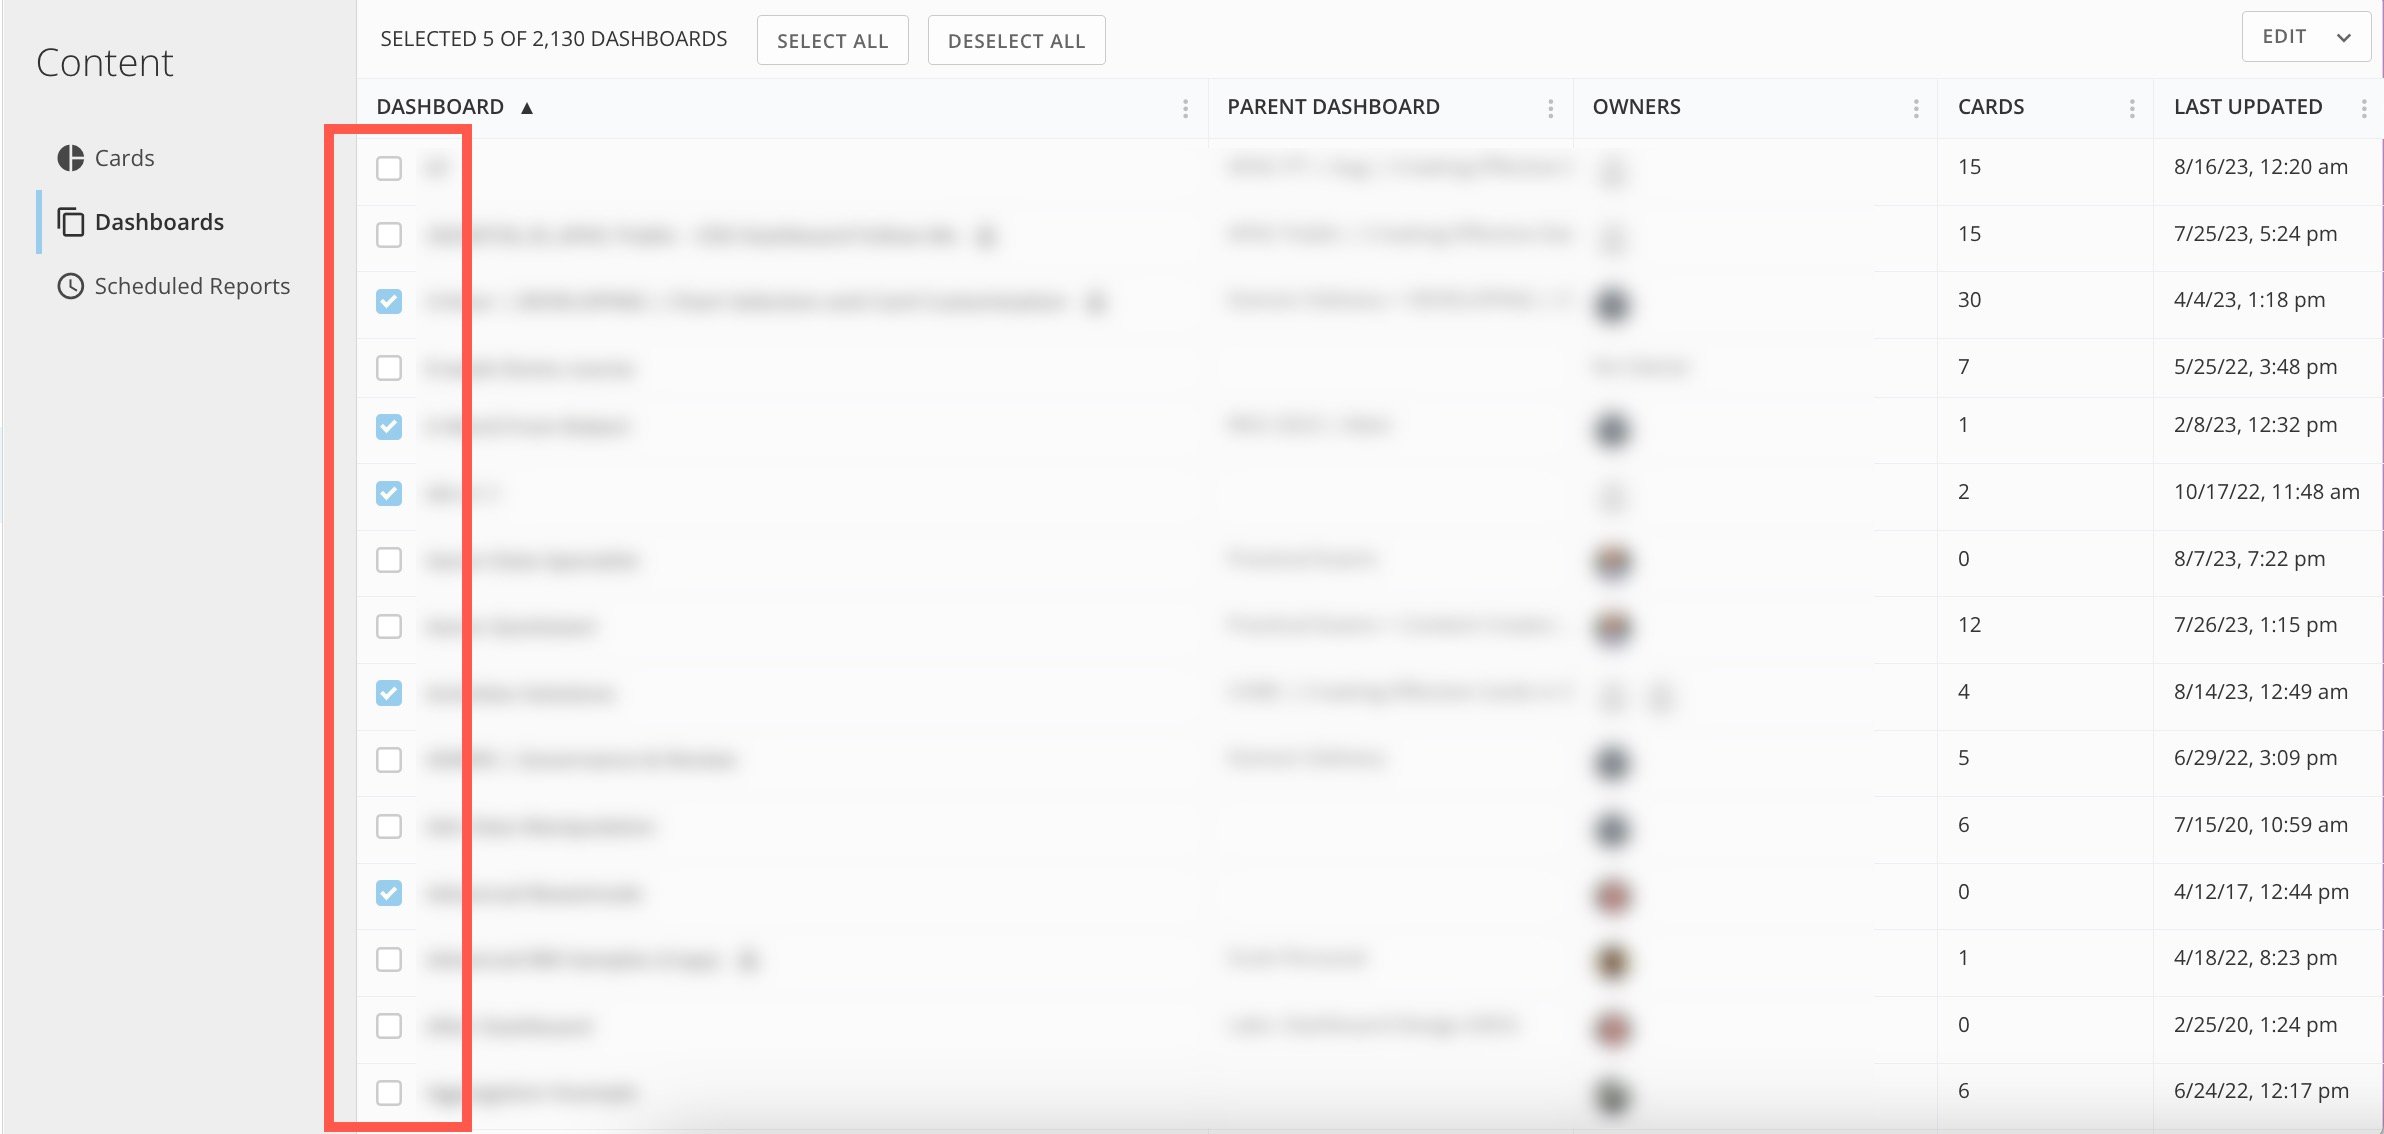
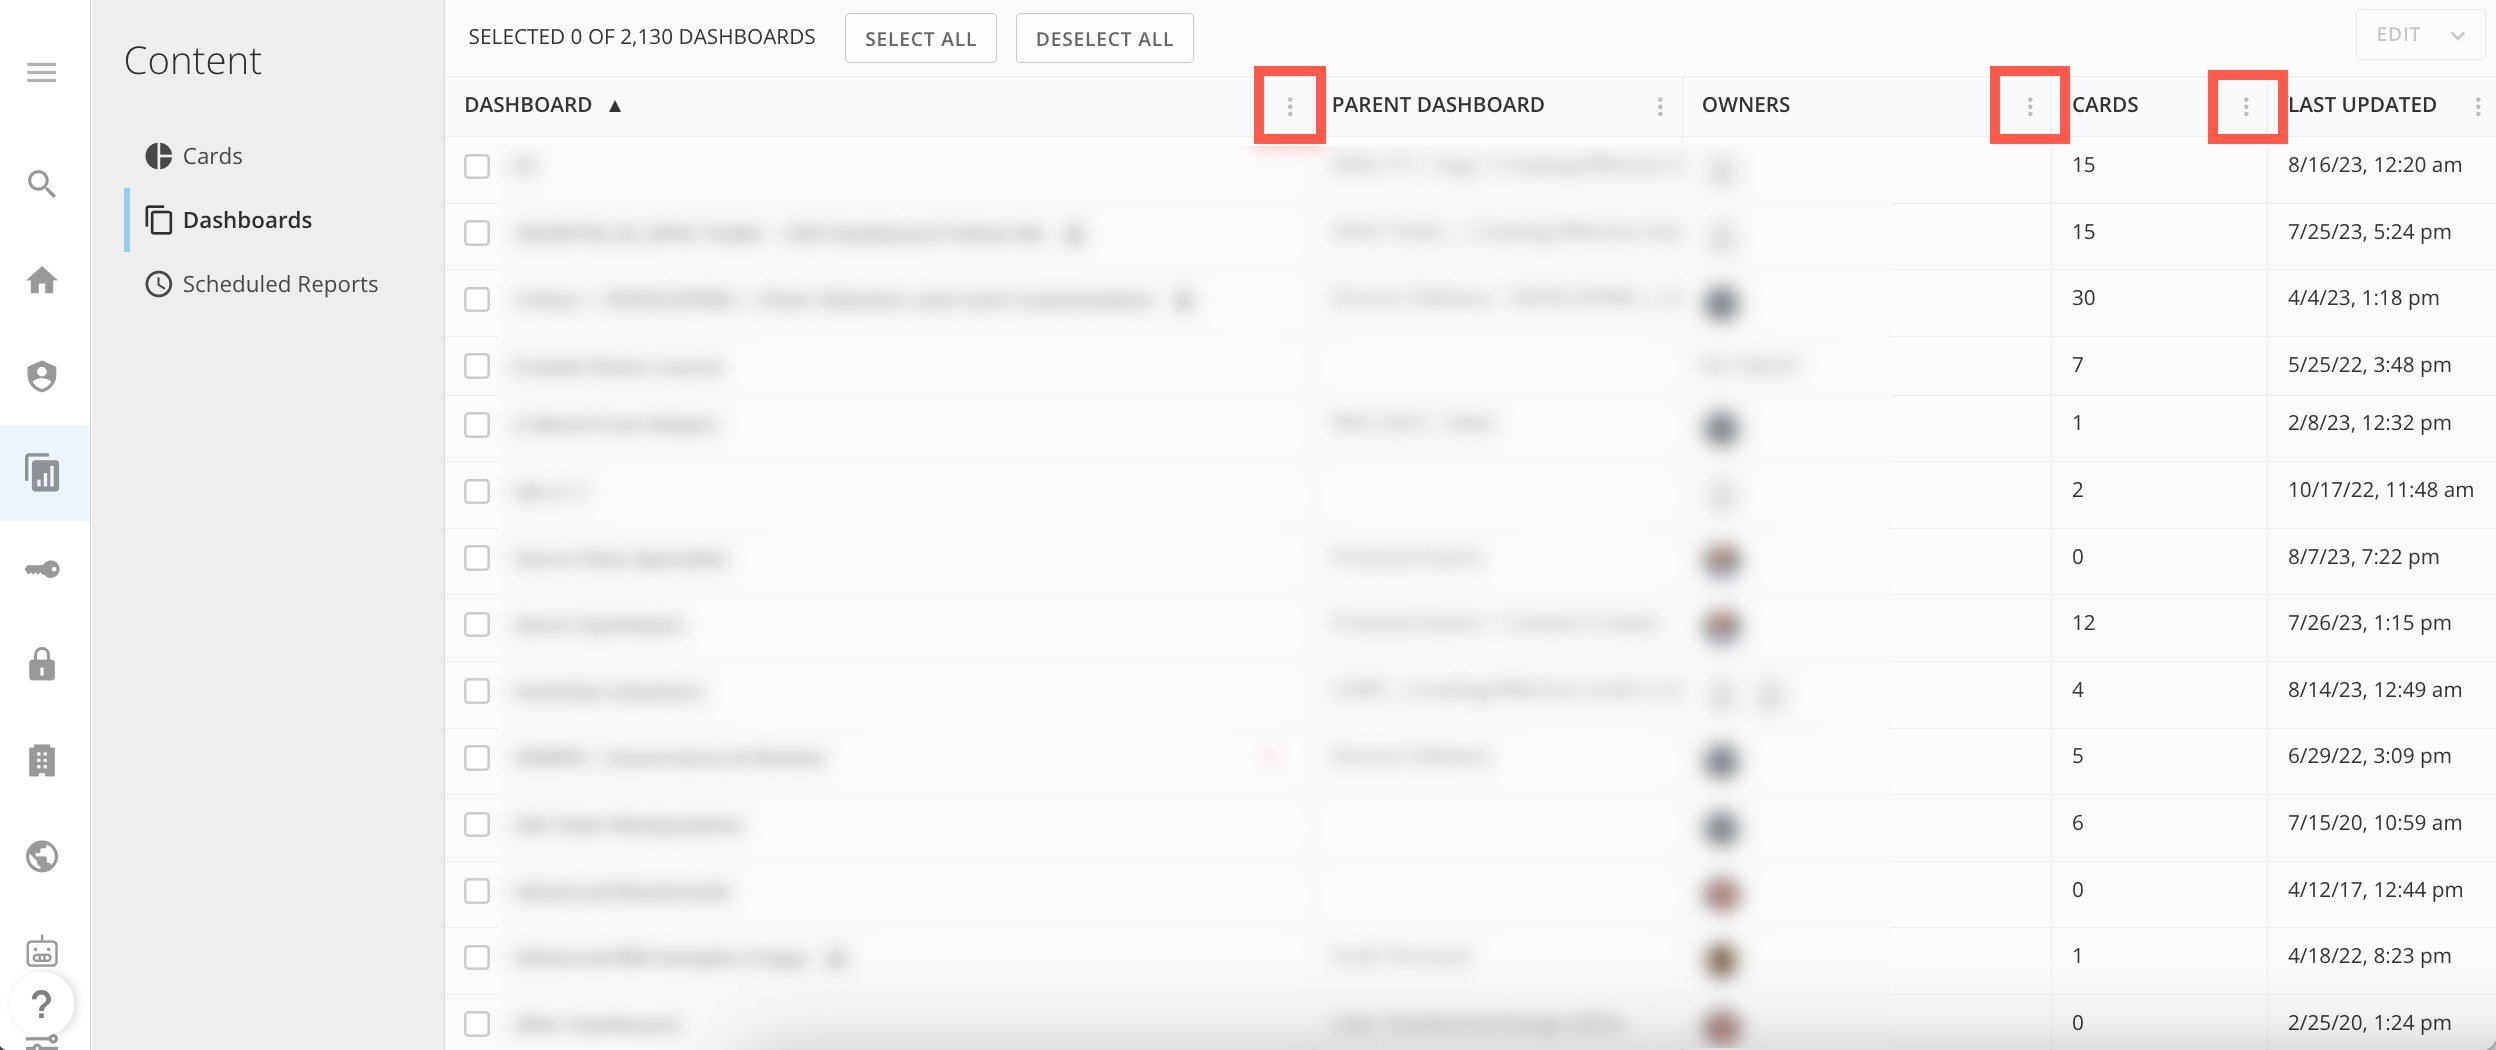 3. Check the box for every dashboard you want to move.
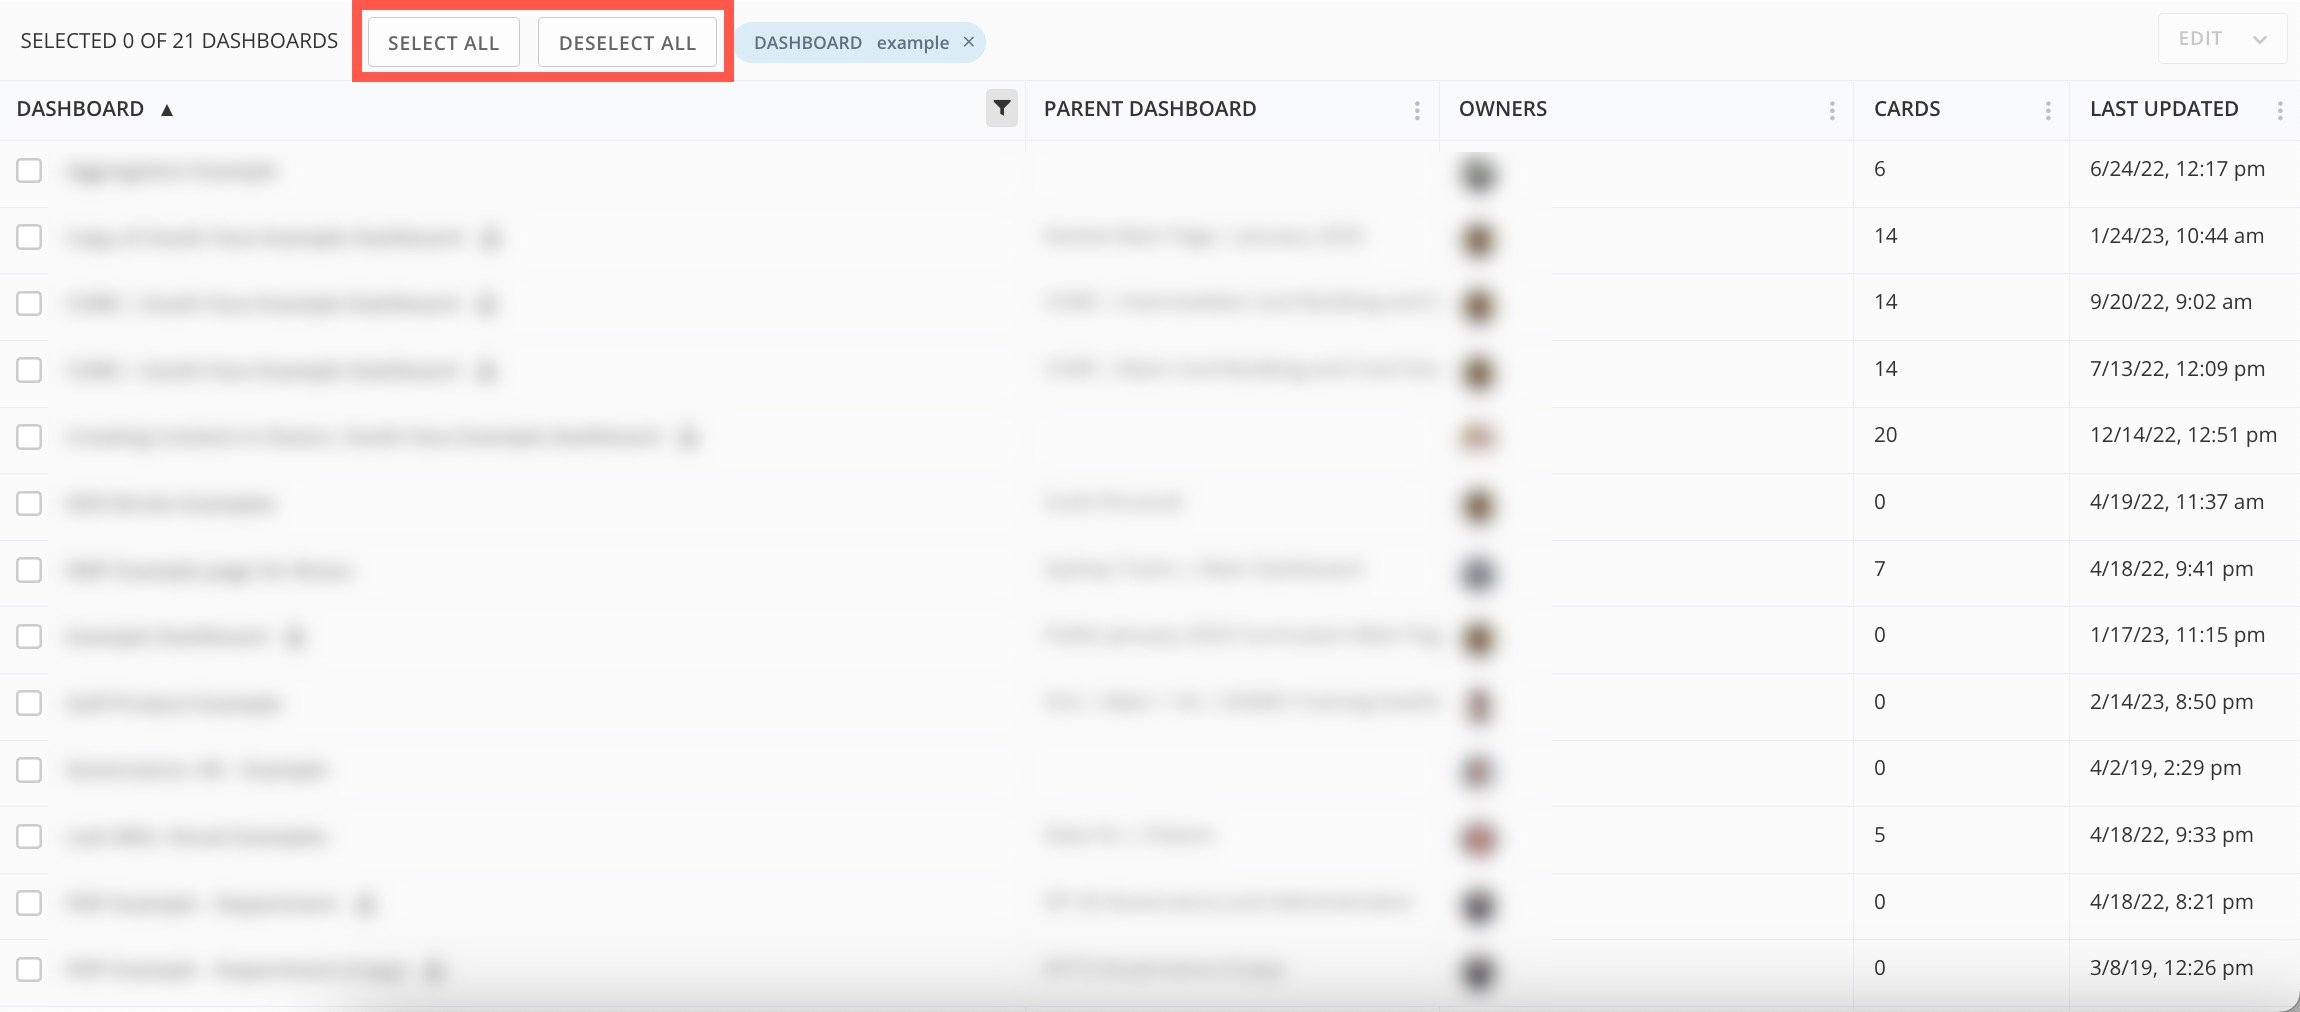
 You can also select or deselect all dashboards passed through your selected Filters.
 4. After selecting the dashboards you want to move, select **Edit > Move dashboard**.
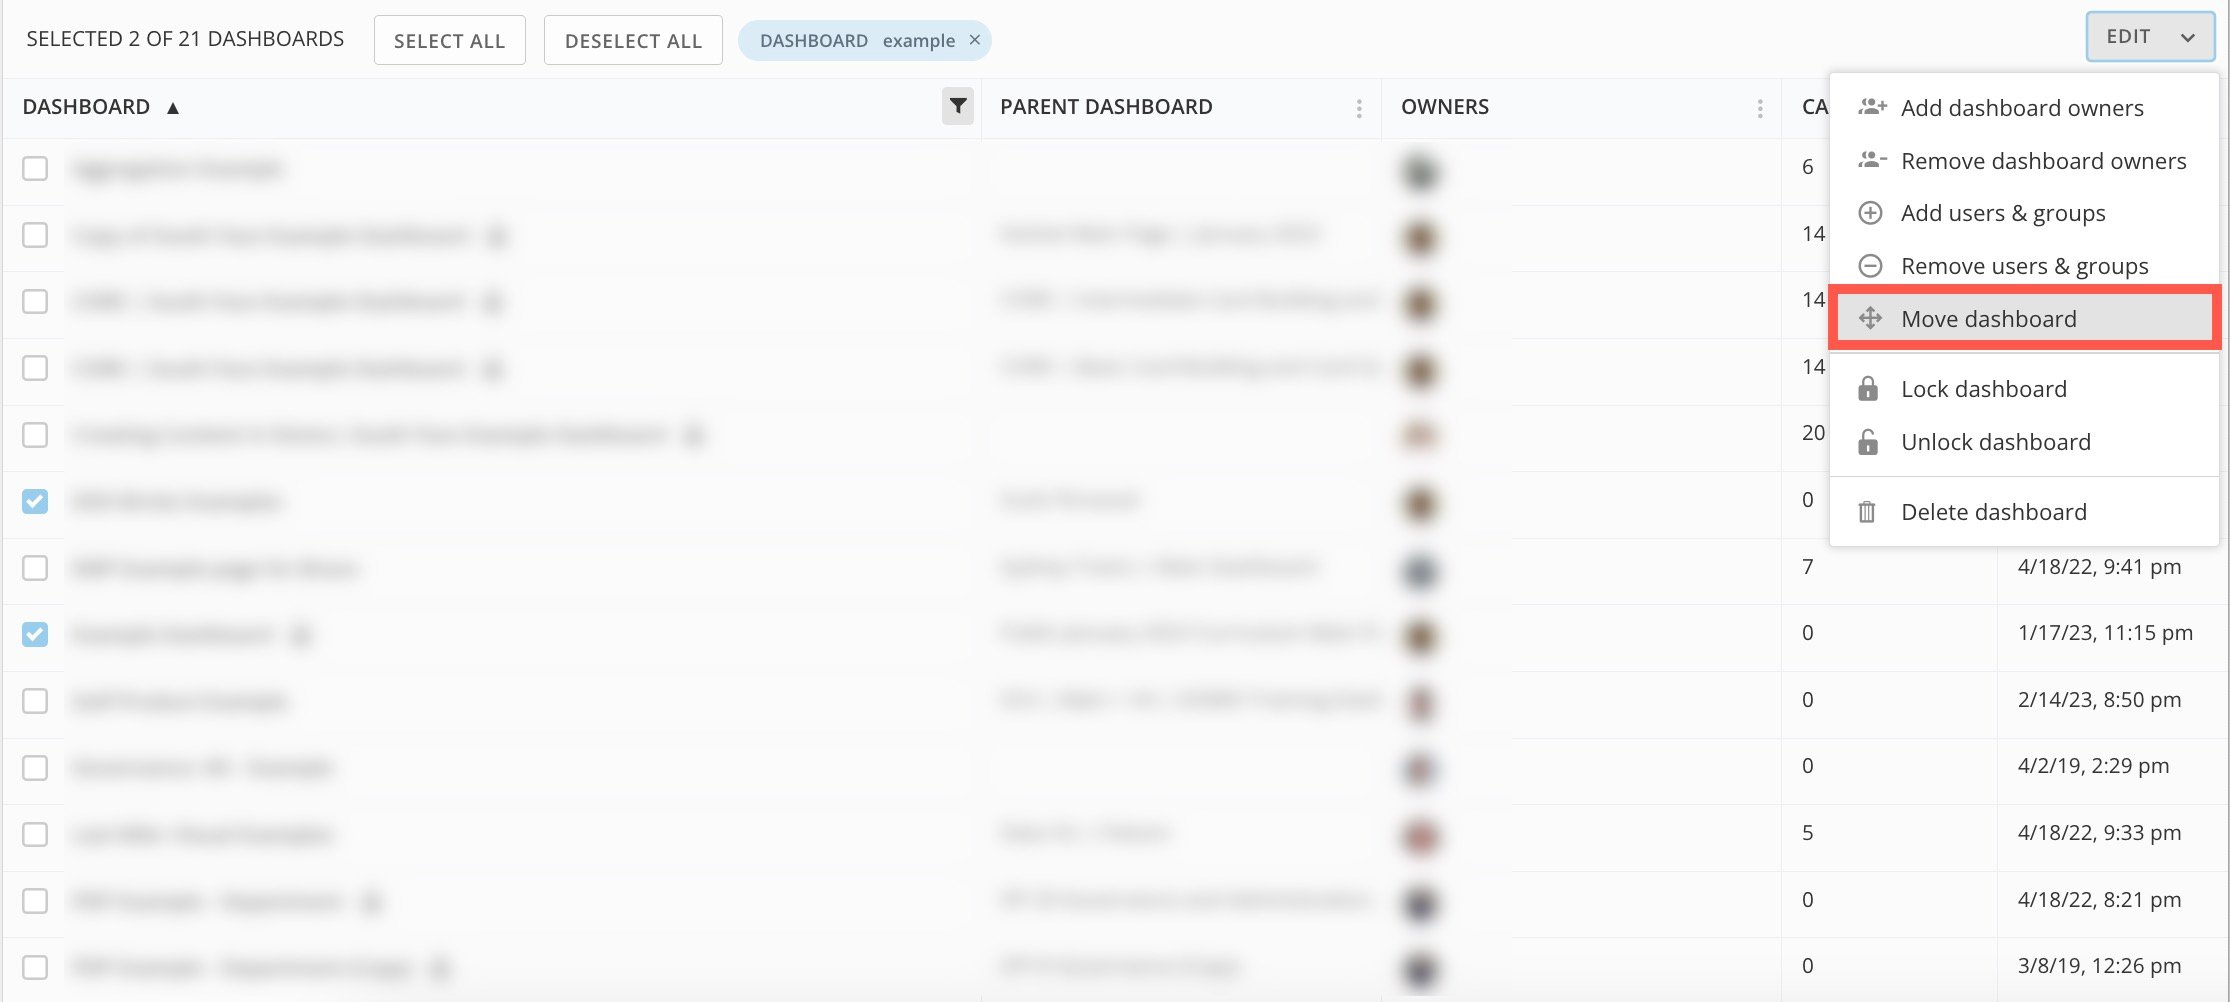 The **Confirm move dashboards** modal displays.
5. In the modal under **Choose location**, select **Top level dashboard** or select **Make subpage** if you want the dashboards to be the sub-dashboards of another top-level dashboard.
6. (Conditional) If you select **Make subpage**, select the top-level dashboard you want the new sub-dashboard to be under from the dropdown. The top results of your search appear automatically in a list as you enter characters and filter accordingly as you add or remove characters.
7. Under **Permissions**, select the desired permissions option for these dashboards. For more information about the available options, see the [Permissions](#permissions) section above.
8. Select **Move Dashboards**.
The changes you specified take effect.
# Delete Dashboards and Sub-dashboards
Depending on your security role, you can delete dashboards from Domo in the Admin Settings.
* If you have a Privileged or Editor
[default security role](/s/article/360043438953) or a custom role with the Edit Pages grant enabled, you can delete any dashboards/sub- you own.
* If you have an Admin
[default security role](/s/article/360043438953) or a custom role with the Manage All Cards, Pages and Apps (App Studio) grant enabled, you can delete any dashboard/sub- in Domo.
For more information about default security roles in Domo, see [Managing Custom Roles](/s/article/360043438973 "Security Role Reference").
If you delete a dashboard and the dashboard has any subs, those subs are deleted. This does not delete any cards on the dashboard or sub-. You can find them on the **Cards** page of your Content Settings.
Follow these steps to delete a dashboard/sub-dashboard:
1. Access the Admin Settings.
2. Under **Content**, select **Dashboards** to open the dashboards list.
3. Check the box beside the dashboard/sub-dashboard you want to delete.
4. Select **Edit** >
The **Confirm move dashboards** modal displays.
5. In the modal under **Choose location**, select **Top level dashboard** or select **Make subpage** if you want the dashboards to be the sub-dashboards of another top-level dashboard.
6. (Conditional) If you select **Make subpage**, select the top-level dashboard you want the new sub-dashboard to be under from the dropdown. The top results of your search appear automatically in a list as you enter characters and filter accordingly as you add or remove characters.
7. Under **Permissions**, select the desired permissions option for these dashboards. For more information about the available options, see the [Permissions](#permissions) section above.
8. Select **Move Dashboards**.
The changes you specified take effect.
# Delete Dashboards and Sub-dashboards
Depending on your security role, you can delete dashboards from Domo in the Admin Settings.
* If you have a Privileged or Editor
[default security role](/s/article/360043438953) or a custom role with the Edit Pages grant enabled, you can delete any dashboards/sub- you own.
* If you have an Admin
[default security role](/s/article/360043438953) or a custom role with the Manage All Cards, Pages and Apps (App Studio) grant enabled, you can delete any dashboard/sub- in Domo.
For more information about default security roles in Domo, see [Managing Custom Roles](/s/article/360043438973 "Security Role Reference").
If you delete a dashboard and the dashboard has any subs, those subs are deleted. This does not delete any cards on the dashboard or sub-. You can find them on the **Cards** page of your Content Settings.
Follow these steps to delete a dashboard/sub-dashboard:
1. Access the Admin Settings.
2. Under **Content**, select **Dashboards** to open the dashboards list.
3. Check the box beside the dashboard/sub-dashboard you want to delete.
4. Select **Edit** > 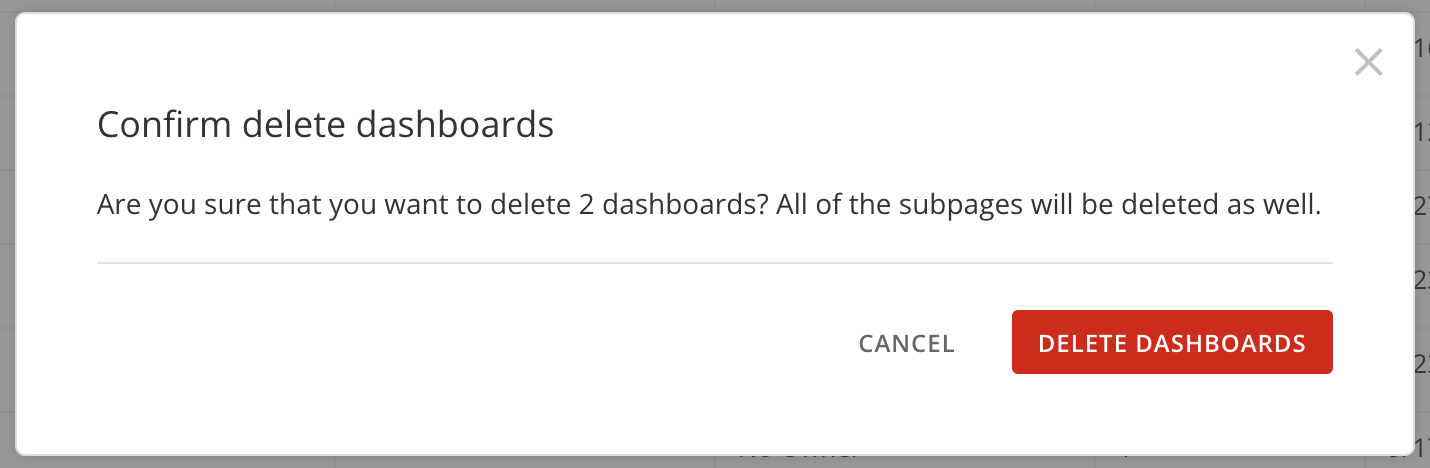 5. Select **Delete Dashboards** or **Cancel**.