Primary Use Cases | This connector is appropriate for:
|
Primary Metrics |
|
Primary Company Roles | Salespeople, executives, etc. |
Average Implementation Time | 30 hours |
Ease of Use (on a 1-to-10 scale with 1 being easiest) | 9 |
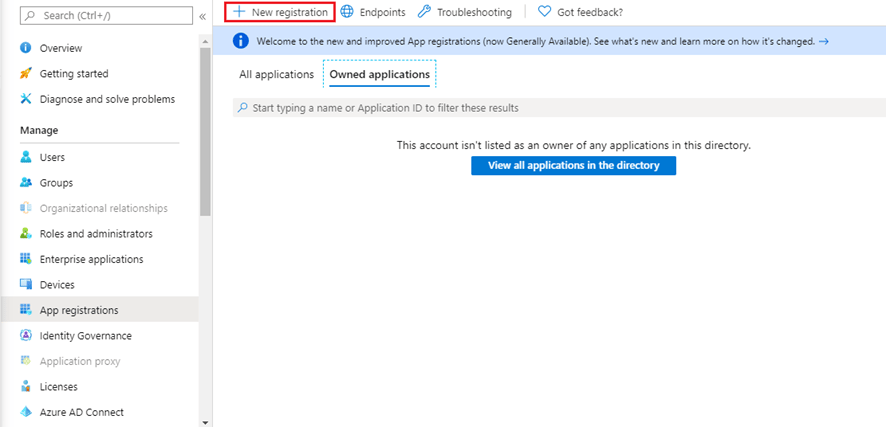 6. Click **New registration**.
7. Fill out the registration form as follows:
* Name: *MicrosoftDynamicsCRMRest*
* Supported account types: Select an option to specify who can use this application or access this API.
Redirect URI: Add and save the following URL: [https://oauth.domo.com/api/data/v1/oauth/providers/microsoft-dynamics-crm/exchange](https://oauth.domo.com/api/data/v1/oauth/providers/microsoft-dynamics-crm/exchange). The authentication response is sent to this URI after successfully authenticating the user. Providing the URI at this stage is optional and it can be changed later, but a value is required for most of the authentication scenarios.
8. Click **Register**. An overview of your registered App will appear.
6. Click **New registration**.
7. Fill out the registration form as follows:
* Name: *MicrosoftDynamicsCRMRest*
* Supported account types: Select an option to specify who can use this application or access this API.
Redirect URI: Add and save the following URL: [https://oauth.domo.com/api/data/v1/oauth/providers/microsoft-dynamics-crm/exchange](https://oauth.domo.com/api/data/v1/oauth/providers/microsoft-dynamics-crm/exchange). The authentication response is sent to this URI after successfully authenticating the user. Providing the URI at this stage is optional and it can be changed later, but a value is required for most of the authentication scenarios.
8. Click **Register**. An overview of your registered App will appear.
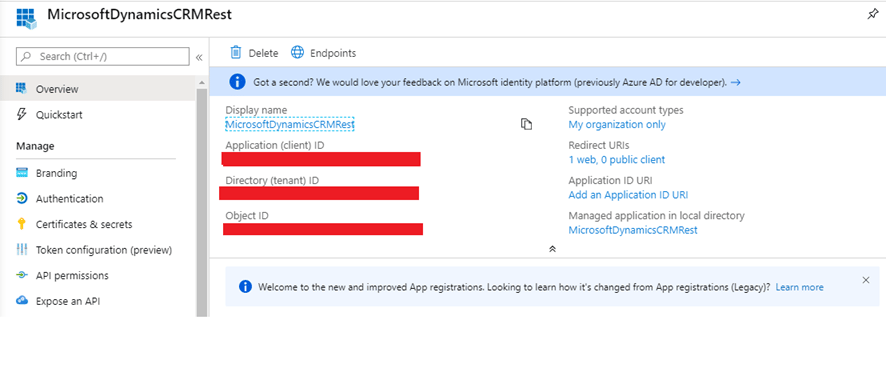 9. Copy the **Application ID** that appears after the application is created and paste it into the **Client ID** field in the Connector credentials section in Domo.
10. Click **API Permissions**.
9. Copy the **Application ID** that appears after the application is created and paste it into the **Client ID** field in the Connector credentials section in Domo.
10. Click **API Permissions**.
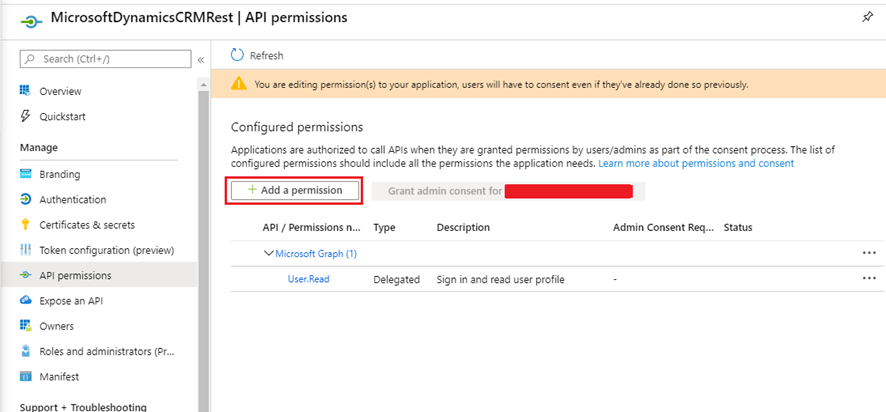 11. Click **Add a permission**. **Request API permissions** section appears.
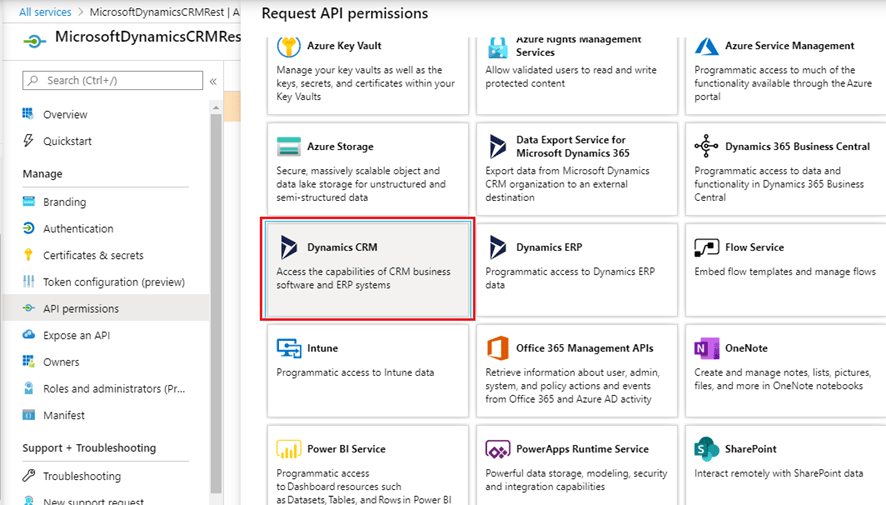 12. Click on **Dynamics CRM** tile.
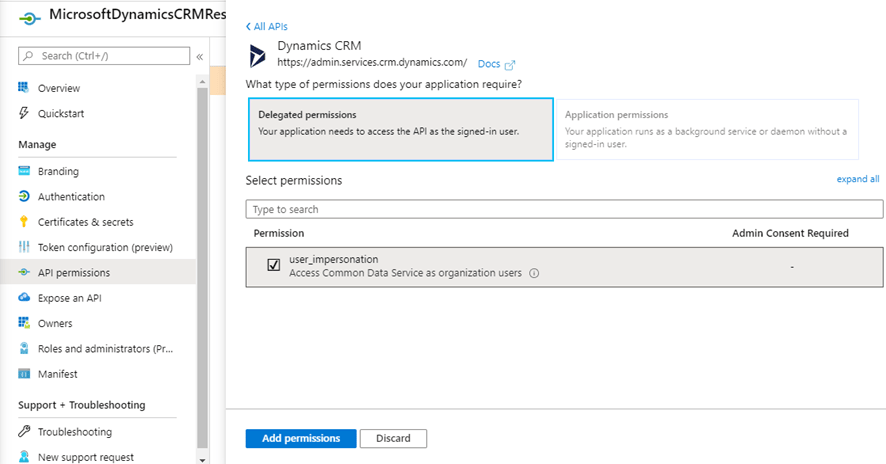 13. Select the **Delegated permissions** for your App and click **Add permissions**. The configured permissions will be listed.
14. Click on **Certificates and secrets**. Certificates can be used as secrets to prove the application’s identity when requesting a token. Also, can be referred to as public keys. Click **Upload certificate** to upload a new certificate for your App.
13. Select the **Delegated permissions** for your App and click **Add permissions**. The configured permissions will be listed.
14. Click on **Certificates and secrets**. Certificates can be used as secrets to prove the application’s identity when requesting a token. Also, can be referred to as public keys. Click **Upload certificate** to upload a new certificate for your App.
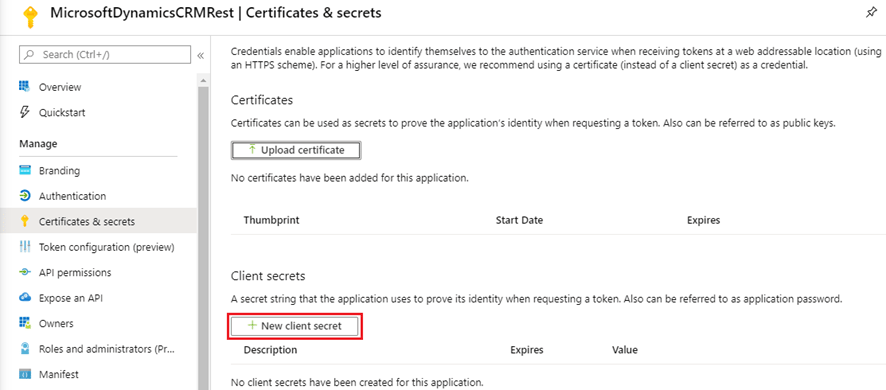 15. Click **New client secret**.
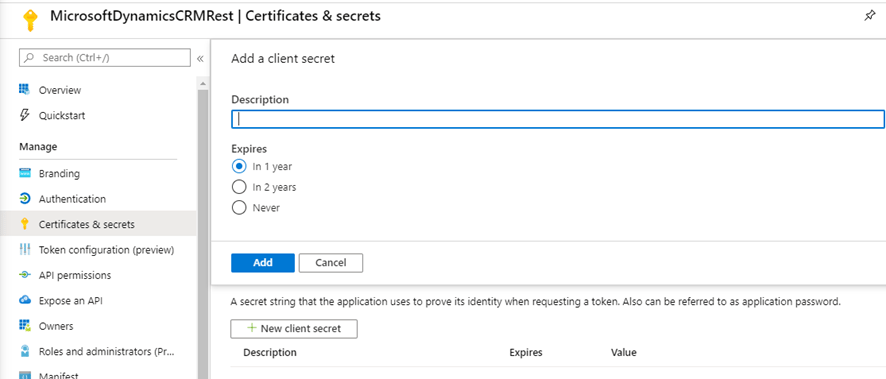 16. Specify the client secret description and the expiry period for your client secret, and click **Add**.
17. Copy the value and paste it into the **Client Secret** field in the Connector credentials section in Domo.
18. Sign into Dynamics CRM at [https://dynamics.microsoft.com/en-us/](https://dynamics.microsoft.com/en-us/).
19. 19. Click on **Dynamics 365 Home**. You should see all of your apps here.
20. Click **Dynamics CRM custom**.
This will redirect you to CRM Online. In our case it is [https://yourcompanv.crm.dynamics.com](https://yourcompanv.crm.dynamics.com/). This goes in the **Resource** field in the connector settings in Domo.
## Connecting to Your Microsoft Dynamics CRM Installation
This section enumerates the options in the **Credentials** and **Details** panes in the Microsoft Dynamics CRM REST Connector page. The components of the other panes in this page, **Scheduling** and **Name & Describe Your DataSet**, are universal across most connector types and are discussed in greater length in [Adding a DataSet Using a Data Connector](https://domohelp.domo.com/Connect/Connecting_to_Data_with_Connectors/General_Guide_to_Connecting_with_Connectors/01Adding_a_DataSet_Using_a_Data_Connector "Adding a DataSet Using a Data Connector").
### Credentials Pane
This pane contains fields for entering credentials to connect to a Microsoft Dynamics CRM installation via Azure. The following table describes what is needed for each field:
16. Specify the client secret description and the expiry period for your client secret, and click **Add**.
17. Copy the value and paste it into the **Client Secret** field in the Connector credentials section in Domo.
18. Sign into Dynamics CRM at [https://dynamics.microsoft.com/en-us/](https://dynamics.microsoft.com/en-us/).
19. 19. Click on **Dynamics 365 Home**. You should see all of your apps here.
20. Click **Dynamics CRM custom**.
This will redirect you to CRM Online. In our case it is [https://yourcompanv.crm.dynamics.com](https://yourcompanv.crm.dynamics.com/). This goes in the **Resource** field in the connector settings in Domo.
## Connecting to Your Microsoft Dynamics CRM Installation
This section enumerates the options in the **Credentials** and **Details** panes in the Microsoft Dynamics CRM REST Connector page. The components of the other panes in this page, **Scheduling** and **Name & Describe Your DataSet**, are universal across most connector types and are discussed in greater length in [Adding a DataSet Using a Data Connector](https://domohelp.domo.com/Connect/Connecting_to_Data_with_Connectors/General_Guide_to_Connecting_with_Connectors/01Adding_a_DataSet_Using_a_Data_Connector "Adding a DataSet Using a Data Connector").
### Credentials Pane
This pane contains fields for entering credentials to connect to a Microsoft Dynamics CRM installation via Azure. The following table describes what is needed for each field:
Field | Description |
|---|---|
Tenant Domain | Enter your Azure tenant domain. For more information about finding this, see "Prerequisites," above. |
Client ID | Enter the client ID for your installed Azure web app. For more information about finding this, see "Prerequisites," above. |
Client Secret | Enter the client secret that was generated when you created your app. For information about generating a new key, see "Prerequisites," above. |
Resource | Enter the name of the resource you want to connect to. |
Menu | Description |
|---|---|
Entity | Select the entity for your report. This list includes every entity in the Dynamics CRM installation that the authenticated user has access to. |
Fetch All Data? | Specify whether you want to retrieve all available data. If you select No , you will choose the data you want by specifying filter options. |
Attributes | Select all attributes for the given entity you want to appear in your report. This menu is not populated until you select an entity in the Entity menu. |
Advanced Options | Check this box if you want to filter your data using attribute filters. |
Filter On | Select the attribute you want to use to filter resulting entities. The list includes all attributes for the selected entity if it does not have the createdon attribute. Otherwise you can filter entities using the createdon attribute. |
Duration | Select whether you want to pull data for a specific date or a date range. |
Report Date | Select whether the report data is for a specific date or for a relative number of days back from today. |
Select Specific Date | Select the date for the report. |
Days Back | Enter the number of past days that should appear in the report. |
Start Date | Specify whether the first date in your date range is a specific or relative date. You select the last date in your range in End Date . |
End Date | Specify whether the second date in your date range is a specific or relative date. You select the first date in your range in Start Date . |
Select Specific Start Date | Select the first date in your date range. |
Select Specific End Date | Select the second date in your date range. |
Days Back to Start From | Enter the number of the farthest day back that should be represented in the report. Combine with Days Back to End At to create a range of represented days. For example, if you entered 10 for Days Back to Start From and 5 for Days Back to End At , the report would contain data for 10 days ago up until 5 days ago. |
Days Back to End At | Enter the number of the most recent day back that should be represented in the report. Combine with Days Back to Start From to create a range of represented days. For example, if you entered 10 for Days Back to Start From and 5 for Days Back to End At , the report would contain data for 10 days ago up until 5 days ago. |
Filter Condition | Select the operator you want to use in your filter. |
Filter Value | Enter the desired filter value. |