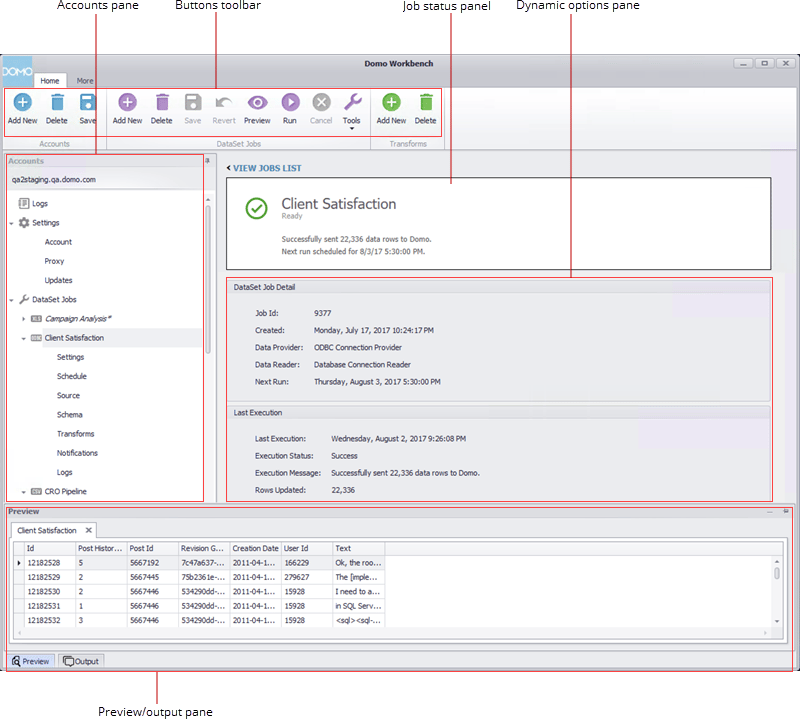
 The following table describes the sections pointed out in the preceding screenshot:
Section | Description |
|---|---|
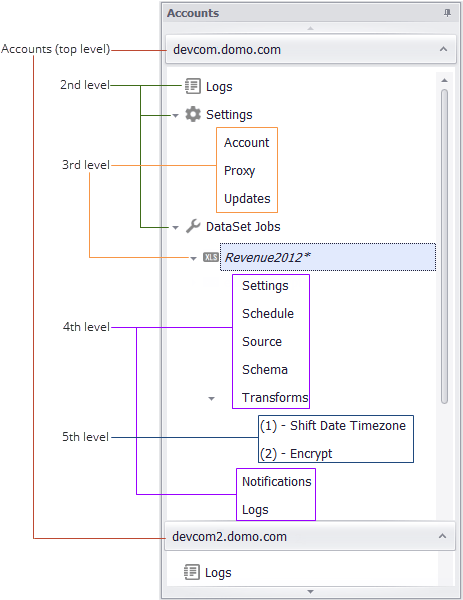
Accounts pane | Lists all connected accounts. For each account, you can access Logs and Settings options, along with all of the DataSet Jobs associated with the account. For each DataSet Job, you can access options such as Settings , Schedule , Transforms , etc. Clicking an item in the Accounts pane opens information or options for that item in the Dynamic Options pane in the center of the application. For example, selecting Settings > Account for a particular account would open options for configuring this account in the Options pane. You can move the Accounts pane anywhere on the screen by clicking on the pushpin icon in the top corner of the pane and dragging the pane. For more information about adding accounts, see Adding an Account in Workbench 4 . |
Buttons toolbar | Provide access to various Workbench options. Buttons are divided across two tabs— Home and More . The Home tab provides options for working with accounts, DataSet jobs, and transforms. The More tab provides options for getting help with Workbench, such as accessing online help, opening help videos, viewing log files, etc., and also provides access to the Plugin Manager. |
| Job status pane | Provides you with insights around when jobs are being run and allows you to make changes, pause, cancel and run jobs. |
Dynamic Options pane | Provides information and/or options depending on the item currently selected in the Accounts pane. |
Preview/output panes | Show preview and output information for a DataSet job. These panes are not populated until you click Preview for a DataSet job in the buttons toolbar at the top of the screen. A tab for the DataSet job is then added to both the Preview and Output panes. If you click Preview for another DataSet job, separate tabs for that job are added to the Preview and Output panes. |
Button | Description | ||||||||||
|---|---|---|---|---|---|---|---|---|---|---|---|
Add New (Account) | Opens the account creation wizard so you can add a new server account to your Workbench. For more information, see Adding an Account in Workbench 4 . | ||||||||||
Delete (Account) | Lets you delete a server account from Workbench. | ||||||||||
Save (Account) | Lets you save changes made to the account in the Settings options. | ||||||||||
Add New (DataSet Job) | Opens the DataSet Job Creation Wizard so you can add a new DataSet Job to Workbench. For more information, see Creating a Job for Uploading Data Using Workbench 4 . | ||||||||||
Delete (DataSet Job) | Lets you delete one or more DataSet Jobs from Workbench. You can also delete a DataSet Job by right-clicking on the job name in the Accounts pane and selecting Delete DataSet Job . | ||||||||||
Save (DataSet Job) | Lets you save changes made to the DataSet Job currently selected in the Accounts pane. | ||||||||||
Revert | Cancels all changes made to the currently selected DataSet Job since you last saved. | ||||||||||
Preview | Opens a preview of the currently open job in the Preview field and an output log in the Output field. You can also open the preview and output log for a DataSet Job by right-clicking on the job name in the Accounts pane and selecting Preview DataSet Job . | ||||||||||
Run | Runs the currently selected DataSet Job, i.e. builds or updates the specified DataSet in Domo. You can also execute a job by right-clicking on the job name in the Accounts pane and selecting Execute DataSet Job . | ||||||||||
Cancel | Cancels a currently running DataSet Job. | ||||||||||
Tools | Provides access to a number of options, including the following:
| ||||||||||
Add New (Transform) | Lets you add a transform to the currently selected DataSet Job. Transforms let you transform the data in a DataSet in a number of ways, including changing the date format, encrypting sensitive data, creating calculated fields, etc. For more information, see all of the following: | ||||||||||
Delete (Transform) | Deletes the currently selected transform. | ||||||||||
Authorize Company File (QuickBooks only) | Lets you authorize Workbench to connect to the selected QuickBooks file. For more information, see Connecting to QuickBooks data . |
Button | Description |
|---|---|
Send Logs | Copies your log files to your Windows Clipboard so you can email them to Domo as a .zip file. |
View Logs | Opens the log file folder in Windows Explorer. Typically, log files are located in C:\ProgramData\DomoWorkbench . You can open log (.txt ) files in a text editor. Log files for manual or scheduled jobs are named based on the job (.xml ) filename and the date: myjob\_yyyy-mm-dd . Log entries for jobs run at the command line are named based on the application name and the date: DomoWorkbench\_yyyy-mm-dd . For more information about running Workbench from the command line, see Running Workbench 4 from the command line . |
Wiki | Opens Domo's Workbench help documentation. |
Community | Opens the Workbench help forum. |
Videos | Opens training videos for Workbench. |
Plugins | Opens the Plugin Manager. Here you can see existing plugins by category and add new plugins for use in Workbench. For more information, see Managing Plugins in Workbench 4 . |
 A
A 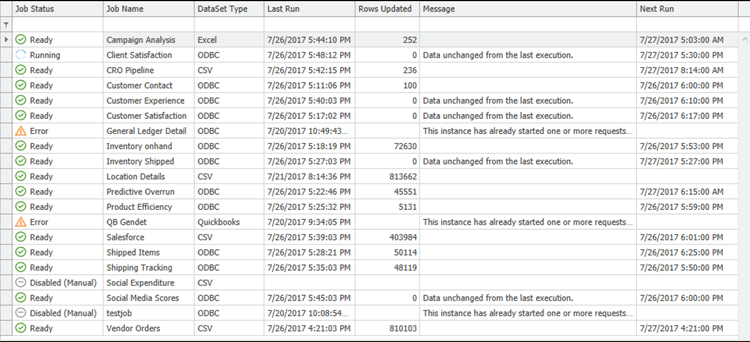 ### Logs
When you click **Logs** for a given account, the logs for that account are shown in the Dynamic Options panel.
### Logs
When you click **Logs** for a given account, the logs for that account are shown in the Dynamic Options panel.
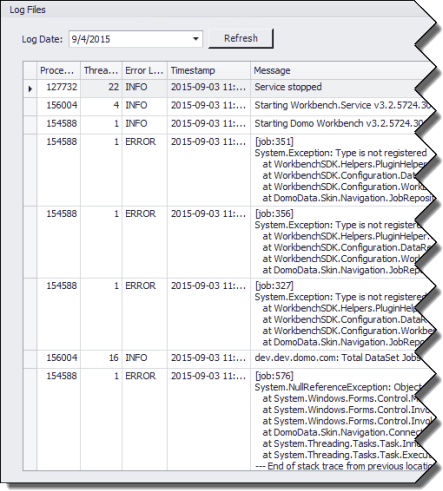 Log information is shown chronologically in reverse. You can show the logs for any day by clicking in the **Log Date** menu and selecting the desired date from the date picker. You can sort the logs in chronological or reverse chronological order. You can also filter logs by error level (ERROR, INFO, or WARN ).
### Settings
In **Settings**, you can see a connection summary, change your account information, configure proxy settings, and set your update URL and frequency. You can access settings options by clicking **Settings** or any of its subtabs in the pane on the left side of Workbench. (Note that there are two **Settings** items available in the **Accounts** pane. The version of **Settings** discussed here refers to the one on the 2nd level of navigation, located under **Logs**. These settings are used to configure account and connection details in your Workbench, while the settings discussed later on are specific to DataSet Jobs.)
#### Connection summary
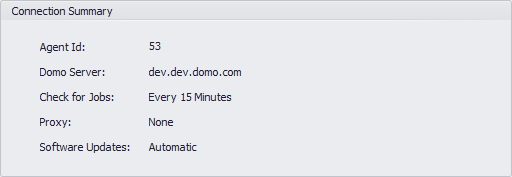
Click **Settings** to see a summary of your connection information, including your agent ID, Domo server, job check frequency, proxy, and software update settings.
Log information is shown chronologically in reverse. You can show the logs for any day by clicking in the **Log Date** menu and selecting the desired date from the date picker. You can sort the logs in chronological or reverse chronological order. You can also filter logs by error level (ERROR, INFO, or WARN ).
### Settings
In **Settings**, you can see a connection summary, change your account information, configure proxy settings, and set your update URL and frequency. You can access settings options by clicking **Settings** or any of its subtabs in the pane on the left side of Workbench. (Note that there are two **Settings** items available in the **Accounts** pane. The version of **Settings** discussed here refers to the one on the 2nd level of navigation, located under **Logs**. These settings are used to configure account and connection details in your Workbench, while the settings discussed later on are specific to DataSet Jobs.)
#### Connection summary
Click **Settings** to see a summary of your connection information, including your agent ID, Domo server, job check frequency, proxy, and software update settings.
 #### Account tab
Lets you edit your connection information for Domo.
#### Account tab
Lets you edit your connection information for Domo.
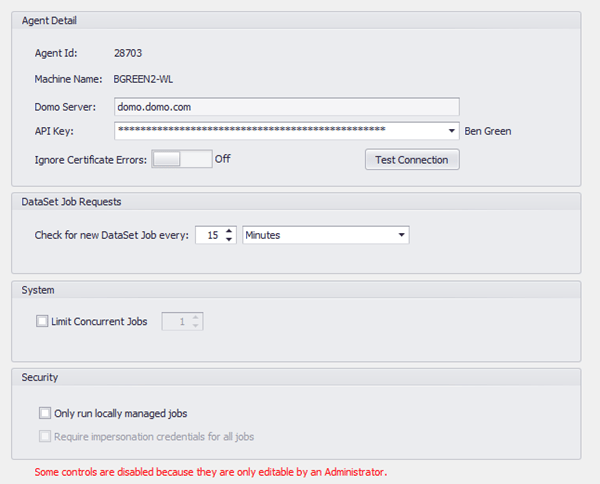 You can refer to the following table to find out more about the components in this tab:
Option | Description |
|---|---|
Domo Server | The URL for the connected server, which you specify when you set up your Workbench account. |
API Key | The API key for the account to use in connecting to Domo. You can generate a new API key by clicking the arrow on the right side of the field, entering your email address and password, and clicking Create Token . |
Ignore Certificate Errors | If turned on, certificate errors are ignored when connecting to this server. |
Test Connection | Lets you test the provided connection credentials. |
Check for new DataSet Job every | Specifies the frequency at which Workbench checks to see if DataSet Jobs need to be processed. Units range from Seconds to Years . Set Never if you don't want Workbench to check for unprocessed jobs. |
| Limit Concurrent Jobs | Lets you limit the number of DataSet Jobs that may run at the same time. |
Only run locally managed jobs | If checked, Workbench runs only DataSet Jobs managed locally, not those on networks. |
| Require impersonation credentials for all jobs (Workbench 4.5 only) | If checked, Workbench requests non-default credentials for all DataSet Jobs (that is, the Requires Impersonation toggle for all Jobs is turned off and cannot be switched back on). This option is only available if you have administrator privileges. |
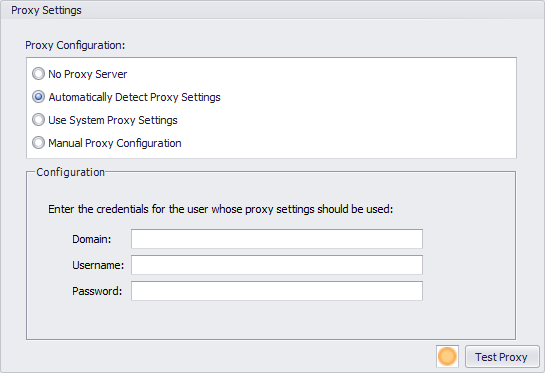
Option | Description |
|---|---|
No Proxy Server | Does not use a proxy server to connect. |
Automatically Detect Proxy Settings | Determines your proxy settings automatically. |
Manual Proxy Configuration | Lets you manually specify the proxy server information to use in connecting. You can do this only after initially connecting to Domo via Workbench. (The first time you connect, your system proxy settings are used.) Enter the server address and port. If the proxy server requires credentials, set Requires Authentication to On , then specify the username and password. |
| Use System Proxy Settings (Workbench 4.5 only) | Determines your proxy settings based on your system proxy settings. |
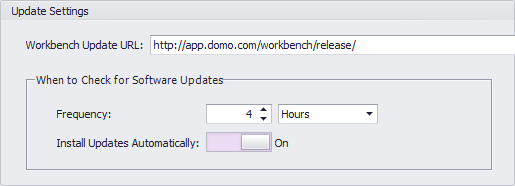 You can refer to the following table to find out more about the components in this tab:
Option | Description |
|---|---|
Workbench Update URL | Specifies the URL that is to be used for Workbench software updates. |
When to Check for Software Updates | Specifies how frequently Workbench should check for software updates. Units range from minutes to years. Select Never if you don't want Workbench to check for software updates. |
Install updates automatically | When turned on, Workbench software is updated automatically. |
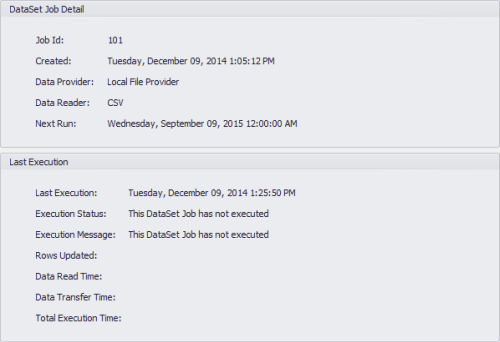
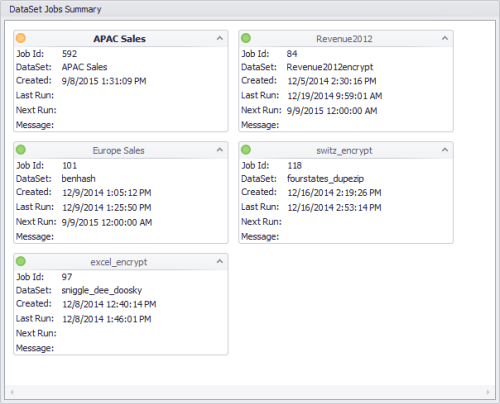 When you click a job (i.e. the job name, not any of the options beneath it in the hierarchy), details about the job and its execution history open in the **Dynamic Options** pane. The following screenshot shows the job details for a DataSet Job named "Europe Sales":
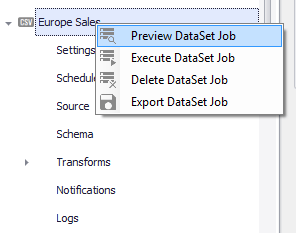
 Right-clicking the name of a DataSet Job provides quick access to a number of options also available in the Buttons toolbar at the top of the Workbench window, namely **Preview DataSet Job** (which also sends an output log to the **Output** pane, like the **Preview** button), **Execute DataSet Job**, **Delete DataSet Job**, and **Export DataSet Job**.
 When a DataSet Job name appears in italics with an asterisk, this indicates that unsaved changes have been made to the job settings.
Each DataSet Job includes a number of parameters that are shown beneath the job name in the hierarchy in the **Accounts** pane. Clicking a parameter opens information and/or options for that parameter in the Dynamic Options pane. For example, clicking the **Schedule** parameter for the "Europe Sales" DataSet job would open an interface with options for setting the run schedule for that job.
The following table lists and describes the parameters available for each job in the **Accounts** pane. These are all described in greater detail in continuation.
When a DataSet Job name appears in italics with an asterisk, this indicates that unsaved changes have been made to the job settings.
Each DataSet Job includes a number of parameters that are shown beneath the job name in the hierarchy in the **Accounts** pane. Clicking a parameter opens information and/or options for that parameter in the Dynamic Options pane. For example, clicking the **Schedule** parameter for the "Europe Sales" DataSet job would open an interface with options for setting the run schedule for that job.
The following table lists and describes the parameters available for each job in the **Accounts** pane. These are all described in greater detail in continuation.
Parameter | Description |
|---|---|
Settings | Lets you configure the DataSet Job name, the DataSet type, the destination DataSet, update method, error handling, and additional settings. |
Schedule | Lets you configure how often this DataSet is updated. |
Source | Lets you configure settings for your source DataSet—transport method, credentials, data source properties, etc. |
Schema | Shows the schema for your DataSet (but only appears after you click Preview for the job). Here you can rename destination columns, change the data type, and include or exclude columns. |
Transforms | Lets you edit all transforms that have been added to this DataSet Job. |
Notifications | Lets you configure notifications for individual users in Domo. |
Logs | Shows all of the logs for this DataSet Job. |
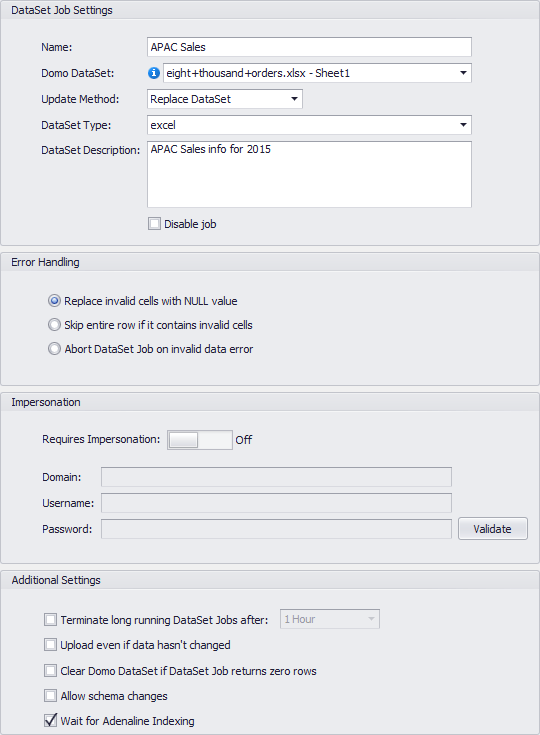 The following table describes the options available in the **Settings** for a DataSet job:
Option | Description |
|---|---|
Name | The name of this job. You initially name a job when you create it in the Workbench DataSet Job Creation Wizard , but you can rename it here. |
Domo DataSet | The DataSet generated by Workbench in Domo, i.e. the destination data source. A blue "i" next to the DataSet name indicates that the DataSet has not yet been created in Domo. |
Update Method | Determines whether new data replaces or is appended to the DataSet when updating. |
DataSet Type | The type of DataSet as shown in Domo. You can select a type from the menu or enter a custom name. The DataSet type you select or enter here is for informational purposes in Domo only. For example, you might be connecting to an ODBC database that contains Twitter data. In this case the best option would be to enter "Twitter" rather than selecting ODBC because the data you are representing in Domo is from Twitter. |
| DataSet Description | The description for this DataSet you entered when you went through the Workbench DataSet Job Creation Wizard . You can edit the description here. |
| Disable Job | Prevents this job from executing. |
Error Handling | Determines what happens when errors are encountered in a DataSet Job. Options include the following:
|
Requires Impersonation | Used when you need to authenticate using non-default credentials. New to 4.5, if an admin user checked the box for Require impersonation credentials for all jobs under Settings > Account , this option is turned on by default and cannot be turned off. |
Domain | Specifies the domain when you are authenticating using non-default credentials (impersonation). |
Username | Specifies your username when you are authenticating using non-default credentials (impersonation). |
Password | Specifies your password when you are authenticating using non-default credentials (impersonation). |
Terminate job if it runs longer than | Lets you specify a time frame (in hours) in which a long-running job is to be terminated. |
Upload even if data hasn't changed | Lets you upload data to Domo even though the data has not changed. Useful when you want the DataSet freshness in Domo to be updated. |
Clear Domo DataSet if DataSet Job returns zero rows | Lets you clear the DataSet in Domo if zero rows are returned when a job runs. If disabled, Workbench does not send a command to Domo to clear out data in the DataSet. If you have a process where you want to upload data in a table after data in another table has been updated, you could disable this option and add some script in your query that looks at the "status" table, running the query if the data is ready. |
Allow schema changes | Allows schema changes to be pushed to Domo when the job is left unattended. |
| Wait for Adrenaline Indexing (Workbench 4.5 only) | Tells Workbench to wait for Adrenaline indexing (Domo indexing data in the cloud) after a DataSet Job uploads. If this option is turned off, Workbench marks the job as successful immediately after an upload. |
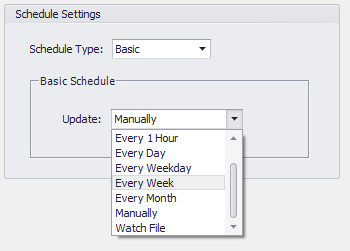 In the **Schedule Type** menu you select the type of schedule you want.
In the **Update** menu you select the update frequency for this DataSet Job. Options range from **Every 30 Minutes** to **Every Month**. If you select **Manually**, the DataSet does *not* update on a schedule; you must run the DataSet Job yourself from within Workbench. If you select **Watch File**, this DataSet Job will run every time the file is updated.
For more information about updating a DataSet, see [Updating or Refreshing the DataSet for a Visualization Card](/s/article/360043429893 "Updating or Refreshing the DataSet for a KPI Card").
When you select a frequency in the menu, the next four upcoming update times are shown at the bottom of the Options pane.
For more information about setting a schedule, see [Scheduling a Job in Workbench 4](/s/article/360046856934 "Scheduling a Job in Workbench 4").
You can also create a group of DataSet Jobs that share the same update schedule. For more information, see [Creating a Schedule Group in Workbench 4](/s/article/360046857074 "Creating a Schedule Group in Workbench 4").
#### Source
When you select **Source** for a DataSet Job in the **Accounts** pane, options for configuring the transport method and data source for the job appear in the Dynamic Options pane.
##### Transport Method
Transport methods determine how data sources are brought into Workbench. You select a transport method in the **Workbench DataSet Job Creation Wizard** and configure options for the selected method in the **Source** pane for the DataSet Job. Options are different for each transport method.
###### Local File Provider
The **Local File Provider** transport method lets you select a file from your machine or a network. This method is used for transporting [XML](/s/article/360046860474 "Creating a Job for Uploading Data Using Workbench 4") data sources into Domo.
The following screenshot shows the options available when this method is selected:
In the **Schedule Type** menu you select the type of schedule you want.
In the **Update** menu you select the update frequency for this DataSet Job. Options range from **Every 30 Minutes** to **Every Month**. If you select **Manually**, the DataSet does *not* update on a schedule; you must run the DataSet Job yourself from within Workbench. If you select **Watch File**, this DataSet Job will run every time the file is updated.
For more information about updating a DataSet, see [Updating or Refreshing the DataSet for a Visualization Card](/s/article/360043429893 "Updating or Refreshing the DataSet for a KPI Card").
When you select a frequency in the menu, the next four upcoming update times are shown at the bottom of the Options pane.
For more information about setting a schedule, see [Scheduling a Job in Workbench 4](/s/article/360046856934 "Scheduling a Job in Workbench 4").
You can also create a group of DataSet Jobs that share the same update schedule. For more information, see [Creating a Schedule Group in Workbench 4](/s/article/360046857074 "Creating a Schedule Group in Workbench 4").
#### Source
When you select **Source** for a DataSet Job in the **Accounts** pane, options for configuring the transport method and data source for the job appear in the Dynamic Options pane.
##### Transport Method
Transport methods determine how data sources are brought into Workbench. You select a transport method in the **Workbench DataSet Job Creation Wizard** and configure options for the selected method in the **Source** pane for the DataSet Job. Options are different for each transport method.
###### Local File Provider
The **Local File Provider** transport method lets you select a file from your machine or a network. This method is used for transporting [XML](/s/article/360046860474 "Creating a Job for Uploading Data Using Workbench 4") data sources into Domo.
The following screenshot shows the options available when this method is selected:
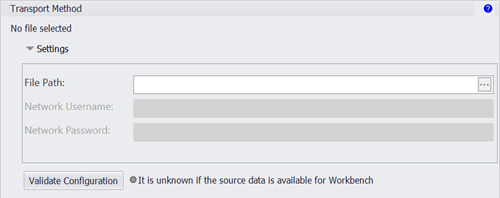 You can use the following table to learn more about these options:
Option | Description |
|---|---|
File Path | Specifies the file path for the local file you want to pull into Workbench. |
Network Username/Password | Specifies the username and password for the network the file is located on, if any. |
Validate Configuration | Lets you validate the transport settings you have configured. |
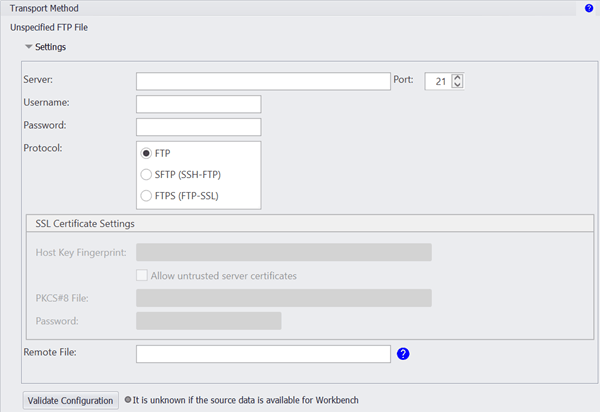 You can use the following table to learn more about these options:
Option | Description |
|---|---|
Server | Specifies the server URL for your FTP server. |
Username | Specifies your username for connecting to the server. |
Password | Specifies your password for connecting to the server. |
Protocol | Determines whether you are retrieving data via FTP, SFTP, or FTPS. |
Host Key Fingerprint (SSL Certificate Settings) | Specifies the host key fingerprint for your SSL certificate, if one is required. Host fingerprints are used to ensure that the SFTP server is the same one you are expecting. |
Allow untrusted server certificates | Lets you upload SSL certificates that don't meet trust requirements. If you are using a self-signed certificate, you must check this box. |
PKCS#8 File (SSL Certificate Settings) | Specifies the PKCS#8 file for your SSL certificate. This is used alongside username and password credentials for more secure authentication. |
Password (SSL Certificate Settings) | Specifies the password for your SSL certificate. |
Remote File | Specifies the file path for the file you want to connect to. |
Validate Configuration | Lets you validate the transport settings you have configured. |
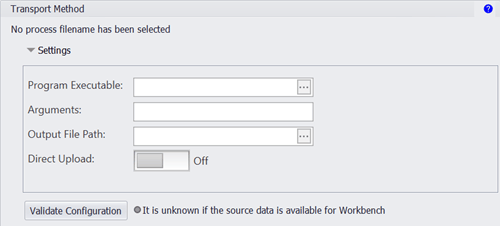 You can use the following table to learn more about these options:
Option | Description |
|---|---|
Program Executable | Lets you select the executable application file to use to pull data into Domo. |
Arguments | Specifies arguments for your script. |
Output File Path | Specifies the file path for the output. The file type should be the same as the data source type you selected in the Workbench DataSet Job Creation Wizard . |
| Direct Upload (CSV only) | Lets you turn on Direct Upload for this job. For more information, see Setting Up Direct Upload in Workbench 4 . |
| Validate Configuration | Lets you validate the transport settings you have configured. |
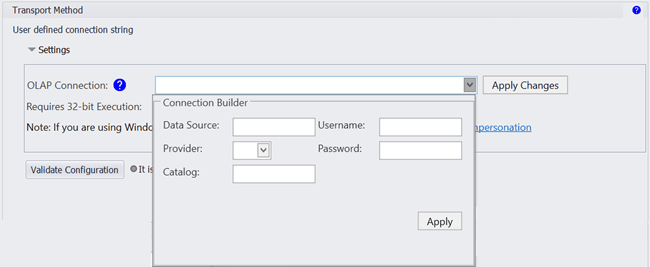 You can use the following table to learn more about these options:
Option | Description |
|---|---|
OLAP Connection | Opens the Connection Builder , where you specify all of the details of your OLAP connection. |
Requires 32b Execution | Determines whether this file transport requires 32b execution. |
Data Source | Specifies the server where the database is located. |
Provider | Select a provider, either MSOLAP or Essbase. |
Catalog | Specifies the Initial Catalog for your OLAP connection. |
Username | Specifies the username for this OLAP connection. |
Password | Specifies the password for this OLAP connection. |
| Validate Configuration | Lets you validate the transport settings you have configured. |
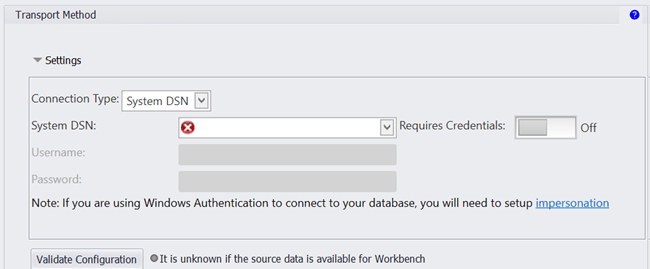 You can use the following table to learn more about these options:
Option | Description | ||||||||||
|---|---|---|---|---|---|---|---|---|---|---|---|
Connection Type | Lets you select a method for connecting to ODBC data.
| ||||||||||
System DSN (System DSN only) | Lets you select the DSN to use for the desired DataSet from all of the DSNs available in your system. | ||||||||||
Requires Credentials (System DSN and User DSN) | Determines whether credentials are required for the specified DSN. | ||||||||||
Username (System DSN and Connection Builder) | Specifies the username you use to connect to the database. | ||||||||||
User DSN (User DSN only) | Lets you select the DSN to use for the desired DataSet from the DSNs available to you. This menu does not populate until you turn on Requires Impersonation in the DataSet Job Settings tab and fill in the parameters. | ||||||||||
Connection Username (User DSN only) | Specifies the username to connect to the database. | ||||||||||
Connection Password (User DSN only) | Specifies the password to connect to the database. | ||||||||||
Password (System DSN and Connection Builder) | Specifies the password you use to connect to the database. | ||||||||||
Driver (Connection Builder only) | Specifies the name of the driver used to access the database. | ||||||||||
Server (Connection Builder only) | Specifies the server name or URL for the database. | ||||||||||
Port (Connection Builder only) | Specifies the port number where the database is found. The default port is the MySQL port. | ||||||||||
Database (Connection Builder only) | Specifies the name of the database to access. | ||||||||||
Timeout (Connection Builder only) | Lets you select the desired timeout value in seconds (60=1 minute) that the connection is kept alive before it is refreshed from the DataSet. | ||||||||||
Connection Parameters (Connection Builder only) | Lets you specify additional parameters for connecting to the DataSet. | ||||||||||
Connection String (Connection String only) | Enter a connection string to connect to the DataSet. | ||||||||||
| Validate Configuration | Lets you validate the transport settings you have configured. |
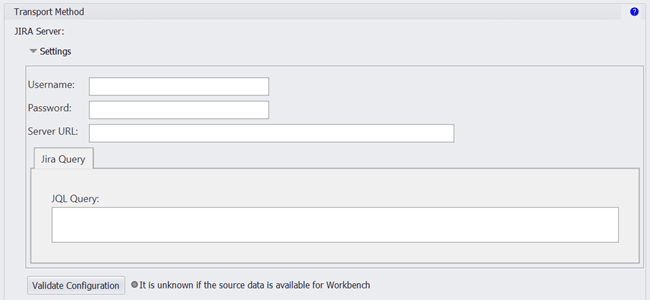 You can use the following table to learn more about these options:
Option | Description |
|---|---|
Username | Specifies the username used to connect to your JIRA instance. |
Password | Specifies the password used to connect to your JIRA instance. |
Server URL | Specifies the URL of your company's JIRA server. |
JIRA Query | Specifies the query for the JIRA data you want to send to Domo. |
Validate Configuration | Lets you validate the transport settings you have configured. |
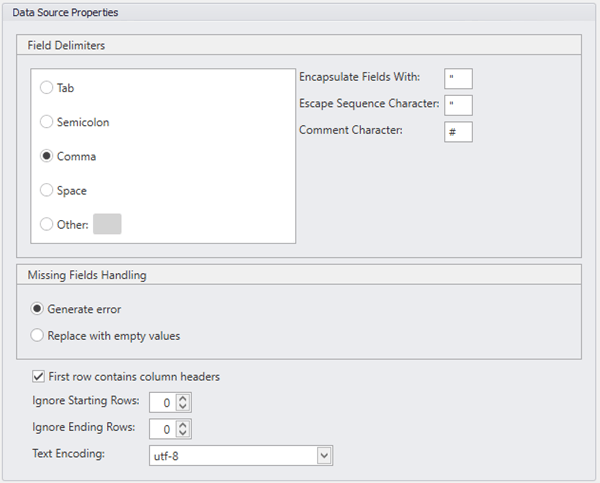 You can use the following table to find out more about all of these components:
Option | Description |
|---|---|
Field Delimiters | Specifies the delimiter character to use in the specified CSV file. |
Encapsulate Fields With | Specifies the character to use for encapsulating fields. |
Escape Sequence Character | Specifies the character to use for escaping. |
Comment Character | Specifies the character to use for commenting. |
Missing Fields Handling | Determines whether to generate an error for missing field values or replace the fields with empty values. |
First row contains column headers | Indicates whether file defines column headers in the first row. If the file has column headers, they should be defined in the first row. |
Ignore starting rows | Specifies the number of rows to skip at the beginning of the data so you can start importing a specific row. The Ignore starting rows field does not include the header row containing the column names. |
Ignore ending rows | Specifies the number of rows to skip at the end of the data. |
Text encoding | Specifies the character encoding used in the CSV file. |
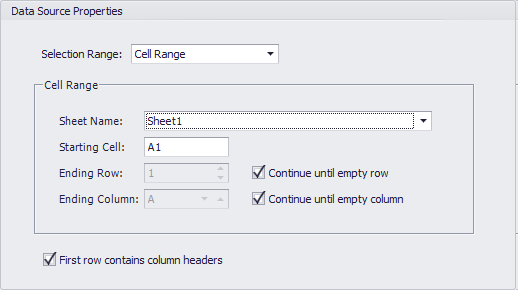 You can use the following table to find out more about these components:
Option | Description | ||||||||
|---|---|---|---|---|---|---|---|---|---|
Selection Range | Lets you select a method for pulling ranged data from the specified Excel file. Methods are as follows:
| ||||||||
Sheet Name (Cell Range and Dynamic Range) | Lets you select the Excel sheet from which you want to pull data. | ||||||||
Starting Cell (Cell Range and Dynamic Range) | Specifies the first cell in the Excel sheet from which data will be pulled. | ||||||||
Ending Row (Cell Range only) | Specifies the ending row for the cell range you want to pull data for. This option is available only when Continue until empty row is unchecked. | ||||||||
Ending Column (Cell Range only) | Specifies the ending column for the cell range you want to pull data for. This option is available only when Continue until empty column is unchecked. | ||||||||
First row contains column headers | Determines whether the first row contains column headers. This is important when building cards in Domo because column headers are used to reference the data in those columns. For more information, see Applying DataSet Columns to Your Chart . | ||||||||
Named Ranges (Named Range only) | Lets you pick a named range from a list. | ||||||||
Ignore Ending Rows (Dynamic Range only) | Specifies how many rows at the end of the sheet you want to ignore. |
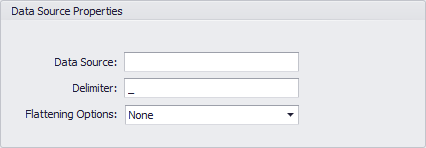 For more information about connecting to JSON data, see [Connecting to JSON data](/s/article/360046860134 "Creating a Job for Uploading Data Using Workbench 4").
###### XML
When XML is the selected Data Source type, you can specify the desired data node and also indicate nodes that should be ignored.
For more information about connecting to JSON data, see [Connecting to JSON data](/s/article/360046860134 "Creating a Job for Uploading Data Using Workbench 4").
###### XML
When XML is the selected Data Source type, you can specify the desired data node and also indicate nodes that should be ignored.
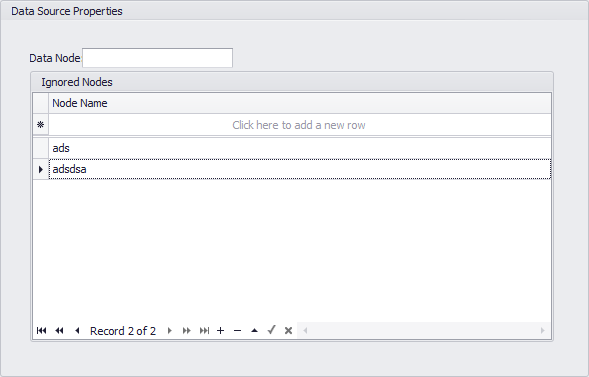 For more information about connecting to XML data, see [Connecting to XML data](/s/article/360046860474 "Creating a Job for Uploading Data Using Workbench 4").
###### OLAP and ODBC
When OLAP or ODBC is the selected Data Source type, you can configure queries and replacement variables.
For more information about connecting to XML data, see [Connecting to XML data](/s/article/360046860474 "Creating a Job for Uploading Data Using Workbench 4").
###### OLAP and ODBC
When OLAP or ODBC is the selected Data Source type, you can configure queries and replacement variables.
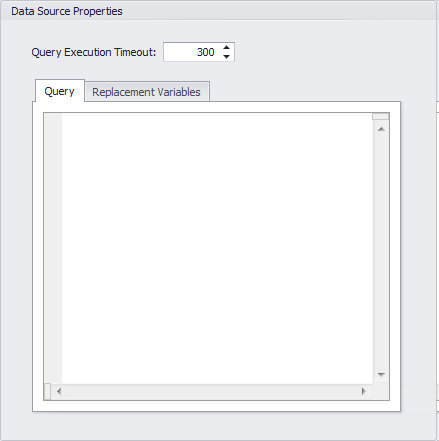 You can use the following table to learn more about these options:
Option | Description |
|---|---|
Query | Lets you enter the query you want to get data. |
Replacement Variables | Lets you define replacement variables for use in your query. |
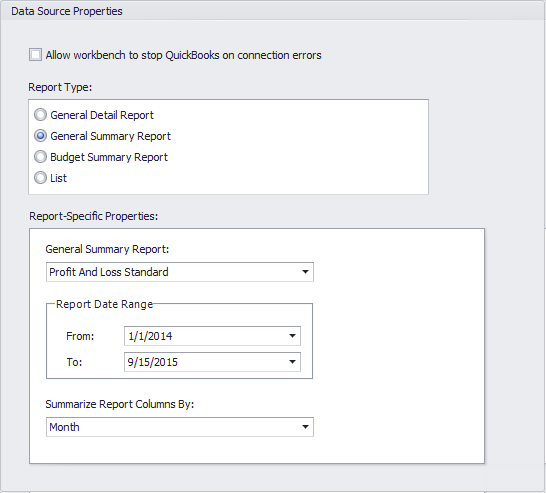 You can use the following table to find out more about all of these components.
Option | Description | ||||||||||
|---|---|---|---|---|---|---|---|---|---|---|---|
Allow Workbench to stop QuickBooks on connection errors | If checked, QuickBooks shuts down if Workbench encounters errors while executing a DataSet job. | ||||||||||
Report Type | Lets you select a primary report type. All report types have a number of sub-reports you can choose from. Primary report types are as follows:
| ||||||||||
Report Date Range (General Detail Report and General Summary Report) | Lets you select the start and end date for this report from a date picker. | ||||||||||
Maximum days to return in single result (General Detail Report only) | Specifies the maximum number of days to return in your QuickBooks report. | ||||||||||
Columns (General Detail Report only) | Lets you select the columns that appear in your QuickBooks report. | ||||||||||
Summarize Report Columns By (General Summary Report only) | Lets you choose the date granularity for your QuickBooks report. For example, if you Month , report data is broken down by month. | ||||||||||
Fiscal Year (Budget Summary Report only) | Lets you select the fiscal year for the report. |
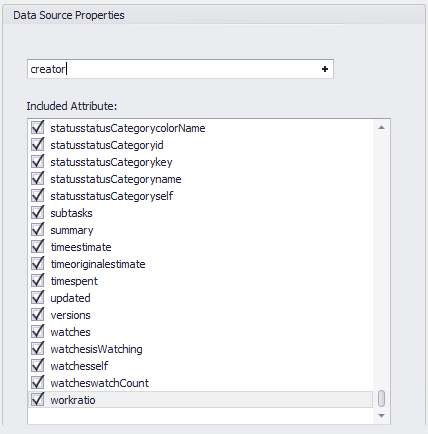 For more information about connecting to JIRA, see [Connecting to JIRA data](/s/article/360046860074 "Creating a Job for Uploading Data Using Workbench 4").
#### Schema
When you select **Schema** for a DataSet job in the **Accounts** pane, options for configuring properties for columns in your data source appear in the Dynamic Options pane. (You must click **Preview** in the Buttons toolbar for schema information to appear here.) Here you can change column names and data types and include or exclude certain columns.
The following screenshot shows an example of the **Schema** tab for a DataSet job.
For more information about connecting to JIRA, see [Connecting to JIRA data](/s/article/360046860074 "Creating a Job for Uploading Data Using Workbench 4").
#### Schema
When you select **Schema** for a DataSet job in the **Accounts** pane, options for configuring properties for columns in your data source appear in the Dynamic Options pane. (You must click **Preview** in the Buttons toolbar for schema information to appear here.) Here you can change column names and data types and include or exclude certain columns.
The following screenshot shows an example of the **Schema** tab for a DataSet job.
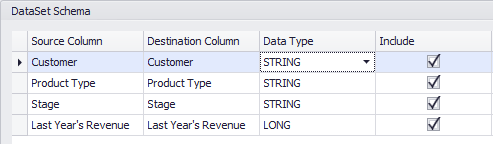 You can use the following table to learn more about the components of the **Schema** interface:
Option | Description |
|---|---|
Source Column | The name of this column in the original data source. You cannot interact with a source column; any changes you make are applied to the destination column (i.e. the column in the Domo DataSet after you execute this DataSet job). |
Destination Column | The name of this column in the Domo DataSet. Any changes you make to a column are applied to this column, not the column from the original data source. You can rename a destination column by clicking in the name field and typing in the desired name. |
Data Type | Indicates the data type for the given column. You can change a data type by clicking in the field and selecting the new data type from the menu. The following data types are available:
|
Include | Determines whether data for this column appears in the DataSet in Domo. You can choose which columns of data are uploaded by checking or unchecking Include for each column heading. |
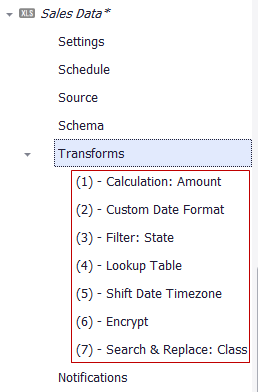 Selecting a transform opens options for configuring that transform in the Dynamic Options pane. All transforms have different options. You can have as many transforms for a DataSet as you want.
Transforms are applied in the same order in which they appear in the navigation tree. You can rearrange transforms in the list by right-clicking the transform you want to move then selecting **Move Up** or **Move Down** as necessary.
For information about all available transforms, see the following topics:
* [Creating Columns in Workbench 4 Using Calculations](/s/article/360046861474 "Creating Columns in Workbench 4 Using Calculations")
* [Setting the Time Zone for a Workbench 4 Job](/s/article/360047504673 "Setting the Time Zone for a Workbench 4 Job")
* [Encrypting and Decrypting Workbench 4 Data](/s/article/360047501293 "Encrypting and Decrypting Workbench 4 Data")
* [Setting a Custom Date Format on a Column in Workbench 4](/s/article/360047504553 "Setting a Custom Date Format on a Column in Workbench 4")
* [Filtering Columns in Workbench 4](/s/article/360046864074 "Filtering Columns in Workbench 4")
* [Replacing a Column Value in Workbench 4](/s/article/360046864274 "Replacing a Column Value in Workbench 4")
* [Combining DataSets in Workbench 4](/s/article/360046861014 "Combining DataSets in Workbench 4")
##### Calculation
With the **Calculations** transform, you can you specify a calculation to use to derive a value in a new column based on a value in another column. Clicking **Calculations** in the **Accounts** pane opens the Calculation Builder in the Dynamic Options pane. Here you can specify a name for the calculation then build your calculation by applying functions to columns in your data source as necessary.
Selecting a transform opens options for configuring that transform in the Dynamic Options pane. All transforms have different options. You can have as many transforms for a DataSet as you want.
Transforms are applied in the same order in which they appear in the navigation tree. You can rearrange transforms in the list by right-clicking the transform you want to move then selecting **Move Up** or **Move Down** as necessary.
For information about all available transforms, see the following topics:
* [Creating Columns in Workbench 4 Using Calculations](/s/article/360046861474 "Creating Columns in Workbench 4 Using Calculations")
* [Setting the Time Zone for a Workbench 4 Job](/s/article/360047504673 "Setting the Time Zone for a Workbench 4 Job")
* [Encrypting and Decrypting Workbench 4 Data](/s/article/360047501293 "Encrypting and Decrypting Workbench 4 Data")
* [Setting a Custom Date Format on a Column in Workbench 4](/s/article/360047504553 "Setting a Custom Date Format on a Column in Workbench 4")
* [Filtering Columns in Workbench 4](/s/article/360046864074 "Filtering Columns in Workbench 4")
* [Replacing a Column Value in Workbench 4](/s/article/360046864274 "Replacing a Column Value in Workbench 4")
* [Combining DataSets in Workbench 4](/s/article/360046861014 "Combining DataSets in Workbench 4")
##### Calculation
With the **Calculations** transform, you can you specify a calculation to use to derive a value in a new column based on a value in another column. Clicking **Calculations** in the **Accounts** pane opens the Calculation Builder in the Dynamic Options pane. Here you can specify a name for the calculation then build your calculation by applying functions to columns in your data source as necessary.
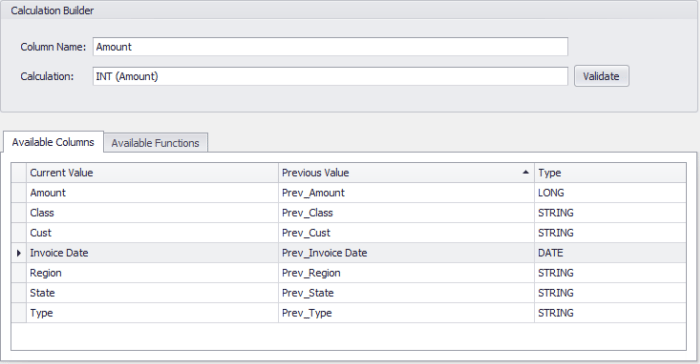 For more information about building calculations, see [Creating Columns in Workbench 4 Using Calculations](/s/article/360046861474 "Creating Columns in Workbench 4 Using Calculations").
##### Custom Date Format
You can use the **Custom Date Format** transform to change the date format for a given column.
For more information about building calculations, see [Creating Columns in Workbench 4 Using Calculations](/s/article/360046861474 "Creating Columns in Workbench 4 Using Calculations").
##### Custom Date Format
You can use the **Custom Date Format** transform to change the date format for a given column.
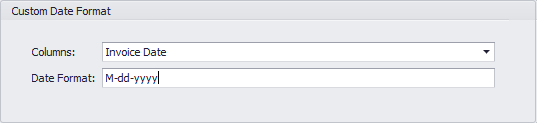 For more information, see [Setting a Custom Date Format on a Column in Workbench 4](/s/article/360047504553 "Setting a Custom Date Format on a Column in Workbench 4").
##### Filter
You can use the **Filter** transform to apply filters to a selected column. You can choose to have Workbench return matches or non-matches for the specified filter query. You can also include or exclude blank cells in your filtered data.
For more information, see [Setting a Custom Date Format on a Column in Workbench 4](/s/article/360047504553 "Setting a Custom Date Format on a Column in Workbench 4").
##### Filter
You can use the **Filter** transform to apply filters to a selected column. You can choose to have Workbench return matches or non-matches for the specified filter query. You can also include or exclude blank cells in your filtered data.
 For more information, see [Filtering Columns in Workbench 4](/s/article/360046864074 "Filtering Columns in Workbench 4").
##### Lookup Table
You can combine data sources in Workbench by using Lookup Tables. A "Lookup Table" is a DataSet you combine with a primary DataSet. The Lookup Table DataSet and primary DataSet must both contain one column with unique matching values ("key columns"). Once you match key columns, a new DataSet is created by joining all columns from both DataSets. Combining DataSets in this way is equivalent to using a LEFT JOIN in SQL.
For more information, see [Filtering Columns in Workbench 4](/s/article/360046864074 "Filtering Columns in Workbench 4").
##### Lookup Table
You can combine data sources in Workbench by using Lookup Tables. A "Lookup Table" is a DataSet you combine with a primary DataSet. The Lookup Table DataSet and primary DataSet must both contain one column with unique matching values ("key columns"). Once you match key columns, a new DataSet is created by joining all columns from both DataSets. Combining DataSets in this way is equivalent to using a LEFT JOIN in SQL.
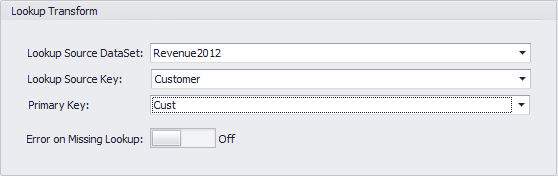 For more information, see [Combining DataSets in Workbench 4](/s/article/360046861014 "Combining DataSets in Workbench 4").
##### Shift Date Timezone
With the **Shift Date Timezone** transform, you can set the time zone for the data in a data source by selecting your desired time zone from a menu.
For more information, see [Combining DataSets in Workbench 4](/s/article/360046861014 "Combining DataSets in Workbench 4").
##### Shift Date Timezone
With the **Shift Date Timezone** transform, you can set the time zone for the data in a data source by selecting your desired time zone from a menu.
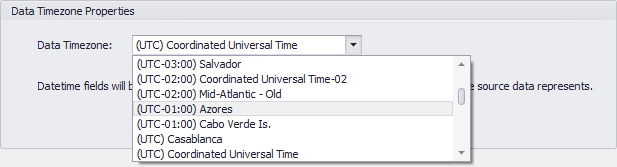 For more information, see [Setting the Time Zone for a Workbench 4 Job](/s/article/360047504673 "Setting the Time Zone for a Workbench 4 Job").
##### Encrypt
You can use the **Encrypt** transform to encrypt one or more columns of data in your data source. After the DataSet has been pulled into Domo, it can only be decrypted in a Sumo table, by users who have been given special access in the **User Access** listing for the DataSet job in Workbench. For more information about Sumo, see Understanding Sumo cards.
For more information, see [Setting the Time Zone for a Workbench 4 Job](/s/article/360047504673 "Setting the Time Zone for a Workbench 4 Job").
##### Encrypt
You can use the **Encrypt** transform to encrypt one or more columns of data in your data source. After the DataSet has been pulled into Domo, it can only be decrypted in a Sumo table, by users who have been given special access in the **User Access** listing for the DataSet job in Workbench. For more information about Sumo, see Understanding Sumo cards.
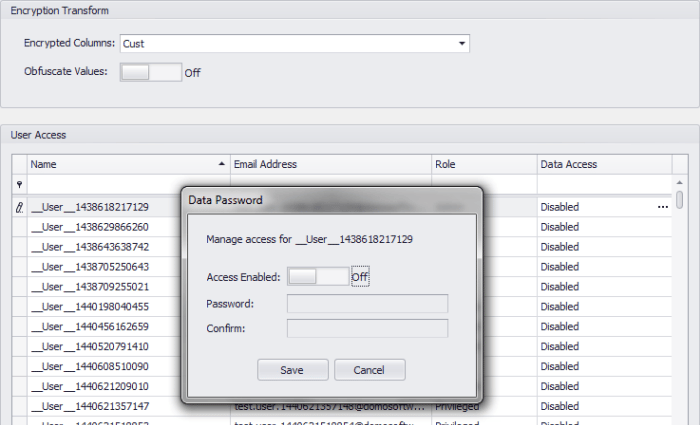 For more information about encryption and decryption, see [Encrypting and Decrypting Workbench 4 Data](/s/article/360047501293 "Encrypting and Decrypting Workbench 4 Data").
##### Search & Replace
You can use the **Search & Replace** transform to replace a specified value in a column with another value. You can also specify a default value to appear in cells in which your search value does not appear. For search and replace values you can open a regular expression builder that includes a number of categories of regular expression constructs.
For more information about encryption and decryption, see [Encrypting and Decrypting Workbench 4 Data](/s/article/360047501293 "Encrypting and Decrypting Workbench 4 Data").
##### Search & Replace
You can use the **Search & Replace** transform to replace a specified value in a column with another value. You can also specify a default value to appear in cells in which your search value does not appear. For search and replace values you can open a regular expression builder that includes a number of categories of regular expression constructs.
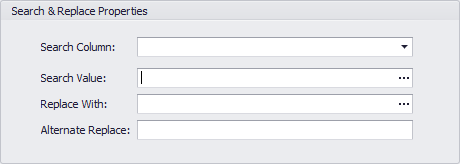 For more information, see [Replacing a Column Value in Workbench 4](/s/article/360046864274 "Replacing a Column Value in Workbench 4").
#### Notifications
When you select **Notifications** for a DataSet job in the **Accounts** pane, options for configuring notifications for the job appear in the Dynamic Options pane. Here you can specify who in your Domo instance is notified when jobs are completed successfully and/or fail. For any user in your instance, you can specify whether he/she is notified upon job success, failure, or both. You can also filter the rows in any column as well as set up custom filters. For more information about notifications, see [Setting Notifications in Workbench 4](/s/article/360047494393 "Setting Notifications in Workbench 4").
For more information, see [Replacing a Column Value in Workbench 4](/s/article/360046864274 "Replacing a Column Value in Workbench 4").
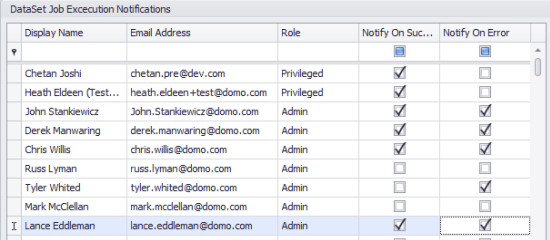
#### Notifications
When you select **Notifications** for a DataSet job in the **Accounts** pane, options for configuring notifications for the job appear in the Dynamic Options pane. Here you can specify who in your Domo instance is notified when jobs are completed successfully and/or fail. For any user in your instance, you can specify whether he/she is notified upon job success, failure, or both. You can also filter the rows in any column as well as set up custom filters. For more information about notifications, see [Setting Notifications in Workbench 4](/s/article/360047494393 "Setting Notifications in Workbench 4").
 #### Logs
When you select **Logs** for a DataSet job in the **Accounts** pane (as opposed to selecting the **Logs** option at the top of the **Accounts** pane, which opens the logs for the account), you can view the logs for that DataSet job in the Dynamic Options pane. For each log item, you can see the process ID, the thread ID, the error level (either "Info" or "Error"), the timestamp, and the log message. You can select logs for any day you want using a date picker. You can also sort logs in ascending or descending timestamp order of filter by error level (ERROR, INFO, or WARN ).
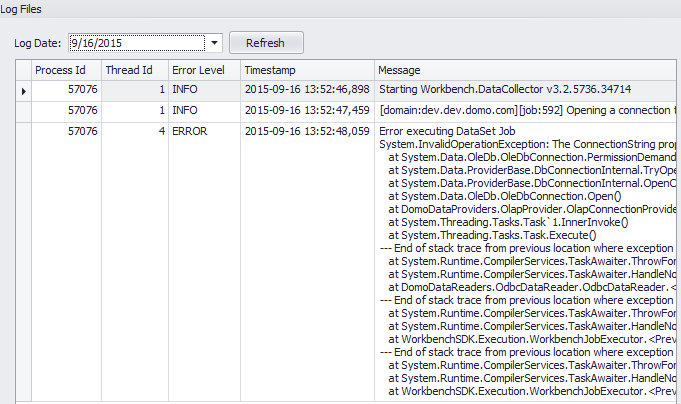
#### Logs
When you select **Logs** for a DataSet job in the **Accounts** pane (as opposed to selecting the **Logs** option at the top of the **Accounts** pane, which opens the logs for the account), you can view the logs for that DataSet job in the Dynamic Options pane. For each log item, you can see the process ID, the thread ID, the error level (either "Info" or "Error"), the timestamp, and the log message. You can select logs for any day you want using a date picker. You can also sort logs in ascending or descending timestamp order of filter by error level (ERROR, INFO, or WARN ).
 ## Dynamic Options pane
In the Dynamic Options pane, you can configure options for DataSet jobs. The options available in this pane update according to what you select in the **Accounts** pane. Unlike the other panes in Workbench, this pane cannot be moved.
## Preview and Output panes
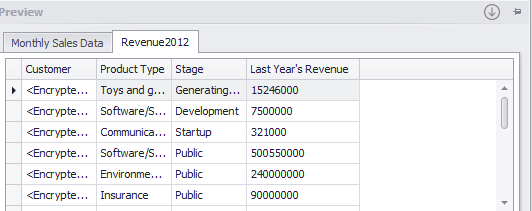
The **Preview** and **Output** panes provide information about a selected DataSet job. The **Preview** pane shows a preview of what the DataSet looks like with all of the settings you have applied, and the **Output** pane provides a log of actions taken as the preview is loaded. Nothing appears in either pane until you click **Preview** in the Buttons toolbar at the top of the Workbench window. If you click **Preview** for more than one DataSet job, tabs for each job appear in the **Preview** and **Output** panes. The following screenshot shows an example of this, where the user has enabled previews for the DataSet jobs "Monthly Sales Data" and "Revenue2012":
## Dynamic Options pane
In the Dynamic Options pane, you can configure options for DataSet jobs. The options available in this pane update according to what you select in the **Accounts** pane. Unlike the other panes in Workbench, this pane cannot be moved.
## Preview and Output panes
The **Preview** and **Output** panes provide information about a selected DataSet job. The **Preview** pane shows a preview of what the DataSet looks like with all of the settings you have applied, and the **Output** pane provides a log of actions taken as the preview is loaded. Nothing appears in either pane until you click **Preview** in the Buttons toolbar at the top of the Workbench window. If you click **Preview** for more than one DataSet job, tabs for each job appear in the **Preview** and **Output** panes. The following screenshot shows an example of this, where the user has enabled previews for the DataSet jobs "Monthly Sales Data" and "Revenue2012":
 Preview and output data is lost when you close Workbench.
By default, the **Preview** and **Output** panes are located side by side in the bottom left corner of the Workbench window. Mousing over a pane causes it to pop open for viewing; if you move the cursor away from a pane, it closes, but you can force it to stay open by clicking anywhere on it.
You can drag the **Preview** and **Output** panes anywhere you want it in the Workbench interface. When you drag a pane, arrow buttons appear, indicating the top, bottom, left side, and right side of the interface. If you drag the pane onto one of these buttons, the corresponding area of the interface is highlighted. Dropping the pane onto a button causes it to be "docked" in the corresponding area. For example, if you dropped the pane onto either up arrow, it would dock in the upper portion of the Workbench window.
Preview and output data is lost when you close Workbench.
By default, the **Preview** and **Output** panes are located side by side in the bottom left corner of the Workbench window. Mousing over a pane causes it to pop open for viewing; if you move the cursor away from a pane, it closes, but you can force it to stay open by clicking anywhere on it.
You can drag the **Preview** and **Output** panes anywhere you want it in the Workbench interface. When you drag a pane, arrow buttons appear, indicating the top, bottom, left side, and right side of the interface. If you drag the pane onto one of these buttons, the corresponding area of the interface is highlighted. Dropping the pane onto a button causes it to be "docked" in the corresponding area. For example, if you dropped the pane onto either up arrow, it would dock in the upper portion of the Workbench window.
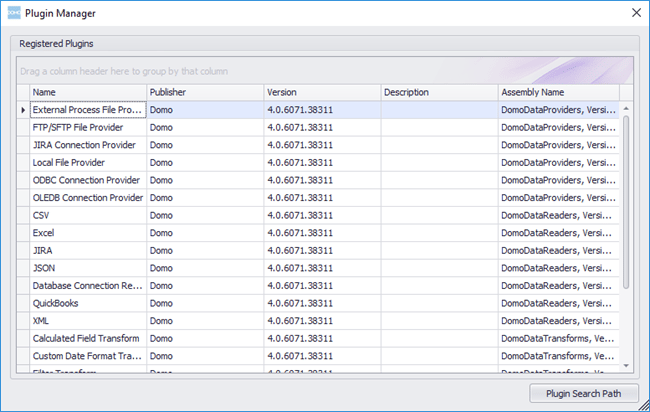 To access the **Plugin Manager**, click **Plugin Manager** in the **More** tab at the top of the Workbench window.
For more information about managing plugins, see [Managing Plugins in Workbench 4](/s/article/360047496013 "Managing Plugins in Workbench 4").
To access the **Plugin Manager**, click **Plugin Manager** in the **More** tab at the top of the Workbench window.
For more information about managing plugins, see [Managing Plugins in Workbench 4](/s/article/360047496013 "Managing Plugins in Workbench 4").