> ## Documentation Index
> Fetch the complete documentation index at: https://domoinc-openapi-sync-dataflows.mintlify.site/llms.txt
> Use this file to discover all available pages before exploring further.

# Snowflake Partition Connector

<Note>
  **Note:** Snowflake will no longer support the username and password authentication mechanism, as of November 2025. As a result, this connector will be retired in November 2025 and will no longer function. Consider using one of the following connection methods instead:

  * [Cloud Amplifier](https://domo-support.domo.com/s/article/4402322966807?language=en_US "Follow link")
  * [Snowflake KeyPair Partition Connector](/s/article/1500000888261 "Snowflake KeyPair Partition Connector")
  * [Snowflake OAuth High Bandwidth With Advanced Partitions](/s/article/4402638182935 "Snowflake OAuth High Bandwidth With Advanced Partitions")
</Note>

## Intro

Snowflake is a cloud-based analytic data warehouse system. The Domo Snowflake Partition Connector makes it easy to bring all your data from your Snowflake data warehouse into Domo based on the number of past days provided. If you are already using Snowflake as a data warehousing solution, this connector helps you use Domo in conjunction with it to get the most from your data. Once your Snowflake data is in Domo, you can combine it with all your other Domo data to get a centralized view of your most mission-critical data. To learn more about the Snowflake API, visit their page ([https://docs.snowflake.net/manuals](https://docs.snowflake.net/manuals "https://docs.snowflake.net/manuals") ).

You connect to your Snowflake account in the Data Center. This topic discusses the fields and menus that are specific to the Snowflake Partition connector user interface. General information for adding DataSets, setting update schedules, and editing DataSet information is discussed in [Adding a DataSet Using a Data Connector](https://domo-support.domo.com/s/article/360042926274?language=en_US "Adding a DataSet Using a Data Connector").

## Prerequisites

To connect to your Snowflake account and create a DataSet, you must have the following:

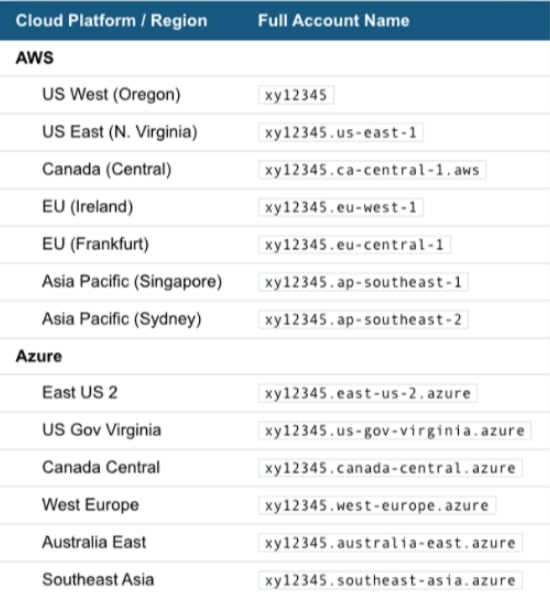
* The full name of your account (provided by Snowflake). For US West Region
  ********account\_name********, and All other regions ********account\_name.region\_id********. This is the portion of your Snowflake URL immediately following https\://.

  Note that your full account name may include additional segments that identify the region and cloud platform where your account is hosted. The following table provides account name examples by cloud platform/region. For each row, it assumes your account name is "xy12345."

  <Frame>
    <img alt="Region.png" src="https://mintcdn.com/domoinc-openapi-sync-dataflows/blcgkVgnZv6gj_XY/images/kb/ka05w00000123Kp-00N5w00000Ri7BU-0EM5w000005vO5U.png?fit=max&auto=format&n=blcgkVgnZv6gj_XY&q=85&s=ac2758851897c13f46da0c76bc1d4306" width="550" height="605" data-path="images/kb/ka05w00000123Kp-00N5w00000Ri7BU-0EM5w000005vO5U.png" />
  </Frame>

* The username and password used to connect to your Snowflake host.

## Connect to Your Snowflake Account

This section enumerates the options in the **Credentials** and **Details** panes in the Snowflake Partition Connector page. The components of the other panes in this page, **Scheduling** and **Name & Describe Your DataSet**, are universal across most connector types and are discussed in greater length in [Adding a DataSet Using a Data Connector](https://domo-support.domo.com/s/article/360042926274?language=en_US "Adding a DataSet Using a Data Connector").

## Credentials Pane

This pane contains fields for entering credentials to connect to your (third-party tool) account. The following table describes what is needed for each field:

<table border="1" cellpadding="1" cellspacing="1" data-aura-rendered-by="33:195;a"><thead><tr><th colspan="1" rowspan="1"><p><span class="s1"> Field </span></p></th><th colspan="1" rowspan="1"><p><span class="s1"> Description </span></p></th></tr></thead><tbody><tr><td colspan="1" rowspan="1"> Account Name </td><td colspan="1" rowspan="1"> Enter the name of your account (provided by Snowflake). For US West Region <b> account\_name </b>, and All other regions <b> account\_name.region\_id </b>. </td></tr><tr><td colspan="1" rowspan="1"> Username </td><td colspan="1" rowspan="1"> Enter the username associated with your Snowflake host. </td></tr><tr><td colspan="1" rowspan="1"> Password </td><td colspan="1" rowspan="1"> Enter the password associated with your Snowflake host. </td></tr><tr><td colspan="1" rowspan="1"> Role </td><td colspan="1" rowspan="1"> Enter your role. </td></tr></tbody></table>

Once you have entered valid Snowflake credentials, you can use the same account any time you go to create a new Snowflake Partition DataSet. You can manage connector accounts in the **Accounts** tab in the Data Center. For more information about this tab, see [Managing User Accounts for Connectors](https://domo-support.domo.com/s/article/360042926054?language=en_US "Managing User Accounts for Connectors").

## Details Pane

In this pane you create an SQL query to pull data from your database. You can choose a specific database table and partition column. You can also specify the number of past days you want to get data for.

<table border="1" cellpadding="1" cellspacing="1" data-aura-rendered-by="33:195;a"><thead><tr><th colspan="1" rowspan="1"><p> Menu </p></th><th colspan="1" rowspan="1"><p> Description </p></th></tr></thead><tbody><tr><td colspan="1" rowspan="1"><span> How would you like to import data into Domo? </span></td><td colspan="1" rowspan="1"><p><span> Select whether you want to import your data by using the </span><span> standard update method (replace/append), by using partition, or upsert mode. </span></p></td></tr><tr><td colspan="1" rowspan="1"><span> How would you like to build your Query? </span></td><td colspan="1" rowspan="1"><table border="1"><thead><tr><td colspan="1" rowspan="1"><span> Query Type </span></td><td colspan="1" rowspan="1"> Description </td></tr></thead><tbody><tr><td colspan="1" rowspan="1"> Custom Query </td><td colspan="1" rowspan="1"><span> Enter the SQL query to execute. </span></td></tr><tr><td colspan="1" rowspan="1"> Query Builder </td><td colspan="1" rowspan="1"><span> Select a table and fields to autogenerate your query. </span></td></tr></tbody></table></td></tr><tr><td colspan="1" rowspan="1"> Query </td><td colspan="1" rowspan="1"><span> Enter the query to execute. The query format must be like: select \* from </span><span class="pl-cce"> " </span><span> databaseName </span><span class="pl-cce"> " </span><span>. </span><span class="pl-cce"> " </span><span> schemaName </span><span class="pl-cce"> " </span><span>. </span><span class="pl-cce"> " </span><span> tableName </span><span class="pl-cce"> " </span></td></tr><tr><td colspan="1" rowspan="1"> Warehouses </td><td colspan="1" rowspan="1"> Select the warehouse containing the data you want to retrieve. The list populates all warehouses you have access to based on your credentials. </td></tr><tr><td colspan="1" rowspan="1"> Databases </td><td colspan="1" rowspan="1"> Select the database containing the data you want to retrieve. The list populates all databases you have access to based on your credentials. </td></tr><tr><td colspan="1" rowspan="1"> Schemas </td><td colspan="1" rowspan="1"> Select the database schema containing the data you want to retrieve. The list populates all schemas you have access to based on your credentials. </td></tr><tr><td colspan="1" rowspan="1"> Database Objects </td><td colspan="1" rowspan="1"> Select the database object containing the data you want to retrieve. The list populates all objects you have access to based on your credentials. </td></tr><tr><td colspan="1" rowspan="1"> Tables </td><td colspan="1" rowspan="1"> Select the database table you want to retrieve. The list populates all tables you have access to based on your credentials. If you do not select a database table, the connector retrieves your entire database schema. </td></tr><tr><td colspan="1" rowspan="1"> Views </td><td colspan="1" rowspan="1"> Select the view. </td></tr><tr><td colspan="1" rowspan="1"> Table Column Name </td><td colspan="1" rowspan="1"> Select the partition column name. </td></tr><tr><td colspan="1" rowspan="1"><span> Table Query Helper </span></td><td colspan="1" rowspan="1"><p> A query is generated based on the selected fields. Copy and paste this text into the QUERY field. You may edit this query, if desired. </p></td></tr><tr><td colspan="1" rowspan="1"> View Column Name </td><td colspan="1" rowspan="1"> Select the partition column name. </td></tr><tr><td colspan="1" rowspan="1"><span> View Query Helper </span></td><td colspan="1" rowspan="1"> A query is generated based on the selected fields. Copy and paste this text into the QUERY field. You may edit this query, if desired. </td></tr><tr><td colspan="1" rowspan="1"><span> Partition Criteria </span></td><td colspan="1" rowspan="1"><span> Select whether you want to partition your data using the date keys, non-date keys, or meta query. </span></td></tr><tr><td colspan="1" rowspan="1"><span> Partition Column Name </span></td><td colspan="1" rowspan="1"><span> Select the partition column name. Only date fields will be shown in this discovery. </span></td></tr><tr><td colspan="1" rowspan="1"><span> Partition Support Format </span></td><td colspan="1" rowspan="1"><span> Select the partition support format. </span></td></tr><tr><td colspan="1" rowspan="1"><span> Partition Non Date Key Column Name </span></td><td colspan="1" rowspan="1"><span> Select a non-date key column name to partition the data. All fields excluding Date fields will appear in this dropdown. </span></td></tr><tr><td colspan="1" rowspan="1"><span> Partition Query to determine partition tags </span></td><td colspan="1" rowspan="1"><p><span> Enter the partition meta query to determine the distinct partition tags (or keys). The column containing the <b> Date </b> data is your partition column. </span></p><p><span> Example: SELECT DISTINCT (DATE\_COLUMN\_NAME) FROM TABLENAME </span></p></td></tr><tr><td colspan="1" rowspan="1"> Past Days </td><td colspan="1" rowspan="1"> Enter the number of past days that you want to get data for. Value can be X, where X is a positive integer. Example: 30. </td></tr><tr><td colspan="1" rowspan="1"> Past Years </td><td colspan="1" rowspan="1"><span> Enter the number of past years that you want to get data for. Value can be X, where X is a positive integer. For example: 30. </span></td></tr><tr><td colspan="1" rowspan="1"> Future Years </td><td colspan="1" rowspan="1"><span> Enter the number of future years that you want to get data for. Value can be X, where X is a positive integer. For example: 30. </span></td></tr><tr><td colspan="1" rowspan="1"> Past Months </td><td colspan="1" rowspan="1"><span> Enter the number of past months that you want to get data for. Value can be X, where X is a positive integer. For example: 30. </span></td></tr><tr><td colspan="1" rowspan="1"> Future Months </td><td colspan="1" rowspan="1"><span> Enter the number of future months that you want to get data for. Value can be X, where X is a positive integer. For example: 30. </span></td></tr><tr><td colspan="1" rowspan="1"> Date Format </td><td colspan="1" rowspan="1"><span> Please select/enter proper date format according to the date format present in partition column. By default <b> yyyy-MM-dd </b> will be used. </span></td></tr><tr><td colspan="1" rowspan="1"> Custom Date Format </td><td colspan="1" rowspan="1"> Enter the custom date format. </td></tr><tr><td colspan="1" rowspan="1"><span> Upsert Key Column(s) </span></td><td colspan="1" rowspan="1"><span> Enter upsert key column name or a comma separated list of upsert key column names. <b> Required only when Update method is Merge </b>. </span></td></tr><tr><td colspan="1" rowspan="1"> Query Tag </td><td colspan="1" rowspan="1"><span> Optional parameter that can be used to tag connector SQL executions in Snowflake as a <b> Query Tag </b>. </span></td></tr></tbody></table>

### Selecting the Update Mode

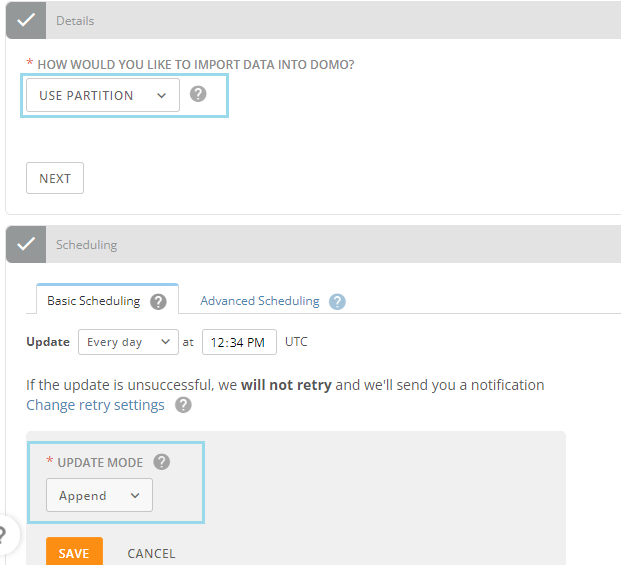
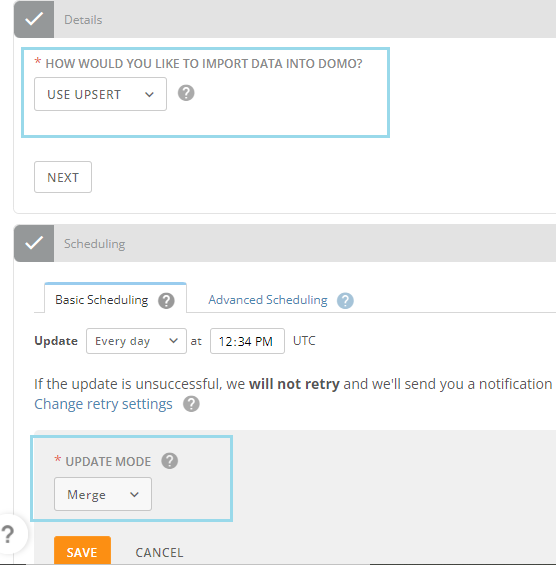
Once you decide how you want to import your data into Domo (by using the standard update method (replace/append), by using partition, or upsert mode), you need to select the relevant update mode in the **Scheduling section** in the Connector.

* If you select 'Partition' in the Details section, then you need to select the 'Append' update mode in the Scheduling section.

<Frame>
  <img alt="Partition-Append.png" src="https://mintcdn.com/domoinc-openapi-sync-dataflows/j23mDb6xH5JxEw9-/images/kb/ka0Vq000000BWXd-00N5w00000Ri7BU-0EM5w000005vO8o.png?fit=max&auto=format&n=j23mDb6xH5JxEw9-&q=85&s=31c9d668c287cc809b0c316d5c98d93f" width="621" height="565" data-path="images/kb/ka0Vq000000BWXd-00N5w00000Ri7BU-0EM5w000005vO8o.png" />
</Frame>

* If you select 'Upsert' in the Details section, then you need to select 'Merge' update mode in the Scheduling section.
<Frame>
  <img alt="Upsert-Merge.png" src="https://mintcdn.com/domoinc-openapi-sync-dataflows/j23mDb6xH5JxEw9-/images/kb/ka0Vq000000BWXd-00N5w00000Ri7BU-0EM5w000005vO8n.png?fit=max&auto=format&n=j23mDb6xH5JxEw9-&q=85&s=b858bd06d99134e7972305500e3f9bb2" width="556" height="565" data-path="images/kb/ka0Vq000000BWXd-00N5w00000Ri7BU-0EM5w000005vO8n.png" />
</Frame>

## Other Panes

For information about the remaining sections of the connector interface, including how to configure scheduling, retry, and update options, see [Adding a DataSet Using a Data Connector](https://domo-support.domo.com/s/article/360042926274?language=en_US "Adding a DataSet Using a Data Connector").