> ## Documentation Index
> Fetch the complete documentation index at: https://domoinc-openapi-sync-dataflows.mintlify.site/llms.txt
> Use this file to discover all available pages before exploring further.

# Zoom Phone Enterprise Connector

## Intro

Zoom is one of the leaders in modern enterprise video communications, with an easy and reliable cloud platform for video and audio conferencing, chat, and webinars. Zoom Phone calling features have been designed to give you a flexible, mobile, and powerful cloud phone system. The Zoom Enterprise Cloud Phone System offers enterprise-class features with a modern user experience to streamline voice communications. It tenders capabilities such as intelligent call routing and auto attendants, out-of-the-box integrations, secure HD voice, interoperability with Standards-based Endpoints, and much more. Use Domo's Zoom Phone Enterprise connector to retrieve your Zoom Phone Enterprise data. To learn more about the Zoom API, visit their [API Documentation](https://marketplace.zoom.us/docs/api-reference/zoom-api "https://marketplace.zoom.us/docs/api-reference/zoom-api").

You connect to your Zoom account in the Data Center. This topic discusses the fields and menus that are specific to the Zoom Phone Enterprise connector user interface. General information for adding DataSets, setting update schedules, and editing DataSet information is discussed in [Adding a DataSet Using a Data Connector](/s/article/360042926274 "Adding a DataSet Using a Data Connector").

## Prerequisites

To connect to your Zoom account and create a DataSet, you must have the Client ID and Client Secret associated with your OAuth App created at [https://marketplace.zoom.us](https://marketplace.zoom.us "https://marketplace.zoom.us"). You can find these credentials in your App Credentials page.

### Creating an OAuth App:

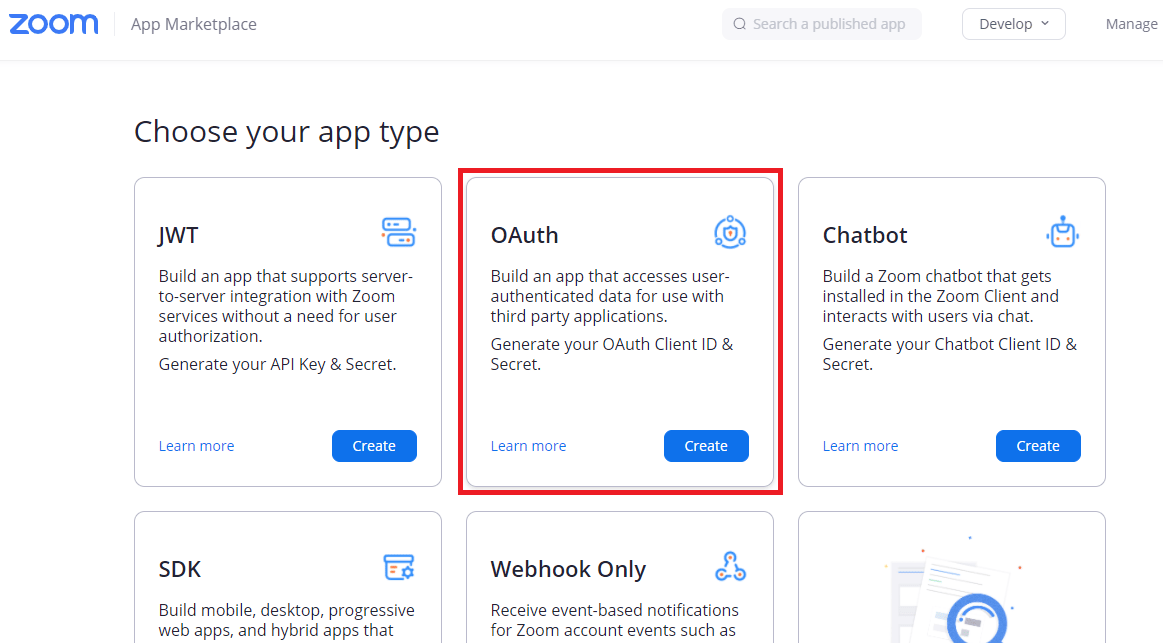
1. First, you need to register your App. Visit the [Zoom App Marketplace](https://marketplace.zoom.us/) and click on the ****Develop**** option in the dropdown on the top-right corner and select Build App. A page with various app types will be displayed.

2. Select ****OAuth**** as the app type and click on ****Create****.

   <Frame>
     <img alt="clipboard_ec411697e6e0fff34f61aa5a54e381aa6.png" src="https://mintcdn.com/domoinc-openapi-sync-dataflows/h3wt9z20TJE_4Mbl/images/kb/ka05w000001236M-00N5w00000Ri7BU-0EM5w000005vNz6.png?fit=max&auto=format&n=h3wt9z20TJE_4Mbl&q=85&s=a44b10603b1e9813e747fd40d9bfbd01" width="1163" height="643" data-path="images/kb/ka05w000001236M-00N5w00000Ri7BU-0EM5w000005vNz6.png" />
   </Frame>

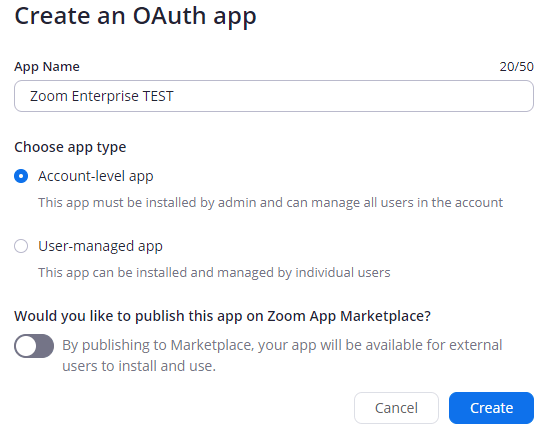
3. Provide the App name and App type, and click **Create**.
   <Frame>
     <img alt="clipboard_ecd9e0f623814095ffb26e56a89b3d004.png" src="https://mintcdn.com/domoinc-openapi-sync-dataflows/h3wt9z20TJE_4Mbl/images/kb/ka05w000001236M-00N5w00000Ri7BU-0EM5w000005vNyv.png?fit=max&auto=format&n=h3wt9z20TJE_4Mbl&q=85&s=9286927a46d7f46d8e95d803c0cda76b" width="545" height="429" data-path="images/kb/ka05w000001236M-00N5w00000Ri7BU-0EM5w000005vNyv.png" />
   </Frame>

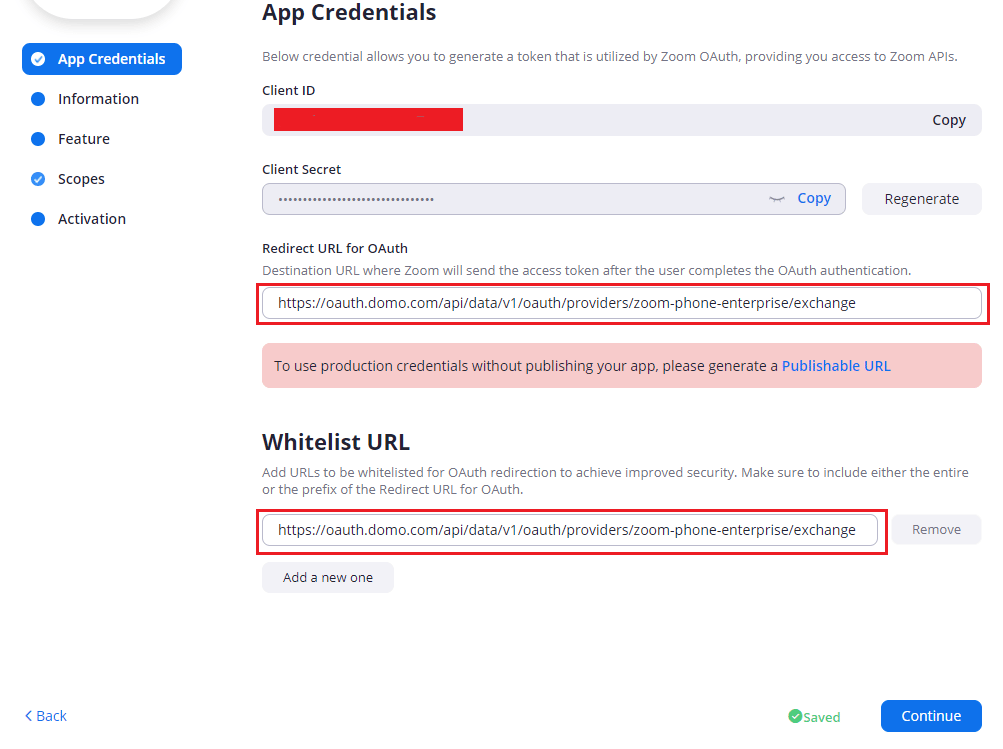
4. Your Client ID and Client Secret will appear in the App Credentials section.

5. Here, you need to add the following redirect URL in the Redirect URL for OAuth and Whitelist URL fields-[https://oauth.domo.com/api/data/v1/oauth/providers/zoom-phone-enterprise/exchange](https://oauth.domo.com/api/data/v1/oauth/providers/zoom-phone-enterprise/exchange)
   <Frame>
     <img alt="clipboard_eb9fad16a4a3a02535df3b28362617d9e.png" src="https://mintcdn.com/domoinc-openapi-sync-dataflows/h3wt9z20TJE_4Mbl/images/kb/ka05w000001236M-00N5w00000Ri7BU-0EM5w000005vNyx.png?fit=max&auto=format&n=h3wt9z20TJE_4Mbl&q=85&s=a7dc328776a8c8d2db8c9f3195ae7394" width="1003" height="749" data-path="images/kb/ka05w000001236M-00N5w00000Ri7BU-0EM5w000005vNyx.png" />
   </Frame>

6. Click **Continue**.

7. Enter the basic information for your App and add feature. Click **Continue**.

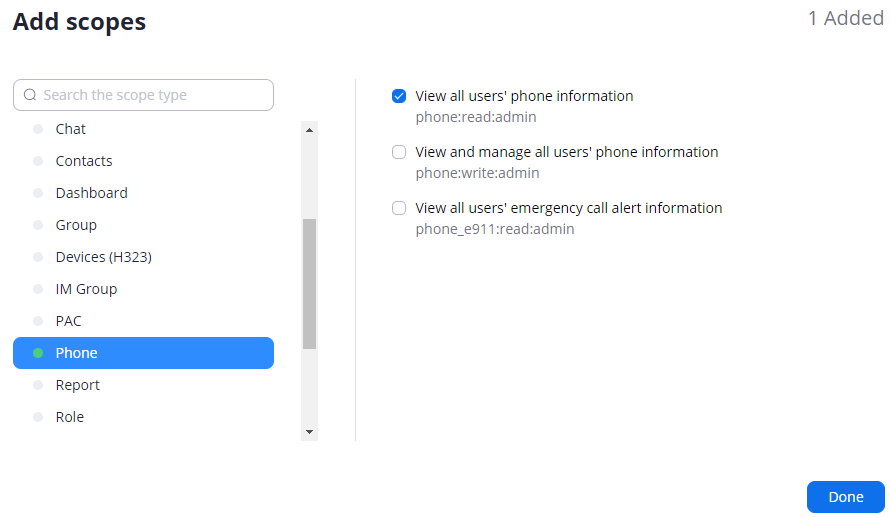
8. In the setting Scopes section, click **Add Scope**.

9. Select the **phone:read:admin** scope and click **Done**.
   <Frame>
     <img alt="clipboard_e10d8e78443a3772dfc5c7550d1386c00.png" src="https://mintcdn.com/domoinc-openapi-sync-dataflows/h3wt9z20TJE_4Mbl/images/kb/ka05w000001236M-00N5w00000Ri7BU-0EM5w000005vNyy.png?fit=max&auto=format&n=h3wt9z20TJE_4Mbl&q=85&s=d0e22f4b231af94db1073301ae2fc26f" width="891" height="517" data-path="images/kb/ka05w000001236M-00N5w00000Ri7BU-0EM5w000005vNyy.png" />
   </Frame>

10. Click **Continue**.

11. In the Activation section, click **Install** to install your App to your account.

## Connecting to Your Zoom Account

This section enumerates the options in the ********Credentials******** and ********Details******** panes in the Zoom Phone Connector page. The components of the other panes in this page, ********Scheduling******** and ********Name & Describe Your DataSet,******** are universal across most connector types and are discussed in greater length in [Adding a DataSet Using a Data Connector](/s/article/360042926274 "Adding a DataSet Using a Data Connector").

### Credentials Pane

In this pane, you need to enter your Client ID and Client Secret associated with your OAuth App that you created at [https://marketplace.zoom.us](https://marketplace.zoom.us "https://marketplace.zoom.us"), and select your Zoom account type.

<table class="mt-responsive-table" data-aura-rendered-by="33:201;a"><tbody><tr><th class="mt-column-width-25" colspan="1" rowspan="1"><p> Field </p></th><th class="mt-column-width-70" colspan="1" rowspan="1"><p> Description </p></th></tr><tr><td class="mt-column-width-25" colspan="1" rowspan="1"> Client ID </td><td class="mt-column-width-70" colspan="1" rowspan="1"> Enter the client ID associated with your OAuth App created at <a href="https://marketplace.zoom.us" target="_blank" title="https://marketplace.zoom.us"> [https://marketplace.zoom.us](https://marketplace.zoom.us) </a>. For more details, see <a href="#h_01ES6Q7RQ75R7DT59TND1MNCJC" target="_self" title="Zoom Phone Enterprise Connector"> Creating an OAuth App </a>. </td></tr><tr><td class="mt-column-width-25" colspan="1" rowspan="1"> Client Secret </td><td class="mt-column-width-70" colspan="1" rowspan="1"> Enter the client secret associated with your OAuth App created at <a href="https://marketplace.zoom.us" target="_blank" title="https://marketplace.zoom.us"> [https://marketplace.zoom.us](https://marketplace.zoom.us) </a>. For more details, see <a href="#h_01ES6Q7RQ75R7DT59TND1MNCJC" target="_self" title="Zoom Phone Enterprise Connector"> Creating an OAuth App </a>. </td></tr><tr><td class="mt-column-width-25" colspan="1" rowspan="1"> Account Type </td><td class="mt-column-width-70" colspan="1" rowspan="1"> Select the Account Type as Business and higher if your plan is Business, Education, VIP, API Partner, or Enterprise; otherwise select Pro. </td></tr></tbody></table>

The Domo Zoom Phone Enterprise connector uses OAuth to connect, so there is no need to enter your Zoom credentials within Domo. Click ********Connect******** (or select ********Add Account******** if you have existing Zoom accounts in Domo) to open the Zoom OAuth screen where you can enter your Zoom email and password.

<Note>
  **Note:** If you are already logged into Zoom when you connect in Domo, you are authenticated automatically when you click **Connect** (after entering the client ID and client secret.) If you want to connect to an account that is different from the one you are logged into, you must first log out of your Zoom account.
</Note>

Once you have entered valid credentials, you can use the same account any time you go to create a new Zoom Phone Enterprise DataSet. You can manage connector accounts in the ********Accounts******** tab in the Data Center. For more information about this tab, see [Managing User Accounts for Connectors](/s/article/360042926054 "Managing User Accounts for Connectors").

### Details Pane

This pane contains a primary ********Reports******** menu, along with various other menus which may or may not appear depending on the report type you select.

<table border="1" cellpadding="1" cellspacing="1" data-aura-rendered-by="33:201;a"><thead><tr><th colspan="1" rowspan="1"><p> Menu </p></th><th colspan="1" rowspan="1"><p> Description </p></th></tr></thead><tbody><tr><td colspan="1" rowspan="1"><p> Report </p></td><td colspan="1" rowspan="1"><p> Select the Zoom Phone Enterprise report you want to run. The following reports are available: </p><table border="1" cellpadding="1" cellspacing="1"><tbody><tr><td colspan="1" rowspan="1"> Account Call Logs </td><td colspan="1" rowspan="1"> Retrieve a list of active or inactive host report for a specified period of time. </td></tr><tr><td colspan="1" rowspan="1"> Calling Plans </td><td colspan="1" rowspan="1"> List all Zoom phone calling plans that are enabled for a Zoom account. </td></tr><tr><td colspan="1" rowspan="1"> Phone Number Details </td><td colspan="1" rowspan="1"> Retrieve details of a specific phone number in a Zoom account. </td></tr><tr><td colspan="1" rowspan="1"> Phone Numbers </td><td colspan="1" rowspan="1"> List all Zoom phone numbers in a Zoom account. </td></tr><tr><td colspan="1" rowspan="1"> Phone Users </td><td colspan="1" rowspan="1"> List all the users on an account who have been assigned Zoom phone licenses. </td></tr><tr><td colspan="1" rowspan="1"> User Call Logs </td><td colspan="1" rowspan="1"> Retrieve a Zoom phone user's call logs. </td></tr><tr><td colspan="1" rowspan="1"> User Profile </td><td colspan="1" rowspan="1"> Retrieve a user's Zoom phone profile. </td></tr><tr><td colspan="1" rowspan="1"> User Recordings </td><td colspan="1" rowspan="1"> Retrieve a user's Zoom phone recordings. </td></tr><tr><td colspan="1" rowspan="1"> User Voicemails </td><td colspan="1" rowspan="1"> Retrieve a user's Zoom Phone voicemails. </td></tr></tbody></table></td></tr><tr><td colspan="1" rowspan="1"> Call Log Type </td><td colspan="1" rowspan="1"> Choose the call log type. </td></tr><tr><td colspan="1" rowspan="1"> Phone Number </td><td colspan="1" rowspan="1"> Select a phone number. </td></tr><tr><td colspan="1" rowspan="1"> Phone Number Type </td><td colspan="1" rowspan="1"> Choose the phone number type. </td></tr><tr><td colspan="1" rowspan="1"> Extension Type </td><td colspan="1" rowspan="1"> Choose the extension type. </td></tr><tr><td colspan="1" rowspan="1"> Number Type </td><td colspan="1" rowspan="1"> Choose the number type. </td></tr><tr><td colspan="1" rowspan="1"> Pending Numbers </td><td colspan="1" rowspan="1"> Choose whether to include or exclude pending numbers. </td></tr><tr><td colspan="1" rowspan="1"> Site </td><td colspan="1" rowspan="1"> Select a site. </td></tr><tr><td colspan="1" rowspan="1"> User </td><td colspan="1" rowspan="1"> Select a user. </td></tr><tr><td colspan="1" rowspan="1"> Status </td><td colspan="1" rowspan="1"> Choose the status. </td></tr><tr><td colspan="1" rowspan="1"> Date Selection </td><td colspan="1" rowspan="1"> Select the date format for your data. </td></tr><tr><td colspan="1" rowspan="1"> Single Date </td><td colspan="1" rowspan="1"> Select whether the report data is for a specific date or for a relative number of days back from today. </td></tr><tr><td colspan="1" rowspan="1"> Specific Date </td><td colspan="1" rowspan="1"> Select the specific date using the date selector. </td></tr><tr><td colspan="1" rowspan="1"> Relative Date </td><td colspan="1" rowspan="1"> Enter the number of days back that you would like to get data for in the <b><b><b><b> Days Back </b></b></b></b> field. Specify either today or 0, yesterday or 1, or today-7 or 7 to get data for 7 days into the past. </td></tr><tr><td colspan="1" rowspan="1"> Date Range </td><td colspan="1" rowspan="1"> Select the specific or relative date range. </td></tr><tr><td colspan="1" rowspan="1"> Start Date - Specific </td><td colspan="1" rowspan="1"> Select the first date in your date range using the date selector. </td></tr><tr><td colspan="1" rowspan="1"> End Date - Specific </td><td colspan="1" rowspan="1"> Select the last date in your date range using the date selector. </td></tr><tr><td colspan="1" rowspan="1"> Start Date - Relative </td><td colspan="1" rowspan="1"><p> Enter the number of days back that you would like to get data from (start day). Combine with <b><b><b><b><b><b><b><b><b><b><b><b><b><b><b><b> End Date </b></b></b></b></b></b></b></b></b></b></b></b></b></b></b></b> to create a range of represented days. </p><p> For example, if you entered 10 for <b><b><b><b><b><b><b><b><b><b><b><b><b><b><b><b> Start Date </b></b></b></b></b></b></b></b></b></b></b></b></b></b></b></b> and 5 for <b><b><b><b><b><b><b><b><b><b><b><b><b><b><b><b> End Date </b></b></b></b></b></b></b></b></b></b></b></b></b></b></b></b>, the report would contain data for 10 days ago up until 5 days ago. </p></td></tr><tr><td colspan="1" rowspan="1"> End Date - Relative </td><td colspan="1" rowspan="1"><p> Enter the number of days back that you would like to get data to (end day). Combine with <b><b><b><b><b><b><b><b><b><b><b><b><b><b><b><b> Start Date </b></b></b></b></b></b></b></b></b></b></b></b></b></b></b></b> to create a range of represented days. </p><p> For example, if you entered 10 for <b><b><b><b><b><b><b><b><b><b><b><b><b><b><b><b> Start Date </b></b></b></b></b></b></b></b></b></b></b></b></b></b></b></b> and 5 for <b><b><b><b><b><b><b><b><b><b><b><b><b><b><b><b> End Date </b></b></b></b></b></b></b></b></b></b></b></b></b></b></b></b>, the report would contain data for 10 days ago up until 5 days ago. </p></td></tr><tr><td colspan="1" rowspan="1"> Time Period </td><td colspan="1" rowspan="1"> Specify the time period that you would like to receive data for. </td></tr><tr><td colspan="1" rowspan="1"> Starting Day of the Week </td><td colspan="1" rowspan="1"> Select the day you would like your week to start with. </td></tr></tbody></table>

### Other Panes

For information about the remaining sections of the connector interface, including how to configure scheduling, retry, and update options, see [Adding a DataSet Using a Data Connector](/s/article/360042926274 "Adding a DataSet Using a Data Connector").
