> ## Documentation Index
> Fetch the complete documentation index at: https://domoinc-openapi-sync-dataflows.mintlify.site/llms.txt
> Use this file to discover all available pages before exploring further.

# Microsoft Exchange Mailbox Only Connector

## Intro

Microsoft Exchange Server is a mail server and calendaring server. To learn more about the Microsoft Exchange API, visit their page ([https://docs.microsoft.com/en-us/exc...s-and-contacts](https://docs.microsoft.com/en-us/exchange/client-developer/exchange-web-services/office-365-rest-apis-for-mail-calendars-and-contacts "https://docs.microsoft.com/en-us/exchange/client-developer/exchange-web-services/office-365-rest-apis-for-mail-calendars-and-contacts") ).

You connect to your Microsoft Exchange account in the Data Center. This topic discusses the fields and menus that are specific to the Microsoft Exchange connector user interface. General information for adding DataSets, setting update schedules, and editing DataSet information is discussed in [Adding a DataSet Using a Data Connector](https://domo-support.domo.com/s/article/360042926274?language=en_US "Adding a DataSet Using a Data Connector").

## Prerequisites

To connect to your Microsoft Exchange Mailbox mailbox and create a DataSet, you must have a Microsoft Exchange Client ID and Client Secret. For information about obtaining these credentials, see [https://docs.microsoft.com/en-us/outlook/rest/get-started](https://docs.microsoft.com/en-us/outlook/rest/get-started "https://docs.microsoft.com/en-us/outlook/rest/get-started"). You must also have your Microsoft credentials (the email address, phone number, or Skype handle associated with your account, as well as your password).

## Connecting to Your Microsoft Exchange Account

This section enumerates the options in the **Credentials** and **Details** panes in the Microsoft Exchange Connector page. The components of the other panes in this page, **Scheduling** and **Name & Describe Your DataSet**, are universal across most connector types and are discussed in greater length in [Adding a DataSet Using a Data Connector](https://domo-support.domo.com/s/article/360042926274?language=en_US "Adding a DataSet Using a Data Connector").

## Credentials Pane

This pane contains fields for entering credentials to connect to the Microsoft Exchange REST API. The following table describes what is needed for each field:

<table border="1" cellpadding="1" cellspacing="1" data-aura-rendered-by="33:195;a">
  <thead>
    <tr>
      <th colspan="1" rowspan="1">
        <p>
          <span class="s1">
            Field
          </span>
        </p>
      </th>

      <th colspan="1" rowspan="1">
        <p>
          <span class="s1">
            Description
          </span>
        </p>
      </th>
    </tr>
  </thead>

  <tbody>
    <tr>
      <td colspan="1" rowspan="1">
        <p>
          Client ID
        </p>
      </td>

      <td colspan="1" rowspan="1">
        <p>
          {" "}

          Enter your Client ID. For step-by-step instructions on obtaining a Client ID and Client Secret, see

          <tt>
            <a href="https://learn.microsoft.com/en-us/entra/identity-platform/quickstart-register-app" target="_blank" title="https://learn.microsoft.com/en-us/entra/identity-platform/quickstart-register-app">
              {" "}

              [https://learn.microsoft.com/en-us/entra/identity-platform/quickstart-register-app\{](https://learn.microsoft.com/en-us/entra/identity-platform/quickstart-register-app\{)" "}
            </a>
          </tt>

          .{" "}
        </p>
      </td>
    </tr>

    <tr>
      <td colspan="1" rowspan="1">
        <p>
          Client Secret
        </p>
      </td>

      <td colspan="1" rowspan="1">
        <p>
          {" "}

          Enter your Client Secret. For step-by-step instructions on obtaining a Client ID and Client Secret, see

          <tt>
            <a href="https://learn.microsoft.com/en-us/entra/identity-platform/quickstart-register-app" target="_blank" title="https://learn.microsoft.com/en-us/entra/identity-platform/quickstart-register-app">
              {" "}

              [https://learn.microsoft.com/en-us/entra/identity-platform/quickstart-register-app\{](https://learn.microsoft.com/en-us/entra/identity-platform/quickstart-register-app\{)" "}
            </a>
          </tt>

          .{" "}
        </p>
      </td>
    </tr>
  </tbody>
</table>

For more information, see [https://learn.microsoft.com/en-us/entra/identity-platform/quickstart-register-app](https://learn.microsoft.com/en-us/entra/identity-platform/quickstart-register-app "https://learn.microsoft.com/en-us/entra/identity-platform/quickstart-register-app").

After you have entered your API credentials, you are taken to the Microsoft OAuth screen where you are prompted to enter your Microsoft credentials. Once you have entered valid credentials, you can use the same account any time you go to create a new Microsoft Exchange DataSet. You can manage connector accounts in the **Accounts** tab in the Data Center. For more information about this tab, see [Managing User Accounts for Connectors](https://domo-support.domo.com/s/article/360042926054?language=en_US "Managing User Accounts for Connectors").

### Configuring Your Azure App

To create a connection with your Microsoft Exchange Mailbox account, you must first create a Microsoft Azure Web App to obtain the necessary client ID and secret.

**To configure an Azure App**:

1. Log into the
   [Azure Portal](https://portal.azure.com/#home "https://portal.azure.com/#home").

2. Click
   **Azure Active Directory > App Registrations > New Registration**.

<Frame>
  <img alt="New_Registrations.png" src="https://mintcdn.com/domoinc-openapi-sync-dataflows/GZtBW7DeR7whzwbr/images/kb/ka0Vq0000000XVR-00N5w00000Ri7BU-0EM5w000005vNwz.png?fit=max&auto=format&n=GZtBW7DeR7whzwbr&q=85&s=8de11640728e253d10f4b651f90b51ba" width="840" height="75" data-path="images/kb/ka0Vq0000000XVR-00N5w00000Ri7BU-0EM5w000005vNwz.png" />
</Frame>

3. Fill out the registration form as follows:

* Name: Enter name for your application.

* Supported account types: Select an option to specify who can use this application or access this API.

* Redirect URI: Enter the redirect URI as: **[https://oauth.domo.com/api/data/v1/oauth/providers/mail-exchange-rest-mailbox-only/exchange](https://oauth.domo.com/api/data/v1/oauth/providers/mail-exchange-rest-mailbox-only/exchange)**.
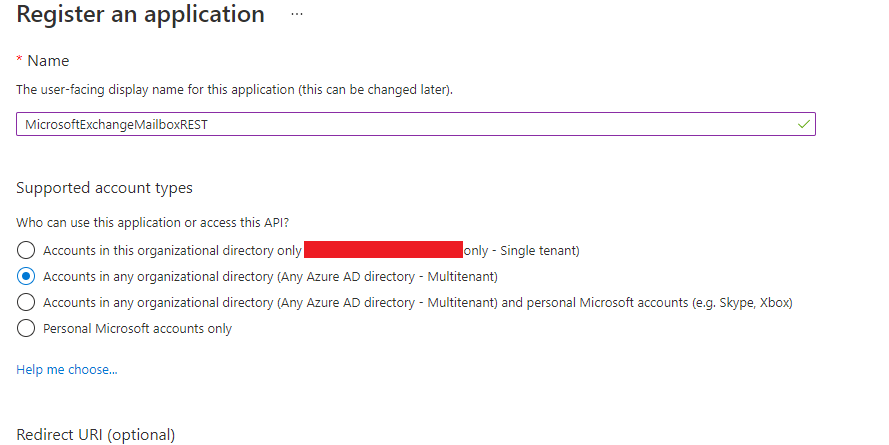
<Note>
  **Note:** The authentication response is sent to this URI after successfully authenticating the user. Providing the
  URI at this stage is optional and it can be changed later, but a value is required for most of the authentication
  scenarios.
</Note>

<Frame>
  <img alt="Register_an_application.png" src="https://mintcdn.com/domoinc-openapi-sync-dataflows/GZtBW7DeR7whzwbr/images/kb/ka0Vq0000000XVR-00N5w00000Ri7BU-0EM5w000005vNxU.png?fit=max&auto=format&n=GZtBW7DeR7whzwbr&q=85&s=d1a2c319a445ab409ab323e0769228c0" width="889" height="445" data-path="images/kb/ka0Vq0000000XVR-00N5w00000Ri7BU-0EM5w000005vNxU.png" />
</Frame>

4. Click **Register**. An overview of your registered App will appear. The **Application ID** that appears here is the **Client ID** you will enter in the **Credentials** pane in Domo.

5. Click
   **API Permissions >> +Add a permission**.

<Frame>
  <img alt="Add_API_permission.png" src="https://mintcdn.com/domoinc-openapi-sync-dataflows/GZtBW7DeR7whzwbr/images/kb/ka0Vq0000000XVR-00N5w00000Ri7BU-0EM5w000005vNwy.png?fit=max&auto=format&n=GZtBW7DeR7whzwbr&q=85&s=cda3629bb7a72c117919ea215c0ddb89" width="1058" height="131" data-path="images/kb/ka0Vq0000000XVR-00N5w00000Ri7BU-0EM5w000005vNwy.png" />
</Frame>

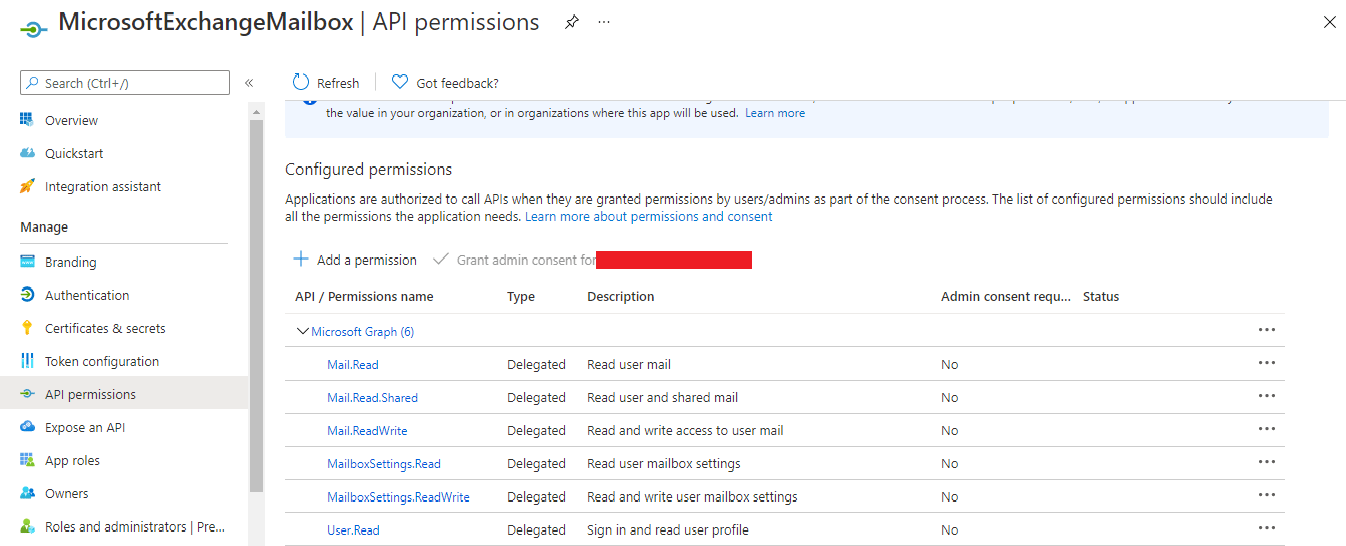
6. **Request API permissions** section appears. Add the API permissions for your application.
<Frame>
  <img alt="Permissions.png" src="https://mintcdn.com/domoinc-openapi-sync-dataflows/GZtBW7DeR7whzwbr/images/kb/ka0Vq0000000XVR-00N5w00000Ri7BU-0EM5w000005vNxY.png?fit=max&auto=format&n=GZtBW7DeR7whzwbr&q=85&s=4d8ea22e15504f8f18d73ce1fc6358b6" width="1346" height="546" data-path="images/kb/ka0Vq0000000XVR-00N5w00000Ri7BU-0EM5w000005vNxY.png" />
</Frame>

7. Now, click on
   **Certificates and secrets**. Certificates can be used as secrets to prove the application's identity when requesting a token. Also, can be referred to as public keys.

8. Click
   **+New client secret**.

<Frame>
  <img alt="New_Client_secret.png" src="https://mintcdn.com/domoinc-openapi-sync-dataflows/GZtBW7DeR7whzwbr/images/kb/ka0Vq0000000XVR-00N5w00000Ri7BU-0EM5w000005vNxZ.png?fit=max&auto=format&n=GZtBW7DeR7whzwbr&q=85&s=d74528b8c0a4bd9fb04aae0935a96580" width="1059" height="180" data-path="images/kb/ka0Vq0000000XVR-00N5w00000Ri7BU-0EM5w000005vNxZ.png" />
</Frame>

9. Specify the client secret description and the expiry period for your client secret, and click
   **Add**.

10. Copy the value and paste it into the
    **Client Secret** field in the **Connector credentials** section in Domo.

## Details Pane

This pane contains a primary **Reports** menu, along with various other menus which may or may not appear depending on the report type you select.

<table border="1" cellpadding="1" cellspacing="1" data-aura-rendered-by="33:195;a">
  <thead>
    <tr>
      <th colspan="1" rowspan="1">
        <p>
          Menu
        </p>
      </th>

      <th colspan="1" rowspan="1">
        <p>
          Description
        </p>
      </th>
    </tr>
  </thead>

  <tbody>
    <tr>
      <td colspan="1" rowspan="1">
        <p>
          Report
        </p>
      </td>

      <td colspan="1" rowspan="1">
        <p>
          Select the Microsoft Exchange report you want to run. The following reports are available:
        </p>

        <table border="1" cellpadding="1" cellspacing="1">
          <tbody>
            <tr>
              <td colspan="1" rowspan="1">
                <p>
                  Messages
                </p>
              </td>

              <td colspan="1" rowspan="1">
                <p>
                  <span>
                    {" "}

                    Returns message details like recipients, body, subject, size, importance, sender's name, received time,
                    sent time, etc.{" "}
                  </span>
                </p>
              </td>
            </tr>
          </tbody>
        </table>
      </td>
    </tr>

    <tr>
      <td colspan="1" rowspan="1">
        <p>
          Folder
        </p>
      </td>

      <td colspan="1" rowspan="1">
        <p>
          Select the folder containing the content you want to import.
        </p>
      </td>
    </tr>

    <tr>
      <td colspan="1" rowspan="1">
        <p>
          Search Type
        </p>
      </td>

      <td colspan="1" rowspan="1">
        <p>
          Select the search type.
        </p>

        <table border="1">
          <tbody>
            <tr>
              <td colspan="1" rowspan="1">
                {" "}

                Search{" "}
              </td>

              <td colspan="1" rowspan="1">
                {" "}

                Returns results based on search criteria. Use the Search query parameter to restrict the results of a request
                to match a search criterion.{" "}
              </td>
            </tr>

            <tr>
              <td colspan="1" rowspan="1">
                {" "}

                Filters{" "}
              </td>

              <td colspan="1" rowspan="1">
                {" "}

                Filters results (rows). Use the Filter option to retrieve just a subset of a collection.{" "}
              </td>
            </tr>
          </tbody>
        </table>
      </td>
    </tr>

    <tr>
      <td colspan="1" rowspan="1">
        <p>
          Filter Type
        </p>
      </td>

      <td colspan="1" rowspan="1">
        <p>
          <span>
            Select Filter type. If the filter type is
          </span>

          <b>
            Starts with
          </b>

          <span>
            , then the connector will perform a
          </span>

          <b>
            Starts with
          </b>

          <span>
            match for the given inputs (from, subject). If the search type is
          </span>

          <b>
            Equals
          </b>

          <span>
            , then the connector will an perform exact search for the given inputs (from, subject).
          </span>
        </p>
      </td>
    </tr>

    <tr>
      <td colspan="1" rowspan="1">
        <p>
          Subject (Optional)
        </p>
      </td>

      <td colspan="1" rowspan="1">
        <p>
          <span>
            Enter the subject to find all the emails for the given subject.
          </span>
        </p>
      </td>
    </tr>

    <tr>
      <td colspan="1" rowspan="1">
        <p>
          From (Optional)
        </p>
      </td>

      <td colspan="1" rowspan="1">
        <p>
          Enter the email id of the user to filter returned data specific to that user.
        </p>
      </td>
    </tr>

    <tr>
      <td colspan="1" rowspan="1">
        <p>
          Search Option
        </p>
      </td>

      <td colspan="1" rowspan="1">
        <p>
          {" "}

          Select the desired search method. If you select

          <b>
            Custom Search
          </b>

          , you are prompted to enter a subject line
          and sender name for the search. If you select

          <b>
            Query
          </b>

          , you are prompted to enter a search query string.{" "}
        </p>
      </td>
    </tr>

    <tr>
      <td colspan="1" rowspan="1">
        <p>
          Query
        </p>
      </td>

      <td colspan="1" rowspan="1">
        <p>
          {" "}

          Enter a Keyword Query Language (KQL) query. For more information about searchable email properties, KQL syntax,
          supported operators, and search tips, see the Microsoft Exchange user documentation.{" "}
        </p>
      </td>
    </tr>

    <tr>
      <td colspan="1" rowspan="1">
        <p>
          Calendar Type
        </p>
      </td>

      <td colspan="1" rowspan="1">
        <p>
          {" "}

          Select whether you want to import a shared or personal (

          <b>
            Own
          </b>

          ) calendar.{" "}
        </p>
      </td>
    </tr>

    <tr>
      <td colspan="1" rowspan="1">
        <p>
          Shared Calendar Search Type
        </p>
      </td>

      <td colspan="1" rowspan="1">
        <p>
          Select whether you want to search for shared calendars by name or email address.
        </p>
      </td>
    </tr>

    <tr>
      <td colspan="1" rowspan="1">
        <p>
          Shared Calendars
        </p>
      </td>

      <td colspan="1" rowspan="1">
        <p>
          Select the shared calendar(s) you want to import into Domo.
        </p>
      </td>
    </tr>

    <tr>
      <td colspan="1" rowspan="1">
        <p>
          Shared Users Email Address
        </p>
      </td>

      <td colspan="1" rowspan="1">
        <p>
          Enter the email address of the user whose calendar you want to retrieve.
        </p>
      </td>
    </tr>

    <tr>
      <td colspan="1" rowspan="1">
        <p>
          File Type
        </p>
      </td>

      <td colspan="1" rowspan="1">
        <p>
          Select whether the attachment you are importing is a CSV, XLS, XLSX, JSON, or XML file.
        </p>
      </td>
    </tr>

    <tr>
      <td colspan="1" rowspan="1">
        <p>
          File Name
        </p>
      </td>

      <td colspan="1" rowspan="1">
        <p>
          {" "}

          Enter the name of the attachment you want to import. If the file name contains an extension, you must include the
          extension.{" "}
        </p>
      </td>
    </tr>

    <tr>
      <td colspan="1" rowspan="1">
        <p>
          File Password (Optional)
        </p>
      </td>

      <td colspan="1" rowspan="1">
        <p>
          If the file you are uploading is password-protected, enter the password here.
        </p>
      </td>
    </tr>

    <tr>
      <td colspan="1" rowspan="1">
        <p>
          Delimiter
        </p>
      </td>

      <td colspan="1" rowspan="1">
        <p>
          {" "}

          Select the delimiter to use in parsing CSV files. If your desired delimiter is not in the menu, select

          <b>
            {" "}

            Other{" "}
          </b>

          then enter the delimiter in the

          <b>
            Custom Delimiter
          </b>

          field.{" "}
        </p>
      </td>
    </tr>

    <tr>
      <td colspan="1" rowspan="1">
        <p>
          Custom Delimiter
        </p>
      </td>

      <td colspan="1" rowspan="1">
        <p>
          {" "}

          Enter the custom delimiter for your CSV file. Enter

          <span class="mt-font-courier-new">
            \t
          </span>

          for tab or Unicode
          characters in

          <span class="mt-font-courier-new">
            \uxxxx
          </span>

          form (e.g.

          <span class="mt-font-courier-new">
            {" "}

            \u005e{" "}
          </span>

          ).{" "}
        </p>
      </td>
    </tr>

    <tr>
      <td colspan="1" rowspan="1">
        <p>
          Quote Character
        </p>
      </td>

      <td colspan="1" rowspan="1">
        <p>
          Select the desired quote character for parsing your CSV file. A double quote (") is the CSV standard.
        </p>
      </td>
    </tr>

    <tr>
      <td colspan="1" rowspan="1">
        <p>
          Custom Quote Character
        </p>
      </td>

      <td colspan="1" rowspan="1">
        <p>
          {" "}

          Enter the desired custom quote character. Enter

          <span class="mt-font-courier-new">
            \t
          </span>

          for tab or Unicode
          characters in

          <span class="mt-font-courier-new">
            \uxxxx
          </span>

          form (e.g.

          <span class="mt-font-courier-new">
            {" "}

            \u005e{" "}
          </span>

          ).{" "}
        </p>
      </td>
    </tr>

    <tr>
      <td colspan="1" rowspan="1">
        <p>
          Escape Character
        </p>
      </td>

      <td colspan="1" rowspan="1">
        <p>
          {" "}

          Select the escape character to use in parsing CSV files. If your desired escape character is not in the menu, select{" "}

          <b>
            Other
          </b>

          then enter the escape character in the

          <b>
            Custom Escape Character
          </b>

          field.{" "}
        </p>
      </td>
    </tr>

    <tr>
      <td colspan="1" rowspan="1">
        <p>
          Custom Escape Character
        </p>
      </td>

      <td colspan="1" rowspan="1">
        <p>
          {" "}

          Enter the custom escape character for your CSV file. Enter

          <span class="mt-font-courier-new">
            \t
          </span>

          for tab
          or Unicode characters in

          <span class="mt-font-courier-new">
            \uxxxx
          </span>

          form (e.g.

          <span class="mt-font-courier-new">
            {" "}

            \u005e{" "}
          </span>

          ).{" "}
        </p>
      </td>
    </tr>

    <tr>
      <td colspan="1" rowspan="1">
        <p>
          Header Start Row (Optional)
        </p>
      </td>

      <td colspan="1" rowspan="1">
        <p>
          Enter the header row number. If you do not enter a number, the first row is considered the header row.
        </p>
      </td>
    </tr>

    <tr>
      <td colspan="1" rowspan="1">
        <p>
          Data Start Row (Optional)
        </p>
      </td>

      <td colspan="1" rowspan="1">
        <p>
          {" "}

          Enter the starting data row number. If you do not enter a number, the first row after the header row is considered
          the starting row.{" "}
        </p>
      </td>
    </tr>

    <tr>
      <td colspan="1" rowspan="1">
        <p>
          Footer Rows to Skip (Optional)
        </p>
      </td>

      <td colspan="1" rowspan="1">
        <p>
          {" "}

          If there are one or more rows at the bottom of the file you do not want to import, enter the number of rows to
          skip.{" "}
        </p>
      </td>
    </tr>

    <tr>
      <td colspan="1" rowspan="1">
        <p>
          Sheet Name (Optional)
        </p>
      </td>

      <td colspan="1" rowspan="1">
        <p>
          {" "}

          If the Excel file you are uploading is found on a specific sheet, enter the sheet name here. If you do not enter
          a sheet name, the first sheet of the workbook will be used.{" "}
        </p>
      </td>
    </tr>

    <tr>
      <td colspan="1" rowspan="1">
        <p>
          Date Field Key
        </p>
      </td>

      <td colspan="1" rowspan="1">
        <p>
          Enter the data tag in your JSON or XML file.
        </p>
      </td>
    </tr>

    <tr>
      <td colspan="1" rowspan="1">
        <p>
          Sublist to Flatten
        </p>
      </td>

      <td colspan="1" rowspan="1">
        <p>
          Enter the lists you want to flatten, separated by commas.
        </p>
      </td>
    </tr>

    <tr>
      <td colspan="1" rowspan="1">
        <p>
          Report Date
        </p>
      </td>

      <td colspan="1" rowspan="1">
        <p>
          Select whether the report data is for a specific date or for a relative number of days back from today.
        </p>
      </td>
    </tr>

    <tr>
      <td colspan="1" rowspan="1">
        <p>
          Select Specific Date
        </p>
      </td>

      <td colspan="1" rowspan="1">
        <p>
          Select the date for the report.
        </p>
      </td>
    </tr>

    <tr>
      <td colspan="1" rowspan="1">
        <p>
          Days Back
        </p>
      </td>

      <td colspan="1" rowspan="1">
        <p>
          Enter the number of past days that should appear in the report.
        </p>
      </td>
    </tr>

    <tr>
      <td colspan="1" rowspan="1">
        <p>
          Start Date
        </p>
      </td>

      <td colspan="1" rowspan="1">
        <p>
          {" "}

          Specify whether the first date in your date range is a specific or relative date. You select the last date in your
          range in

          <b>
            End Date
          </b>

          .{" "}
        </p>
      </td>
    </tr>

    <tr>
      <td colspan="1" rowspan="1">
        <p>
          End Date
        </p>
      </td>

      <td colspan="1" rowspan="1">
        <p>
          {" "}

          Specify whether the second date in your date range is a specific or relative date. You select the first date in
          your range in

          <b>
            Start Date
          </b>

          .{" "}
        </p>
      </td>
    </tr>

    <tr>
      <td colspan="1" rowspan="1">
        <p>
          Select Specific Start Date
        </p>
      </td>

      <td colspan="1" rowspan="1">
        <p>
          Select the first date in your date range.
        </p>
      </td>
    </tr>

    <tr>
      <td colspan="1" rowspan="1">
        <p>
          Select Specific End Date
        </p>
      </td>

      <td colspan="1" rowspan="1">
        <p>
          Select the second date in your date range.
        </p>
      </td>
    </tr>

    <tr>
      <td colspan="1" rowspan="1">
        <p>
          Days Back to Start From
        </p>
      </td>

      <td colspan="1" rowspan="1">
        <p>
          {" "}

          Enter the number of the farthest day back that should be represented in the report. Combine with

          <b>
            {" "}

            Days Back to End At{" "}
          </b>

          to create a range of represented days.{" "}
        </p>

        <p>
          {" "}

          For example, if you entered

          <span class="mt-font-courier-new">
            10
          </span>

          for

          <b>
            {" "}

            Days Back to Start From{" "}
          </b>

          and

          <span class="mt-font-courier-new">
            5
          </span>

          for

          <b>
            Days Back to End At
          </b>

          , the report would contain
          data for 10 days ago up until 5 days ago.{" "}
        </p>
      </td>
    </tr>

    <tr>
      <td colspan="1" rowspan="1">
        <p>
          Days Back to End At
        </p>
      </td>

      <td colspan="1" rowspan="1">
        <p>
          {" "}

          Enter the number of the most recent day back that should be represented in the report. Combine with

          <b>
            {" "}

            Days Back to Start From{" "}
          </b>

          to create a range of represented days.{" "}
        </p>

        <p>
          {" "}

          For example, if you entered

          <span class="mt-font-courier-new">
            10
          </span>

          for

          <b>
            {" "}

            Days Back to Start From{" "}
          </b>

          and

          <span class="mt-font-courier-new">
            5
          </span>

          for

          <b>
            Days Back to End At
          </b>

          , the report would contain
          data for 10 days ago up until 5 days ago.{" "}
        </p>
      </td>
    </tr>
  </tbody>
</table>

## Other Panes

For information about the remaining sections of the connector interface, including how to configure scheduling, retry, and update options, see [Adding a DataSet Using a Data Connector](https://domo-support.domo.com/s/article/360042926274?language=en_US "Adding a DataSet Using a Data Connector").
